1
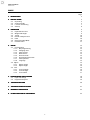
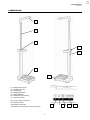
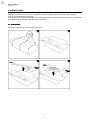
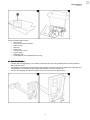
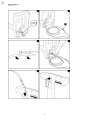
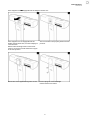
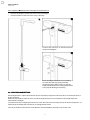
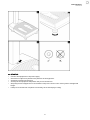
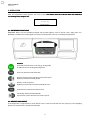
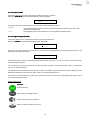
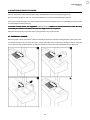
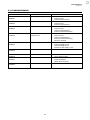
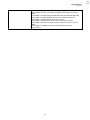
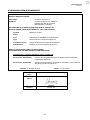
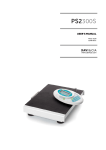
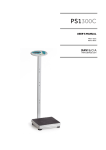
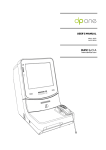
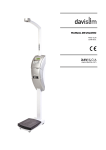
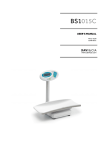
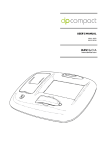
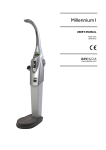
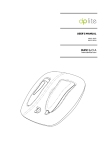
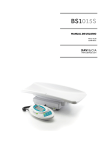
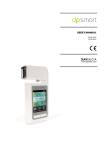
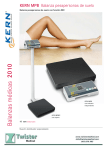
USER’S MANUAL
MA08-02/B
15/09/2011
www.davicia.com
USER’S MANUAL
MA08-02/B
INDEX
Page
2
1. DESCRIPTIO
DESCRIPTION
TION
2. INSTAL
INSTALLATION
LATION
2.1. Unpacking
2.2. Scale assembly
2.3. Location and setting
2.4. Startup
3
3
4
7
8
3. OPERATION
3.1. Keyboard functions
3.2. Weight and height
3.3. Taring
3.4. Mother / Baby function
3.5. Hold
3.6. Body Mass Index (BMI)
3.7. Printed results
9
9
9
10
10
10
10
11
4. SETUP
4.1. Programming
4.1.1. BMI programming
4.1.2. Changing units
4.1.3. Clock setting
4.1.4. Date format
4.1.5. Printout mode
4.1.6. Programming the ticket
4.1.7. Coin operated
4.1.8. Language
4.2. Adjust
4.2.1. Adjust weight
4.2.2. Adjust height
4.3. Test
4.3.1. Test of weight
4.3.2. Test of height
4.3.3. Test of ADC
12
12
13
13
13
13
14
14
15
15
15
15
16
16
16
16
17
5. MAINTENANCE AND CLEANING
5.1. Paper roll change
5.2. Equipment disposal
18
18
19
6. TROUBLESHOOTING
20
7. TECHNICAL SPECIFICATIONS
21
8. WARRANTY CERTIFICATE
23
9. CE DECLARATION
DECLARATION OF CONFORMITY
24
1
USER’S MANUAL
MA08-02/B
1. DESCRIPTION
1
2
3
7
6
4
5
(1)
(2)
(3)
(4)
(5)
(6)
(7)
Height meter sensor
Height meter arm
LCD display
Weighing platform
Adjustable feet
Height meter arm fixing
Connector panel
(8) Power supply connection
(9) ON/OFF switch
(10) Auxiliar connection
(11) RS232C serial interface for PC connection
8
2
9
10
11
USER’S MANUAL
MA08-02/B
2. INSTALLATION
MEDICAL SCALE scale comes factory configured according to the voltage of each country and is ready for
operation immediately after unpacking.
Connect the device to the power supply via the power supply cable. It is necessary that the outlet is provided with
grounding. Adapters should not be used without grounding.
2.1. UNPACKING
Remove the packaging as shown in the Figures below:
3
USER’S MANUAL
MA08-02/B
The attached box (06) contains:
o User manual.
o Power source with mains lead.
o 4 Allen screws.
o Allen key.
o Metal cover.
o 4 metal cover screws.
o 2 plastic plugs.
o Cable grip strip.
o 2 rolls of paper. (For model with printer only)
2.2
2.2. SCALE ASSEMBLY
o
o
o
Carefully place the equipment on its side (07) and attach the column from underneath the scales' platform
(08) using the screws.
The weighing cell cable has to be passed through the pipe. The end of the cable is taped to the cable grip strip
supplied and it is threaded through the pipe until it appears out of the top (09-13).
Connect the weighing cell cable to the plate connector as shown in the diagram (14).
4
USER’S MANUAL
MA08-02/B
5
USER’S MANUAL
MA08-02/B
If the equipment is not equipped with the height measure arm:
If the equipment is not equipped with the
height measurement arm, move the display to
cover the hole.
Remove the retaining screws on the lower
section, move the console and attach it again
in the new position.
The console has to be properly held in the rear
position.
Attach the cover supplied using the 4 screws.
Insert 2 plugs to cover the height
measurement arm's holes.
6
USER’S MANUAL
MA08-02/B
If the equipment is equipped with the height measurement arm:
o
o
Remove the height measurement arm from the packaging
Contains:4 Allen screws (2 for each arm), 1 Allen key.
Connect the connector to the CPU board as
shown in the diagram.
Insert the height measurement arm making
sure that the cable is properly attached.
Attach using the 2 Allen screws, so that the
height measurement arm is firmly held parallel
to the pipe facilitating its mounting.
2.3
2.3. LOCATION AND SETTING
Set the equipment in a place flat and level, where it is perfectly supported. This last point is of vital importance to
proper operation.
Make sure that within a radius of 70 cm around the equipment there is no interference that might affect the
measurement of height.
To make sure that the weighing results are accurate, the scale must be exactly level in the horizontal position. To
make the job of levelling the scale easier, it is equipped with a level.
Turn the screw feet on the bottom of the platform until the bubble in the level is in the inner circle.
7
USER’S MANUAL
MA08-02/B
2.2. STARTUP
o
o
o
o
o
o
Connect the equipment to the power supply.
Check that no objects are placed on the platform of the equipment.
Actuate the switch on the bottom.
At this point the equipment will perform the process of self-test.
Step away from the equipment to not interfere in the process of auto-zero of the systems of weight and
height.
If the process of self-test completes successfully, the screen displays “0.0 kg”
8
USER’S MANUAL
MA08-02/B
3. OPERATION
After the equipment startup appears the home screen. This means that the scale has done the calibration
successfully and is ready for use.
0.000 kg
Home screen
3.1. KEYBOARD FUNCTIONS
WARNING! Never use the membrane keypad with pointed objects such as pencils, pens, finger nails, etc.
Breakage or malfunction of the keypad as a result of such improper use is not covered by the guarantee.
Function
Activates the scale when it is in energy-saving mode.
Provides access to the programming menu.
Prints out the ticket with the results.
Down arrow key: lowers the value or the menu option.
Male key: indicates the male gender.
OK key: confirms options.
Hold key: activates/de-activates the Hold function.
Activates/de-activates the Tare function.
Female key: indicates female gender.
Up arrow key: raises the value or the menu option.
3.2. WEIGHT AND HEIGHT
If the equipment is programmed to work without coins, a few seconds after the user steps up to the weighing
platform, measurements are made automatically.
9
USER’S MANUAL
MA08-02/B
IMPORTANT: During the measurements it’s recommended to maintain an upright posture and not moving.
Failure to follow directions, the result of the measurement may be altered.
At the end of the measurements appear on the screen the values obtained.
68.200 kg
1.71 m
3.3. TARING
To enable this feature hold the TARE button for 2 seconds.
o
o
o
Being the equipment on, place yourself first on the scale without the extra weight and press the TARE key for
2 seconds. The screen is set back to zero showing that the weight is stable and that Tare function is active.
Upload Now the extra weight on the scale. The scale shows only the value this additional weight. We can make
as many weighings as we wish. Stepping off the platform it shows on the screen "----".
By a further long press of the TARE key, the function Tare is disabled, its indicator disappearing from the
screen.
3.4. MOTHER / BABY FUNCTION
This feature allows weighing babies in the arms of his mother or father. Optimal for pediatric use since it
calculates the weight of infants and children with an accuracy of 10 g.
o
o
o
Being the equipment on, place yourself first on the scale without the baby and press the TARE key for 2
seconds. The screen is set back to zero showing that the weight is stable and indicating that Tare function is
active.
Step up now with the baby on the scale platform, the display only shows the baby's weight value with a
precision of 10g. We can make as many weighings as we wish. Stepping off the platform it shows on the
screen "----".
By a further long press of the TARE key, the function Tare is disabled, its indicator disappearing from the
screen.
3.5
3.5. HOLD
Memorizing the value of the displayed weight after getting off the platform, it is possible to assist the patient first
before scoring his weight.
To enable this feature you need to press the HOLD key for 2 seconds.
o
o
Press the HOLD key for 2 seconds while on the platform and viewing the current weight on display. Hold
function indication appears and the weight value is locked on the screen.
By a further long press of the HOLD key, the function Hold is disabled, its indicator disappearing from the
screen.
3.6. BODY MASS INDEX (BMI)
(BMI)
The Body Mass Index is a ratio of weight to height that provides us with a reference value regarding our weight.
Model with built-in height-meter:
The scale automatically calculates the user's BMI and shows it on the display without the need to press any key.
Model without height-meter:
The scale allows you to enter the patient's height manually via the keypad. After the weight has been calculated, it
appears on the display and a reference height of 1.70m flashes on the display. Using the <↑> and <↓> keys, select
10
USER’S MANUAL
MA08-02/B
the patient's height and then confirm by pressing <OK>. The equipment will automatically display the appropriate
BMI.
IMPORTANT: BMI is a valid reference for adults only.
Evaluating the Body Mass Index
Classification of the BMI according to the WHO:
< 16:
Severe thinness.
16 to 17:
Thinness
17 to 18.5:
Underweight
18.5 to 25:
Normal range
25 to 30:
Overweight
30 to 35:
Mild obesity
35 to 40:
Medium obesity
> 40:
Morbid obesity
3.7
3.7. PRINTED RESULTS
Upon completion of the selected measurements, the equipment automatically prints a receipt (depending on
setup) with the obtained results of the performed measurements.
11
USER’S MANUAL
MA08-02/B
4. SETUP
The pre-configured settings can be modified and functions activated via the menu in order to adapt them to suit
specific needs.
To access the setup menu of the equipment, follow the procedure below:
1.
Switching off the equipment.
2.
Press and hold down the <Start> key.
3.
While still holding the Start key down, switch the equipment on.
The following option screen will appear:
>> 1.ADJUST
2.TEST
<<
Keyboard operation
Using the <↑> and <↓> keys, select the menu option and confirm by pressing <OK>.
Down arrow key: lowers the value or the menu option.
Up arrow key: raises the value or the menu option.
Confirms options.
Setup menu
ADJUST
TEST
PROGRAM
WEIGHT
HEIGHT
EXIT
WEIGHT
HEIGHT
ADC
EXIT
BMI
UNITS
CLOCK
DATE MODE
PRINTOUT
TICKET
COINS
LANGUAGE
EXIT
EXIT
Weight settings
Height settings
Exit settings menu
Weight test
Height test
ADC test
Exit Test submenu
Activate BMI
Select units
Program date and time
Date format
Printout mode
Program lines of ticket
Program coins
Select language
Exit programming submenu
Exit menu
4.1
4.1. PROGRAMMING
To access the programming menu, select the PROGRAM option and the following screen will appear:
>> 1.BMI
2.UNITS
12
<<
USER’S MANUAL
MA08-02/B
4.1
4.1.1.
.1. BMI programming
This option turns the BMI function on and off. When the BMI function is on, the scale automatically calculates the
BMI.
Select the BMI option and the following screen will appear:
>> BMI ON
BMI OFF
<<
Use the arrow keys to select the option you want and confirm by pressing <OK>.
BMI ON
BMI OFF
BMI function on
BMI function off
4.1
4.1.2.
.2. Changing
Changing units
This option allows you to change the weight and height units.
Select the UNITS option and the following screen will appear:
>> kg - m
lb - ft/in
<<
Use the arrow keys to select the option you want and confirm by pressing <OK>.
kg - m
lb – ft/in
st – ft/in
Kilos - meters
Pounds - feet/inches
Stones - feet/inches
4.1
4.1.3.
.3. Clock setting
This option allows you to program the date and time.
Select the CLOCK option and the following screen will appear:
DD/MM/YY
0
Enter the date digit by digit using the arrow keys and confirm by pressing <OK>.
After you enter the date, the following screen will appear for you to enter the time:
HH:MM
0
Enter the hour digit by digit using the arrow keys and confirm by pressing <OK>.
4.1
4.1.4.
.4. Date format
This option allows you to select the date format.
Select the DATE MODE option and the following screen will appear:
>>
dd/mm/yy
mm/dd/yy
<<
Use the arrow keys to select the option you want and confirm by pressing <OK>.
dd/mm/yy
mm/dd/yy
Day / Month / Year
Month / Day / Year
13
USER’S MANUAL
MA08-02/B
4.1.5
.1.5.
.5. Printout mode
This option allows you to select the printout mode: automatic or manual.
Select the PRINTOUT option and the following screen will appear:
>> MANUAL
AUTO
<<
Use the arrow keys to select the option you want and confirm by pressing <OK>.
MANUAL
The equipment does not print out the ticket unless the person presses the <Print> key
while still on the platform.
The equipment prints out the ticket once it has made the measurements.
AUTO
4.1
4.1.6.
.6. Programming the ticket
This option allows you to programme the 4 lines at the top of the ticket.
Select the TICKET option and the following screen will appear:
Line?: 1
Use the arrow keys to select the line (from 1 to 4) you want to programme and confirm by pressing <OK>. The
following screen will then appear:
L01/01>>_
The first line tells you the line number and the position of the character. You can now start to enter the data for
that line using the keypad.
You can use up to 24 characters per line. Use the arrow keys to select a character and press <OK> to confirm and
move on to the next position.
The equipment automatically centres the text, so there is no need to programme all 24 positions. When you have
finished entering the text for that line, press <Start> to end the editing process.
If you want to enter another line, you have to select the new line. The 4 lines are programmed separately, so that
you can edit any line you want.
Keyboard operation
Function
Ends line editing.
Exits without recording the line.
Down arrow key: lowers the value.
OK key: confirms character, forward
14
USER’S MANUAL
MA08-02/B
Deletes character, back
Up arrow key: raises the value.
4.1
4.1.7.
.7. Coin operated
This option allows you to programme the number of coins to indicate the price of the service if the equipment has
a coin selector.
Select the COINS option. The display will show the following message:
COINS NUMBER: 0
Indicate the number of coins using the arrow keys and confirm by pressing <OK>.
NOTE: To programme the equipment in free mode, set the number of coins at zero.
4.1
4.1.8.
.8. Language
This option allows you to programme the language for the printed ticket.
Select the LANGUAGE option. The display will show the following message:
>>1.CASTELLANO <<
2.ENGLISH
Indicate the language using the arrow keys and confirm by pressing <OK>.
4.2. ADJUST
ADJUST
DAVI equipments have been perfectly calibrated and tested, so there is no need to make any prior adjustments
for them to function correctly.
To access the adjust menu, select the ADJUST option and a screen will appear asking for an access code
(password).
Access code: Press the keys <Tare> <Mujer> <Start> <Print>
Enter the password and press <OK>. The following screen will appear:
>> 1.WEIGHT
2.HEIGHT
<<
4.2.1. Weight adjust
To adjust the weight, select the ADJUST option and the following screen will appear:
NO WEIGHT
PRESS <OK>
With no weight on the platform, press <OK>.
The equipment memorises the tare and the display shows:
15
USER’S MANUAL
MA08-02/B
STANDARD MASS
PRESS <OK>
Now place a standard mass on the platform. We recommend using a mass of at least 20 kg to ensure a correct
adjustment. Then press <OK>.
STANDARD MASS
000000 g
Use the keypad to enter the value (in grams) of the standard mass you have placed on the platform. For example,
20 kg. Enter 020000 g and press <OK> to confirm.
IMPORTANT: To make sure the adjustment is accurate, always enter the weight of the standard mass in grams. If
you do not have a standard mass whose weight you already know in grams, you must first calculate the value of
the mass you are using.
1 lb = 453.59 g
STANDARD MASS
020.000 kg
The equipment is now adjusted. Press <OK> to exit.
4.2.2. Height adjust
To adjust it, select the HEIGHT option and the following screen will appear:
PROGRAM HEIGHT
↓>0 cm
+<↑
Using the arrow keys, you can increase or decrease the reference value. Confirm it by pressing <OK>.
4.3
4.3. TEST
To access the test menu, select the TEST option and the following options screen will appear:
>> 1.WEIGHT
2.HEIGHT
<<
4.3.1. Test of weight
To access the weight test, select the WEIGHT option and the following screen will appear:
19870g
43,87lb
19,900 kg
The equipment is now in automatic weight mode and displays the weight on the platform. You can check the
weight function by placing masses of various different weights on the platform and seeing whether the correct
weight is shown.
Press <OK> to exit.
4.3.2. Test of height
To access the height test, select the HEIGHT option and the following screen will appear:
16
USER’S MANUAL
MA08-02/B
1,85 m
6’0.7”
The equipment is now automatically measuring height. Place an object of known height and check that the
measurement given by the equipment is correct.
Press <OK> to exit.
4.3
4.3.3.
.3. Test of ADC
To access the ADC test, select the ADC option and the following screen will appear:
weight
519478
This test tells you whether the analogue digital converter (ADC) is working properly. With no weight on the
platform the equipment will show a value between 500000 and 600000 approximately. It is important to make
sure that the value is constant and any variations are less than 50 units.
Press <OK> to exit.
17
USER’S MANUAL
MA08-02/B
5. MAINTENANCE AND CLEANING
The only maintenance that can be performed by unqualified personnel is the change of paper roll.
Do not perform repairs on your own. In case of breakdown contact the Technical Support Service.
If the power cable is damaged, it must be replaced by the Technical Support Service or qualified personnel in order
to avoid dangerous malfunctioning.
To ensure accurate results, the equipment MEDICAL SCALE requires an annual maintenance check that only
authorized personnel from the Davi & Cia Technical Support Service can perform.
Clean the unit using only a soft cloth. Do not use gasoline or any similar solvent.
5.1
5.1. PAPER ROLL CHANGE
When the paper is finish, the printer is deactivated and the machine continues working without printing the ticket.
To change the paper roll, we open the cover, we put the paper roll as indicated in the figure and we close the
cover. We must switch off and switch on again the machine to restart the scale and detect the new paper roll.
18
USER’S MANUAL
MA08-02/B
5.2
5.2. EQUIPMENT DISPOSAL
All electrical and electronic products should be disposed of separately from the
municipal waste stream via designated collection facilities appointed by the
government or the local authorities.
This crossed-out wheeled bin symbol on the product means the product is covered
by the European Directive 2002/96/EC.
The correct disposal and separate collection of the equipment will help prevent
potential negative consequences for the environment and human health. It is a
precondition for reuse and recycling of used electrical and electronic equipment.
19
USER’S MANUAL
MA08-02/B
6. LISTADO DE ERRORES
Error Indicator
WEIGHT ERROR
CODE 01
Cause
Error weight reading
OVERFLOW
CODE 02
Weight over 225 kg
UNDERFLOW
CODE 03
Weight under 0 kg
ZERO WEIGHT ERROR
CODE 04
Error in Zero reading at
machine start.
HEIGHT ERROR
CODE 05
Height reading error.
E2PROM BASE
CODE 30
Error data in E2PROM BASE
ERROR PRINTER
CODE 40
NO PAPER
CODE 41
Failure in PRN
UNKNOWN ERROR
CODE 99
Unknown error
Paper feed failure
20
-
Correction
Failure in load cell
Failure in A/D
Failure in load cell wires
Failure in load cell
Failure in A/D
Failure in load cell wires
Failure in load cell
Failure in A/D
Failure in load cell wires
Failure in load cell mounting
Failure in load cell
Failure in A/D
Failure in load cell wires
Failure in load cell mounting
Knocks in load cell
Failure in height cell.
Failure in height circuit.
Failure in height wires.
Failure in power supply +12V
Error in E2PROM BASE
-
Comms error in PRN
Power failure in PRN
Paper finished
Paper feed failure
Paper detector failure
USER’S MANUAL
MA08-02/B
7. TECHNICAL SPECIFICATIONS
Model:
Manufacturer:
Display:
Weight (with / without height
meter):
Maximum external dimensions
(with / without height meter)::
Measurement range:
Weight:
Height:
Measurement methods:
Weight:
Height:
Measurement accuracy:
Weight:
Height:
Power supply:
Consumption:
In operation:
Temperature:
Humidity:
Printer:
Paper width:
e:
d:
Min:
Max.
Class:
Fuses primary circuit:
Power supply 230V:
Power supply 115V:
Classification according to EN
60601-1
Applicable Standards:
MEDICAL SCALE
DAVI & CIA
C/Murcia 35 nave G
E08830 Sant Boi de Llobregat
Barcelona – SPAIN
LCD alphanumeric
2 x 16 characters
33 kg / 36 kg (aprox.)
34,5 x 49,5 x 113 cm / 34,5 x 49,5 x 224 cm
2.5 to 225 kg in div.100 g
0 to 200 cm in div. 1 cm
300 kg load cell
Ultrasound
+/- 100 g , n=3000
+/- 1 cm
230V~ , 50 Hz
115V~, 50/60 Hz
In operation, max. 40 VA
0 ºC to +40 ºC
30 % to 75 %
Thermal printhead
8 dots/mm.
384 dots/line, 32 characters per line.
Speed = 40 mm/s.
Paper end detection using a photoelectric cell.
60 mm
100 g / 0.2 lb
100 g / 0.2 lb
2.5 kg / 5.5 lb
225 kg / 500 lb
III
2 x 0,315 A 5 x 20 mm, type T
2 x 0,630 A 5 x 20 mm, type T
Electronic scale with height meter. Equipment with metallic envelope
and Class I of protection against electric shock.
Protection against electric shocks Type BF.
SEGURIDAD ELÉCTRICA / Electrical Security
UNE EN 60601-1: 2008+ERRATUM:2008
EN 60601-1-2 (2007):
EMISIÓN ELECTROMAGNÉTICA / EM Emission.
-EN 55011 (2007) / A2 (2007): Radiada / Radiated (Clase B/Class B).
-EN 55011 (2007) / A2 (2007): Conducida / Conducted (Clase B/Class B).
-EN 55014-1 (2006): Conducida discontínua / Discontinuous Conducted
(Clase B/Class B).
-EN 61000-3-2 (2006): Armónicos / Harmonics (Clase A/Class A).
-EN 61000-3-3 (1995) / A1 (2001) / A2 (2005): Fluctuaciones de tensión y
flickers / Fluctuations and flickers.
21
USER’S MANUAL
MA08-02/B
INMUNIDAD ELECTROMAGNÉTICA / EM Immunity.
-EN 61000-4-2 (1995) / A1 (1998) / A2 (2001): Descarga electrostática /
ESD;
-EN 61000-4-3 (2006): Campo radiado EM de RF / EM radiated field of RF;
-EN 61000-4-4 (2004); Ráfagas de transitorios rápidos / EFT burst;
-EN 61000-4-5 (2006); Ondas de choque / Surges;
-EN 61000-4-6 (2007): RF en modo común / RF common mode;
-EN 61000-4-8 (1996) / A1 (2001); Campo magnético a 50 Hz / 50 Hz H
field;
-EN 61000-4-11 (2004); Interrupciones de alimentación / Dips,
interruptions.
22
USER’S MANUAL
MA08-02/B
8. WARRANTY CERTIFICATE
We provide a 1-year guarantee from the date of purchase. The guarantee covers manufacturing defects or
defects occurring as a result of normal use and operation.
It excludes all removable parts such as batteries, wires, power supply devices, etc. Faults falling within the
guarantee period shall be rectified free of charge upon presentation of the purchase receipt for the equipment.
No other rights can be taken into consideration.
Return shipment is at the customer's expense if the equipment is anywhere other than at the customer's
headquarters.
In the event of damage during shipment, guarantee rights will be granted only if the equipment is shipped in the
original packaging. You are therefore recommended to keep the original packaging.
Following expiry of the guarantee period, all services requested will be dealt with by our specialist technicians at
the user's expense.
23
USER’S MANUAL
MA08-02/B
9. CE DECLARATION OF CONFORMITY
FABRICANTE PRODUCTO:
PRODUCT MANUFACTURER:
DAVI & CIA S.L.
DIRECCIÓN:
ADDRESS
C/ Murcia, 35, Nave G
Polígono Industrial Can Calderón
E08830 Sant Boi de Llobregat
BARCELONA - ESPAÑA
DECLARAN BAJO SU RESPONSABILIDAD QUE EL PRODUCTO:
DECLARE UNDER THEIR RESPONSIBILITY THAT THE PRODUCT
Nombre
Name
MEDICAL SCALE
Tipo
Type
EQUIPO ELECTROMÉDICO / MECÁNICO
Electromedical / mechanical equipment
Finalidad Prevista
Intended Use
Equipo pesapersonas incorporando tallímetro
Weighing scales incorporating height rod
CUMPLE LOS REQUISITOS DE LAS DIRECTIVAS:
CONFORMS WITH THE REQUISITES OF THE DIRECTIVES
Pesapersonas, Tallímetro (Weighing scales, Height rod)
EC Directive 2004/108/CE
Directiva de Compatibilidad Electromagnética (Electromagnetic
Compatibility Directive)
EC Directive 90/384/CEE
Directiva de Instrumentos de Pesaje No Automático (Non-Automatic
Weighing Instruments Directive)
th
DATE: 15 April 2010
FECHA: 15 de Abril de 2010
J.Masana
Nombre:
Name
Firmado:
Signed
Director
DAVI & CIA
Cargo:
Function
24
USER’S MANUAL
MA08-02/B
This manual and other support documents are available on the web
www.davicia.com
C/ Murcia, 35 Nave G Pol.industrial Can Calderón.
E 08830 Sant Boi de Llobregat. Barcelona. Spain
Tel. +34 93 654 32 32
Fax. +34 93 654 16 62
25
[email protected]
www.davicia.com