1
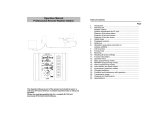
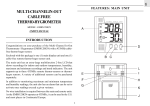
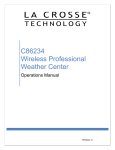
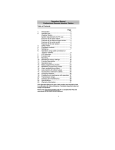
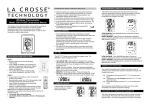
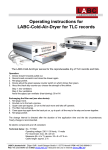
Quick Set Up Manual - WS-2800-IT Professional Weather Station
Download the complete owner's manual and the free PC software at: www.lacrossetechnology.fr
Carefully open the package and check that the following contents are complete:
Wind Sensor
Rain Sensor
Thermo-Hygro Sensor
Wireless Display
USB Transceiver
•
•
•
•
•
•
Mast holder
Right angle adaptor
1 x U-bolts
2 Washers + 2 Nuts
Plastic Reset Rod
• Base sensor, funnel top
cover and battery cover
(pre-assembled)
•
•
•
•
Rain protection cover
•
Wall mount adapter
Mounting screws
Plastic anchors for
screws
USB wireless
interface for
PC
Detachable
stand
Setting up:
IMPORTANT: Make sure to observe the correct polarity when inserting batteries. The "+" markings on the batteries must line up with the
diagrams inside the battery compartments. Inserting the batteries incorrectly may result in permanent damage to the units. During the
setup process, place the wireless display and the outdoor sensors on a surface with 1-3 meters between the sensors and the display. Only
use Alkaline Batteries for the Wireless Display and Thermo-hygro sensor, rechargeable batteries may not work.
1.
2.
IMPORTANT: Completely reset the rain sensor:
a. Unscrew the battery cover on bottom of the rain sensor and remove the
rechargeable batteries.
b. Completely cover the solar panel to block any light source.
c. Wait 20s, then re-insert the 2 x AA rechargeable batteries and re-screw
the battery compartment back.
d. Wait 2s, and uncover the solar panel.
e. Swing the seesaw and put the rain cover top back.
f. Place the solar rain sensor under bright environment to charge-up the
rechargeable batteries.
3.
4.
5.
Press Reset Button on
Bottom of the Wind Sensor
(Solar Panel Must Face Light)
It is important to allow sufficient light to reach the solar panel while activating the wind sensor.
Make sure the lights are on in the setup room and the solar panel is facing a 60W light bulb or
brighter - do not cover with hands or other objects. Remove the black protective foil on the solar
panel and use the provided plastic reset rod to gently press the reset button once in the hole on the
bottom of the sensor.
To active the solar rain sensor. First, twist open the funnel cover of the rain sensor, then remove
the securing tape from the seesaw and the black protective cover from the solar panel. Swing the
seesaw to reset and activate the rain sensor. Put back the funnel cover to the rain sensor. The
solar rain sensor should then be placed under a bright environment in order to charge up the
rechargeable batteries.
Unscrew Battery
Cover on Bottom on
the Rain Sensor
Top view
Cover
completely the
Solar Panel
Insert two "C" size batteries into the thermo-hygro sensor with the correct
Seesaw
polarity.
Insert three "C" size batteries into the wireless display with the correct polarity.
NOTE: Every time the wireless display receives data from the sensors, the
wireless icons will blink once and then return to solid if the last transmission
was successful. A wind speed or rainfall amount that reads "0" does not mean
reception failure, it means that there was no wind or rain at the time of the last measurement. The thermo-hygro sensor syncs with
the wind and rain sensors and sends all outdoor sensor data to the display. The thermo-hygro sensor tries for 7 minutes to sync to
the wind sensor and for the rain sensor. If not successful within 7 minutes, the thermo-hygro sensor will stop looking for the other
sensors.
Setup troubleshooting: If the sensor data fails to display for any of the outdoor sensors within 10 minutes, (“- - -“ is displayed),
remove the batteries from all units (except for the Wind Sensor) for 1 minute and start the Setup procedure again at Step 1 and
completely reset the solar rain sensor (see Step 2: Important).
Pressure History Graph
Wind Direction
Barometric Pressure
Wind Speed
Forecast Icon and Weather
Tendency Arrows
Time and Date
Wind Chill
Indoor Temperature
Indoor Humidity
Outdoor Temperature
Outdoor Humidity
Rainfall Amount
Mounting the sensors and placement of the wireless display:
IMPORTANT: Ensure that all of the sensor data can be received at the intended mounting locations before you drill mounting holes. The
outdoor sensors have a wireless range of 50 meters. Keep in mind that the 50 meters range equates to an open air scenario with no
obstructions. Each obstruction (roof, walls, floors, ceilings, etc.) will reduce the range.
Wind Sensor
Solar Panels
Faces True South
50 meters
(max.)
25 meters
(max.)
Solar
Rain Sensor
50 meters
(max.)
100 meters
(max.)
* Wind and Rain Sensors should be located on
the same side of the house as the Thermohygro Sensor to ensure the signal strength
The thermo-hygro sensor measures outdoor temperature & humidity and collects the data from the wind and the rain sensors and sends all
outdoor weather data to the wireless display, so the thermo-hygro sensor must be within the 100 meters wireless range of the wireless
display. This allows the wind and rain sensors to be placed relative to the thermo-hygro sensor rather than the wireless display. See
Wireless Data Diagram above.
•
The wind and rain sensors must be mounted within the 50 meters wireless range of the thermo-hygro sensor and on the same side of
the house.
•
The wireless display must be within the 25 meters wireless range of the USB transceiver to send weather data to the PC.
If the sensor wireless icons drop from the display as you move them into their intended locations, the sensors may be too far from the
wireless display. Try moving the wireless display or the sensors closer and wait a few minutes to see if the wireless icons display again. If
the wireless icons are still not displayed after re-positioning the sensors or the wireless display, press and hold the UP ARROW (▲) key
for 2 seconds to re-synchronize the wireless display with the sensors.
Wind sensor
The wind sensor must be installed with the front of the sensor (the solar panel) facing true South, or the reported wind direction will not
be accurate. Mount within the 50 meters wireless range of the thermo-hygro sensor and on the same side of the house. The roof may or
may not be an ideal mounting location. Secure the main unit to the shaft of the mast holder. Use the right-angle adaptor if the wind sensor
will be mounted on a horizontal mast or surface.
Fasten the wind sensor to a suitable mast using the two U-bolts, washers and nuts included. Note: Mount the wind sensor onto a mast so
the wind can reach the sensor unobstructed from all directions for an accurate reading. The ideal mast is between 15,75mm and 33mm in
diameter. The wind sensor DOES NOT have replaceable batteries, it consumes solar power and charges the internal battery pack
automatically.
Rain sensor
The rain sensor should be mounted on a level surface in an open and bright area within the 50 meters wireless range of the thermo-hygro
sensor and on the same side of the house. Mount the rain sensor at least 0.5 meter off the ground level for optimum wireless transmission.
The rain sensor should be accessible to allow for period cleaning of debris or insects.
Thermo-Hygro Sensor
The thermo-hygro sensor is "weather resistant", but not "water proof". To ensure an extended life of your sensor, mount it in a semi-covered
place out of the elements. An ideal location for the thermo-hygro sensor is under the eaves on the North side of the house to avoid the
effects of sunlight. Mount the sensor 0.30 meter down from the eaves to ensure optimum performance. This way the weather data collected
by the sensor will not be affected by the temperature of the air coming out of the attic.
To wall mount the thermo-hygro sensor, fix the wall holder onto the desired wall using the included screws, plug the sensor firmly into the
wall holder and replace the rain cover if it is not already in place. Note: After mounting the units, if the weather data is not received, press
and hold the UP ARROW (▲) key for 2 seconds to synchronize the wireless display to the sensors.
Heavy Weather PC Software
Use your PC to store and graph the latest weather data collected by the weather station. Download the Heavy Weather PC software from
www.lacrossetechnology.fr . See the download page for installation instructions and computer requirements.
R&TTE Directive 1999/5/EC
Summary of the Declaration of Conformity : We hereby declare that this wireless transmission
device does comply with the essential requirements of R&TTE Directive 1999/5/EC.