1
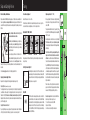
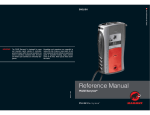
Version 1.0 2012
Your Barryvox® will not protect you against avalanches!
As a winter outdoor enthusiast, you must consider all possible avalanche prevention measures
and plan your trips carefully. Companion rescue – the worst case – must be practiced frequently.
Barryvox Service Centers, Registration and Additional Resources
For additional information on avalanche rescue, avalanche theory, the registration of your
Barryvox and the official Barryvox Service Centers please visit www.mammut.ch/Barryvox.
The following documents are available for the Barryvox Transceivers at
www.mammut.ch/BarryvoxManual
• Barryvox Legal and Regulatory Guide
• Barryvox Emergency Plan
• Barryvox User Manual
• Barryvox Reference Handbook
• Barryvox Application Safety Guide
It is absolutely necessary that you read this safety relevant information and familiarize yourself
with the device before you use it in avalanche terrain!
© Copyright by Mammut Sports Group AG and Genswein. All rights reserved.
Technical Data Digital device with 3 antennas / Transmit frequency: 457 kHz / Maximum
range: > 60 m / Search strip width: 50 m / W-Link communication channel / Alkaline batteries:
3 x AAA 1,5 Volt / Battery life: typical 250 h SEND, min 200 h in SEND mode followed by 1 h
in SEARCH / Dimensions: 113 x 75 x 27 mm / Weight: 210 g (incl. Batteries).
Type/Model: ELEMENT Barryvox® A10010-10000 (W-Link 868 MHz), A10012-10000 (W-Link
915 MHz), A10013-10000 (W-Link off).
Technical data and specifications are subject to change without notice.
USER MANUAL
Find the Barryvox Reference Handbook at:
Head Office:
Mammut Sports Group AG
Birren 5
5703 Seon, Switzerland
Tel. +41 (0)62 769 81 81
[email protected]
North America:
Mammut Sports Group Inc.
135 Northside Drive
US-Shelburne, VT 05482
Tel. +1 802 985 5056
[email protected]
www.mammut.ch/BarryvoxManual
Setup and Carrying Positions
Touring
Batteries, Handling and Maintenance
Personal Rescue Equipment
Single Group Check (GROUP CHECK)
Only use alkaline LR03/AAA batteries. Always replace all 3 batteries and use new batteries of
the same type. Never use rechargeable batteries and always replace all the batteries at the
same time. When not using the transceiver for an extended period of time (summer), remove the
batteries.
Avalanche Transceiver + Shovel + Probe
The additional use of a Mammut or Snowpulse Airbag increases the chance to stay on the
surface and therefore considerably reduces the risk of a complete burial.
Before a party takes off, the transceivers of all party members
must be checked. The group members switch their transceivers to SEND.
Main Switch OFF / SEND / SEARCH
The group leader switches his device to “group check” by turning it from OFF into the SEND and presses the lateral key within
the first 5 seconds.
1
To ensure the proper performance of the transceiver, it is
highly recommended that you send your device to an official
Barryvox service center once every three years for a functional test. Press the key on the side during shut-down to view the recommended date of the
next check.
OFF
SEND
OFF -> SEND
SEND
SEARCH
OFF
SEND
OFF
SEARCH
SEND
SEARCH
SEND -> SEARCH
SEARCH -> SEND
SEND -> OFF
Start-Up / Self- and Battery Test
While starting, the device conducts a selftest. If the self-test fails, an error
message is displayed for 20 seconds along with an acoustic warning. If the
battery power falls below 20% or the battery icon is displayed, the batteries
must be replaced as soon as possible!
Carrying System and Carrying Positions
Regardless of the carrying position, the display should always face your body!
Carrying the Transceiver in a Pocket
If you carry the Barryvox in a secure pant pocket, the zipper must remain closed for the duration
of the trip. If possible, attach the wrist loop to your pants or secure it around your belt.
OFF
Always make sure that the switch locks into position mechanically to avoid an undesired
change of mode.
Stick the emergency plan on the back of the battery compartment lid.
Carrying System (Recommended Carrying Position)
The carrying system has to be put on your innermost layer of clothing prior to beginning the trip
(see illustration on the base plate of the carrying system) and has to be worn on your body for
the duration of the trip. The transceiver shall always remain covered by one layer of clothing. Using the red hook on the wrist loop the device should always remain anchored to the base
plate of the carrying system.
SEARCH
OFF
2
Avoid having other electronic devices (e.g. mobile phones,
radios, headlamps, cameras), metal objects (pocket knives,
magnetic buttons), or other transceivers close to your running
avalanche transceiver.
SEARCH
Handle your Barryvox with care. Do not drop it on the
ground and avoid mechanical shocks.
Now, the group leader checks the device of each participant:
The test is successful if you can clearly hear beep sounds
from each participant's transceiver within the range indicated
on the display.
The test distance is 1 m, the spacing between the participants is 2 m. The indicated test distance must not be
shortened. In case the device discovers that the distances are
too short a distance warning and alarm sound warns the user.
If your ELEMENT Barryvox® detects that the transmit frequency
of the tested device is not within the normative regulations, an
«E6» warning message will be shown. In this case, repeat the
test with 5 m distance between the participants to identify the
defective transmitter. Such devices must be checked/repaired
by the manufacturer.
When all devices of the participants have been tested, the
group check is finished. The group leader switches his device
now as well to SEND by pressing the key on the side.
Mode SEND
The SEND mode is the normal operating mode outdoors or in all other situations in which there is a risk of avalanches. Each time the SEND mode
has been activated, this is confirmed by a triple beep sound. Each individual signal pulse is tested. If the test is successful, this is confirmed by a
blink of the red SEND-Control LED. The LCD display is automatically deactivated in the SEND mode.
How to solve a problem: If no tone is heard within the indicated range, the device may not be used.
1. Check if the device is switched to SEND.
2. Replace the batteries.
3. Have the device checked by the manufacturer.
GROUP
CHECK
SEND
Search
Emergency Plan
Signal Search
The emergency plan (klistermärke på enhetens
baksida) shows the elementary steps for a successful companion rescue.
• Search avalanche surface systematically.
Depending on the situation at hand, the procedure
must be adapted.
1. Obtain an overview
2. Turn OFF all transceivers which are not used
for the search
3. At least one rescuer conducts a transceiver
search, while looking and listening
at the same time
4. Transceiver search finished;
all transceivers to SEND
5. Excavate – First Aid – Call for help
The transceiver search is comparable
to the landing of an airplane!
Coarse Search
• Use the device in a calm and concentrated
manner. Avoid jerky movements.
• Hold the beacon horizontally in front of you.
10
«Large distance to the target»:
Fast search speed, low search precision
Optimization of Range
3
Coarse Search
Fine Search
«Airport visible»:
Slow down considerably
«Signal»
RESCUE ORGANIZATION: EVENT DRIVEN, LOUD AND CLEAR COMMUNICATION
Pinpointing
LAST SEEN POINT
UNKNOWN
«Fine Search»
«Probe Hit»
Fine Search
During fine search hold the transceiver directly
above the snow surface! Proceed in a straight line
until you reach the point of the smallest distance
reading and use the shovel to mark this spot as
a visual reference for the probing spiral.
LAST SEEN POINT
UNKNOWN
To optimize the range, rotate the transceiver slowly around all axes. Hold the
device with the loudspeaker facing your
ear sidewise of your head.
Search Suspension
• Watch the distance and direction information
on the display.
• Move in the direction indicated by the arrow.
• If the distance increases, then you are moving
away from the victim. Continue the search in
the opposite direction.
During the search for multiple subjects, signals may
overlap making it impossible to analyze the signal of
a single buried subject.
MULTIPLE RESCUERS
• The closer you approach the victim, the slower and more concentrated your movements
should be.
Marking & Multiple Search
«Landing»:
Transceiver on the snow surface,
move slowly,
high search precision.
Without user interaction
the device will automatically revert from SEARCH
to SEND after 8 minutes.
Prior to reverting, the device will sound an alarm.
Reverting can be avoided if the key is pressed
within 30 seconds of the alarm.
In case rescuers are buried in a second avalanche, this function allows them to be located
using transceivers.
LAST SEEN POINT
SINGLE RESCUER
Mark
Signal Search
• During signal search, the rescuer has
the visual focus on the surface of the
debris in order to be able to see body
parts or objects protruding the snow
surface. The first signal is indicated by
a distinct double beep sound.
Auto-Revert to SEND
Pinpointing
Exact pinpointing with the avalanche probe. If the buried subject ist hit
with the probe pole, the pole is left in the snow and the buried subject
marked as found by pressing the key.
Do not use the 3-Mark function until the location has been confirmed
by a probe hit and do not hold the device on the snow surface to mark
the buried subject.
Multiple Burials
Continue the search for further buried subjects by marking the ones previously found.
The rescuer has to interrupt the search process
temporarily to avoid deviating from the optimal
search path. The ELEMENT Barryvox® will indicate
the necessity to suspend the search by displaying
the «Stop» symbol. Stand still, and do not move
until the word «Stop» disappears, at which time
you can continue to search.
The + symbol indicates that signals are received
from additional buried subjects that cannot be
isolated and entered in the list of buried subjects
yet. Turn off the transceivers of the buried subjects already found as soon as possible to simplify
the isolation of the remaining signals.
Rescue
Excavating the Buried Subject
Digging must be practiced, as it uses by far the biggest amount of time.
Cut out blocks of snow with the shovel.
The V-Shaped Snow Conveyor Belt:
• Position diggers in a «V» formation
• The first two rescuers are in a distance of one shovel
length from each other, all additional rescuers are in a
distance of two shovel lengths from each other.
• Length of «V»:
· Flat terrain: 2x burial depth
· Steep terrain: 1x burial depth
• Amount of rescuers: 1 per 80 cm length of «V»
• Rescuer at the tip of the “ V” digs alongside the probe to
the buried subject
• Diggers rotate frequently (approx. every 4 min) clockwise
on command of the rescuer at the tip of the «V».
• Cut out blocks of snow with the shovel by stepping on
the shovel blade which is held perpendicular to the
surface. Apply a half-moon shaped cutting pattern.
Position yourself facing the open end of the “V”, cut
the first half-moon without pulling back on the shovel
shaft. When cutting the second and subsequent halfmoons, pull the shovel shaft gently backwards after you
have cut the block so that it pops out. To cut the next
half-moon, step backwards toward the probe, like this,
you do not step on the pre-cut blocks.
In multiple burial situations, the transceiver of a rescued
subject should be turned off as soon as possible.
80 cm
90°