1
FOTOMATE
Digital Photo Frame
User Manual
FM 110 7inch - Black
FM 115 7inch - White
Cautions
Precautions and maintenance
●
●
●
●
●
For indoor use only
To avoid risk of fire or electric shock, do not expose the unit to moisture or condensation.
To avoid overheating, do not block the ventilation holes on the back of the Digital Photo Frame.
Keep the Digital Photo Frame out of direct sunlight.
Do not dismantle the Digital Photo Frame. There is a risk of electric shock and there are no userserviceable parts inside. Dismantling the Digital Photo Frame will void your warranty.
Cleaning the LCD Screen
● Treat the screen carefully. Because the screen of the Digital Photo Frame is made of glass and it
would easily be broken or scratched.
● If fingerprints or dust accumulate on the LCD screen, we recommend using a soft, non-abrasive
cloth such as a camera lens cloth to clean the LCD screen.
● Moisten the cleaning cloth with the cleaning solution and apply the cloth to the screen.
WARNING:
Please power off the unit before inserting or removing a card or
USB device.
Failure to do so may cause damage to the card/USB and the unit.
To reduce the risk of fire or electric shock, do not expose this
appliance to rain or moisture.
&21*5$78/$7,21621<285385&+$6(2)7+(
)2720$7(',*,7$/3+272)5$0(
*$85$17((:$55$17<&$5'
352'8&76(5,$/180%(5
7KLV SURGXFW FDUULHV D PDQXIDFWXUHÿV JXDUDQWHH RI PRQWKV 6HH HQFORVHG
ERRNOHW
3OHDVHFRPOHWH\RXUGHWDLOVRQWKLVIRUPDQGVHQGWR
9LD(PDLODGPLQ#FQVPDUNHWLQJFR]D
)D[ 3RVW3R%R[5DQGEXUJ
&RUUHVSRQGHQFHZLOOEHVHQWWR\RXRQQHZGHYHORSPHQWVDQGSURPRWLRQV
1$0(
3267$/$''5(66
&2'(
(0$,/
6725(:+(5(352'8&7:$6385&+$6('
'$7(2)385&+$6(
6$/(63(5621
)25)857+(5,1)250$7,213/($6(&217$&7285+(/3'(6.21
Preface
DPF—— let you can enjoy your happy time at every time, without computer or printing!
Your are appreciated for using the DPF, in order to enjoy your happy life brought by DPF,
please read this manual carefully before using it.
Main features:
z
z
z
z
Photo (JPEG)
Music (MP3, WMA)
Video (MP4, VOB, DAT, MPG, AVI)
Calendar, clock , alarm and auto power on/off.
Technical specification:
z
z
z
z
z
z
7 inches TFT LCD panel resolution˖480×234
Supported media format: JPEGǃMP1ǃMP2ǃMP3ǃMP4ǃVOBǃDATǃWMAǃAVIǃ
DIVX
Supported memory card: SDǃMSǃMMC
Support U-disc (support P&P)
Support calendar, clock, alarm, auto power on/off functions.
Support AV output
Operation instruction:
1.1
IR controller instruction:
2.2 the DPF support reading U-disc & memory card. System will first read U-disc and then read memory
card. If system have both U-disc & memory card at the same time, it will read U-disc by default.
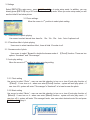
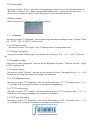
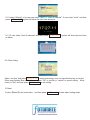
3. Settings
SelectǏSETUPǐin main menuˈpress ENTER or OKkey to enter setup mode. In addition, you can
directly pressǏSETUPǐkey of IR controller to enter setup mode. When you enter setup mode you will
see the initial UI as below picture.
3.1 Photo settings:
Move the cursor to 1st position to select photo setting:
3.1.1 interval time of photo playing:
Use cursor to select interval time: have 5sǃ10sǃ15sǃ30sǃ1minǃ3min 6 options in all
3.1.2 Transition effect of photo playing
Use cursor to select transition effect , there all total 16 modes in all.
3.1.3 browse mode of photo
Use cursor to select “Browse”to decide the browse mode of
options: “thumbnail ”and “File manager”.
ǏPhotoǐfunction. There are two
3.2 auto play setting
Move the cursor to 2nd position to select auto play setting:
3.2.1 Photo setting
Use cursor to select “Photo”ˈuser can use this selection to turn on or turn off auto play function of
ǏPhotoǐ. If user turn on itˈwhen user enterǏPhotoǐfunctionˈsystem will auto play photo.˗if
user turn off it, system will enter “File manager”or“thumbnail” to let user browse the photo.
3.2.2 Music setting
Use cursor to select “Music”ˈuser can use this selection to turn on or turn off auto play function of
ǏMusicǐ. If user turn on itˈwhen user enterǏMusicǐfunctionˈsystem will auto play music.˗if
user turn off it, system will enter “File manager”mode, user can select desired music file and press
ENTER or OK to play it.
3.2.3 Movie setting
Use cursor to select “Movie”ˈuser can use this selection to turn on or turn off auto play function of
ǏMovieǐ. If user turn on itˈwhen user enterǏMovieǐfunctionˈsystem will auto play movie.˗if
user turn off it, system will enter or“movie file browse” to let user browse the movie.
3.3 Display settings
Move the cursor to 3rd position to select Display setting:
3.3.1 TVstandard
Use cursor to select “TV Standard”, user can select right standard according to their TV system. There
are “NTSC”, “PAL” & “AUTO” 3 options in all.
3.3.2 AV Output setting:
Use cursor to select “ AV Output” to set TV-display mode or Panel-display mode.
3.3.3 Display Type setting
Use cursor to select “Display type” to set aspect ratio ,there are “16:9” , “4:3” , “ Auto” 3 options in
all .
3.3.4 Brightness setting
Use cursor to select “Brightness”, user can set the brightness of picture,. There are “Normal”, “bright”
& “Soft” 3 options in all.
3.3.5 contrast setting
Use cursor to select “Contrast”, user can set the contrast of picture. The range is from -4 ~ 0 ~ +4, 9
levels in all, the larger the number is, the higher the contrast is.
3.3.6 TFT Brightness setting
Use cursor to select “TFT Brightness”, user can set the brightness of TFT. The range is from -7 ~ 0 ~
+7, 15 levels in all, the larger the number is, the higher the brightness is.
3.3.7 TFT Contrast setting
Use cursor to select “TFT Contrast”, user can set the contrast of TFT. The range is from -7 ~ 0 ~ +7,
15 levels in all, the larger the number is, the higher the contrast is.
3.3.8 TFT saturation setting
Use cursor to select “TFT Saturation”, user can set the saturation of TFT. The range is from -7 ~ 0 ~
+7, 15 levels in all, the larger the number is, the higher the saturation is.
3.4 custom setup
Move the cursor to 4th position to select custom settings.
3.4.1 OSD language setting
Use cursor to select “OSD language” to set the system’s OSD language, there are “English”,
“French”, “German”, “Italian”, “Spanish”, “Portuguese”, “Dutch” and “Polish” 8 languages in all.
3.4.2 style setting
Use cursor to select “Style” to set desired UI style, there are 4 UI styles in all.
3.4.3 LOGO Type setting
Use cursor to select “LOGO Type” to set desired LOGO type, there two LOGO types in all .
3.4.4 repeat mode setting
Use cursor to select “Repeat Mode” to set the mode of repeat playing. There are “off”,
“one”, ”folder” and “all” 4 options in all.
Off:
One:
cancel repeat mode
repeat current playing file
Folder: repeat current folder
All: repeat all files in current media
3.4.5 Default setting
Use cursor to select “Default” to let user restore system to default setting.
4 Photo playing
4.1selectǏPhotoǐin the main menuˈand then press ENTER or OK ˈsystem will auto detect linked
media (U-discǃmemory card). If there is not any media linked, system will return to main menu.
4.2 If there is media linked and reading OK, system will enter photo browse mode according to
“browse mode of photo” in SETUP (3.1.3)
(File Manger)
(thumbnail)
4.3 inǏPhotoǐmodeˈsystem only support photo playing, the supported format is JPG.
4.4 if user turn on photo auto play, system will auto play photo after enteringǏPhotoǐmode.
5 Music playing
5.1 selectǏMusicǐin the main menuˈand then press ENTER or OK ˈsystem will auto detect linked
media
(U-discǃmemory card). If there is not any media linked, system will return to main menu.
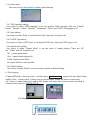
5.2 If there is media linked and reading OK, system will enter file manger, as below picture:
5.3 inǏMusicǐmodeˈsystem only support music playing, the supported format is MP2/MP3/WMA..
5.4 if user turn on music auto play, system will auto play music after enteringǏMusicǐmode.
6 Photo+Music playing
6.1 selectǏPhoto+Musicǐin the main menuˈand then press ENTER or OK ˈsystem will auto detect
linked media (U-discǃmemory card). If there is not any media linked, system will return to main menu.
6.2 If there is media linked and reading OK, system will enter file manger, as below picture:
6.3 inǏPhoto+Musicǐmodeˈsystem only support photo and music playing, the supported format is
JPG & MP2/MP3/WMA.
6.4 if user turn on photo+music auto play, system will auto play Photo+music after entering
ǏPhoto+Musicǐmode.
7 Movie playing
7.1 selectǏMovieǐin the main menuˈand then press ENTER or OK ˈsystem will auto detect linked
media
(U-discǃmemory card). If there is not any media linked, system will return to main menu.
7.2 If there is media linked and reading OK, system will enter file manger, as below picture:
7.3 in Ǐ Movie ǐ mode ˈ system only support movie playing, the supported format is
DAT/MPG/VOB/MP4DŽ
7.4 if user turn on movie auto play, system will auto play movie after enteringǏMovieǐmode
8 Calendar
8.1Calendar display
selectǏCalendarǐin the main menuˈand then press ENTER or OK to enter calendar setting
mode, select “Display” and press ENTER or OK to enter calendar display
8.2 week search
User can use direction key to adjust month/year to search the week.
8.3 date setting
selectǏCalendarǐin the main menuˈand then press ENTER or OK to enter calendar setting mode,
select “set data” and press ENTER or OK to enter calendar date setting. User can use direction key to
set the calendar and date. When user finished date setting, he can press “OK” to confirm or “cancel” to
cancel setting. Move cursor to “Exit” and then press ENTER or OK to exit setting.
9 clock setting
9.1 Clock display
9.1.1 selectǏClockǐin the main menuˈand then press ENTER or OK to enter clock setting mode
9.1.2 select “Display” to let user can select “clock” or “clock & calendar”. If user select “clock” and then
press ENTER or OK , system will show the clock time as below:
9.1.3 If user select “clock & calendar” and then press ENTER ᡆ OK , system will show the clock time
as below:
˖
9.2 Clock setting
Select “set time” and press ENTER or OK to enter time setting, user can use direction key to set time.
When user finished time setting, he can press “OK” to confirm or “cancel” to cancel setting. Move
cursor to “Exit” and then press ENTER or OK to exit setting.
10 Alarm
൘selectǏAlarmǐin the main menuˈand then press ENTER or OK to enter alarm setting mode
10.1alarm on/off setting
Select “on” to turn off alarm and select “off” to turn off alarm.
10.2 alarm time setting
Select “set time” and press ENTER or OK to enter time setting, user can use direction key to set time.
When user finished time setting, he can press “OK” to confirm or “cancel” to cancel setting. Move
cursor to “Exit” and then press ENTER or OK to exit setting.
10.3Alarm ring
When alarm is triggered, system will pop up a dialog, user can press any key to exit alarm ring
mode at that time.
11 Auto-power On/Off setting
selectǏAuto Powerǐin the main menuˈand then press ENTER or OK to enter auto power setting
mode
11.1Power on enable setting
Select “on” or “off” to let user can turn on or turn off auto power on function.
11.2 Auto power off setting
Select “on” or “off” to let user can turn on or turn off auto power off function.
11.3 auto power on/off time setting
Select “set time” and press ENTER or OK to enter time setting, there are “power on” and “power off”
two items in all, user can use direction key to set time. When user finished time setting, he can press
“OK” to confirm or “cancel” to cancel setting. Move cursor to “Exit” and then press ENTER or OK to
exit setting.
12 Photo Edit
൘selectǏEditǐin the main menuˈand then press ENTER or OK to enter photo edit mode. In this
mode user can select “copy”, “delete” or “exit”.
12.1copy photo
This function allow user to copy photo on media, and use the copied photo as screen saver. User can
use
to select photo, and then press ENTER or OK to confirmˈthe selected photo will be
marked by a red frame, and press ENTER or OK again to cancel the selection. When user finished
the selection, he can press key to “save” buttonˈpress ENTER or OK to save all selected
photo.
12.2 delete photo
This function allow user to delete saved photo. User can move cursor to “delete” button, and then
press ENTER or OK to enter delete mdoe, then use key to select the photo to be deleted, and
then press ENTER or OK to delete selected photo. User also can select “delete all” to delete all saved
photo. In addition, user can use to select photo to be sorted.
13 Photo favorite
൘selectǏFavoriteǐin the main menuˈand then press ENTER or OK to enter favorite photo
modeˈuser can press ENTER or OK to select desired photo to play.
14. function switchover
Press ǏSELECTǐon the remote controller to back to the main menu, execute the switchover of all
kinds of functions through direction key. The functions include 11 kinds of functions such as Ǐpictureǐ,
Ǐmusicǐ, Ǐpicture +musicǐ,Ǐmovieǐ, Ǐsettingsǐ, Ǐcalendarǐ, Ǐclockǐ,Ǐalarm clockǐ,
Ǐautomatic power offǐ, Ǐeditǐ, Ǐfavoriteǐ.
15 Screen saver
15.1 No screen saver mode
System will not enter screen save in below modes:
ǏPhotoǐˈǏMusicǐˈǏPhoto+MusicǐˈǏMovieǐǏClockǐandǏCalendarǐ
15.2 screen saver mode
In normal case, if the DPF does not play any media and last over 20s, system will enter screen saver
mode, to protect your TFT LCD panelˈuser can press any key to exit screen saver, return to before
mode.
16 common problem and solution:
Problem
System can
power on
not
Can
not
read
memory card
System can not
display the photo
when you enter
photo mode
Video output is
abnormal
The picture size is
too small on TFT
Black
blocks
around the picture
Reason & solution
ƽMake sure the power adapter is plugged OK
ƽMake sure the Power switch is at “ON”
Go to maintenace point for checking if problem still exist.
ƽMemory card is not plugged OK
ƽNo playable files on card
ƽThe file format is not supported
ƽPhoto format supported˖JPEG
ƽMusic format supported˖MP3/WMA
ƽMovie format supported˖DAT/MPG/VOB/MP4DŽDŽ
ƽThe picture format is not supported
ƽNo photo in the card
Attention: the DPF only support JPEG format, other format , like
TIFF,BMP,GIF is not supported.
ƽMake sure AV-out cable is plugged OK
ƽMake sure the TV mode of AV-output is the same as TV’s.
ƽThe resolution of video/picture is smallDŽ
ƽUse Zoom function to view it .
●This is normal, because different DC take photo with different solution
and different resolution.
Manufactured and Distributed by
No 2 Noble Road
Bordeaux. Randburg
Tel ( 011 781 6001 )
www.cnsmarketing.co.za