1
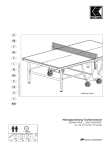
TOP STAR
Art.-Nr. 07172-100
D
GB
F
NL
E
I
Der Umwelt zuliebe: Wir drucken auf 100% Altpapier!
PL
US patent 7,197,990 & 6,990,910 Other patents pending
10
13
GB
Assembly Instructions
Before assembling or using the table-tennis table, please read the following instructions carefully.
They contain important information for use and maintenance of the equipment as well as for your
personal safety. Keep these instructions in a safe place for maintenance purposes or
for ordering spare parts.
All KETTLER products are designed in accordance with the latest safety regulations and undergo a constant process of quality control
during manufacturing. The knowledge gained in this process is used to constantly improve and develop our products. In order to offer
our customers the very best in product quality, we reserve the right to make technical changes at any time. In spite of this, should you
have any cause for complaint, please contact your KETTLER dealer.
Note on Safety
The table-tennis table should be used only for its intended purpose, i.e. for playing with suitable table-tennis bats and balls.
its correct use, and draw their attention to any potential source
of danger, especially when setting up or dismantling the table.
All other uses are prohibited and may be dangerous. The manufacturer cannot be held liable for damage or injury caused by
improper use of the table.
When setting up or dismantling the table, stay clear of its folding radius.
Damaged or worn components may endanger your safety or
shorten the lifespan of the table-tennis table. Replace worn or
damaged components immediately and remove the table from
use until this has been done. Use only spare parts manufactured
by KETTLER.
The table-tennis table complies with all safety regulations. Incorrect repairs, alterations to the design (removal of original
parts, addition of other components etc.) may endanger the
safety of the user.
Instruct other persons (in particular children) using the table in
When folded up, the table-tennis table presents a large surface
to the wind. For this reason, ensure that it is stored in a sheltered position.
The table-tennis table may be pushed only into the transport position because there is otherwise a danger of injury.
The unit complies with the standard EN 14468–1:2004.
Depending on frequency of use, check all screws, bolts etc. regularly to ensure that they are in good condition.
Caution: While assembly of the product keep off children’s
reach (Choking hazard - contains small parts).
In case of enquiry, please contact your KETTLER dealer.
Handling the equipment
Do not use the table-tennis table until it has been fully and correctly assembled and checked.
For practising without a partner, the table halves can be folded
up singly.
Ensure that table-tennis tables which are not weatherproof are
not exposed to dampness or rain. Keep them well away from
direct sources of heat. Should the surface become warped, lay
the table on a level surface for a few days.
For more information on the sport of table-tennis, you are referred to the specialist literature on the subject.
Set the table up on a level surface.
Do not use corrosive or abrasive materials to clean the equipment. Ensure that such materials are not allowed to pollute the environment. In most cases, a slightly dampened cloth is sufficient.
Do not cover it with plastic foil, under which condensation may
form. We recommend the weatherproof KETTLER tarpaulin, art.
no. 7032-300.
Waste Disposal: KETTLER products are recyclable. At the end of
its useful life please dispose of this article correctly and safely
(local refuse sites).
Instructions for Assembly
The equipment must be assembled with due care by two adult
persons.
Ensure that you have received all the parts required (see check
list) and that they are undamaged. Should you have any cause
for complaint, please contact your KETTLER dealer.
Before assembling the equipment, study the drawings carefully
and carry out the operations in the order shown by the diagrams. The correct sequence is given in capital letters.
Please note that there is always a danger of injury when working with tools or doing manual work. Therefore please be careful when assembling this machine.
Ensure that your working area is free of possible sources of danger, for example don’t leave any tools lying around. Always dispose packaging material in such a way that it may not cause
any danger. There is always a risk of suffocation if children
play with plastic bags!
The fastening material required for each assembly step is shown
in the diagram inset. Use the fastening material exactly as instructed.
Bolt all the parts together loosely at first, and check that they
have been assembled correctly. Tighten the locknuts by hand
until resistance is felt, then use spanner to finally tighten nuts
completely against resistance (locking device). Then check that
all screw connections have been tightened firmly. Attention:
once locknuts have been unscrewed they no longer function correctly (the locking device is destroyed), and must be replaced.
For technical reasons, we reserve the right to carry out preliminary assembly work (e.g. addition of tubing plugs).
Please keep original packaging of this article, so that it may be
used for transport at a later date, if necessary. Goods may only be
returned after prior arrangement and in (internal) packaging, which
is safe for transportation, in the original box if possible. It is important to provide a detailed defect description / damage report!
List of spare parts
When ordering spare parts, always state the full article number,
spare-partnumber, the quantity required and the S/N of the product (see spare parts drawing).
Example order: Art. no. 07132-000 / spare-part no. 10100016
/ 2 pieces / S/N......
Important: spare part prices do not include fastening material; if
. (bolts, nuts, washers etc.) is required, this
fastening material
should be clearly stated on the order by adding the words “with
fastening material“
Checkliste (Packungsinhalt)
GB Checklist (contents of packaging)
F
Liste de vérification (contenu de l’emballage)
NL Checklijst (verpakkingsinhoud)
E
Lista de control (contenido del paquete)
I
Lista di controllo (contenuto del pacco)
PL
Lista kontrolna (zawartość opakowania)
2
ø4x30
3
2
2
2
ø3,9x16
2
M6x20
2
M6x16
4
ø12
8
4
3
2
2
ø16
2
4
ø25
2
4
2
2
66
1
M6
2
4
M6
4
M8
2
4
2
4
M6x110
M8x110
1
M8x60
16
6
4
4
1
10
4
2
2
2
2
4
4
2
4
2
4
2
6
Sie benötigen zusätzlich folgendes Werkzeug (Gehört nicht zum Lieferumfang):
You also need the following tools (Not included):
Vous avez besoin de cet util en complément (con compris dans la livraison)
U heeft tevens volgend gereedschap nodig (Is niet in de levering ingesloten):
Usted necesita adicionalmente la siguiente herramienta (no pertenece al volumen de suministro):
Per eseguire il montaggio, Vi occorre il seguente attrezzo (non è incluso nel volume di fornitura):
10
13
Dodatkowo potrzebne są następujące narzędzia (nie objęte zakresem dostawy):
11
Messhilfe für Verschraubungsmaterial
GB Measuring help for screw connections
F
Gabarit pour système de serrage
NL Meethulp voor schroefmateriaal
E
Ayuda para la medición del material de atornilladura
I
Misura per materiale di avvitamento
PL
Wzornik do połączeń śrubowych
1
2x
A
B
B
C
1x
M8x110
4x
ø16
C
1x
M8
12
2
2x
A
B
1x
M8x110
4x
ø16
1x
M8
3
2x
66mm
66mm
2x
M8x60
2x
ø25
13
4
1x
3x
ø4x30
5
1x
2x
M6x16
2x
ø12
2x
M6
14
6
2x
7
2x
C
B
B
A
A
2x
ø12
2x
M6
15
8
A
A
!
B
2x
A
A
4x
4x
M6x110
4x
D
Die Streben des Tragrahmens müssen hierbei ein wenig zur
Seite gebogen werden; gehen Sie hierbei vorsichtig vor!
E
Los puntales del marco soporte tienen que ser ligeramente
doblados; ¡ejecute este proceso con cuidado!
GB
To do this, the braces for the frame must be bent slightly to
the side. Proceed with care when doing this.
I
F
Pour cela les jambes de forces du cadre porteur doivent être
pliées un peu de côté; pratiquer là avec précaution
A questo proposito è necessario piegare leggermente verso
il lato i montanti della staffa di supporto; procedere con cautela!
PL
Poprzeczki pałąka podporowego muszą zostać przy tym
nieznacznie rozgięte na zewnątrz. Zachować przy tym
ostrożność!
NL
De stangen van het draagframe moeten hierbij aan de kant
enigszins gebogen worden; ga bierbij voorzichtig te werk!
9
D
Sichern Sie die Plattenhälfte für die folgenden Montageschritte unbedingt gegen Abrutschen und/oder Umkippen!
E
Asegure la mitad de la plancha para los próximos pasos de
montaje contra deslizamiento y/o vuelco!
GB
Position one of the table halves and ensure that it cannot slip
or tilt over.
I
F
Il est absolument nécessaire de sécuriser les plateaux pour les
opérations de montage qui suivront, afin qu’ils ne puissent ni
glisser ni se renverser.
Per eseguire le seguenti fasi montaggio occorre assolutamente assicurare il piano di gioco contro lo scivolamento
e/oppure il ribaltamento.
PL
Po drugiej stronie ułożyć połówkę płyty. Dla następnych operacji montażowych należy koniecznie zabezpieczyć
połówkę płyty przed ześlizgnięciem się i/lub przewróceniem się!
NL
16
Blokkeer deze bladhelft voor het volgende deel van de montage tegen wegglijden en/of kantelen.
10
C
B
D
click!
A
D
11
M8x60
2x
2x
2x
17
12
Führen Sie die Schritte 10 bis 11 für die zweite Plattenhälfte durch. Denken Sie auch hier wieder an die Sicherung der Platte!
D
GB
Carry out steps 10–11 for the second half of the table. Again, ensure that the table cannot slip or tilt over!
Effectuer les opérations 10 à 11 pour la deuxième moitié de table. Là non plus, ne pas oublier la sécurisation du plateau.
F
NL
Voer de montagestappen 10 tot 11 voor de tweede bladhelft uit. Denk ook hierbij weer aan de vergrendeling van het blad!
E
Ejecute los pasos 10 a 11 para la segunda mitad de la plancha.
I
Ripetere le operazioni da 10 a 11 anche per il sesondo semipiano
PL
Powtórzyć kroki 10 do 11 dla drugiej połówki płyty.
13
B
2
click!
A
1
14
B
2x
A
B
4x
M6x20
4x
4x
18
15
2x
1
2
4x
3,9x16
16
2x
19
17 Handhabungshinweis
GB Handling
F
Indication relative à la manipulation
NL Bedieningsinstruktie
E
Instrucciones de manejo
I
Avvertenze per il maneggio
PL
Wskazówki obsługowe
C
B
A
click!
18
2x
2x
4x
3,9x16
20
19
1
NL
Montage van de netpost
2
1 Schuif de netstang door de zijkant van het net.
3
2 Steek de netstang in uitsparingen van de nethouder.
3 Knoop het spandraad door kunststof lus.
4
4 Laat het spandraad via inkeping boven in de netstang lopen.
Span het net door de kunststof lus op het haakje van de
nethouder te klemmen.
E
Montaje del portared
1 Introducir la barra de la red por el borde lateral de la red.
2 Insertar la barra de la red en las escotaduras del portared.
D
Montage des Netzhalters
1 Netzstange durch seitliche Netzkante schieben.
2 Netzstange in Aussparungen am Netzhalter einstecken.
3 Anudar el hilo tensor al artefacto plástico.
4 Introducir el hilo tensor en la barra de la red por la muesca
superior. Tensar la red encajando debidamente al artefacto
plástico en el clavillo del portared.
3 Spannfaden mit Kunststofflasche verknoten.
4 Spannfaden über obere Einkerbung in Netzstange führen.
Netz spannen durch entsprechende Einklinkung der Kunststofflasche am Netzhalter-Dorn.
GB
Instructions for Assembling
the net set
I
Montaggio dell’attacco della rete
1 Spingere la stecca della rete attraverso il bordo laterale della rete.
2 Introdurre la stecca della rete negli incavi dell’attacco della
rete.
1 Passez la barre de tension à travers le filet.
3 Annodare il fito tenditore e il passante di plastica.
2 Fixez la barre de tension sur le poteau.
4 Tirare il filo tenditore attraverso l’intaglio superiore nella stecca di rete . Tendere la rete scegliendo una posizione del passante di plastica sulla spina dell’attacco della rete.
Instructions de montage pour
l’ensemble poteaux-filet
1 Slide the tension pin through net
2 Place pin in designated slots
3 Tie tension string to plastic tension tab.
4 Place tension string in slots over tension pin and net post. Adjust net tension by adjusting plastic tension tab.
PL
Montaż uchwytów siatki
1 Wsunąć pręty mocujące w boczne kieszenie siatki.
2 Wetknąć pręty mocujące siatkę do nacięć w uchwytach siatki.
3 Związać sznurek naciągający z nakładką z tworzywa sztucznego.
4 Włożyć sznurek napinający do górnego nacięcia pręta mocującego siatkę. Naciągnąć siatkę przez zaczepienie
nakładki z tworzywa sztucznego na trzpieniu uchwytu siatki.
max 1 cm = ok.
F
max 1 cm = ok.
4 Passez la corde dans la rainure de la barre de tension. Tendre le filet en fixant la patte de réglage sur la pointe du poteau.
max 1 cm = ok.
3 Prenez la corde et faite un noeud sur la patte de réglage.
21
20
15cm
21 Handhabungshinweis
GB Handling
F
Indication relative à la manipulation
NL Bedieningsinstruktie
E
Instrucciones de manejo
I
Avvertenze per il maneggio
PL
Wskazówki obsługowe
A
click!
C
B
22
Ersatzteilzeichnung und –liste
GB Spare parts drawing and list
F
Dessin et liste des pièces de rechange
E
Designación y lista de las piezas de recambio
I
Disegno ed elenco dei pezzi di ricambio
PL
NL Reserveonderdeeltekening en –lijst
Rysunek i lista części zamiennych
7
33
37
34
27 35 42
3
32
48
24
2
43
44 25
4
29
5
14
20
21
23
19
31
41
30
47
16
11
13
18
8
9
45
36
17 15 12 40
39 10 10
1
Typenschild – Seriennummer
Type label – Serial number
Plaque signalétique – Numèro de serie
Typeplaatje – Seriennummer
Placa identificativa – Número de serie
Targhetta tecnica – Numero di serie
Tabliczka identyfikacyjna – Numer serii
HEINZ KETTLER GmbH & Co. KG
D-59469 Ense-Parsit
Art.-Nr. 07044-000
1-334 O - 1801 00001
geprüft nach prEN 14468-1, -2
Klasse C, Typ 4
Made in Germany
23
Ersatzteilliste
Teil
Nr.
1
2
3
4
5
6
7
7
8
9
10
11
13
14
15
16
17
18
19
20
21
22
23
24
25
30
31
32
33
34
35
36
37
38
39
40
41
42
43
44
45
46
47
48
49
Bezeichnung
Stück
TT-Platte (Bitte unbedingt Art--Nr. des
TT-Tisches angeben!)
Fußgestell
Zwischenstrebe komplett
Bodenschoner
Stützbügel mit Rohrverbindern (Paar)
Rohrschelle
Lagerböckchen
Lagerböckchen
Lagerschelle
Schubstrebe mit Rohrverbinder
Verbindungsrohr
TT-Räder-Set (2x2)
Bremshebel mit Rändelstift
Seitenteil
Radverbinder
Radverbinder
6-kant-Schraube M6x140mm
Distanzrohr ø12x1,8x85mm
Sicherungshebel (unten), Raste
Sicherungshebel (oben), Raste
Sicherungshebel (Mitte), Raste
Zugfeder
Zugdraht
Distanzrohr ø10x1,9x16mm
Gleitstücke (Set)
Schlägerhalterung (Teil 1)
Schlägerhalterung (Teil 2)
Netzhalter kpl.
Netz kpl.
Spannlasche
Seitenverkleidung (oben)
Seitenverkleidung (unten)
PA-U-Scheibe ø12x6,4x15mm
6-kant-Schraube M6x110mm mit Fadensicherung
Distanzhülse
Distanzhülse
Anschlagwinkel
Begrenzungswinkel
Auslösehebel
Auslösehebel
Spreizniete ø6x9,5mm
Stopfen ø8mm
Reibschutz-Set (4 Stück)
Rohrverbinder
Schraubenbeutel
docu 3204/12.11
2
2
2
4
2
4
8
4
4
4
3
2
2
2
2
2
4
4
4
2
2
2
4
10
1
1
1
2
1
2
2
2
4
4
2
4
2
2
2
2
2
2
1
4
1
Ersatzteil-Nr.
für 07172-100
TOP STAR
94130125
94111391
94111394
70130823
94111396
–
10128028
–
70131000
94111397
94111399
94180261
70130816
94111299
70130847
70130848
10206086
97201441
70130826
70130827
70130828
25616011
25057020
97200573
94111159
70130872
70130873
94111269
94180384
10128013
70130874
70113449
10108131
94110892
70130825
70130525
97201284
97201819
70130833
70130834
10418503
10100169
70130890
70130824
94180186