1
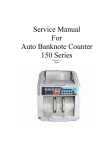
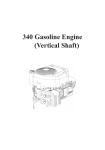
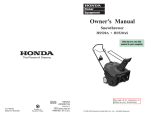
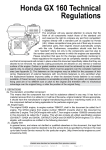
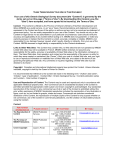
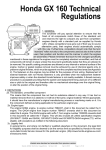
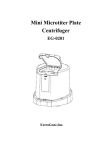
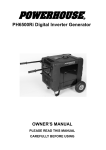
140 160 170 200 Gasoline Engine
(Vertical Shaft)
Owner’s Manual
PREFACE
Thank you for choosing a small general gasoline engine of our company.
The manual gives information with respect to operation and maintenance
of the 140 160 170 200general gasoline engine, and be sure to read it
carefully first before operation. Only operate as the manual tells, can
insure user’s safety and get the best results of the engine operation. If a
problem should arise or if you have any questions about your gasoline
engine, consult an authorized our company servicing dealer.
The vertical shaft gasoline engine series products in this Owner's Manual
are mainly used for the high pressure washer, lawn mower and mini tiller.
All information and diagrams of this manual are in accordance with the
newest products at the publishing time. If revision and other change of
the information descried in this manual are a little different from the
actual status, our company will explain it. Our company reserves the right
to make change at any time without notice and without incurring any
obligation. No part of this publication may be reproduced without written
permission.
This manual should be considered a permanent part of the generator and
should remain with the generator if resold.
·1·
SAFETY MESSAGES
Your safety and the safety of others are very important. We have provided
important safety messages in this manual and on the gasoline engine.
Please read these messages carefully.
A safety message alerts you to potential hazards that could hurt you or
others. Each safety message is preceded by a safety alert symbol
and
one of three words: DANGER, WARNING, or CAUTION. These mean:
You WILL be KILLED or SERIOUSLY HURT if you
don’t follow instructions.
You CAN be HURT if you don’t follow instructions.
Your gasoline engine or other property could be
damaged if you don’t follow instructions.
·2·
CONTENTS
CONTENTS
PREFACE… …………………………………………………………… 1
SAFETY MESSAGES… ……………………………………………… 2
I. SAFETY PRECAUTIONS…………………………………………… 4
II. PARTS DESCRIPTION……………………………………………… 6
III. PRE-OPERATE INSPECTION…………………………………… 10
IV. STARTING THE ENGINE… …………………………………… 15
V. RUNNING THE ENGINE………………………………………… 18
VI. STOPPING THE ENGINE… …………………………………… 19
VII. EXHAUST CONTROL SYSTEM SERVICE… ………………………… 20
VIII. MAINTENANCE… …………………………………………… 22
IX. TRANSPORT AND STORAGE… ……………………………… 26
X. TROUBLESHOOTING…………………………………………… 27
XI. SPECIFICATIONS… …………………………………………… 31
XII. ELECTRIC DIAGRAM… ……………………………………… 32
XIII. EASY WORN PARTS AND ACCESSORIES LIST…………………………… 33
·3·
SAFETY PRECAUTIONS
I. SAFETY PRECAUTIONS
Indicate a possibility of invalid warranty and personal
or equipment damage if instructions are not followed.
Please pay special attention to the following:
1. Strictly set the engine according to the regulated power on the owner's
manual. Do not overload, overrun the engine or run it with low load
and at low speed in a long time.
2. Use specified grade of gasoline. The fuel should be fully deposited
and filtrated before use. Keep clean the fuel filler, change the oil
periodically.
3. Periodically check the installation, connection and the degree of
tightness of the fixed bolt. Tighten it if necessary.
4. Periodically clean the element of the air cleaner, change it when
necessary.
5. The engine is air-cooled, so clean the radiator, wind cover and fan in
time in order to make the engine cool normally.
6. The operator should be familiar with the working principle and structure
of the gasoline engine, knowing how to make an emergent stop and the
operation of all controlling parts. Any one without training is forbidden
to operate the engine. Keep periodical maintenance. Solve problems in
time. Do not run the engine in spite of malfunction.
7. Running the engine in a well-ventilated place, keep it at least one meter away
from building walls or other equipments, keep away from inflammables such
as gasoline, matches and so on to avoid possibility of fire.
8. Refuel in a well-ventilated area with the engine stopped, and in places
·4·
SAFETY PRECAUTIONS
refueling or storing gasoline, no smoking and any flames or sparks.
9. Refuel the fuel tank not too full so as to avoid fuel’s spilling out. If there
is spilled fuel around, be sure to clean it thoroughly before starting.
10. Do not run the engine in airtight or ill-ventilated places.
11. The exhaust muffler is very hot during running the engine even after
the engine stops. Never touch it, or you may get burns. Transport or
store the engine with it cooling down entirely.
12. Safe warning label:
Please carefully read warning label before operating. Our company will
not assume any responsibility for person hurt, or equipment damaged
caused by disregarding this warning label.
Please read the
owner’s manual
carefully before
operating
Don’t breath
exhaust in
Please keep
the fire far
away
Don’t operate
indoors.
13. Exhaust label:
·5·
II. PARTS DESCRIPTION
1. Feature
CARBURETOR
OIL DIPSTICK
SPARK PLUG
MUFFLER
STARTER GRIP
FUEL TANK
CAP
FUEL TANK
AIR CLEANER
(140)
·6·
PARTS DESCRIPTION
START HANDLE
OIL DIPSTICK
MUFFLER SPARK PLUG
FUEL TANK
COVER
AIR CLEANER
(160 170)
·7·
PARTS DESCRIPTION
START HANDLE
OIL DIPSTICK
SPARK PLUG
MUFFLER
FUEL TANK COVER
AIR CLEANER
(200)
·8·
PARTS DESCRIPTION
2. Model No.
MODEL NO.
FINISHED PRODUCT NO.
SER. NO.
(140 160 170)
MODEL NO.
FINISHED PRODUCT NO.
SER. NO.
(200)
·9·
PRE-OPERATE INSPECTION
III. PRE-OPERATE INSPECTION
1. Engine Oil
Engine oil is a key factor in deciding the engine’s performance. Do not
apply engine oil with additives or 2-stroke gasoline engine oil, because
they haven’t enough lubrication, and may shorten the engines service life.
Check the engine with it stopped on a level ground.
Engine oil capacity:
140
0.5L
160 170 200
0.6L
Engine oil recommended: SAE10W-30
As viscosity varies with regions and temperatures, SF class oil is
recommended.
Check method:
1) Remove the dipstick and clean it.
2) Reinsert the dipstick into the oil Filling hole without screwing it, and
check oil level.
3) If the oil level is too low, add the recommended engine oil up to the
oil upper level.
4) Reinstall the dipstick.
· 10 ·
PRE-OPERATE INSPECTION
Engine oil change:
Used engine oil may cause skin cancer if repeatedly left in contact with
the skin for prolonged periods. It is still advisable to thoroughly wash
your hands with soap and water as soon as possible after handling used
oil. Please dispose of used engine oil in a manner that is compatible with
the environment.
OIL DIPSTICK
OIL HOLE
1) Screw the oil dipstick out.
2) Tilt the gasoline engine and let the oil overflowing out from the hole.
· 11 ·
PRE-OPERATE INSPECTION
2. Air Cleaner
Never run the engine without an air cleaner, or severe wear of the
engine may be resulted in.
AIR CLEANER ELEMENT
AIR CLEANER
COVER
1) Remove the air cleaner housing.
2) Remove foam element or paper element, paying attention to prevent
dust and foreign matter entering into air cleaner.
3) Check, clean or replace damaged air cleaner parts.
4) Reinstall the air cleaner parts back.
FUEL UPPER LEVEL
FUEL
3. Fuel Check
1) Remove the fuel tank cap and
check fuel level.
2) If the level is too low, refuel the
tank. Remember adding fuel not
over the fuel upper level.
· 12 ·
FUEL TANK
PRE-OPERATE INSPECTION
1. Gasoline is extremely flammable and is explosive under certain
conditions.
2. Refueling in a well-ventilation area with the engine stopped. Do
not smoke and allow flames or sparks in the area where gasoline is
stored or where the fuel tank is refueled.
3. Do not overfill the fuel tank (there should be no fuel in the filling
neck). After refueling, make sure the fuel tank cap is set back
securely.
4. Be careful not to spill fuel when refueling. Spilled fuel or fuel
vapor may ignite. If any fuel is spilled, make sure the area is dry
before starting the engine.
5. Avoid repeated or prolonged contact with skin or breathing of fuel
vapor. Keep out of reach of children.
Fuel tank capacity: 1.0L
Only use unleaded gasoline and recommend gasoline grade 90#over.
Unleaded gasoline can reduce gasoline engine carbon deposit and prolong
the exhaust system service life.
Never use contaminated gasoline or mixed gasoline with oil. Don’t allow
the dust, foreign matter or water entering into fuel tank.
Fuel may damage the oil paint and plastic. Be careful not to spill fuel
when refueling. Any damage due to oil spilling is not within valid
warranty.
· 13 ·
PRE-OPERATE INSPECTION
"Light knocking" or "spark exploding" sound can be hear when the
engine overloading. It is normal. Do not worry about that.
If " knocking" or "spark exploding" sound occur at a steady speed
under normal load, change brand of gasoline; if such phenomena still
happen, consult your dealer for help, otherwise the engine may be
damaged.
When the engine is running, continuously "Knocking" or "spark
exploding" sound occurring will damage engine.
"Knocking" or "spark exploding" sound from misusing will not be
within the valid warranty.
· 14 ·
STARTING THE ENGINE
IV. STARTING THE ENGINE
1. Starting method:
A. Turn the throttle lever and brake lever along with direction of arrow to
bottom. (“OPEN” position), As shown as following.
BRAKE LEVER
THROTTLE LEVER CLOSE
OPEN
B. Turn the throttle lever along with direction of arrow to bottom.
(“OPEN” position) and turn the engine stop switch to “ON” state as
shown as following.
STOP ENGINE
SWITCH
(ON)
THROTTLE LEVER
CLOSE
STO P
OPEN
· 15 ·
STARTING THE ENGINE
C. Put the choke cable to “OPEN” position and turn the engine stop
switch turn to “ON” position at the same time as shown on the
following drawing:
CHOKE CABLE
STOP ENGINE
SWITCH
(ON)
OPEN
STO P
Don’t pull the throttle level if the gasoline engine is hot. Assemble the
choke cable according to user requirement.
D. Starting primer gasbag operation is important operation of the starting
engine. Turn the stop engine switch to “ON” state. For cold starting,
slightly press the primer gasbag three to five times in succession and
quickly pull the recoil cable grip. For hot starting, directly pull the
starter cable grip.
STOP ENGINE
SWITCH
(ON)
PRESS GASBAG
THREE TIME. THEN,
PULL CABLE GRIP.
START ENGINE
· 16 ·
STO P
STARTING THE ENGINE
2. STARTING THE ENGINE
Pull the starter grip lightly until resistance is felt, then, briskly pull to
syncline upper 30 degree out.
Don’t allow the starter grip to snap back against the engine. Return
it gently to prevent damage to the starter
· 17 ·
RUNNING THE ENGINE
V. RUNNING THE ENGINE
1. After starting, push the choke lever in the direction of the arrow to
bottom.
2. After preheating the engine a period of time, you can fix a load.
AIR CLEANER
START
IDLE
RUNNING
3. Pull the choke cable from the "OPEN" position to "RUNNING"
position after starting engine.
4. Change the engine speed
by adjusting the governor
screw. For high speed, turn
clockwise, and for low speed,
turn counterclockwise. Please
operate carefully. If you have
any question, please contact
our company authorized dealer
unless the user have the proper
tool and professional ability.
· 18 ·
STOPPING THE ENGINE
VI. STOPPING THE ENGINE
1. Slowly turn the throttle lever to “IDLE” position
AIR CLEANER
START
IDLE
RUNNING
2. If the engine is controlled by brake lever, only turn the brake lever to
“CLOSE” position for stopping engine ( as shown on the following Fig.1)
If the engine is controlled by engine stop switch, For stopping the
engine, directly turn the stop engine switch to "0" position (as shown
on the following Fig.2) or press down the "STOP" for 5 seconds
over by first finger, then loosen it (as shown on the following Fig.3).
The engine stop engine is device of the opening and closing ignition
circuit. (as shown on the following Fig.2)
ENGINE STOP
SWITCH
ON
OFF
THROTTLE
LEVER
CLOSE
OPEN
(Fig.1)
(Fig.2)
(Fig.3)
Sudden stopping at high speed under heavy load is forbidden,
otherwise damage will result.
· 19 ·
EXHAUST CONTROL SYSTEM SERVICE
VII. EXHAUST CONTROL SYSTEM SERVICE
With the engine running, carbon monoxide, oxide of nitrogen and
hydrocarbon will produce, and in certain conditions, oxide of nitrogen
and hydrocarbon will react chemically each other to make smoke while
carbon monoxide is toxic, so exhaust control of them is very important.
The company decreases the exhaust emissions by introducing poor-fuel
carburetors and other devices into the engine to solve the problem.
To keep the exhaust of your engine with in the standard exhaust emission,
pay attention to the following:
1. Maintenance
Maintain the engine periodically in accordance with the maintenance
schedule in the manual. The maintenance schedule is made out on the
base of normal use in normal conditions, if using under heavy load, dusty
or wet circumstances or in high temperature, service of the engine should
be done more often.
2. Replacing Parts
To ensure the best quality and reliability, use only new genuine our
company parts or their equivalents for repair and replacement.
3. Tampering and Altering
Tampering with or altering the emission control system may increase emissions
beyond the legal limit. Among those acts that constitute tampering are:
1) Removal or alteration of any part of the intake, fuel, or exhaust
systems.
· 20 ·
EXHAUST CONTROL SYSTEM SERVICE
2) Altering or defeating the governor linkage or speed-adjusting
mechanism to cause the engine to operate outside its design
parameters.
4. Problems Affecting Exhaust Emissions
1) Difficult starting or difficult stopping.
2) Unstable idle speed.
3) Give off black smoke or consume too much fuel.
4) Poor ignition sparks or sparks returned.
5) Too early ignition.
· 21 ·
MAINTENANCE
VIII. MAINTENANCE
1. Maintenance Schedule
In order to keep the engine well, must periodically service and adjust the
engine. Service shall be as following schedule.
MAINTENANCE SCHEDULE
Frequency
Item
Oil level
check
Engine oil
Each
time
Check
Clean –
replace
Clean,
adjust
Spark plug
Each
season
or
50 hrs
Every 6
month
or
100 hrs
Each
year
or
300 hrs
√
Replace
Air cleaner
First
month
or
20 hrs
√
√
√
√
√
Replace
√
Oil strainer
Clean
√
Valve clearance
Checkadjust
√*
Cylinder head
Clean
√*
Fuel tank
Replace
Every three years
* These items should be serviced by company authorized dealer, unless
you have the proper tools and mechanically proficient.
Service more frequently when used in dusty areas.
· 22 ·
MAINTENANCE
2. Maintenance Method
1) Replacement of engine oil
Drain the engine oil rapidly and completely out when the engine is hot.
(1) Remove the oil dipstick, drain plug and washer and drain engine oil
thoroughly. Reinstall the drain plug and screw in it securely.
(2) Fill the recommended engine oil and check oil level with oil dipstick.
(3) Reinstall the oil dipstick and tighten it securely.
Please dispose of used engine oil and the oil containers in a manner
that is compatible with the environment. We suggest you take used
oil in a sealed container to your local recycling center or service
station for reclamation. Do not throw it in the trash or pour it on the
ground or down a drain.
2) Maintenance of air cleaner
A dirty or damaged air cleaner will allow dust entering into the engine,
causing rapid engine wear. So, service the air cleaner in time.
. Remove the bolt and air cleaner cover. Be careful to prevent dirt and
debris from falling into the air cleaner base opening.
. Remove the foam element or paper element.
. Check, clean or replace the damaged air cleaner parts.
. Reinstall the air cleaner parts, then bolt and screw down it.
· 23 ·
MAINTENANCE
Never clean the air cleaner element with gasoline or low flash-point
detergents, or explosion may happen.
Clean the foam filter with soapy water, blow the paper element with
compressed air or lightly tap off dust and never dry to brush .
(1) Gasoline is extremely flammable and explosive in certain
condition. Keep cigarette, sparks and fire away.
(2) After reinstalling the deposit cup, don’t start the engine until the
area around is dry.
3) Maintenance of spark plug
In order to ensure the engine normal running, gap of the spark plug
must be correct and no deposit around the spark plug.
0.7-0.8mm
Spark recommended using plug model
NGK:
BP6ES/BPR6ES
DENSO:
W16EPR-U/W16EP-U
CHAMPION: RN9YC4
NHSP:
F7TC/F7RTC
TORCH:
F7TC/F7RTC
Don’t touch the muffler to avoid burn in the engine
running or just stopping a moment.
· 24 ·
MAINTENANCE
(1) Remove the spark plug cap.
(2) Clear away dirt around the spark plug base.
(3) Dismantle the spark plug with a spark plug wrench.
(4) Visually check the spark plug. Clean with a steel brush. If the
insulator is damaged, replace the spark plug instead.
(5) Measure the spark plug clearance with a feeler. The clearance should
be 0.7~0.8mm. If adjustment is necessary, bend the side electrode
carefully.
(6) To avoid cross-threading, first, screw in spark plug by hand, then
tighten with a spark plug wrench to compress the gasket.
(7) If a new spark plug is used, please replace it with same spark plug
model as can as possible, and more twist 1/2 turns after compressing
the gasket.
(8) If reinstalling the used spark plug, just more twist 1/8-1/4 turns.
(1) The spark plug must be tightened securely, or it may become
very hot to damage the engine.
(2) Only use recommended spark plug or the equivalent. Incorrect
heat range of the spark plug may damage the engine.
4) Idle speed adjustment of the carburetor
. (1) Start the engine and preheat it to normal operating temperature.
. (2) Adjust the throttle stopping screw to obtain minimum idle speed.
Minimum idle speed:(1,900±100) r/min.
· 25 ·
TRANSPORT AND STORAGE
IX. TRANSPORT AND STORAGE
Do not incline the engine so as to avoid fuel’s spill in transporting.
Spilled fuel or fuel vapor may ignite to cause fire. If suspension for a
long time, storage should be as following:
1. The storage area is dry and free of dust.
2. Completely drain fuel out of the fuel tank and carburetor.
Fuel is extremely flammable and explosive under
certain conditions. Keep smoke, fire and spark away
from operating site.
3. Replace engine oil.
4. Remove the spark plug. Fill about a spoon of fresh engine oil onto the
cylinder. Crank the engine up to distribute engine oil evenly. Reinstall
the spark plug.
5. Lightly pull the recoil starter rope until the resistance is felt. Close the
choke to protect the dust from entering in.
6. Cover the engine to protect dust entering.
· 26 ·
TROUBLESHOOTING
X. TROUBLESHOOTING
1. Start Engine Difficultly (By using recoil starter)
Fuel supply is not
smooth or no fuel supply.
Fuel supply is
normal.
Spark plug is
in bad conditions
Normal
spark plug
Something wrong with the fuel system.
Normal high –
tension line spark.
High-tension
line no spark
High-tension coil run out Normal
ignition system.
Normal spark plug spark
Normal fuel supply system.
Normal fuel supply system.
Abnormal cylinder compression.
Normal cylinder compression
TROUBLE
CAUSE
There is no enough fuel in fuel
tank and fuel cock is closed.
Air vent in the fuel filler cap is clogged
Fuel cock is clogged
Improper or clogged main oil
flow hole.
Needle valve is not closed properly or start hole is clogged.
Float is damaged or sticking.
Fuel is too filthy or deteriorated
There is water in fuel.
Too much fuel in engine
Wrong fuel brand
Too much carbon deposit
and dirt around electrodes.
Electrodes are burn damaged
seriously or insulators damaged.
Improper electrodes gap.
High –tension line is damaged.
Ignition coil is damaged.
REMEDY
Fill fuel, open fuel cock.
Dredge air vent.
Clean first and then dredge
Readjust or clean, blow to get
through.
Dismantle needle valve and repair, clean, blow to get through.
Repair float
Replace
Replace
Drain extra fuel, dry up spark
plug electrodes.
Select proper fuel brand corresponding with the requirements.
Clear away.
Replace spark plug.
Adjust to proper value.
Replace
Replace
Magneto loses magnetism.
Replace
Wrong gap between ignition Adjust gap between ignition and
coil and flywheel
flywheel
Piston ring is worn to or even
Replace
over its wear limit
Piston ring is broken.
Replace
Piston ring is sticking.
Clear up carbon fouling.
Spark plug is not installed
Tighten with a gasket in.
tighten or without a gasket.
Check cylinder gasket, and
the flatness of the surface by
Air leakage between cylinder which cylinder block contactblock and cylinder head.
ing with cylinder head
Tighten cylinder head bolts in stipulated order to stipulated torque.
Check valve. Clearance and
Air leakage in the valves
tightness, repair if necessary.
· 27 ·
TROUBLESHOOTING
If still can’t starting, have the engine to our authorized dealer for
repairing.
· When testing the spark plug, never hold the high- voltage wire of
the spark plug with wet hand.
· Make sure there is no spilled fuel outside the engine and that the
spark plug isn’t dipped with fuel.
· To prevent fire, keep sparks far away from the spark plug
mounting hole.
2. Gasoling Engine Power Output Insufficiency
Fuel supply system
CAUSE
Poor compression
When increasing throttle, speed increase slow or
even decrease and stop running
TROUBLE
Air in fuel line or fuel line
clogged
Main oil flow hole is not adjusted properly
In carburetor, needle valve hole
and main oil flow hole clogged.
Fuel cock is clogged up.
Exhaust air or dredge fuel
line
Readjust
Clean and blow to get
through
Clean, replace damaged part
Too much carbon deposit in
Clear away
combusting chamber.
Too much car bon fouling in
Clear away
muffler and exhaust pipe.
Clean air cleaner filter eleAir cleaner is clogged up.
ment
Intake pipe is leaking
Repair or replace
Piston or cylinder or piston ring
Replace the worn
is worn
Air leakage from the surface by
which cylinder block contacting Replace cylinder gasket
with cylinder head.
Too big or too small valve clearReadjust
ance.
Valve tightness is poor.
· 28 ·
REMEDY
Repair
TROUBLESHOOTING
3. Gasoline Engine Gannot Running Unsmoothly
TROUBLE
CAUSE
Knocking
sound
Abnormal combustion
Spark lacking
Piston, cylinder or piston ring
is worn excessively.
Piston pin and piston pin hole
are worn excessively.
Tie rod small head is worn
excessively.
Roller bearing for crankshaft
main shaft is worn.
Engine is too hot
Too much carbon deposit in
combustion chamber
Improper gasoline brand or low
gasoline quality
There is water in float chamber
improper spark plug electrodes clearance
Something wrong with induced coil, and so on
REMEDY
Replace the worn
Replace piston or piston
pin
Replace tie rod
Replace roller bearing
Shoot trouble
Clear away
Replace with qualified gasoline
Clean
Adjust
Check and replace damaged parts
4. Stop Suddenly When Running
TROUBLE
CAUSE
Fuel supply system
Stop suddenly when
running.
Ignition
system
The other
Fuel is finished
Carburetor is clogged
Float chamber is leaking
Needle valve is sticked.
Spark plug is punctured,
or short-circuited by carbon deposit
Side electrode of spark
plug is dropped out
High-tension wire is
dropped out
Ignition coil is punctured
or short-circuited
Parking wire is located on
engine body
Cylinder is seriously scored
and valve dropped out
REMEDY
Refill fuel
Check fuel line and dredge
Repair
Dismantle float chamber and
eliminate it
Replace spark plug
Replace spark plug
Weld on
Replace ignition coil
Find out meeting and insulate
Repair or replace damaged
parts
· 29 ·
TROUBLESHOOTING
5. Gasoline Engine Is Overheat
TROUBLE
Gasoline
engine is
overheat
CAUSE
Oil insufficient or wrong oil ratio in
the gasoline
Exhaust pipe blocked up
Shroud leaking
Cooling fins blocked by foreign
matter
Connection rod deformation to make
piston and cylinder bushing side wear
Cylinder or piston or piston ring is
worn to make hunting between cylinder and crankcase
Improper adjustment of engine governor to produce speed high.
Crankshaft main bearing burnt out
REMEDY
Refill engine oil
Clean exhaust pipe
Repair damaged part
Clear cooling fins
Replace connection rod
Replace the worn parts
Readjust engine governor
Replace main bearing
The gasoline engine should be kept about 80 ~ 110℃ temperature
around the outlet of the shroud. If the temperature is too high, it will
indicate the gasoline engine overheating.
6. Abnormal Noise Exist When Engine Running
TROUBLE
Beating sound
CAUSE
REMEDY
Piston, piston ring or cylinder is worn
Connection rod or piston pin and piston
pin hole are worn
Crankshaft main neck is worn
Replace the worn part
Replace the worn
part
Replace bearing
Piston ring is broken
Replace piston ring
Too much carbon deposit in combust- Clear away carbon
Metal b eatin g
ing chamber
deposit
sound when abImproper fuel brand
Replace fuel
normal combusFind a cause and
Engine is overheat
tion occurs
eliminate it
Readjust valve
Improper valve clearance
clearance properly
The other
Fly wheel is not connected with crankConnect tightly
shaft tightly
· 30 ·
SPECIFICATIONS
XI. SPECIFICATIONS
1. Main Specificaton
Model
items
L×W×H(not including crankshaft output terminal)(mm)
Dry Weight(kg)
140
160
365×291×275
10
170
395×348×282
12.1
Engine Type
200
404 x 356 x 292
12.5
13
single cylinder horizontal,4-stroke, (OHV)
Displacement(ml)
139.36
163
173.2
196.2
Bore × Stroke(mm)
65×42
68×45
70×45
70×51
Theoretical Maximum Power 2.3kw/3,600r/min 3.0kw/3,600r/min 3.2 kw/3,600r/min
Recommended Using
1.5kw/3,000r/min 2.3kw/3,000r/min 2.4kw/3,000r/min
Power
Maximum Torque
6.3N·m/2,500r/min 8.8N·m/2,500r/min 9.0N·m/2,500r/min
Fuel Consumption
3.5kw/3600r/min
2.5kw/3000r/min
10.5N•m/2500r/min
395g/kw·h
Cooling System
Forced air
Ignition System
capacitance discharge type
PTO Shaft Rotation
vertical shaft output
Data Adjustment
Items
Spark plug clearance
Carburetor idle speed
Valve clearance (cold engine)
Technical data
0.7-0.8mm
1900±100r/min
intake: 0.15±0.02mm
exhaust: 0.20±0.02mm
Service
To see P23
To see P24
Serviced by our company authorized dealer
Specification is subject to change without notice. For further
information, please contact our company dealer.
2. Torque Of Important Bolts
Items
Connection-rod bolt
Cylinder head bolt
Flywheel nut
Crankcase cover bolt
Valve clearance adjusting nut
Valve rocker bolt
Specifications
M7×1.25
M8×1.5
M14×1.5
M8×1.5
M6×0.5
M8×1.25
Torque valve
N·m
kg·m
12
1.2
26
2.6
52
5.2
26
2.6
10
1.0
24
2.4
· 31 ·
ELECTRIC DIAGRAM
XII. ELECTRIC DIAGRAM
ENG SWITCH
ENG SWITCH
OFF
ON
SPARK PLUG
· 32 ·
IGNITION COIL
B1
Black
EASY WORN PARTS AND ACCESSORIES LIST
XIII. EASY WORN PARTS AND ACCESSORIES LIST
Easy worn parts list:
Accessories list:
Cylinder head cover gasket
Socket
Cylinder head gasket
Force bar
Spark plug
Oil sealing
Breath groove gasket
Crankcase gasket
Recoil starter
Carburetor gasket
Carburetor insulation gasket
Insulation plate gasket
Air cleaner gasket
Exhaust vent gasket
· 33 ·
93004-Z030430-0000