1
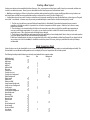
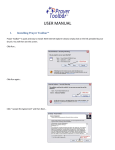
HENRY SCHWAB
C O M PA N Y
THE FUNERAL INDUSTRY STANDARD SINCE 1937
PrayerPrint Program
USER MANUAL
HENRY SCHWAB
C O M PA N Y
THE FUNERAL INDUSTRY STANDARD SINCE 1937
PRAYERPRINT SOFTWARE
800.447.1049
HENRY SCHWAB COMPANY | P.O. BOX 1347 | NEWBURYPORT, MA 01950 | PH. 800.447.1049 | FAX 800.582.0585
Introduction
This guide explains how to install and start PrayerPrint. It provides an overview of how PrayerPrint works, including general information about the menus,
commands and features. The guide will provide you with all the tools necessary to get you up and running quickly. The software has been designed so that
you can add, edit, maintain and print high quality prayer cards quickly and easily.
Software License Agreement
Activation of PrayerPrint on a specific computer constitutes an agreement between Myriad Data Corporation and the owner of the installed copy of
PrayerPrint. It is understood that the software was designed for and will only be installed on a single personal computer.
System Requirements
Computer: Virtually any hardware setup that is running Microsoft Windows Versions 2000, NT, XP, VISTA and Version 7 - and which has either a CD-ROM
drive or modem – will accommodate PrayerPrint.
Printer: Any LaserJet, InkJet or DeskJet printer whose drivers are compatible with any of the operating systems listed above is PrayerPrint compatible.
-
Installation
Installing from a CD:
PrayerPrint will auto-install when the CD-ROM is placed in your CD drive. Although you can install PrayerPrint anywhere you would like, the default
installation directory is: C:\Program files\Henry Schwab Company\PrayerPrint
You may also manually install the CD as follows:
1. Insert CD into appropriate drive.
2. Click the Start button on the Desktop task bar.
3. Select Run from the Start Menu. Follow the instructions on the screen. The Install program will tell you when the installation is complete.
NOTE: If you are using either the VISTA or Windows 7 operating system, you must - immediately after installing the software - right click the Desktop
icon and select “Run as administrator”. Then - after making sure you have exited the software - double click the Desktop icon, run the software, and
proceed to Activate by following the prompts. Otherwise, you will receive an error message and not be permitted access to the program.
IMPORTANT: After the initial installation and Activation of PrayerPrint onto computers running either the VISTA or Version 7 operating
systems, you MUST right click the Desktop icon and select “Run as Administrator" before the following features are used. Otherwise, there
is the possibility that these features will not properly “save, modify or rename” a file. To be safe, we recommend Running as Administrator
as a daily rule.
1. Before any session during which you intend to use the Backup or Restore features under Utilities
2. Before any session during which you intend to Add, Delete or Rename a graphic
Activation
All initially installed copies of PrayerPrint need to be Activated; otherwise, the word “SAMPLE” appears on all printed output of the Unactivated version.
Activation is a simple process by which you click Activate on the Main Menu and retrieve the 16 digit Registration ID (which will appear in red). Then simply
call Myriad Data Corp. at 800.364.1509. You will be provided with a 5 digit unlock key and complete instructions. Once activated, the word "SAMPLE" will
no longer appear on any printed output.
Main Menu Overview
The Main Menu of PrayerPrint is essentially a tool bar. The name PrayerPrint appears on the top left portion of your display. The toolbar choices and
a list of those features that each contains is outlined below.
Selection
4-up, 8 _” x 11” (w/ tab)
6-up, 8 _” x 11” (w/ tab)
8-up, 8 _” x 10” (w/o tab)
8-up, 8 _” x 11” (w/ tab)
Recent Selections
Exit
Utilities
Preferences
Graphics Manager
Prayer Manager >
> View/Edit Prayers
> Print Prayers
Backup
Restore
Reindex Prayers Database
Calendar Reference
About – Contact and ID information is displayed.
Help – Access this User Manual while using PrayerPrint (does not require internet access).
Online
Henry Schwab Company
Technical Support
Activate – (Only appears on Evaluation copies)
Main Menu Details
Selection
Prayer Cards: Print text and graphics directly onto industry standard prayer card formats.
Formats include the following four formats and layout sizes:
4-up, 8.5” x 11” (w/ tab)
6-up, 8.5” x 11” (w/ tab)
8-up, 8.5" x 10” (w/o tab)
8-up, 8.5” x 11” (w/ tab)
As you mouse-over the layout sizes shown under Selection, you will see schematics of respective layouts to the immediate right of each choice.
Recent Selections: A list of recently saved prayer card layouts with the most recent shown at top of list. Simply double-click the Recent Selection of your
choice and you will be brought to the composition screen of that particular layout.Exit: Closes all PrayerPrint files and returns control over to your Desktop.
over to your Desktop.
Utilities
Preferences: Configure PrayerPrint to meet any specific requirements your operating system and hardware setup may require. Default settings are
shown below.
• Type of printer manual feed: Default = Edge justified
• Set printer paper size parameters: Default = unchecked
• When printing landscape: Default = Right edge exits first
Update: Configures Preferences as selected.
Cancel: Return to Main Menu without recording last changes to Preferences.
Reset Defaults: Resets all Preference items to defaults shown above.
Graphics Manager: View, Rename and Delete images that reside in the Assets directory of PrayerPrint. All images are listed alphabetically and
will appear to the left of Local images screen. Navigate the list using the PgUp/PgDn and arrow keys. In order to be while in this Utility selection,
images must be in .bmp, .jpg, .pcx, or .tif format and reside in the C:\Program files\. . . PrayerPrint \Assets directory.
NOTE: The Graphics Manager is for viewing and managing graphic images. In order to place a specific image into a specific layout, you must first be on a
composition screen and have chosen the Insert/replace feature while in the Select Mode.
Prayer Manager: Manage and selectively Print one or all prayers in your prayer database. PrayerPrint comes with more than 100 prayers and
sentiments, but you can add as many more as you would like as well as modify those that are already there.
View/Edit Prayers: View, Add, Edit and Delete prayers, sentiments and frequently used lines of text that you would like to be able to place in text
text blocks in any selected composition.
Print Prayers: Selectively print as many listed prayers as you like. Prayers are configured four to an 8.5” x 11” page (portrait) and will
appear exactly as last saved
NOTE: The Prayer Manager is for viewing and managing prayers. In order to import a prayer into a specific text block into a specific layout, you must choose the
desired image using the Insert/replace feature while in the Select Mode.
Backup: Backup or “save” files that contain variable information to include all memorial compositions, prayer database and post card mailing list.
Files can be backed up to any source or location available to your computer. Files that have been backed up can be restored - or retrieved - using
the Restore selection (see below).
Restore: Import files containing variable information that was backed up using the Backup selection (see above).
NOTE: Restored files will overwrite files of the same name if the same named files reside in the location into which the backed up files are restored.
Reindex Prayers Database: Occasionally, certain temporary files used by PrayerPrint to sort and index data become corrupt due to computer
malfunction. If you notice unusual behavior while using the Prayer Manager, reindexing your prayer database may help.
Calendar Reference: A calendar reference to review past and future dates and days of the week. Provided as a convenience for those instances
when you need to know the exact day of the week a decedent died, the day of the week a service can be held, or some other scheduling
requirement – without having to exit PrayerPrint.
About
A quick reference screen showing the software version, ID number and our toll free telephone number. If you have not yet activated your copy
of PrayerPrint, the words “Evaluation Copy” will appear next to the “AD” (Activation Date) of your PrayerPrint installation also appears on this
screen. Otherwise, the actual date the program was activated will appear.
Online
You must be online to access these selections.
Activate
You will only see this selection if using an Evaluation version of PrayerPrint.
Editing Tool Bar
The editing tool bar is located at the top of the page on the Main menu. It shows all selectable options while you are viewing any particular composition
screen. If a particular feature is “grayed out” (that is, not selectable), it is because that feature is either not available while in the currently selected
Mode or you are already “in” – have selected – that mode (see Modes, below). There are two parts to the toolbar: the function part and the text
editing part.
The Function part of the toolbar (below) is comprised of basic functions such as Saving a file, Printing a selection, selecting one of the four Modes or
choosing a prayer to be inserted into a layout.
The Text Editing portion provides for editing features such as font type, color, style and size selection, as well as left, right, center or block justified
alignment.
NOTE: You must be in particular Mode in order to perform any particular function. For example, if you want to add or modify text, you must be in the Text mode.
Similarly, if you want to add, delete or move a specific image block, you must be in the Select mode. The Mode you are currently in - if you are "in" a Mode - is always
displayed on the bottom left portion of your display.
Save Changes
Click to save current composition under existing or new and unique name. If this is a new composition, the field will be left blank (as shown above);
otherwise, the last name under which the composition was saved will appear in the name field. If you want to change the name, simply type over the
old one.
Print
Selecting the Print icon provides a screen similar to the one shown above.
The field following “Enter actual number of prayer cards required” shows the number “2”. This is the default number for prayer cards (8-up prayer
card sheets).
Always enter the actual number of cards you want to print. For example, if you need 200 prayer cards, enter “200”. Do not enter “25” (the number
of sheets required to print 200 prayer cards: 25 x 8 = 200).
Also on the Print screen are the following choices:
• Print: Click to print the “actual number of items required”.
• Setup: Select the printer you wish to use for the current print job if more than one printer is attached to and configured for your
computer.
• Cancel: Cancel any print changes and return to composition screen.
• Adjustments: In most cases, all settings should be set to zero (“0”). In the uncommon event the printer you are using – for whatever
reason – is printing too far vertically or horizontally, or is printing too large or too small for the sheet size, make adjustments
accordingly.
Select Mode
The Select Mode is the mode you must be in if you want to add, delete, resize, or move an image or text block. While in the Select Mode, you can also
layer blocks (that is, move any block in front of or behind another block).
Image and text blocks are required before you can insert images or text into those blocks. You can add as many as 42 blocks (image or text) on
any one composition. You can also easily create one large block to fill the entire composition screen and work within it.
NOTE: In order to accomplish the following tasks, you must be in the Select Mode (click the icon with the blue arrow that faces north-west) and the words "Select Mode"
must appear in the bottom left portion of your display (near the Start button).
• Add an image or text field: Right click white space (that is, any area that does not already have any blocks) on any composition screen and then left
click to choose among Add image, Add text field and Add text field (Rotatable). Image blocks appear as gray squares, standard text fields
appear as white squares and Rotatable text fields appear as yellow squares.
• Add text field (rotatable): Right click white space on any composition screen and then left click to choose to add a text field that is either rotated
90 degrees to the right or left.
• Delete any image or text field: Left click any image or text field so that it is selected, and then right click that same, selected field. To permanently delete the selected block, simply select “Delete image” or “Delete this field”, as appropriate.
• Move an image or text field: Left click any image or text field so that it is selected, hold the mouse down, and then drag and drop that image
anywhere on the composition screen you would like.
• Move an image or text field to the front or back: Left click any image or text field so that it is selected, right click that same, selected field and then
choose to either “Move to back” or “Move to front”, as appropriate.
• Insert/replace image: To insert a new image into a blank image block or to replace an existing image with a new on, left click the image so that
it is selected, right click that same, selected block, and then choose Insert/replace image. At this point, you will be presented with an alphabetical
list of all images residing in the PrayerPrint directory. Simply choose the image and click the “Open” button.
• Resize an image or text field: To make any image or text field larger or smaller, left click the block so that it is selected, click on one of the five
grab buttons located on the perimeter of each block, and then drag as appropriate.
• Stretch image to fit block: The image blocks you create are square, but the images you use may not be. Therefore, you have the option of either
1) using the image as it is (the default), or 2), stretching it to fit the image block. To stretch an image to fit the block you must left click the image
block, and then right click that same, selected block. If you want to modify the size and aspect ratio of the image, click "Stretch to Fit". A check
mark will appear next to the selection if chosen. This is a personal choice, although for decedent photos it may be preferable to use the default.
T
Text Mode
The Text Mode is the mode you must be in if you want to add, edit, delete, or in any way modify the appearance of text in a given text block. It is
also the mode you must be in to select and insert prayers from your prayer database.
NOTE: In order to add text you must first create a text field to hold that text (see Select Mode). Once a text field is created, text can be added and aligned, prayers
can be imported, and fonts and colors can be changed.
• Add new text: Left click within any text and start typing. Again, your mouse cursor must be in a given text block in order for text to be added. If
the text block in which you are typing is too small to hold the text you are adding you must click the Select Mode icon and stretch the block so that it
can accommodate your newly added text.
• Replace existing text: Highlight the text that you want to replace, hit the Del key, and then start typing. If you are cutting and pasting text, right
click the highlighted portion of the text you want to replace, and then click Paste with your left button.
• Change font: Highlight the text in any text field whose font style, color or size you want to change and then click the appropriate text editing icon.
NOTE: You can change the font of an individual letter as well as the entire text field simply by highlighting the portion of text you want to change and then making
your font change. You can change as many font sizes, colors and styles within a given text field as you would like.
• Add Prayer: To add a prayer from the Prayer database, simply place the cursor into the text field in which you want to place the prayer, click the
Select Prayer icon, browse the prayers in the database, and then click Select and Return to view the selected prayer that is now in the text block you
were in immediately prior to clicking the Select Prayer icon. You can also simply type in a new prayer or sentiment, but it will not become part of your
permanent prayer database.
NOTE: When Selecting and Returning a prayer to a text block, the selected prayer will overwrite everything that was in that text field. Any modifications made to the
selected prayer while in the text block will not affect the prayer as shown in the prayer database. To permanently modify a paryaer, you must access that praye
through the Prayer Manager under Utilities.
Background Mode
The Background Mode provides the option of adding background images such as borders, watermarks and logos to any memorial composition. You
must select the Background Mode icon to add a background.
NOTE: Background images can only be viewed as they will appear with other image blocks and text fields on the printed product while in Preview Mode. Background
images will always be placed beneath all other blocks within any given composition.
• Add a Background image: Selecting the Background Mode icon prompts you to “Add a background image?”. To add a background, simply click the
Yes button and a large, blank, image block will be inserted onto you composition screen into which you can place any qualified graphic.
• Insert/replace Background image: To insert a new background image into a background image block or to replace an existing image with a new
one, left click the image block so that it is selected, right click that same, selected block, and then choose Insert/replace image. At this point, you will
be presented with an alphabetical list of all images residing in the PrayerPrint directory. Simply browse and choose the image you want and then
click the “Open” button.
• Resize a Background image: To resize any background image, left click the block so that it is selected, click on one of the five grab buttons located
on the perimeter of the block, and then drag and stretch as appropriate.
• Delete a Background image: Left click the background image so that the image is selected, then right click and follow the prompts.
Preview Mode
The Preview is simply your what-you-see-is-what-you-get screen before you print. Make certain that your composition looks the way you want it to look
when printed. If something is not correct, go back to the appropriate mode and make your changes before you print.
Creating a New Layout
Creating a new layout can be accomplished in either of two ways. First, you can open an existing layout, modify it to suit your new needs, and then save
it under a new and unique name. Second, you can choose New from the Select layout screen and start from scratch.
• Modifying an existing layout: If there is a layout for a particular stationery item that you like, opening, modifying and then saving it under a new
and unique name would be far more expedient than starting a new layout from scratch. (See Save Changes icon.)
• Creating New a layout from scratch: Creating a new layout can be extremely rewarding, but accept the fact that there.s a learning curve. The good
news is that – once learned – it becomes very easy to create personalized designs to meet even the most discriminating family's needs.
1. The first step is to add one or more text fields and image blocks (re: Select Mode). Remember that imported prayers overwrite
everything in the block into which it is imported so be sure to have a separate text .eld for prayers. Otherwise, use as few or as many
fields as you would like.
2. The second step is to resize and position the blocks on the composition screen where you think they would be most appropriate to
meet your specific design requirements. If you prefer, you can stretch a text block so that it fills the entire area of the prayer card
composition screen. Then, simply enter text and change fonts as desired.
3. The third step involves adding text and images into the blocks and fields you have already placed. Now is when you resize and reposition
your layout based on what you put in the text fields and image blocks.
4. Make your final adjustments, see how your composition looks while in the Preview Mode, and then Save Changes! If your layout looks the
way you want it to in the Preview Mode, it should look as well when printed. Of course, printing a proof before an entire job is always
recommended.
Mode Comparison Chart
Certain functions can only be selected while in one or more of the editing modes (that is, the select mode, text mode and background mode). The
Preview Mode is not considered an editing mode as much as a display of how your compositions will look when printed.
The following chart depicts which behaviors are directly associated with their respective modes.
Select
Text
Background
Add background
Add frame image
Add image
Add prayer
Add text
Add text field
Align text
Change font
Change color, text
Change color, background
Delete background
Delete image
Delete text
Delete text field
Image beneath background
Image on top of background
Insert prayer
Insert/replace image
Insert/replace background
Move background
Move image
Move text field
Move to front
Move to back
Print
Resize background
Resize image
Resize text block
Save layout
Stretch to fit
Troubleshooting
There are an infinite number of things that can cause software to perform in an unexpected way. Some of these things can be eliminated by first trying the
following:
Reboot your computer
Operating systems are complex and can easily be affected by an improperly shared system file, a reaction to an electrical spike, an incorrect setting, or a
memory management problem. Rebooting your computer may solve your problem.
Check your printer settings
• Simple things first: Make certain that your printer is on, online and the paper tray is filled and pushed in all the way.
• Check to make sure that you are using the correct print drivers. Print drivers are the software mechanisms that allow your printer to communicate with
and interpret commands sent by your computer. All printers are different and use different drivers. If you have the wrong driver, did not install one
properly, or the one that is installed does not keep pace with a new operating system that you may have just installed, you will have problems.
• If your hardware has more than one selectable printer, make certain that the one you are trying to use is the one that has been selected. PrayerPrint
always chooses the default printer as selected in your Control Panel. However, when you choose the print icon from within PrayerPrint, you are given
the opportunity to choose from any other printer that may be selectable.
• Verify default settings under Utilities > Preferences on the Main Menu tool bar of PrayerPrint. The default printer settings are intended to accomodate
most printer manufacturers settings, but if yours is different, you may have to select otherwise.
Frequently Asked Questions (FAQ)
Will PrayerPrint print onto stock that is not 8.5” x 11”?
Yes. PrayerPrint accommodates paper sizes other than 8.5” x 11” as long as your printer has an adjustable manual feed, which is the case on virtually
all modern printers. This is the same feature that allows you to print envelopes.
Under Utilities > Preferences on the main menu tool bar, there is a prompt asking for the Type of manual feed adjustment on your printer. If your printer
has one slide that pushes either to the left or to the right, choose Edge (the default). If your printer has two slides that converge toward the center,
choose Center. This setting lets your software know where the paper is “registered” so that text and graphics can be positioned correctly for the size of
paper you are using.
Why do I get an “Error 21, Open Error” message?
An “Error 21, Open Error” message indicates that a required file – which is named in the body of the message – cannot be accessed by PrayerPrint. The
inability to access or “use” the file is probably attributed to one of the following four reasons: 1) the file is corrupt or missing, 2) the file is a "read only"
file and must have its “read only” attribute removed, 3) you are on a network and the file is already open and being used by another user, or, 4) you
are not on a network but the software has been loaded two or more times on your current PC. If, after removing the probable cause, you still get the error,
contact technical support.
What types of graphic images can I use?
PrayerPrint recognizes all images that are Windows (.bmp), JIFF (.jpg), Zsoft Paintbrush (.pcx) and Tagged Image File Formate (.tif) compliant.
However, virtually any type of file you would like to use can easily be converted into one of these image types using standard photo editing software such
as Corel's Paint Shop and Adobe Photoshop.
I know I added a particular line of text while in the Text mode, but I cannot see it while in the preview mode. Where did it go?
If you cannot see a line of text in the Preview mode that you can while in the Text mode, it is because the size of the font being used is too big for the
text block itself. If text does not appear in the Preview Mode, it will not print. The solution is to either reduce the size of the font while in Text Mode or
increase the size of the text block while in Select Mode.
Why can.t I find my image in the Graphics manager screen?
In order to be viewed by the Graphics manager, all images must reside in the same directory in which your software is installed. If images are in the
ASSETS subdirectory of the PrayerPrint folder, they will automatically be alphabetized and be listed with all the other images.
Note: The screen presented to you when selecting an image for inclusion in an image block does allow you to indicate an image source other than the
PrayerPrint directory.
Why do I get an “Error 50, Access Violation” message when I try to print using my images?
An “Error 50” error message indicates that you attempted to use an image that was not recognized as a valid image file. The most frequently
occurring causes for the Error 50 message are 1) trying to use an image other than .bmp, .jpg, .pcx, or .tif, or 2) the size of the image you are
using is too large.
The solution to an incompatible image type is to convert the image. The size of the image is very important. Since you will typically be printing a
decedent photo as many as eight times on a blank prayer card sheet, the amount of data being sent to your printer could easily overwhelm your
printer's memory. Generally, an image in the 300kb - 500kb range is acceptable; beyond that is questionable. Possible solutions to a large image
problem include 1) re-scanning the photo using a smaller layout size, or 2) cropping the scanned image more closely.