Transcript
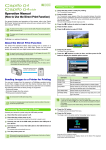
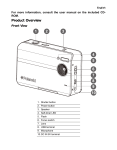
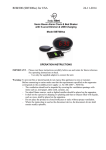
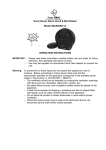
Safety Information
Product Diagram
Troubleshooting
Hereby, Polaroid Corporation declares that this Instant Mobile Printer is in compliance with the essential
requirements and other relevant provisions of Directive 1999/5/EC.
AC adapter input
FCC WARNING
Changes or modifications not expressly approved by the party responsible for compliance could void the
user’s authority to operate the equipment.
PROBLEM
NOTICE
This equipment has been tested and found to comply with the limits for a Class B digital device, pursuant
to part 15 of the FCC Rules. These limits are designed to provide reasonable protection against harmful
interference in a residential installation.
The paper jammed before printing (nothing
has been ejected)
DO NOT:
• Send another image to be printed.
Photo
exit slot
Paper tray door
DO:
•
•
•
•
This equipment complies with the FCC/IC radiation exposure limits sent forth for uncontrolled equipment and
meets the FCC radio frequency (RF) Exposure Guidelines in Supplement C to OET62 and RSS-102 for the IC
radio frequency (RF) Exposure rules. This equipment has very low levels of RF energy that is deemed to comply
without maximum permissive exposure evaluation (MPE). But it is desirable that is should be installed and
operated with at least 20cm and more between the radiator and person’s body (excluding extremities: hands,
wrists, feet, and ankles).
Power button
Power/Battery
LED indicator
Status LED
indicator
USB connector
Battery cover
This device complies with Part 15 of the FCC Rules and the RSS-Gen of IC Rules. Operation is subject to
the following two conditions: (1) this device may not cause interference, and (2) this device must accept any
interference, including interference that may cause undesired operation of this device.
CAUTION
RISK OF EXPLODING IF BATTERY IS REPLACED BY AN INCORRECT TYPE.
DO NOT:
• Send another image to be printed.
DO:
• Turn off the printer. Open the paper tray
door and remove the photo paper. Place
one sheet of photo paper upside down (with
the watermark facing up) in the paper tray.
Gently glide the photo paper under the print
head. Close the paper tray door. The sheet
of photo paper will automatically eject.
Open the paper tray door and reload the
photo paper.
Paper
door latch
This equipment generates, uses, and can radiate radio frequency energy and, if not installed and used in
accordance with the instructions, may cause harmful interference to radio communications. However, there
is no guarantee that interference will not occur in a particular installation. If this equipment does not cause
harmful interference to radio or television reception, which can be determined by turning the equipment off
and on, the user is encouraged to try to correct the interference by one or more of the following measures:
Reorient or relocate the receiving antenna
Increase the separation between the equipment and receiver
Connect the equipment into an outlet or on a circuit different from that to which the receiver
is connected
Consult the dealer or an experienced radio/TV technician for help.
This transmitter must not be co-located or operated in conjunction with any other antenna or transmitter.
SOLUTION
The photo has streaks
LED
BATTERY CAUTIONS
1. Use only the provided charger with this product.
2. Only charge the battery as recommended by the instructions.
3. The battery provided with his product is intended for this product only.
4. Prolonged use of the printer will result in the battery becoming warm.
Color
Action
Solid
Power on
Orange
Solid
Low battery
Solid
Out of battery
Orange
Pulse (1X speed)
Charging from AC adapter
Green
Pulse (1X speed)
Fully charged from AC adapter
This product contains electrical or electronic materials. The presence of these materials
may, if not disposed of properly, have potential adverse effects on the environment and
human health. Presence of this label on the product means it should not be disposed of
as unsorted waste and must be collected separately. As a consumer, you are responsible
for ensuring that this product is disposed of properly. To find out how to properly
dispose of this product, please go to www.polaroid.com and click on “Company“ or
call the customer service number for your country listed in the instruction manual.
Green
Solid
Ready to print
Green
Pulse (1X speed)
Receiving information
Green
Pulse (3X speed)
Printing
Red
Pulse (1X speed)
Paper jam
Solid
Out of paper, non feed
Orange
DO NOT:
• Pull out paper.
DO:
• Turn off the printer. Open the paper tray door
and remove media. Place one sheet of photo
paper upside down (with the watermark
facing up) in the paper tray. Gently glide the
photo paper under the print head. Close the
paper tray door. The sheet of photo paper
will automatically eject. Open the paper tray
door and reload the photo paper. Close the
paper tray door.
Communication
Green
Red
BATTERY WARNINGS
1. Avoid contact with leaking or a damaged battery.
2. Do not short battery terminals.
3. Adult supervision is recommended when product is used by young children.
4. Avoid areas of excessive heat or moisture.
5. Do not disassemble the battery.
The paper jammed while printing (part of
the image has already ejected)
If all else fails...
DO:
• Turn off the printer. If the printer will not
power off, remove the battery cover and the
battery. Replace the battery and batter cover.
Turn on the printer.
For additional troubleshooting and frequently asked questions,
please visit www.polaroid.com/pogo or call 1-888-POLAROID.
Installing and Charging the Battery
Printing: Camera Cell Phone
To install the battery:
Passcode: 6-0-0-0
1
2
3
Open paper tray door.
Check to see if there is paper in the tray.
If so, ensure the paper is loaded correctly.
If not, add a new pack of Polaroid ZINK
Photo Paper.
For specific printing directions for your phone, visit www.polaroid.com/pogo.
The following is an example for connecting to the printer and print your images.
The terminology used in your cell phone may be different.
Remove battery door cover.
Install battery.
Replace battery door cover.
To charge the battery:
1. Install the battery (see above steps).
2. Connect the AC adapter to the printer and the power source.
Notes:
• Before using the printer on battery power, fully charge the battery for
2.5 hours.
• You can print photos while plugged into the power source.
Installing Polaroid ZINK Photo Paper™
1. Select the image you would like to print from the stored images
on your camera cell phone. In the “options” menu, select “send
via Bluetooth.” Search for devices and select the Polaroid printer
and print.
2. If you are unable to print from “send via Bluetooth,” select
“connectivity” or “Bluetooth” under the “settings” or “tools”
menu. Search for devices and select the Polaroid printer. Once
paired, go back to stored images and select the image you
want to print. In the “options” menu, select “beam” or “send via
Bluetooth”. Select the Polaroid printer and print.
3. If your camera cell phone does not include “send via Bluetooth”
under the “options” menu, select the image you want to print.
Select the “options” menu and select “print via Bluetooth”.
Search for devices, select the Polaroid printer, and print.
To install the Paper:
1
2
Printing: Digital Camera
For specific print directions for your digital camera, please review your digital
camera user’s manual or manufacturer’s website.
Press and release latch on the paper tray door.
Unwrap the 10-pack of Polaroid ZINK
Photo Paper.
3
4
Slide the 10-pack of Polaroid ZINK Photo
Paper into the printer. Make sure the ZINK
Smart Sheet™ is placed facedown. Close the
printer tray door. The ZINK Smart Sheet will
automatically eject.
Press and hold the POWER button to turn
on the printer.
Notes:
• Works only with Polaroid PoGo™ and other Polaroid ZINK products.
• The printer must be empty before refilling. Do not fill the printer with more than one 10-pack of
Polaroid ZINK Photo Paper. Having more than 10 sheets of paper may damage the printer.
• Aviod bending the Polaroid ZINK Photo Paper.
• Only hold the Polaroid ZINK Photo Paper by its edges; avoid touching the printing surface with
your fingers.
For additional troubleshooting for your camera, visit www.polaroid.com/pogo.
The following is an example for connecting to the printer and print your images.
The terminology used in your camera may be different.
1. Connect your digital camera and printer to determine if a print
option or printer icon is automatically displayed on the camera
screen.
2. If no print option appears, select “menu” and navigate to
confirm that PictBridge is enabled. Note: if “USB” is displayed
under “settings” then PictBridge is NOT enabled.
3. Once PictBridge is enabled, select the image you want to print
and follow the on-screen instructions to print.
Notes:
• Do not disconnect the USB cord until entire printing process is
complete.
• Do not turn off the printer while printing.
• Do not open paper tray door while printing.
• To print the date on your photo, ensure the Date Stamp feature on
your digital camera is enabled.
• Does not print when connected to a PC.