1
Fishpro
Copyright© 2014 by Samco Software Inc.
PROPRIETARY RIGHTS NOTICE: All rights reserved. No part of this material may be reproduced or transmitted
in any form or by any means, electronic, mechanical, or otherwise, including photocopying and recording or in
connection with any information storage or retrieval system, without the permission in writing from SAMCO Software
Inc.
SAMCO Software Inc. ("SAMCO") has taken reasonable preventative measure to ensure the accuracy of the
information contained in this manual. However, SAMCO makes no warranties or representations with respect to
the information contained herein; and SAMCO shall not be liable for damages resulting from any errors or omissions
herein or from the use of the information contained in this manual.
SAMCO is a registered trademark of SAMCO Software Inc., Unit 61 - Building 6, 7789 - 134th Street, Surrey,
British Columbia V3W 9E9, Canada. Telephone (604) 597-4211. http://www.samco.com
Other product and company names are trademarks of their respective corporations.
Table of Contents
Fishpro Features and Terminology ..................................................................................... 1
Key Terminology...................................................................................................................... 2
Getting Started.................................................................................................................... 1
Fishpro data files ...................................................................................................................... 2
The Accounts Receivable data files ......................................................................................... 3
General Rules ..................................................................................................................... 1
Menus ....................................................................................................................................... 2
The Menu ........................................................................................................................... 1
Maintain Fishpro Control Data ............................................................................................ 1
Maintain System Codes ...................................................................................................... 1
Forms Codes ............................................................................................................................. 1
Maintain form codes ................................................................................................................. 2
Maintain species codes ............................................................................................................. 4
Maintain catch areas ................................................................................................................. 9
Maintain tax codes .................................................................................................................. 13
Maintain gear types ................................................................................................................ 18
Maintain delivery locations .................................................................................................... 26
Maintain landing status codes ................................................................................................ 31
Maintain packers .................................................................................................................... 34
Maintain quality codes ........................................................................................................... 38
Maintain company divisions................................................................................................... 41
Maintain catch reports ............................................................................................................ 45
Maintain deduction types ....................................................................................................... 49
FishPro
Samco Power Accounting
Table of Contents
TOC.1
Maintain expense types ........................................................................................................... 53
Maintain species exports ......................................................................................................... 56
Maintain Fishers .................................................................................................................. 1
Maintain Boats .................................................................................................................... 1
Add boats .................................................................................................................................. 2
Delete boat ................................................................................................................................ 6
Load boat file ............................................................................................................................ 9
Maintain Prices ................................................................................................................... 1
Update prices for a gear type .................................................................................................... 4
Fish Ticket Processing ........................................................................................................ 1
Process ticket ............................................................................................................................ 3
Print ticket edit list .................................................................................................................. 37
Post tickets .............................................................................................................................. 39
Tickets on hold report ............................................................................................................. 41
Undistributed tickets report..................................................................................................... 41
Automatic adjustments............................................................................................................ 41
Edit DFO transmission file ..................................................................................................... 49
Cheque/Receipt Entry ........................................................................................................ 1
History Menu ....................................................................................................................... 1
Boat report ................................................................................................................................ 2
Fisher report .............................................................................................................................. 5
Ticket report .............................................................................................................................. 8
Catch area report ....................................................................................................................... 9
Species report .......................................................................................................................... 12
Packer report ........................................................................................................................... 14
DFO Species report ................................................................................................................. 15
Quality code report ................................................................................................................. 17
Price adjustment summary ...................................................................................................... 19
Boat performance report ......................................................................................................... 20
Fish ticket reprint .................................................................................................................... 22
User defined reports ................................................................................................................ 23
Fish Tax History Report.......................................................................................................... 24
Year end price comparison ..................................................................................................... 26
FishPro
Samco Power Accounting
Table of Contents
TOC.2
Custom Reports ...................................................................................................................... 28
Reporting Menu .................................................................................................................. 1
Automatic earnings generation ................................................................................................. 2
Report on hirings ...................................................................................................................... 3
Recalculate EI amounts ............................................................................................................ 4
Print Record of Employment .................................................................................................... 5
Print T4 Forms ........................................................................................................................ 10
Print WCB report .................................................................................................................... 12
Third party demand report ...................................................................................................... 13
Inventory report ...................................................................................................................... 14
Print T5 forms......................................................................................................................... 15
Income tax collected report .................................................................................................... 17
Average weights calculation................................................................................................... 18
T4 Summary listing ................................................................................................................ 19
EI report .................................................................................................................................. 20
Settlement Summary report .................................................................................................... 21
Account balances report ......................................................................................................... 23
Fishers list ............................................................................................................................... 24
Utility functions Menu.......................................................................................................... 1
Print data integrity report.......................................................................................................... 1
Print documents ........................................................................................................................ 2
Skipper Number report ............................................................................................................. 3
Packer file export program ....................................................................................................... 3
Packer file import program ....................................................................................................... 5
Rebuild weight/pieces history .................................................................................................. 7
Recalculate ticket gross amounts.............................................................................................. 7
Reset ROE flags ....................................................................................................................... 8
Change posted ticket values ..................................................................................................... 9
Recalculate fisher earnings ..................................................................................................... 11
Salmon tax repayment ............................................................................................................ 12
Prior year settlement calc ....................................................................................................... 13
Recalculate YTD – EI adjustment .......................................................................................... 13
End of Period/Year Functions............................................................................................ 1
FishPro
Samco Power Accounting
Table of Contents
TOC.3
Print Reports from Disk ...................................................................................................... 1
File Utilities ......................................................................................................................... 1
Rebuilding Data Files ............................................................................................................... 9
Change Current Company .................................................................................................. 1
Journal Entries .................................................................................................................... 1
Enter a journal entry.................................................................................................................. 1
Changes to unposted documents ............................................................................................... 5
Delete journal entries ................................................................................................................ 5
Print journal edit list.................................................................................................................. 6
Post journal entries .................................................................................................................... 7
Cheque/Receipt Entry ............................................................................................................... 8
Packer Extension ................................................................................................................ 1
To install the Packer Program ................................................................................................... 1
To start up a new packer ........................................................................................................... 2
Process fish tickets .................................................................................................................... 2
Change prices ............................................................................................................................ 2
Trip start-up .............................................................................................................................. 2
Trip shutdown ........................................................................................................................... 3
Create DFO disk ....................................................................................................................... 3
Catch summary ......................................................................................................................... 3
Interest Charges.................................................................................................................. 1
Add interest ............................................................................................................................... 3
Change/Inquire interest ............................................................................................................. 4
Delete interest ........................................................................................................................... 4
Calculate interest charges ......................................................................................................... 5
Interest charges edit list ............................................................................................................ 6
Post interest charges .................................................................................................................. 7
Interest rates .............................................................................................................................. 7
Add interest rates ...................................................................................................................... 8
Change/inquire Interest Rates ................................................................................................... 9
Delete Interest Rates ................................................................................................................. 9
Print Interest Rate List .............................................................................................................. 9
Error Messages ................................................................................................................... 1
FishPro
Samco Power Accounting
Table of Contents
TOC.4
Help .................................................................................................................................... 1
____________________
FishPro
Samco Power Accounting
Table of Contents
TOC.5
Chapter 1
Fishpro Features and Terminology
Fishpro is designed for use by independent fish processing businesses. A customized
Accounts Receivable package is incorporated to handle the tracking of Fishers accounts.
The package includes features required most by fish processing companies.
These features include:
-
May be used either independently or integrated with General Ledger, Order
Entry/Billing, Inventory Control, Point of Sale, Purchase Order, and/or Job Cost
Supports multiple companies
Provides for multiple warehouses
Supports multiple tax codes
Provides for modification and deletion of tickets before posting
Optionally provides use of DFO information
Reports are available for tracking of area codes, landing status, delivery
locations, packers, gear types, Fisher, species and users
Multiple tickets for gear types
Fifty species can be entered on one ticket
Prices can be temporarily or permanently overridden
Creates automatic adjustment tickets based on user selection criteria
Will automatically calculate EI and Third Party Demands
Will print Records of Employment, T4F and T5 Forms, and a WCB report
Prices can be by weight or auto-piece count
Distribution to Fishers can be by dollars, percent or share
Includes optional password protection and backup/restore facilities.
Will calculate interest charged or earned on Fishers accounts
Product description - Accounts Receivable
The SAMCO Accounts Receivable package is designed for use by independent businesses.
FishPro
Samco Power Accounting
Features and Terminology
1.1
The package includes those features most asked for by thousands of users whose
experiences over the past eleven years with earlier versions of this package have helped
refine it to its current mature level. These features are described on the next page:
-
Handles both open item and balance forward customers
Provides maintenance and lists on both the salesman and customer files
Allows sales transaction entry, editing and posting, with edit list and journal
Allows for entry, editing and selection of recurring sales transactions
Allows cash receipts entry, editing and posting, with edit list and journal
Prints an aging report and statements in several different formats
Allows on-line customer account inquiry
Allows reports to be stored on disk to save computer time, then printed later
at your convenience
Allows use of multiple printers
Automatically calculates and posts finance charges, with edit list and journal
Controls sales commissions due and prints a commissions due report
Prints a report showing A/R distributions to the General Ledger
Prepares deposits
Prints deposit slips and a deposit summary
Prints a cash history report
May be interfaced to the SAMCO General Ledger, Job Cost, Order Entry/Billing
and/or Sales Analysis systems or used stand-alone
May be interfaced to SAMCO Cheque Reconciliation to reconcile the
chequebook into which payments from customers are deposited
Includes password protection and extensive data file integrity checks and
backup/restore facilities
Key Terminology
Following are definitions of key Fishpro and Accounts Receivable words used in this
manual.
Accounting
"Accounting" is the methodical collection, systematic categorization, and organized
presentation of financial records.
Accounts Receivable
"Accounts receivable" is the area of accounting dealing with the sales made by a
business, and with the money owed to it. It is often abbreviated "A/R" or "AR".
As used here, "account" means "a record of financial activity". And "receivable" means
"able to be received" or "due to you".
Adjustment ticket
FishPro
Samco Power Accounting
Features and Terminology
1.2
An adjustment ticket is used to adjust various details of a fish ticket which has been
posted. The most common use is to increase the price paid for one or more species of
fish. The adjustment ticket appears like a regular ticket except that the prices are
then changed from the original ticket. When an adjustment is made to an original
ticket, that ticket plus all corresponding adjustment tickets are merged into one as a
reference to adjust against.
Aging
To "age" means "to determine how old". In A/R, customer accounts are aged according
to how many days the amount they owe you remains unpaid. A/R provides four
different categories into which a customer's account can be aged. These categories
(called "aging periods") are typically set up as:
"Current"
"31-60 days"
"61-90 days"
"Over 90 days"
Although you can define different periods if you wish.
Each amount owed to you by a customer then falls into one of these categories, and the
categories can be totaled for each customer and then for all your customers.
Alphanumeric
When this manual refers to an "alphanumeric" entry, it means that the entry can be
letters of the alphabet, numerals (numbers), special symbols (*,&,%,$, etc.) or any
combination of all three kinds. In contrast, if an entry is specified as "numeric" (or
stated as "5 digits", for example"), only numbers can be used.
A/R Open Item file
The more permanent file into which the transactions are posted is called the A/R Open
Item file. This file contains every sale, debit memo, credit memo, cash receipt and
finance charge for every customer. It is the file which holds the complete, itemized,
current record for all of your customer accounts.
Association
Fishers may belong to one of a number of fishing association groups.
Auto-piece count
This is used when the weight of two or more species delivered is known but only a count
of fish for the group is taken. If selected, the auto-piece count will look at each
species average weight in the price file to distribute the count among the various
species based on the total weight of each species. The pieces caught are tracked
FishPro
Samco Power Accounting
Features and Terminology
1.3
throughout the Fishpro system and printed on some reports but the main reason to use
this calculation method is the requirement by DFO for DFO statistic reporting to be
supplied by Fishpro.
Boat
A boat is identified by a five digit CFV (Canadian Fishing Vessel) number issued by the
DFO. On the west coast, a boat crew can consist of 1 to 10 people. One crew
member, the first entered on fish tickets, is identified as the skipper. This skipper may
be a company. The money received from a catch is distributed to the crew as
determined by the gear type and skipper choice.
Book fish
Book fish and cash fish are used to determine EI eligibility, duration and EI benefit
payments. A skipper may be exempt if he is a company, but deckhands are considered
employees and are eligible for EI. Fishers may book the value of their catch into an
account and draw money from the account at a later date. Fish processing companies
may advance money or expense amounts to Fishers until they have a catch value from
which the company can deduct these expenses, and EI eligibility is based on catch value
before expenses. EI eligibility is considered by deckhand, not by fish ticket.
Cash fish
A Fisher can take cash for the catch. However, as the catch value is used for EI
determination, each member of the crew has his/her portion credited to them and then
the cash payment debited.
Catch area
DFO has published maps marking fishing areas. This catch area must be reported on
fish tickets for government reporting.
Catch tax
Currently, no catch taxes exist in Canada (at least on the west coast). The tax codes
for a ticket can automatically calculate an amount to deduct from the catch value, by
weight or pieces caught, and post to specific G/L accounts. Because the tax rates can
be negative, this feature can also be used to pay bonuses based on the catch.
CFV #
See Boat.
Cheque reconciliation
"Reconciliation" means "bringing into agreement". When reconciliation is applied to
FishPro
Samco Power Accounting
Features and Terminology
1.4
chequebooks, it means "bringing into agreement" the balance of your chequebook and
the balance shown on your bank statement.
Customer accounts
There are two generally accepted methods of keeping track of customer accounts.
SAMCO A/R allows you to use both methods:
Open item method: Under the "open item" method, each and every transaction made
against a customer's account is kept on the computer's disk until you decide to remove
the matching debits and credits.
The open item method allows you to apply each cash receipt (payment you receive) or
credit memo to one or more specific sales (invoices), debit memos or finance charges.
You can partially pay or skip specific items, applying payments to later items if you
wish.
Of course, the SAMCO package is always capable of calculating the total balance due
from an open item customer, and does so upon request. But the ability to look at
older, not fully paid invoices from back months can be helpful, especially for highly
active customers who pay by specific invoice number.
Balance forward method: The "balance forward" method of keeping a customer's
account typically results in all entries being summarized into a single "balance brought
forward" amount. When a payment is received from a balance forward customer, that
payment is always applied to the oldest unpaid item(s).
The balance forward method of controlling a customer's account is often useful for
customers who buy only occasionally and whose accounts usually contain only a few
entries.
Data organization
The information you enter is stored on your disk. In order for the programs to be able
to locate specific pieces of data (within large masses of data) and to be able to process
it logically, data must be organized in some predictable way. Fishpro and the
Accounting software organizes your data for you automatically as it stores it on your
disk. There are three terms you should understand about the way the data is
organized:
Character: a "character" is any letter, number or other symbol you can type on your
keyboard.
Field: a "field" (sometimes called a "data field") is one or more character(s)
representing a single piece of data. For example, a name, a date, or a dollar amount
are all fields.
FishPro
Samco Power Accounting
Features and Terminology
1.5
Record: a "record" is a group of one or more related fields. For example, the fields
representing a Fisher's name, SIN, address, and other pertinent information might be
grouped together into a record called the "Fisher record".
Data files
A "data file" is a collection of one or more related records. It is often referred to simply
as a "file" (without the word "data").
The Employee file is an example of a data file. Such a file could be made up of several
records, each of which contained the name, address, social insurance number, birth
date, marital status, pay-rate, etc., for one employee.
Each file is kept separately from other information on the diskette or disk. (There are
other types of files in addition to data files. For example, programs are stored on the
diskette or disk as "program files". However, references to "file" in this User Manual
mean "data file" unless specifically stated otherwise.)
Debits and credits
In addition to handling a particular area of accounting, as described above (such as
accounts receivable or accounts payable), each SAMCO package also keeps track of the
effect of those transactions on G/L. When you make sales to, or receive payment from
your customers, this activity affects not only A/R, but also G/L.
These transactions must be recorded both in the proper A/R customer accounts and in
G/L under the proper G/L account numbers.
The terms "debit" and "credit" refer to the types of transactions which must be recorded
in G/L accounts to accurately reflect the activity occurring in all accounting areas.
(See the Glossary for exact definitions of these terms.)
In A/R, a debit memo issued by you to a customer increases what that customer owes
you, and a credit memo decreases what is owed. Unfortunately, debit doesn't always
mean "a increase in an account" and credit doesn't always means a "decrease in an
account". In some accounting areas, a debit increases a G/L account and a credit
decreases a G/L account. In other areas, a debit decreases, and a credit increases, a
G/L account.
This occurs because of the system called "double entry accounting" (also called "double
entry bookkeeping") which is the standard method of accounting used today.
Directory
An index that operating systems, such as Linux, maintain on disk. The directory
contains an entry for each file.
FishPro
Samco Power Accounting
Features and Terminology
1.6
Document
As used in A/R, a "document" is the paper record of a transaction. Invoices, credit
memos and debit memos issued by you are all examples of A/R documents. (A "debit
memo" is a transaction which increases a customer's account. He owes you more as a
result of the transaction. The opposite is true of a "credit memo".)
Double entry accounting
The concept behind double entry accounting is that every transaction results in
balancing debit and credit entries into the General Ledger. Let's look at the debits and
credits involved when a typical independent business pays for goods or services bought
earlier on credit:
The debit: The disbursement (payment you make) results in a debit transaction which
decreases your "money owed to others" account (usually called the "accounts payable"
account). This is a "debit to accounts payable".
The credit: The payment also causes a credit transaction which decreases one of your
"cash on hand" accounts. This is a "credit to cash".
So two entries are made into G/L which balance each other. These balancing entries
form the basis of double entry accounting. If you or your accountant ever find your G/L
accounts "out of balance", it means that the proper balancing entries were not made.
No attempt is going to be made in this manual to teach you all about accounting,
especially about what types of transactions cause what accounts to be debited or
credited. Unless you're an accountant or fully responsible for maintaining your
company's General Ledger, don't worry if you don't remember whether a debit increases
or decreases a particular type of G/L account.
When using RealWorld A/R, you will occasionally be asked to enter the G/L account to
be debited or credited. Just refer to the appropriate chapter in this User Manual,
where you'll find exact instructions about what to enter.
Within General Ledger, Accounts Receivable, Accounts Payable, Payroll, Inventory
Control, Order Entry/Billing, Job Cost, and Purchase Order, SAMCO software
automatically takes care of all double entry accounting as you make the required
entries on the screen.
DFO
Department of Fisheries and Oceans. It is the federal governing body for the fishing
industry.
DFO form code
When reporting to DFO, either via the DFO RAW file feature or via copies of individual
FishPro
Samco Power Accounting
Features and Terminology
1.7
fish tickets, codes for species and form codes, as specified by DFO, must be used even if
they are different than the internal codes used by a company. The form code is a DFO
specified code that identifies how the fish was delivered including dressed, head-on/off
and initial processing by the Fishers.
Field
A "field" (sometimes called a "data field") is a collection of one or more characters
representing a single piece of data. For example, a name, a date, and a dollar amount
are all fields.
Fish processing
Most fish processing companies buy fish directly from commercial fishing boats and
optionally process this fish into other forms. The Fishpro package handles the buying
aspect of fish processing.
Fish days
Each fish ticket corresponds to a trip made by a boat. The number of days fishing is
reported to DFO and should not exceed the limit set by DFO.
Fish ticket entry
This is the process of entering fish ticket information into a computer system. Tickets
can be entered, changed and deleted up to the point where they are posted. The
posting makes them permanent and updates the various Fishpro history and A/R files.
Gear types
A gear type is the type of gear used on a fishing boat to catch fish or other products.
Often prices differ for the same species caught using different gear types and fish
processing companies usually prefer history information reported by gear type.
General Ledger
When your company makes sales and receives payments, this activity affects not only
accounts receivable, but also the area of accounting called "general ledger".
General ledger is the area of accounting where the records from all areas of accounts
are brought together to be classified and summarized, thereby creating a "financial
statement" of the overall condition of the company's finances.
As used here, "general" means "pertaining to many areas". General ledger is often
abbreviated "G/L" or "GL".
FishPro
Samco Power Accounting
Features and Terminology
1.8
"Ledger" means a book where accounting records are kept. (This term evolved from
pre-computer times when account records were kept exclusively by hand in large books
called "ledgers".)
General ledger account
A "general ledger account" is a specific category under which all financial activity of a
certain kind is classified. General ledger account is often abbreviated "G/L account".
Accountants are experts at defining the various G/L accounts needed by a business.
Part of the definition process involves assigning an "account number" to each G/L
account.
Independent businesses usually use a 3 or 4 digit account number. For example, you
may have a G/L account called "100 - Cash in the bank", one called "200 - Sales of
Product A", and one called 210 - Sales of Product B".
Typically, an independent business will have a hundred or more G/L accounts. Each
time any financial activity occurs, the dollar amount of the activity is recorded under
the appropriate G/L account numbers.
The financial activity in your accounts receivable area must be categorized by G/L
account number so that your accountant can manually transfer such information into
the general ledger he keeps for you. Of course, if you're also using SAMCO General
Ledger, this information can be transferred automatically into that package.
Glazed percent
The percentage allowable for water.
Gross amount
The gross amount refers to the value of the catch earned by deckhands. The total of all
deckhands gross amounts is the gross amount for the boat for that catch.
Help
At any time while running a SAMCO package you can press the "Help" key - F10 on most
keyboards. A brief explanation of the particular function you are using will then
appear on your screen.
Herring catch area
DFO requires a second five digit catch area for herring. This field is requested at ticket
entry if the gear type for the ticket specifies that an alternate area code is required.
Integrated
FishPro
Samco Power Accounting
Features and Terminology
1.9
When a set of accounting packages is "integrated", any data generated in one area and
needed in another area is automatically supplied to that other area. You don't have to
enter the data twice.
Inventory Control
The "control" of inventory includes being able to regulate or know what goes into
inventory and what goes out of inventory. This includes knowing the value of what is in
inventory at any time. Inventory Control is often abbreviated as "I/C".
Landing status
DFO requires reporting of the landing status of the fish. The standard code is 01 for
commercial fishing and there are other codes for things such as test fishing and seized
fish.
Maintaining files
As used here, the word "maintain" means to "keep up-to-date". Therefore, "file
maintenance" or "maintaining a file" means keeping a data file up-to-date.
Multi-company
"Multi-company" refers to the capability to do accounting functions for multiple
companies with the same set of packages. A user wanting to do accounting functions
for more than one company on SAMCO packages can select the "multi-company" option.
Multiple ticket tax codes
Each ticket can have up to three tax codes to represent different taxes applied to a
ticket.
Packer
A packer is a boat that goes out to active fishing areas to buy fish directly from fishing
boats on behalf of the fish processing company and then brings the fish in themselves.
Plants
Same as delivery or receiving station.
Post transactions
To "post transactions" means to take transactions from a temporary file and move them
to a permanent file (where other transactions probably already exist). For example,
sales transactions are initially entered into a temporary transaction file. After sales
transactions have been entered and edited, they are posted to the more permanent A/R
Open Item file (defined below).
FishPro
Samco Power Accounting
Features and Terminology
1.10
Often, during transaction posting, information in other data files in also updated. For
example, when sales transactions are posted, the account balance and historical sales
figures in the Customer file are also updated.
Purging files
As used here, "purge" means to remove unnecessary items. The A/R Open Item file is
occasionally purged of matching entries. Fully paid sales (or debit memos) and their
matching cash receipts (and credit memos) are deleted from the file.
Any unpaid sales, debit memos, and finance charges, and any un-allocated cash receipts
and credit memos, are kept on the A/R Open Item file, even if the file is purged.
Receiving stations
A company may have several locations where Fishers may deliver fish. The company
assigns codes to each of these locations to enter on the fish ticket.
Record
A "record" is a collection of one or more related fields. For example, the fields
representing a customer's name, address, and account balance could be grouped
together into a record called the "customer record".
Royalties
Another name for catch taxes.
Seine statements
A style of report for the Seine gear type indicating the exact distribution of the catch
value to the deckhands and owners of the boat.
S.I.N.
Social Insurance Number. Since the Fishpro system is to be used to print T4 and T5
forms for the Fishers, the A/R account number used must be the Fisher's SIN number.
Skipper
As used here, the skipper is the first crew member entered on the ticket during ticket
entry.
Species catch history
This is a report provided by the system to detail what has been caught over a period of
time.
FishPro
Samco Power Accounting
Features and Terminology
1.11
Species codes
Each species a company will buy from Fishers is assigned a species code by the company.
This code can be a number, an abbreviation or any other combination of letters, digits
and/or punctuation. Since the species determines the default price, a species could
be split into several codes, for example, by weight.
Spool
SPOOL is an acronym which stands for "Save Printer Output Off-Line". Spooling is a
technique that allows a report to be printed at a later time. Instead of a report going
directly to a printer when you print from within a function, it is saved as a disk file
(which is much faster).
T4 forms
These are printed at the end of the year to indicate the earnings of a Fisher over the
year for fish sold to the fish processing company.
Third party demand
The government often issues a demand to withhold earnings from a specific deckhand.
This amount can be entered in the Fisher's A/R account file and will automatically be
deducted if this Fisher appears on a fish ticket. The system will create a cheque
payable to the government agency or financial institution specified.
Ticket entry
The process of entering fish tickets into the system.
Ticket tally
This report is a summary of the tickets entered into the system before they are posted.
It is a means of verifying corrections to tickets before they are posted.
Transactions
As used in accounting, "transaction" means a business event involving money and goods
or services. For example, a transaction occurs each time you gas up your car: you pay
money in exchange for gasoline (goods). Or another example: you give a television set
(goods) to your neighbor in exchange for the use of his lake cottage (services).
Since computer software deals primarily with business events which have already taken
place, in SAMCO software "transaction" means the record of a completed business event
involving money and goods or services.
FishPro
Samco Power Accounting
Features and Terminology
1.12
The records of sales made and payments received are examples of A/R transactions.
The records of goods and services purchased by you are transactions which are found in
the accounting area called "accounts payable". The records of quantities of goods
received are transactions you find in the area of accounting called "inventory control".
In SAMCO software, transactions are usually entered into the computer and stored in a
temporary file, where they can be edited until completely correct, then moved into
more permanent areas. (See the definitions of File, Record, and Posting later in this
chapter.)
Trip history
The Fishpro System retains a history of tickets posted which feeds many of the reports in
the system.
Trip days
The number of days spent on a trip which must be reported to the government.
_____________________________
FishPro
Samco Power Accounting
Features and Terminology
1.13
Chapter 2
Getting Started
Introduction
We assume, at this point, that the Fishpro package has been installed on your computer
according to the SAMCO Installation Guide. If not, refer to that manual and install the
package on your computer.
We also assume that you have familiarized yourself with the main features of this
package by reading the chapter titled Understanding SAMCO Fishpro. If you have not
done so, read that chapter and return to this chapter.
The Fishpro package not only allows you to automate your fish processing accounting
but all your accounts receivable. If you wish to make use of all the capabilities of the
package you will need to follow all the steps in this manual. If you are automating your
fish processing accounting only, then follow the instructions for Fishpro only.
In order to use Fishpro, you must first enter information describing your
company and how you want the package to handle your information. If you intend to
use the A/R package for all your accounts receivable, you will need to enter certain
data regarding your current accounts receivable status. First you must study the
chapter titled General Rules.
Your accountant
We advise that you consult with your accountant before using SAMCO software. He or
she is a professional in the accounting area, and should understand your computer
accounting software if he/she is to continue to serve you well. Moreover, because of
his/her expertise, your accountant may have some good advice for you regarding
converting from your old system to SAMCO software.
FishPro
Samco Power Accounting
Getting Started
2.1
The Fishpro and Accounts Receivable data files
In order to use this package, you first need to enter certain data specific to the fishing
industry, your company, and how accounting functions are to be handled.
There are 9 different Fishpro and 8 different A/R data files (if necessary, see the
definition of "data files" in the chapter titled Understanding A/R and Fishpro) which you
must enter information into before you can begin using the package on a regular basis.
Fishpro data files
FISHPRO Control file
This file contains certain "control information" you must enter. This information
defines the parameters for tickets, EI, WCB, A/R accounts, DFO information and
defaults for frequently entered data such as delivery locations.
For example, one of the pieces of information in the F/P Control file determines the
number of the next cheque as it is entered during processing.
BOAT file (DIST. and HIST.)
This file stores a record of each boat by its CFV#.
HIST file
Within the History file there are five sub-files: Ticket, Catch, Distribution, Detail, and
Boat history.
Stored in this file is the history information from all posted tickets. This information is
used for all reports in the History menu. It is also needed for functions such as
Automatic Adjustments and Print Records of Employment.
CODES file
There is two sections to the CODES file: Accounts Receivable and Fishpro. All codes
stored in these two files are user-defined. The A/R contains ship-via codes, terms
codes (not used by Fishpro) and tax codes.
Stored in the Fishpro codes file are all codes entered in the Maintain system codes
function. These include form codes, species codes, valid catch areas, tax/bonus
codes, gear types, delivery location codes, landing status codes, boat association codes,
packers and user codes.
FishPro
Samco Power Accounting
Getting Started
2.2
PRICE file
The prices defined for each valid species by each valid gear type are stored in this file.
INVENTORY file
This file contains PTD and YTD totals for each species caught. Each time tickets are
posted, these totals will increment.
FISHER/CUSTOMER file
The Fisher/customer file stores all information in the Maintain Fisher/customer
function, such as name, address, skipper status, gross earnings and EI paid.
TICKET file (DIST. and HIST.)
This file stores all unposted ticket information. Included in this file are two sections.
One to store ticket catch information, the other the deckhand distribution detail.
Once tickets are posted, their related information is cleared from this file.
BOAT DISTRIBUTION file
Stored in this file are records of who was most recently on each boat and what their
share of the catch was for that trip. This information appears when the next ticket for
that boat is entered. The default distributions can be changed using the Maintain boat
deckhand distributions function in the chapter titled Utility Functions.
The Accounts Receivable data files
A/R CONTROL file
This file contains certain "control information" which you must enter. This information
defines the way you do your accounting and, as a result, controls some of the features of
the SAMCO packages.
For example, one of the pieces of information in the A/R Control file determines how
you calculate finance charges on past due accounts.
Another piece of information tells the SAMCO packages whether or not you have Sales
Reps in your company. Since this information controls many of the options available in
other SAMCO packages, it is important that you enter it correctly.
VALID G/L ACCOUNT file
This file is necessary and common to all accounting functions. All General Ledger
accounts to which A/R activity may be distributed (allocated) must be entered into this
FishPro
Samco Power Accounting
Getting Started
2.3
file. The number and description from your G/L Chart of Accounts for each of your
sales accounts, credit and debit memo accounts, freight accounts, sales tax accounts,
finance charges accounts, etc., must all be entered into this file.
CODES file
This file contains codes for the shipping methods you use to ship goods to your
customers, the terms you use with them, and the sales taxes you must charge them.
You create these codes. For example, you could choose the code UPS to mean "ship via
United Parcel Service", N30 to mean "2% 10, Net 30 days", and CAL to stand for the sales
tax you charge California customers.
SALES REP file
If your company doesn't use Sales Reps, you don't need to enter any data into this file.
Otherwise, this file contains the codes for your Sales Reps. (Typically, the code is
either a number or the Sales Rep's initials.) For example, you might use "TQA" as the
code for Thomas Q. Anderson.
CUSTOMER file
This file contains the basic information about your customers, such as name, address,
credit status, usual shipping method, terms, sales tax status, and year-to-date
statistics.
A/R OPEN ITEM file
In A/R, an open item is any sale, credit or debit memo, cash receipt, finance charge or
balance forward transaction on file for any customer. The A/R Open Item file is simply
the collection of all open items for all customers. It is arranged by date of transaction
for each customer.
Build the data files
You are now ready to build the data files required for the A/R and Fishpro packages.
First study the chapter titled General Rules. Then start with the menu according to the
instructions in the chapter titled The Menu.
Follow the next chapters (in sequence) to:
1. Build the VALID G/L ACCOUNT file, using the chapter titled Maintain Valid G/L
accounts in the System Functions manual.
2. Build the A/R CONTROL file, using the chapter titled Maintain A/R Control data in
the Accounts Receivable manual.
3. Build the FISHPRO CONTROL file, using the chapter titled Maintain Fishpro
Control data.
4. Build the FISHER file, using the chapter titled Maintain Fisher data.
FishPro
Samco Power Accounting
Getting Started
2.4
5. Build the FISHPRO CODES file, using the chapter titled Maintain System Codes.
6. Build the A/R CODES file, using the chapters titled Maintain Ship Via codes,
Maintain Terms Codes, and Maintain Tax Codes in the Accounts Receivable
manual.
7. Build the SALES REP file, using the chapter titled Maintain Sales Rep Data in the
Accounts Receivable manual.
8. Load the A/R OPEN ITEM file, using the chapter titled Load A/R Open Item Data in
the Accounts Receivable manual.
9. Set the customer balances, using the chapter titled Set Customer Account
Balances in the Accounts Receivable manual.
10. Run the Print Data Integrity Report function. If there is a difference between
the actual and calculated values, set these equal at this point.
Regular use
When you have finished building your data files as outlined above, your are ready to use
the FISHPRO in your day-to-day activities. The remaining chapters in this manual show
you how to:
Day-to-day activities for Fishpro
-
Process ticket entry transactions
Make automatic price changes
Print various reports
Print a Data Integrity Report
Close out the period and the year
Maintain boats
Maintain Fishers
Maintain system codes
Cheque/Receipt entry
Day-to-day activities for A/R
-
Enter sales transactions, including debit and credit memos and invoice charges
Enter and select recurring sales transactions
Process journal entries
Process cash receipt transactions
Change an apply-to number or due date
Inquire into a customer's account
Calculate and process finance charges
Calculate and process interest charges
Print the A/R Aging Report
Print Customer Statements
Print the Commissions Due Report
Print the A/R Distribution to G/L Report
Process cash history
FishPro
Samco Power Accounting
Getting Started
2.5
-
Maintain bank accounts
Prepare deposits
Print deposit slips
Print the cash history report and deposit summary
Functions for purging the A/R Open Item file and performing the period-end procedures
are explained in the chapters titled Purge A/R Open Item File and the chapter titled
Process End of Period.
Appendix A contains most of the error messages that can occur when using SAMCO
Fishpro. (The separate SAMCO Installation Guide contains an appendix listing a few
additional error messages that can occur.)
Appendix B explains how to use the "Help" feature built into the packages. "Help"
provides descriptions of functions and can be viewed on the screen while you are
running those functions.
In each chapter you are told in more detail what the function does, how to select from
the menu, and how to enter the data required for the function. Examples of data entry
are given for almost every possible entry on the screen.
_____________________________
FishPro
Samco Power Accounting
Getting Started
2.6
Chapter 3
General Rules
Introduction
This chapter contains a description of the rules that apply throughout the functions in
the SAMCO packages.
The rules are described in this order:
-
Menus
The ENTER key
Skipping data items
Defaults
"First" and "Last"
Characters and digits
Entering decimal points
Entering dates
The END key
The ESCAPE key
The F1 and F2 keys
The F3 key
The F4 key
The F5 key
The F8 key
The F10 key
Entering lower case letters
Turning off and re-booting your computer
Data entry errors
Correcting data during entry
Printing reports
Selecting where to print reports
Displaying reports in your screen
FishPro
Samco Power Accounting
General Rules
3.1
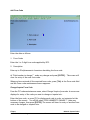
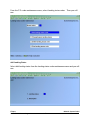
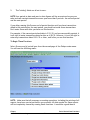
Menus
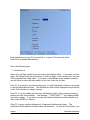
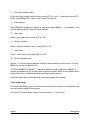
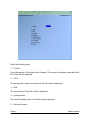
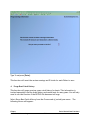
A "menu" is a list of things from which something can be selected.
Nearly all of the functions of this SAMCO package are shown on the package's menu,
which is displayed when you start the package. To perform a function, type the
number of the function (as shown on the menu), then press ENTER. For example,
here's a small sample menu:
Please select
1. Function A
2. Function B
3. Function C
To perform function B, type 2 and then press the ENTER key.
ENTER key
Always end every entry of data into a field by pressing the ENTER key. In this manual
every entry you are requested to make is written in bold type. After typing that entry,
you then press the ENTER key (on some computers, the ENTER key is labelled "RETURN"
or *return symbol*)
Because you end every typed entry by pressing ENTER, we have omitted the word ENTER
or (ENT) in the typing instructions. Thus, an instruction to "type 2 and then press
ENTER" is written: "Type 2."
When you use the F1, F2, F8, and F10 keys (described later in this chapter), you do not
have to press ENTER.
Skipping data items
Data items (called "fields") that do not require an entry may be skipped by pressing
ENTER.
For example, there may be three lines available for the customer address on the screen,
but you need only two for the particular customer you are entering. When you get to
the third line, skip it by pressing ENTER.
Defaults
A "default" is the entry the computer will automatically make if you don't enter
something different.
There are many places in SAMCO packages where you can simply press the ENTER or F1
key and the computer will default to some logical choice. For example, d date entry
FishPro
Samco Power Accounting
General Rules
3.2
will often default to either today's date or to the last date entered when you press
ENTER.
Questions requiring a yes (Y) or no (N) usually show the default answer on the screen in
the position where your answer would appear if you typed something. (Example:
DISPLAY THIS REPORT? N) If you wish to accept the default (in the example, N for No),
press ENTER. If you do not wish to use the default answer, enter your chosen answer
instead (in the example, you would enter Y for yes).
Some defaults are prompted by a message (a "prompt") near the bottom of your screen,
similar to this: "PRESS F1 TO DEFAULT TO 0010-020 MISC. EXPENSES". (See explanation
of F1 and F2 keys below.) A common use of the F1 default is when an entry screen first
appears. A prompt appears, stating a choice like: "ENTER THE ITEM # OR PRESS F1 FOR
FIRST ITEM".
Sometimes, you are given a choice of defaults, one being shown in the field (which you
can select by pressing ENTER) and the other being an "F1 prompt" (which you can select
by pressing F1).
A common use of a choice of defaults is when you are selecting a range of numbers to
print. You may enter either a starting # or press F1 to default to "First" (first number on
file). After you have done some the cursor moves to the ending # field and a prompt
appears, stating a choice of entering an number, pressing F1 for "Last" (last number on
file), or pressing ENTER to choose the same number as the starting #. (You can press
ENTER only if you had entered a number for starting #, instead of pressing F1 for "First".)
"First" and "Last"
Often, a message like "ENTER ACCOUNT OR PRESS F1 FOR FIRST ACCOUNT" appears.
"First" refers to the first account in the Account file. "Last" is treated similarly.
If the entry field ("ACCOUNT" in this example) requires a number entry, then "First"
means the lowest-numbered account on file, as you would expect. However, if the
entry field requires an "alphanumeric" entry (characters such as letters, numbers and
special symbols, as in a customer number or item number), then "First" means the
customer number or item number that would appear at the beginning of a list sorted
alphanumerically. "Last" refers to the customer number or item number that would
appear at the end of such a list.
Refer to the appendix titled Technical Notes for an explanation of how alphanumeric
characters are stored.
Characters and digits
In this User manual, if an entry field is specified as "up to 3 digits", it means up to 3
numeric digits. Only numerals and decimal point are allowed. If an entry field is
specified as "up to 3 characters", it means up to 3 alphanumeric characters. Numerals,
letters and special symbols are allowed.
FishPro
Samco Power Accounting
General Rules
3.3
Entering decimal points
If an entry field allows decimal places, the decimal point must be entered if the digits to
the right of it are not zero. For example, to enter "twelve dollars and fifty cents", you
must enter either 12.5 or 12.50, and you must type the period.
If all the digits to the right of the decimal point are zero, you do not have to enter either
the decimal point or the zeros. For example, to enter "twelve dollars and zero cents",
you could enter either 12 or 12. or 12.0 or 12.00.
If the digits to the right of the decimal point are zero and were not entered, the decimal
point and the zeros will still display.
Entering dates
Enter all dates in the format MMDDYY (six numeric digits, with no slashes). The date
will automatically be re-displayed in the format "MM/DD/YY" (with the slashes). Dates
are checked to make sure that the month and the day are valid. For example, for
"October 9, 2005", enter 100905. (A date such as "February 30, 1991", entered as
023091, will not be allowed.)
The END key
The END key is used to end a function and return to the previous screen display. (On
some computers, there is no key labelled "END". If this is the case with your computer,
or if the END key does not produce the expected results, refer to the chapter in your
SAMCO Installation Guide entitled Special Keys.) On some computers, the TAB key
performs the END key function.
The ESCAPE key
In many places, you may press the ESCAPE key (labelled "ESC") to cancel a data entry
screen before its normal end. You may also use the F8 key to do this. (On some
computers there is no key labelled "ESC". If this is the case with your computer, or if
the ESC key does not produce the expected results, refer to the chapter in your SAMCO
Installation Guide entitled Special Keys).
The F1 and F2 keys
The F1 and F2 keys (function 1 and function 2) are used for various purposes. Wherever
F1 and F2 are allowed, either this manual will explain their use, or their use will be
clearly explained on the screen.
(On some computers there are no keys labelled F1 and F2. If this is the case with your
computer, or it the F1/F2 keys do not produce the expected results, refer to the
chapter in your SAMCO Installation Guide entitled Special Keys.)
FishPro
Samco Power Accounting
General Rules
3.4
The F3 key
The F3 key is used to 'jump' from one module to another. A jump window will be
opened and all you need to do is enter the two character designator for the module that
you want to 'jump' into. The function of this key is fully detailed in the SAMCO
Installation Guide.
The F4 key
The F4 key is used to display the 'system identification' window. The information
displayed includes: company name, company number, software release date,
operating system, user id, date and time.
The F5 key
The F5 key is used open up the 'Extended Functions' window. This window allows
access to the following: the system gateway, a calculator, a personal and system
notepad, and the find functions for customers, vendors, items, g/l accounts, and
employees. A full explanation of the 'Extended Functions' window can be found in the
SAMCO System Functions User Guide.
The F7 key
The F7 key is used to repaint the screen. This is useful if your screen has had other
information typed over the SAMCO screen. You can hit the F7 key and the original
SAMCO screen, with existing entries, will be re-displayed.
The F8 key
The F8 key is used like the ESCAPE key. In many places you may press the F8 key to
cancel a data entry screen before its normal end.
The F10 key
The F10 key is the "Help" key. At any point in any SAMCO package, when a program is
waiting for you to enter some data, you can press F10 to get "Help". When you press
F10, information about the current function you are using will display on the screen.
Entering lower case letters
Sometimes, when you enter lower case letters, these will be changed automatically to
upper case. This means that lower case letters aren't allowed right there. You can
continue to enter lower case letters if you wish, but they'll be automatically converted
to upper case.
Many data items (such as names and addresses) can contain lower case letters, so feel
free to use them if you wish.
FishPro
Samco Power Accounting
General Rules
3.5
Turning off and re-booting your computer
Never shut your computer off or "re-boot" in the middle of a SAMCO function. Wait
until you are at the operating system prompt before turning your computer off. If you
shut your computer off or re-boot in the middle of a SAMCO function, you can cause your
data files to become corrupted (fouled up).
Data entry errors
There are several types of errors that can be made while entering data in a SAMCO
accounting package. Nearly all of these errors (except typing errors) will be caught by
your SAMCO software. For each error, an appropriate message will be displayed at the
bottom of the screen.
Usually, the correction will be obvious. However, if it is not, refer to the chapter in
this User Manual for the function you are using or to the appendix titled Error Messages.
Correcting data during entry
NOTE: The keys described below do not work in the same way on all computers. If they
do not work in the way described on your computer, refer to the chapter of the
Installation Guide titled Special Keys.
You can correct the data you are currently entering, before you press the ENTER key, by
using the left and right arrow keys. If you are entering data in a field and you notice
you have made an error earlier in the field, you can use the left arrow key to return to
the point of the error and make the correction, then use the right arrow key to return to
where you were.
When you select a data field, using "FIELD NUMBER TO CHANGE ?", the previous entry
will often continue to appear in the field. You can correct the entries that continue to
appear by using the arrow keys and the keys described below.
When you are at the point of the error, you can do these things:
Delete the character at the cursor, using the DEL (delete) key. When you do this, the
characters immediately to the right of the cursor all shift over to the left.
Delete the character immediately to the left of the cursor by pressing the BACKSPACE
key (top right-hand part of the keyboard).
Type over the characters that appear, starting from the cursor position and going to the
right. This is called "overtype" mode.
Insert characters in front of the character the cursor is under. To do this, press the INS
key on the numeric keypad. This takes you out of "overtype" mode and puts you into
"insert" mode. If you press the INS key again, you will return to "overtype" mode.
FishPro
Samco Power Accounting
General Rules
3.6
If you decide to erase all contents of a field, press CTRL and X at the same time. This
clears the field, and the cursor appears at the beginning of the field for a new entry.
If you hold down the CTRL key while pressing the ENTER key, all characters from the
cursor position to the right will be deleted.
NOTE: On some computers, the left arrow, right arrow, DEL and INS keys are on the
numeric keypad. In order for them to function as described above, you must not have
NUM LOCK turned on. If NUM LOCK is on, pressing these keys will have the same effect
as entering numbers into the field.
Printing reports
At any time while a report is being printed, you can press F1 to stop the printer. After
pressing F1, you can either press F1 again to resume printing, or press ESC to cancel the
report.
A number is automatically assigned to each report as it is printed to help you track the
repots you have printed.
Selecting where to print reports
Throughout this package, when you choose to print a report, you are given a choice of
printing it right away on a printer, displaying it on the screen (unless the printed report
is required for an audit trail), or printing it to disk.
Printing to disk: When you run a function that prints a report, you can specify that you
want it to be stored on disk for later printing. Using this capability, you can save
reports until a printer is available, then print several or all reports at once. Printing to
disk is usually a lot faster than printing on a printer.
Printing from disk: Later, when you wish to print the reports that were stored on disk,
you can print one or all of them. This gives you the ability to store reports for one long
print run (for example, overnight).
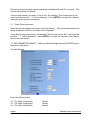
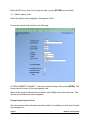
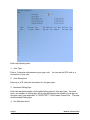
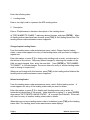
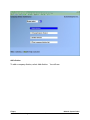
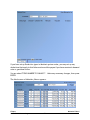
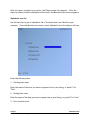
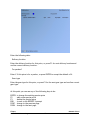
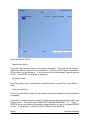
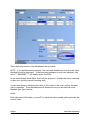
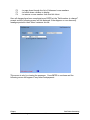
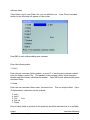
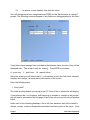
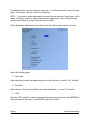
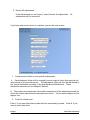
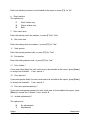
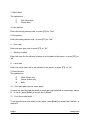
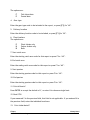
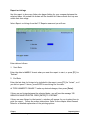
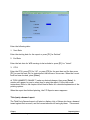
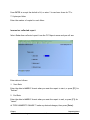
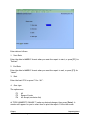
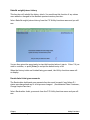
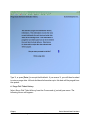
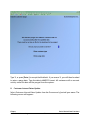
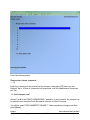
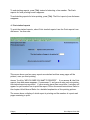
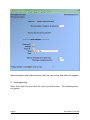
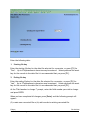
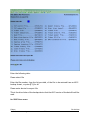
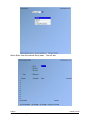
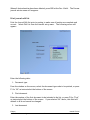
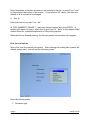
"How to print" menu
In every function that prints a report, after you have specified the parameters for the
report (range of items to print, order of printing, etc.), you see a window appear similar
to the one below.
FishPro
Samco Power Accounting
General Rules
3.7
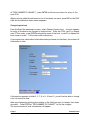
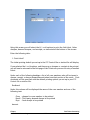
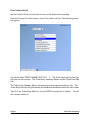
Make a selection, or F10 for help at any time
NOTE: If you specified fewer than fifteen printers in the Maintain System Printers
function, only the specified printers appear on the menu. DISPLAY ON SCREEN does not
appear for reports that are required as an audit trail. For an audit trail report, a
printed copy is essential.
Also, the "Local print" option is only available for Linux users.
Reports which are classified as special forms can only be immediately printed, so
DISPLAY ON SCREEN or PRINT TO DISK do not appear. Special forms include payroll
cheques, A/R statements, invoices, quotations, purchase orders, etc.
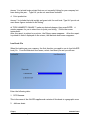
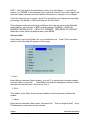
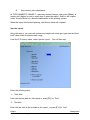
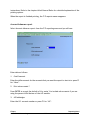
1. SEND TO PRINTER 1
From the "how to print" menu, type 1 to print the report on printer 1.
2. thru 15. SEND TO PRINTER 2 thru 15
FishPro
Samco Power Accounting
General Rules
3.8
From the "how to print" menu type 2,3,4, thru 15 (if printers 2,3,4, thru 15 are
displayed) to print the report on the selected printer.
L. LOCAL PRINT
From the "how to print" menu, type L to print the report on the terminals local printer.
S. DISPLAY ON SCREEN
From the "how to print" menu, type S to display the report on the screen.
D. PRINT TO DISK
From the "how to print" menu, type D to store the report on disk.
After you select one of the options above, you are asked "ANY CHANGE ?". Answer Y
and change your selection, or answer N to execute your selection.
Displaying reports on your screen
Instead of printing on a printer or to disk, you can display on your screen any report not
required for an audit. By displaying a report, you get faster access to the information,
especially when the printer is not available.
To display a report on the screen, instead of printing it, choose "DISPLAY ON SCREEN"
from the "how to print" menu.
If you press the F1 key at any time, the screen "freezes". The bottom line on your
screen then shows
"PRESS F1 TO CONTINUE, F2 TO SHIFT DISPLAY, ESC TO CANCEL".
Pressing F2 lets you see the 80 columns on the right, instead of the 80 in the left. Using
F2, you can shift back and forth as many times as you like. Pressing F1 again will cause
the report to continue displaying.
A report number is automatically assigned to each report as it is printed. However,
when you display a report, it appears on your screen without a report number, and a
report number is not used.
When you post transactions, you are not allowed to display the report. It must be
printed, in order to preserve the audit trail.
____________________________
FishPro
Samco Power Accounting
General Rules
3.9
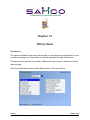
Chapter 4
The Menu
Introduction
The menu displayed on the screen depends on the SAMCO modules you have installed or
which one of the modules you are using to perform your tasks. The menu is used to
select the functions you wish to perform.
To begin this function
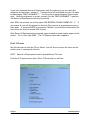
If you're running LINUX or UNIX:
You must change directories to the directory where you installed your software. For
example, type cd(space)/usr/ssi. This changes the current directory to "ssi", or
"/usr/ssi", where the package is installed. Then type MENU and then select Fish
Processor from the menu which appears.
If you're running VMS:
You must set the default directory to the one where your data files are located. Then
type MENU to go to the main menu. In either case, a title and copyright screen
appears. To release this screen, press [ENTER].
NOTE: "VMS" is the name of the operating system for users of VAX model machines
produced by Digital Equipment Corporation. Where VMS procedures are different,
alternate text appears such as "For VMS users".
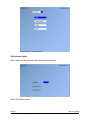
If you are using the multi-company feature of the SAMCO packages (see the System
Functions User Manual chapter titled Maintain Multi-Company Data), you will next be
asked to enter the Company-ID. This is a 2-character code specifying the company you
want to process.
FishPro
Samco Power Accounting
The Menu
4.1
NOTE: This code must have been previously set up in the Multi-Company file
described in the System Functions User Manual.
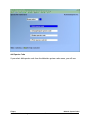
Enter the code, then press [ENTER]. You are then asked "RIGHT COMPANY ?". If it is,
press [ENTER] to default to Y; if not, answer N and enter the Company-ID of the right
company.
If you enter an incorrect code or a code which has not been setup in the Multi-Company
file, the message "COMPANY NOT FOUND" will be displayed and you will be prompted for
another company number.
Next, you may be asked to enter your initials. If so, simply enter your initials (up to
three characters), then press [ENTER]. (If you're not asked for your initials, go on to the
next paragraph.)
You may then be asked to enter your password. (If no password is requested, go on to
the next paragraph.) Be sure to press [ENTER] after typing your password. If you enter
the wrong password, an error message will display, and you'll be given another chance
to enter the correct password. You may end at this point by pressing [TAB].
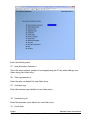
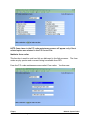
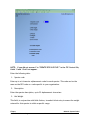
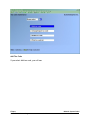
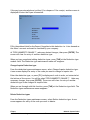
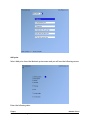
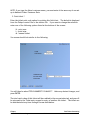
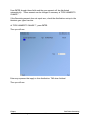
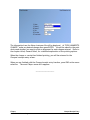
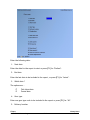
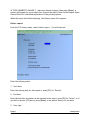
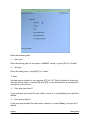
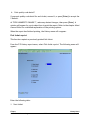
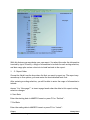
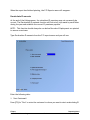
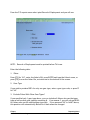
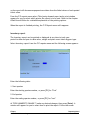
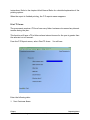
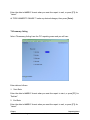
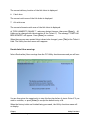
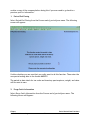
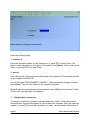
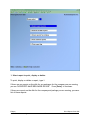
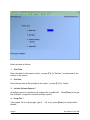
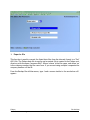
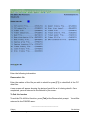
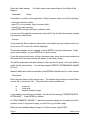
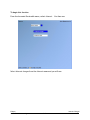
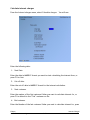
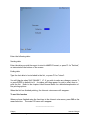
The main menu now appears:
FishPro
Samco Power Accounting
The Menu
4.2
The packages listed here will depend upon the selections defined for this company data
in the Maintain Company data function. Refer to the chapter titled Getting Started.
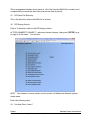
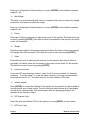
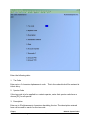
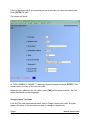
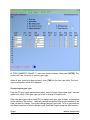
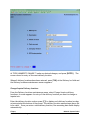
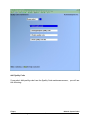
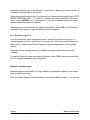
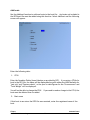
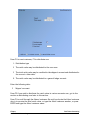
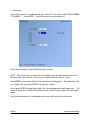
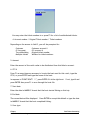
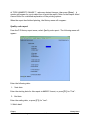
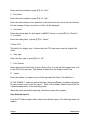
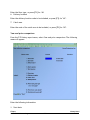
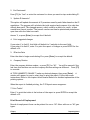
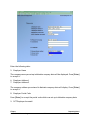
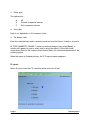
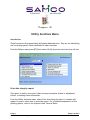
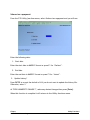
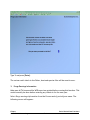
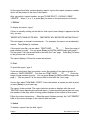
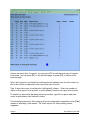
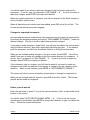
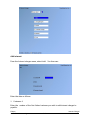
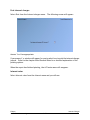
Fish Processing menu - page one
From the main menu, select the number corresponding to Fish Processor and press
[ENTER]. The following screen will appear:
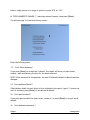
FishPro
Samco Power Accounting
The Menu
4.3
Make a selection, or press [F2] for more selections, or [F11] for help at any time
The functions that you will be using most often (such as Process fish tickets, Maintain
fisher, etc.) are on the first page of the Fishpro menu.
Fish Processing menu - page two
To get to the Fishpro menu - page two, press the [F2] key when the first page is
showing. The following screen appears:
FishPro
Samco Power Accounting
The Menu
4.4
Make a selection, or press [F2] for more selections, or [F11] for help at any time
To end use of the Fishpro menu
When you have finished using a function, press [Tab] when the cursor is at the Please
select field. Page one of the Fishpro menu reappears.
When you have run all the functions you want to run from the Fishpro menu, press [Tab]
and the Main menu reappears.
_____________________________
FishPro
Samco Power Accounting
The Menu
4.5
Chapter 5
Maintain Fishpro Control Data
Introduction
This program generates a file containing information that seldom changes and provides
default responses for users performing daily tasks. The fields that may change are those
such as Income Tax or printers. You would use this program to maintain those changes.
You will be required to supply account numbers for various items in the Fishpro Control
file.
To begin this function
From the main menu, type the number corresponding to Fish Processing. Press [F2] to
move to the second screen of the Fishpro menu, select Control Information. The
following screen appears:
FishPro
Samco Power Accounting
Maintain Fishpro Control Data
5.1
Enter data as follows:
1. Next Ticket Number
This is an 8-digit field for the ticket number which will be entered during ticket
processing. If you use 6 or less digits, the software will preface the number with a two
digit year, based on the current year you enter for item 14 of this menu, and zero fill to
make an 8 digit ticket number.
Once you enter a number, then at ticket entry you can press the F1 key and the program
will supply the number automatically based on the last number. The prefaced year date
and zero fill will not be displayed here.
2. Next Adjustment Number
During ticket processing, an adjustment number based on the LAST ticket number
entered will be displayed and can be accepted by pressing the F1 key. Adjustment
tickets will be marked with an asterisk (*).
3. Next Distribution Number
This is an 8 digit field for the distribution number which will be used when distributing
the gross catch value to the crew. If you use 6 or less digits, the software will preface
FishPro
Samco Power Accounting
Maintain Fishpro Control Data
5.2
the number with a 2 digit year, based on the current year entered for item 14, and zero
fill to make an 8 digit distribution number.
4. Print Tickets Default
From the choices displayed at the bottom of the screen, type the letter which
corresponds to your most common ticket printing method.
5. Ticket Printer Number
Enter the number of the printer the tickets are to be printed on.
6. Ticket Copies
Enter any digit between 0-9 for the number of tickets to be printed. If you have a
pre-printed three-part form then you may only require 1 copy of the ticket. However,
if you are using plain paper, you may require 3 copies of each ticket.
7. Ticket Format
The choices are "1 - plain paper 2 - DFO fish slip", as displayed at the bottom of the
screen. Enter the number corresponding to the type of paper you will be printing fish
tickets on.
8. Print boat owner on tkt?
Answer Y to print the boat owner on the top of the ticket; answer N to print the skipper
if available.
9. Current Year
Enter the last two digits of the current processing year. As this number is used by the
software to preface tickets, adjustment tickets and distributions, it should coincide
with your accounting year.
10. Period Ending Date
Enter the date which will be your first period ending date from when you started using
Fishpro.
11. Settlements payable account
Enter the G/L account for the Settlements Payable, or press ? to search the G/L account
listing.
12. Default Inventory Account
FishPro
Samco Power Accounting
Maintain Fishpro Control Data
5.3
Enter the inventory account number you set up in the Maintain valid G/L accounts. The
account description will display.
If the account number you enter is not on file, the message "This account not on file would you like to add it ? Y" will be displayed. Press [ENTER] to accept the Y default,
then type in the account description.
13. Ticket Clearing Account
Enter the account number you set up for ticket clearing. The account description you
set up in Maintain valid G/L accounts will be displayed.
If you did not setup the account, the message "This account not on file - would you like
to add it ? Y" will be displayed. Press [ENTER] to accept the Y default, then type in
the account description.
At "FIELD NUMBER TO CHANGE ?", make any desired changes then press ENTER to go to
page two of the menu.
You will then see:
Enter the following data:
14. Tax Code 1 Description
15. Tax Code 2 Description
16. Tax Code 3 Description
FishPro
Samco Power Accounting
Default
Default
Default
Maintain Fishpro Control Data
5.4
The tax codes can also be used to pay bonuses to fishers. If the tax code is entered as
a negative number, the calculated amount will be added on at ticket entry. See the
chapter titled Maintain System Codes for more information.
Any tax code default set up here must be set up exactly the same way in Maintain
system codes, Tax codes, or you will get the "TAX CODE NOT ON FILE" message at ticket
entry.
NOTE: The tax code description(s) entered here will appear as data entry field(s) on
the ticket entry screen.
17. Use EI rules ?
Answer Y or N.
18. Yearly EI maximum
Enter the EI maximum for current tax year.
19. Skipper Ins. Expense %
This is the percentage of the skipper's share that is considered to be used for expenses,
and will not be included in the skipper's insurable earnings. Employment and
Immigration Canada currently have set this at 25%.
This field must be changed whenever there are revisions by Employment and
Immigration Canada.
20. EI Ratio
Enter the current EI ratio. This value is used in EI calculations in the ticket entry
program.
This field must be changed whenever there are revisions by Employment and
Immigration Canada.
21. EI employer multiplier
Enter the EI employer portion ratio for current tax year. When the EI Report is printed,
this multiplier is used to calculate the company’s portion of the EI.
22. EI Account
Enter the EI account number you set up in Maintain valid General Ledger accounts. The
account description from the account file will be displayed.
FishPro
Samco Power Accounting
Maintain Fishpro Control Data
5.5
If you did not setup an account for income tax, you can set one up here. Enter the
account number and profit centre (if applicable). A message will be displayed: "This
account not on file - would you like to add it ? Y", press ENTER for Yes, then type the
account description.
23. EI based on posted date?
Answer Y or N depending on what date the EI calculation is to apply.
24. WCB Maximum
Enter the maximum annual income as specified by WCB. Any income earned over this
amount is declared as an excess on the WCB Report.
This field must be changed whenever there are revisions by the Workers' Compensation
Board.
25. WCB percent
Enter the percent as specified by WCB.
26. Business number
Enter the business number assigned to your company by Revenue Canada Taxation. This
number, along with the name and address from the Company file will appear on ROE's.
At "FIELD NUMBER TO CHANGE ?", make any desired changes, then press ENTER to go to
page 3 of the menu. You will see:
FishPro
Samco Power Accounting
Maintain Fishpro Control Data
5.6
Enter the following data:
27. Next Automatic Customer #
This is the next customer number to be assigned using the F1 key when adding a new
fisher during fish ticket entry.
28. Sales representative
Enter the sales rep default for new fisher entry.
29. Customer type
Enter the customer type default for new fisher entry.
30. Statement cycle
Enter the statement cycle default for new fisher entry.
31. Credit limit
FishPro
Samco Power Accounting
Maintain Fishpro Control Data
5.7
Enter the credit limit default for new fisher entry.
32. Credit rating
Enter the credit rating default for new fisher entry.
33. Finance charges
Enter the finance charges default (Y/N) for new fisher entry.
34. Terms code
Enter the terms code default for new fisher entry.
35. A/R account number
Enter the A/R account number default for new fisher entry.
36. Tax code
Enter the tax code default for new fisher entry.
Use City / Province ?
Enter Y to set default City and Province
City ?
Enter the City to set as default.
Province ?
Enter the Province code to set as default.
At "FIELD NUMBER TO CHANGE ?", make any desired changes, then press [ENTER] to go
to page 4 of the menu. You will see the following:
FishPro
Samco Power Accounting
Maintain Fishpro Control Data
5.8
The data entered on this screen will automate your statistical reporting requirements
for the Department of Fisheries and Oceans.
Enter the following data:
37. Create DFO Slip File
If you want to automate your DFO reporting, answer Y to create a DFO slip file. If you
answer N, the rest of the fields will be skipped and page 5 of the menu will be displayed.
38. Your DFO Company Number
Enter the number assigned to your company by the Department of Fisheries and Oceans.
39. System Name
If you selected the DFO RAW file creation in the Control File and intend to transmit the
RAW to DFO you will to talk to DFO for the name you should enter here. You only need
to enter information here if you are going to transmit the RAW file.
40. Next DFO Batch Number
FishPro
Samco Power Accounting
Maintain Fishpro Control Data
5.9
This is a sequential number which starts at 1 the first time the RAW file is created, and
is sequentially incremented each time you process end-of-period.
41. DFO Data File Directory
This is the directory where the RAW file is located.
42. DFO Buying Station
Enter a 2 character code for the DFO buying station.
At "FIELD NUMBER TO CHANGE ?", make any desired changes, then press [ENTER] to go
to page 5 of the menu. You will see:
NOTE: Your answers to some options on this screen will define the Maintain system
codes menu.
Enter the following data:
43. Use Auto Piece Count ?
FishPro
Samco Power Accounting
Maintain Fishpro Control Data
5.10
If you answer Y here you will have the option of using auto piece count at ticket entry.
Auto piece count is used at ticket entry if you have three or four species on one ticket
and you know the number of pieces for each species but only the total weight of the
catch.
If you wish to use auto piece count, you must have entered each species in the Price file
by unit as well as weight. Refer to the chapter 12 titled Maintain Prices.
You enter the number of pieces for each species and the total catch weight for the last
species and the total catch weight for the last species on the ticket. The software will
take the average weight for each species from the Price file and proportion the total
weight of the catch as equally as possible.
Enter Y if you wish to use auto piece count and N if you do not wish to use auto piece
count.
44. Use quality codes ?
Press Y or N. If you choose N, the quality code will not be asked for while performing
ticket entry.
44. Use Landing Status ?
Press Y or N. If you choose N, the landing status will not be asked for while performing
ticket entry.
You would then enter a 2 character alphanumeric default landing status code if you
answered Y. This will be the default used in ticket entry. Type the code for one of the
delivery locations you will set up in your Maintain delivery locations. This default should
be the delivery location used most often.
46. Use Area Codes ?
Enter Y or N. These are the DFO catch area codes for a geographic location. A current
list is available from DFO.
47. Verify Trip Date ?
Type Y or N. If you answer N then the trip date of the boat will not be checked. If you
answer Y, then the number of fishing days will be checked against the days for the
current trip.
48. Default Delivery Location ?
Enter the delivery location to be used as the default delivery location. This is the deliver
location used most often. The Fishpro control file maintenance routine defaults this to
1.
FishPro
Samco Power Accounting
Maintain Fishpro Control Data
5.11
The default delivery location of 1 must be set up in the Maintain delivery locations
function. This should be the delivery location used most often.
49. Use Packers ?
Enter Y if you use packers, and N if you do not use packers.
50. Use Company Divisions?
Enter Y if you use company divisions, and N if you do not.
51. Default Gear Type
Enter the code to represent the most common gear type used by your company. This
code can be overridden at ticket entry.
NOTE: This gear type code must be set up using the Maintain gear types function to be
valid at ticket entry.
52. Use settlement report ?
Answer Y or N.
53. Print crew on fish ticket ?
Answer Y or N depending if you want to print the crew members on a fish ticket.
54. Crewpeople have accounts ?
Answer Y if the crew members have accounts with your company. Answer N if they are
not set up as customers.
55. Use expense screen ?
Answer Y if you distribute expenses at ticket entry. Otherwise, answer N.
56. Fisher account inquiry ?
Answer Y if you wish to inquire on fishers’ accounts. Otherwise, answer N.
57. Allow area add in ticket ?
Answer Y if you wish to add another catch area at time of ticket entry. Otherwise,
answer N.
FishPro
Samco Power Accounting
Maintain Fishpro Control Data
5.12
At "FIELD NUMBER TO CHANGE ?", make any desired changes, then press [ENTER] to go
to page 6 of the menu. You will see:
At "FIELD NUMBER TO CHANGE ?", make any desired changes, then press [ENTER] to
return to the main menu.
58. Check Account Number
Enter the check account number you setup in the A/R Control file or the Maintain valid
G/L accounts function.
If you are using profit centres in conjunction with this account, type the profit centre
number. If you are not using profit centres, press ENTER.
The description you entered when you set up the account will be displayed.
FishPro
Samco Power Accounting
Maintain Fishpro Control Data
5.13
59. Next Check Number
Enter the check number that you intend to start with when using this system.
60. Print Checks Default
From the choices displayed at the bottom of the screen, type the letter which
corresponds to your most common check printing method.
61. Checks Printer Number
Enter the number of the printer the checks are to be printed on.
62. Checks always mounted?
Answer Y if you do not want to be prompted to load and unload checks into the printer
before and after printing.
Remain:
Enter the quantity of check forms remaining on the printer. The system keeps a count
of the number of checks remaining based on the quantity printed. This allows the
system to prompt you to load more checks when it thinks you are running out.
If you do not want the system to track the quantity of check forms in the printer press
[F1].
63. Check format?
Options are:
1 – stub on bottom
2 – stub on top
3 – short stub on bottom
4 – CSS format, Check-stub-stub (identical to AP checks)
4 – SCS format, Stub-check-stub (identical to AP checks)
64. Cash account number
Enter the cash account number you setup in the A/R Control file or Maintain Valid G/L
accounts.
If you are using profit centres in conjunction with this account, type the profit centre
number. If you are not using profit centres, press [ENTER].
The description you entered when you setup the account will be displayed.
65. Next receipt number
FishPro
Samco Power Accounting
Maintain Fishpro Control Data
5.14
Enter the receipt number you intend to start with when you start using the system.
66. Print receipts default
From the choices displayed at the bottom of the screen, type the letter which
corresponds to your most common ticket printing method.
67. Receipt printer number
This should be the number of the printer you will use to print receipts.
NOTE: If you use the same printer to print everything on then you will need to change
paper to match the print job you are executing.
68. Receipt always mounted?
Answer Y if you do not want to be prompted to load and unload receipts into the printer
before and after printing.
Remain:
Enter the quantity of receipt forms remaining on the printer. The system keeps a
count of the number of receipts remaining based on the quantity printed. This allows
the system to prompt you to load more receipts when it thinks you are running out.
If you do not want the system to track the quantity of Receipt forms in the printer press
[F1].
69. Next JV number?
Enter next journal voucher number.
70. Journal voucher printer?
Enter the printer number that you print the journal vouchers on.
71. Journal always mounted?
Answer Y if you do not want to be prompted to load and unload journal forms into the
printer before and after printing.
Remain:
Enter the quantity of journal forms remaining on the printer. The system keeps a count
of the number of journals remaining based on the quantity printed. This allows the
FishPro
Samco Power Accounting
Maintain Fishpro Control Data
5.15
system to prompt you to load more journals when it thinks you are running out.
If you do not want the system to track the quantity of journal forms in the printer press
[F1].
_____________________________
FishPro
Samco Power Accounting
Maintain Fishpro Control Data
5.16
Chapter 6
Maintain System Codes
Introduction
The system codes included in this function must be set up before normal fish ticket
processing can begin as many other functions draw from the Codes files for their
information. Once these codes have been entered, the Maintain system codes function
will be used to maintain any changes to this information on an ongoing basis.
This chapter describes the codes files and initial entry of required information. All
codes maintained by this function can be added, changed or inquired into, deleted, and
lists of the various codes can be printed.
NOTE: In the Change/Inquire function of all codes in this menu, the code itself
cannot be changed or deleted. The code must be deleted then added again using the
Add function.
Forms Codes
From the Fishpro menu select Form codes.
Fishpro
Samco Power Accounting
You then see:
Maintain System Codes
6.1
NOTE: Some items in the F/P codes maintenance menu will appear only if their
related option was selected in the F/P Control File.
Maintain form codes
This function is used to code how fish are delivered to the fish processor. The form
codes vary by species and a current listing is available from DFO.
From the F/P codes maintenance menu select Form codes. You then see:
Fishpro
Samco Power Accounting
Maintain System Codes
6.2
Add Form Code
Enter the data as follows:
1. Form Codes
Enter the 1 or 2 digit form code supplied by DFO.
2. Description
Enter up to 25 alphanumeric characters describing the form code.
At "Field number to change ?", make any changes and press [ENTER]. The screen will
clear for entry of the next form code.
When you have entered all the required form codes, press [Tab] at the Form code field
and the Form codes maintenance menu reappears.
Change/inquire Form Code
From the F/P codes maintenance menu, select Change/Inquire form code. A new screen
displays for entry of the code you want to change or inquire into.
Enter the form code, or press [F1] to display each code in order, as instructed at the
bottom of the screen. You will be asked "FIELD NUMBER TO CHANGE ?". Make any
necessary changes, then press [ENTER]. The screen will clear for entry of another form
code to be changed or inquired into.
Fishpro
Samco Power Accounting
Maintain System Codes
6.3
When you are through with this function, press [Tab] at the Form code field. The Form
codes maintenance menu reappears.
Delete Form Codes
From the Form codes maintenance menu, select Delete form codes. A new screen
appears for entry of the code you want to delete.
Enter the form code to be deleted, or press [F1] to display each code in order, as
instructed at the bottom of the screen.
When the form code is found, the description is displayed and you are asked "OK TO
DELETE FORM CODE ? N". Answer Y to delete the code, press [F1] for the next code,
or press [ENTER] for N. If you answer Y, the code is deleted and you can enter another
form code to be deleted.
When there are no more form codes to be deleted, press [Tab] at the Form code field.
The Form codes maintenance menu reappears.
Print Form Code List
From the Form codes maintenance menu, select Print form code list. A window appears
for you to select how to print the list. Follow the screen instructions. Refer to the
chapter titled General Rules for a detailed explanation of the printing options.
When the list has finished printing, the Form codes maintenance menu will reappear.
To end the Form codes maintenance function, press [Tab] as the menu selection. The
F/P codes maintenance menu reappears.
Maintain species codes
This function is used to code species. You can give each species your own code, but the
proper DFO code must also be assigned for DFO statistical reporting purposes. Refer to
Appendix 8 titled Catch Statistics Coding Summary. A current list of species codes is
available from DFO.
From the F/P codes maintenance menu, select Species codes and you will see:
Fishpro
Samco Power Accounting
Maintain System Codes
6.4
Add Species Code
If you select Add species code from the Maintain system codes menu, you will see:
Fishpro
Samco Power Accounting
Maintain System Codes
6.5
NOTE: If you did not answer Y to "CREATE DFO SLIP FILE ?" in the F/P Control file,
fields 11 and 12 will not appear.
Enter the following data:
1. Species code
Enter up to a 6 character alphanumeric code for each species. This code can be the
same as the DFO code or a code specific to your organization.
2. Description
Enter the species description, up to 25 alphanumeric characters.
3. Min Weight
This field, in conjunction with field 4 below, is used at ticket entry to ensure the weight
entered for this species is within a specific range.
Fishpro
Samco Power Accounting
Maintain System Codes
6.6
Enter up to 3 digits plus 2 decimal places, or press [ENTER] for the default minimum
weight of .00.
4. Max Weight
This field, in conjunction with field 3 above, is used at ticket entry to ensure the weight
entered for this species is within the range.
Enter up to 3 digits plus 2 decimal places, or press [ENTER] for the default maximum
weight of .00.
5. Pieces
Enter up to 7 digits for the year-to-date piece count for the species. This field can be set
to zero by pressing [ENTER]. Each time a ticket is processed for this species, this piece
count will increment.
6. Weight
Enter the total weight for this species delivered to date. Each time a ticket is processed,
this weight field will increment. This field can be set to zero by pressing [ENTER].
7. Value
Enter the total year-to-date amount paid out for this species. Each time a ticket is
processed, this dollar value will increment by the value on the ticket for this species.
This field can be set to zero by pressing [ENTER].
8. Inventory Account
If you are NOT using Inventory Control, enter the G/L account number for inventory
receiving. If you are using I/C, enter the same inventory receiving account number
here that was used in I/C. You must enter an account number in this field.
9. Include weight?
Press [ENTER] to accept the Y default if the weight for this species is to be included in
the period and year-to-date totals. The only time you would answer N is if packaging
was set up as a species code. This would ensure that the packaging weight is not
included in the inventory totals.
10. DFO Species Code
Enter the code specified by DFO for this species, or press [ENTER] to leave blank.
11. DFO Form Code
Fishpro
Samco Power Accounting
Maintain System Codes
6.7
Enter the DFO form code for this species code, or press [ENTER] to leave blank.
12. Default quality code
Enter the quality codes assigned to this species of fish.
Your screen should look similar to the following:
At "FIELD NUMBER TO CHANGE ?", make any desired changes, then press [ENTER]. The
screen clears for entry of the next species code.
When all the species codes have been added, press [Tab] as the menu selection. The
Species file maintenance menu reappears.
Change/inquire Species Code
Once the species code information has been added, it is unlikely you will need to make
any changes to it.
Fishpro
Samco Power Accounting
Maintain System Codes
6.8
NOTE: Fields 5, 6, and 7 increment as fish tickets are processed and supply
year-to-date information on each species. If you make changes to these fields your
historical information will no longer be correct.
From the Species file maintenance menu, select Change/Inquire species code. A screen
appears for entry of the species code you want to change or inquire into. Enter the code
or press [F1] to see each code in order, as instructed at the bottom of the screen.
Make any desired changes by selecting the number of the field you want to change, then
entering the new data.
At "FIELD NUMBER TO CHANGE ?", make any desired changed, then press [ENTER]. The
screen clears for entry of another species code.
When no more changes or inquiries are to be made, press [Tab] at the Species code
field. The Species file maintenance menu reappears.
Delete Species Codes
From the Species file maintenance menu, type 3. A screen displays for entry of the code
you want to delete. Enter the species code or press [F1] to display the species codes in
order, as instructed at the bottom of the screen.
Make the deletion by typing Y in response to "OK TO DELETE SPECIES ? N", or press
[ENTER] to accept the N default. The screen will clear for entry of another species
code to be deleted.
When there are no more species codes to be deleted, press [Tab] at the Species code
field. The Species file maintenance menu reappears.
Print Species Code List
From the Species file maintenance menu, select Print species code list. A window will
appear for you to select how to print the list. Follow the screen instructions. Refer to
the chapter titled General Rules for a detailed explanation of the printing options.
When the selection you made is complete, the F/P codes maintenance menu reappears.
To end the Species file maintenance function, press [Tab] as the menu selection and the
F/P codes maintenance menu reappears.
Maintain catch areas
Fishpro
Samco Power Accounting
Maintain System Codes
6.9
This option will only available to you if you answered Y to "USE AREA CODES ?" in the F/P
Control file. Catch areas entered at ticket entry will be verified to ensure they are
valid. Catch areas can be added, deleted, changed, inquired into and printed.
From the F/P codes maintenance menu select Catch Areas. Then you will see.
Add Area Code
Select Add catch area and you will see:
Fishpro
Samco Power Accounting
Maintain System Codes
6.10
Enter the following data:
1. Area Code
Enter up to an 8-character alphanumeric area code for the catch area. A reference map
of catch areas is available from DFO.
2. Description
Enter up to 25 alphanumeric characters describing the catch area.
3. Valid Area
Enter Y or N. If you answer N here, a warning message will display during ticket entry
warning that you are attempting to use an invalid area.
If an area becomes invalid you will need to update this item using the Change/Inquire
function, to ensure the warning message is displayed during ticket entry.
The screen shows:
Fishpro
Samco Power Accounting
Maintain System Codes
6.11
At "FIELD NUMBER TO CHANGE ?", make any desired changes, then press [ENTER] and a
new screen is displayed for entry of the next catch area.
When you have added all the catch areas needed, press [TAB] as the menu selection.
The Catch area codes maintenance menu reappears
Change/inquire Area Code
From the Catch area codes maintenance menu, select Change/inquire area code. A
screen appears for entry of the catch area you want to change or inquire into.
Enter the number or press [F1] to display each catch area in order, as instructed at the
bottom of the screen. Make any desired changes by selecting the number of the field
you want to change or inquire into. Press [ENTER] at "FIELD NUMBER TO CHANGE?" to
file the changes. The screen clears for entry of the next catch area to be changed or
inquired into.
If no more catch areas are to be changed or inquired into, press [TAB] at the Area code
field and the Catch area codes maintenance menu reappears.
Delete Area Code
From the Catch area codes maintenance menu, select Delete area code. A screen will
display for you to enter the catch area you want to delete.
Fishpro
Samco Power Accounting
Maintain System Codes
6.12
Enter the number or press [F1] to display each catch area in order, as instructed at the
bottom of the screen. Make the deletion by typing Y, press [F1] for the next area code,
or press [ENTER] to accept the N default. The screen will clear for entry of another
catch area to delete.
When there are no more catch areas to delete, press [TAB] at the Area code field. The
Catch area codes maintenance menu reappears.
Print Area Code List
From the Catch area codes maintenance menu, select Print area code list. A window
appears for you to select how to print the list. Follow the screen instructions. Refer to
the chapter titled General Rules for a detailed explanation of the printing options.
When the list has finished printing, the Catch area codes maintenance menu will
reappear.
To end the Catch area codes maintenance function, press [TAB] for the menu selection.
The Fishpro codes maintenance menu reappears.
Maintain tax codes
The system will handle three tax code categories which can be used to calculate either
a tax, royalty or bonus on species.
This function is used at ticket entry to calculate tax, royalties or bonuses based on catch
value in pieces, by weight or percent. The calculated amount will then be deducted or
added to the catch value.
While there are three categories for tax codes, the number of species rates associated
with a tax code is unlimited.
Use this function to add, change or inquire into, delete or print a list of tax codes.
From the F/P codes maintenance menu select Tax codes and you will see:
Fishpro
Samco Power Accounting
Maintain System Codes
6.13
Add Tax Code
If you select Add tax code, you will see:
Fishpro
Samco Power Accounting
Maintain System Codes
6.14
Enter the following data:
1. Tax Code
Enter up to a 3-character alphanumeric code. This is the code which will be entered at
ticket entry.
2. Species Code
If the tax code is to be applied to a certain species, enter that species code here or
choose [F1] for all species.
3. Description
Enter up to 25 alphanumeric characters describing the tax. The description entered
here can be used to search for the tax code.
Fishpro
Samco Power Accounting
Maintain System Codes
6.15
4. Calculation Method
The following prompt will be displayed:
P - percent
U - unit
W - by weight
Type P, U, or W.
Percent Calculation: takes a percentage of the gross amount of the catch.
Unit Calculation: takes a given dollar amount per unit of the catch.
Weight Calculation: takes a given dollar amount by weight of the catch.
5. Rate
Enter the rate to be used by the calculation method. Type a percentage, dollar value, or
weight value depending on your answer above. If the rate is to be a bonus, enter it as
a negative rate, as instructed at the bottom of the screen.
6. Account Number
Enter the account number that will be used during ticket posting for tax or royalty
amounts. This account number should have been setup in the Maintain valid G/L
accounts function.
If you did not set the account up in the Maintain valid G/L accounts function, it can be
added here. Type in the account number. You will be asked "THIS ACCOUNT NOT ON
FILE - WOULD YOU LIKE TO ADD IT ?". Type Y and press [ENTER]. You will then be
prompted to enter the account description. Do so, then press [ENTER].
The description from the G/L account will be displayed.
7. Amount PTD
Enter the amount of this tax, royalty, or bonus for this accounting period. This field will
increment as the tax, royalty, or bonus is calculated for this period-to-date.
If this is the beginning of an accounting period or the start of a new accounting year,
press [ENTER] for zero.
8. Amount YTD
Enter the amount of the tax, royalty, or bonus for this accounting year. This field will
increment as the tax, royalty, or bonus is calculated for this year-to-date.
Fishpro
Samco Power Accounting
Maintain System Codes
6.16
If this is the beginning of an accounting period or the start of a new accounting year,
press [ENTER] for zero.
The screen will show:
At "FIELD NUMBER TO CHANGE ?", make any desired changes and press [ENTER]. The
screen clears for entry of the next tax code.
When you have added all the tax codes, press [TAB] as the menu selection, the Tax
codes maintenance menu reappears.
Change/inquire Tax Codes
From the Tax code maintenance menu, select Change/inquire tax codes. A screen
appears for entry of the tax code you want to change or inquire into.
Fishpro
Samco Power Accounting
Maintain System Codes
6.17
Enter the tax code or press [F1] to display each tax code in order, as instructed at the
bottom of the screen.
Make any desired changes by selecting the number of the field you want to change.
Press [ENTER] at "FIELD NUMBER TO CHANGE ?", to file the changes. The screen clears
for entry of the next tax code to be changed or inquired into.
When there are no more changes or inquiries, press [TAB] at the Tax code field and the
Tax code maintenance menu re-appears.
Delete Tax Codes
From the Tax code maintenance menu, select Delete tax codes. A new screen will
display for you to enter the tax code you want to delete.
Enter the tax code or press [F1] to display each tax code in order, as instructed at the
bottom of the screen. Make the deletion by typing Y, or press [F1] for next tax code,
or press [ENTER] to default to N. The screen will clear for entry of another tax code to
delete.
When there are no more tax codes to delete, press [TAB] at the Tax code field. The
Tax code maintenance menu reappears.
Print Tax Code List
From the Codes maintenance menu select Print tax code list. A window appears for
you to select how to print the list. Follow the screen instructions. Refer to the
chapter titled General Rules for detailed information about the printing options.
From the Tax codes maintenance menu, press [TAB] as the menu selection. The F/P
Codes maintenance menu reappears.
Maintain gear types
This function allows you to give a description for each gear type code defining catch
value distribution information. Use this function to add, change/inquire into, or delete
a gear type. A list of the various gear types can be printed.
Up to 12 categories can be set for each gear type. These categories will determine how
the gross catch value is to be distributed and how the allocated amount for each
category is to be distributed to the crew members.
Using gear types
Fishpro
Samco Power Accounting
Maintain System Codes
6.18
In order to provide flexible and accurate accounting by gear type, you can set
calculations up to reflect requirements of the skipper or company. The distribution
can be by percent, dollars, or share.
Each gear type has its own method of splitting up the catch value but the Seine gear
type quite often uses the 7/11 formula.
This gear type can be set up as follows:
Code desc
Ded type
Ded default
Boat share
Net share
Crew share
Percent
Percent
Remaining
22.727
17.647
.00
This is the same as:
Boat share
Net share
Crew share
2.5/11
1.5/11
7/11
Typically, the distribution types to crew members are set up the following way:
Boat share
Net share
Crew share
Percent
Percent
Share
NOTE: The boat share, net share, and crew share deduction types are required for
the 7/11 formula. More can be added if necessary.
Some other deduction types are:
Fuel
Allows the skipper to be reimbursed for the fuel expense.
Other
Allows the skipper to be reimbursed for other expenses, usually
for cost of gear purchased.
Grub expense
Entered as a negative number to reduce the deckhands pay for
the cost of food.
Grub credit
Balancing entry for grub expense. Allows the skipper to be
reimbursed for the food expense.
From the F/P codes maintenance menu, select Gear types. You will then see:
Fishpro
Samco Power Accounting
Maintain System Codes
6.19
Add Gear Type
If you select Add gear type you will then see:
Fishpro
Samco Power Accounting
Maintain System Codes
6.20
Enter the following data:
1. Gear Type
Enter a 3 character alphanumeric gear type code. You can use the DFO code or a
convention of your own.
2. Gear Description
Enter up to a 25 character description for the gear type.
3. Maximum Fishing Days
Enter the maximum number of allowable fishing days for this gear type. At ticket
entry, the number of fishing days will be checked against the number of trip days for
this gear type if you answered Y to "VERIFY TRIP ?" in the Fishpro Control file. Trip days
cannot exceed fishing days.
4. Use Alternate Area ?
Fishpro
Samco Power Accounting
Maintain System Codes
6.21
If you answered Y to "USE AREA CODES ?" in the Fishpro Control file, you have the option
of entering this information.
Enter Y or N if you wish a secondary area to be entered on the fish ticket. This function
is usually used for herring.
5. Always distribute ?
If you answer Y here, the catch values from all tickets will have to be distributed to
crew members at the time they are entered. If you answer N, you will have the option
of distributing the catch value "Now" or "Later" at ticket entry.
6. DFO Gear type
Enter the 2 digit DFO code associated with this gear type.
7. Form code set
Enter the 2 digit DFO code associated with this gear type.
8 - 19 (described below)
Code Description
Enter a 9 alphanumeric character description for this distribution entry. The sequence
of the descriptions here will determine the sequence on the first distribution screen
when entering a fish ticket.
Join ? L#
Enter Y if the settlement amount reduces another column
Deduction Type
Enter one of the letters A, P, or R, to indicate the method to be used to calculate the
dollar value to be distributed from the gross catch for the distribution type entered
above. At fish ticket entry, this is the default calculation method that will appear on
the first distribution screen.
A. Amount
A set amount will be taken from the gross catch value for this
distribution type.
P. Percent
A percentage will be taken from the catch value for this
distribution type.
G. % of gross
A percentage of the gross will be taken from the catch value for this
distribution type.
Fishpro
Samco Power Accounting
Maintain System Codes
6.22
R. Remaining
The leftover amount of the catch value will be given to this
distribution type. Use this method for the last distribution type.
Deduction Default
Enter a default amount for the deduction type entered above. If you used percent as
the deduction type, then enter a percent for the deduction default. This amount can be
overridden at ticket distribution.
The field can be set to zero by pressing [ENTER].
Distribution Type
Enter a one letter code based on the displayed choices, then press [ENTER]. The code
entered here will define how the amount of this deduction is to be distributed to the
crew members. This distribution type can be overridden at ticket entry.
A. Amount Each crew member is given a set amount from this distribution amount.
P. Percent Each crew member is given a percentage of the distribution amount.
S. Share
Each crew member is given a share of the distribution amount based on
a value entered on the ticket.
Reuse val ?
If you answer Y, this distribution amount will be included in the gross income for the
crew members. Press [ENTER] to accept the Y default, or type N.
For example, if the distribution type is for grub expense, it should not be included in the
fisher's gross income. In this case, you would answer N.
Incl ins ?
Enter Y if this distribution amount is to be included in the gross income for EI insurable
earnings.
Incl WCB ?
Enter Y if this distribution amount is to be included in the gross income for WCB
calculation purposes.
Where a fishing license, permit, or quota is allowed an additional 40% of the cost before
the WCB assessable is calculated, change the WCB %. The actual WCB amount is
calculated when the WCB report is printed.
Fishpro
Samco Power Accounting
Maintain System Codes
6.23
Display Order
Enter a number for the sequence in which this distribution is to appear on the
Distribution entry screen at ticket entry. Three columns at a time can be displayed on
each ticket distribution screen.
For example, crew share may have been the first distribution type entered in this
function, but you want it to appear in the third column on the Distribution entry screen
at ticket entry. You would enter 3 in this field.
For example, you may have entered four distribution categories. These categories could
be: Boat shr, Crew shr, Expenses and Grub. As the expenses may only be applicable
to the skipper you may have entered it as the second item but want to display it as the
fourth column at ticket entry. You may want the Boat shr, Crew shr, and Grub amounts
to display as columns 1, 2, and 3 respectively.
When you have entered all the distribution descriptions for this gear type, press
[ENTER] at the next line item number.
Setl type
Enter the code that applies to this line. It may be left blank.
P
C
E
O
Pre-crewshare exp
Crewshare
Other earnings
Post-crewshare exp
Exp type
Enter a expense type code that applies to this line. These codes are setup in Maintain
system codes, Expense types. It may be left blank
The screen will show:
Fishpro
Samco Power Accounting
Maintain System Codes
6.24
At "FIELD NUMBER TO CHANGE ?", make any desired changes, then press [ENTER]. The
screen will clear for entry of another gear type.
When all gear types have been entered, press [TAB] at the Gear type field. The Gear
types maintenance menu will reappear.
Change/inquire gear type
From the F/P gear types maintenance menu, select Change/inquire gear type. A screen
appears for entry of the gear type you want to change or inquire into.
Enter the gear type code or press [F1] to display each gear type in order, as instructed
at the bottom of the screen. Make any desired changes by selecting the number of the
field you want to change. You cannot change the gear type code. To do so you must use
the Delete function to delete the gear type, then add it again using the Add function.
Fishpro
Samco Power Accounting
Maintain System Codes
6.25
Press [ENTER] at "FIELD NUMBER TO CHANGE ?" to file the changes. The screen clears for
entry of the next gear type.
When there are no more changes or inquiries, press [TAB] at the Gear type field and the
Gear types maintenance menu reappears.
Delete Gear Type
From the Gear types maintenance menu, select Delete gear type. A new screen
displays for you to enter the gear type code you want to delete.
Enter the gear type code or press [F1] to display each gear type in order as instructed at
the bottom of the screen. Make the deletion by typing Y or press [F1] for the next gear
type code or press [ENTER] to clear the screen for entry of another gear type to delete.
When there are no more gear types to delete, press [TAB] at the Gear type field.The
Gear types maintenance menu reappears.
At "FIELD NUMBER TO CHANGE ?" press [ENTER], then press [TAB] at the Gear type field.
The Gear type maintenance menu reappears.
Print Gear Type List
From the Gear types maintenance menu, select Print gear type list. A window appears
for you to select how to print the list. Follow the screen instructions. Refer to the
chapter titled General Rules for a detailed explanation of the printing options.
When the list has finished printing, the Gear types maintenance menu reappears.
From the Gear types maintenance menu, press [TAB] as the menu selection. The F/P
codes maintenance menu reappears.
Maintain delivery locations
Use this function to set up and maintain the valid delivery location codes used to track
tickets when using more than one receiving station.
If you answered N to "USE DELIVERY LOCATIONS ?" in the F/P Control file, this function is
not available to you.
From the Codes maintenance menu select Delivery locations. You then see:
Fishpro
Samco Power Accounting
Maintain System Codes
6.26
Add Delivery Locations
If you select Add delivery location, you will then see:
Fishpro
Samco Power Accounting
Maintain System Codes
6.27
Enter the following data:
1. Delivery location
Enter up to a 2 character alphanumeric code to indicate the delivery location of a catch.
The delivery location for a packer should be where the fish will eventually be delivered.
2. Description
Enter a 25 alphanumeric character description for the delivery location code.
3. Cheque account
Enter the G/L account number from the valid G/L account file from which cheques are
issued.
If the account has not yet been added using the Maintain valid G/L accounts function,
you can add it now. Type in the account number. You will then be asked "THIS
ACCOUNT IS NOT ON FILE - WOULD YOU LIKE TO ADD IT ?". Answer Y and type in the
account description.
Fishpro
Samco Power Accounting
Maintain System Codes
6.28
4. Cash account
Enter the G/L account number from the valid G/L account file from which cash is issued.
If the account has not yet been added using the Maintain valid G/L accounts function,
you can add it now. Type in the account number. You will then be asked "THIS
ACCOUNT IS NOT ON FILE - WOULD YOU LIKE TO ADD IT ?". Answer Y and type in the
account description.
5. Company division
Enter the company division number as setup under the menu option "Maintain Company
Divisions".
6. DFO buying station
Enter the DFO buying station number as assigned by DFO.
The screen will show:
Fishpro
Samco Power Accounting
Maintain System Codes
6.29
At "FIELD NUMBER TO CHANGE ?" make any desired changes, and press [ENTER]. The
screen clears for entry of the next delivery location.
When all delivery locations have been entered, press [TAB] at the Delivery loc field and
the Delivery locations maintenance menu reappears.
Change/Inquire Delivery locations
From the Delivery locations maintenance menu, select Change/inquire delivery
locations. A screen appears for entry of the delivery location you want to change or
inquire into.
Enter the delivery location code or press [F1] to display each delivery location in order,
as instructed at the bottom of the screen. The delivery location entered must be on file
to be valid. Once you enter a valid delivery location, the remaining data fields display
automatically.
Fishpro
Samco Power Accounting
Maintain System Codes
6.30
Make any desired changes by selecting the number of the data field you want to change.
Press [ENTER] at "FIELD NUMBER TO CHANGE ?" to file the changes. The screen clears for
entry of another delivery location to be changed or inquired into.
When no more delivery locations codes are to be changed or inquired into, press [TAB]
at the Delivery loc field. The Delivery locations maintenance menu reappears.
Delete Delivery Locations
From the Delivery locations maintenance menu, select Delete delivery location. A
screen appears for entry of the delivery location code you want to delete.
Enter the code or press [F1] to display each code in order, as instructed at the bottom
of the screen. Delete the code by typing Y, or press [ENTER] to accept the N default
and the screen will clear for entry of another code to be deleted.
When there are no more delivery locations to be deleted, press [TAB]. The Delivery
locations maintenance menu reappears.
Print delivery location list
From the Delivery locations maintenance menu, select Print delivery location list. A
window appears for you to select how to print the delivery location list. Follow the
screen instructions. Refer to the chapter titled, General Rules, for a detailed
explanation of printing options.
When the list has finished printing, the Delivery locations maintenance menu will
reappear.
To end the Delivery locations maintenance function, press [TAB] as the menu selection.
The F/P codes maintenance menu reappears.
Maintain landing status codes
This function provides maintenance of the DFO landing status codes and gives a
description for each valid landing status code. If you answered N to "USE LANDING
STATUS ?" in the F/P Control file, this function is not available to you.
A list of the DFO landing status codes is available in Appendix 8 titled Catch Statistics
Coding Summary. A current list is available from DFO.
Fishpro
Samco Power Accounting
Maintain System Codes
6.31
From the F/P codes maintenance menu, select Landing status codes. Then you will
see:
Add Landing Status
Select Add landing status from the Landing status codes maintenance menu and you will
see:
Fishpro
Samco Power Accounting
Maintain System Codes
6.32
Enter the following data:
1. Landing status
Enter a two digit code to represent the DFO landing status.
2. Description
Enter a 25 alphanumeric character description of the landing status.
At "FIELD NUMBER TO CHANGE ?" make any desired changes, and press [ENTER]. When
all landing status codes have been entered, press [TAB] at the Landing status field. The
Landing status codes maintenance menu reappears.
Change/inquire Landing Status
From the Landing status codes maintenance menu, select Change/inquire landing
status. A new screen appears for entry of the landing status code you want to change or
inquire into.
Enter the number or press [F1] to display each landing code in order, as instructed at
the bottom of the screen. Make any desired changes by selecting the number of the
field you want changed, then, enter the new data. Press [ENTER] at "FIELD NUMBER
TO CHANGE ?" to file the changes. The screen clears for entry of another landing status
code to change or inquire into.
When you are through with this function, press [TAB] at the Landing status field and the
Landing status codes maintenance menu reappears.
Delete Landing Status
From the Landing status codes maintenance menu, select Delete landing status. A
screen appears for entry of the landing status code you want to delete.
Enter the number or press [F1] to display each landing status code in order, as
instructed at the bottom of the screen. Make deletions by typing Y, or press [ENTER]
when asked "OK TO DELETE LANDING STATUS ? N" to accept the N default. The screen
will clear for entry of another landing status code to delete.
When there are no more landing status codes to be deleted, press [TAB] at the Landing
status field. The Landing status codes maintenance menu displays.
Fishpro
Samco Power Accounting
Maintain System Codes
6.33
Print Landing status codes
To print a list of the valid landing status codes, select Print landing status list, from the
Landing status codes maintenance menu. A window will appear for you to select how to
print the report. Follow the screen instructions. Refer to the chapter titled, General
Rules, for a detailed explanation of the printing options.
When the report has finished printing, the Landing status codes maintenance menu will
reappear.
To end the Landing status codes maintenance function, press [TAB] as the menu
selection. The F/P codes maintenance menu reappears.
Maintain packers
Any boats used as packers must be set up using this function in order to be used at ticket
entry.
From the F/P codes maintenance menu, select Maintain Packers. You will see:
Add Packer
From the Maintain packers menu, select Add packer. You will see:
Fishpro
Samco Power Accounting
Maintain System Codes
6.34
Enter the following data:
Packer code
1. Packer code
When a boat is identified or designated by DFO as a packer, the CFV# will begin with a 2
or 8. Enter the CFV# of the boat you wish to designate as a packer.
NOTE: The CFV# of the boat MUST be used as the packer code or you will get the
"BOAT NOT PACKER" message at ticket entry.
2. Packer name
Enter the name of the packer as designated by DFO, or the name of the boat. Up to 25
alphanumeric characters are allowed.
Fishpro
Samco Power Accounting
Maintain System Codes
6.35
3. A/R Account number
Enter the number of the fisher/customer to be credited for the catch value, or press
[F1] to scan the fisher/customer file.
4. Cheque account
Enter the cheque GL account number to be credited for funds paid to this packer.
If the account is not on file, you can add it now. Enter the account number and press
[ENTER]. You will be asked "THIS ACCOUNT IS NOT ON FILE - WOULD YOU LIKE TO ADD IT
? Y" Press [ENTER] to default to Y, then type in the account description.
5. Cash account
Enter the cash GL account number to be credited for cash paid to the packer.
The screen will show:
Fishpro
Samco Power Accounting
Maintain System Codes
6.36
At "FIELD NUMBER TO CHANGE ?", make any desired changes then press [ENTER]. The
screen clears for entry of the next packer.
When all packers have been added, press [TAB] at the Packer code field and the
Maintain packers menu reappears.
Change/Inquire packer
From the Maintain packer menu, select Change/inquire packer. A screen appears for
entry of the packer to be changed or inquired into.
Enter the CFV#, use [F1] to display each packer in order, or press [ENTER] and type the
name of the packer. Follow the screen instructions. Make any changes by selecting the
number of the field you want to change, then, enter the new data. Press [ENTER] at
"FIELD NUMBER TO CHANGE ?" to file the changes. The screen clears for entry of the next
packer.
Fishpro
Samco Power Accounting
Maintain System Codes
6.37
When no more packer information is to be changed or inquired into, press [TAB] at the
CFV# field. The Maintain packers menu reappears.
Delete packer
From the Maintain packers menu, select Delete packer. A new screen displays for
entry of the packer you wish to delete.
Enter the CFV# of the boat, or use [F1] to display each CFV# in order, or press [ENTER]
and type the name of the boat or press [F1] to display each boat in order. Follow the
screen instructions. When you press [ENTER] in response to the "OK TO DELETE BOAT ?"
question, the boat is deleted and the screen clears for entry of the next CFV# to
delete.
When there are no more packers to be deleted, press [TAB] as the menu selection and
the Maintain packers menu reappears.
4. Print Packer List
From the Maintain packers menu, type 4. A window appears for you to select how to
print the packer list. Follow the screen instructions. Refer to the chapter titled,
General Rules, for a detailed explanation of the printing options.
When the Packer List has finished printing, you will be returned to the Maintain packers
menu.
To end use of the Maintain packers function, press [TAB] as the menu selection. The F/P
codes maintenance menu will reappear.
Maintain quality codes
This function is used to code the quality of the fish that are delivered to the fish
processor. This is a user defined code.
From the F/P codes maintenance menu select Quality codes maintenance. You then
see:
Fishpro
Samco Power Accounting
Maintain System Codes
6.38
Add Quality Code
If you select Add quality code from the Quality Code maintenance menu, you will see
the following:
Fishpro
Samco Power Accounting
Maintain System Codes
6.39
Enter the data as follows:
1. Quality Code
Enter the 1 or 2 digit form code supplied by DFO.
2. Description
Enter up to 25 alphanumeric characters describing the quality code.
At "Field number to change ?", make any changes and press [ENTER]. The screen will
clear for entry of the next quality code.
When you have entered all the required quality codes, press [TAB] at the Quality code
field and the Quality codes maintenance menu reappears.
Change/inquire Quality Code
From the quality codes maintenance menu, select Change/inquire quality code. A new
screen displays for entry of the code you want to change or inquire into.
Enter the quality code, or press [F1] to display each code in order, as instructed at the
bottom of the screen. You will be asked "FIELD NUMBER TO CHANGE ?". Make any
necessary changes, then press [ENTER]. The screen will clear for entry of another
quality code to be changed or inquired into.
Fishpro
Samco Power Accounting
Maintain System Codes
6.40
When you are through with this function, press [TAB] at the Quality code field. The
Quality codes maintenance menu reappears.
Delete Quality Codes
From the Quality codes maintenance menu, select Delete quality code. A new screen
appears for entry of the code you want to delete.
Enter the quality code to be deleted, or press [F1] to display each code in order, as
instructed at the bottom of the screen.
When the quality code is found, the description is displayed and you are asked "OK TO
DELETE QUALITY CODE ? N". Answer Y to delete the code, press [F1] for the next code,
or press [ENTER] for N. If you answer Y, the code is deleted and you can enter another
quality code to be deleted.
When there are no more quality codes to be deleted, press [TAB] at the Quality code
field. The Quality codes maintenance menu reappears.
4. Print Quality Code List
From the Quality codes maintenance menu, type 4. A window appears for you to select
how to print the list. Follow the screen instructions. Refer to the chapter titled General
Rules for a detailed explanation of the printing options.
When the list has finished printing, the Quality codes maintenance menu will reappear.
To end the Quality codes maintenance function, press [TAB] as the menu selection.
The F/P codes maintenance menu reappears.
Maintain company divisions
Company divisions are identified by a 3 digit number and represent separate identities
when dealing with fisher in terms of T4 forms, records of employment and EI. Each
delivery location has a company division.
From the Fishpro System Codes maintenance menu select Company Division
Maintenance. You will see:
Fishpro
Samco Power Accounting
Maintain System Codes
6.41
Add division
To add a company division, select Add division. You will see:
Fishpro
Samco Power Accounting
Maintain System Codes
6.42
Enter the following data:
1. Division number
Enter a 3 digit number for this company division. This is the number used to search for
the division in the Print ROE's and Print T4 functions.
2. Division name
Enter up to 30 alphanumeric characters to describe the name of this division.
3. Address-1
Enter the first line of the address for this division. Up to 30 alphanumeric characters are
allowed. You can skip this field by pressing [ENTER].
4. Address-2
Enter the second line of the address, up to 30 alphanumeric characters. You can skip
this field by pressing [ENTER].
5. Address-3
Fishpro
Samco Power Accounting
Maintain System Codes
6.43
Enter the third address line. You can skip this field by pressing [ENTER].
6. Phone number
Enter the 12 alphanumeric character telephone number for this division. You can skip
this field by pressing [ENTER].
7. RCT employer number
Enter the 9 character RCT employer number for this division.
8. DFO company number
Enter 3 characters for the DFO company number.
At "FIELD NUMBER TO CHANGE ?", make any desired changes, then press [ENTER]. The
screen will clear for entry of another company division.
When you have completed adding company divisions, press [TAB] at the Division number
field. The Company division maintenance menu will reappear.
Change/inquire Company division
From the company divisions maintenance menu, select Change/inquire company
division. A new screen displays for entry of the code you want to change or inquire
into.
Enter the company division, or press [F1] to display each code in order, as instructed at
the bottom of the screen. You will be asked "FIELD NUMBER TO CHANGE ?". Make any
necessary changes, then press [ENTER]. The screen will clear for entry of another
company division to be changed or inquired into.
When you are through with this function, press [TAB] at the Company division field. The
Company divisions maintenance menu reappears.
Delete Company divisions
From the Company divisions maintenance menu, select Delete company division. A new
screen appears for entry of the code you want to delete.
Enter the company division to be deleted, or press [F1] to display each code in order, as
instructed at the bottom of the screen.
When the company division is found, the description is displayed and you are asked "OK
TO DELETE COMPANY DIVISION ? N". Answer Y to delete the code, press [F1] for the
Fishpro
Samco Power Accounting
Maintain System Codes
6.44
next code, or press [ENTER] for N. If you answer Y, the code is deleted and you can
enter another company division to be deleted.
When there are no more company divisions to be deleted, press [TAB] at the Company
division field. The Company divisions maintenance menu reappears.
Print Company division List
From the Company divisions maintenance menu, select Print company division list. A
window appears for you to select how to print the list. Follow the screen instructions.
Refer to the chapter titled General Rules for a detailed explanation of the printing
options.
When the list has finished printing, the Company divisions maintenance menu will
reappear.
To end the Company divisions maintenance function, press [TAB] as the menu selection.
The F/P codes maintenance menu reappears.
Maintain catch reports
This function is used to add, delete and modify user designed catch reports. The reports
are user definable and print from the fish ticket history file.
From the Fishpro Codes maintenance menu select Catch Reports. You will see:
Fishpro
Samco Power Accounting
Maintain System Codes
6.45
Press F2 for printout
At the Report # you can enter the number of an existing report, the number of a new
report to be created, or press [F2] to get a listing of all reports currently available.
You are then prompted for the report title which will be printed in the heading of the
printed report. Press [ENTER] if you wish to leave it unchanged.
At this point you can use any of the following keys to do:
[F1]
[F2]
A
S
D
[ENTER]
[TAB]
-
change to the previous page
change to the next page
add a new line to the report
change the selection criteria for the line
delete the line
to change the existing line
to exit to the REPORT # prompt
The UP and DOWN arrow keys are used to move the cursor to a position where the
appropriate command can be entered against a given line number.
If you choose to add or change the existing line the following fields are available to be
modified:
Line #
The line number determines what order the report lines will be printed on the report.
The line number is not printed on the report. It is suggested that you [Enter] the line
numbers in increments of 10 to allow lines to be inserted later.
Description
Enter the description to be shown on the report for this line. Up to 34 alpha-numeric
characters are allowed.
Include: pieces/weight/value/tickets
These four columns determine whether the totals for these fields are printed on the
report. The default for each column is Y.
Detail?
Enter the code corresponding to the type of detail you want printed on the report for
each line or enter for NONE. The valid codes are displayed on the bottom of the screen
and are:
G
- Gear code
Fishpro
Samco Power Accounting
Maintain System Codes
6.46
S
F
D
L
Q
-
Species code
Form code
Delivery location
Landing status
Quality code
If you adding a new line then you are prompted for the selection criteria used for the
line. You will see the following screen:
At this point you can use any of the following keys to do:
[F1]
[Shift] [F1]
A
D
[ENTER]
[TAB]
-
change to the previous page
change to the next page
add a new line to the report
delete the line
to change the existing line
to exit back to the LINE # prompt
The UP and DOWN arrow keys are used to move the cursor to a position where the
appropriate command can be entered against a given line number.
If you choose to add or change the existing line the following fields are available to be
modified:
Gear
Fishpro
Samco Power Accounting
Maintain System Codes
6.47
This is the gear type to be included in this report line. The gear type is set up under the
Maintain Gear Types function.
Species codes
This the species code to be included in this report line. There are two fields to be
entered which represents the start and end of the range to be selected. The gear type is
set up under the Maintain Species Codes function.
Form
This the form code to be included in this report line. There are two fields to be entered
which represents the start and end of the range to be selected. The gear type is set up
under the Maintain Form Codes function.
Dlv
This is the delivery location to be included in this report line. The delivery location is set
up under the Maintain Delivery Locations function.
LS
This is the landing status to be included in this report line. The landing status is set up
under the Maintain Landing Status function.
Area
This the area code to be included in this report line. There are two fields to be entered
which represents the start and end of the range to be selected. The gear type is set up
under the Maintain Area Codes function.
Qlty
This is the quality code to be included in this report line. There are two fields to be
entered which represents the start and end of the range to be selected. The gear type is
set up under the Maintain Quality Codes function.
Multiple lines can be set up with different codes and ranges in each. They will all be
considered in the fish ticket selection.
To end this function
Hit [TAB] and you will be return to the LINE # prompt. Hit [TAB] again and you will be
returned to the REPORT # prompt.
Fishpro
Samco Power Accounting
Maintain System Codes
6.48
Hitting the [TAB] key one more time will return you to the F/P codes maintenance
menu.
Maintain deduction types
Deduction types are identified by a 3 digit number and represent deductions that may
be used in ticket processing
From the Fishpro System Codes maintenance menu select Deduction types. You will
see:
Add Deduction Type
To add a deduction type, select Add deduction type. You will see:
Fishpro
Samco Power Accounting
Maintain System Codes
6.49
Enter the following data:
1. Deduction code
Enter a 3 digit number for this deduction type.
2. Description
Enter up to 25 alphanumeric characters to describe this deduction type.
3. Short desc.
Enter up to 8 alphanumeric characters to provide a short description for this deduction
type.
4. When to deduct ?
The options are..
D
E
A
When demanded
When entered
Always
5. Deduct on adjustments ?
Answer Y or N depending on whether this deduction applies to adjustment tickets.
Fishpro
Samco Power Accounting
Maintain System Codes
6.50
6. Deduct on debit accts ?
Answer Y or N depending on whether this deduction applies to debit accounts.
7. Default percent
Enter the percentage that applies to this deduction.
8. Trip limit
Enter the trip limit or press ENTER to leave blank for no limit.
9. Year limit
Enter the year limit or press ENTER to leave blank for no limit.
10. Calc on adjusted value ?
Answer Y or N depending on whether the deduction applies to the adjusted value.
11. Pay type
The options are .
Q
R
G
A
Check
Receipt
G/L account
A/R customer account
12. This field depends on the selection in Pay type.
Q
R
G
A
n/a
n/a
G/L account #
Customer/fisher account #
13. A/R doc type
This field depends on the selection in Pay type.
Q
R
G
A
Defaults to Check
Defaults to Receipt
Options are J – journal voucher, X – tax,
Options are J – journal voucher, X – tax,
Fishpro
Samco Power Accounting
M - miscellaneous
M - miscellaneous
Maintain System Codes
6.51
If the pay type entered above is either Q for cheque or R for receipt, another screen is
displayed to enter the Payee information.
Fill in the address fields for the Payee if it applies to this deduction i.e. it is a demand on
the fisher’s account and must be remitted by your company.
At "FIELD NUMBER TO CHANGE ?", make any desired changes, then press [ENTER]. The
screen will clear for entry of another deduction type.
When you have completed adding deduction types, press [TAB] at the Deduction type
number field. The Deduction type maintenance menu will reappear.
Change/inquire Deduction type
From the deduction types maintenance menu, select Change/inquire deduction type.
A new screen displays for entry of the code you want to change or inquire into.
Enter the deduction type, or press [F1] to display each code in order, as instructed at
the bottom of the screen. You will be asked "FIELD NUMBER TO CHANGE ?". Make any
necessary changes, then press [ENTER]. The screen will clear for entry of another
deduction type to be changed or inquired into.
When you are through with this function, press [TAB] at the Deduction type field. The
Deduction types maintenance menu reappears.
Delete Deduction types
From the Deduction types maintenance menu, select Delete deduction type. A new
screen appears for entry of the code you want to delete.
Fishpro
Samco Power Accounting
Maintain System Codes
6.52
Enter the deduction type to be deleted, or press [F1] to display each code in order, as
instructed at the bottom of the screen.
When the deduction type is found, the description is displayed and you are asked "OK TO
DELETE DEDUCTION TYPE ? N". Answer Y to delete the code, press [F1] for the next
code, or press [ENTER] for N. If you answer Y, the code is deleted and you can enter
another deduction type to be deleted.
When there are no more deduction types to be deleted, press [TAB] at the Deduction
type field. The Deduction types maintenance menu reappears.
Print Deduction type List
From the Deduction types maintenance menu, select Print deduction type list. A
window appears for you to select how to print the list. Follow the screen instructions.
Refer to the chapter titled General Rules for a detailed explanation of the printing
options.
When the list has finished printing, the Deduction types maintenance menu will
reappear.
To end the Deduction types maintenance function, press [TAB] as the menu selection.
The F/P codes maintenance menu reappears.
Maintain expense types
Expense types are identified by a 3 digit number and represent expenses that may be
used in ticket processing
From the Fishpro System Codes maintenance menu select Expense types. You will see:
Fishpro
Samco Power Accounting
Maintain System Codes
6.53
Add Expense Type
To add an expense type, select Add expense type. You will see:
Enter the following data:
1. Expense code
Fishpro
Samco Power Accounting
Maintain System Codes
6.54
Enter a 3 digit number for this expense type.
2. Description
Enter up to 25 alphanumeric characters to describe this expense type.
3. Default type
Enter up to a one digit code for the default type.
4. Default amount
Enter the default amount for this expense.
5. Pay type
The options are
G
A
G/L account
A/R customer account
5. This field depends on the selection in Pay type.
G
A
G/L account #
Customer account #
At "FIELD NUMBER TO CHANGE ?", make any desired changes, then press [ENTER]. The
screen will clear for entry of another expense type.
When you have completed adding expense types, press [TAB] at the Expense type
number field. The Expense type maintenance menu will reappear.
Change/inquire Expense type
From the expense types maintenance menu, select Change/inquire expense type. A
new screen displays for entry of the code you want to change or inquire into.
Enter the expense type, or press [F1] to display each code in order, as instructed at the
bottom of the screen. You will be asked "FIELD NUMBER TO CHANGE ?". Make any
necessary changes, then press [ENTER]. The screen will clear for entry of another
expense type to be changed or inquired into.
When you are through with this function, press [TAB] at the Expense type field. The
Expense types maintenance menu reappears.
Delete Expense types
Fishpro
Samco Power Accounting
Maintain System Codes
6.55
From the Expense types maintenance menu, select Delete expense type. A new screen
appears for entry of the code you want to delete.
Enter the expense type to be deleted, or press [F1] to display each code in order, as
instructed at the bottom of the screen.
When the expense type is found, the description is displayed and you are asked "OK TO
DELETE EXPENSE TYPE ? N". Answer Y to delete the code, press [F1] for the next code,
or press [ENTER] for N. If you answer Y, the code is deleted and you can enter another
expense type to be deleted.
When there are no more expense types to be deleted, press [TAB] at the Expense type
field. The Expense types maintenance menu reappears.
Print Expense type List
From the Expense types maintenance menu, select Print expense type list. A window
appears for you to select how to print the list. Follow the screen instructions. Refer to
the chapter titled General Rules for a detailed explanation of the printing options.
When the list has finished printing, the Expense types maintenance menu will reappear.
To end the Expense types maintenance function, press [TAB] as the menu selection.
The F/P codes maintenance menu reappears.
Maintain species exports
Species exports are identified by a 3 digit number and represent expenses that may be
used in ticket processing
From the Fishpro System Codes maintenance menu select Species exports. You will
see:
Fishpro
Samco Power Accounting
Maintain System Codes
6.56
Add Species export
To add a species export, select Add species export. You will see:
Enter the following data:
1. Export group
Fishpro
Samco Power Accounting
Maintain System Codes
6.57
Enter up to 5 alphanumeric characters for this species export.
2. Description
Enter up to 25 alphanumeric characters to describe this species export.
3. Export type
The options are
T
O
Transfer file
Office sales
4. Active ?
Enter Y or N depending on whether this export group is active now.
5. Len of sequence
The sequence number can be from 1 to 8 digits.
6. Next sequence #
This is the next sequence number to be used for next export.
7. File name
Use the following codes in the file name
%s
%c
%u
%y
%m
%d
sequence #
company id
user id
year
month
day
8. Include prior year adj ?
Answer Y or N depending whether the prior year adjustments should be included in the
file.
9 - 17. Field 1 to Field 9
Enter the field name and its length.
At "FIELD NUMBER TO CHANGE ?", make any desired changes, then press [ENTER]. The
next screen for the entry of the field information will appear:
Fishpro
Samco Power Accounting
Maintain System Codes
6.58
Press TAB when finished entering the lines and the screen will clear for entry of another
species export.
When you have completed adding species exports, press [TAB] at the Species export
number field. The Species export maintenance menu will reappear.
Change/inquire Species export
From the species exports maintenance menu, select Change/inquire species export. A
new screen displays for entry of the code you want to change or inquire into.
Enter the species export, or press [F1] to display each code in order, as instructed at
the bottom of the screen. You will be asked "FIELD NUMBER TO CHANGE ?". Make any
necessary changes, then press [ENTER]. The screen will clear for entry of another
species export to be changed or inquired into.
When you are through with this function, press [TAB] at the Species export field. The
Species exports maintenance menu reappears.
Delete Species exports
From the Species exports maintenance menu, select Delete species export. A new
screen appears for entry of the code you want to delete.
Enter the species export to be deleted, or press [F1] to display each code in order, as
instructed at the bottom of the screen.
Fishpro
Samco Power Accounting
Maintain System Codes
6.59
When the species export is found, the description is displayed and you are asked "OK TO
DELETE SPECIES EXPORT ? N". Answer Y to delete the code, press [F1] for the next
code, or press [ENTER] for N. If you answer Y, the code is deleted and you can enter
another species export to be deleted.
When there are no more species exports to be deleted, press [TAB] at the Species
export field. The Species exports maintenance menu reappears.
Print Species export List
From the Species exports maintenance menu, select Print species export list. A window
appears for you to select how to print the list. Follow the screen instructions. Refer to
the chapter titled General Rules for a detailed explanation of the printing options.
When the list has finished printing, the Species exports maintenance menu will
reappear.
To end the Species exports maintenance function, press [TAB] as the menu selection.
The F/P codes maintenance menu reappears.
Calculate export coding
From the Species exports maintenance menu, select Calculate export coding and you
will see:
Fishpro
Samco Power Accounting
Maintain System Codes
6.60
Enter the following data:
1. Coding group
Enter up to 5 alphanumeric characters for this coding group.
2. Start date
Enter the start date in MMDDYY format or press F1 for “Earliest”
3. End date
Enter the end date in MMDDYY format or press F1 for “Latest”
4. Start ticket #
Enter the first ticket # of the range you wish to print or press F1 for “First”.
5. End ticket #
Enter the last ticket # of the range you wish to print or press F1 for “Last”.
6. Print detail ?
Answer N if you do not want ticket detail on the report or press ENTER to accept the
default of Y.
7. Do export ?
Enter Y to update the YTD file and create an export file or N to only print a report.
8. Reset YTD ?
This field in not applicable if you entered N to Do export?
Enter Y to clear year-to-date totals or N to keep and add to them.
9. Transmit all ?
This field in not applicable if you entered N to Do export?
Enter Y to export new totals or N to export differences from last export.
When the report has finished printing, the Species exports maintenance menu will
reappear.
To end the Species exports maintenance function, press [TAB] as the menu selection.
The F/P codes maintenance menu reappears.
_______________________________
Fishpro
Samco Power Accounting
Maintain System Codes
6.61
Chapter 7
Maintain Fishers
Introduction
This function is used to add and maintain information about your fishers.
The Fisher/Customer file is shared by Accounts Receivable and Fishpro.
To begin this function
From the Fishpro menu, select Maintain fishers. You will then see:
Fishpro
Samco Power Accounting
Maintain Fishers
7.1
1. Customer #
You may find a fisher/customer that already exists by entering a ?, or by pressing ENTER
to search by the following fields:
If you want to enter a new customer, press F2 for quick add. You will see the following
window:
Fishpro
Samco Power Accounting
Maintain Fishers
7.2
Use the fisher’s SIN number as the customer number or automatically assign the next
customer number by pressing F1.
2. SIN #
Enter the SIN number of the fisher or leave blank
3. Name
Press F2 to enter an individual’s name by Last name, First name or enter a company’s
name. In some cases, the fisher may operate as a company. The name can be a
combination of upper and/or lowercase to a maximum of 25 characters.
NOTE:
When deciding upon the naming convention, you should consider the following:
the fisher's name will appear on ROE's, T4's, labels and reports, invoices,
statements, cheques and receipts as typed here.
many of the fields throughout the package will allow for searching by the first
five characters. The alphabetic customer list uses the first five characters for
ordering names.
Fishpro
Samco Power Accounting
Maintain Fishers
7.3
You could skip this field and enter it at ticket entry. At ticket entry, the first person
entered on a boat is considered to be the skipper. You may want to enter all your
skippers at this time, and add deckhands at ticket entry. Also, some of the information
requested here is not requested at ticket entry.
4. Address-1
Enter the first line of the fisher/customer address, up to 25 alpha-numeric characters.
If you do not need 2 lines for the address, press ENTER for the lines you don't need.
5. Address-2
Enter the second line of the fisher/customer address, up to 25
characters.
alphanumeric
6. City Prov
Enter the name of the city, up to 15 alphanumeric characters.
Enter a 2 character postal service code for the province.
7. Post code
Enter the postal code.
8. Phone #
Enter the fisher/customer's telephone number. Up to 12 alphanumeric characters are
allowed.
9. EIC status
This field is used to define whether or not EI will be deducted.
I = insurable calculation
These three categories are usually used for a skipper. The skipper may own the boat,
operate the boat as a company or operate a boat owned by another company.
Generally speaking, the skipper's share of the catch value is exempt from EI payment.
C = company exempt
X = exempt
L = lease
For customers other than fishers, use "X".
For Native fishers, use “N”.
Fishpro
Samco Power Accounting
Maintain Fishers
7.4
For foreign fishers, use “F”.
You will then be returned to the Maintain fisher window and enter any other
information that is necessary for the fisher.
3. CFV #
Enter a ? to search for the boat to be associated with the fisher.
NOTE: You must have previously used the Load boat file function or have entered the
boat information in Maintain boats.
4. Last trip
Enter the date of the last trip for this fisher. If there is no last trip date, press ENTER
for NONE.
5. Skipper
Answer Y if he or she is a skipper and press ENTER to accept the default N if he or she is
a deckhand.
6. EI status
The options are:
I
Insurable
C
Company
X
Exempt
L
Lease
N
Native
F
Foreign
7. EI paid
Enter any EI contributions paid for the year-to-date. This field will be updated
automatically as EI contributions are deducted from the fisher's portion of the catch
value. You may set this entry to zero by pressing ENTER.
8. EI adjustment
This field will be updated automatically by the Recalculate YTD EI adjustment function.
Any adjustment calculated will be entered here. This amount plus the EI paid amount
will be the figure printed on the T4.
Fishpro
Samco Power Accounting
Maintain Fishers
7.5
9. WCB status
The options are
X exempt
R regular (subject to yearly limit)
N no limit
10. Income amount
Enter any monies paid for the year-to-date. This field will be updated automatically by
the fisher's portion of the catch value. You may set this entry to zero by pressing
ENTER.
11. Gross earnings
This is the amount that is accumulated for Box 78 of the T4 slip.
For owners, it is equal to the catch value i.e., the boat gross total.
For crew, it equal to their share of the catch.
12. Insurable amt
Enter any monies paid that are EI insurable for the year-to-date. This field will be
updated automatically by the fisher's portion of the catch value. You may set this
entry to zero by pressing ENTER.
For owners
For crew
i.e. Type 1 fishers, it is equal to the boat gross less 25%,
less crew share, up to the maximum insurable earnings.
i.e. Type 2 fishers, it is equal to the catch share, up to the
maximum insurable earnings.
13. Credit limit
Enter the fisher/customer's credit limit. Up to 6 digits are allowed (from 0 to 999,999
in whole dollars). The entry of 999,999 means unlimited credit.
Avail credit
This field will be calculated based on the credit limit minus the amount of credit
extended and will be filled in after entry of the credit rating. It cannot be accessed.
14. Gear types
Gear types will be added to this field as tickets are posted. You may want to enter the
gear type if this fisher owns a boat, or press ENTER to leave blank.
15. Message-1
16. Message-2
Fishpro
Samco Power Accounting
Maintain Fishers
7.6
Enter messages which may have been left for the fisher. You can have two messages or
use the two to incorporate one message. Press ENTER to skip one or both of these
fields.
17. First/Last
Name
Fisher name OR
Company name
18 - 22. Address and phone fields entered in quick add
23. Fax
Enter the fisher/company's fax number. Up to 12 alphanumeric characters are
allowed.
24. Parent cust #
This is the parent customer number for reference only.
25. Print cust #
If the fisher is operating as a company, his or her name must appear on T4’s. Therefore,
you would enter his name here. For all other fishers you would press ENTER to skip the
field.
26. Net partnership amt
This is the amount that is accumulated for Box 79 of the T4 slip.
For owners, it is equal to the catch value i.e., the boat gross total
Less 25% prescribed amount
Less amount to sharepersons
Multiplied by the partnership allocation percent
For crew, this field is not applicable.
27. Share-person amt
This is the amount that is accumulated for Box 80 of the T4 slip.
For owners, this field is not applicable.
For crew, it is equal to their catch share.
You are asked "FIELD NUMBER TO CHANGE ?". Make any necessary changes, then press
ENTER.
The second screen of Maintain fishers appears:
Fishpro
Samco Power Accounting
Maintain Fishers
7.7
If you have set up Deduction types in Maintain system codes, you may set up any
deductions that apply to this fisher and record the payee if you have received a demand
note or garnishee notice.
You are asked "FIELD NUMBER TO CHANGE ?". Make any necessary changes, then press
ENTER.
The third screen of Maintain fishers appears.
Fishpro
Samco Power Accounting
Maintain Fishers
7.8
This screen tracks the trip history for this fisher.
At FIELD NO TO CHANGE ?, you may enter the line number and change the following
information:
Trip Date
Status - insurable
ROE issued
Days Worked
That status column has two pieces of information:
1 - C or O for whether the fisher was an owner or a crew member for that ticket.
2 – EI status: I=Insurable, C=Company, X=Exempt, L=Lease, N=Native, F=Foreign
Press F4 for detail, and enter the line number for the ticket information.
Press F3 to reset the ROE flags from Y to N. The ROE flag gets set to Y after the Record
of Employment has been printed. Resetting to N is uncommon and you are given a
warning about the ROE’s. They are serialized government documents that must be
accounted for.
Press F2 to override this warning and reset all the Y flags to N. If you enter for OK,
nothing will happen.
TAB out of this screen to return to the trip history screen.
You are asked "FIELD NUMBER TO CHANGE ?". Press ENTER and the fourth screen of
Maintain fishers appears.
Fishpro
Samco Power Accounting
Maintain Fishers
7.9
This screen displays the fisher A/R account. If there is a “U” beside the document
number, this means that the document has been entered but not yet posted.
In this case, the company owes the fisher monies for one trip.
Press F3 to print out a copy of the account.
Press F4 and the line number to display the ticket details.
Press ENTER to return to the Maintain fisher entry screen.
____________________
Fishpro
Samco Power Accounting
Maintain Fishers
7.10
Chapter 8
Maintain Boats
Introduction
This function is used to add, change/inquire, delete or list information about boats. A
file supplied by DFO contains a listing of every boat within a DFO geographical area.
From the Fishpro menu, select Maintain boats, and you will see:
Fishpro
Samco Power Accounting
Maintain Boats
8.1
Add boats
Use the Add boat function to add new boats to the boat file. Any boats not included in
the DFO boat file must be added using this function. Select Add boat and the following
screen will appear.
Enter the following data:
1. CFV#
Enter the Canadian Fishing Vessel Number as provided by DFO. If you enter a CFV# of a
boat in the DFO file, the name will be displayed along with either the NONE defaults for
"Last trip" and "Clearance date", or the year-to-date figures for the "Gross amount" and
"Total Weight" will be displayed.
You will not be able to change the CFV#. If you need to make a change to the CFV#, the
boat must be deleted then re-added.
2. Boat name
If this boat is new since the DFO file was received, enter the registered name of the
boat.
Fishpro
Samco Power Accounting
Maintain Boats
8.2
NOTE: This field is not entered as stored in the customer/fisherman file and is only
used here for search purposes with the F1 key.
3. Last trip
Enter the last trip date for the boat. This field is optional, you can press ENTER to skip
the field or enter the date in MMDDYY format.
4. Skipper
This field is optional. You can enter the skipper/fisherman number, or name. This
must be in your fisherman/customer file.
Press F1 to display the fishermen in order, as directed at the bottom of the screen, or
type the fisherman's SIN, or press ENTER and type the skipper's name. You can skip this
field by pressing ENTER.
5. Gear types
This field is optional. Enter the gear type code(s) associated with this boat, or press
ENTER to leave blank. You can enter up to five different gear type codes for each boat.
This field will be updated as tickets are posted.
6. Owner cust#
This field is optional. Enter the owner of the boat's customer number as stored in the
customer/fisherman file, or press ENTER to leave blank.
7. Gross amount
This field will be calculated as fish tickets are processed. If you have a year-to-date
amount to bring forward, enter it here, or press ENTER for zero.
8. Total weight
This field will be calculated as fish tickets are processed. If you have a year-to-date
amount to bring forward, enter it here, or press ENTER for zero.
Taxes YTD These fields are only displayed if the Fishpro control file has the tax codes
and literals set up.
9. "literal from control file"
10. "literal from control file"
11. "literal from control file"
These fields are the Year To Date accumulators for taxes on fish caught by this boat.
Fishpro
Samco Power Accounting
Maintain Boats
8.3
At "FIELD NUMBER TO CHANGE ?", press ENTER and the screen clears for entry of the
next CFV#.
When you have added the information for all the boats you want, press END at the CFV#
field and the Maintain boats menu reappears.
Change/Inquire boat
From the Boat file maintenance menu, select Change/Inquire boat. A screen appears
for entry of the boat to be changed or inquired into. Enter the CFV#, use F1 to display
each CFV# in order, press ENTER and type the name of the boat, or use F1 to display the
boat names in order. Follow the screen instructions.
If you inquire into a boat after tickets have been processed for that boat, the screen will
look similar to this:
If information appears in fields 3, 5, 7, 8 or 9, 10 and 11, you will not be able to change
it as it is historical data.
Make any changes by selecting the number of the field you want to change, then enter
new data. Press ENTER at "FIELD NUMBER TO CHANGE ?" to file the changes.
The second screen of boat information will appear.
Fishpro
Samco Power Accounting
Maintain Boats
8.4
Press ENTER at "FIELD NUMBER TO CHANGE ?" to file the changes. If there are trips on
file for this boat, you will see the following screen:
This screen is for viewing only. Press ENTER to continue.
Fishpro
Samco Power Accounting
Maintain Boats
8.5
An empty screen will appear for entry of the next boat.
When no more boat information is to be changed or inquired into, press END at the CFV#
field. The Maintain boat menu reappears.
Delete boat
From the Boat file maintenance menu, select Delete boat. A new screen displays for
entry of the boat you wish to delete. Enter the CFV#, or use F1 to display each CFV# in
order, or press ENTER and type the name of the boat, or use F1 to display the boat
names in order. Follow the screen instructions.
Answer Y or press ENTER to respond N to the "OK TO DELETE BOAT ? N" question. The
screen clears for entry of another CFV# to delete.
Depending upon whether you started your search by CFV#, the boat name or the
customer name, and the whereabouts of this information in the numeric or alphabetic
sequence, using the F1 key will display the next CFV#, boat name or fisherman name in
order from that point on.
When there are no more boats to be deleted, press END. The Boat file maintenance
menu reappears.
Numeric boat list
You use this function to get a numeric list of the boats that have fished for your
company. From the Maintain boat menu, select Numeric boat list, and you will see:
Fishpro
Samco Power Accounting
Maintain Boats
8.6
Enter the following data:
1. Starting boat number
Enter the CFV# of the boat you want to appear first on your listing or press F1 for "First".
2. Ending boat number
Enter the CFV# of the boat you want to appear last on your listing or press F1 for "Last".
3. Print inactive boats
Answer Y to include boats not currently fishing for your company but have during the
year. Type N if you do not want them included in the listing.
4. Print production
Answer Y to include the total weight and gross total for each boat. Type N if you do not
want these figures included in the listing.
At "FIELD NUMBER TO CHANGE ?" make any desired changes, then press ENTER. A
window appears for you to select how to print your listing. Follow the screen
instructions. Refer to the chapter titled, General Rules, for detailed information about
printing.
Fishpro
Samco Power Accounting
Maintain Boats
8.7
After the report is printed on a printer, the Fishpro menu will reappear. After the
report is printed to disk or displayed on the screen, the Maintain boat screen reappears.
Alphabetic boat list
Use this function to get an alphabetic list of the boats that have fished for your
company. From the Maintain boat menu, select Alphabetic boat list and you will see:
Enter the following data:
1. Starting boat name
Enter the name of the boat you want to appear first on your listing, or press F1 for
"First".
2. Ending boat name
Enter the name of the boat you want to appear last on your listing, or press F1 for "Last".
3. Print inactive boats
Fishpro
Samco Power Accounting
Maintain Boats
8.8
Answer Y to include boats printed that are not currently fishing for your company but
have during the year. Type N if you do not want them included.
4. Print production
Answer Y to include the total weight and gross total for each boat. Type N if you do not
want these figures included in the listing.
At "FIELD NUMBER TO CHANGE ?" make any desired changes, then press ENTER. A
window appears for you to select how to print your listing. Follow the screen
instructions.
After the report is printed on a printer, the Fishpro menu reappears. After the report
is printed to disk or displayed on the screen, the Maintain boat menu reappears.
Load boat file
When first setting up your company, the first function you need to use is Load the DFO
boat file. From the Maintain boat menu, select Load boat file and you will see:
Enter the following data:
1. DFO filename
This is the name of the file DFO supplies and contains all the boats in a geographic area.
2. Add new boats
Fishpro
Samco Power Accounting
Maintain Boats
8.9
If this is the first time you are using this function, answer Y and all boats will be added.
If you are loading an updated DFO file, press ENTER to accept the N default. Only the
boats currently in your boat file will be updated.
At "FIELD NUMBER TO CHANGE ?", press ENTER. The screen will show a count of boats
as they are being updated or added.
When the process is complete, the message "PROCESSING COMPLETE - PRESS END TO
RETURN TO BOAT MENU" appears.
NOTE: You will only use Load boat file initially or when DFO issues a new file.
To end the Boat file maintenance function, press END as the menu selection. The
Fishpro menu reappears.
____________________
Fishpro
Samco Power Accounting
Maintain Boats
8.10
Chapter 9
Maintain Prices
Introduction
This application provides the prices by species and gear type at ticket entry. The price
types can be by single unit measurements of weight or unit. The species and gear type
codes will be validated against the ones you set up in Maintain species codes and
Maintain gear types.
If you see the message "SPECIES (gear type) NOT ON FILE", you must use the Add option
of the respective Maintenance function in Maintain System Codes.
Use this function to add, change or inquire into, delete or print a list of prices for
species by gear type.
NOTE: If a price does not exist and is needed during fish ticket entry a price of zero
dollars is assumed. The price can be overridden and the user will be prompted to make
the price permanent. If the price is made permanent during fish ticket entry a new
price item is created in the price file.
From the Fishpro main menu, select Maintain prices. Then you will see:
Fishpro
Samco Power Accounting
Maintain Prices
9.1
Add price
Select Add price from the Maintain prices menu and you will see the following screen:
Enter the following data:
Fishpro
Samco Power Accounting
Maintain Prices
9.2
1. Delivery location
Enter a valid delivery location and the description for the delivery location will be
displayed.
2. Packer price?
Enter Y and this price is only used during fish ticket entry if the boat entered is a packer.
This allows you to set up different prices for fish delivered to a packer.
3. Species
Enter a valid species code and the description for the species will be displayed.
4. Gear type
Enter a valid gear type code and the description for the gear type will be displayed.
NOTE: If the species and gear type you enter is in the price file, the information for
items 5, 6 and 7 will be displayed. You can change fields 5 - 7 at "FIELD NUMBER TO
CHANGE ?". If you do not wish to make any changes to the information, press ENTER at
"FIELD NUMBER TO CHANGE ?".
5. Price type
Enter one of the following codes to define what the single unit price is to be for each
species:
W
U
T
- by weight
- by unit
- by ton
If you going to use the auto-piece count capability at ticket entry, the price type must
be by unit.
6. Price
Enter the amount you will pay for a single unit measurement for each species.
7. Average weight
Press ENTER for the default of .00 or enter the average weight for this species. If you
are going to use the auto-piece count capability at ticket entry, you must enter an
average weight for the species.
8. Year end price
Fishpro
Samco Power Accounting
Maintain Prices
9.3
At "FIELD NUMBER TO CHANGE ?", press ENTER or make any desired changes, and then
press ENTER. The screen clears for the next price code.
When there are no more prices to add, press TAB at the first field and the Maintain
prices menu reappears.
Change/Inquire prices
From the Maintain prices menu, select Change/Inquire prices. A new screen displays
for entry of the species code price you want to change or inquire into. Enter the code,
or press F1 to display next price or F2 for next species code, as instructed at the bottom
of the screen.
You will be asked "FIELD NUMBER TO CHANGE ?". Make any desired changes to fields 3
- 5, then press ENTER. The screen clears for entry of the next species code price.
When all desired price changes/inquires have been made, press END as the menu
selection. The Price maintenance menu reappears.
Delete Price
From the Maintain prices menu, select Delete prices. A new screen displays for entry
of the species code price you wish to delete. Enter the code or press F1 to display each
price in order, as instructed at the bottom of the screen.
Make your decision by
typing Y, pressing F1 to see another code, or pressing ENTER to bring up any empty
screen for entry of another species code.
When there are no more prices to be deleted, press TAB at the first field. The Maintain
prices menu reappears.
Update prices for a gear type
From the Maintain prices menu, select Update prices for a gear type and the following
screen will be displayed:
Fishpro
Samco Power Accounting
Maintain Prices
9.4
Enter the following data:
Delivery location
Enter the delivery location for this price, or press F1 for next delivery location and
confirm correct delivery location.
For packers?
Enter Y if this price is for a packer, or press ENTER to accept the default of N.
Gear type
Enter the gear type for this price, or press F1 for the next gear type and confirm correct
gear type.
At this point you can use any of the following keys to do:
ENTER- to change the existing species price
F2
- add a new species price
F3
- delete the species price
END - to exit to the REPORT # prompt
PGUP - change to the previous page
PGDN - change to the next page
Fishpro
Samco Power Accounting
Maintain Prices
9.5
The UP and DOWN arrow keys are used to move the cursor to a position where the
appropriate command can be entered against a given species price.
If you choose to add or change the existing species price, the following fields are
available to be modified:
Species
Enter a valid species code. If the species code is not set up the message "Species code
not on file" will be displayed. You will be re-prompted for a species code.
Description
The species description will be displayed. If this description is not correct it should be
changed under the Maintain species function of the Maintain system codes menu.
Type
Enter the unit pricing type code to use for this species. The valid type codes are:
W
U
T
- by weight
- by unit
- by ton
Price
Enter the price for the unit specified in the previous field. Maximum of $99999.999 per
unit.
Avg-weight
Enter the average weight for this species. This weight is used during fish ticket entry to
determine number of pieces under the auto-piece-count process.
When all changes and additions have been completed the press TAB and the screen will
be cleared and you will be returned to the delivery location field.
If all pricing changes have been completed then press TAB and you will be returned to
the Maintain prices menu.
Price list in gear type order
From the Maintain prices menu, select Price list in gear type order and the following
screen will display:
Fishpro
Samco Power Accounting
Maintain Prices
9.6
Enter the following data:
1. Gear type
Enter a valid gear type, or F1 for all gear types.
2. Delivery location
Enter a valid delivery location, or F1 for all delivery locations.
3. Print packer prices?
Enter Y for yes, N for no, or A for all prices.
At "FIELD NUMBER TO CHANGE ?", press ENTER or make any desired changes, and then
press ENTER. The printer window then appears and you can select to which printer the
report is to be sent.
Price list in species order
From the Maintain prices menu, select Price list in species order and the following
screen will display:
Fishpro
Samco Power Accounting
Maintain Prices
9.7
Enter the following data:
1. Start species
Enter a valid species, or F1 for "First".
2. End species
Enter a valid species, or F1 for "Last".
3. Delivery location
Enter a valid delivery location, or F1 for all delivery locations.
4. Print packer prices?
Enter Y for yes, N for no, or A for all prices.
At "FIELD NUMBER TO CHANGE ?", press ENTER or make any desired changes, and then
press ENTER. The printer window then appears and you can select to which printer the
report is to be sent.
To end the Maintain prices function, press TAB at the menu selection. The Fishpro
menu reappears.
____________________
Fishpro
Samco Power Accounting
Maintain Prices
9.8
Chapter 10
Fish Ticket Processing
Introduction
This function is used to:
setup header information for new tickets
make adjustments to tickets
reverse a posted ticket
process tickets
distribute catch values to fishers
process distributions
print ticket edit lists
produce a tickets on hold report
post tickets
print a report of undistributed tickets
make automatic adjustments to prices for completed tickets
The default for many of the fields is either information in the Fishpro Control File,
System Code files or the information entered on the last ticket. Therefore, it is
suggested you group your tickets so you can input tickets with similar information one
after another. An example would be gear type. You would group all tickets with the
same gear type codes together so you do not have to change this field for every ticket
entered.
If you wish to adjust the price paid on a ticket, you can make adjustments to the original
ticket. There are three methods: one for individual tickets, one for a date range by
Fishpro
Samco Power Accounting
Fish Ticket Processing
10.1
gear type, catch area, delivery location and species code, and a non-specific catch
adjustment ticket.
If there are corrections to be made to a posted ticket i.e. changes in species or, for
changes to the distribution between owner and deckhands, it is best to reverse the
original ticket and issue an amended one.
If the gear type is set to “Always distribute- No”, a ticket may be posted without a
settlement to the crew. This ticket may be settled later with a distribution ticket.
Refer to the chapter titled Maintain System Codes for gear type setup.
The Ticket processing function handles two methods of calculating catch values:
1.
Individual species by unit or weight and gear type.
2.
Auto piece count by unit and weight based on an average weight by species and
gear type.
At any time during the Process ticket and Process distribution functions press ESC and
you will see the following choices:
Backup
Will display the previous screen for changes or inquiries.
Re-do
Allows re-entry of data on the current screen.
Hold
Will put the current ticket "on hold" to be completed at a later time.
Cancel
Will cancel current ticket. Cancelled tickets can be reactivated until
posting, at which time they are deleted.
To begin this function
From the Fishpro menu, select Process ticket. You then see:
Fishpro
Samco Power Accounting
Fish Ticket Processing
10.2
Process ticket
Select Process ticket from the Ticket entry menu and you will see:
Fishpro
Samco Power Accounting
Fish Ticket Processing
10.3
Enter ticket#, press F1 for next ticket, or press F2 to add next ticket#
Press F3 for available tickets, F4 for adjustment ticket or, F5 to reverse a ticket
NOTE: The Packer, Delivery loc, Landing status, Area and Alternate area fields will
only display on this screen if their respective options were selected in the F/P Control
file. Fields 12, 13, and 14 will not display if tax code descriptions were not defined in
the F/P Control file. Refer to the chapter titled Maintain Fishpro Control Data.
Enter the following data:
1. Ticket #
Enter up to an 8-digit number from your source ticket. If you enter 6 or less digits, the
Fishpro software will preface it with two digits of the current year and zero fill to
complete the 8 digit field. If you enter a ticket number manually, you will have to
enter the date when it is the first ticket for the day.
Fishpro
Samco Power Accounting
Fish Ticket Processing
10.4
Press F1, if you wish to continue working on a "on-hold" ticket or reactivate a cancelled
ticket. The fish ticket will be displayed and you will be at the "Field number to change"
prompt.
Press F2, if you are adding the first new ticket of the current processing session the next
ticket number. The message "*** NEW TICKET ***" will display beside the ticket
number. If you wish to accept the default ticket number and date, press ENTER to
continue.
Press F3, to get a window displayed of all unposted tickets. The ticket number, boat
name and ticket status will be shown. As with all find windows, you can scroll up and
down through the window and then copy your selected ticket to the ticket number field.
Press F4, to make a price adjustment to a posted ticket. The adjustment tickets are for
the change in prices, not the new price. The original ticket number is required for a
price adjustment. You are also able to press F2 if it is a non-specific adjustment, ie. an
adjustment is required, but does not apply to a specific ticket.
Press F5, to a reverse a posted ticket. The ticket may be cancelled completely, or an
amended ticket may be entered. The original ticket number is required for a reversal.
The original ticket date will be used. If an amended ticket is entered, a new fish slip is
printed with the heading “Amended”.
NOTE: If you enter a ticket number previously used, the original ticket number will
move to the right of the screen and you will be asked for an adjustment number. Refer
to the section in this chapter titled Adjustment tickets.
2. Entry Date
The system date will be displayed. If you type a date different from the system date,
the date you type will be displayed on the next ticket. Use the MMDDYY format.
3. Delivery Date
The system date will be displayed. If you type a date different from the system date,
the date you type will be displayed on the next ticket. Use the MMDDYY format.
Press ENTER to accept the default date or change the field to the date you want on the
ticket. If you enter a date in the future, you will hear a "BEEP" and a warning message
"TICKET IS IN THE FUTURE. PRESS F2 TO OVERRIDE" is displayed. Similarly, if you
enter a date which is more than 15 days before the current date you will hear a "BEEP"
and the warning message "TICKET DATE IS MORE THAN 15 DAYS IN THE PAST. PRESS F2
TO OVERRIDE" is displayed.
4. CFV#
Fishpro
Samco Power Accounting
Fish Ticket Processing
10.5
Enter the CFV# of the boat used, press F1 as many times as necessary to locate the
correct boat, or you can press ENTER and type the name of the boat. You will see the
message "PRESS F1 FOR NEXT BOAT, PRESS F2 TO ADD NEW BOAT".
If you press F2 you will be asked to enter the new boats CFV #. Enter the 5 digit
number, and press ENTER. You will then be asked to enter the name of the new boat.
5. Gear type
If a default gear type code was set up in the Fishpro Control file or the station file, it will
be displayed. Press ENTER to accept it, or type the gear type code from the source
document.
NOTE: The gear type code you enter here must have been previously set up using the
Maintain gear types function. Refer to the chapter titled Maintain System Codes.
The description from the gear type file will be displayed
6. Packer
NOTE: This field will display only if Y was answered to "USE PACKERS ?" in the F/P
Control file.
If a packer was used on the last ticket of this processing session, it will be displayed. If
the boat displayed is correct, press ENTER. If not, type N, and enter the correct
packer.
If no packer is displayed, you can press F1 as many times as necessary to locate the
correct boat, type the CFV# or press ENTER and type the boat name. This field is
optional and can be skipped by pressing ENTER.
You will then be asked "APPLY CHEQUES AND RECEIPTS TO PACKER ACCOUNT ? N".
Answer Y, or press ENTER to accept the N default. If you answer Y, any cheques or
receipts issued from this ticket will be applied against the selected packer's AR account.
The boat entered here must have previously been added to the Packer file or you will
see the message "BOAT IS NOT A PACKER". Refer to the chapter titled Maintain System
Codes.
7. Delivery loc
NOTE: This field will display only if Y was answered to "USE DELIVERY LOCATIONS ?" in
the F/P Control file.
Fishpro
Samco Power Accounting
Fish Ticket Processing
10.6
If a default delivery location was entered in the Fishpro Control file or the station file,
it will be displayed and the field will be skipped. This field can be changed if necessary
at "FIELD NUMBER TO CHANGE ?".
If there is no previously entered delivery location, enter the 1 or 2 digit code for the
location of where the fish were delivered, or press F1 to scan the delivery locations on
file.
The delivery location must be a valid location on file.
8. Fish days
This is the number of fishing days during this trip. This cannot exceed the number
specified in the Gear type file. If you type a number greater than the allowed fishing
days, you will hear a "BEEP" and the message "FISHING DAYS GREATER THAN ALLOWED
FOR GEAR TYPE. PRESS F2 TO OVERRIDE. PRESS ENTER TO CONTINUE".
9. Trip days
This is the number of days the boat was on this trip. This cannot be less than the fish
days.
10. Landing status
NOTE: This field will display only if Y was answered to "USE LANDING STATUS ?" in the
F/P Control file.
DFO supplies a list of landing status codes. If a default landing status code was setup in
the Fishpro Control file, it will be displayed and the field will be skipped. This field can
be changed if necessary at "FIELD NUMBER TO CHANGE ?".
If no landing status code is displayed, press F1 as many times as necessary to locate the
correct landing status, or type the applicable landing status code.
11. Catch area
NOTE: This field and the Alternate area field below will display only if Y was answered
to "USE AREA CODES ?" in the F/P Control file.
This is a DFO statistical catch area code. (These statistical code maps are available
from DFO.)
Enter the catch area code, or press F1 to scan the area codes on file. The catch area
codes must first be set up in the Maintain catch area function.
The description will be displayed
Fishpro
Samco Power Accounting
Fish Ticket Processing
10.7
12. Alternate area
If N was answered to "USE ALTERNATE AREA ?" when the gear type being used for this
ticket was set up, then "NOT APPLICABLE" is displayed in this field and it cannot be
changed.
If Y was answered to "USE ALTERNATE AREA ?", up to 8 alphanumeric digits can be
entered.
Although the alternate area is usually used for a 5 digit herring code, this field can also
be used for a short comment or other information relating to this fish ticket. Whatever
is entered here will print on the fish ticket.
13. Reference
This defaults the gear type description, and if the fish ticket is for at packer boat the
words "to packer" will also be entered here. This reference only shows in the customer
account inquiry and on customer statements.
14. Tax Code
15. Tax Code
16. Tax Code
NOTE: These fields will display only if Tax code descriptions were set up in the F/P
Control file.
These three data fields are used for taxes to be deducted from, or royalties to be added
to, the gross catch value.
If any default tax codes were entered beside the tax code descriptions in F/P Control
file, they will be displayed. Press ENTER to accept them, or enter the tax codes from
the source document.
If you do not want to use the default tax codes, they can be deleted. Select the
number of the field to be deleted, press the space bar, then press ENTER.
If you see the "TAX CODE NOT ON FILE" message, you will have to use the Add function of
Maintain tax codes in Accounts Receivable.
At "FIELD NUMBER TO CHANGE ?", enter the field number you wish to change and then
press ENTER.
When you are finished making changes press ENTER to go to the second screen of the
fish ticket. Page one of three screens where you can list up to a total of 45 species
items will be shown as follows:
Fishpro
Samco Power Accounting
Fish Ticket Processing
10.8
Enter the data as follows:
Species/description
Enter the 2 digit species code from the source document. This code will be checked
against the species codes on file and validated. If this is a valid code the description
will be filled in by the software. If it is not a valid code, the message "Species code not
on file. Press ENTER to continue" is displayed.
Ql (quality code)
Enter the quality code of this species on this fish ticket, or press F1 for next quality
code.
Form code and Price
The Form code and Price fields for the species code will be displayed, and the fields will
be skipped.
If you want to change the price, press F2 to back up from the pieces field and then type
the new price. You will be asked "MAKE PRICE CHANGE PERMANENT ? N". Press
ENTER if you do not wish to permanently change the price or type Y and press ENTER if
you do. If you answer Y, the price will be changed in the Price file.
Fishpro
Samco Power Accounting
Fish Ticket Processing
10.9
From the Price field you can change the Form code field by pressing F2 to back up and
typing a new form code. From the Pieces field, the form code can be changed by
pressing F2 twice and typing another form code, or pressing F1 to display the next form
code on file, as instructed at the bottom of the screen.
From the Pieces field, the quality code can be changed by pressing F2 three times and
typing another quality code, or pressing F1 to display the next quality code on file, as
instructed at the bottom of the screen.
However, the quality code and form code must be a valid code on file. Press ENTER to
accept the information displayed.
Pieces
If the catch value is being calculated by pieces, enter the number of pieces from the
source document. You must have a price by unit for this species in your price file.
If the catch value is not being calculated by pieces, press ENTER to skip this field.
Press ENTER to skip the weight column. If there is a weight on the ticket, you can enter
the amount.
To use the auto piece count capability, enter each species with their respective piece
counts and no total-weight except the last one. When you enter the last species, press
F1 at the total-weight column, and enter the total weight for the ticket. The pieces
will be calculated and distributed proportionally and the amount column will be
calculated based on the average weight from the price file.
NOTE: The auto piece count capability will only work if you have a species by the gear
type on the ticket complete with a price type by unit, and an average weight defined in
the Price file.
If auto piece count calculations do not work, check the gear type on the ticket and
ensure it is valid in your Price file. Refer to the chapter titled Maintain Prices.
Total weight
If you deduct a percentage for glazed weight, press F3 and type the percentage, as
instructed at the bottom of the screen.
Fishpro
Samco Power Accounting
Fish Ticket Processing
10.10
Enter the total weight from the source document if weight is the method being used to
calculate the catch amount. If pieces are used to calculate the catch, the weight from
the source document can be entered.
If you entered a glazed percent, this will be deducted from the weight entered from the
fish ticket. If you are using auto piece count, the glazed percent will not be deducted
until the last species item is entered.
When you type the last species you type the total number of pieces in the Pieces
column, press F1 to turn auto piece count on, then type the weight for the individual
species item in the Total weight column and press ENTER.
When you press ENTER, the software will calculate and proportion the pieces based on
the information in the Prices file.
Amount
This field will be automatically calculated for you. If no amount is calculated, it means
there is no price for this species on file. Check the price column. If auto piece count
is used, this column will be blank except for the last species entered.
Enter as many species items as you have on the source document. If you require
additional lines, press F2 for a second page, and F2 again for a third page. You can
enter up to 45 items per ticket. If you use all 15 lines on page 1 (or page 2), you will be
presented with page 2 (or page 3) respectively.
When all species for this ticket have been entered, your screen will look similar to the
following:
Fishpro
Samco Power Accounting
Fish Ticket Processing
10.11
Make any desired changes, then press ENTER at "FIELD NUMBER TO CHANGE ?".
NOTE: If Y was answered to "ALWAYS DISTRIBUTE ?" in Maintain gear types, you will
bypass the following screen and will move directly to the page 1 of the Distribution
entry screen.
If you are distributing the catch later you will see a screen similar to the following:
Fishpro
Samco Power Accounting
Fish Ticket Processing
10.12
Press F1 for next customer, F2 to distribute now
1. Distribution type
S
The catch value may be distributed to the crew now.
C The total catch value may be credited to the skipper's account and distributed to
the crew at a later date.
G The catch value may be distributed to a general ledger account.
Enter the following data:
C
Skipper’s account
Press F2 if you wish to distribute the catch value to various accounts now, got to the
section on distributing now later in this section.
Press F1 to scroll through the fishers/customer file until you locate the fisher/customer
who is to receive the total catch value, or type the fisher/customer number, or press
ENTER and type the fisher/customer name.
Fishpro
Samco Power Accounting
Fish Ticket Processing
10.13
NOTE: If you type the fisher/customer name, you must enter it the same way it was set
up in Maintain Fisher/Customer Data
3. Print ticket ?
Enter the ticket print code option for printing this fish ticket. The default is displayed
from the Fishpro control file or the station file. If you want to change the selection
enter one of the following options listed at the bottom of the screen:
N - print now
L - print later
M - manual ticket
You screen should look similar to the following:
You will then be asked "FIELD NUMBER TO CHANGE ?". Make any desired changes, and
press ENTER.
The total catch value of this ticket will be credited to the account selected, and you will
be returned to the Ticket entry screen for entry of another fish ticket. The ticket can
be distributed at any time through Process distribution.
Fishpro
Samco Power Accounting
Fish Ticket Processing
10.14
S Settle now
If the catch value is to be distributed now, select F2. You will be asked "FIELD NUMBER
TO CHANGE ?". Press ENTER. You will then see a screen similar to:
This is the first page of the distribution entry screens.
NOTE: The information on this screen will depend upon the distributions set in the
Maintain gear type function. Refer to the chapter Maintain System Codes.
Press ENTER at each share field will be calculated and displayed. The remainder will
not change until you press ENTER to accept the amount.
As you press ENTER through these fields, the remaining amount should equal zero. If it
does not equal zero, check the distributions set up for this gear type in Maintain gear
types.
Once the distributions are completed your screen will look like the following:
Fishpro
Samco Power Accounting
Fish Ticket Processing
10.15
These are the total amounts that are to be distributed to the skipper and crew.
You can change these amounts if you desire. At "FIELD NUMBER TO CHANGE ?", enter
the number of the field you want to change. Make any changes and press ENTER.
NOTE: The remaining amount must be zero before you can continue.
When you are finished, press ENTER at "FIELD NUMBER TO CHANGE ?", and you will see
the crew section of the Distribution entry screens.
Fishpro
Samco Power Accounting
Fish Ticket Processing
10.16
This is the crew section of the distribution entry screens.
NOTE: If you used the boat previously, the crew and distributions from the last ticket
distribution will be displayed. If there are any messages for any crew members, the
word "*** MESSAGES ***" will display under the CFV#.
As you work through these fields, there will be an arrow (>) beside the fisher/customer
to show who you are currently working with.
You are now going to distribute the value of this ticket to the crew, and/or the boat
and/or expenses. These distributions will depend on how you set them up in the
Maintain gear type function.
Name
Enter the name of the fisher, or press F1 to search by fisher number until you locate the
correct fisher.
Fishpro
Samco Power Accounting
Fish Ticket Processing
10.17
NOTE: This first field on the distribution screen is for the skipper. If you did not
answer Y to "SKIPPER" in the Maintain fisher/customer function, then some reports will
show the fisher/customer name but indicate the person or company is not a skipper.
If the first few lines are co-owners, press F7 in any field to and change the ownership
percentage. The default is 100% ownership for the first fisher.
If the skipper's name you enter here is different from the one set up in the Maintain
boats function, you will hear a "BEEP" and the message "WARNING: BOAT HAS
DIFFERENT SKIPPER ON FILE. PRESS F2 TO OVERRIDE. PRESS ENTER TO CONTINUE."
When the correct fisher has been located, press ENTER.
Add new fisher
If the fisher is not in your Fisher file, you can add him now. Press F2 and a window
similar to the following will appear on the screen:
1. Cust #
Enter the new customer/fisher number, or press F1 to use the next customer number
from the Fishpro control file.
Press END to exit without adding new customer/fisher.
Use may also use the fisher’s SIN # as the Cust #.
2. SIN #
This number is the fisher Social Insurance Number and the software validates the
number.
3. Name
Enter the new customer/fisher name, last name first. This is a required field. Up to
25 alphanumeric characters can be entered.
Fishpro
Samco Power Accounting
Fish Ticket Processing
10.18
4.
5.
6.
7.
8.
Ads-1
Ads-2
City
Prov
Post cd
Phone
Entry of these fields is optional at this point but should be entered when it is available.
8. EI st
Enter the EI status code for this fisher, or press ENTER to accept the default. The valid
codes are:
I
C
X
L
N
F
-
Insurable
Company (this account is a company)
eXempt
Lease (this account investment income not employment income)
Native fisher
Foreign fisher
The information may be entered now or can be added later in the Change/Inquire
function of Maintain fisher/customer. For more information on these data entry fields,
refer to the chapter titled Maintain Fisher/Customer Data.
When you have finished adding the new fisher/customer, press ENTER. The Fisher Data
window will disappear, and the new fisher will appear on the Distribution entry screen.
Distribution entry
Each shares of the catch value must now be distributed among the crew members. The
amounts to be distributed are displayed in the order determined in the function
Maintain gear types.
Each crew member's portion of the column total can be calculated in either a dollar
amount, a percentage of the total column value or a share of the total column value.
You can press F1 to change the column calculation method. If the column is set for
Dollars ($) and you want the column calculation to be Percent (%) or Share (S), press F1.
You will see the calculation method change for that column.
($)
If the column is calculated in dollars, and the crew member is to receive the total
amount, enter the amount displayed under the column heading or, type the amount this
fisher is to receive.
Fishpro
Samco Power Accounting
Fish Ticket Processing
10.19
(%)
If the column is calculated in percent, and the crew member is to receive the
total amount, then type 100, or enter the percentage this fisher is to receive.
(S)
If the calculation method is share, enter the number of shares this crew member
is to receive. The first number you enter will change the remaining amount to zero as
the system assumes that number to be equal to the total value for the column. As you
enter additional shares for other crew members, the system will calculate the total
number of shares and adjust the amounts.
The Total Amount field will display the gross amount this crew member is to receive. It
cannot be changed.
You will then be prompted to enter the next fisher/customer who is to receive a portion
of this catch value.
When all crew members have been included in this distribution, press ENTER at the
Name field and the cursor will move to the lower half of the screen. You will now fill in
the deductions for each crew member.
Earnings taxation and EI calculation
NOTE: The cursor will move directly to the EI status field. The Tax and Demand fields
can be accessed if necessary by using the Arrow keys.
The first fisher you will be dealing with is the skipper.
Amount
This amount is the crew member’s earnings from this fish ticket. It is taken from the
total amount column shown above. It cannot be changed.
Tax
If there is an Income tax percentage to be deducted recorded against this fisher, then
an amount will be displayed here. This amount is the calculated by the software.
This figure is based on information entered in the Fishpro Control file and the
Fisher/Customer file. It can be modified by pressing the F2 key at the EI status field
until you reach this field.
Demand
If there is a Third Party Demand amount recorded against this fisher, then an amount
will be displayed here. This figure is based on information entered in the Fishpro
Control file and the Fisher/Customer file. It can be modified by pressing the F2 key at
the EI status field until you reach this field.
EI status
Fishpro
Samco Power Accounting
Fish Ticket Processing
10.20
The EI status code set up in the Maintain fisher/customer function for this fisher will be
displayed. This status can be temporarily overridden for this trip, or you can press
ENTER to accept it.
You can also press F2 or the UP ARROW to move back to the previous field.
EI
If the fisher has a EI status of I, the EI amount will be automatically calculated based on
the trip days and the EI ratio set up in the F/P Control file. This amount can be
changed. If the fisher has already paid his maximum amount for the week or year, no
EI deduction will be calculated.
If the fisher's EI status is C, X, L, N, or F no amount will be calculated here. Refer to the
chapter titled Maintain Fisher/Customer for information on EI status.
Account
Press ENTER to accept the gross amount, or enter the balance to be put on this fisher's
account.
Cash
Enter the amount of cash the fisher wants paid to him.
Cheque
Enter the amount of the cheque to be issued to the fisher.
NOTE: If any amounts are entered in the Cash or Cheque fields, the Account field will
be automatically adjusted.
The remaining fields will have historical information displayed which cannot be
changed. Your screen should now look similar to the following:
When you have finished, press ENTER. You will then enter the deductions for the next
fisherman/customer.
When you have completed the distributions and deductions for all crew members, make
any desired changes at "FIELD NUMBER TO CHANGE ?", then press ENTER.
At "FIELD NUMBER TO CHANGE ?", enter the number of the field you want to change.
Choose the field to change and press ENTER. You can also choose one of the following
options:
F1
- to page up through the list of fishermen/crew members
Fishpro
Samco Power Accounting
Fish Ticket Processing
10.21
F2
F3
F4
- to page down through the list of fishermen/crew members
- to switch share columns to display
- to remove a crew member from this fish ticket
Once all changes have been completed press ENTER at the "Field number to change?"
prompt and the following screen will be displayed if the skippers or crew have any
messages posted to their fisher/customer record:
This screen is only for viewing the messages. Press ENTER to continue and the
following screen will appear if any fisher took payment.
Fishpro
Samco Power Accounting
Fish Ticket Processing
10.22
Using this screen you will select the N, L or M options to print the fish ticket, fisher
cheques, demand cheques, and receipts, as instructed at the bottom of the screen.
Enter the following data:
1. Print ticket?
The ticket printing default you set up in the F/P Control file or station file will display.
If you selected the L or M options, and there are no cheques or receipts to be printed,
you will now be returned to the first page of the Ticket entry screen for entry of another
ticket.
Under each of the following headings a list of all crew members who will be issued a
cheque, receipt, or have a demand amount taken from their portion of the catch. Each
document will be specified with the default printing options you set up in your F/P
Control file or station file.
Deckhand
Under this column will be displayed the name of the crew member and one of the
following text:
Cheq - cheque for crew member to be printed
Dmnd - Third party demand cheque to be printed
Rcpt - Cash receipt to be printed
Amount
Fishpro
Samco Power Accounting
Fish Ticket Processing
10.23
The amount of the cheque or receipt will be displayed in this column. This field cannot
be changed.
Print?
Enter the code to determine when the cheque/receipt is to be printed. The default
printing options are set up in your F/P Control file or station file. The valid codes are:
N
L
M
- print cheque/receipt now
- print cheque/receipt later
- manual cheque/receipt
Number
Enter a document number, or press F1 for the next default document number as set up
in your F/P Control file or station file..
For any documents given an N print status, you will be prompted for the Print device and
if you want to print an alignment. These questions are asked for each document
selected.
If you want a sample statement with X's printed so you can check the alignment of the
forms on the printer, answer Y. A sample form will be printed and you will be asked
again "PRINT ALIGNMENT ?" You can print as many alignment forms as you wish. When
the alignment is correct, answer N to the "PRINT ALIGNMENT ?" question. The
document will then be printed.
When all desired documents are finished printing, you will be returned to the Ticket
entry screen for entry of another ticket.
Process distribution
Use this function to distribute catch values not distributed at ticket entry.
From the Fishpro menu, select Process distribution and you will see:
Fishpro
Samco Power Accounting
Fish Ticket Processing
10.24
Enter distribution#, press F1 for next dist.#, or press F2 to add next dist.#
Press F3 for available distributions
Enter the following data:
1. Distribution #
Enter up to a 8-digit number from your source distribution ticket. If you enter 6 or less
digits, the Fishpro software will preface it with two digits of the current year and zero
fill to complete the 8 digit field. If you enter a distribution ticket number manually,
you will have to enter the date when it is the first ticket for the day.
Press F1, if you wish to continue working on a "on-hold" distribution ticket or reactivate
a cancelled distribution ticket. The distribution ticket will be displayed and you will be
at the "Field number to change" prompt.
Press F2, if you are adding the first new distribution ticket of the current processing
session the next ticket number. The message "*** NEW TICKET ***" will display beside
the ticket number. If you wish to accept the default distribution ticket number and
date, press ENTER to continue.
Press F3, to get a window displayed of all unposted distribution tickets. The
distribution ticket number and boat name will be shown. As with all find windows, you
Fishpro
Samco Power Accounting
Fish Ticket Processing
10.25
can scroll up and down through the window and then copy your selected distribution
ticket to the ticket number field.
2. Entry Date
The current date will be displayed. Press ENTER to accept this default or type another
date in the format MMDDYY.
3. Source type
C
G
T
M
Customer
G/L account
Tax withholding
Multiple tickets
Customer #
Enter the number of the fisherman from whose account the catch value will be
distributed, or press F1 as many times as necessary to locate the correct
fisherman/customer or enter a ? to search for a fisher.
In response to "RIGHT CUSTOMER ? Y", press ENTER if this is the correct
fisherman/customer, or type N and press ENTER and press F1 to scan through the
fishermen/customers again. Follow the screen instructions.
G/L account
Enter the G/L account or press ? to search for the correct G/L account
Tax witholding
For a tax withholding distribution, you will be asked for the original ticket number.
Multiple tickets
For M type distribution a window will appear as follows:
Fishpro
Samco Power Accounting
Fish Ticket Processing
10.26
You may enter the ticket numbers in or press F5 for a list of undistributed tickets.
4. Account number / Original Ticket number / Ticket numbers
Depending on the answer in field 3, you will be prompted for..
Customer
G/L account
Tax withholding
Multiple tickets
Customer account #
G/L account #
Original ticket number
Window for ticket numbers
5. Amount
Enter the amount of the catch value to be distributed from this fisher's account.
6. CFV #
Press F1 as many times as necessary to locate the boat used for this catch, type the
CFV#, or press ENTER and type the name of the boat.
In response to "RIGHT BOAT ? Y ", press ENTER if it is the right boat. If not, type N and
press ENTER then press F1 to scan through the boat file.
7. Start date
Enter the date in MMDDYY format that the boat started fishing on this trip.
8. End date
The current date will be displayed. Press ENTER to accept this default or type the date
in MMDDYY format that the boat completed fishing.
9. Gear type
Fishpro
Samco Power Accounting
Fish Ticket Processing
10.27
The default gear type specified in the F/P Control file will be displayed. You can press
F1 as many times as necessary to locate the appropriate gear type used for the catch, or
press ENTER to accept the default.
10. Delivery loc
The default delivery location specified in the F/P Control file will be displayed. You
can press F1 as many times as necessary to locate the appropriate delivery location for
this catch or press ENTER to accept the default.
11. Reference
Enter a comment or a reference text or number to be associated with this distribution
ticket. This reference will be displayed on the customer/fisherman account and in the
journal entry. Up to a 25 alphanumeric character reference can be entered.
At "FIELD NUMBER TO CHANGE ?", make any desired changes. When all changes are
complete, then press ENTER. You will see a screen similar to:
NOTE: The distribution categories displayed will depend on what was set up in the
Maintain gear types function.
Fishpro
Samco Power Accounting
Fish Ticket Processing
10.28
Press ENTER through these fields and the gross amount will be distributed
automatically. These amounts can be changed if necessary at "FIELD NUMBER TO
CHANGE ?".
If the Remaining amount does not equal zero, check the distributions set up in the
Maintain gear types function.
At "FIELD NUMBER TO CHANGE ?", press ENTER.
Then you will see:
Enter any expenses that apply to this distribution. TAB when finished.
Then you will see:
Fishpro
Samco Power Accounting
Fish Ticket Processing
10.29
NOTE: If you used the boat previously, the crew and distributions from the last ticket
distribution will be displayed. If there are any messages for any crew members, the
word "*** MESSAGES *** will display under the CFV#.
As you work through these fields, there will be an arrow (>) beside the fisher/customer
to show who you are currently working with.
You are now going to distribute the value of this ticket to the crew, and/or the boat
and/or expenses. These distributions will depend on how you set them up in the
Maintain gear type function.
Name
Enter the name of the fisher, or press F1 to search by fisher number until you locate the
correct fisher.
NOTE: This first field on the distribution screen is for the skipper. If you did not
answer Y to "SKIPPER" in the Maintain fisher/customer function, then some reports will
show the fisher/customer name but indicate the person or company is not a skipper.
If the skipper's name you enter here is different from the one set up in the Maintain
boats function, you will hear a "BEEP" and the message "WARNING: BOAT HAS
DIFFERENT SKIPPER ON FILE. PRESS F2 TO OVERRIDE. PRESS ENTER TO CONTINUE."
When the correct fisher has been located, press ENTER.
Fishpro
Samco Power Accounting
Fish Ticket Processing
10.30
Add new fisher
If the fisher is not in your Fisher file, you can add him now. Press F2 and a window
similar to the following will appear on the screen:
Press END to exit without adding new customer
Enter the following data:
1. Cust #
Enter the new customer/fisher number, or press F1 to use the next customer number
from the Fishpro control file. This number is the customer/fisher Social Insurance
Number and the software validates the number. Press END to exit without adding new
customer/fisher.
2. Name
Enter the new customer/fisher name, last name first. This is a required field. Up to
25 alphanumeric characters can be entered.
3.
4.
5.
6.
7.
Ads-1
Ads-2
City
Prov
Post cd
Phone
Entry of these fields is optional at this point but should be entered when it is available.
Fishpro
Samco Power Accounting
Fish Ticket Processing
10.31
8. EI st
Enter the EI status code for this fisher, or press ENTER to accept the default. The valid
codes are:
I
C
X
L
N
F
-
insurable
Company (this account is a company)
exempt
lease (this account investment income not employment income)
native
foreign
The information may be entered now or can be added later in the Change/Inquire
function of Maintain fisher/customer. For more information on these data entry fields,
refer to the chapter titled Maintain Fisher/Customer Data.
When you have finished adding the new fisher/customer, press ENTER. The Fisher Data
window will disappear, and the new fisher will appear on the Distribution entry screen.
Distribution entry
Each shares of the catch value must now be distributed among the crew members. The
amounts to be distributed are displayed in the order determined in the function
Maintain gear types.
Each crew member's portion of the column total can be calculated in either a dollar
amount, a percentage of the total column value or a share of the total column value.
You can press F1 to change the column calculation method. If the column is set for
Dollars ($) and you want the column calculation to be Percent (%) or Share (S), press F1.
You will see the calculation method change for that column.
($)
If the column is calculated in dollars, and the crew member is to receive the total
amount, enter the amount displayed under the column heading, or type the amount this
fisher is to receive.
(%)
If the column is calculated in percent, and the crew member is to receive the
total amount, then type 100, or enter the percentage this fisher is to receive.
(S)
If the calculation method is share, enter the number of shares this crew member
is to receive. The first number you enter will change the remaining amount to zero as
the system assumes that number to be equal to the total value for the column. As you
enter additional shares for other crew members, the system will calculate the total
number of shares and adjust the amounts.
Fishpro
Samco Power Accounting
Fish Ticket Processing
10.32
The Total Amount field will display the gross amount this crew member is to receive. It
cannot be changed.
You will then be prompted to enter the next fisher/customer who is to receive a portion
of this catch value.
When all crew members have been included in this distribution, press ENTER at the
Name field and the cursor will move to the lower half of the screen. You will now fill in
the deductions for each crew member.
Earnings taxation and EI calculation
NOTE: The cursor will move directly to the EI status field. The Tax and Demand fields
can be accessed if necessary by using the Arrow keys.
The first fisher you will be dealing with is the skipper.
Amount
This amount is the crew member’s earnings from this fish ticket. It is taken from the
total amount column shown above. It cannot be changed.
Tax
If there is a Income tax percentage to be deducted recorded against this fisher, then an
amount will be displayed here. This amount is the calculated by the software. This
figure is based on information entered in the Fishpro Control file and the
Fisher/Customer file. It can be modified by pressing the F2 key at the EI status field
until you reach this field.
Demand
If there is a Third Party Demand amount recorded against this fisher, then an amount
will be displayed here. This figure is based on information entered in the Fishpro
Control file and the Fisher/Customer file. It can be modified by pressing the F2 key at
the EI status field until you reach this field.
EI status
The EI status code set up in the Maintain fisher/customer function for this fisher will be
displayed. This status can be temporarily overridden for this trip, or you can press
ENTER to accept it.
You can also press F2 or the UP ARROW to move back to the previous field.
EI
Fishpro
Samco Power Accounting
Fish Ticket Processing
10.33
If the fisher has a EI status of I, the EI amount will be automatically calculated based on
the trip days and the EI ratio set up in the F/P Control file. This amount can be
changed. If the fisher has already paid his maximum amount for the week or year, no
EI deduction will be calculated.
If the fisher's EI status is C, X, or L, no amount will be calculated here. Refer to the
chapter titled Maintain Fisher/Customer for information on EI status.
EI weeks
When you are at the EI amount field, you will see "PRESS F1 TO CHANGE EI WEEKS". If
you want to override the calculated EI weeks, press F2 to changed the number. The
new EI amount will be calculated based on the new EI weeks. When you have finished,
press ENTER.
Account
Press ENTER to accept the gross amount, or enter the balance to be put on this fisher's
account.
Cash
Enter the amount of cash the fisher wants paid to him.
Cheque
Enter the amount of the cheque to be issued to the fisher.
NOTE: If any amounts are entered in the Cash or Cheque fields, the Account field will
be automatically adjusted.
The remaining fields will have historical information displayed which cannot be
changed.
When you have finished, press ENTER. You will then enter the deductions for the next
fisher/customer.
When you have completed the distributions and deductions for all crew members, make
any desired changes at "FIELD NUMBER TO CHANGE ?", then press ENTER.
Choose the field to change and press ENTER. You can also choose one of the following
options:
F1
F2
F3
- to page up through the list of fishers/crew members
- to page down through the list of fishers/crew members
- to switch share columns to display
Fishpro
Samco Power Accounting
Fish Ticket Processing
10.34
F4
- to remove a crew member from this fish ticket
Once all changes have been completed press ENTER at the "Field number to change?"
prompt. The following screen will appear if any fishers are taking payment at this time.
If any fishers have message lines recorded in the Maintain fisher function, they will be
displayed now. This screen is only for viewing. Press ENTER to continue.
N - print now
L - print later
M - manual ticket
Using this screen you will select the N, L or M options to print the fish ticket, demand
cheques and receipts, as instructed at the bottom of the screen.
Enter the following data:
1. Print ticket?
The ticket printing default you set up in the F/P Control file or station file will display.
If you selected the L or M options, and there are no cheques or receipts to be printed,
you will now be returned to the first page of the Ticket entry screen for entry of another
ticket.
Under each of the following headings a list of all crew members who will be issued a
cheque, receipt, or have a demand amount taken from their portion of the catch. Each
Fishpro
Samco Power Accounting
Fish Ticket Processing
10.35
document will be specified with the default printing options you set up in your F/P
Control file or station file.
Deckhand
Under this column will be displayed the name of the crew member and one of the
following text:
Cheq - cheque for crew member to be printed
Dmnd - Third party demand cheque to be printed
Rcpt - Cash receipt to be printed
Amount
The amount of the cheque or receipt will be displayed in this column. This field cannot
be changed.
Print?
Enter the code to determine when the cheque/receipt is to be printed. The default
printing options are set up in your F/P Control file or station file. The valid codes are:
N
L
M
- print cheque/receipt now
- print cheque/receipt later
- manual cheque/receipt
Number
Enter a document number, or press F1 for the next default document number as set up
in your F/P Control file or station file..
For any documents given an N print status, you will be prompted for the Print device and
if you want to print an alignment. These questions are asked for each document
selected.
If you want a sample statement with X's printed so you can check the alignment of the
forms on the printer, answer Y. A sample form will be printed and you will be asked
again "PRINT ALIGNMENT ?" You can print as many alignment forms as you wish. When
the alignment is correct, answer N to the "PRINT ALIGNMENT ?" question. The
document will then be printed.
When all desired documents are finished printing, you will be returned to the Ticket
entry screen for entry of another ticket.
Fishpro
Samco Power Accounting
Fish Ticket Processing
10.36
Print ticket edit list
Use the Ticket Edit list to verify the accuracy of all tickets before posting.
From the Process fish tickets menu, select Print ticket edit list. The following screen
will appear.
You will be asked "PRINT SUMMARY EDIT LIST ? Y". The Print ticket edit list function
will give you two options: The Ticket Entry Summary Report and the Ticket Entry Edit
List.
The Ticket Entry Summary Report will summarize each unposted ticket on file. The
Ticket Entry Edit List will give species and deckhand distribution detail for each ticket.
Type N to see Ticket Entry Edit List, or press ENTER to accept the Y default. You will
see a screen similar to:
Fishpro
Samco Power Accounting
Fish Ticket Processing
10.37
Enter the following data:
1. User identification
After login and company ID, you were asked for your initials. You must type that
information here. If you do not enter exactly the same information, you will get the
message "NO TICKETS SELECTED" as you are not a recognized user. You can press F1 for
"All" users, as instructed at the bottom of the screen.
2. Gear type
Press F1 for "All" or type one gear type code you want printed in the list.
3. Delivery location
Press F1 for "All" or type one delivery location code you want printed.
4. Include adjustments
If you want adjustment tickets to be included in the edit list, press ENTER to accept the
Y default, or type N.
At "FIELD NUMBER TO CHANGE ?", make any desired changes, then press ENTER.
A window will appear for you to select how to print the Ticket Edit list. Follow the
screen instructions. Refer to the chapter titled General Rules for a detailed
explanation of the printing options.
Fishpro
Samco Power Accounting
Fish Ticket Processing
10.38
When the list has finished printing, the Ticket entry menu will reappear.
Post tickets
When you have verified that the fish tickets are correct and complete, as shown on the
Ticket Edit list, you are ready to post them to the permanent files.
Any cancelled tickets will be purged from the Ticket file when posting is complete.
Tickets on hold cannot be posted.
Select Post tickets from the Process fish tickets menu and you will see the following
screen:
Enter the following data:
Are fish tickets OK to post ?
Answer Y, or press ENTER to accept the N default.
If you answer Y, you will see:
Fishpro
Samco Power Accounting
Fish Ticket Processing
10.39
NOTE: In a multi-user environment, you will not be allowed to post at this time if
another user is accessing these fish tickets. Once you begin posting, other users will
not be able to enter other fish tickets until posting is complete.
Enter the data as follows:
1. User identification
After login and company ID, you were asked for your initials. You must type that
information here. If you do not enter exactly the same information, you will get the
message "NO TICKETS SELECTED" as you are not a recognized user. You can press F1 for
"All" users.
2. Gear type
To post tickets for one specific gear type, enter the gear type code, or press F1 for "All".
3. Delivery location
To post tickets with one delivery location, enter the code or press F1 for "All".
4. Include adjustments
If adjusted tickets are to be included in the posting, press ENTER to accept the Y
default, or type N.
Fishpro
Samco Power Accounting
Fish Ticket Processing
10.40
At "FIELD NUMBER TO CHANGE ?", make any desired changes and press ENTER. A
window appears for you to select how to print the Ticket Tally Posting. If you selected
only one printer in the customer file, you will not be offered a printer choice. Follow
the screen instructions.
When the Ticket Tally Posting has finished printing, the posting is complete, and you
will be returned to the Ticket entry menu.
Tickets on hold report
This report produces a list of all tickets on hold for any reason. The report gives the
following information: ticket number, ticket date, boat CFV#, boat name, gear type,
value of the ticket, user id that created the ticket and the ticket type.
To print this report , select Tickets on hold report from the Process fish tickets menu.
A window appears for you to select how to print the report. Follow the screen
instructions. Refer to the chapter titled General Rules for a detailed explanation of
the printing options.
When the report has finished printing, the Ticket entry menu will reappear.
Undistributed tickets report
This report produces a listing of all tickets that have not yet been distributed. The
report gives the following information: customer/fisher number and name, ticket
number, ticket date, boat CFV#, boat name, gear type and value of the ticket.
To print this report , select Undistributed tickets report from the Process fish tickets
menu. A window appears for you to select how to print the report. Follow the screen
instructions. Refer to the chapter titled General Rules for a detailed explanation of
the printing options.
When the report has finished printing, the Ticket entry menu will reappear.
Automatic adjustments
This function is used to produce automatic price adjustments on original prices paid for
all tickets processed in a specified date range for one or all gear types, catch areas,
delivery locations and species.
After all adjustments have been calculated based on your selection criteria, you will
have the option to cancel them if necessary.
Fishpro
Samco Power Accounting
Fish Ticket Processing
10.41
The adjusted price can be an amount, a percent or to a fixed amount for one or all gear
types, catch areas, delivery locations and species.
NOTE: If you wish to make adjustments to more than one but not all gear types, catch
areas, or delivery locations, these steps must be repeated for every extra gear type,
catch area or delivery location that you want to adjust.
Select Automatic adjustments from the Process fish tickets menu and you will see:
Enter the following data:
1. Start date
Enter the date you want the adjustment price to be effective, or press F1 for "Earliest".
2. End date
Enter the last date to be included in the price adjustment, or press F1 for latest.
3. CFV#
Enter the CFV#, press F1 as many times as necessary to locate the boat, press ENTER and
type the name of the boat, or press ENTER again for all boats.
Fishpro
Samco Power Accounting
Fish Ticket Processing
10.42
4. Gear type
Enter the code for one gear type or press F1 for "All".
5. Catch area
Press F1 for “All” or enter areas to include or exclude.
6. Exclude areas ?
Enter Y to exclude areas entered in field 5 from the search, or N to use the areas for the
search.
7. Alt catch area
Enter one alternate catch area or press F1 for "All".
8. Delivery loc
Enter one delivery location or press F1 for "All".
9. Exclude reductions?
If you change the effective price of a species to a (F)ixed amount, it is possible that the
final price may be reduced if the fisher was paid more than that originally. If you
answer Y to exclude reductions, a price adjustment will not be made if it reduces the
price on a particular fish ticket.
Press ENTER to accept the Y default, or type N.
10. Print species?
Print detailed species information on fish tickets selected for adjustment. Press ENTER
to accept the Y default, or type N.
11. Exclude packer tickets?
Press ENTER to accept the N default, where the fish tickets with packer boat numbers
are not adjusted.
12. History company id
Enter the company number for fish ticket history information or use ? to search for the
correct company.
13. Calculate tax ?
Fishpro
Samco Power Accounting
Fish Ticket Processing
10.43
Answer Y or N depending on whether there is a tax calculation to be done on the
adjustments.
14. Reference
Enter any reference information here. The field will default to “Adjustment”.
At "FIELD NUMBER TO CHANGE ?" make any desired changes and press ENTER. When all
changes to this screen have been completed press ENTER and the following screen will
be displayed:
Enter the following data:
1. Change type
Enter the method by which you want to adjust the fish ticket prices. The valid codes
are:
A
P
F
- by amount
- by percent
- to a fixed amount
The following fields are prompted for up to 15 different species codes.
Species
Fishpro
Samco Power Accounting
Fish Ticket Processing
10.44
Enter the species code to be included in the automatic adjustment. The species
description will be displayed.
Old price Low
Enter the old price lowest amount to be included in the automatic adjustment, or press
F1 for "Lowest".
Old price High
Enter the old price highest amount to be included in the automatic adjustment, or press
F1 for "Greatest".
$ increase
% increase
New price
Enter the appropriate amount based on which change type you chose at the "Change
type" prompt.
At "FIELD NUMBER TO CHANGE ?" make any desired changes and press ENTER. A window
appears for you to select how to print the report. Refer to the chapter titled General
Rules for a detailed explanation of the printing options. Follow the screen
instructions.
When the report is finished printing or displaying on the screen, you will see the
following:
Fishpro
Samco Power Accounting
Fish Ticket Processing
10.45
Select:
1.
Accept these adjustments and select more
Since one selection screen may not be enough to select everything required, (for
example, different prices for selected species for two different delivery
locations) this option will return you to the Automatic adjustments screen for
entry of more adjustments. Another report will print for the second selection.
The adjustments entered will be added to the previous set of adjustments.
The grand total on the report prints the total adjustment value so far. This
selection/printing process can be repeated as many times as necessary.
2. Reject these adjustments but select more
After viewing the report, you decide to cancel the adjustments, this will return
you to the Automatic adjustments, Ticket selection screen.
3. Accept these adjustments and continue
When you have verified that all calculated adjustments are correct as shown on
the Automatic Adjustments report, you are ready to create the adjustment
tickets.
4. Reject these adjustments and continue
Use this feature to reject the latest selection but continue with the earlier
selections and create the adjustment tickets.
Fishpro
Samco Power Accounting
Fish Ticket Processing
10.46
5. Discard all adjustments
If the adjustments are not correct, select Discard all adjustments. All
adjustments will be cancelled.
If you have selected an option to continue, you see the next screen:
1. Create normal tickets or non-specific adjustments.
A One adjustment ticket will be created for every original ticket that matches the
value set up on the previous screen. The adjustment value will then be distributed to
the various deckhands according to the boat deckhand distributions. These
distribution amounts can be changed if desired.
N This creates one adjustment ticket which summarizes all the adjustments made for
all the fish tickets selected onto one adjustment ticket. It also creates cheques for the
skipper only.
2. Print fish tickets now ?
Enter Y if you want the tickets produced to be immediately printed. Enter N if you
want to print them later.
Fishpro
Samco Power Accounting
Fish Ticket Processing
10.47
3. Paid to Skippers only ?
The options are..
Y This option will also create adjustment tickets, but the total adjustment value will
be given directly to the skipper.
N
Adjustment tickets will include skipper and crew from original ticket
B This option will also create adjustment tickets, but the total adjustment value will
be given directly to the boat skipper.
NOTE: These adjustments will affect each fisher's earnings information. The
adjustment tickets that are created can be edited and posted like normal tickets.
You will be asked "ARE YOU SURE ?". Answer Y or N. If you answer N, you will be
allowed to select another option. If you answer Y, the screen will show which ticket it
is processing, and the adjustment tickets will be created.
4. Create bonus checks ?
This option will create a cheque for the amount of the adjustment payable to the
skipper. The screen will show which ticket it is processing, and the Reporting menu
will reappear. The cheques can then be printed when desired through the Print
documents function in F/P Utility Functions menu.
5. Subtract account debits ?
Enter Y if you want the debit balance on a fisher’s account to be subtracted from the
check amount.
6. Add account credits ?
Enter Y if you want the credit balance on a fisher’s account to be added to the check
amount.
7. Print checks now ?
Enter Y if you want the checks printed immediately.
8. Print by boat summary ?
The options are:
N
No report
Fishpro
Samco Power Accounting
Fish Ticket Processing
10.48
S
Summary report
9. Adjustment date
Accept the system date, enter a different date, or press F1 to use original ticket dates.
10. Exempt from EI ?
Answer Y if these adjustment tickets are exempt from EI calculations
Edit DFO transmission file
Select Edit DFO transmission file from the Process fish tickets menu and you will see:
You may enter the batch number, press ENTER to move to the Ticket number field and
enter the ticket number, or press F1 for a list of all tickets not yet sent to DFO or F2 for
a list of the batches.
To end this function
Press TAB at the Ticket processing menu and you will be returned to the main F/P menu.
____________________
Fishpro
Samco Power Accounting
Fish Ticket Processing
10.49
Chapter 11
Cheque/Receipt Entry
Introduction
Use this function to add, change or inquire into cheques or receipts not printed at ticket
entry.
This function can be used to print cheques or receipts for advances to fishers' accounts.
To begin this function, from the Fishpro menu, select Cheque/Receipt entry. Then you
will see:
Fishpro
Samco Power Accounting
Cheque/Receipt Entry
11.1
Enter the following data:
1. Type
Enter Q if this is a cheque or R for a receipt, as instructed at the bottom of the screen.
2. Cheque #/rcpt #
Enter the number you want on the cheque or receipt, or press F1 for the next
cheque/receipt number.
3. Date
The current date is the default. Press ENTER to accept current date, or type the date
you want to appear on the cheque/receipt.
4. Customer/Fisher #
Press F1 as many times as necessary to scan through the fishers on file and press ENTER
to select the appropriate one. If you know the fisher's # you can type it, or press ENTER
and type the fisher's name. The fisher's current A/R balance is displayed.
5. Amount
Enter the amount of the cheque/receipt. If the amount is over the credit limit for the
fisher, a message "Customer over credit limit by (dollar amount)." You will be asked to
press F2 to override.
6. Reference
Enter up to a 25 alphanumeric character reference for the cheque/receipt.
7. Cheque/receipt Printed?
There will be a default response displayed based on the information in the Fishpro
control file or defined in the Maintain user function. You may change this field to one
of the following:
N = now
L = print later
M = manual cheque/receipt
Select the appropriate letter for printing the cheque/receipt.
Fishpro
Samco Power Accounting
Cheque/Receipt Entry
11.2
If you select M when you press ENTER at "FIELD NUMBER TO CHANGE ?" the screen clears
for entry of the next cheque/receipt. When you select this option, a cheque/receipt
will never be printed, as the option assumes the cheque/receipt was already issued.
At "FIELD NUMBER TO CHANGE ?", make any desired changes. If you select L or N and
press ENTER at "FIELD NUMBER TO CHANGE ?" you will see the following screen:
You can use this 20 line screen for any comments or information you want to appear on
the cheque/receipt.
At "FIELD NUMBER TO CHANGE ?", make any desired changes, then press F2. You will
see page 3 of the Cheque/Receipt entry.
Fishpro
Samco Power Accounting
Cheque/Receipt Entry
11.3
The information from the fisher/customer file will be displayed. At "FIELD NUMBER TO
CHANGE ?" make any desired changes then press ENTER. You will be asked for the print
device and whether you want to print an alignment for each cheque entered. Refer to
the chapter titled, General Rules, for a detailed explanation of the printing options.
When the cheque or receipt has finished printing, you will be returned to the
Cheques/receipts entry screen.
When you are finished with the Cheque/receipt entry function, press END as the menu
selection. The main Fishpro menu will reappear.
____________________
Fishpro
Samco Power Accounting
Cheque/Receipt Entry
11.4
Chapter 12
History Menu
Introduction
The reports included in this menu will provide you with historical information for your
current processing year. Fish tickets can also be reprinted through this function.
All reports can be printed on a printer, displayed on the screen, or printed to disk for
later printing.
From the main Fishpro menu, select History menu. Then you will see:
Fishpro
Samco Power Accounting
History Menu
12.1
Boat report
Using the Boat report, you can track inventory received from one or all of your boats
over a selected period of time.
If selected, ticket summary detail can also be shown, which includes deckhand
distribution and species detail.
From the F/P History menu, select Boat report. You will then see the first page of the
two page screen:
Enter the following data:
1. Sort order
The boats included in the report can be sorted in three ways: (C) by CFV#, or (N) by boat
name, or (G) by boat gross, or (S) by skipper name, as instructed at the bottom of the
screen.
2. Start ticket date
Enter a date in MMDDYY format when you want the report to start, or press [F1] for
"Earliest".
Fishpro
Samco Power Accounting
History Menu
12.2
3. End ticket date
Enter the date in MMDDYY format for the last day boats are to be included in the report,
or press F1 for "Latest".
4. CFV#
One CFV# can be entered or you can press [F1] for "All". Enter the CFV# of the boat for
which you want the history report, or press [F2] then [F1] to scan the boat file, as
instructed at the bottom of the screen.
5. Boat gross minimum
If all boats are to be included regardless of their gross catch value, press [Enter] for
zero. Otherwise, enter a minimum gross value. Only boats with a greater catch value
than the amount entered will be included in the report.
6. Gear type
Enter the code for the gear type to be included in the History report, or press [F1] for
"All".
7. Delivery location
Enter one delivery location code to be included, or press [F1] for "All".
8. Landing status
Enter one delivery landing status code to be included, or press [F1] for "All". (This field
only appears if the F/P control file option to “Use landing status” has been set to Yes.)
9. Catch area
Enter one catch area code or press [F1] for "All". (This field only appears if the F/P
control file option to “Use area codes” has been set to Yes.)
10. Plant/packers
The options are…
P
Plant tickets only
K
Packer tickets only
B
Both
11. Start species
12. End species
Fishpro
Samco Power Accounting
History Menu
12.3
Enter a single species or a range of species or press [F1] for “All”.
At "FIELD NUMBER TO CHANGE ?", make any desired changes, then press [Enter].
You will see page 2 of the Boat history screen:
Enter the following data:
13. Print ticket summary ?
If you press [Enter] to accept the Y default, the report will show you each ticket
number, date and delivery location for the boats selected.
NOTE: If N is answered to this question, the next 2 fields will default to N and cannot be
changed.
14. Print deckhand detail ?
If distribution detail for each ticket is to be included in the report, type Y. If you do not
want it included, press [Enter] to accept the N default.
15. Print species detail ?
If you want species detail for each ticket, answer Y, or press [Enter] to accept the N
default.
16. Print deckhand summary ?
Fishpro
Samco Power Accounting
History Menu
12.4
This option will include deckhand names and numbers in the report. Press [Enter] to
accept the Y default, or type N.
17. Print species summary ?
If the various totals for each species caught are to be included, press [Enter] to accept
the Y default. If you do not want species summary, type N.
18. Print each boat on a separate page ?
Answer Y if you want each boat printed on its own page, or press [Enter] to accept the
N default.
19. Print adjustments ?
The options are ..
N
Y
O
No adjustments
Adjustments
Only adjustments
20. Include prior year adjustments?
If Y or O was chosen in the previous field, the options are ..
N
Y
O
No prior year
Include prior year
Only prior year
At "FIELD NUMBER TO CHANGE ?", make any desired changes then press [Enter]. A
window will appear for you to select how to print the report.
When the report has finished printing, the F/P History report menu will reappear.
Fisher report
Use this report for a record of all fishers who have fished for your company in a selected
date range.
From the F/P History menu, select Fisher report. You will see:
Fishpro
Samco Power Accounting
History Menu
12.5
NOTE: The titles of fields 2 and 3 will depend on your answer to field 1.
Enter the following data:
1. Print order
The report can be sorted in alphabetical order by name, or in numerical order by the
fishers’ account numbers. Enter C or N as appropriate.
2. Start customer name/number
The titles of these fields depend on your answer to the Print order question above.
Enter the starting customer name/number you wish to start with, or press [F1] for
"First".
3. End customer name/number
Enter the last customer name/number to be included in the report, or press [F1] for
"Last".
Fishpro
Samco Power Accounting
History Menu
12.6
4. Which date ?
The options are ..
F
P
Fish ticket date
Posted date
5. Start date
Enter the starting date or press [F1] for "Earliest".
6. End date
Enter the last date to be included in this report, or press [F1] for "Latest".
7. Gear type
Enter one gear type code or press [F1] for "All".
8. Print ticket detail ?
Type Y if you wish to see detail of the tickets selected, or press [Enter] to accept the N
default.
9. Print deductions summary ?
Type Y if you wish to see a summary of the deductions on the tickets selected, or press
[Enter] to accept the N default.
10. Print each fisher on a new page?
Press [Enter] to accept the N default, or type Y to have each fisher printed on a
separate page.
11. Include unposted tickets?
Type Y if you wish to see the unposted tickets in the range selected, or press [Enter] to
accept the N default.
At "FIELD NUMBER TO CHANGE ?", make any desired changes then press [Enter]. A
window will appear for you to select how to print the report. Refer to the chapter titled,
General Rules for a detailed explanation of the printing options.
When the report has finished printing, the F/P History reports menu reappears.
Fishpro
Samco Power Accounting
History Menu
12.7
Ticket report
Use this report to see the gross amount for tickets in a date range selected by you.
From the F/P History reports menu, select Ticket report. You will see:
NOTE: If you answered N to "USE AREA CODES ?" and "USE DELIVERY LOCATIONS ?" in the
F/P Control file, fields 7 and 8 will not display.
Enter the following data:
1. By ticket # or date ?
Enter T for a report sorted by ticket number or D for date order, as instructed at the
bottom of the screen.
2. Start ticket number/date ?
The titles of fields 2 and 3 depend on your answer above.
Enter the ticket starting number/date or press [F1] for "First".
Fishpro
Samco Power Accounting
History Menu
12.8
3. End ticket number/date
Enter the ticket ending number/date or press [F1] for "Last". If you did not press [F1]
above, press [Enter]for a report on all tickets for one day.
4. Print species ?
Press [Enter] to accept the Y default or type N and press [Enter]. If you answer Y, you
will get species detail for each ticket specified.
5. Gear type
Enter 1 gear type code or press [F1] for "All".
6. Delivery location
Enter 1 delivery location code or press [F1] for "All".
7. Catch area
Enter 1 catch area code or press [F1] for "All".
8. Exclude adjustments ?
Answer Y if you wish the adjustment tickets to be excluded from the report, or press
[Enter] to accept the default of N.
At "FIELD NUMBER TO CHANGE ?", make any desired changes, then press [Enter]. A
window will appear for you to select how to print the report. Refer to the chapter titled,
General Rules for a detailed explanation of the printing options.
When the report has finished printing, the History menu will reappear.
Catch area report
The Catch area history report will show all boats that have fished in the selected area
and the species caught in those areas.
From the F/P History menu, select Catch area report. You will see:
Fishpro
Samco Power Accounting
History Menu
12.9
Enter the following data:
1. Start date
Enter the date for the report to start or press [F1] for "Earliest".
2. End date
Enter the last date to be included in the report, or press [F1] for "Latest".
3. Which date ?
The options are ..
F
P
Fish ticket date
Posted date
4. Gear type
Enter one gear type code to be included in the report or press [F1] for "All".
5. Delivery location
Fishpro
Samco Power Accounting
History Menu
12.10
Enter one delivery location to be included in the report or press [F1] for "All".
6. Plant/packers
The options are…
P
K
B
Plant tickets only
Packer tickets only
Both
7. Start catch area
Enter the starting catch are number, or press [F1] for "first".
8. End catch area
Enter the ending catch are number, or press [F1] for "last".
9. Start species
Enter the starting species code, or press [F1] for "first".
10. End species
Enter the ending species code, or press [F1] for "last".
11. Print tickets ?
If you want ticket detail for each catch area to be included in the report, press [Enter]
to accept the N default. If not, answer Y.
12. Print species ?
If you want species detail for each catch area to be included in the report, press [Enter]
to accept the N default. If not, answer Y.
13. Print area species summary ?
If you want area species summary for each catch area to be included in the report, press
[Enter] to accept the Y default. If not, answer N.
14. Include adjustments ?
The options are…
N
Y
No adjustments
Adjustments
Fishpro
Samco Power Accounting
History Menu
12.11
O
Only current year adjustments
At "FIELD NUMBER TO CHANGE ?", make any desired changes, then press [Enter]. A
window will display for you to select how to print the report. Refer to the chapter
titled, General Rules for a detailed explanation of the printing options.
When the report has finished printing, the History menu will reappear.
Species report
Using this report, you can track species are caught with each gear type used and their
total value within a selected date range.
From the F/P History menu, select Species report. You will then see:
Enter the following data:
1. Start date
Enter the starting date for this report or press [F1] for "First".
2. End date
Enter the last date to be included in the report, or press [F1] for "Last".
Fishpro
Samco Power Accounting
History Menu
12.12
3. Which date?
The options are ..
F
P
Fish ticket date
Posted date
4. Start species
Enter the starting species code, or press [F1] for "first".
5. End species
Enter the ending species code, or press [F1] for "last".
6. Gear type
Enter one gear type code or press [F1] for "All".
7. Delivery location
Enter the code for the delivery location to be included in the report, or press [F1] for
"All".
8. Catch area
Enter one catch area code to be included in the report, or press [F1] for "All".
9. Plant/packers
The options are…
P
K
B
Plant tickets only
Packer tickets only
Both
10. Print each gear type on a new page ?
If you do not want the species detail for each gear type selected on a new page, answer
N. If you do, press [Enter] to accept the Y default.
11. Print form code detail ?
To see species form code detail on the report, press [Enter] to accept the Y default, or
answer N.
Fishpro
Samco Power Accounting
History Menu
12.13
At "FIELD NUMBER TO CHANGE ?", make any desired changes, then press [Enter]. A
window will appear for you to select how to print the report. Refer to the chapter titled
General Rules for a detailed explanation of the printing options.
When the report has finished printing, the History menu will reappear.
Packer report
From the F/P History menu, select Packer report. You will then see:
Enter the following data:
1. Start date
Enter the starting date for this report or press [F1] for "Earliest".
2. End date
Enter the last date for packers to be included in the report, press [F1] for "Latest", or if
you did not answer [F1] above, press [Enter] to see packer history for one date.
3. Gear type
Fishpro
Samco Power Accounting
History Menu
12.14
Enter one gear type code or press [F1] for "All".
4. Delivery location
Enter the delivery location code to be included, or press [F1] for "All".
5. Catch area
Enter the code of the catch area to be included, or press [F1] for "All".
6. Start species
Enter the starting species code, or press [F1] for "first".
7. End species
Enter the ending species code, or press [F1] for "last".
8. Packer number
Enter one packer number, or press [F1] for "All".
9. Print species detail ?
If you want species detail for each ticket, answer Y, or press [Enter] to accept the N
default.
10. Print each packer on a separate page ?
If you do not want each packer on a separate page, answer N, or press [Enter] to accept
the Y default.
At "FIELD NUMBER TO CHANGE ?", make any desired changes, then press [Enter]. A
window will appear for you to select how to print the report. Refer to the chapter titled,
General Rules, for a detailed explanation of the printing options.
When the report has finished printing, the History menu will reappear.
DFO Species report
From the F/P History report menu, DFO species report. The following menu will appear:
Fishpro
Samco Power Accounting
History Menu
12.15
Enter the following data:
1. Start date
Enter the starting date for this report in MMDDYY format, or press [F1] for "First".
2. End date
Enter the ending date, or press [F1] for "Last".
3. Gear type
Enter the gear type code to be included in the report, or press [F1] for "All".
4. Delivery location
Enter the delivery location code to be included, or press [F1] for "All".
5. Catch area
Enter the code of the catch area to be included, or press [F1] for "All".
Fishpro
Samco Power Accounting
History Menu
12.16
At "FIELD NUMBER TO CHANGE ?", make any desired changes, then press [Enter]. A
window will appear for you to select how to print the report. Refer to the chapter titled
General Rules for a detailed explanation of the printing options.
When the report has finished printing, the History menu will reappear.
Quality code report
From the F/P History report menu, select Quality code report. The following menu will
appear:
Enter the following data:
1. Start date
Enter the starting date for this report in MMDDYY format, or press [F1] for "First".
2. End date
Enter the ending date, or press [F1] for "Last".
3. Which date?
Fishpro
Samco Power Accounting
History Menu
12.17
The options are .
F
P
Fish ticket date
Posted date
4. Gear type
Enter the gear type code to be included in the report, or press [F1] for "All".
5. Delivery location
Enter the delivery location code to be included, or press [F1] for "All".
6. Plant/packers
The options are…
P
K
B
Plant tickets only
Packer tickets only
Both
7. Start catch area
Enter the starting catch area code for this report or press F for “All”.
8. End catch area
Enter the ending catch area code for this report or press F for “All”.
9. Start species
Enter the starting species code for this report or press F for “All”.
10. End species
Enter the starting species code for this report or press F for “All”.
11. Print all boats?
Press ENTER to accept the default of Y, or enter N to choose a single boat.
12. Boat CFV#
If you answered Y in the previous field, this field is not applicable. If you entered N in
the previous field, enter the individual boat here.
13. Print ticket detail ?
Fishpro
Samco Power Accounting
History Menu
12.18
Type Y if you wish to see detail of the tickets selected, or press [Enter] to accept the N
default.
At "FIELD NUMBER TO CHANGE ?", make any desired changes, then press [Enter]. A
window will appear for you to select how to print the report. Refer to the chapter titled
General Rules for a detailed explanation of the printing options.
When the report has finished printing, the History menu will reappear.
Price adjustment summary
From the F/P History report menu, select Price adjustment summary. The following
menu will appear:
Enter the following data:
1. Start date
Enter the starting date for this report in MMDDYY format, or press [F1] for "First".
2. End date
Enter the ending date, or press [F1] for "Last".
Fishpro
Samco Power Accounting
History Menu
12.19
3. Start CFV#
Enter the starting CFV# for this report in MMDDYY format, or press [F1] for "First".
4. End CFV#
Enter the ending CFV#, or press [F1] for "Last".
5. Gear type
Enter the gear type code to be included in the report, or press [F1] for "All".
6. Delivery location
Enter the delivery location code to be included, or press [F1] for "All".
7. Catch area
Enter the code of the catch area to be included, or press [F1] for "All".
8. Print ticket detail ?
Type N if you do not wish to see detail of the tickets selected, or press [Enter] to accept
the Y default.
9. Print each boat on a separate page ?
Type N if you do not want each boat printed on it's own page, or press [Enter] to accept
the Y default.
At "FIELD NUMBER TO CHANGE ?", make any desired changes, then press [Enter]. A
window will appear for you to select how to print the report. Refer to the chapter titled
General Rules for a detailed explanation of the printing options.
When the report has finished printing, the History menu will reappear.
Boat performance report
From the F/P History report menu, select Boat performance report. The following menu
will appear:
Fishpro
Samco Power Accounting
History Menu
12.20
Enter the following data:
1. Start year
Enter the starting year for this report in MMDDYY format, or press [F1] for "Earliest".
2. End year
Enter the ending year, or press [F1] for "Latest".
3. Boat
One boat can be entered or you can press [F1] for "All". Enter the boat for which you
want the history report, or press [F2] then [F1] to scan the boat file, as instructed at
the bottom of the screen.
4. Print gear type detail ?
If you want gear type detail for each ticket, answer N, or press [Enter] to accept the Y
default.
5. Print species detail ?
If you want species detail for each ticket, answer N, or press [Enter] to accept the Y
default.
Fishpro
Samco Power Accounting
History Menu
12.21
6. Print quality code detail ?
If you want quality code detail for each ticket, answer N, or press [Enter] to accept the
Y default.
At "FIELD NUMBER TO CHANGE ?", make any desired changes, then press [Enter]. A
window will appear for you to select how to print the report. Refer to the chapter titled
General Rules for a detailed explanation of the printing options.
When the report has finished printing, the History menu will reappear.
Fish ticket reprint
This function reprints a previously printed fish ticket.
From the F/P History report menu, select Fish ticket reprint. The following menu will
appear:
Enter the following data:
1. Start ticket
Fishpro
Samco Power Accounting
History Menu
12.22
Enter the ticket number or press [F1] for “first”
2. End ticket
Enter the ticket number or press [F1] for “last”
Enter the ticket number to be reprinted. If the ticket does not exist in the ticket history
file the message "History record not on file" will be displayed.
3. Start date
Enter the starting date for this report in MMDDYY format, or press [F1] for "Earliest".
4. End date
Enter the ending date, or press [F1] for "Latest".
5. Boat CFV#
This field is for display only. It shows the boat CFV# and name from the original fish
ticket.
6. Gear type
Enter the Gear type or press [F1] for “All”
7. Print Format
Enter the format of fish ticket to print. Enter either 1 to use the Plain paper form, or 2
to use DFO fish ticket form. The default is taken from the Fishpro control file.
8. Copies
Enter the number of copies to print of the reprinted fish ticket. The default is 1.
At "ANY CHANGE ?", make any desired changes, then press [Enter]. A window will appear
for you to select how to print the report. Refer to the chapter titled General Rules for
a detailed explanation of the printing options.
When the report has finished printing, the History menu will reappear.
User defined reports
From the F/P History report menu, select User defined reports. The following menu will
appear:
Fishpro
Samco Power Accounting
History Menu
12.23
Enter the following data:
1. Report number
Enter the report number of the report to be printed. The title of the report will be
displayed to the right of the report number.
2. Start date
Enter the starting date for this report in MMDDYY format, or press [F1] for "Earliest".
3. End date
Enter the ending date, or press [F1] for "Latest".
At "FIELD NUMBER TO CHANGE ?", make any desired changes, then press [Enter]. A
window will appear for you to select how to print the report. Refer to the chapter titled
General Rules for a detailed explanation of the printing options.
When the report has finished printing, the History menu will reappear.
Fish Tax History Report
From the F/P History report menu, select Fish tax report. The following menu will
appear:
Fishpro
Samco Power Accounting
History Menu
12.24
Enter the following information:
1. Fish tax type
Enter the Fish tax type
2. Start date
Enter the starting date for this report in MMDDYY format, or press [F1] for "Earliest".
3. End date
Enter the ending date, or press [F1] for "Latest".
4. Which date?
The options are ..
F
P
Fish ticket date
Posted date
5. Gear type
Fishpro
Samco Power Accounting
History Menu
12.25
Enter the Gear type, or press [F1] for “All
6. Delivery location
Enter the delivery location code to be included, or press [F1] for "All".
7. Catch area
Enter the code of the catch area to be included, or press [F1] for "All".
Year end price comparison
From the F/P History report menu, select Year end price comparison. The following
menu will appear:
Enter the following information:
1. Start date
Fishpro
Samco Power Accounting
History Menu
12.26
Enter the starting date for the current year report in MMDDYY format, or press [F1] for
"Earliest".
2. End date
Enter the ending date for the current year, or press [F1] for "Latest".
3. Start date
Enter the starting date for the previous year report in MMDDYY format, or press [F1] for
"Earliest".
4. End date
Enter the ending date for the previous year, or press [F1] for "Latest".
5. Which date?
The options are ..
F
P
Fish ticket date
Posted date
6. Start species
Enter the starting species number, or press [F1] for "first".
7. End species
Enter the ending species number, or press [F1] for "last".
8. Gear type
Enter the gear type code to be included in the report, or press [F1] for "All".
9. Delivery location
Enter the delivery location code to be included, or press [F1] for "All".
10. Catch area
Enter the code of the catch area to be included, or press [F1] for "All".
11. Plant/packers
The options are…
Fishpro
Samco Power Accounting
History Menu
12.27
P
K
B
Plant tickets only
Packer tickets only
Both
12. Print each gear type on a new page ?
If you do not want the species detail for each gear type selected on a new page, answer
N. If you do, press [Enter] to accept the Y default.
13. Print form code detail ?
To see species form code detail on the report, press [Enter] to accept the Y default, or
answer N.
14. Exclude prior-year adj?
Press ENTER to accept the default of Y, or enter N if you want to include the
adjustments for the prior year.
At "FIELD NUMBER TO CHANGE ?", make any desired changes, then press [Enter]. A
window will appear for you to select how to print the report. Refer to the chapter titled
General Rules for a detailed explanation of the printing options.
When the report has finished printing, the History menu will reappear.
Custom Reports
From the F/P History report menu, select Custom reports. The following menu will
appear:
Fishpro
Samco Power Accounting
History Menu
12.28
With this feature you may design your own report. You select the order the information
is sorted by (up to 5 levels), a range of information to include for each sorting selection,
and date range plus various criteria to include/exclude in the report.
1. – 5. Report Order
Choose the fields from the drop down list that you want to report on. The report may
cascade up to five options; you must enter the most detailed level first.
After entering a sorting selection, you will be able to enter the range of information to
include.
Answer Y to “New page ?” to insert a page break when the data in this report sorting
selection changes.
6. Start Date
Enter the starting date in MMDDYY format or press F1 for “Earliest”.
7. End Date
Enter the ending date in MMDDYY format or press F1 for “Latest”.
Fishpro
Samco Power Accounting
History Menu
12.29
8. Also sort detail by
Enter the order to further sort the entry in field 1. Valid answers include:
V
W
P
N
Value
Weight
Pieces
Nothing
9. Descending or ascending ?
If you chose V, W, or P in the previous field, you may sort the date in either descending
or ascending order. If you chose N, the field in not applicable.
Minimum or Maximum
If you select to print in descending order, you will be prompted to enter a Minimum
cut-off. Any selection from field 1 that is lower than the minimum entered here will
not be included on the report. Leave blank for no minimum.
If you select to print in ascending order, you will be prompted to enter a Maximum
cut-off. Any selection from field 1 that is higher than the maximum entered here will
not be included on the report. Leave blank for no maximum.
10. Number of items to print
Press F1 for no limit or enter the number of selections from field 1 to include on the
report. This allows you to zoom in on the information. For example, you may want to
print the five most common gear types.
11. Print detail in columns
Enter Y if you want the first selection to be the column headings. Enter N if you want
it to be a cascading report.
12. Export file name
Enter the file name if you wish to export this data to a file. Press F1 if you want to print
out or display the report.
13. Print value ?
Enter Y if you want to print the dollar value of the selection. Enter N if you do not want
this column to appear in the report.
14. Print weight ?
Fishpro
Samco Power Accounting
History Menu
12.30
Enter Y if you want to print the total weight of the selection. Enter N if you do not want
this column to appear in the report.
15. Print pieces ?
Enter Y if you want to print the number of pieces of the selection. Enter N if you do not
want this column to appear in the report.
16. Print % of value ?
Enter Y if you want the resulting data to show the % of total value for the sub-totals and
grand totals. Enter N if you do not want this column to appear in the report.
17. Print % of weight ?
Enter Y if you want the resulting data to show the % of total weight for the sub-totals
and grand totals. Enter N if you do not want this column to appear in the report.
16. Print % of pieces ?
Enter Y if you want the resulting data to show the % of total pieces for the sub-totals and
grand totals. Enter N if you do not want this column to appear in the report.
To end this function
When you are finished with the History reports function, press END as the menu
selection. The main Fishpro menu will reappear.
______________
Fishpro
Samco Power Accounting
History Menu
12.31
Chapter 13
Reporting Menu
Introduction
You will use these functions to produce T4's, ROE's, T5's, Inventory reports, a Third Party
Demand report, a Worker's Compensation report, and a Report on Hirings.
The Recalculate EI amounts function is used to adjust the EI eligibility dates and
amounts, and should be run before printing Records of Employment and T4 forms.
To begin this function
From the main Fishpro menu, select Reporting menu, and you will see:
Fishpro
Samco Power Accounting
Reporting Menu
13.1
Automatic earnings generation
This function creates a data file of the weekly fisher earnings for a range of dates. This
file can then be sent to the EI office on disk.
Select Automatic earnings generation from the F/P Reports menu and you will see:
Enter data as follows:
1. Start Date
Enter the date in MMDDYY format when you want the report to start. The date entered
will be automatically change to the nearest Sunday date for reporting.
2. End Date
Enter the last date for earnings to be included in the report. The date entered will be
automatically change to the nearest Saturday date for reporting.
At "FIELD NUMBER TO CHANGE ?" make any desired changes, then press [Enter].
As the report is being generated the data file BP0101 is created in the local directory.
The data file must then be transferred to a device and sent to the EI office.
If there are earnings for that period, a window will appear for you to select how to print
the report. Follow the screen instructions. Refer to the chapter titled General Rules for
a detailed explanation of the printing options.
When the report has finished printing, the F/P Reports menu will reappear.
Fishpro
Samco Power Accounting
Reporting Menu
13.2
Report on hirings
Use this report to show new fisher who began fishing for your company between the
selected dates. All posted fish tickets will be checked for fishers whose first trip was
within that date range.
Select Report on hirings from the F/P Reports menu and you will see:
Enter data as follows:
1. Start Date
Enter the date in MMDDYY format when you want the report to start, or press [F1] for
"Earliest".
2. End Date
Enter the last date for hirings to be included in the report, press [F1] for "Latest", or if
you did not press F1 above, press ENTER to see hirings for one date.
At "FIELD NUMBER TO CHANGE ?" make any desired changes, then press [Enter].
If there are no hirings between the selected dates, you will see the message "NO
HIRINGS IN RANGE SELECTED. PRESS [ENTER] TO CONTINUE".
If there are new fishers for that period, a window will appear for you to select how to
print the report. Follow the screen instructions. Refer to the chapter titled General
Rules for a detailed explanation of the printing options.
Fishpro
Samco Power Accounting
Reporting Menu
13.3
When the report has finished printing, the F/P Reports menu will reappear.
Recalculate EI amounts
At the end of the fishing season, the calculated EI premiums may not necessarily be
correct. The Recalculate EI amounts function will look at all trips made by each fisher
during the year and establish the correct EI premiums payable.
NOTE: This function should always be run before Records of Employment are printed
to ensure correctness.
Type Recalculate EI amounts from the F/P reports menu and you will see:
Enter the following data:
1. Start Customer#
Press [F1] for "First" or enter the customer for whom you want to start recalculating EI.
Fishpro
Samco Power Accounting
Reporting Menu
13.4
2. End Customer#
Press [F1] for "Last" or enter the customer for whom you want to stop recalculating EI.
3. Update EI Amounts ?
This option will update the amount of EI premiums owed by each fisher based on the EI
regulations. The program will calculate the total required and compare it to what has
already been paid. The changed amount, which could be a debit or a credit, is then
created as a journal voucher. The journal voucher can then be printed and posted as an
open item onto the fisher's account.
Answer Y, or press [Enter] to accept the N default.
4. Print suggested changes
If you enter Y in field 3, this field will default to Y and skip to the next field.
If you enter N in field 3, enter Y to print the report of changes or press ENTER for the
default of N.
5. Effective Date
Enter the date to begin recalculating EI or press [Enter] to accept the default.
6. Company Division
Enter the company division number, or press [F1] for "All". You will be warned if the
last time this function was run the company division setting was different. Press [F2]
to override.
At "FIELD NUMBER TO CHANGE ?" make any desired changes, then press [Enter]. A
window will appear for you to select how to print the report. Follow the screen
instructions. Refer to the chapter titled General Rules for a detailed explanation of the
printing options.
When the report is finished printing, the F/P Reports menu reappears.
7. Print Totals?
Enter Y to print the totals at the bottom of the report or press ENTER to accept the
default of N.
Print Record of Employment
Record of employment forms can be printed for one or "All" fisher with one or "All" gear
types.
Fishpro
Samco Power Accounting
Reporting Menu
13.5
From the F/P reports menu select print Record of Employment and you will see:
NOTE: Records of Employment must be printed before T4 forms.
Enter the following data:
1. Fisher
Press [F1] for "All", enter the fisher's SIN, press ENTER and type the fisher's name, or
press [F2] to scan the fisher file, as instructed at the bottom of the screen.
2. Gear Type
If you wish to produce ROE's for only one gear type, enter a gear type code, or press F1
for "All".
3. Exclude Fisher With Other Gear Types ?
If you specified only 1 gear type above, you can include all fishers who use that gear
type as well as other gear types by answering N. If you answer Y, you will only get ROE's
for fishers who use the selected gear type only. If you answered "All" in field 2 above,
this question will automatically default to N and cannot be changed.
Fishpro
Samco Power Accounting
Reporting Menu
13.6
4. Company Division
Enter the company division number, or press [F1] for "All".
Your screen will look similar to:
At "FIELD NUMBER TO CHANGE ?", make any desired changes, then press [Enter]. You
will then see the second page:
Fishpro
Samco Power Accounting
Reporting Menu
13.7
Enter the following data:
5. Employer Name
The company name you set up in Maintain company data will be displayed. Press [Enter]
to accept it.
6. Employer Address-1
7. Employer Address-2
The company address you entered in Maintain company data will display. Press [Enter]
to accept it.
8. Employer Postal Code
Press [Enter] to accept the postal code which was set up in Maintain company data.
9. RCT Employer Account#
Fishpro
Samco Power Accounting
Reporting Menu
13.8
The RCT account number set up in the F/P Control File will display. Press [Enter] to
accept it.
10. Reason For Issuing
Enter a one letter code to describe the reason for issuing the ROE. The choices are:
A
B
C
D
-
end of season
illness/injury
quit
other
Press [Enter] to accept the A default, or enter another appropriate code.
11. Comments
Enter any comments to be printed on the Record of Employment. Up to 90
alphanumeric characters can be entered. If no comments are to be printed, press
[Enter] to skip this field.
12. Language
The choices are E for English or F for French. Press [Enter] to accept the E default.
13. Issuer Phone Number
Enter the area code, phone number (with no spaces) and an optional 4 digit extension.
14. Issuer Name
Type in your name or the name of the person issuing the ROE. Up to 20 characters can
be entered.
15. Issue Date
Type in the date you are issuing the report, or press [Enter] to accept the default date.
At "FIELD NUMBER TO CHANGE ?", make any desired changes, then press [Enter].
You then see "PLEASE MOUNT RECORD OF EMPLOYMENT FORMS ON PRINTER. TYPE
"DONE" WHEN READY".
Mount the Record of Employment forms on the printer so that the print head is at the
top of the form. Adjust the printing pressure according to the thickness of the forms.
When you have finished mounting the forms, type DONE. You are then asked "PRINT
ALIGNMENT ? N".
Fishpro
Samco Power Accounting
Reporting Menu
13.9
If you want a sample Record of Employment with X's printing so you can check the
alignment on the printer, answer Y. A sample form will be printed and you will again
be asked again "PRINT ALIGNMENT ?". You can print as many alignment forms as you
wish. When the alignment is correct, answer N to the "PRINT ALIGNMENT ?" question.
The Record of Employments will then be printed.
After ROE's are printed, you will be asked "ARE RECORDS OF EMPLOYMENT OK? Y". If
you answer N, you will be returned to the first Print records of employment screen to
start again. If you press ENTER to accept the Y default, you will also be returned to the
first screen for entry of another ROE to print.
After Record of Employments are printed, you are asked to mount regular paper on the
printer. Do so, then type DONE. The F/P Reports menu then reappears.
Print T4 Forms
Use this function to issue the T4's to fishers. You will have to mount the forms on the
printer prior to running this function.
NOTE: Records of Employment must be printed before T4 forms.
From the F/P reports menu select Print T4 Forms and you will see:
Fishpro
Samco Power Accounting
Reporting Menu
13.10
Enter the following data:
1. Is this a restart ?
Press [Enter] to accept the N default. You would only change this to Y if you had started
printing T4's and had to stop for some reason such as adding more forms.
2. Fisher
You can either press [F1] for "All", type the fisher's SIN, press [F2] to scan the fisher file,
or press [Enter] and type the fisher's name, as instructed at the bottom of the screen.
3. Print Skipper's Name ?
Type N if you do not want the skipper's name to printed on the T4's, or press [Enter] to
accept the Y default.
4. Print Companies ?
If you want T4's printed for companies, press [Enter] to accept the Y default. If not,
answer N.
5. Print leases
If you want T4's printed for leases, press [Enter] to accept the Y default. If not, answer
N.
6. Deduction Name
Gear Types
If another deduction name is to appear on the T4 form, enter the name of the deduction
and the appropriate gear type code(s) will display. The deduction entered here will
appear on the lower left of the form.
If you do not enter a deduction name here, you will not be allowed to make an entry in
the next field.
7. Deduction Description
Enter up to 25 alphanumeric characters describing the deduction. You must enter a
description here. The description entered here will appear on the T4's beside the
deduction total.
8. Company Division
Enter the company division number, or press [F1] for "All".
Fishpro
Samco Power Accounting
Reporting Menu
13.11
You are then asked "FIELD NUMBER TO CHANGE ?". Make any desired changes, then
press [Enter].
9. Income tax deduction code
Enter the deduction code for income tax or leave blank for no income tax reported.
10. Limit insurable to gross ?
Press ENTER to accept the default of Y.
You then see "PLEASE MOUNT T4 FORMS ON PRINTER. TYPE "DONE" WHEN READY".
Mount the statement forms on the printer so that the print head is at the top of the
form. Adjust the printing pressure according to the thickness of the forms. When you
have finished mounting the forms, type DONE. You are then asked "PRINT ALIGNMENT
? N".
If you want a sample statement with X's printing so you can check the alignment on the
printer, answer Y. A sample form will be printed and you will again be asked again
"PRINT ALIGNMENT ?". You can print as many alignment forms as you wish. When the
alignment is correct, answer N to the "PRINT ALIGNMENT ?" question. The statements
will then be printed.
After statements are printed, you are asked to mount regular paper on the printer. Do
so, then type DONE. The F/P Reports menu then reappears.
Print WCB report
The WCB report will list the WCB gross for each fisher in your company, and will
calculate any amount in excess of the user-defined WCB maximum, Refer to the chapter
titled Fishpro Control Data.
The Print trip detail option will include individual ticket values, skipper status, and each
fisher's gross earnings for each ticket.
Select Print WCB report from the F/P reports menu and you will see:
Fishpro
Samco Power Accounting
Reporting Menu
13.12
Enter the following data:
1. Start Date
Enter the starting date for the report or press [F1] for Earliest".
2. End Date
Enter the last date for WCB earnings to be included or press [F1] for "Latest".
3. CFV#
Enter the CFV#, press [F1] for "All", or press [F2] for the next boat on file then press
[F1] to scan the boat file, as instructed at the bottom of the screen. When the correct
boat has been located, press [Enter].
At "FIELD NUMBER TO CHANGE ?" make any desired changes, then press [Enter]. A
window will appear for you to select how to print the report. Follow the screen
instructions. Refer to the chapter titled General Rules for a detailed explanation of the
printing options.
When the report has finished printing, the F/P Reports menu reappears.
Third party demand report
The Third Party Demand report will print or display a list of fishers who have a demand
issued against their account, and the current amount still owing by them. This amount
Fishpro
Samco Power Accounting
Reporting Menu
13.13
on the report will decrease as payments are taken from the fisher's share of each posted
ticket value.
From the F/P reports menu select Third party demand report and a print window
appears for you to select which printer the report is to be sent. Refer to the chapter
titled General Rules for a detailed explanation of the printing options.
When the report is finished printing, the F/P Reports menu will reappear.
Inventory report
The Inventory report can be printed or displayed at any time to track your
period-to-date and year-to-date value, weight and piece count totals by gear type.
Select Inventory report from the F/P reports menu and the following screen appears:
Enter the following data:
1. Start species
Enter the starting species number, or press [F1] for "First".
2. End species
Enter the ending species number, or press [F1] for "Last".
At "FIELD NUMBER TO CHANGE ?" make any desired changes, then press [Enter]. A
window will appear for you to select how to print the report. Follow the screen
Fishpro
Samco Power Accounting
Reporting Menu
13.14
instructions. Refer to the chapter titled General Rules for a detailed explanation of the
printing options.
When the report is finished printing, the F/P reports menu reappears.
Print T5 forms
The government requires a T5 form from every fisher/customer who earned any interest
income during the year.
This function will issue a T5 to fishers whose interest income for the year is greater than
the selected cut-off amount.
From the F/P Reports menu, select Print T5 forms. You will see:
Enter the following data:
1. Start Customer Name
Fishpro
Samco Power Accounting
Reporting Menu
13.15
Enter the name of the first fisher/customer to be issued a T5 form, or press [F1] for
"First".
2. End Customer Name
Enter the name of the last fisher/customer to be issued a T5 form, press [F1] for "Last",
or press [Enter] to print a T5 for only one fisher/customer.
3. Start Date
Enter the starting date, in MMDDYY format, for the calculated interest to be included in
the T5 form.
4. End Date
Enter the last date for calculated interest to be included in the form, or press [F1] for
"Latest".
5. Cut-off Amount
Enter a cut-off amount, or press [Enter] for .00. If any fisher's total interest during the
selected time period does not add up to the amount entered here, no T5 form will be
printed for him.
At "FIELD NUMBER TO CHANGE ?" make any desired changes, then press [Enter].
If there is no earned interest in the ranges specified, you will see the following message
"NO EARNED INTEREST TO PRINT. PRESS ENTER TO CONTINUE".
If there is earned interest to be printed, you will see "PLEASE MOUNT T5 FORMS ON
PRINTER, TYPE "DONE" WHEN READY".
Mount the statement forms on the printer so that the print head is at the top of the
form. Adjust the printing pressure according to the thickness of the forms. When you
have finished mounting the forms, type DONE. You are then asked "PRINT ALIGNMENT
? N".
If you want a sample T5 form with X's printed so you can check the alignment on the
printer, answer Y. A sample form will be printed and you will again be again "PRINT
ALIGNMENT ? N" You can print as many alignment forms as you wish. When the
alignment is correct, press ENTER to accept the N default. The T5 forms will then be
printed.
After the T5 forms have finished printing, you are asked to mount the regular paper on
the printer. Do so, then type DONE. The F/P Reports menu then reappears.
6. Use laser forms ?
Fishpro
Samco Power Accounting
Reporting Menu
13.16
Press ENTER to accept the default of N, or enter Y to use laser forms for T5’s.
7. Copies per fisher
Enter the number of copies for each fisher.
Income tax collected report
Select Deductions collected report from the F/P Reports menu and you will see:
I
Enter data as follows:
1. Start Date
Enter the date in MMDDYY format when you want the report to start, or press [F1] for
"Earliest".
2. End Date
Enter the date in MMDDYY format when you want the report to end, or press [F1] for
"Latest".
At "FIELD NUMBER TO CHANGE ?" make any desired changes, then press [Enter].
Fishpro
Samco Power Accounting
Reporting Menu
13.17
If there was income tax collected the period, a window will appear for you to select how
to print the report. Follow the screen instructions. Refer to the chapter titled General
Rules for a detailed explanation of the printing options.
When the report has finished printing, the F/P Reports menu will reappear.
3. Which date ?
Enter F for fish ticket date or P for posted date.
4. Deduction type
Enter the deduction type code or press F1 for “All”.
Average weights calculation
Select Average weights calculation from the F/P reporting menu and you will see:
Enter data as follows:
1. Start Date
Enter the date in MMDDYY format when you want the report to start, or press [F1] for
"Earliest".
2. End Date
Fishpro
Samco Power Accounting
Reporting Menu
13.18
Enter the date in MMDDYY format when you want the report to end, or press [F1] for
"Latest".
At "FIELD NUMBER TO CHANGE ?" make any desired changes, then press [Enter].
T4 Summary listing
Select T4 summary listing from the F/P reporting menu and you will see:
Enter data as follows:
1. Start Date
Enter the date in MMDDYY format when you want the report to start, or press [F1] for
"Earliest".
2. End Date
Enter the date in MMDDYY format when you want the report to end, or press [F1] for
"Latest".
Fishpro
Samco Power Accounting
Reporting Menu
13.19
3. Fisher type
The options are …
A
X
C
All
Exclude companies/natives
Only companies/natives
4. Sort order
Enter A for alphabetic or N for numeric order.
4. Tax deduct code
Enter the code that was used to deduct income tax from the fishers’ tickets or accounts.
At "FIELD NUMBER TO CHANGE ?" make any desired changes, then press [Enter]. A
window will appear for you to select how to print the report. Follow the screen
instructions. Refer to the chapter titled General Rules for a detailed explanation of the
printing options.
When the report is finished printing, the F/P reports menu reappears.
EI report
Select EI report from the F/P reporting menu and you will see:
Fishpro
Samco Power Accounting
Reporting Menu
13.20
Enter data as follows:
1. Which date
The options are…
D
P
E
Entry date
Posted date
Earnings date
2. Start Date
Enter the date in MMDDYY format when you want the report to start, or press [F1] for
"Earliest".
3. End Date
Enter the date in MMDDYY format when you want the report to end, or press [F1] for
"Latest".
4. Detail level
The options are…
M
W
D
T
F
Monthly
Weekly
Daily
Ticket detail
Fisher detail
At "FIELD NUMBER TO CHANGE ?" make any desired changes, then press [Enter]. A
window will appear for you to select how to print the report. Follow the screen
instructions. Refer to the chapter titled General Rules for a detailed explanation of the
printing options.
When the report is finished printing, the F/P reports menu reappears.
Settlement Summary report
From the F/P reporting menu, select Settlement summary report and you will see:
Fishpro
Samco Power Accounting
Reporting Menu
13.21
Enter data as follows:
1. Start Date
Enter the date in MMDDYY format when you want the report to start, or press [F1] for
"Earliest".
2. End Date
Enter the date in MMDDYY format when you want the report to end, or press [F1] for
"Latest".
3. Boat
Enter the boat CFV# or press F1 for “All”.
4. Gear type
The options are…
F1
F3
F4
All
Range of boats
All except (exclusion list)
At "FIELD NUMBER TO CHANGE ?" make any desired changes, then press [Enter]. A
window will appear for you to select how to print the report. Follow the screen
Fishpro
Samco Power Accounting
Reporting Menu
13.22
instructions. Refer to the chapter titled General Rules for a detailed explanation of the
printing options.
When the report is finished printing, the F/P reports menu reappears.
Account balances report
Select Account balances report from the F/P reporting menu and you will see:
Enter data as follows:
1. Cutoff amount
Enter the dollar amount for the accounts that you want the report to start at or press F1
for “None”.
2. Print sub-accounts ?
Press ENTER to accept the default of N or enter Y to include sub-accounts if you are
using the parent/child feature of the A/R module.
3. A/R subledger
Enter the G/L account number or press F1 for “All”.
Fishpro
Samco Power Accounting
Reporting Menu
13.23
At "FIELD NUMBER TO CHANGE ?" make any desired changes, then press [Enter]. A
window will appear for you to select how to print the report. Follow the screen
instructions. Refer to the chapter titled General Rules for a detailed explanation of the
printing options.
When the report is finished printing, the F/P reports menu reappears.
Fishers list
Select Fishers list from the F/P reporting menu and you will see:
Enter data as follows:
1. Sort by: Fisher, Name, SIN number or CFV number
2. Starting fisher #
Enter the fisher ID where you want the report to start, or press [F1] for
"Earliest".
Fishpro
Samco Power Accounting
Reporting Menu
13.24
3. Ending fisher #
Enter the fisher ID where you want the report to end, or press [F1] for "Latest".
4. Starting CFV#
Enter the boat number where you want the report to start, or press press [F1] for
"Earliest".
5. Ending CFV#
Enter the boat number where you want the report to end, or press press [F1] for
"Latest".
6. Starting last-trip date
Enter the date in MMDDYY format when you want the report to start, or press
[F1] for "Earliest".
7. Ending last-trip date
Enter the date in MMDDYY format when you want the report to end, or press [F1]
for "Latest".
8. Format
Full All the fields plus credit limit found on first page of the fisher
Brief Customer number, Name, SIN#, and EI-status only
9. Include Amounts?
Y
All the T4 and T4A amounts found the first page of the fisher
N
No T4 and T4A amounts
At "FIELD NUMBER TO CHANGE ?" make any desired changes, then press [Enter]. A
window will appear for you to select how to print the report. Follow the screen
instructions. Refer to the chapter titled General Rules for a detailed explanation of the
printing options.
When the report is finished printing, the F/P reports menu reappears
To end this function
To end use of the Reporting menu, press [Tab] at the Please select field. The F/P Main
menu reappears.
____________________
Fishpro
Samco Power Accounting
Reporting Menu
13.25
Chapter 14
Utility functions Menu
Introduction
These functions will be used mainly by Systems Administrators. They are for identifying
and correcting specific fields calculated in other functions.
From the Fishpro menu press [F2] then select Utility functions menu and you will see:
Print data integrity report
This report is used to show you if there are any incomplete tickets or adjustment
tickets, or missing ticket information.
From the Utility functions menu, select Print data integrity report. A window will
appear for you to select how to print the report. For a complete explanation of the
printing options, refer to the chapter titled, General Rules.
Fishpro
Samco Power Accounting
Utility Functions
14.1
When the report is finished printing, the Utility functions menu will reappear.
Print documents
This function would be used to print many documents at one time. Documents that have
a "Manual" status can be printed, and documents that have already been printed can be
reprinted.
From the Utility functions menu, select Print documents and a screen similar to the one
below will appear:
At "FIELD NUMBER TO CHANGE ?", select the number beside the document you wish to
print, and type Y.
The cursor will move down through all fields below the one selected on that screen.
Type Y for each document to be printed, or press [Enter] to accept the N default.
Press [F2] to view the next screen of documents, as instructed at the bottom of the
screen.
Fishpro
Samco Power Accounting
Utility Functions
14.2
When you have selected the documents to be printed, press [Enter] at "FIELD NUMBER
TO CHANGE ?". You will be asked to enter the print device and whether or not you want
to print an alignment for each document you selected.
When the documents have finished printing, you will be returned to the
F/P Utility functions menu.
Skipper Number report
This report will show a list of boats with no skippers or more than one skipper. It will
also print a list of deckhands for the boat. If there are no such boats, the report will be
blank.
Select Skipper Number report from the F/P Utility functions menu. A window appears
for you to select how to print the report. Follow the screen instructions. Refer to the
chapter titled, General Rules for a detailed explanation of the printing options.
When all printing is complete the F/P Utility functions menu reappears.
Packer file export program
This function creates an export file of data for use on a packer, using a restricted
version of the Fishpro software. The files exported are:
-
all Fishpro system codes
all current prices
all fishers
all boats since last export
all deckhand distributions
the Fishpro control file
the company file
NOTE: If the export of data to a packer is not done regularly, it is recommended that the
last load date be set to "Never" so that you are assured of transferring all data.
Select Packer file export program from the F/P Utility functions menu and you will see:
Fishpro
Samco Power Accounting
Utility Functions
14.3
Enter the following data:
1. Packer number
Enter the CFV# of the boat you have designated as a packer, or press [F1] for next
packer boat number.
2. Last load date
Enter the date of the last load of data to this packer, in the format MMDDYY, or press
[F1] for "Never".
3. Packer user id
Enter the unique user id to be assigned to all fish tickets created on the packer. This is
to allow processing and reporting of the packer fish tickets separately.
4. Device size in Kbytes
Enter the size of the device that the packer export information is to be copied to.
in the packer company file. The default is C.
Fishpro
Samco Power Accounting
Utility Functions
14.4
5. Start ticket #
Enter the starting ticket number to be used on the packer for fish ticket entry.
6. Next automatic customer #
Enter the first number to create for new customers
7. Default gear type
Enter the default gear type to be used on the packer during fish ticket entry. The
default is 10.
8. Default delivery location
Enter the default delivery location to be used on the packer during fish ticket entry.
9. This machine's device
Enter the device for this machine. The software will automatically transfer the export
data to this device once the export data file has been created. You may press F1 to
bypass copy to the device.
At "FIELD NUMBER TO CHANGE ?", make any desired changes then press [Enter]. The
screen clears and several messages display as this function processes each of the files to
be exported to the packer system.
When this function is complete it will returns to the Utility functions menu.
Packer file import program
This function reads an import file of data created on a packer, using a restricted version
of the Fishpro software. The information imported is:
- changes to customers/fishers
- fish tickets created on a the packer
Select Packer file import program from the F/P Utility functions menu and you will see:
Fishpro
Samco Power Accounting
Utility Functions
14.5
Enter the device from where the packer import data files are to be read. The default
drive letter is A.
You are then prompted "Are you sure?", if you answer Y then a report of all tickets and
updated customers/fishers will be printed. Any fish ticket number to be imported is
already on file, a warning message will be printed and the fish ticket will not be
imported.
After the report is printed you are prompted:
Load tickets?
The default is Y, and you can enter N to terminate the import of the packer fish tickets.
Press [Enter] and the screen will display a processing message where each fish ticket
number being processed will be displayed. If a fish ticket number being imported is
already on file it is skipped.
Once the import processing is completed a "Processing complete" message is displayed
on the screen. Press [Enter] and the F/P Utility functions menu will be displayed.
Fishpro
Samco Power Accounting
Utility Functions
14.6
Rebuild weight/pieces history
This function will rebuild the history totals. You would use this function if any values
were added or changed in the Maintain species inventory function.
Select Rebuild weight/pieces history from the F/P Utility functions menu and you will
see:
You are then given the opportunity to stop this function before it starts. Enter Y if you
wish to continue, or press [Enter] to accept the default entry of N.
When the history totals are finished being processed, the Utility functions menu will
re-display.
Recalculate ticket gross amounts
The Recalculate deckhands gross amounts function must be used if any fishers E.I.
status was changed and any or all trips were changed. (See Maintain Fisher/Customer,
Change/Inquire function.)
Select Recalculate ticket gross amts from the F/P Utility functions menu and you will
see:
Fishpro
Samco Power Accounting
Utility Functions
14.7
You are then given the opportunity to stop this function before it starts. Enter Y if you
wish to continue, or press [Enter] to accept the default entry of N.
The screen will display which ticket and deckhand it is processing. When the gross
amounts are finished being processed, the F/P Utility functions menu will re-display.
Reset ROE flags
When a Record of Employment is printed for a fisher, all trips included in that report
will be set to Y, to indicate they have already been printed. This function will reset all
trips to a N status, so they can be printed again.
NOTE: Record of Employment flags can also be reset through the Trip history screen in
Maintain Fisher/Customer Data.
Select Reset ROE flags from the F/P Utility functions menu and the following screen will
be displayed:
Fishpro
Samco Power Accounting
Utility Functions
14.8
Enter the following data:
1. Start customer name
Enter the first customer/fisher name to be selected for reset, or press [F1] for "First".
Up to a maximum of 25 alpha-numeric characters may be entered.
2. End customer name
Enter the last customer/fisher name to be selected for reset, or press [F1] for "Last".
Up to a maximum of 25 alpha-numeric characters may be entered.
Once the ROE has been printed, all trips included on that report will again be set to Y.
When the ROE flags are finished being processed, the F/P Utility functions menu will
re-display.
Change posted ticket values
Select Change posted ticket values from the F/P Utility functions menu and you will
see:
Fishpro
Samco Power Accounting
Utility Functions
14.9
Enter the following data:
1. Ticket #
Enter the number of the ticket to be changed. The current information associated with
the ticket will be displayed.
2. CFV#
The current boat number and name on the fish ticket is displayed.
3. Date
The current date of the fish ticket is displayed.
4. Landing status
The current landing status of the fish ticket is displayed.
5. Delivery location
Fishpro
Samco Power Accounting
Utility Functions
14.10
The current delivery location of the fish ticket is displayed.
6. Catch Area
The current catch area of the fish ticket is displayed.
7. Alt catch area
The current alternate catch area of the fish ticket is displayed.
At "FIELD NUMBER TO CHANGE ?", make any desired changes, then press [Enter].) All
fields can be changed with the exception of the Ticket #.) The message "TICKET HAS
BEEN UPDATED" will appear. Press [Enter] to continue.
When there are no more posted ticket values to be changed, press [Tab] at the Ticket #
field. The Utility functions menu will reappear.
Recalculate fisher earnings
Select Recalculate fisher earnings from the F/P Utility functions menu and you will see:
You are then given the opportunity to stop this function before it starts. Enter Y if you
wish to continue, or press [Enter] to accept the default entry of N.
When the history totals are finished being processed, the Utility functions menu will
re-display.
Fishpro
Samco Power Accounting
Utility Functions
14.11
Salmon tax repayment
From the F/P Utility functions menu, select Salmon tax repayment and you will see:
Enter the following data:
1. Start date
Enter the start date in MMDDYY format or press F1 for “Earliest”.
2. End date
Enter the end date in MMDDYY format or press F1 for “Latest”.
3. Update history ?
Press ENTER to accept the default of N if you do not want to update the history file.
Otherwise, enter Y.
At "FIELD NUMBER TO CHANGE ?", make any desired changes then press [Enter].
When this function is complete it will returns to the Utility functions menu.
Fishpro
Samco Power Accounting
Utility Functions
14.12
Prior year settlement calc
From the F/P Utility functions menu, select Prior year settlement calc and you will see:
Enter the following data:
1. Prior year company number
Enter the company number that holds the prior year data. The default is the current
company.
2. Reset flags first ?
Press F1 to accept the default of Y. Otherwise, press N if you do not wish the flags to
be reset.
At "FIELD NUMBER TO CHANGE ?", make any desired changes then press [Enter].
When this function is complete it will returns to the Utility functions menu.
Recalculate YTD – EI adjustment
From the F/P Utility functions menu, select Recalculate YTD – EI adjustment and you
will see:
Fishpro
Samco Power Accounting
Utility Functions
14.13
Enter the following data:
1. Year
Enter the year that is to be adjusted. The default is the current year.
2. Update fisher record ?
Press F1 to accept the default of N. Otherwise, press Y if you wish the fishers’ records
to be updated.
At "FIELD NUMBER TO CHANGE ?", make any desired changes then press [Enter].
When this function is complete it will returns to the Utility functions menu.
_____________________________
Fishpro
Samco Power Accounting
Utility Functions
14.14
Chapter 15
End of Period/Year Functions
Introduction
Use this function to clear the period-to-date fields in the Fisher, Salesman, and Codes
files. It is usually run at the end of an accounting period after all accounting operations
have been done, to set the period-to-date fields to zero, or to the amount (if any) that
has already been accumulated for the next period.
If this is the last period of the year, the function will also reset the year-to-date fields.
The current period is determined by the "Current period end date" kept in the A/R
Control file. Any sale or cash receipt transaction dated on or before this date is added to
the period-to-date and year-to-date fields in the appropriate data records. Any
transaction dated after the current period end date is added to a "holding" field which is
not accessible to you directly.
When this function is run, the following happens:
1.
The amounts stored in the "holding" fields are transferred into the period-todate fields, so that the period-to-date fields are now accurate for the new
period.
2.
The current period end date in the A/R Control file is set to the ending date of
the new period.
3.
If this is not the end of the year, the amounts in the "holding" field are added
to the year-to-date amounts.
4.
If this is the end of the year, the year-to-date amounts are set equal to the
amounts in the "holding" fields.
Fishpro
Samco Power Accounting
End of Period/Year Functions
15.1
5.
The "holding" fields are all set to zero.
NOTE: Your period-to-date and year-to-date figures will be accurate as long as your
sales and cash receipts transactions never span more than 2 periods - the current period
and the next period.
If you delay running this Process end of period function until you have transactions
dated in the period after the next period, you should not enter these transactions.
Don't enter them until after you have run this function.
For example, if the current period end date is 3/31/19, and you use monthly periods, it
is all right to enter transactions dated as late as 4/30/19. However, it is not all right to
enter any transactions dated 5/01/19 or later, until after you run this function.
To Begin These Functions
Select Process end of period/year from the second page of the Fishpro main menu.
You will see the following menu:
NOTE: Make sure that all necessary accounting operations, including the printing of all
reports, have been carried out before you proceed. All data needed for these reports
will be completely cleared by running these functions. It would be a good idea to
Fishpro
Samco Power Accounting
End of Period/Year Functions
15.2
archive a copy of the company before doing this if you ever need to go back to a
previous year for information.
1. Period End Closing
Select Period End Closing from the Process end of period/year menu. The following
screen will appear:
Confirm whether you are sure that you really want to do this function. Then enter the
new period ending date in the format MMDDYY.
The period-to-date totals for tax codes and inventory species pieces, weight, and value
will be reset to zero.
2. Purge Catch Information
Select Purge Catch Information from the Process end of period/year menu. The
following screen will appear:
Fishpro
Samco Power Accounting
End of Period/Year Functions
15.3
Type Y and press [Enter].
The various catch totals in the Fisher, boat and species files will be reset to zero.
3. Purge Earnings Information
Make sure all T4 forms and the WCB report are printed before running this function. This
would normally be done before entering any tickets in for the new year.
Select Purge earnings information from the Process end of period/year menu. The
following screen will appear:
Fishpro
Samco Power Accounting
End of Period/Year Functions
15.4
Type Y and press [Enter].
This function will reset the various earnings and EI totals for each Fisher to zero.
4. Purge Boat Catch History
This function will purge previous years catch history for boats. This information is
tracked separately from the ticket history and can be kept for many years. You will only
need to run this function if the BOTHIS file becomes too large.
Select Purge Boat Catch History from the Process end of period/year menu. The
following screen will appear:
Fishpro
Samco Power Accounting
End of Period/Year Functions
15.5
Once you are sure that you want to do this, type Y in response to "ARE YOU SURE YOU
WANT TO DO THIS ?". You will then be prompted to enter a purge year. All boat catch
history will be purged up to the year entered.
5. Purge Boat Deckhands History
The Fishpro system maintains a list of who was most recently on each boat. This
function allows the user to purge this list for boats that have not had activity since a
certain date. This function is only required to be run if the BOTHIS file grows too large.
Select Purge Boat Deckhands History from the Process end of period/year menu. The
following screen will appear:
Fishpro
Samco Power Accounting
End of Period/Year Functions
15.6
Type Y, or press [Enter] to accept the N default. If you answer Y, you will then be asked
to enter a purge date. All boat deckhand information up to this date will be purged from
the system.
6. Purge Fish Ticket History
Select Purge Fish Ticket History from the Process end of period/year menu. The
following screen will appear:
Fishpro
Samco Power Accounting
End of Period/Year Functions
15.7
Type Y, or press [Enter] to accept the N default. If you answer Y, you will then be asked
to enter a purge date. Type the date in MMDDYY format. All fish ticket history up to
this date will be purged from the system. Since this information is used to produce the
Record of Employment, do not purge the ticket history if you still need to print any
ROE’s.
7. Purge Inactive Fisher
This function should be run before the A/R open item purge. This removes a customer
and all his open items if he has had no account activity since the specified date.
Select Purge Inactive Fisher from the Process end of period/year menu. The following
screen will appear:
Fishpro
Samco Power Accounting
End of Period/Year Functions
15.8
Type Y, or press [Enter] to accept the N default. If you answer Y, you will then be asked
to enter a purge date. Type the date in MMDDYY format. All customers will no account
activity since this date will be purged from the system.
8. Customer Interest Dates Update
Select Customer Interest Dates Update from the Process end of period/year menu. The
following screen will appear:
Fishpro
Samco Power Accounting
End of Period/Year Functions
15.9
Press [Enter] to default to N, or answer Y and enter the old year. At "ANY CHANGE ? N",
make any desired changes, then press [Enter]. All interest dates in the given year will
be incremented by one year. Any that have been changed are then printed in the
Interest Date Update report.
A window will then appear for you to select how to print the report. Follow the screen
instructions. Refer to the chapter titled General Rules for a detailed explanation of
the printing options.
When the report has finished printing, the Process end of period/year menu will
reappear.
9. Account Clearing
Fishpro
Samco Power Accounting
End of Period/Year Functions
15.10
This function is used to create transactions and cheques to pay out credit balances on
fishermen accounts.
Select Account Clearing from the Process end of period/year menu. The following menu
will appear:
1. Calculate amounts
Select 1 from the Account clearing menu. The following screen will appear:
Fishpro
Samco Power Accounting
End of Period/Year Functions
15.11
Enter a cut off amount of up to 8 numeric digits including 2 decimal places, or press
[Enter] for zero.
You will then be asked "ANY CHANGE ?". Answer Y to make a change, or press [Enter] to
default to N. The screen will then show which customer it is processing.
When processing is complete, the Account clearing menu will reappear.
2. Add transaction
Select 2 from the Account clearing menu. The following screen will appear:
Fishpro
Samco Power Accounting
End of Period/Year Functions
15.12
Enter the following data:
1. Customer #
Enter the customer number for the transaction, or press [F1] for next Fisher. The
Fisher's name will appear to the right of the number. Press [Enter] if this is the correct
Fisher, or press [F1] for the next Fisher.
2. Amount
Enter the amount of the transaction and cheque to be produced. The maximum amount
on one cheque is $999999.99.
You will be asked "FIELD NUMBER TO CHANGE ?". Make any desired changes and then
press [Enter]. You will then return to the customer # prompt.
When all desired transactions have been entered, press [Tab] at the Customer # field.
The Account clearing menu will reappear.
3. Change/Inquire transaction
To change or inquire into account clearing transactions, select 3 from the Account
clearing menu. A screen will appear for you to select the customer. Enter the customer
number, or press [F1] to see the transactions in order, as instructed at the bottom of
Fishpro
Samco Power Accounting
End of Period/Year Functions
15.13
the screen. You will be asked "FIELD NUMBER TO CHANGE ?". Make any desired changes
to the Amount field.
When you are finished, press [Enter] at "FIELD NUMBER TO CHANGE ?" to file the
changes. Press [Tab] at the Customer # field to return to the Account clearing menu.
4. Delete transaction
From the Account clearing menu, type 4. A screen will appear for you to select the
transactions to be deleted. Enter the customer number, or press [F1] to scan the
transactions on file, as instructed at the bottom of the screen. You will be asked "OK TO
DELETE TRANSACTION ? N" Answer Y, or press [Enter] to accept the N default. If you
answer N, the screen will clear for entry of another transaction to be deleted.
When all desired transactions have been deleted, press END at the Customer # field.
The Account clearing menu will reappear.
5. Clearing edit list
Print the Clearing Edit List to verify that the calculated transactions amounts are
correct.
Select 5 from the Account clearing menu. A window will appear for you to select how to
print the Account Clearing Edit List. Refer to the chapter titled General Rules for a
detailed explanation for the printing options.
When the list has finished printing, the Account clearing menu will reappear.
6. Create cheques
Select 6 from the Account clearing menu. The following screen will appear:
Fishpro
Samco Power Accounting
End of Period/Year Functions
15.14
Enter the following data:
Please enter cheque comments
1 - 10
Enter any comments to be printed on the cheques, then press [F2] when you are
finished. Up to 10 line of comments can be printed, with 60 alphanumeric characters
per line.
11. Print cheques now?
Answer Y or N to the "PRINT CHEQUES NOW ?" question. If you choose N, the cheques can
be printed later using the Print documents function in Extra Functions.
You will be asked "FIELD NUMBER TO CHANGE ?". Make any desired changes and then
press [Enter].
Fishpro
Samco Power Accounting
End of Period/Year Functions
15.15
The screen will show each customer/fisher number it is processing and then return to
the Account clearing menu.
To end this function
Press [Tab] at the 'Please select' prompt and the F/P period/year end closing menu will
reappear.
_____________________________
Fishpro
Samco Power Accounting
End of Period/Year Functions
15.16
Chapter 16
Print Reports from Disk
Introduction
Throughout this package, when you chose to print a report, you were given a choice of
printing it right away on a printer, displaying it on the screen, or printing it to disk.
Printing to disk: When you run a function that prints a report, you can specify that you
want it to be stored on disk for later printing. Doing this, you can save reports until a
printer is available, then print several or all reports at once. Printing to disk is faster
than printing directly to a printer.
Printing from disk: Later, when you wish to print the reports that were stored on disk,
you can print one or all of them. This gives you the ability to store reports for one long
print run (for example, overnight).
Printing from disk is also sometimes called "de-spooling". The word "spool" is a computer
word meaning "Save Printer Output Off-Line". This means that the printer output does
not go directly to the printer, but is saved somewhere else (in this case, on the hard
disk).
To begin this function
From the main Fishpro menu, press [F2], select Print Reports from disk.
NOTE: You can access the reports for any company (if you are using multi-companies)
and for any package by using this function, no matter what company or package you are
in at the moment. Each of the four options in this function has its own way of accessing
these different reports, as described below.
You will then see:
Fishpro
Samco Power Accounting
Print Reports from disk
16.1
1. Select report to print, display or delete
To print, display or delete a report, type 1.
If there are no reports on the disk for any packages for the company you are running,
you see "NO REPORTS HAVE BEEN SAVED ON DISK". Press [Enter] to continue.
If there are reports on the disk for the company and package you are running, you see a
list of these reports:
Fishpro
Samco Power Accounting
Print Reports from disk
16.2
Type in the number of the report you want to print, display, or delete, press [F1] to see
more reports, if any, or press [F2] to see a list of all reports for the SAMCO packages
used for this company. Press [F3] to purge a report
If you are in the "all packages" mode, you can return to the "single package" mode by
returning to screen 1 of the list of reports, then pressing [F2].
If you are in the "single package" mode, and the package you are running has no reports
on the disk, you are switched to the "all packages" mode automatically, as long as any
other package being used by this company has reports on disk for the company that you
are running. If you then press [F2] to return to the "single package" mode, you see
"THERE ARE NO SPOOLED REPORTS FOR THE (name) PACKAGE.
On the second and later screens showing reports, type in the number of the report,
press [F1] to see the next page, or press [SH/F1] to return to the preceding page.
Fishpro
Samco Power Accounting
Print Reports from disk
16.3
On the second and later screens showing reports, type in the report sequence number
which will be printed at the top of that report.
After you select a report number, you see "PLEASE SELECT: 1-DISPLAY 2-PRINT
3-DELETE". Select 1, 2 or 3, or press [Esc] to return to the previous set of choices.
1. DISPLAY
To display the report, type 1.
If there is actually nothing on the disk for that report (even though it appeared on the
list), you see:
"REPORT NOT FOUND ON THE DISK. TABLE ENTRY WILL BE DELETED AUTOMATICALLY".
This can happen in unusual circumstances. For example, the report was accidentally
erased. Press [Enter] to continue.
If the report is on disk, you are asked "PRINT PAGES ____ TO ____". Enter the range of
page numbers to print. You can press [Enter] at the first field to begin with page 1.
You can press F1 at the second field to end with the "Last" page. Press [Esc] to return
to the previous set of choices.
The report displays. Follow the screen instructions.
2. Print
To print the report, type 2.
If you are using more than one printer, enter the number of the desired printer in
answer to "WHICH PRINTER?". You then see "PRINT PAGES ____ TO ____". Enter the
range of page numbers to print. You can press [Enter] at the first field to begin with
page 1. You can press F1 at the second field to end with the "Last" page.
You are then asked "HOW MANY COPIES?". Enter the number of copies you wish to print,
or press [Enter] to print one copy.
The report is then printed. The report selection screen re-displays with the word
"PRINTING" shown opposite the selected report. If you are printing more than one copy,
the number of the copy which is being printed displays at the bottom of the screen.
Follow the screen instructions. When the report finishes printing, the "LAST PRINTED"
field on the screen changes to the current date and time.
3. Delete
To delete a report from the disk, type 3.
Fishpro
Samco Power Accounting
Print Reports from disk
16.4
If this is an audit trail report, and it has not been fully printed, you see "THIS REPORT
MUST BE FULLY PRINTED BEFORE IT CAN BE DELETED". Press [Enter] to continue, then
either use option 2 to print the report (and then return here to delete it), or press [Esc]
to select another report.
Audit trail reports must be fully printed before they can be deleted, using "1" for the
starting page and "Last" for the ending page.
If this is not an audit trail report, or if the report has been fully printed, you see "ARE
YOU SURE?". If you answer N, the Report selection screen reappears. If you answer Y,
the report is deleted and removed from the Report selection screen.
2. Print list of disk reports
To print a list of reports stored on the disk, type 2. You then see:
NOTE: If you are not using multi-companies, "REPORTS FOR WHICH COMPANY" does not
appear.
Reports For Which Company
Enter the company code for the reports you want to list, press [Enter] for the current
company, press [F1] to scan the company file, or press [F2] to print a list of reports for
"All" companies.
Fishpro
Samco Power Accounting
Print Reports from disk
16.5
Reports For Which Package
From the list displayed at the bottom of the screen, type the two-letter code for the
package whose reports you want to list, press [Enter] to default to the package you are
now using; or press [F2] for "All" packages. If you are not using multi-companies, press
[F1] for "All" packages. If you select a package which you do not have on your
computer, you see "THIS PACKAGE NOT INSTALLED ON YOUR SYSTEM". Press [Enter] to
continue.
Show Only Stacked Reports ?
A "stacked report" is one which you have selected (using option 3, Stack reports for later
printing, below) to put in a "stack" to be printed as part of a group at a later time. Type
N to show all reports, or type Y to show only reports in the stack. (There is only one
stack of reports.)
A window appears for you to select how to print the report. Follow the screen
instructions. Refer to the chapter titled General Rules for a detailed explanation of
the printing options.
After printing, the Print list of disk reports screen reappears.
When you are through printing lists of reports, press [Tab] at the first field. The Print
reports from disk menu reappears.
3. Stack reports for later printing
To stack reports for later printing, type 3 from the Print reports from disk menu.
You will see the following:
Fishpro
Samco Power Accounting
Print Reports from disk
16.6
Enter the following data:
Reports For Which Company
Enter the company code for which you want reports stacked, press [Enter] for the
current company, press [F1] to display the next company in order, or press [F2] to stack
reports from "All" companies.
Reports For Which Package
From the list of packages displayed at the bottom of the screen, type the two letter
code of the package you want to stack reports for; press [Enter] for the package you are
now using; or press [F1] for "All" packages. If you select a package which you do not
have on your computer, you see "THIS PACKAGE NOT INSTALLED ON YOUR SYSTEM".
Press [Enter] to continue.
You are asked "ANY CHANGE ?" To make changes, answer Y. Otherwise, answer N.
You then see a screen listing the reports for the company and package you specified:
Fishpro
Samco Power Accounting
Print Reports from disk
16.7
If there are more than 16 reports, you can press [F1] to see the next page of reports.
From there, you can press [F1] to see the next page, or press [F2] to return to the
previous page.
Select each report to be stacked by entering the line number from the left column on
the screen which corresponds to the report you want to stack.
Type Y when the cursor is positioned in the Stacked? column. Enter the number of
copies of that report to be printed, or press [Enter] to select one copy to be printed.
To unselect a report that has been stacked previously, type N or a space when the
cursor is positioned in the Stacked? column.
To end stacking reports for this company (if you are using multi-companies), press [Tab]
instead of selecting a line number. The Stack reports for later printing screen
reappears.
Fishpro
Samco Power Accounting
Print Reports from disk
16.8
To end stacking reports, press [Tab] instead of selecting a line number. The Stack
reports for later printing screen reappears.
To end stacking reports for later printing, press [Tab]. The Print reports from disk menu
reappears.
4. Print stacked reports
To print the stacked reports, select Print stacked reports from the Print reports from
disk menu. You then see:
This screen shows you how many reports are stacked and how many pages will be
printed, once you start printing.
Answer Y or N to "ARE YOU SURE YOU WANT TO PROCEED?". If you answer N, the Print
reports from disk menu reappears. If you answer Y, and you are using only one printer,
the stacked reports are printed. If you are using more than one printer, a window will
appear for you to select how to print the report. Follow the screen instructions. Refer to
the chapter titled General Rules for a detailed explanation of the printing options.
The screen shows a display of which report is printing and the number of reports and
pages remaining to print.
Fishpro
Samco Power Accounting
Print Reports from disk
16.9
When the reports have finished printing, the Print reports from disk menu will reappear.
5. Print report log
Select Print report log from the Print reports from disk menu. The following screen
will appear:
Fishpro
Samco Power Accounting
Print Reports from disk
16.10
Enter the data as follows:
1. Start Date
Enter the date for the report to start, or press [F1] for "Earliest", as instructed at the
bottom of the screen.
2. End Date
Enter the last date to be included in the report, or press [F1] for "Latest'.
3. Include Ordinary Reports ?
An ordinary report is one that is not required for an audit trail. Press [Enter] to accept
the Y default, or type N to exclude ordinary reports.
4. Purge File ?
If the report file is to be purged, type Y. If it is not, press [Enter] to accept the N
default.
Fishpro
Samco Power Accounting
Print Reports from disk
16.11
At "FIELD NUMBER TO CHANGE ?", make any desired changes, then press [Enter]. A
window will appear for you to select how to print the report. Follow the screen
instructions. Refer to the chapter titled General Rules for a detailed explanation of the
printing options.
When all printing has completed, the Print reports from disk menu will reappear.
To end this function
To end the printing reports from disk function, press [Tab] when at the Print reports
from disk screen. The package menu reappears.
_____________________________
Fishpro
Samco Power Accounting
Print Reports from disk
16.12
Chapter 17
File Utilities
Introduction
This function is intended to be used ONLY to convert the data files from their internal
"indexed" format to a "flat" ASCII format. They can also be used to restore "flat" ASCII
files into internal "indexed" format.
It is not intended to be used for daily or periodic backups for off-site storage. There are
other utilities available which are much more efficient and less time consuming.
To begin this function
From the Fishpro main menu, press [F2] to get to the second screen and select File
Utilities. You will see a screen similar to the following:
Fishpro
Samco Power Accounting
File Utilities
17.1
1. Export a file
This function is used to convert the listed data files from the internal format to a "flat"
ASCII file. The Fishpro data file is read in and an output file is created in the Fishpro root
directory with the name "xxxxxxnn.BAK". Where 'xxxxxx' is the file name, and where 'nn'
is the company number the file came from. If you are not using multiple companies the
company number will be 00.
From the Backup file utilities menu, type 1 and a screen similar to the one below will
appear:
Fishpro
Samco Power Accounting
File Utilities
17.2
Enter the following data:
Please select file
Enter the file number, from the list provided, of the file to be converted to an ASCII
backup format, or press [F1] for all.
Please enter device for exported file
This is the drive letter of the backup device that the ASCII version of the data file will be
written.
for UNIX/Linux users
Fishpro
Samco Power Accounting
File Utilities
17.3
The drive letter entered here will be attached to the front of the file name. The letter
A is recommended for consistency. The ASCII backup file name in the Fishpro root
directory will read A:xxxxxxnn.BAK.
Please enter the device size in kilobytes
Enter the size of the diskette the ASCII backup files are to be written to.
The following table shows some of the more common device sizes in kilobytes:
1440 = Normally, high density 3 1/2"
F1
= Unlimited, Hard disk drive
If you enter a specific device size, once the device is filled you will then be asked for
another device. This process will be repeated until all the data is written to the device.
The screen will then prompt you "Any change ?". Enter Y and all the entries that you
have made will be cleared and you will be returned to the "Please select file" prompt.
Press [Enter] to accept the default of N.
NOTE: If you choose to export "All" files, the screen will move immediately into
displaying the file and record being backed up. It skips past the "(C) CREATE NEW
CONVERTED FILE OR (A) ADD RECORDS TO EXISTING CONVERTED FILE", "STARTING FILE
KEY", and "ENDING FILE KEY" prompts
The following screen will be displayed only if did not select "All" files at the "Please
select file" prompt:
Fishpro
Samco Power Accounting
File Utilities
17.4
Enter the following data:
1. Starting file key
Enter the starting file key for the data file selected for conversion, or press [F1] for
"First". Up to 37 alphanumeric characters may be entered. Unless you know the exact
key for the records in the data file it is recommended that you press [F1].
2. Ending file key
Enter the ending file key for the data file selected for conversion, or press [F1] for
"Last". Up to 37 alphanumeric characters may be entered. Unless you know the exact
key for the records in the data file it is recommended that you press [F1].
At the "Field number to change ?" prompt, enter the field number you wish to change
and press ENTER.
When you have completed all changes, press [Enter] and the following prompt will
appear:
(C) create new converted file or (A) add records to existing converted file
Fishpro
Samco Power Accounting
File Utilities
17.5
Enter C to create a new backup file and over-write any pre-existing ASCII backup for this
data file, or enter A to add the records selected for conversion to any pre-existing ASCII
backup file on the device specified.
After selecting which type of backup file to create the screen then clears and the ASCII
backup file name is displayed along with a counter of the number of records converted.
If you had selected ALL at the "Please select file", it is assumed that you wish to create
a new converted file. After the "Any change ?" prompt, the screen clears and the ASCII
backup file name is displayed along with a counter of the number of records converted
for all files.
The 'Export a file' menu reappears after the file or files selected have been exported so
that you may export another file.
After you have completed running the convert routine, press [Tab] at the "Please select
file" prompt. A window will appear for you to select how to print the backup log. A
backup log shows the files(s) backed up, the number of records per file, the date and
time. Refer to the chapter titled General Rules for a detail explanation of the printing
options.
Once the report is printed you are returned to the File Utilities menu.
2. Restore from an export file
This function is used to restore one of more of the listed data files from the "flat" ASCII
file format to the internal Fishpro format. The ASCII backup file is read in and an output
file is created in the Fishpro company sub-directory with the name "xxxxxx.DAT".
Where "xxxxxx" is the file name.
From the File utilities menu, type 2 and a screen similar to the one below will appear:
Fishpro
Samco Power Accounting
File Utilities
17.6
Enter the following data:
Please select file
Enter the file number, from the list provided, of the file to be restored from an ASCII
backup format, or press [F1] for all.
Please enter device for export file
This is the drive letter of the backup device that the ASCII version of the data file will be
read.
for UNIX/Linux users
Fishpro
Samco Power Accounting
File Utilities
17.7
The drive letter entered here will be attached to the front of the file name. The letter
A is recommended for consistency. The ASCII backup file name in the Fishpro root
directory will read A:xxxxxxnn.BAK.
Please enter the device size in kilobytes
Enter the size of the device the ASCII backup files are to be written to.
The following table shows some of the more common device sizes in kilobytes:
1440 = Normally, high density 3 1/2"
F1
= Unlimited, Hard disk drive
If you enter a specific device size, once the device is filled you will then be asked for
another device. This process will be repeated until all the data is written to the device.
NOTE: If you choose to restore "All" files, the screen will move immediately into
displaying the prompt "THIS FUNCTION WILL NOW INITIALIZE ..." (see below). It skips
past the "(C) CREATE NEW DATA FILE OR (A) ADD RECORDS TO EXISTING DATA" prompt.
The screen will then prompt you "Any change ?". Make any necessary changes, then press
ENTER in response to "Any change?".
"(C) Create New Data File Or (A) Add Records To existing Data File".
If you answer C (Create new file), all of the existing data records in the original file will
be destroyed, and the data records contained in the converted file will be transferred to
the original file.
If you answer A (Add records to file), all of the existing records in the original file will
remain, and the data records contained in the converted file will be added to the
original file.
The following message will display:
"This function will now initialize the data file used in production. Its contents will be
fully replaced with data from the converted file. Please make sure you want to do this.
Are you sure?"
Answer "Y" or "N", as appropriate.
The file will now be restored. A message will be displayed on the screen, showing the
count of the records as they are restored.
When the restoration of the file or files is complete the 'Restore from an exported file'
menu will be displayed.
Fishpro
Samco Power Accounting
File Utilities
17.8
You may select another file to restore. You may continue to restore files or press [Tab]
to print the restore log and then return to the File Utilities menu.
A window will appear for you to select where to print the restore log. A restore log
shows the file(s) restored, the number of records per file, the date and time. Refer to
the chapter titled General Rules for a detailed explanation of the printing options.
NOTE: You can use the 'Export' and 'Restore' functions on an entire data file to recover
disk space from a file that has been purged or compressed (or from a file that has had
many deletions). First do a full (first record to last record) 'Export' of the file. Then
do a full 'Restore from the exported file', using the (C) Create new data file option.
Rebuilding Data Files
Rebuilding data files can be used for one of two reasons:
1. A data file has become corrupted and needs to be recovered.
2. To recover disk space and clean out deleted or purged records.
The Rebuild a file function essentially takes the good records out of a file, removes the
old file, and creates a new file with the good records.
To begin, select Rebuild a file from the File utilities menu.
You then see:
Fishpro
Samco Power Accounting
File Utilities
17.9
Enter the following information:
Please select file
Enter the number of the file you wish to rebuild or press [F1] to rebuild all of the F/P
data files.
A new screen will appear showing the status of each file as it is being rebuilt. Once
completed, you are returned to the Rebuild a file screen.
To End this function
To end the 'File Utilities' function, press [Tab] at the Please select prompt. You will be
returned to the FISHPRO menu.
_____________________________
Fishpro
Samco Power Accounting
File Utilities
17.10
Chapter 18
Change Current Company
Introduction
If more than one company has been set up in the Fishpro software, this function will
provide the operator with a method for moving in and out of the different companies
without having to exit the system. This function can be accessed through either the
Fishpro or Accounts Receivable menus.
To begin this function
From the Fishpro menu, press [F2], select Change company number. The following
screen will appear:
Fishpro
Samco Power Accounting
Change Current Company
18.1
Company-ID must be two characters (A-Z, 0-9)
Enter the two character ID for the company you wish to switch to, then press [Enter].
Answer Y to "ARE YOU SURE ?" or N if you wish to re-enter it.
You will be asked, on subsequent screens, for your initials and a password. Both are
dependant on whether or not you answered Y to "USE CHANGE LOG ?" and "ARE
PASSWORDS USED ?" in the Maintain company data function of the company you are
about to enter.
You will then see the menu of the package you were in before the Change current
company function was run. For example, if you changed the company number through
Fishpro, the first menu of the new company to appear will be the Fishpro main menu.
To end this function
If you wish to return to the company you were originally in or move to another company,
repeat the steps.
_____________________________
Fishpro
Samco Power Accounting
Change Current Company
18.2
Chapter 19
Journal Entries
Introduction
Various types of documents are included in this function to handle a variety of
transactions, although it is mainly used when handling transactions to and from fisher
accounts, as no sales information is required. It will also facilitate having several
fishers/customers associated with one transaction. Catch values can be manually
distributed if desired.
Journal entries can be added, changed and inquired into, deleted, and a Journal Entries
Edit list can be printed. Once transactions have been entered and verified as correct,
you can post them to the A/R Open Item file.
Enter a journal entry
Select the Journal Entry option from the main menu. The following menu will display:
Fishpro
Samco Power Accounting
Journal Entries
19.1
Select Enter from the Journal Entry menu. You will see:
Fishpro
Samco Power Accounting
Journal Entries
19.2
Enter the data as follows:
1. Doc #
Enter up to a 6 digit document number or press F1 for the next cheque number, F2 for
the next receipt number, or F3 for the next journal voucher number.
If you select any of these options, as instructed at the bottom of the screen, the next
field will default to your selection and cannot be changed.
2. Doc type
From the list at the bottom of the screen, enter a 1 letter code for the type of
document. The choices are:
Q = cheque Select Q when the journal entry involves issuing a cheque.
R = receipt Use the receipt document to record cash advances to fishers, payments
from fishers, or miscellaneous cash payments.
J = journal voucher The journal voucher is used to correct mistakes or transfer amounts
from one fisher account to another.
M = miscellaneous The miscellaneous document is similar to a journal voucher. Used
for Third Party demands.
U = EI premium
Usually created by the fish ticket posting function at ticket entry.
X = Income tax
Usually created by the fish ticket posting function at ticket entry.
3. Doc date
Enter the correct date in MMDDYY format, or press ENTER to accept the default date.
4. Reference
Enter up to 25 alphanumeric characters describing this journal entry. If the document
is a cheque, receipt, or a journal voucher, this field will be filled in for you. Press
ENTER to accept it, or the default reference can be changed if desired.
Debit
Enter the debit amount, or press ENTER to leave blank. If a debit amount is entered
here, the credit field below will default to zero and cannot be changed.
Credit
Fishpro
Samco Power Accounting
Journal Entries
19.3
Enter the credit amount.
skipped.
Customer#
If a debit amount was entered above, this field will be
Name
If the debit or credit is to be applied to a fisher/customer enter one of the following:
-
enter the customer number
press F2 for no customer, skip to account field
press F1 for next customer
press ENTER and type the fisher/customer name
You can scroll through the customers by using the F1 key at both the customer number
and customer name fields.
Account
If you entered a fisher/customer name above, the default account number which was
set up in the F/P Control file will be displayed.
This account number can be changed, or press ENTER to accept it and enter a 3 digit
profit centre number, or press ENTER for no profit centre.
If you did not previously enter a fisher/customer name, enter the account number and
the name of the account entered will display in the Name column.
You will be returned to the debit column on the next line for entry of the next debit or
credit for this journal entry. You will be prompted "PRESS F1 FOR REMAINING AMOUNT
OF xx.xx"
When all debits and credits are entered, press ENTER at the debit and/or credit column.
Print status
Enter the print status of this journal entry. The default will be taken from the Fishpro
control file or the station file. The print status codes available are:
N
L
M
- print now
- print later
- manual cheque/receipt
If your debits and credits are not equal, you will see the message "DISTRIBUTIONS DO
NOT BALANCE". Press ENTER to continue.
At "FIELD NUMBER TO CHANGE ?", make the necessary changes to the debit and credit
columns, press F3 to go back a page, or press F4 to go forward a page.
When you are finished making changes to the first screen, press ENTER.
Fishpro
Samco Power Accounting
Journal Entries
19.4
You will be asked if you want to make any changes to the 2nd screen reserved for
comments. If you do, type Y in response to "ANY CHANGE ? N". If you do not want to
make any changes, press ENTER to accept the N default.
When your printing selection is complete, you will be returned to the Enter screen for
entry of another journal entry.
When all desired journal entries have been added, press END at the Doc # field. The
Process journal entries menu will reappear.
Changes to unposted documents
Any unposted documents created from other functions can be changed or inquired into
by entering the document number and type At "FIELD NUMBER TO CHANGE ?", make any
desired changes. The Doc # and Doc type fields cannot be changed.
If you need to make changes to these fields, you will have the delete the journal entry
using the Delete function, then add it again using the Enter function. If you need to
print the document, use the Print documents function in Utility Functions menu.
When you are finished making changes to the first screen, press ENTER. You will be
asked if you want to make any changes to the 2nd screen reserved for comments. If
you do, type Y in response to "ANY CHANGE ? N". If you do not want to make any
changes, press ENTER to accept the N default.
If the document type is a cheque, you will then be asked if you want to make any
changes to the name and address of the person or company who the cheque is to be
issued to. When you are finished, press ENTER at "FIELD NUMBER TO CHANGE ?".
The screen will clear for entry of another journal entry to changed or inquired into.
When you are through with this function, press END at the Doc # field. The Process
journal entries menu will reappear.
Delete journal entries
Enter the document or press F1 to scan the journal entries on file, as instructed at the
bottom of the screen.
You will be asked "OK TO DELETE JOURNAL ENTRY ? N". If this is not the correct
journal entry to be deleted, press ENTER to accept the N default, or type Y to delete the
entry. Follow the screen instructions.
Fishpro
Samco Power Accounting
Journal Entries
19.5
When all desired entries have been deleted, press END at the Doc # field. The Process
journal entries menu will reappear.
Print journal edit list
Print the Journal Edit list prior to posting to make sure all entries are complete and
correct. Select Edit list from the Journal entry menu. The following screen will
appear:
Enter the following data:
1. Document type
From the window on the screen, select the document type code to be printed, or press
F1 for "All" as instructed at the bottom of the screen.
2. First document
Enter the number of the first document to be included in the list, or press F1 for "First",
as instructed at the bottom of the screen. If you selected "All" above, this field will
default to N/A and cannot be changed.
3. Last document
Fishpro
Samco Power Accounting
Journal Entries
19.6
Enter the number of the last document to be included in the list, or press F1 for "Last",
as instructed at the bottom of the screen. If you selected "All" above, this field will
default to N/A and cannot be changed.
4. User id
Enter your user id or press F1 for “All”.
At "FIELD NUMBER TO CHANGE ?", make any desired changes then press ENTER. A
window will appear for you to select how to print the list. Refer to the chapter titled
General Rules for a detailed explanation of the printing options.
When the list has finished printing, the Process journal entries menu will reappear.
Post journal entries
Select Post from the Journal entry menu. After entering the posting date (usually the
default system date), you will see the following screen:
Enter the following data:
1. Document type
Fishpro
Samco Power Accounting
Journal Entries
19.7
From the window on the screen, select the document type code to be printed, or press
F1 for "All" as instructed at the bottom of the screen.
2. First document
Enter the number of the first document to be included in the list, or press F1 for "First",
as instructed at the bottom of the screen. If you selected "All" above, this field will
default to N/A and cannot be changed.
3. Last document
Enter the number of the last document to be included in the list, or press F1 for "Last",
as instructed at the bottom of the screen. If you selected "All" above, this field will
default to N/A and cannot be changed.
4. User id
Enter your user id or press F1 for “All”.
At "FIELD NUMBER TO CHANGE ?", make any desired changes then press ENTER. A
window will appear for you to select how to print the list. Refer to the chapter titled
General Rules for a detailed explanation of the printing options.
When the list has finished printing, the Process journal entries menu will reappear.
To end this function
Press END at the 'Please select' prompt and the main menu will reappear.
Cheque/Receipt Entry
Please see Chapter 11 for an explanation of this function. Cheques and receipts may be
entered in Journal Entry or from the Fishpro menu.
____________________
Fishpro
Samco Power Accounting
Journal Entries
19.8
Chapter 20
Packer Extension
Introduction
This program is used on each packer boat to allow them to enter their own fish tickets.
All data is then brought to the main processor to update the system.
To install the Packer Program
Install the required programs, make a new directory such as C:\packer, change to that
directory, put the program disk in drive A:, and type a:rw-start. This will load in the
required object code.
When you are asked for the device and hard drive letters, insert the data file disk
created on the main machine, and complete the screen. This sets up the company file
on the packer machine.
To run this program, type RW-MENU and then select the trip start-up function. This
loads the various files into the packer machine.
After fish tickets have been processed on the packer machine, use the trip shutdown to
write out the fish tickets to the device. Any customer file changes made in the new
fisher window are also put on the device. This produces the following files:
CUSFIP.DAT
TIKFIP.DAT
These files must be copied into the data file directory on the main machine. The
import function on the extra functions menu must be run to load these files. At this
point, tickets entered on the packer appear as unposted tickets in the ticket file.
Fishpro
Samco Power Accounting
Packer Extension
20.1
To update the packer again, run the export function, copy the three files onto a device,
and then run the trip start-up function on the packer machine again.
To start up a new packer
1. create a directory for the packer programs and data files
2. create a sub-directory for the company data file, default 00
3. create an empty company file in the company sub-directory
4. run rw-start.bat, from the device drive
5. run rw-packer, from the packer directory and choose the trip start-up function.
To start the packer menu, enter FPMENU.
Process fish tickets
This function is identical to the Process fish tickets function on the main Fishpro system
with these exceptions:
-
packer is automatically defaulted form the packer control file
no adjustment type fish tickets can be processed
no distribution-only fish tickets can be processed
no cheque amounts can be entered a crewshare distribution
fish tickets are printed immediately
you cannot assign cheque or receipt numbers
EI calculations are based on a per ticket amount rather than an averaged season
amount
Change prices
This is the same as Maintain prices on main menu of the Fishpro system.
Trip start-up
Read load drive letters from the company file and imports information into packer files.
If the packer data file does not exist, it will be created. If the packer data file does
exist, it will be updated.
Fishpro
Samco Power Accounting
Packer Extension
20.2
Trip shutdown
This assumes the same export data file disks as used in the trip start up function. The
data files exported are the fish ticket file and customer file.
Create DFO disk
Creates a data file for delivery to the DFO in a format specified by the DFO. Not
currently used but for a future enhancement.
Catch summary
- species codes are the DFO codes and not the company codes
- the cash on hand is packer boat number
____________________
Fishpro
Samco Power Accounting
Packer Extension
20.3
Chapter 21
Interest Charges
Introduction
Use this function to calculate interest charged or paid on fisher/customer accounts.
Calculated interest charges can be changed, inquired into or deleted before they are
posted, and an Interest Charges Edit List and Interest Rate Table can be printed.
If you answered Y to INT CHARGED ? or INT EARNED ? in the Fisher/Customer file but did
not specify a rate or date, then the interest calculation will be based on the rates in the
interest rate table.
If you did specify a date and rate in the Fisher/Customer file, the interest will be
calculated using those parameters. You can override the information in the
Fisher/Customer file with a different rate and time.
You can use this function to set various rates for various times. You can also use it if
you make a special arrangement for a fisher/customer.
In the Fisher/Customer file, the interest will be included in the gross amount. If you
have paid interest or interest has been charged in your old system, you can enter the
amount.
This function uses the rate, start and end dates as specified for each fisher/customer in
the customer file.
Interest charges will be calculated on the credit or debit fisher/customer account
balance for the date range specified.
Fishpro
Samco Power Accounting
Interest Charges
21.1
To begin this function
From the Accounts Receivable menu, select Interest. You then see:
Select Interest charges from the Interest menu and you will see:
Fishpro
Samco Power Accounting
Interest Charges
21.2
Add interest
From the Interest charges menu, select Add. You then see:
Enter the data as follows:
1. Customer #
Enter the number of the first fisher/customer you wish to add interest charged or
payable.
Fishpro
Samco Power Accounting
Interest Charges
21.3
2. Date
Enter the effective date in MMDDYY format.
3. Amount Earned
Enter the earned interest amount up to 8 digits including 2 decimals, plus an optional
minus sign.
4. Amount Charged
Enter the amount of interest to be charged, up to 8 digits including 2 decimals, plus an
optional minus sign.
At "FIELD NUMBER TO CHANGE ?", make any necessary changes then press ENTER.
When you have entered all the interest amounts, press END at the Customer # field.
The Interest charges menu reappears.
Change/Inquire interest
From the Interest charges menu, select Change/Inquire. A screen will appear for you
to select the interest charges you wish to inquire into.
Enter the number of the fisher/customer, or press F1 for "First". Make any desired
changes to fields 3 and 4, then press ENTER to file the changes. The screen will clear
for entry of another interest charge to be changed or inquired into.
When you are finished with this function, press END at the Customer # field. The
Interest charges menu will reappear.
Delete interest
From the Interest charges menu, select Delete. A screen will appear for you to enter
the interest charges to be deleted.
Enter the number of the fisher/customer whose interest charge is to be deleted, or
press F1 for "First". Make the deletion by typing Y in response to "OK TO DELETE
INTEREST ? N". If this is not the correct interest charge to be deleted, press ENTER to
default to N. An empty screen will appear for entry of the next interest charge to be
deleted.
When there are no more interest charges to be deleted, press ENTER at the Customer #
field. The Interest charges menu will appear.
Fishpro
Samco Power Accounting
Interest Charges
21.4
Calculate interest charges
From the Interest charges menu, select Calculate charges. You will see:
Enter the following data:
1. Start Date
Enter the date in MMDDYY format you want to start calculating the interest from, or
press F1 for first.
2. Cut-off date
Enter the cut-off date in MMDDYY format for the interest calculation.
3. Start customer
Enter the number of the first customer/fisher you want to calculate interest for, or
press F1 to default to the "First" customer on file.
4. End customer
Enter the Number of the last customer/fisher you want to calculate interest for, press
Fishpro
Samco Power Accounting
Interest Charges
21.5
F1 for the "Last" customer/fisher, or (if you did not select "First" above) press ENTER to
select only the customer number entered at the previous prompt.
5. Customer types
Enter up to 5 different customer types to be included for selection to have interest
calculated on, or press F1 to default to "All"
6. Cut-off amt
Enter the minimum cut-off amount to have interest calculated on.
7. Zero balance customer cut-off amount
Enter the minimum cut-off amount to have interest calculated on for currently zero
balance customers.
8. Compound interest?
Enter Y if you wish to calculate compound interest, or press F1 to default to N.
9. Interest Charged?
Is interest to be charged on debit daily balances? Enter N if interest is not to be
charged, or press ENTER to accept the default of Y.
10. Interest earned?
Is interest to be paid on credit daily balances? Enter N if interest is not to be paid, or
press ENTER to accept the default of Y.
11. Print calculation ?
Press ENTER to accept the default of N. Otherwise, press Y to print the calculation
results.
At "FIELD NUMBER TO CHANGE ?", make any necessary changes then press ENTER.
When you have entered all the interest amounts, press END at the Customer # field.
The Interest charges menu reappears.
Interest charges edit list
Select Edit list from the Interest charges menu and a window will appear for you to
select how to print the list. Refer to the chapter title General Rules for a detailed
explanation of the printing options.
When the list has finished printing, the Interest charges menu will reappear.
Fishpro
Samco Power Accounting
Interest Charges
21.6
Post interest charges
Select Post from the Interest charges menu. The following screen will appear:
Answer Y or N as appropriate.
If you answer Y, a window will appear for you to select how to print the interest charges
journal. Refer to the chapter titled General Rules for a detailed explanation of the
printing options.
When the report has finished printing, the A/R main menu will reappear.
Interest rates
Select Interest rates from the Interest menu and you will see:
Fishpro
Samco Power Accounting
Interest Charges
21.7
Add interest rates
Select Add from the Interest rates menu and you will see:
Enter the following data:
Fishpro
Samco Power Accounting
Interest Charges
21.8
1. Start date
Enter the date in MMDDYY format you want to start calculating the interest.
2. Earned rate %
Enter the percentage amount to be earned, or press ENTER for zero.
3. Charged rate %
Enter the percentage of interest to be charged, or press ENTER for zero.
At "FIELD NUMBER TO CHANGE ?", make any desired changes, then press ENTER. The
screen will clear for entry of another interest rate to add.
When there are no more interest rates to be added, press END at the first field. The
Interest rates menu will reappear.
Change/inquire Interest Rates
From the Interest rates menu, select Change/Inquire. A screen appears for entry of
the interest rate you want to change or inquire into. Enter the start date or press F1 to
scan the interest rates on file.
Make any desired changes be selecting the number of the field you want to change, then
entering the new data. Press ENTER to "FIELD NUMBER TO CHANGE ?" to file the
changes. The screen will then clear for entry of another interest rate to be changed or
inquired into.
Delete Interest Rates
From the Interest rates menu, select Delete. A screen will appear for entry of the
interest rate you want to delete.
When all desired interest rates are deleted, press END at the first field. The Maintain
interest rates menu will reappear.
Print Interest Rate List
From the Interest rates menu, select Print. The following screen will appear:
Fishpro
Samco Power Accounting
Interest Charges
21.9
Enter the following data:
Starting date
Enter the date you wish the report to start in MMDDYY format, or press F1 for "Earliest",
as instructed at the bottom of the screen.
Ending date
Type the last date to be included in the list, or press F1 for "Latest".
You will then be asked "ANY CHANGE ? N". If you wish to make any changes, answer Y,
or press ENTER to default to N. A window will then appear for you to select how to
print the list. Refer to the chapter titled General Rules for a detailed explanation of
the printing options.
When the list has finished printing, the Interest rates menu will reappear.
To end this function
When you have finished using the functions in the Interest rates menu, press END as the
menu selection. The main A/R menu will reappear.
____________________
Fishpro
Samco Power Accounting
Interest Charges
21.10
Year End Procedures
These steps must be done before entering in new fish tickets for the new calendar
year.
ROE’s, go to Fishpro, Reporting menu, Print record of employment.
Print all fisher Records of Employment.
T4’s and T4A’s, go to Fishpro, Reporting menu, Print T4/T4A forms:
Print all fisher and company T4’s and T4A’s.
Produce XML file for T4 remittance to government.
T4 and T4A Summary, go to Fishpro, Reporting menu, Print T4/T4A summary listing:
Print T4 and T4A Summary for company records.
WCB report, go to Fishpro, Reporting menu, Print WCB report:
Print WCB report.
Start fishers at zero for new tax year, go to Fishpro, F2, Process end of period/year,
and Purge earnings information:
This function resets the fisher earnings fields to zero for the new tax year.
Purge fisher accounts. If all fisher accounts are zero, go to AR, F2, Purge fully paid
open items.
Purge all customers/fishers with statement cycle of “F”. This will remove last year’s
account detail and leave a balance forward amount. This should be zero, as all fisher
accounts should be settled by year end.
Go to Fishpro, F2, and Control Information:
Change the current year on the first page of the Control Information.
Change the Yearly EI maximum, EI ratio, EI employer multiplier, WCB maximum, and
WCB rate for the New Year.
Start fish slips for the New Year.
Fishpro
Samco Power Accounting
Error Messages
A.1
Appendix A Error Messages
Explanation
When you are using the accounting packages, various messages may display for
incorrect entries or incorrect use of functions. This appendix is provided to give you a
quick reference for these messages.
NOTE: In this Appendix, "***" in an error message represents a place where a word will
be substituted, depending on what function you are using at the time. Words like
"CUSTOMER", "VENDOR", OR "EMPLOYEE" will appear where "***" occurs in an error
message. For example, if you are using a function dealing with customer codes, the
message would read "CUSTOMER CODE NOT ON FILE".
*** CODE NOT ON FILE
Situation: The code you entered is not on file
Handling: Enter a different code or add the code you need. (To add a code, you may
have to exit from the function you are in, enter the function for adding codes to make
the addition, then re-enter the function you were originally using.)
*** NOT ON FILE
Situation: The data you are attempting to access is not on file.
Handling: Try another entry or put the data you want on file before you attempt to
access it.
(To put the data on file at this point will require that you exit from the function you're
currently using, enter the function for adding missing data and then re-enter the
function you were originally using.)
ALL 999's IN A FIELD ON A PRINT-OUT OR ON THE SCREEN
Situation: A number has exceeded its allowed maximum size.
Handling: Enter the data as two or more transactions (instead of one.)
"BEEP"
Fishpro
Samco Power Accounting
Error Messages
A.2
Situation: You will occasionally hear a "beep" from your computer when you are
entering data. This means either:
1. You have entered too many characters; or
2. You have entered data in the wrong format. (For example, you have attempted
to enter letters when numbers should have been entered.)
Handling: Refer to your User Manual for the maximum number of characters that can
be entered and the required format, then correct your entry.
CALCULATION OVERFLOW
Situation: An arithmetic calculation in the program has resulted in an answer which is
too large for the field that it is to be placed in.
Handling: Refer to the applicable chapter in the User Manual. If necessary, get
technical software support.
CHANGE NOT ALLOWED
Situation: You are attempting to make a change where changes are not allowed.
Handling: Refer to you User Manual for instructions. See also the section entitled
"Allow Protected Change ?" in the Maintain Company Data chapter of this User Manual
and in the Installation Guide.
ENTRY MUST BE ALPHANUMERIC
Situation: You have entered non-alphabetic characters in a field which accepts only
letters (A through Z).
Handling: Enter only alphabetic characters (A through Z).
ENTRY MUST BE NUMERIC
Situation: You have entered non-numeric characters in a field which accepts only
numbers.
Handling: Enter only numeric characters (0 through 9 and a decimal point and minus
sign - commas are not allowed).
ENTRY MUST BE POSITIVE
Situation: You have entered a negative number in a field which accepts only positive
numbers.
Handling: Enter a positive number.
Fishpro
Samco Power Accounting
Error Messages
A.3
END KEY NOT ALLOWED
Situation: Use of the END key is not allowed at this point in the program.
Handling: Continue to a point where you can use the END key.
ESC KEY NOT ALLOWED
Situation: Use of the ESC key is not allowed at this point in the program.
Handling: Continue to a point where you can use the ESC key.
F1 (OR F2) KEY NOT ALLOWED
Situation: Use of the F1 (or F2) key is not allowed here.
Handling: Consult your User Manual for acceptable entries.
FUNCTION NOT ON THIS DISK
Situation: This occurs when the function you have selected from the menu is not on
your disk.
Handling: Check that the application is on the disk and correct drive.
INVALID ENTRY - TRY AGAIN
Situation: You have entered data that is invalid for the particular field you are working
on.
Handling: Check your User Manual to find out what an acceptable entry would be.
NO *** IN RANGE
Situation: This message means that there is no data in the range you specified. (For
example, if you asked to print customers from numbers 100 to 200 and there are no
customers with numbers between 100 and 200, you will get this message.)
Handling: Enter different starting and ending limits, or refer to your User Manual for
more detailed instructions.
NO *** ON FILE
Situation: This message means there is no data of this type on file. (For example, if
you try to print out customers before any customers have been entered, you'll get this
error message.)
Fishpro
Samco Power Accounting
Error Messages
A.4
Handling: Enter some data before retrying the same function.
NOT PROCESSED
Situation: This message usually appears if you press the ESC key during data entry. It
means that the data you entered on the screen will not be processed. Some functions
have more than one screen for data entry. In most cases, the ESC key will not affect
the previous screens. See the User Manual for data on the ESC key for the function you
are using.
Handling: Press ENTER to continue.
POSTING OUT OF BALANCE
Situation: This appears if you attempt to post general ledger entries which cause one
or more accounting period totals to be out of balance.
Handling: Check the entries you are attempting to post, to make certain that they are
the correct amounts and that they are being assigned to the proper accounting periods.
Make any corrections necessary.
SELECTION INVALID FOR PASSWORD
Situation: The function you are trying to select cannot be accessed by the password
you are using.
Handling: Enter the correct password for the function you wish to enter, or don't
attempt to select this function.
TOO LONG, ENTER IN FORMAT (--)
Situation: You are attempting to enter too many numbers in a field.
Handling: When entering the data, follow the exact format indicated in the User
Manual.
TOTAL PERCENTAGE CAN'T BE MORE THAN 100 %
Situation: Your entries total more than 100 %.
Handling: Re-enter correct entries.
WARNING - DISTRIBUTIONS ARE OUT OF BALANCE
Situation: Your distribution amounts do not total the transaction amount.
Handling: Enter distribution amounts which total the transaction amount.
Fishpro
Samco Power Accounting
Error Messages
A.5
WINDOWS.EXE NOT LOADED
Situation: The executable program WINDOWS.EXE could not be loaded into memory.
Handling:
1. Put the file WINDOWS.EXE onto the current directory if it is not there.
2. There may be insufficient memory to load the file. Memory-resident programs
could be taking up needed memory. Reboot the system and try again. If there
is still a problem, make sure that no memory-resident programs are loaded by
start-up batch files, then try again.
Fishpro
Samco Power Accounting
Error Messages
A.6
Appendix B
Help
Summary
To view text describing the highlights of part of a SAMCO package while you are running
it, press the F10 key to get the Help function.
The Help function is available at any time while you are running a package, except
during printing and posting and while files are being processed in File Recovery Utilities.
There are three levels of Help, ranging from Function Help (a very specific description
of the function you are running), through System Help (a description of the general
capabilities of the package you are running), to General Help (a description of the
functions of special keyboard keys).
Using Help
To see the Help text, press the F10 key. The level of Help text that you see depends on
what you are running at the time.
If you have a main menu ("General Ledger", "Inventory Control", etc.) displayed, you will
get System Help.
If you already selected a function from a main menu and are running a function such as
"Add", you will get Function Help.
Along with the text, you see a message "ENTER FOR MORE, FOR MORE GENERAL, OR
PRESS END".
If you press ENTER, you will see more text at the same level.
If you press END, you will return to the function you were running.
Fishpro
Samco Power Accounting
Help
B.1
"
" in this message means "Press the Up-Arrow key". If you do, you will see more
general Help text. For example, if you were seeing Function Help text, you will see
System Help text. You will also see a message "ENTER FOR MORE, FOR MORE SPECIFIC,
OR PRESS END".
ENTER and END give the same results as above. "(down arrow)" in this message means
"Press the Down-Arrow key". If you do, you will see more specific Help text that you
just left.
_____________________________
Fishpro
Samco Power Accounting
Help
B.2