1
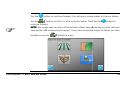
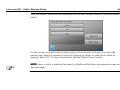
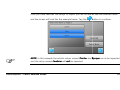
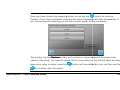
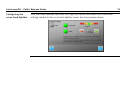
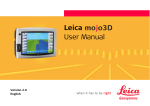
Leica mojo3D
Public Release Notes
Version 3.2.272
English
Leica mojo3D – Public Release Notes
2
Table of contents
1
Introduction ................................................................................................................................... 6
2
New functionality & key changes .................................................................................................... 8
3
2.1
Load Reactive Steering Support .............................................................................................. 12
2.2
Krone Steering Support .......................................................................................................... 12
2.3
John Deere R Series Steering Support ..................................................................................... 13
2.4
New Holland T8.XXX and Case Magnum Tier 4 Steering Support .............................................. 13
2.5
Automatic SRK Engaged Calibration Procedure ........................................................................ 14
2.6
Warning Signs On Startup....................................................................................................... 15
2.7
Selectable SIM Card Detection ................................................................................................ 16
2.8
Zoom Level On Display Remembered On Shutdown ................................................................. 18
2.9
Load a Guidance Pattern without Turning off Treatment ......................................................... 19
2.10
Minimum Line Spacing Reduced To 12”/30cm .......................................................................... 19
2.11
Position Status Tab mojo3D and mojo3D+Twist ...................................................................... 20
2.12
GSM/HSPA/Auto Cell Modem Mode ......................................................................................... 21
2.13
Twist Firmware Update ........................................................................................................... 23
2.14
Virtual Vista Registration Ready ............................................................................................. 23
Using RTCM 2.x for Network DGPS ................................................................................................. 24
4
5
3.1
Support for New Steer Kits .................................................................................................... 25
3.2
Swap Left and Right Steering Control ..................................................................................... 26
3.3
Bug Fix for the AS400 Master Switch not working correctly ..................................................... 27
Export of Google Earth, Shapefile and GeoTIFF Files Formats ......................................................... 28
4.1
Exporting a Treatment or Coverage ......................................................................................... 29
4.2
Exporting a Boundary ............................................................................................................. 32
4.3
Exporting a Wayline ................................................................................................................ 35
4.4
Opening Google Earth Files ..................................................................................................... 39
Importing Google Earth and Shapefile File Formats ........................................................................ 44
5.1
Importing Google Earth and Shapefile Boundaries ................................................................... 45
5.2
Importing Google Earth and Shapefile Waylines ...................................................................... 52
6
Support of SteerDirect Kits Using the mojo3D + Twist Only Configuration ..................................... 59
7
Export and Import of Stored Vehicle/Implement Setups ................................................................. 60
8
7.1
Exporting Vehicle/Implement Setups ....................................................................................... 61
7.2
Importing Vehicle/Implement Setups ...................................................................................... 64
Cross Track Lightbar Mode ............................................................................................................ 71
8.1
Lightbar Settings .................................................................................................................... 72
Leica mojo3D – Public Release Notes
3
Leica mojo3D – Public Release Notes
9
4
Support for AgroTronix Pulvix 8100 Direct Section Control ............................................................ 77
10
Support for mojoXact ................................................................................................................ 77
11
Display enhancements ............................................................................................................... 78
11.1
12
12.1
13
13.1
14
Larger view of field ................................................................................................................ 78
Replay Guidance ........................................................................................................................ 79
Using Replay Guidance ........................................................................................................... 79
Network DGPS ........................................................................................................................... 82
Setting up Network DGPS ....................................................................................................... 82
Save and Restore Vehicle/Rig Configurations.............................................................................. 88
14.1
Saving a Vehicle/Rig Configuration .......................................................................................... 89
14.2
Restoring a Vehicle/Rig Configuration ..................................................................................... 92
14.3
Renaming a Configuration ...................................................................................................... 94
14.4
Deleting Configurations.......................................................................................................... 96
15
Stationary Engage and Reverse Steering .................................................................................... 98
15.1
Enabling Stationary Engage and Reverse Steering ................................................................... 99
15.2
Using Stationary Engage and Reverse Steering ...................................................................... 102
15.3
Autosteer Button States ...................................................................................................... 104
16
Improved Error Display ............................................................................................................ 105
17
17.1
18
Ability to Turn SBAS (WAAS/EGNOS) ON or OFF ........................................................................ 108
Setting SBAS ON or OFF ....................................................................................................... 109
Upgrading the Leica mojo3D software ...................................................................................... 110
18.1
Upgrading Software from Virtual Wrench™ ........................................................................... 110
18.2
Upgrading Software via USB Flash Drive ................................................................................ 112
Leica mojo3D – Public Release Notes
5
Leica mojo3D – Public Release Notes
6
1 Introduction
General information
Current Version
Leica Geosystems provides free of charge software updates for the Leica mojo3D in order
to provide customers with the best possible experience. This document describes the
changes in the latest software release, how to use the new functionality and the various
methods to upgrade the software.
Leica mojo3D version 3.2.272
Released February 2013
Compatibility
This software is compatible with all Leica mojo3D displays.
It is recommended that if using the Leica mojo3D with a Leica mojoXact or Leica mojoRTK
console that the software on the mojoXact or mojoRTK is also upgraded to the latest
version in order to obtain the full benefits of the latest software.
Leica mojo3D – Public Release Notes
7
Leica mojo3D – Public Release Notes
2
New functionality & key changes
Overview
Added updated GPS Authcodes to GPS firmware (3.2.272)
Load Reactive Steering Support (3.2.270)
Krone Steering Support (3.2.270)
John Deere R Series Steering Support (3.2.270)
New Holland T8.XXX and Case Magnum Tier 4 Steering Support (3.2.270)
Automatic SRK Engaged Calibration Procedure (3.2.270)
ISO 11684 Warning Icons on startup (3.2.270)
Selectable SIM Card detection (3.2.270)
Zoom level on display remembered on shutdown (3.2.270)
Load a Guidance pattern without turning off treatment (3.2.270)
Minimum Line Spacing reduced to 12”/30cm (3.2.270)
Position Status tab added for mojo3D and mojo3D+Twist (3.2.270)
GSM/HSPA/Auto Switch to control cell modem mode (3.2.270)
Twist Firmware update (3.2.270)
Slovakian, Hungarian and Japanese support added (3.2.270)
8
Virtual Vista Registration Ready (3.2.270)
Incorporate new GNSS receiver firmware v1.103 (3.1.248)
Add mojoXact GNSS receiver firmware upgrade to the mojo3D Dealer Menu (3.1.248)
Use RTCM2.x for network DGPS (3.1.248)
Support for new steer kits (New Holland T9 and Case Steiger) (3.1.248)
Fix start up issue seen when there is a problem with the stored coverage map file
(3.1.248)
Fix NTRIP status display for active streams which are not sending useful data
(3.1.248)
Fixed CPU loading issue which can occur when guiding straight lines (3.1.248)
Fixed NTRIP header for some servers which could not handle new headers (3.1.248)
Swap Left and Right Steering Control (3.1.224)
Bug Fix for AS400 Master Switch not working correctly (3.1.224)
Export of data to Google Earth, Shapefile and GeoTIFF formats (3.1.210)
Import of previously exported Google Earth and Shapefile data (3.1.210)
Support of SteerDirect kits using the mojo3D + Twist only (3.1.210)
Improvements to section control to prevent unwanted shutoff (3.1.210)Export and
Import of stored vehicle/implement setups (3.1.210)
Leica mojo3D – Public Release Notes
9
Leica mojo3D – Public Release Notes
10
Automatically configure steering controller after SRK/SteerDirect Hyd set up wizard so
that the user doesn’t have to do manually afterwards (3.1.210)
Cross track lightbar mode in addition to the existing Leica smart lightbar mode
(3.1.210)
Support for AgroTronix Pulvix 8100 direct section control (3.1.210)
Replay guidance to follow the path of previous treatments (3.0.284)
Network DGPS support for the stand-alone mojo3D (3.0.284)
Chinese support added (3.0.284)All references to GL1DE or Glide have been changed
to GUIDE (3.0.284)
Support for the mojoXact (3.0.284)
Display enhancements to better utilize the screen area (3.0.284)
New look user interface (3.0.284)
Save and restore vehicle/rig configurations (3.0.284)
Stationary engage added (3.0.284)
Reverse autosteer for supported steering platforms added (3.0.284)
Curve performance improvements (3.0.284)
Diagnostic and error display improvements (3.0.284)
QuickSteer simulator mode can be turned on/off from the dealer menu (3.0.284)
Ability to turn SBAS (eg WAAS/EGNOS) on or off in user menus (3.0.284)
Additional languages added (3.0.284)
Leica mojo3D – Public Release Notes
11
Leica mojo3D – Public Release Notes
12
2.1 Load Reactive Steering Support
Overview
The Mojo3D now supports tractors with load reactive steering systems.
Contact your dealer for more information on the Load Reactive Kit (Part # 796175) and
the specific vehicles supported.
2.2 Krone Steering Support
Overview
The mojo3D now supports new steer kits for the Krone Big X, BIG M 500 and BIG M 420
using the ISOBus In Cab Connector Cable (Part # 798426)
Contact your dealer for more information on specific vehicles supported.
Also refer to the section below “Support of SteerDirect Kits Using the mojo3D + Twist
Only Configuration” for information on auto steer with the mojo3D.
2.3 John Deere R Series Steering Support
Overview
The mojo3D now supports new steer kits for the John Deere R series tractors model year
2012 onwards using the ISOBus In Cab Connector Cable (Part # 798426) and Unlock
Voucher – JDR Series Steering Support (805032)
Contact your dealer for more information on specific vehicles supported.
Also refer to the section below “Support of SteerDirect Kits Using the mojo3D + Twist
Only Configuration” for information on auto steer with the mojo3D.
2.4 New Holland T8.XXX and Case Magnum Tier 4 Steering Support
Overview
The mojo3D now supports new steer kits for the New Holland T8.XXX and Case Magnum
Tier 4 series tractors
Contact your dealer for more information on specific vehicles supported.
Leica mojo3D – Public Release Notes
13
Leica mojo3D – Public Release Notes
14
Also refer to the section below “Support of SteerDirect Kits Using the mojo3D + Twist
Only Configuration” for information on auto steer with the mojo3D.
2.5 Automatic SRK Engaged Calibration Procedure
Overview
The SRK calibration is now performed with fewer button presses than earlier which has
made the process more automated and easier to setup. This was also introduced to
support calibration of Load Reactive Steering kits which required this functionality.
2.6 Warning Signs On Startup
Overview
The mojo3D now displays the Warning Signs shown below on startup to conform to the
ISO11684 standard which is also a requirement for the John Deere R Series Support.
This is displayed to ensure the operator that riding on the machine is allowed only on a
passenger seat, has read the User Manual and to keep a safe distance away from people
and other hazards.
Leica mojo3D – Public Release Notes
15
16
Leica mojo3D – Public Release Notes
2.7 Selectable SIM Card Detection
Overview
The mojo3D now supports selectable Cell Modem Enable/Disable.
A Network Data plan for the mojo3D and a SIM card with an active data plan is required
before you can utilize the online features of the mojo3D. Contact your dealer to obtain
the required unlock vouchers.
Enabeling/Disabeling
the Cell Modem
From the main screen tap on the
then tap the
button on the right hand side of the screen and
button.
You need to progress through the wizard by tapping the
screen below.
button until you get to the
•
To enable the Cell Modem, check the box.
Leica mojo3D – Public Release Notes
17
Leica mojo3D – Public Release Notes
•
18
To disable the Cell Modem un-check the box.
2.8 Zoom Level On Display Remembered On Shutdown
Overview
Of the 50 Zoom levels that the operator has available to use on main guidance display,
the Zoom level is now remembered between shutdowns instead of returning to the
default zoom level as in previous software versions.
2.9 Load a Guidance Pattern without Turning off Treatment
Overview
The mojo3D now supports loading waylines without turning off treatment. This allows a
user to select a previously saved Wayline while continuing the treatment application.
2.10 Minimum Line Spacing Reduced To 12”/30cm
Overview
The mojo3D now supports Line Spacing’s down to 12” / 30cm. This supports specialty
applications like Turf harvesting and other applications where narrow work widths are
required.
Refer to the Mojo3D User manual section 3.3 on how to set the section width.
Leica mojo3D – Public Release Notes
19
20
Leica mojo3D – Public Release Notes
2.11 Position Status Tab mojo3D and mojo3D+Twist
Overview
The mojo3D now has a Position Status Tab similar to when a mojoXact and a mojoRTK is
connected to the mojo3D. This has been added to better troubleshoot position related
problems.
See “794535 - mojoXact Position Status Information Guide_V2.0” for information on the
different positioning and reference status information.
View the Position
Status Tab
From the main screen tap on the status button
button
, then tap the Position Status
2.12 GSM/HSPA/Auto Cell Modem Mode
Overview
The mojo3D now supports switching of the Cell Modem modes. This may be helpful in
areas where Cell coverage is marginal and the user can force the Cell modem to use GSM
for example to possibly improve Cell coverage.
To troubleshoot the cell modem signal from the main screen tap the
button then
tap the
Button. Go to the
page to view the RSSI. If the RSSI is < -90 it
might be helpful to change the Cell Modem mode.
From the main screen tap on the
then tap the
button on the right hand side of the screen and
button.
You need to progress through the wizard by tapping the
screen below.
Leica mojo3D – Public Release Notes
button until you get to the
21
Leica mojo3D – Public Release Notes
•
•
To select a mode check the box to the left of the setting.
Options available are Automatic, HPSPA or GSM
22
2.13 Twist Firmware Update
Overview
The Twist firmware is now upgradable. This has been implemented to avoid CanBus
network conflicts on some steerkits. After installing version 3.2.270 the Twist firmware
will require an upgrade.
The user will be automatically prompted to upgrade the Twist Firmware after the
installation of the mojo3D software has been completed. To Upgrade the Twist Firmware
simply follow the directions on the screen.
2.14 Virtual Vista Registration Ready
Overview
Virtual Vista is a web based telematics solution soon to be released which connects to the
mojo3D through the built in Cell modem.
When Virtual Vista is released refer to the “806873-1.0.0_Leica_Virtual_Vista_UserManual”
and dealer for further information.
The Virtual Vista website can be found at www.virtualvista.com
Leica mojo3D – Public Release Notes
23
Leica mojo3D – Public Release Notes
3
24
Using RTCM 2.x for Network DGPS
Overview
The mojo3D now supports RTCM 2.x as a network DGPS reference source. This allows you
to use RTCM 2 streams from your network provider for network DGPS positioning rather
than the more expensive RTCM 3 streams sold for RTK solutions.
Supporting RTCM 2 effectively increases your options with respect to DGPS reference
sources.
Using RTCM 2
To set the mojo3D up to use RTCM 2 is no different to connecting to any other network
source. Simply select the appropriate data stream from your reference network provider.
Refer to the “Network DGPS” section later in this document for more information.
3.1 Support for New Steer Kits
Overview
The mojo3D now supports new steer kits for the New Holland T9 Tier 4 series and Case
Steiger.
Contact your dealer for more information on specific vehicles supported.
To use the newly supported steer kits refer to the section below “Support of SteerDirect
Kits Using the mojo3D + Twist Only Configuration” for information on auto steer with the
mojo3D.
Leica mojo3D – Public Release Notes
25
26
Leica mojo3D – Public Release Notes
3.2 Swap Left and Right Steering Control
Overview
Swapping Left &
Right Steering
Control
This allows the service technician who is installing either a SteerDirect SRK or SteerDirect
Hydraulic steerkit to swap the Left and Right Steering control in situations where after
the install has been completed the Steering is pulsing/steering in the wrong
wro direction.
To swap the left and right steering control go to the main screen and tap the
button followed by the
button.
You will then be taken to the Valves Reversed screen (see example below)
Select the required
uired option either Normal or Reversed on the display and tap the
button to save the setting.
3.3 Bug Fix for the AS400 Master Switch not working correctly
Overview
In the previous Software Version 3.1.210 there was an issue where the External Master
Switch for the AS400 was not working whereas the Master on the display was working
correctly. This has now been rectified in this version.
Leica mojo3D – Public Release Notes
27
Leica mojo3D – Public Release Notes
4
28
Export of Google Earth, Shapefile and GeoTIFF Files Formats
Overview
The mojo3D can now export treatment (or coverage maps), field boundaries and waylines
in the following formats:
Google Earth - KMZ and KML files (treatments/coverage, boundaries and waylines)
Shapefiles – SHP (boundaries and waylines)
GeoTIFF (treatment/coverage only)
The export of these file formats allow you to produce and manage visually oriented work
records.
Some of these work records can also be imported back into other mojo3D’s that may
need to repeat the same work that had been performed previously.
NOTE: to export Google Earth, Shapefile and GeoTIFF files you need a USB memory key to
export the data onto. You won’t be able to access the export functions until the USB
memory key is inserted into the mojo3D.
4.1 Exporting a Treatment or Coverage
Exporting a
treatment
Once you have some coverage recorded on your mojo3D you can go into the field
management screen by going to the main screen and tapping the
by the
button followed
button.
You will then be taken to the field management screen (see example below).
Select the treatment you wish to export from the list on the left of the screen. The
selected item is the one displayed as blue.
Leica mojo3D – Public Release Notes
29
Leica mojo3D – Public Release Notes
30
button and the
Once you have selected the treatment you want to export tap the
treatment export will begin. Note that the export button has the arrow pointing to the
USB memory key. The import button (when visible) has the arrow coming from the USB
memory key.
NOTE: depending on the size of the treatment map the export operation may take a
minute or more.
Once the treatment has finished exporting you will see a message similar to the one
below:
Tap the
button to close the message and return to the field management screen.
When the export operation has completed there will be three new files on the USB
memory key. As an example, if the treatment you exported was named “FieldB3” the files
on the USB stick will be:
FieldB3_-_Treatment.kmz - this is a Google Earth file and contains the
treatment map/coverage, any boundary that may have been associated with the
treatment and a Replay wayline which is the path used to create the treatment.
FieldB3_-_Treatment.tif – this file is a GeoTIFF which is an image which can
be used as an overlay in other mapping applications. These files can be opened by the
following applications:
Farm Works
SST Summit
Greenstar Apex
AgLeader SMS
FieldB3_-_Treatment.tfw – this file is a referencing file used by third party
applications to position the GeoTIFF correctly in the application.
NOTE: Refer to the section “Opening Google Earth Files” below for information on viewing
and using Google Earth files.
Leica mojo3D – Public Release Notes
31
32
Leica mojo3D – Public Release Notes
4.2 Exporting a Boundary
Exporting a
boundary
Once you have a boundary recorded on your mojo3D you can go into the boundary
management screen by going to the main screen and tapping the
the
button followed by
button.
You will then be taken to the boundary management screen (see example below).
Select the boundary you wish to export from the list on the left of the screen. The
selected item is the one displayed as blue.
button and the
Once you have selected the boundary you want to export tap the
boundary export will begin. Note that the export button has the arrow pointing to the
USB memory key. The import button, when visible, has the arrow coming from the USB
memory key.
NOTE: depending on the size of the boundary map the export operation may take a
minute or more.
Once the boundary has finished exporting you will see a message similar to the one
below:
Leica mojo3D – Public Release Notes
33
Leica mojo3D – Public Release Notes
Tap the
screen.
34
button to close the message and return to the boundary management
When the export operation has completed there will be five new files on the USB memory
key. As an example, if the boundary you exported was named “FieldB3” the files on the
USB stick will be:
FieldB3_-_Boundary.kml - this is a Google Earth file and contains the
boundary.
There are four files which make up the Shapefile version of the boundary which
can be opened by other third party applications. The files produced these are:
FieldB3_-_Boundary.shp
FieldB3_-_Boundary.dbf
FieldB3_-_Boundary.prj
FieldB3_-_Boundary.shx
NOTE: Refer to the section “Opening Google Earth Files” below for information on viewing
and using Google Earth files.
4.3 Exporting a Wayline
Exporting a wayline
Once you have a wayline set or some coverage recorded on your mojo3D you can go into
the wayline management screen by going to the main screen and tapping the
followed by the
button
button.
You will then be taken to the wayline management screen (see example below).
NOTE: The example screen above shows an A-Heading
Heading wayline named FieldB3 and a
treatment replay wayline above that also named FieldB3 because the system has a
treatment called FieldB3. The A-Heading
Heading wayline is selected and shown blue here.
Leica mojo3D – Public Release Notes
35
Leica mojo3D – Public Release Notes
36
Select the wayline you wish to export from the list on the left of the screen. The selected
item is the one displayed as blue.
button and the
Once you have selected the wayline you want to export tap the
wayline export will begin. Note that the export button has the arrow pointing to the USB
memory key. The import button, when visible, has the arrow coming from the USB
memory key.
NOTE: depending on the size of the wayline the export operation may take a minute or
more.
Once the wayline has finished exporting you will see a message similar to the one below:
Leica mojo3D – Public Release Notes
37
Leica mojo3D – Public Release Notes
Tap the
38
button to close the message and return to the wayline management screen.
When the export operation has completed there will be five new files on the USB memory
key. As an example, if the wayline you exported was named “FieldB3” and the wayline
type was an A-Heading wayline the files on the USB stick will be:
FieldB3_-_A-Heading.kml - this is a Google Earth file and contains the
wayline.
There are four files which make up the Shapefile version of the wayline which can
be opened by other third party applications. The files produced these are:
FieldB3_-_A-Heading.shp
FieldB3_-_A-Heading.dbf
FieldB3_-_A-Heading.prj
FieldB3_-_A-Heading.shx
NOTE: Refer to the section “Opening Google Earth Files” below for information on viewing
and using Google Earth files.
4.4 Opening Google Earth Files
Overview
Once you have exported Google Earth files (KMZ and KML files) it is a relatively simple task
to open them in Google Earth on your computer.
The Google Earth files which can be exported from the mojo3D include your treatment
map, boundaries and waylines.
NOTE: You need to have Google Earth installed on your computer before you can view
your exported files. Go to http://www.google.com/earth/index.html to download and
install Google Earth.
The easiest way to open a KMZ or KML file in Google Earth is to start Google Earth and
then drag the KMZ or KML file into the main window of Google Earth. You can open and
view multiple files at once when you open them this way.
Leica mojo3D – Public Release Notes
39
Leica mojo3D – Public Release Notes
The example below shows Google Earth after it has opened a file which was exported
from the mojo3D. You can see the loaded object on the screen and is listed in the left
panel (outlined in red).
40
Click on the little
button to the left of the object name to expand the object in the list.
Do this for each level as it expands to see more of the lower level objects. See the
example of an expanded object in the red outline below.
Leica mojo3D – Public Release Notes
41
Leica mojo3D – Public Release Notes
42
Once you have expanded the object you can click on each level of the object to display
and information about that object. See the example below. Here the object with the blue
line on the left has been clicked and the information about that object is displayed in the
middle of the screen.
Opening other
objects
The examples above show an A+Heading wayline which was exported from the mojo3D.
The same concepts apply for opening and viewing other objects exported from a mojo3D
such as treatment/coverage, boundaries or other wayline types.
Leica mojo3D – Public Release Notes
43
Leica mojo3D – Public Release Notes
5
44
Importing Google Earth and Shapefile File Formats
Overview
When Google Earth and Shapefile data has been exported from a mojo3D it can be
imported into a different mojo3D. Also the mojo3D can import some Shapefiles from
rd
other 3 party applications.
NOTE:
NOTE before any files can be imported from the USB memory key all files to import data
from must be in the root (or base) folder of the USB memory key. If your third party
application has created a folder structure you need to copy the files you want to import
into the root folder of the USB memory key.
The mojo3D software now allows the import of Google Earth and Shapefiles that had
rd
been exported from a mojo3D and some shapefiles generated by 3 party applications.
Google Earth objects (boundaries and waylines) which were exported from a mojo3D, can
be moved and restructured within Google Earth and then saved as a new Google Earth
file. The new Google Earth file may contain one or more mojo3D objects and the mojo3D
can still import the objects contained in those files.
5.1 Importing Google Earth and Shapefile Boundaries
Importing a
boundary from a
Google Earth file or
Shapefile
You can import a boundary from a KML or KMZ file which was exported from a mojo3D.
Likewise for importing boundaries from shapefiles – if you are importing shapefiles which
have been exported from a mojo3D, they will be imported without any information loss.
NOTE: The mojo3D will not import a KML/KMZ from other sources as the format from
other 3rd party applications as the internal file format can vary significantly.
NOTE: The mojo3D will import boundaries from shapefiles which were generated by 3rd
party applications provided the shape type is a polygon as defined in the shapefile
standard.
Leica mojo3D – Public Release Notes
45
46
Leica mojo3D – Public Release Notes
Before you can import the boundary from a KML/KMZ
KMZ file you must first make sure that
the file is in the root, or uppermost, folder of the USB memory key. This is also the case
for importing a boundary from a shapefile.. All files which make up the shapefile must be
in the uppermost folder of the USB memory key.
Once the files are on the USB memory key and you have the USB memory key inserted in
the mojo3D, enter the boundary management screen by tapping
tappin the
the main screen), then tap the
button.
button (from
On the boundary management screen you should be able to see the
button - note
that the arrow goes from the USB stick to the Google Earth icon, not the other way
around. See below,, the import button is to the right of the export button.
NOTE: if there are no Google Earth files or Shapefiles on the USB memory key to import
the button will be disabled. You may have the wrong file formats on the USB key or you
may not have the files
es in the uppermost folder of the USB memory key.
Leica mojo3D – Public Release Notes
47
Leica mojo3D – Public Release Notes
48
Once you have pressed the import button you need to select the type of file you are
going to import from – Google Earth (KML) or Shapefile (SHP). See screen below, there
are two buttons KML and SHP.
To import from a Google Earth KML/KMZ file, tap the KML button.
button If you want to import
from a shapefile, tap the SHP button. To move on to the item selection screen tap the
button.
NOTE: The
e KML and SHP buttons will each be enabled if files of that type exist in the
upper most directory of the USB memory key and are ready for import – if there are no
files of KML/KMZ or shapefile type the button for that type will be disabled.
You will then see a screen of available boundaries to import. You can select one boundary
or multiple boundaries by tapping each item in the list. If you have selected a boundary
for import but want to remove it from you selection you can tap it again. If the item is
blue it is selected for import. The screen below shows two items selected ready for
import.
You can tap the “Select All” button to select all items for import or you can tap “Select
None” to de-select all items and start selecting again.
Once
ce you have selected the items you want to import tap the
Leica mojo3D – Public Release Notes
button.
49
Leica mojo3D – Public Release Notes
Name conflicts
50
If there are already boundaries saved on the mojo3D which have the same name as one
of the boundaries to be imported you will see a screen like the one below.
Tap the box for either Automatic or Manual renaming of the imported boundaries.
Automatic renaming will rename the imported boundaries by adding a number at the end
of the name so that you can still identify the setup but can still figure out which was on
the mojo3D already and which one was imported.
If you chose Manual renaming will progress to another screen where you define a new
name for each imported boundary that needs a new name.
Once the import operation has started you will be taken to another screen and if the
import operation is successful you will see the screen change to look like the one below.
Tap the
button to complete the import wizard and return to the boundary
management screen.
The newly imported boundaries will appear in the boundary management screen and will
be available for loading.
Leica mojo3D – Public Release Notes
51
Leica mojo3D – Public Release Notes
52
5.2 Importing Google Earth and Shapefile Waylines
Importing a wayline
from a Google Earth
file or Shapefile
You can import a wayline from a KML or KMZ file which was exported from a mojo3D.
Likewise for importing waylines from shapefiles – if you are importing shapefiles which
have been exported from a mojo3D, they will be imported without any information loss.
NOTE: The mojo3D will not import a KML/KMZ from other sources as the format from
other 3rd party applications as the internal file format can vary significantly.
NOTE: The mojo3D will lines from shapefiles which were generated by 3rd party
applications provided the shape type is a polyline (sometimes just called a line) as defined
in the shapefile standard, HOWEVER, these lines will only be imported as replay waylines.
Before you can import a wayline from a KML/KMZ file you must first make sure that the
file is in the root, or uppermost, folder of the USB memory key. This is also the case for
importing a wayline from a shapefile. All files which make up the shapefile must be in the
uppermost folder of the USB memory key.
Once the files are on the USB memory key and you have the USB memory key inserted in
the mojo3D, enter the wayline management screen by tapping
pping the
main screen), then tap the
Leica mojo3D – Public Release Notes
button (from the
button.
53
Leica mojo3D – Public Release Notes
54
On the wayline management screen you should be able to see the
button - note
that the arrow goes from the USB stick to the Google Earth icon, not the other way
around. See below, the import button is to the right of the export button.
NOTE: if there are no Google Earth files or Shapefiles on the USB memory key to import
the button will be disabled. You may have the wrong file formats on the USB key or you
may not have the files in the uppermost folder of the USB memory key.
Once you have pressed the import button you need to select the type of file you are
going to import from – Google Earth (KML) or Shapefile (SHP). See screen below, there
are two buttons KML and SHP.
To import from a Google Earth KML/KMZ file, tap the KMLL button. If you want to import
from a shapefile, tap the SHP button. To move on to the item selection screen tap the
button.
NOTE: The KML and SHP buttons will each be enabled if files of that type exist in the
upper most directory of the USB memory key and are ready for import – if there are no
files of KML/KMZ or shapefile type the button for that type will be disabled.
Leica mojo3D – Public Release Notes
55
56
Leica mojo3D – Public Release Notes
You will then see a screen of available waylines to import. You can select one wayline or
multiple waylines by tapping each item in the list. If you have selected a wayline for
import but want to remove it from you selection you can tap it again. If the item is blue it
is selected for import. The screen below shows two items selected ready for import.
You can
n tap the “Select All” button to select all items for import or you can tap “Select
None” to de-select all items and start selecting again.
Once you have selected the items you want to import tap the
button.
Name conflicts
If there are already waylines saved on the mojo3D which have the same name as one of
the wayline to be imported you will see a screen like the one below.
Tap the box for either Automatic or Manual renaming of the imported waylines.
Automatic renaming will rename the imported waylines by adding a number at the end of
the name so that you can still identify the setup but can still figure out which was on the
mojo3D already and which one was imported.
If you chose Manual renaming will progress to another screen where you define a new
name for each imported wayline that needs a new name.
Leica mojo3D – Public Release Notes
57
Leica mojo3D – Public Release Notes
58
Once the import operation has started you will be taken to another screen and if the
import operation is successful you will see the screen change to look like the one below.
Tap the
button to complete the import wizard and return to the wayline
management screen.
The newly imported waylines will appear in the wayline management screen and will be
available for loading.
6
Support of SteerDirect Kits Using the mojo3D + Twist Only Configuration
Overview
The mojo3D when used without an RTK device has always been able to autosteer the
Leica QuickSteer but it can now be used to steer all the steer kits supported by the
mojoXact. A Leica Twist and an unlock code is required to autosteer directly from the
mojo3D.
Contact your dealer to obtain a Leica Twist and the required unlock code. You may also
need assistance from your dealer to provide the steer kit and cables to steer your vehicle.
NOTE: there are some limitations when steering directly from the mojo3D and these
include:
No reverse steering
Steering accuracy will not be the same as when using the mojo3D with an RTK
device. This is because the mojo3D stand alone system provides an autonomous
or DGPS position, not RTK.
Some engage switches built into the vehicle, such as in Fendt tractors, will not
work.
Leica mojo3D – Public Release Notes
59
Leica mojo3D – Public Release Notes
7
60
Export and Import of Stored Vehicle/Implement Setups
Overview
The mojo3D can save and restore vehicle/implement settings and now has an added
feature where you can export the stored vehicle setups onto a USB memory key which
can then be used to import the vehicle setups into another mojo3D.
This allows the transfer of vehicle settings from one mojo3D to another so that you can
use any of your mojo3D devices on a vehicle that was originally configured on a different
mojo3D.
NOTE: when you export the vehicle setups to the USB memory key you will overwrite any
vehicle setups which may have already been on the USB memory key at the time of
export.
7.1 Exporting Vehicle/Implement Setups
Exporting setups
Before you can export the vehicle/implement setups you first need to insert a USB
memory key into the mojo3D.. Then from the main screen tap the
button followed
by the
button. You will then see a screen similar to the one below. Tap the
button so that it is blue as in the image below (note that the arrow points from the
mojo3D to the USB memory key - not from the USB memory key to the mojo3D)
Leica mojo3D – Public Release Notes
61
Leica mojo3D – Public Release Notes
Tap the
62
button to continue forward. You will see a screen similar to the one below.
Tap the
button so that it is blue as shown here.. Then tap the
the export operation.
button to start
If there is already exported vehicle setup data on the USB memory key you will be asked if
you want to overwrite the data on the USB memory key. Tap
overwriting the data or tap
to proceed with
to abandon the export operation.
Once the export operation has completed you will see a screen similar to the one shown
below.
Tap the
button to return to the main screen.
Leica mojo3D – Public Release Notes
63
64
Leica mojo3D – Public Release Notes
7.2 Importing Vehicle/Implement Setups
Importing setups
Before you can import vehicle/implement setups, you need to have a USB memory key
which contains previously exported vehicle/implement setups that were exported from a
mojo3D. Then insert the USB memory key into the mojo3D you are importing the setups
into.
From the main screen tap the
button followed by the
button. You will then
see the screen below. Tap the
button so that it is blue as in the image below (note
that the arrow points from the USB memory key to the mojo3D - not from the mojo3D to
the USB memory key)
Tap the
button to continue forward. You will see a screen similar to the one below.
Tap the
button so that it is blue as shown below. Then tap the
continue forward.
button to
NOTE: this screen may not have all the buttons shown here depending
depend
on what data you
have on the USB memory key to import. If you have no vehicle setups to import you won’t
be able to see the
Leica mojo3D – Public Release Notes
button to press.
65
Leica mojo3D – Public Release Notes
66
Once the export operation has completed you will see a screen similar to the one shown
below.
On this screen you select which vehicle setups that you wish to import from the USB
memory key. Select or deselect a setup by tapping its button or select all of them by
tapping “Select All”. To clear all selections tap the “Select None” button.
NOTE: when a setup is selected for import its button will be blue (see example screen on
the next page).
Once you have selected the setups to import you will be able to see the selected items
and the screen will look like the example below. Tap the
button to continue.
NOTE: in this example the vehicle setups named Tractor and Sprayer are to be imported
and the setup named Combine will not be imported.
Leica mojo3D – Public Release Notes
67
Leica mojo3D – Public Release Notes
Name conflicts
68
If there is already a vehicle setup saved on the mojo3D which has the same name as one
of the setups to be imported you will see a screen like the one below.
Tap the box for either Automatic or Manual renaming of the imported vehicle setups.
Automatic renaming will rename the imported setups by adding a number at the end of
the name so that you can still identify the setup but can still figure out which was on the
mojo3D already and which one was imported.
If you chose Manual renaming will progress to another screen where you define a new
name for each imported setup that needs a new name.
button to continue
Once you have chosen the renaming option to use tap the
immediately If
forward. If you chose automatic renaming the import operation will start immediately.
you choose manual renaming you will see a screen similar to the one below.
Tap a setup, tap the Rename button and use the on-screen
screen keyboard to enter a new
name for the setup. You need to repeat this for every setup in the list and when you have
given each setup a unique name the
button will be enabled and you can then tap the
to continue with the import.
Leica mojo3D – Public Release Notes
69
Leica mojo3D – Public Release Notes
70
Once the import operation has started you will be taken to another screen and if the
import operation is successful you will see the screen change to look like the one below.
Tap the
button to complete the import wizard and return to the main screen.
screen
8
Cross Track Lightbar Mode
Overview
The mojo3D was initially released with a smart lightbar exclusive to Leica Geosystems. This
lightbar was designed to make it easier for people to steer accurately with lightbars.
Although the smart lightbar is more advanced than the traditional cross track only
lightbars it was found that a lot of users who have already used traditional lightbars
prefer to keep doing so.
The mojo3D now provides an option to change the lightbar so that it operates as a
traditional cross track only lightbar. Also, in the cross track only mode you can also set
the amount of cross track error per lightbar segment, effectively adjusting the sensitivity
of the lightbar.
Leica mojo3D – Public Release Notes
71
72
Leica mojo3D – Public Release Notes
8.1 Lightbar Settings
Changing the light
bar settings
To change the lightbar settings enter the mojo3D settings menu by tapping the
button on the main screen, then tap the
wizard.
button to enter the mojo3D settings
You then need to progress through the wizard by tapping the
the screen below.
button until you get to
The default lightbar mode is the Leica Geosystems smart lightbar which uses both cross
track error and heading error to guide you to the line.
If you want to change the lightbar mode to a traditional cross track only lightbar tap the
“Crosstrack” box and more settings will appear for the cross track lightbar. See the
section just below “Configuring the cross track lightbar”
If you want to continue with the smart light bar simply tap the
through the wizard.
Leica mojo3D – Public Release Notes
button to continue
73
Leica mojo3D – Public Release Notes
Configuring the
cross track lightbar
Once you have selected the cross track light bar option the screen will show more
settings related to the cross track lightbar mode. See the example below.
74
There are two settings for the cross track lightbar:
“Chase” setting:
when Chase mode is on (green) the lightbar represents where the line is
relative to where the vehicle is and to steer to the line you steer towards
the light – you chase the light.
when Chase mode is off (gray) the lightbar represents the position of the
vehicle relative to the line and to steer the vehicle onto the line you steer
away from the light to “pull” the light to the line.
Cross track error per lightbar segment: this setting determines how much cross
track error is represented by each segment in the lightbar.
NOTE: Although the Leica Geosystems smart lightbar works differently to the cross
track lightbar it is a Chase mode lightbar
NOTE: When setting the cross track per lightbar segment setting a small number will
make the lightbar be sensitive and hard to follow but more accurate, a large number
will make the lightbar less sensitive and easy to follow but less accurate.
Leica mojo3D – Public Release Notes
75
76
Leica mojo3D – Public Release Notes
Once you have chosen the light bar settings that you are happy with you can progress
through the setup wizard by tapping the
button.
9
Support for AgroTronix Pulvix 8100 Direct Section Control
Overview
The mojo3D now supports direct section control via the AgroTronix Pulvix 8100. Direct
section control allows the mojo3D to automatically turn sections off when you go over
ground already covered or when the vehicle stops.
You need to have the direct section control feature unlocked on the mojo3D. Contact
your dealer to unlock this feature on your mojo3D.
An installation guide is available on the mojo3D downloads page at
www.virtualwrench.com.
www.virtualwrench.com
10 Support for mojoXact
Overview
The mojo3D software now supports the mojoXact. Consult the user manual for full details
on connecting the mojoXact and configuring the mojo3D.
Further information can also be downloaded from www.virtualwrench.com.
www.virtualwrench.com
Leica mojo3D – Public Release Notes
77
78
Leica mojo3D – Public Release Notes
11 Display enhancements
11.1
Larger view of field
Larger view of the
field
If the buttons on the left or the right side of the main navigation screen have not been
touched for 20 seconds the buttons fade away to provide a larger view of the field.
The buttons fade in a way so that the field behind is very easy to see but the buttons can
be identified. If one of the buttons on the left or the right are pressed they quickly turn
opaque and can be easily seen.
View with buttons not faded
New Look
View with buttons faded
As part of the new look the buttons have been changed to look more like buttons instead
of display cells. The button shape and backgrounds have changed for a fresher look and
feel. See images above.
12 Replay Guidance
Overview
The mojo3D now provides a feature called Replay Guidance. This feature allows you to
load a previous treatment as a guidance pattern. Loading a treatment as a guidance
pattern allows you to follow the path of a previous treatment but with the treatment
cleared so that you can treat it again.
12.1
Using Replay Guidance
1. Wayline
Options
From the main navigation screen tap the
button. Note: if the buttons cannot be
seen tap the right hand side of the screen until you can see them.
2. Load Wayline
Tap the
Menu
button to enter the load wayline menu
Leica mojo3D – Public Release Notes
79
80
Leica mojo3D – Public Release Notes
3. Select
Just like previous versions of software, all the waylines will be listed for loading except
Treatment as now you will also be able to select saved treatments. Select a treatment from the list on
the left and then
Wayline
tap
to proceed
OR
tap
to abandon the request.
When you select a treatment from the Load Wayline menu you will load the path of the
treatment, not the treatment itself.
4. Wayline
Loaded
Once you have chosen to load the treatment as a wayline you will be taken back to the
main navigation screen and depending on how large the treatment is it may take a few
seconds to load the lines.
You can now engage onto the line and turn section control again to retreat the same
path.
Leica mojo3D – Public Release Notes
81
Leica mojo3D – Public Release Notes
82
13 Network DGPS
Overview
The mojo3D stand-alone system can now provide a DGPS (Differential GPS) position type.
Network DGPS utilizes a network of base stations or single base stations to provide
differential GPS correction signals via the cell phone network.
Before you can configure the mojo3D to use Network DGPS you need to obtain two
unlock codes. This is done by redeeming vouchers for Network DGPS and Network Data
Plan. Contact your dealer to obtain the required unlock vouchers.
13.1
Setting up Network DGPS
Unlock Codes
Before you can configure the mojo3D to use Network DGPS you need to unlock Network
DGPS and Network Data Plan on the mojo3D. Once you have redeemed the Network DGPS
and Network Data Plan vouchers you will be issued with the required unlock code/codes.
Loading unlock
codes onto the
mojo3D
There are two ways that you can load the codes onto the mojo3D.
1. Connect the mojo3D to Virtual Wrench. Once connected the new codes will
automatically be loaded onto the mojo3D
2. You can enter the code(s) manually via the mojo3D by doing the following:
a. On the right hand side of the screen, tap the
button.
b. Then tap the
button
c. You will then see a feature status screen which shows the features which
are locked and unlocked.
d. Tap the
button to go to the code entry screen
e. Enter the code using the keyboard making sure that you use the correct
f.
capitalization for letters and tap the
letters and numbers on the keyboard.
button to switch between
Once you have the code entered, tap
to proceed.
p
Leica mojo3D – Public Release Notes
83
84
Leica mojo3D – Public Release Notes
Once you have entered the code(s),, go back to feature status screen and confirm that
Network DGPS and Network Data Plan are both unlocked. See example below.
Tap
Enabling Network
DGPS
to get back to the main screen.
NOTE: This step assumes that the mojo3D is already configured as a stand-alone
stand
mojo3D
and that Network DGPS and Network Data Plan are unlocked.
From the main screen, tap the
button followed by the
you to the correction source selection screen.
button. This will take
On the correction source selection screen tap the “Network DGPS” button so that it is
blue (as in the example below) and then the
Server and log-in
details
button to progress.
By tapping on the entry boxes for Host, Port, Username and Password, enter in all the
details (which should have been supplied by your Network DGPS provider).
Tap the
button once you have all the details entered.
Leica mojo3D – Public Release Notes
85
86
Leica mojo3D – Public Release Notes
Select a stream
Once you have details entered into the system the mojo3D will download a list of
available data streams from the Network server. When you select a stream from the list
(by tapping the stream name) you will get some information about the stream on the
right hand side of the screen (see example below)
NOTE: the distance to the reference source shown on the right is a guide only and may
be incorrect. Some servers provide a virtual correction location which can only be
assigned to a location close to you once you have connected to the data stream. Until
that time, the reported distance is meaningless.
Tap the
and
buttons as required to scroll through the list of streams.
Once you have selected the appropriate stream for your location
ocation and configuration, tap
the
Configuration
confirmation
button to progress.
If you have everything entered correctly the system will attempt to connect to the
correction source. This may take some time and if successful you will see a screen that
looks like the one below.
If everything is ok, tap
to complete the Network DGPS configuration and begin using
the system or tap
to go back and make any changes. Alternatively, if the settings are
not correct you can go forwards and restart the configuration wizard.
Leica mojo3D – Public Release Notes
87
88
Leica mojo3D – Public Release Notes
When the mojo3D is running Network DGPS a network status icon similar to
shown in status area (upper left) of the main screen.
will be
14 Save and Restore Vehicle/Rig Configurations
Overview
The mojo3D is now capable of saving and recalling vehicle and rig configurations. When
you save or restore a configuration you are saving or restoring everything relating to the
vehicle and the implement including section control settings.
This feature has been implemented on the assumption that it would only be
b the mojo3D
moving from vehicle to vehicle. If a vehicle has a mojoXact installed it is assumed that the
mojoXact stays with the vehicle. The mojoXact is designed to be fitted and calibrated and
to then stay in the vehicle.
It is recognised that this may not always be the case but in an effort to accommodate
most users, saving and restoring vehicle settings has been implemented on the
assumption that it is only the mojo3D which moves between vehicles.
14.1
Saving a Vehicle/Rig Configuration
General information
When you have the vehicle, rig and section control all configured for your equipment you
can save that information for recalling later.
NOTE: This part of the procedure assumes that you have a working configuration to save.
Leica mojo3D – Public Release Notes
89
Leica mojo3D – Public Release Notes
Saving a
configuration
90
button on the right hand side of the main screen followed by the
Tap the
button. This will take you to the vehicle/rig setup management page which will be empty
if you have no previously saved configurations (see below)
Tap the
button to save the current configuration.
Renaming a
configuration
Once you have saved a configuration it will appear in the list on the left of the vehicle/rig
setup management screen (see below).
e (as above) and tap the
button. A
Tap the vehicle configuration name so that it is blue
keyboard will be displayed where you can type in a new name for the configuration. Tap
the
button once you have typed in the new name.
When you want to get out of the configuration screen you can tap the
Leica mojo3D – Public Release Notes
button.
91
Leica mojo3D – Public Release Notes
92
14.2
Restoring a Vehicle/Rig Configuration
General information
When you have stored vehicle/rig configurations on the mojo3D they can be reloaded so
that you don’t have to re-enter all the details of the configuration again.
NOTE: It is up to the operator to confirm that they have restored the correct
configuration and that the settings are correct. The system cannot detect if incorrect
settings have been loaded.
Restoring a
Configuration
button on the right hand side of the main screen followed by the
Tap the
button to get into the vehicle/rig configuration management screen. Select a
configuration to load by tapping its name in the list of configurations (see below).
When you select a configuration
uration you can preview some information about it by looking on
the right hand side of the screen. There you can see the type of tractor and rig, the
number of sections and the overall implement width.
Leica mojo3D – Public Release Notes
93
Leica mojo3D – Public Release Notes
94
o load, tap the
button and you
Once you have selected the configuration you want to
will be taken to the main screen with the selected configuration being loaded.
If you wish to cancel the loading operation you can tap the
main screen without making any changes.
button to go back to the
14.3
Renaming a Configuration
General information
You can rename any configuration so that you can easily identify one configuration from
another.
Even though configurations can have the same name it is recommended to have unique
names for each configuration.
Renaming a
Configuration
Enter the vehicle/rig configuration management screen as described above in save and
restoring.
Select a configuration by tapping on its name in the list and tap the
button.
A keyboard will appear where you can type in a new name for the configuration.
When you have finished typing the new name tap
cancel the name change.
to save the change or tap
to
Once you are finished in the vehicle/rig configuration management
manageme screen you can press
to return to the main screen without making any changes to the currently loaded
configuration.
If you press
to exit the configuration screen you will load what ever configuration is
currently selected on the screen which may nott be what you intended to do.
Leica mojo3D – Public Release Notes
95
96
Leica mojo3D – Public Release Notes
14.4
Deleting Configurations
General information
You can delete any configuration so that you believe is incorrect or is no longer required.
Once you delete a configuration you can not restore it. If you accidentally delete a
configuration you need to manually recreate it and save it again.
Deleting a
Configuration
Enter the vehicle/rig configuration management screen as described above in save and
restoring.
Select a configuration by tapping on its name in the list and once you are sure that it is
the correct configuration that you want to delete tap the
button.
You will be asked if you sure you want to delete the configuration. Tap
the deletion or tap
to cancel the deletion.
to confirm
Deleting ALL
Configurations
If you want to delete all configurations stored on the mojo3D make sure you are in the
vehicle/rig configuration management screen and tap the
button.
You will be asked if you sure you want to delete the all the configurations. Tap
confirm the deletion or tap
to
to cancel the deletion.
Once you are finished in the vehicle/rig configuration management screen you can press
to return to the main
in screen without making any changes to the currently loaded
configuration.
If you tap
to exit the configuration screen you will load what ever configuration is
currently selected on the screen which may not be what you intended to do.
Leica mojo3D – Public Release Notes
97
Leica mojo3D – Public Release Notes
98
15 Stationary Engage and Reverse Steering
Overview
The mojo3D now supports stationary engage. It also supports reverse steering for some
steering platforms and vehicle types.
Stationary engage allows you to arm the autosteer system before you move so that you
can concentrate on other tasks as you begin to move. Stationary engage also allows you
to stop for a moment then take off again without having to manually re-engage the
autosteer system.
Stationary engage will automatically disarm if the vehicle has not moved for some time.
The amount of time is 15 seconds by default but can be set between 1 and 30 seconds.
Reverse steering is now supported for some mojoXact steering platforms and vehicles.
This allows the operator to engage the steering while in reverse.
Enabling reverse engage requires stationary engage to be turned on. This allows the
operator to autosteer while driving forwards, then stop, then drive in reverse and the
vehicle will continue to autosteer without having to manually re-engage. The operator can
then stop, go forward again and the steering will still be engaged. This can be repeated a
number of times with no need for the operator to re-engage the steering.
Reverse steering is only allowed
wed on AB or A+Heading waylines which are both straight
wayline types.
15.1
Enabling Stationary Engage and Reverse Steering
Steer
Open vehicle setup
wizard
From the main screen tap on the
then tap the
button on the right hand side of the screen and
button.
You need to progress through the wizard by tapping the
screen below.
button until you get to the
You may not see the reverse engage steering option if reverse engage is not supported
for your steer kit or vehicle type.
Leica mojo3D – Public Release Notes
99
Leica mojo3D – Public Release Notes
100
When you get to the screen below you can tap the gray or green boxes to enable or
Enabling/disabling
stationary engage
disable reverse steering and stationary engage.
and reverse steering
When the box is gray the feature is disabled, when the box is green the feature is
enabled.
If you turn on reverse steering then stationary engage will automatically be forced on
because reverse steering requires stationary engage to be enabled.
Likewise, if you turn stationary engage off reverse steering will be forced off.
If reverse engage is not supported for your steer kit or vehicle type, you will not be able
to see the “Enable Reverse Steering” button on the screen above.
Setting the
stationary engage
time limit
While on this screen, you can tap the number for the stationary engage time limit to
change how long the stationary engage system will stay armed when the vehicle is not
moving.
The default time limit is 15 seconds but this can be set anywhere from 1 to 30 seconds.
Once you have chosen settings for reverse steering, stationary engage and the stationary
engage time limit you can tap the
main screen.
Leica mojo3D – Public Release Notes
button to continue through the wizard back to the
101
102
Leica mojo3D – Public Release Notes
15.2
Using Stationary Engage and Reverse Steering
Using Stationary
Engage
Once you have turned on stationary engage you will have the ability to arm the autosteer
system before you start moving.
The following instructions are written assuming that you have already turned roading off
and that there is a wayline set or loaded to autosteer along.
When you are not moving you can tap the
button and the button will go green with
a pause symbol which signifies that autosteer is armed but not engaged. The button will
look like this:
states.
See below for a more detailed description of autosteer button
When you start moving the system will automatically engage if you are close enough to
the line and you are not attacking the line too steeply. Otherwise the system will wait
until you meet those criteria before engaging.
If you don’t move the vehicle before the stationary engage time limit or you don’t meet
the engage criteria before the time limit the stationary engage will disarm.
Using Reverse
Engage
Reverse steering requires stationary engage to be enabled. Reverse steering supports
going from forwards to reverse and back without the operator having to manually reengage the steering. Without stationary engage turned on the system would disengage as
you slow down between forwards and reverse.
To use reverse engage you can simply engage the steering while driving in reverse as long
as the reverse engage criteria are met. Alternatively, you can already have the steering
engaged while driving forwards on an AB or A+Heading wayline and then drive in reverse
making sure the time between forwards and reverse is shorter than the stationary engage
time limit.
You can change between forward and reverse as many times as you like without the
system disengaging as long as you don’t stop any longer than the stationary engage time
limit.
For the system to engage in reverse you need to be less than one meter from the line,
less than 20 degrees angle of attack and travelling at less than 6mph (10kph).
Leica mojo3D – Public Release Notes
103
Leica mojo3D – Public Release Notes
104
15.3
Autosteer Button States
Overview
The addition of stationary engage has slightly impacted the way the autosteer button is
displayed. See the table below for the latest definitions of the autosteer button states.
Autosteer button
states
Roading is enabled – steering cannot be
engaged until roading is turned off.
Roading is turned off and the steering is not
engaged, stationary engage is not armed.
Roading is turned off and if the steering
button is tapped the system will steer
immediately because all engage criteria are
currently being satisfied.
Autosteer is armed but not active. Steering
is armed but is not active because the
vehicle is not moving or the engage criteria
are not yet satisfied
The steering system is engaged and actively
steering
16 Improved Error Display
Overview
It has been recognised that some non-critical errors are displayed and block the user from
continuing on until they acknowledge the error. For non-critical errors the operator can
still see the screen and can still press the buttons they want to press.
An example of this would be when an operator attempts to engage the autosteer but
they are too far from the line. The previous software would show a message in the
middle of the screen about being too far from the line. This message both blocks the view
of the field on the screen and tapping other parts of the screen is blocked until the
operator acknowledges the error.
The new software shows a brief summary of any error, critical or non-critical, at the
bottom of the main screen but will only require acknowledgement for critical errors. For
errors such as the “Too far from line” error the message is shown at the bottom of the
screen and the user can still make attempts to engage the steering as they get closer to
the line.
Leica mojo3D – Public Release Notes
105
Leica mojo3D – Public Release Notes
Details
106
When any error occurs, the background of the status display in the top left corner of the
main screen goes red signalling that there has been an error.
A brief description of any error that is currently active or was active less than 10 seconds
ago will be displayed at the bottom of the main screen. If there is more than one error to
display at the bottom of the screen it will cycle through each error for 2 seconds each. As
the error becomes inactive for 10 seconds it will be removed from the list of errors to
display at the bottom. The 10 seconds is added to make sure that the operator has time
to see any rapidly disappearing errors.
When the status display in the upper left corner is red, you can press it to get details of
the error.
Critical errors are still shown as blocking messages on the screen because those errors
need to be addressed before normal operation can continue.
The section control status bar normally seen at the bottom of the screen has been moved
up slightly to make room for the error message at the bottom of the screen.
Example of the
Change
Old Error Display
Leica mojo3D – Public Release Notes
New Error Display
107
Leica mojo3D – Public Release Notes
108
17 Ability to Turn SBAS (WAAS/EGNOS) ON or OFF
Overview
Depending on the location where the system is being used and also on the configuration
of the mojo3D, some users may experience different performance depending on whether
or not they are utilising SBAS (space based augmentation systems which include WAAS in
North America and EGNOS in Europe).
The operator can now choose whether or not the mojo3D uses SBAS.
This setting only affects stand-alone mojo3D systems (ie. those not connected to a
mojoXact or mojoRTK).
This setting can only be accessed if the mojo3D is set to a region where SBAS is available.
Enabling SBAS may reduce GPS availability as two GPS receiver channels are allocated to
receiving SBAS satellites.
17.1
Turning SBAS ON or
OFF
Setting SBAS ON or OFF
1. On the main screen tap the
button on the right hand side and then tap the
button.
2. Tap the
button until you get to the screen below if you are not there already
3. Tap the box beside the text “Enable SBAS” to change the color of the box. When
the box is gray SBAS will be OFF, when the
he box is green SBAS will be ON.
ON
Leica mojo3D – Public Release Notes
109
110
Leica mojo3D – Public Release Notes
4. Tap the
button once you have made your selection.
18 Upgrading the Leica mojo3D software
18.1
Upgrading Software from Virtual Wrench™
General information
A new version of software, if available, may be obtained by downloading from Virtual
Wrench™
Do not turn off the Leica mojo3D while performing the software upgrade.
upgrade
Caution
Downloading
software, step-bystep
To download a new version of software from Virtual Wrench™, carry out the following
steps:
1. On the main navigation screen, tap the service button.
2. On the flyout menu, tap the download software button.
3. If you are not already connected to Virtual Wrench a dialog confirming connection will
be displayed:
tap
to proceed.
OR
tap
to abandon the request
4. Once connected a dialog will be displayed showing the current version and the version
available for download:
tap
to proceed.
OR
tap
to abandon the request
5. Both progress bars (Current Stage and Overall Progress) will be completely full when
the download is complete. Tap
to start the install.
The Leica mojo3D will automatically restart when the installation is complete.
Leica mojo3D – Public Release Notes
111
Leica mojo3D – Public Release Notes
18.2
Upgrading Software via USB Flash Drive
General information
A new version of software may be installed from a USB Flash Drive.
112
Visit www.VirtualWrench.com to obtain the latest software download and copy to a USB
Flash Drive.
Caution
Upgrading software
with a USB Flash
Drive, step-by-step
Do not turn off the Leica mojo3D, or remove the USB Flash Drive, while performing the
software upgrade.
To upgrade the Leica mojo3D software via USB Flash Drive, carry out the following steps:
1. The USB interface is on the lower left front of the
Leica mojo3D display. Lift the rubber cover and insert
a compatible USB Flash Drive into the USB slot.
2. On the main navigation screen, tap the service button.
3. On the flyout menu, tap the upgrade from USB button.
4. Tap on the software version in the list to select it. Tap
to start the install.
5. Both progress bars (Current Stage and Overall Progress) will be completely full when
the installation is complete.
The Leica mojo3D will automatically restart when the installation is complete.
Remove the USB Flash Drive only when the unit is powered down.
Leica mojo3D – Public Release Notes
113
www.leica-geosystems.com
Original text
© 2010 Leica Geosystems AC, Heerbrugg, Switzerland
Leica mojo3D – Public Release Notes – v3.2.272
Leica Geosystems AG
Heinrich-Wild-Strasse
CH-9435 Heerbrugg
Switzerland
Phone: +41 71 727 31 31