1
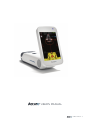
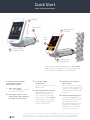
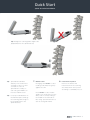
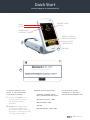
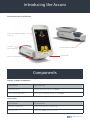
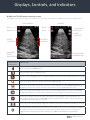
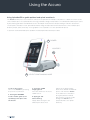
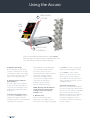
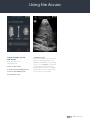
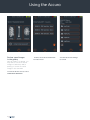
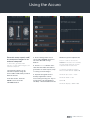
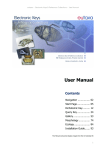
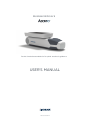
RIVANNA MEDICAL’S
Pocket-sized ultrasound device for spinal anesthesia guidance.
USER’S MANUAL
735-00005 Rev A
CAUTION: In the United States, federal law restricts this device
to use by or on the order of a physician.
Copyright © 2015 by Rivanna Medical, LLC. All rights reserved. No part of this User’s Manual may be copied or
transmitted by any method without the express written consent of Rivanna Medical, LLC.
RIVANNA™, Accuro™, BoneEnhance™,
and SpineNav3D™ are trademarks of
Rivanna Medical, LLC.
Cidex® is a registered trademark of
Aprorocidin International.
The Accuro ultrasound system
referenced in this document is
covered by US and foreign
patents pending.
This document and the information
contained in it is proprietary and
confidential information of Rivanna
Medical, LLC (“RIVANNA”) and
may not be reproduced, copied in
whole or in part, adapted, modified,
disclosed to others, or disseminated
without the prior written permission
of RIVANNA. This document is
intended to be used either by
customers, and is licensed to them
as part of their RIVANNA equipment
purchase, or to meet regulatory
commitments as required by the
FDA and other local regulatory
requirements. Use or dissemination
of this document by unauthorized
persons is strictly prohibited.
THIS DOCUMENT IS PROVIDED
WITHOUT WARRANTY OF ANY
KIND, IMPLIED OR EXPRESSED,
INCLUDING, BUT NOT LIMITED TO,
THE IMPLIED WARRANTIES OF
MERCHANTABILITY AND FITNESS
FOR A PARTICULAR PURPOSE.
RIVANNA shall in no event be liable
for incidental or consequential
damages resulting from the use
of Accuro. Some states do not
allow the exclusion of incidental
or consequential damages so this
exclusion may not apply to you.
liability for errors or omissions and
reserves the right to make changes
without further notice to any
products herein to improve reliability,
function, or design. RIVANNA may
make improvements or changes in
the products or programs described
in this document at any time without
prior notice. CONTACT YOUR
RIVANNA REPRESENTATIVE FOR
UP TO DATE DOCUMENTATION. All
information in this User’s Manual may
change at any time without notice.
For the most up-to-date
information, see the online manuals
at rivannamedical.com. Examples
provided by RIVANNA in this User’s
Manual do not in any way represent
real patient or exam data.
RIVANNA has taken care to ensure
the accuracy of this document.
However, RIVANNA assumes no
© Copyright, Rivanna Medical, LLC, all rights reserved. Unauthorized copying of this document, in addition to
infringing copyright, might reduce the ability of RIVANNA to provide accurate and current information to users.
Contact Information:
Rivanna Medical, LLC
107 E Water Street
Charlottesville, VA 22902 USA
T: 800-645-7508
www.rivannamedical.com
[email protected]
2
1
USER’S MANUAL
USER’S MANUAL 3
Quick Start
Spinal Anesthesia Guidance
1. POWER
LOCATOR™
2.
4.
BRIGHTNESS
& ZOOM
MIDLINE
5.
3.
SELECT SPINE
IMAGING MODE
6. CROSS HAIR
& OVERLAY
SCAN IN TRANSVERSE ORIENTATION, holding Accuro
perpendicular to imaging surface. Red dashed line and
cross hair indicate interlaminar space identified.
To perform a clinical lumbar
spine epidural or spinal
anesthesia procedure:
1.
2.
4
Turn on the Accuro
Turn on the Accuro by pressing
the power on/off button.
If using the Accuro Locator™
needle guide (sold separately),
then place onto the Accuro
3.
Select the SPINE
imaging mode
Press the SPINE icon from the
HOME screen.
4. Apply gel and start scanning
Apply ultrasound gel to the
lumbar spine area and scan
in the transverse orientation,
taking care to hold the Accuro
perpendicular to the imaging
surface. Optimize brightness
and zoom as desired.
5. Align the Accuro with the
spine mid-line
Move the device left or right to
ensure the mid-line indicator is
centered on the imaging screen
(indicated by a dashed red line
as shown).
6. Find the interlaminar space*
Scan with the Accuro along
the lumbar spine region until
the interlaminar space is
automatically identified at the
desired intervertebral level
(indicated by cross hair and
orange overlay as shown).
*CAUTION: The images and calculations provided by the Accuro instrument are intended for use by competent
users, as a diagnostic tool. The user should be aware of the instrument specifications, accuracy, and limitations.
These limitations must be considered before making any decision based on images and quantitative values.
Quick Start
Spinal Anesthesia Guidance
Tip: Arrange the scanning plane angle to be
perpendicular to the spinal anatomy.
7.
Tip: SpineNav3D identifies
anatomy in the transverse
orientation only. For other
orientations, turn off
SpineNav3D overlays or
scan using the BONE icon
from the HOME screen.
Tip: For proper identification of
interlaminar space, arrange
the scanning plane angle to
be perpendicular to the
spinal anatomy.
7.
Mark the skin
Disengage the Accuro Locator
needle guide and press gently
against the skin.
8. Perform the injection
Remove the ultrasound
instrument from the scanning
site and perform the injection
according to standard protocol.
If the Accuro Locator needle
guide is not used, then note the
skin position corresponding to
the middle of the transducer
face using a preferred method,
such as a surgical marker.
USER’S MANUAL 5
Quick Start
Save an Image to an Examination File
1.
PRESS PAUSE
THEN STILL IMAGE
CAPTURE OR
VIDEO CAPTURE
PLAY
SPINENAV3D
OVERLAY TOGGLE
1.
ALTERNATIVELY,
CAPTURE STILL
WITH PHYSICAL
BUTTON DURING
LIVE IMAGING
3.
4.
2.
To save an image to an
examination file:
6
1.
Press the pause button then
the still-image capture or video
capture buttons on the Accuro
touchscreen. Alternatively,
quickly press and release the
physical device button. The
image will be saved to the
current Exam for review
in the GALLERY.
2.
From the HOME screen, select
VIEW EXAM GALLERY.
3.
Next, select the desired Exam
from the menu.
4. Select the desired image
to review.
Quick Start
Save an Image to an Examination File
EXPORT IMAGE
AS PNG
BACK
PAUSE
SPINENAV3D
OVERLAY TOGGLE
VIDEO PLAYBACK
FRAME INDICATOR
EXAM/PATIENT
INFORMATION
1.
USB PORT
x
Accuro ATLAS DESKTOP APPLICA
TM
Accuro ATLAS
TM
2.
RELEASE NOTES
1. Alpha testing
2. Bug fixes
3. Added abillity to s
into report in edit
DESKTOP APPLICATION V1.0
Copyright © Rivanna
Rivanna Medic
Medical,
al, LLC This application is a companion
desktop application for the Accuro handheld ultrasound device.
OK
To annotate, generate exam
reports, or save exam images
to an external computer:
1.
2.
Connect the Accuro to an
external computer using the
provided micro-USB to
USB cable.
OK
Minimum system requirements:
Computer operating system
Microsoft Windows® 7/8/8.1/10
Minimum
- 1 GHz
Accuro ATLAS
DESKTOPprocessor
APPLICATION
V1.0
AccuroATLAS image export
and analysis software autoruns and will enable annotation,
generation of exam reports, and/
or saving of exam images.
For the most up-to-date
information, see the online
manuals at rivannamedical.com.
TM
Minimum RAM – 1 GB
USB 2.0
application
for the Accuro
Minimum
display
– 1024 ATLAS
x 768
Copyright © Rivanna Medical, LLC
This application is a companion desktop
Handheld ultrasound device.
OK
x
DEFAULT EXAM INFORMATION
HOSPITAL
PHYSICIAL
PROCEDURE NAME/CODE
USER’S MANUAL
CANCEL7
OK
Table of Contents
Accuro
Quick start ........................................................................4
Table of contents..............................................................8
Important information................................................... 10
Product description............................................................. 10
Principles of operation........................................................ 10
Indications for use................................................................ 10
Essential Performance........................................................ 10
Contraindications.................................................................. 10
Statement of prescription................................................. 10
Warnings and cautions....................................................... 10
WARNINGS...........................................................................10
CAUTIONS............................................................................10
Introducing the Accuro.................................................. 11
Instrument parts and features...........................................11
Components..................................................................... 11
Battery Charger Components............................................11
Accessories................................................................................11
Displays, controls, and indicators................................ 12
Console display and functions..........................................12
Home screen............................................................................12
BONE and TISSUE preset scanning screen.................13
SPINE preset scanning screen..........................................14
Gallery main screen...............................................................16
Gallery image selection screen.........................................16
Gallery still-image view screen.........................................17
Gallery video playback screen..........................................18
Settings screen.......................................................................19
Using the Accuro........................................................... 20
Using SpineNav3D to guide epidural
and spinal anesthesia......................................................... 20
Additional scanning tips................................................ 23
General purpose scanning with the Accuro...............24
Image storage, review, and export.................................25
Save an image to an examination file..................... 25
Review saved images in the gallery......................... 26
Generate exam reports and/or save
exam images to an external computer.................. 27
8
Accuro maintenance......................................................28
Instrument care and maintenance inspection...........28
Cleaning and disinfection..................................................28
Cleaning procedure......................................................... 28
Disinfecting procedures................................................ 28
Electromagnetic compatibility (EMC)....................... 29
Electromagnetic Emissions.............................................. 30
Electromagnetic Immunity.................................................31
Electromagnetic Emissions................................................31
ALARA Principle.............................................................32
Applying ALARA............................................................... 32
Direct controls................................................................... 32
Indirect controls................................................................ 32
Receiver controls.............................................................. 32
Other technical specifications......................................33
Instrument specifications...................................................33
Operating and storage conditions.................................33
Probe specifications............................................................33
Acoustic output specifications........................................33
Battery specifications.........................................................33
Accuracy statement.............................................................33
Summary of acoustic quantities.....................................34
Accuro safety..................................................................35
Symbols....................................................................................35
Important Information
Product description
The Accuro is a pocket-sized
and battery operated ultrasound
instrument. The device is a single
self-contained unit consisting of
an ultrasound system, ultrasound
probe, and rotatable touchscreen
display. The instrument provides a
SPINE imaging preset to facilitate
spinal anesthesia imaging guidance
with real-time 3D navigation of the
lumbar spine. The SPINE preset
uses patent-pending technology,
called SpineNav3D, to automate
spinal bone landmark detection
and depth measurements and
to assess real-time scan plane
orientation in 3D.
Accuro ultrasound scans and
measurements can be saved in
an examination file on the device
and exported to a computer for
storage or printing.
Principles of operation
Medical ultrasound imaging uses
an ultrasound transducer, which
transmits and receives high
frequency mechanical waves. The
transmitted ultrasound waves
reflect off of structures in the body
that exhibit changes in acoustic
impedance. A portion of the
reflected ultrasound energy returns
to the ultrasound transducer and
is converted back into an electrical
signal, which is then amplified,
digitized, and processed through a
series of filters. The digital signal is
transformed into an image that can
be saved in memory and displayed
to the display screen in real-time.
The Accuro SPINE preset uses
ultrasonic reflections acquired
from multiple scan planes to
obtain 3D volume scans of the
lumbar spine. The SpineNav3D
technology facilitates image
interpretation of individual 2D
lumbar spine scans by automating
spinal bone landmark detection
and depth measurements and
providing a real-time assessment
of scan plane orientation in
3D. SpineNav3D technology
makes image interpretation and
measurements of the lumbar spine
anatomy simple, quick, and easy. A
sonographer is not required to use
the SPINE preset.
Real-time 2D scans from either
SPINE or BONE presets are
formed using patent pending
BoneEnhance technology. The
BoneEnhance technology provides
images of bone anatomy at greater
bone-to-tissue contrast compared
with conventional ultrasound
image reconstructions.
Indications for use
The Accuro ultrasound scanner is
intended for diagnostic ultrasound
imaging of the human body in the
following clinical applications:
•
Abdominal
•
Musculoskeletal (Conventional
and superficial)
•
Cardiac
•
Peripheral vascular
A typical examination using the
Accuro is guidance of neuraxial
anesthesia.
Essential performance
The essential performance of
the Accuro consists of ultrasonic
image display of the dimension
and location of spinal anatomy,
display of ultrasound indexes
pertaining to safety related
indications, and prevention of
unintended or excessive ultrasound
output and transducer assembly
surface temperature.
Contraindications
The Accuro ultrasound instrument
is not intended for ophthalmic use
or any use causing the acoustic
beam to pass through the eye.
Statement of prescription
United States law restricts this
device to sale or use by, or on the
order of, a physician.
Warnings and cautions
The Accuro should only be used
by trained individuals who have
been authorized by a physician.
All users must read the entire
User’s Manual prior to using the
Accuro. To prevent damage of the
equipment or injury to yourself or
others, carefully read the following
warnings and cautions before
using the Accuro. Rivanna Medical,
LLC disclaims all responsibility and
liability for the operating safety,
reliability and performance of
the Accuro if the warnings and
cautions disclosed in this User’s
Manual are disregarded in any way.
The Accuro has not been evaluated
for use with high frequency (HF)
surgical equipment.
USER’S MANUAL 9
Important Information
WARNINGS
WARNING! Risk of explosion, fire,
or serious injury
If you use the Accuro in the
presence of flammable anesthetics,
the hazard of potential explosion
exists.
Do not place the Accuro near a
heat source or expose it to direct
flame. Such exposure may lead to
corrosive liquid leakage, electrical
shock, or fire.
Stop using the Accuro if the casing
is damaged. Failure to do so may
result in electrical shock or fire.
Electrical shock may result from
using damaged USB cables with the
Accuro or if modifications are made
to the Accuro by anyone other than
personnel authorized by RIVANNA.
Avoid dropping or subjecting the
Accuro to severe impacts. This
could result in electrical shock,
corrosive liquid leakage, and injury.
If battery leakage is present, wear
protective gloves and discard the
Accuro immediately following
applicable regulations.
WARNING! Potential patient hazard
Do not use the Accuro instrument
for ophthalmic indications.
Ophthalmic use may cause
patient injury.
CAUTIONS
CAUTION: Potential patient hazard
from acoustic exposure
To date, exposure to diagnostic
medical ultrasound has not
been shown to produce adverse
health effects. However, medical
professionals should use ultrasound
only when clinically indicated.
Medical professionals should use the
lowest exposure times possible. The
ultrasound output of the Accuro is
10
not user-adjustable and is limited
to the minimum level necessary for
effective performance.
CAUTION: Hazardous materials
present. Assure proper disposal.
The Accuro may contain lead,
mineral oils, batteries, and other
environmentally hazardous
materials. When the Accuro has
reached the end of its useful
service, follow your local protocols
for hazardous waste disposal.
CAUTION: Assure proper distance
from patient.
When transmitting data to or from
your computer, make sure that
the Accuro, accessories, and the
computer are outside of the patient
vicinity (more than six feet from
the patient).
CAUTION: Assure proper computer
system and/or printer configuration
When using the Accuro with an
external computer system and/
or printer unit, the computer
system and/or printer unit must be
minimally certified to EN/IEC
60101-1-1 system standard.
CAUTION: Damage to the
instrument may occur
Only apply commercially available
ultrasonic couplant, which has been
specifically formulated for use in
medical applications, to the acoustic
window (or face) of the probe.
Failure to do so may cause damage
to the Accuro instrument.
CAUTION: Damage to the
instrument may occur
Do not attempt to sterilize the
Accuro instrument. Damage to the
Accuro instrument may occur.
CAUTION: Damage to the
instrument may occur
Hot water in excess of 113°F or 45°C
may damage the instrument.
CAUTION: Damage to the
instrument may occur
Do not immerse the instrument in
disinfectant solution.
CAUTION: Images and calculations
are not to be used as the sole basis
for clinical diagnosis
The images and calculations
provided by the Accuro instrument
are intended for use by competent
users, as a diagnostic tool. They
are explicitly not to be used as the
sole, irrefutable basis for clinical
diagnosis. Users are encouraged
to account for the clinical utility
of the Accuro and make their own
professional conclusions.
CAUTION: Risk of inaccurate
measurements
The images and calculations
provided by the Accuro instrument
are intended for use by competent
users, as a diagnostic tool. The user
should be aware of the instrument
specifications, accuracy, and
limitations. These limitations must
be considered before making any
decision based on images and
quantitative values.
Incorrect image settings, equipment
malfunction, or failure to correctly
operate the Accuro can result in
measurement errors or failure to
detect certain details in the image.
The user must be thoroughly
familiar with the operation of the
Accuro in order to optimize its
performance and to recognize
possible malfunctions and
limitations. Application training
is available through the sales
representative.
Introducing the Accuro
Instrument parts and features
ROTATING TOUCHSCREEN
DISPLAY
POWER /
BACK BUTTON
ULTRASOUND PROBE
MICRO USB
DISPLAY ROTATION HINGE
Components
Battery charger components
PART NAME
DESCRIPTION
USB wall charger
Charges the battery inside the Accuro
Micro-USB to USB cable
Connects the USB wall charger to the Accuro
Accessories
PART NAME
DESCRIPTION
Acoustic coupling gel
Travel sized ultrasound coupling gel
Carrying case
Transports Accuro and accessories
USER’S MANUAL 11
Displays, Controls, and Indicators
Console display
and functions
The Accuro console consists of
an LCD touchscreen display and
a single power button. The LCD
display presents a combination of
user information, scan displays, and
prompts, which vary depending on
the current device function.
The power button has the function
of either powering on/off the
device, putting the device in sleep
mode, or saving images. The
functionality depends on the state
of the device, such as the current
screen, and the length of the
button hold.
BUTTON OR INDICATOR
FUNCTION
Press to go to SPINE imaging
preset using SpineNav3D
automation.
Press to go to BONE imaging
preset using BoneEnhance
technology.
Home screen
The HOME screen appears when
the Accuro is first powered on. The
HOME screen serves as a starting
point for all the main functions of
the Accuro.
Press to go to general
purpose ultrasound
TISSUE imaging.
Press to go to the
GALLERY main menu screen.
Press to access the
Accuro HELP screen.
Press to power off the device.
Press to go to the
SETTINGS screen.
Indicates the current
battery charge.
Indicates the available
mmc storage space.
12
Displays, Controls, and Indicators
BONE and TISSUE preset scanning screen
The BONE or TISSUE scanning screen appears after you press the BONE or TISSUE button from the HOME screen.
LIVE IMAGING
PAUSED
BACK
BACK
PAUSE
PLAY
STILL-IMAGE
CAPTURE
VIDEO
CAPTURE
DEPTH
CONTROLS
CONTRAST
CONTROLS
MAXIMUM
DEPTH
INDICATOR
BUTTON OR
INDICATOR
EXAM/PATIENT
INFORMATION
FUNCTION
Press to go back to HOME screen.
Press to pause current imaging session.
Press to resume imaging session. This button replaces pause button after pause button is pressed.
Press up or down arrow to increase or decrease imaging depth.
Press up or down arrow to increase or decrease image brightness. In the BONE imaging preset,
brightness controls are used to increase or decrease the tissue signal brightness only.
Press to save the current image on the screen. The saved image will be stored in the GALLERY
and associated with the current exam. This button is present after the pause button is pressed.
Press to save a video of the previous 4 seconds before the imaging session was paused. The
saved video will be stored in the GALLERY and associated with the current exam. This button is
present after the pause button is pressed.
Press to go to the exam information page where patient information and exam information is entered.
Press the physical device button to save the current image to the current exam during live imaging.
This button can save either still-image or video capture depending on the user’s settings. To
toggle between still-image and video capture go to HOME->SETTINGS->Physical Button.
USER’S MANUAL 13
Displays, Controls, and Indicators
SPINE preset
scanning screen
BACK
The SPINE preset screen
appears after you press
the SPINE button from the
HOME screen.
PAUSE
SPINOUS PROCESS
DEPTH ESTIMATE
SPINAL CROSS
SECTION
IDENTIFICATION
INTERLAMINAR
SPACE DEPTH
ESTIMATE
CAUTION: For accurate
imaging results,
SpineNav3D™ must be
performed in the lumbar
spine region with a
transverse scan plane
orientation.
MAXIMUM
DEPTH
INDICATOR
SCAN PLANE
ORIENTATION
ALONG 3D SPINE
10.25.15
SPINE: 02
3D NAVIGATION
SPINE
12:45:28 P
TI : 1.0 M I : 1.2
BUTTON OR INDICATOR
FUNCTION
Indicator in the top panel of the SPINE preset screen that automatically
identifies the presence and location of either interlaminar space or
spinous process cross-sections within the 2D scan.
The cross-section overlay is orange when interlaminar space is
identified and blue when spinous process is identified.
6
5
14
10
The cross-section overlay possesses a transparency that indicates
algorithmic confidence of correct interlaminar space or spinous process
identification. A less transparent overlay indicates high confidence in
anatomy detection while more transparency indicates less confidence.
The transparency of the overlay matches that of the 3D navigation
spine in the bottom image panel.
Displays, Controls, and Indicators
BUTTON OR
INDICATOR
FUNCTION
Indicator in the bottom panel of the SPINE preset screen that illustrates the position and
orientation of the current 2D scan plane along a 3D spine reconstruction.
The 3D spine possesses a transparency that indicates algorithmic confidence of correct
spinal position detection. A less transparent 3D spine indicates high confidence in
position and scan plane orientation while more transparency indicates less confidence.
The transparency of the 3D navigation spine overlay matches that of the cross-section
overlay in the top image panel.
Indicator along the right of the display that automatically detects the depths of the
interlaminar space and spinous process depths. Interlaminar space is indicated with
orange text while spinous process is indicated with blue text. The depth indicator
possesses a transparency that indicates algorithmic confidence of correct interlaminar
space or spinous process position detection.
Press to go back to HOME screen.
Press to pause current imaging session.
Press to resume imaging session. This button replaces the pause button after pause
button is pressed.
Press up or down arrow to increase or decrease imaging depth.
Press up or down arrow to increase or decrease image brightness. The brightness control
is used to increase or decrease the tissue signal brightness only.
Press to save the current image on the screen. The saved image will be stored in the GALLERY
and associated with the current exam. This button is present after the pause button is pressed.
Press to save a video of the last 4 seconds before the imaging session was paused. The
saved video will be stored in the GALLERY and associated with the current exam. This
button is present after the pause button is pressed.
Press to go to the exam information page where patient information and exam
information is entered.
Press the physical device button to save the current image to the current Exam. This
button can save either still-image or video capture depending on user’s preference. To
toggle between still-image and video capture go to HOME->SETTINGS->Physical Button.
USER’S MANUAL 15
Displays, Controls, and Indicators
Gallery main screen
The GALLERY screen appears after
you press the VIEW EXAM GALLERY
icon from the HOME screen.
BUTTON OR
INDICATOR
FUNCTION
Press to go to HOME screen.
Press to go to HOME screen.
Press to power off the device.
Press to go to the SETTINGS screen.
Press to select exam(s) for deletion.
Indicates the current battery charge.
Indicates the available mmc
storage space.
Gallery image selection screen
The GALLERY image selection screen
appears after you press the VIEW
IMAGE GALLERY icon from the HOME
screen and then select an Exam from
the GALLERY main screen.
BUTTON OR
INDICATOR
FUNCTION
Press to go to HOME screen.
Press to go to HOME screen.
Press to power off the device.
Press to go to the SETTINGS screen.
Press to select exam(s) for deletion.
Indicates the current battery charge.
Indicates the available mmc storage
space.
Press to go to the exam info page
where patient information and exam
information can be entered.
16
Displays, Controls, and Indicators
Gallery still-image view screen
The GALLERY still image view screen appears after you press the GALLERY icon from the HOME screen, then
select an Exam from the GALLERY main screen, and select a file with a ‘.dat’ prefix.
BACK
EXPORT IMAGE
AS PNG
SPINENav3D
OVERLAY
TOGGLE
EXAM/PATIENT
INFORMATION
BUTTON OR
INDICATOR
FUNCTION
Press to go back to GALLERY image
selection screen.
Press to export current image
as ‘.png’ file.
Press to go to the exam info page
where patient information and exam
information is entered.
Press button to cycle through four options:
1. 3D model on, only
2. Overlay on, only
3. Both 3D model and overlay on
4. Both 3D model and overlay off
USER’S MANUAL 17
Displays, Controls, and Indicators
Gallery video playback screen
The gallery video playback screen appears after you press the GALLERY icon from the HOME screen,
then select an Exam from the GALLERY main screen, and select a file with a ‘video’ prefix
BACK
EXPORT
IMAGE AS PNG
PLAY
SPINENav3D
OVERLAY
TOGGLE
PAUSE
EXAM/PATIENT
INFORMATION
BUTTON OR INDICATOR
VIDEO PLAYBACK FRAME
FUNCTION
Press to go back to GALLERY image selection screen.
Press to export current image as ‘.png’ file.
Press to go to the exam info page where patient information and exam
information is entered.
Press to start/resume video playback.
Press to pause video playback.
Press button to cycle through four options:
1. 3D model on, only
2. Overlay on, only
3. Both 3D model and overlay on
4. Both 3D model and overlay off
Video playback progression indicator.
18
Displays, Controls, and Indicators
Settings screen
The SETTINGS screen appears after
you press the SETTINGS icon from the
HOME screen.
BUTTON OR
INDICATOR
FUNCTION
Press to go to HOME screen.
Press to go to back to HOME screen.
Press to power off the device.
Press to go to the settings main menu.
Press to set the date.
Press to set the time.
Press to set the institution name.
Press to view device and software information.
Swipe up or down to display
more settings items.
Press to turn on/off USB storage.
Press to diagnose mmc card or to format
mmc card.
Press to turn on/off SpineNav3D overlay icon
and/or 3D model icon.
Press to toggle screen flip on/off
(180 degrees flip).
Press to choose between video or still-image action
for physical button quick press.
Press to set time before device automatically goes
to sleep.
Press to prepare device for software upgrade.
USER’S MANUAL 19
Using the Accuro
Using SpineNav3D to guide epidural and spinal anesthesia
The Accuro SPINE preset uses ultrasonic reflections acquired from multiple scan planes to obtain 3D volume scans
of the lumbar spine. The SpineNav3D technology facilitates image interpretation of individual 2D lumbar spine scans
by automating spinal bone landmark detection and depth measurements and providing a real-time assessment
of scan plane orientation in 3D. SpineNav3D makes image interpretation and measurements of the lumbar spine
anatomy simple, quick, and easy. A sonographer is not required to use the SpineNav3D preset.
To perform a clinical lumbar spine epidural or related spinal anesthesia procedure:
1.
POWER
LOCATOR™
2.
3.
1. Turn on the Accuro.
Turn on the Accuro by pressing
the power on/off button.
2. If using the RIVANNA
Locator needle guide (sold
separately), then place onto
the Accuro.
20
SELECT SPINE IMAGING MODE
3. Select the SPINE
imaging preset.
Press the SPINE icon from the
HOME screen.
4. Apply gel and
start scanning.
Apply ultrasound gel to the
lumbar spine area of the
patient in the approximate
area of the desired interlaminar
space. Scan with the Accuro
in the transverse orientation
along the patient’s lumbar
spine region. For best results,
arrange the Accuro to be
perpendicular to the spinal
anatomy.
Using the Accuro
Press the SPINE icon from
the HOME screen.
4.
SCAN WITH THE ACCURO IN THE
TRANSVERSE ORIENTATION
Tip: Arrange the scanning plane angle to
be perpendicular to the spinal anatomy.
USER’S MANUAL 21
Using the Accuro
5.
BRIGHTNESS
& ZOOM
MIDLINE
6.
7.
CROSS HAIR
& OVERLAY
SCAN IN TRANSVERSE ORIENTATION, holding Accuro
perpendicular to the spinal anatomy. Red dashed line and
cross hair indicate interlaminar space identified.
5. Optimize the image.
Use the brightness and depth
controls to optimize the image.
The depth should be set at least
3 cm deeper than the expected
depth of the epidural space.
6. Align the Accuro with the
spine mid-line.
Move the device left or right to
ensure the mid-line indicator is
centered on the imaging screen
(indicated by a dashed red line
as shown).
7. Find the interlaminar space.
Scan with the Accuro along the
lumbar spine region until the
interlaminar space is automatically
identified at the desired
22
intervertebral level (indicated by
cross hair and orange overlay
as shown). Take note of the
interlaminar space depth estimate
(top panel; orange number).
When properly aligned, both
cross-section overlay indicator
(top panel) and 3D spine
indicator (bottom panel)
achieve maximum opacity.
NOTE: Overlay and 3D indicator
can be turned on/off from the
Settings screen. The factory
default is ‘on’.
8. Mark the skin.
With the interlaminar space
identified on the display screen,
and center in the image, disengage
the Accuro Locator needle guide
and press gently against the skin.
If the Accuro Locator needle
guide is not used, then note the
skin position corresponding to
the middle of the transducer face
using a preferred method, such as
a surgical marker.
9. Perform the injection.
Remove the ultrasound instrument
from the scanning site and perform
the injection according to standard
protocol. Use the skin location
identified in Step 8 as the starting
point for needle insertion. Use
the depth reading from Step 7
as a guide to achieve the desired
insertion depth.
Using the Accuro
Move the device left or right to ensure the mid-line indicator is centered on the imaging screen
(indicated by a dashed red line as shown).
Additional scanning tips
CAUTION: For accurate imaging results, SpineNav3D must be performed in the lumbar spine
region with a transverse scan plane orientation.
CAUTION: The images and calculations provided by the Accuro instrument are intended for
use by competent users, as a diagnostic tool. The user should be aware of the instrument
specifications, accuracy, and limitations. These limitations must be considered before making
any decision based on images and quantitative values.
Tip: For best results in detecting interlaminar space anatomy, ensure that the transverse
scanning plane is perpendicular to the spinal anatomy.
Tip: For scanning orientations other than transverse, it is recommended that the SpineNav3D
overlays are turned ‘off’ from the Settings screen, or alternatively, that scanning is performed
using the BONE icon from the home screen.
USER’S MANUAL23
Using the Accuro
General purpose scanning
with the Accuro
To perform a clinical diagnostic
scan with the Accuro:
1. Turn on the Accuro.
24
2. Select the TISSUE icon from the
Home screen.
3. Optimize the image.
If needed, adjust the image using
the general purpose imaging
controls (see BONE and TISSUE
preset scanning screen).
4. Perform the diagnostic scan.
Using the Accuro
Image storage, review,
and export
Save an image to an
examination file
1. Turn on the Accuro.
2. Select desired imaging preset
icon from the HOME screen.
4. Capture image.
When the desired scan is achieved,
press the still-image button (see
BONE and TISSUE preset scanning
screen) on the Accuro touchscreen
or quickly press and release the
physical device button. The image
will be saved to the current Exam
for review in the GALLERY.
3. Perform the scan.
USER’S MANUAL25
Using the Accuro
Review saved images
in the gallery
After an exam is conducted, you
may want to review the saved
images for data entry and/or
printing. To review the saved
images in the GALLERY:
1. From the Home screen, select
VIEW EXAM GALLERY.
26
2. Next, select the desired Exam
from the menu.
3. Select the desired image
to review.
Using the Accuro
Generate exam reports and/
or save exam images to an
external computer
To annotate, generate exam
reports, or save exam images to an
external computer:
1. Connect the Accuro to an
external computer using the
micro-USB to USB cable provided
with the Accuro.
2. On the Accuro, from the
HOME screen select the
SETTINGS button.
3. In the settings main screen
select USB STORAGE and press
the “Turn On USB Storage
button”.
4. AccuroATLAS software autoruns and will enable annotation,
generation of exam reports, and/
or saving of exam images.
5. A quick start guide for the
desktop application can be
accessed by pressing “F1” key on
a keyboard or by navigating to
the Help -> Documentation menu.
Minimum system requirements
Note: In order to access the
AccuroATLAS auto-run software,
the following minimum system
requirements must be met:
Computer operating system –
Microsoft Windows® 7/8/8.1/10
Minimum processor - 1 GHz
Minimum RAM – 1 GB
USB 2.0
Minimum display – 1024 x 768
USER’S MANUAL27
Accuro Maintenance
Instrument care and
maintenance inspection
The Accuro should be inspected
for physical damage and
cracks prior to every use of the
instrument. Stop using the
Accuro if damage is noted. Failure
to do so may result in electrical
shock or fire.
Cleaning and disinfection
Disinfecting procedures
Cleaning procedure
If the instrument needs to
be disinfected, damped the
nonabrasive cloth with Cidex®
from Advanced Sterilization
Products and wipe the instrument
until thoroughly cleaned.
The Accuro instrument should be
cleaned between patient uses. To
clean the Accuro probes, follow
these instructions:
Turn off the Accuro system.
Dampen a nonabrasive cloth with
isopropyl alcohol and wipe the
probe until thoroughly cleaned.
Gently wipe the dampened
cloth over exterior surfaces
requiring cleaning.
Wipe with a dry cloth.
28
CAUTION: Damage to the
instrument may occur
Do not immerse the instrument in
disinfectant solution.
Use cleaning and disinfecting
procedures as described above.
Electromagnetic Compatibility (EMC)
The Accuro has been designed and
tested and found to comply with
the electromagnetic compatibility
(EMC) limits for medical devices
to the EN/IEC 60601-1-2:2007
standard for EMC. These limits are
designed to provide reasonable
protection against harmful
interference in a typical
medical installation.
WARNING: Use of the Accuro
adjacent to or stacked with other
equipment should be avoided
because it could result in improper
operation. If such use is necessary,
this equipment and the other
equipment should be observed
to verify that they are operating
normally.
WARNING: Use of accessories,
transducers and cables other than
those specified or provided by
RIVANNA could result in increased
electromagnetic emissions or
decreased electromagnetic
immunity of this equipment and
result in improper operation.
CAUTION: Medical electrical
equipment requires special
precautions regarding EMC and
must be installed and operated
according to these instructions.
It is possible that high levels of
radiated or conducted radiofrequency electromagnetic
interference (EMI) from portable
or mobile RF communications
equipment or other strong or
nearby radio-frequency sources,
could result in performance
disruption of the ultrasound
system. Evidence of disruption
may include image degradation
or distortion, erratic readings,
equipment ceasing to operate, or
other incorrect functioning.
If this occurs, survey the site to
determine the source of disruption,
and take the following actions to
eliminate the source(s):
•
Turn equipment in the vicinity
off and on to isolate the source
•
Relocate or re-orient the
interfering source
•
Increase distance between
source and the ultrasound unit
•
Educate clinical staff to
recognize potential EMIrelated problems
•
Restrict use of cell phones, etc.
near the ultrasound unit
•
Purchase medical
devices that comply with
IEC 60601-1-2:2007
Electromagnetic emissions
Guidance and manufacturer’s declaration – electromagnetic emissions
The Accuro is intended for use in the electromagnetic environment specified below. The customer or the user
of the Accuro should assure that it is used in such an environment.
Emissions Test
Compliance
Electromagnetic Environment — Guidance
RF Emissions CISPR
11
Group 1
The Accuro uses RF energy only for its internal function.
Therefore, its RF emissions are very low and are not
likely to cause any interference in nearby electronic
equipment.
RF Emissions CISPR
11
Class A
The Accuro is suitable for use in all establishments other
than domestic and those directly connected to the
public low-voltage power supply network that supplies
buildings used for domestic purposes.
Harmonic Emissions
IEC 61000-3-2
Class A
Voltage Fluctuations/
Flicker Emissions
Complies
USER’S MANUAL29
Electromagnetic Compatibility (EMC)
Electromagnetic Immunity
The Accuro is intended for use in the electromagnetic environment specified below. The customer or the user of the
Accuro should assure that it is used in such an environment.
Immunity Test
IEC 60601 Test Level
Compliance
Level
Electromagnetic Environment – Guidance
Electrostatic
Discharge (ESD)
±6 kV contact
±8 kV air
In
compliance
Floors should be wood, concrete or ceramic tile.
If floors are covered with synthetic material, the
relative humidity should be at least 30%.
IEC 61000-4-2
±2 kV for power-supply lines In
compliance
±1 kV for input/output lines
Mains power quality should be that of a typical
commercial or hospital environment.
Surge
±1 kV line(s) to line(s)
IEC 61000-4-5
±2 kV line(s) to earth
In
compliance
Mains power quality should be that of a typical
commercial or hospital environment.
Voltage
dips, short
interruptions
and voltage
variations on
power supply
input lines
<5% UT (>95% dip in UT)
for 0.5 cycle
Immunity
Mains power quality should be that of a typical
commercial or hospital environment. If the user of
the Accuro requires continued operation during
power mains interruptions, it is recommended
that the Accuro system be powered from an
uninterruptible power supply or a battery.
IEC 61000-4-11
< 5% UT (>95% dip in UT)
for 5 s
Power Frequency (50/60 Hz)
magnetic field
3 A/m
In
compliance
Power frequency magnetic fields should be at
levels characteristic of a typical location in a
typical commercial or hospital environment.
Conducted RF
3 Vrms
3V
IEC 61000-4-6
150 kHz to 80 MHz
Portable and mobile RF communications
equipment should be used no closer to any
part of the Accuro including cables, than the
recommended separation distance calculated
from the equation applicable to the frequency
of the transmitter.
Radiated RF
3 V/m
3 V/m
Recommended separation distance
IEC 61000-4-3
80 MHz to 2.5 GHz
Electrical fast
transient/burst
IEC 6100-4-4
40% UT (60% dip in UT)
for 5 cycles
70% UT (30% dip in UT)
for 25 cycles
IEC 61000-4-8
1.2
1.2
80 MHz to 800 MHz
2.3
800 MHz to 2.5 GHz
where is the maximum output power rating of
the transmitter in watts (W) according to the
transmitter manufacturer and is the recommended
separation distance in meters (m).
Field strengths from fixed RF transmitters, as
determined by an electromagnetic site survey,a
should be less than the compliance level in each
frequency range.b
Interference may occur in the vicinity of equipment
marked with the following symbol:
30
Electromagnetic Compatibility (EMC)
NOTE: Ut is the AC mains voltage prior to application of the test level.
At 80 MHz and 800 MHz, the higher frequency range applies.
These guidelines may not apply in all situations. Electromagnetic propagation is affected by absorption and
reflection from structures, objects and people.
a.
Field strengths from fixed transmitters, such as base stations for radio (cellular/cordless) telephones and land mobile radios, amateur radio, AM and FM radio broadcast and TV broadcast cannot be predicted theoretically with accuracy. To assess the electromagnetic environment due to fixed RF transmitters, an electromagnetic site survey should be considered. If the measured field strength in the location in which the Accuro is used exceeds the applicable RF compliance level above, the Accuro should be observed to verify normal operation. If abnormal performance is observed, additional measures may be necessary, such as re-orienting or relocating the Accuro.
b. Over the frequency range 150 kHz to 80 MHz, field strengths should be less than 3 V/m.
Electromagnetic Emissions
Recommended separation distances between portable and mobile RF communications equipment and Accuro.
The Accuro is intended for use in an electromagnetic environment in which radiated RF disturbances are
controlled. The customer or the user of the Accuro can help prevent electromagnetic interference by maintaining
a minimum distance between portable and mobile RF communications equipment (transmitters) and the Accuro
as recommended below, according to the maximum output power of the communications equipment.
Rated maximum
output of transmitter
(W)
Separation Distance According to Frequency of Transmitter (m)
150 kHz to 80 MHz
1.2
80 MHz to 800 MHz
1.2
800 MHz to 2.5 GHz
2.3
0.01
0.12
0.12
0.23
0.1
0.38
0.38
0.73
1
1.2
1.2
2.3
For transmitters rated at a maximum output power not listed above, the recommended separation distance in meters (m) can be
estimated using the equation applicable to the frequency of the transmitter, where is the maximum output power rating of the
transmitter in watts (W) according to the transmitter manufacturer.
NOTE 1:
At 80 MHz and 800 MHz, the separation distance for the higher frequency range applies.
NOTE 2: These guidelines may not apply in all situations. Electromagnetic propagation is affected by absorption and reflection from structure, objects, and people.
For transmitters rated at a maximum output power not listed above, the recommended separation distance d in
meters (m) can be estimated using the equation applicable to the frequency of the transmitter, where P is the
maximum output power rating of the transmitter in watts (W) according to the transmitter manufacturer. NOTE 1
At 80 MHz and 800 MHz, the separation distance for the higher frequency range applies. NOTE 2 These guidelines
may not apply in all situations. Electromagnetic propagation is affected by absorption and reflection from
structures, objects and people.
USER’S MANUAL 31
ALARA Principle
ALARA is the guiding principle
for the safe use of diagnostic
ultrasound. Sonographers and
other qualified ultrasound users,
using good judgment and insight,
determine the acoustic exposure
that is “as low as reasonably
achievable.” There are no set
rules to determine the correct
acoustic exposure for every
clinical situation. The qualified
ultrasound use determines the
most appropriate way to keep
exposure low and bio-effects to
a minimum, while obtaining a
clinically efficacious study.
A thorough knowledge of the
imaging modes, transducer
capability, system setup, and
scanning techniques is essential.
The imaging mode determines
the nature of the ultrasound
beam. A stationary beam (nonscanning mode) results in a more
concentrated exposure than a
scanned beam (imaging mode),
which spreads the acoustic
exposure over the scanned area.
The transducer capability depends
upon the frequency, penetration,
resolution, and field of view. The
default system presets are set
at the start of each new patient.
It is the scanning technique of
the qualified ultrasound user
along with patient body habitus
variability that determines
the system setting during the
examination.
The variable which affect the way
the qualified user implements
the ALARA principle include:
patient body size, location of
the bone relative to the focal
point, attenuation in the body,
and ultrasound exposure time.
Exposure time is an especially
32
useful variable because the
qualified user can, for the most
part, control it. The ability to limit
exposure over time supports the
ALARA principle.
Applying ALARA
The system imaging mode
selected by the user is determined
by the diagnostic information
required. B-mode imaging
provides anatomical information
and Tissue Harmonic Imaging,
which uses higher received
frequencies, provides less image
clutter, artifact, and improves the
overall resolution of the B-mode
image. Understanding the nature
of the various operational modes
allows the qualified user to most
effectively apply the ALARA
principle.
Prudent use of ultrasound requires
that patient exposure to ultrasound
be limited to the lowest acoustic
output for the shortest time
necessary to achieve acceptable
diagnostic results. Decisions that
support prudent use are based
on the type of patient, exam type,
patient history, ease or difficulty
in obtaining diagnostically useful
information, and potential localized
heating of the patient due to
transducer surface temperatures.
The user uses the system controls
to adjust image quality and limit
ultrasound acoustic output. The
system controls are divided
into three categories relative to
acoustic output: controls that
directly affect output, controls
that indirectly affect output, and
receiver controls.
Direct controls
The Accuro system does not
contain any controls that directly
affect output.
Indirect controls
The Accuro system does not
contain any controls that indirectly
affect output.
Receiver controls
The receiver controls are the gain
controls. Receiver controls do not
affect acoustic output. They should
be used, if possible, to improve
image quality before using controls
that directly or indirectly affect
output.
Other Technical Specifications
Instrument specifications
Item
Specification
Maximum dimensions
5.1 cm x 6.5 cm x 16.5 cm
Weight
0.7 lb (0.31 kg)
Display type
48.96 mm x 73.44 mm (480 pixels x 320 pixels, 166 dpi)
Operating and storage conditions
The Accuro is designed to function under the following operating and storage conditions:
Condition
Description
Storage temperature
-10°C - 50°C
Storage humidity range
20% - 95% non-condensing
Operating temperature
10°C - 40°C
Operating humidity range
20% - 80% non-condensing
Probe specifications
Item
Description
Diameter
12 mm
Frequency
5 MHz
Sector size
60°
Max scan depth
12.5 cm
Acoustic output specifications
See summary of acoustic quantities on the following page.
Battery specifications
Accuracy statement
The Accuro contains a Lithium Ion battery than is
permanently enclosed in the instrument unit. The
battery is not replaceable. A battery icon is located on
the instrument upper right display and indicates the
current charge level and when recharging is required.
The battery meets the following specifications:
The measurement accuracy of linear distances and
SpineNav3D landmark depth estimates are validated
on images of tissue-equivalent ultrasound phantoms.
Both phantoms possessed speeds of sound 1540 +/- 10
m/s. In in-vivo use, the accuracy may be greater due to
variations in speed of sound.
Item
Description
Specification
Accuracy
Battery type
Lithium ion
< 6%
Battery life
Up to 80 minutes of continuous
imaging
Linear distance measurement
accuracy (vertical and horizontal)
SpineNav3D accuracy
< 3 mm (< 10%)
Charge time
< 4 hours from an empty battery to
full charge
Battery is charged by plugging the device into the
provided USB cable and the USB cable into the
provided USB wall charge.
USER’S MANUAL33
Other Technical Specifications
Summary of acoustic quantities
Transducer Model: Accuro Operating Mode: B-Mode
Note 1: Information need not be provided for any formulation of TIS not yielding the maximum value of TIS for that mode.
Note 2:Information need not be provided regarding TIC for any TRANSDUCER ASSEMBLY not intended for transcranial or neonatal cephalic uses.
Note 3:Information on MI and TI need not be provided if the equipment meets both the exemption clauses given in 51.2 aa) and 51.2 dd).
(a)
Intended use does not include cephalic so TIC is not computed
#
No data reported.
34
Safety
Symbols
SYMBOL
DEFINITION
Type BF applied part
Manufacture date
Manufacturer of project
Follow Instructions For Use (IFU)
Serial number
Degree of protection against harmful ingress of water
USER’S MANUAL35
USER’S MANUAL
© Copyright, Rivanna Medical, LLC, all rights reserved. Unauthorized copying of this document, in addition to
infringing copyright, might reduce the ability of RIVANNA to provide accurate and current information to users.
Contact Information:
Rivanna Medical, LLC
107 E Water Street
Charlottesville, VA 22902 USA
T: 800-645-7508
www.rivannamedical.com
[email protected]
36