1
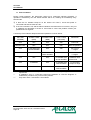
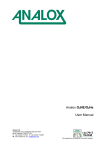
CO Clear
User Manual
CO Clear
User Manual
List of Contents
1
2
3
4
5
6
7
8
9
10
11
12
13
14
Safety information ..............................................................................................................3
Package contents checklist................................................................................................5
About the product...............................................................................................................6
Sensor characteristics and helium effect ...........................................................................7
Installation of the product...................................................................................................8
Option available .................................................................................................................9
Operation .........................................................................................................................12
Compressor connection ...................................................................................................12
Maintenance.....................................................................................................................12
Calibration ........................................................................................................................12
Fault conditions ................................................................................................................12
Specifications ...................................................................................................................12
Disposal ...........................................................................................................................12
Declaration of conformity .................................................................................................12
Document Ref: ACO-810-20 - November 2012
Page 1
CO Clear
User Manual
Document Ref: ACO-810-20 - November 2012
Page 2
CO Clear
User Manual
1
Safety information
The Analox CO Clear™ is designed to be compliant with the following standards: EN610101: 2001, IEC61010-1: 2001, CAN/CSA-C22.2 No. 61010-1 Second Edition 2004, ANSI/UL
61010-1 Second Edition 2005. It is designed to be safe at least under the following
conditions.
1) Indoor use
2) Altitude up to 2000m
3) Temperature -5°C to +40°C
4) Maximum relative humidity 80% for temperatures up to 31°C decreasing linearly to 50%
relative humidity at 40°C.
5) Mains voltage supply fluctuations not to exceed 10% of the nominal voltage
6) Impulse withstand (over-voltage) category II of IEC 60364-4-443
7) Pollution degree 2
8) Mains voltage:230V AC
110V AC
24V DC
(Not Adjustable - Instrument will be factory set)
(Not Adjustable - Instrument will be factory set)
(Not Adjustable - Instrument will be factory set)
9) Mains power:Less than 5VA – 110V AC and 230V AC Versions
Less than 5W – 24V DC Version.
10) Mains frequency - 50/60Hz
11) The Remote Alarm Repeater has ingress protection to IP43: direct sprays of water up to
60 from the vertical in accordance with EN 60529:1991 + A1. All other units have
ingress protection to IP65: low pressure water jets from all directions and totally protected
from dust in accordance with EN 60529:1991 + A1.
12) Insulation: - Reinforced insulation, class II product according to IEC536.
13) Not for use in corrosive or explosive atmospheres
14) Not approved for use in vehicles, ships or aircraft
Document Ref: ACO-810-20 - November 2012
Page 3
CO Clear
User Manual
Fuse ratings:230V AC, 500mA,
110V AC, 500mA,
9-24V DC, 200mA,
F rating 250V (20mm x 5mm Glass Cartridge)
F rating 250V (20mm x 5mm Glass Cartridge)
AS rating 250V (20mm x 5mm Glass Cartridge)
Battery Back-Up:The Battery Back-Up is non repairable.
refurbishment/replacement.
Please return faulty units to Analox for
4 to 20mA (or 0-1V) Output:Connected equipment must meet the requirements for reinforced insulation.
NOTE - If the equipment is used in a manner not specified by the manufacturer, the
protection provided by the equipment may be impaired.
Document Ref: ACO-810-20 - November 2012
Page 4
CO Clear
User Manual
2
Package contents checklist
On receipt of the Analox CO Clear™ please check you have the following:
1)
2)
3)
4)
5)
6)
7)
Analox CO Clear™ main unit and Alarm Repeater
User Manual
Test Certificate
Rawl Plugs and Screws for Wall Mounting
Drilling Template
Analox CO Clear™ Window Sticker
Analox CO Clear™ wall notice
Any optional items ordered such as:
1)
2)
3)
4)
5)
6)
Battery back-up
Relay junction box
Additional 6mm Push-fit connector
Additional ¼ inch Push-fit connector
6mm tubing
¼ inch tubing
Document Ref: ACO-810-20 - November 2012
Page 5
CO Clear
User Manual
3
About the product
Two variants of the Analox CO Clear™ are available.
The Analox CO Clear™ is designed to detect the presence of Carbon Monoxide in air or
Nitrox gas compressors.
The Analox CO Clear He™is designed to detect the presence of Carbon Monoxide in Heliox
(HeO2) gas compressors. This variant can be identified by the warning sticker shown below.
Different versions of the instrument allow operation from:
1) 210/250V AC supply
2) 110/120V AC supply
3) 9-24V DC supply
The Analox CO Clear™ is intended to be used as a permanent installation. It provides a
digital readout of Carbon Monoxide and 2 audio and visual alarms to warn you of elevated
levels of Carbon Monoxide. The alarms are set with a small hysteresis (0.5ppm) which means
the CO concentration has to fall below the alarm set point before the alarm cancels. The
instrument uses an Electrochemical cell together with state of the art technology, built in an
IP65 splash proof housing and is designed to provide long, trouble free service, with minimum
maintenance.
Optional items fitted to or supplied with the unit may include the following:
1) One or two medium duty relays
2) Test Gas and control valve
3) Battery Back-Up
4) 4-20mA output
Document Ref: ACO-810-20 - November 2012
Page 6
CO Clear
User Manual
4
Sensor characteristics and helium effect
The carbon monoxide cell is a capilliary type sensor. These types of sensors are affected by
the presence of Helium (He), and in such cases give higher than anticipated outputs. For this
reason the Analox CO Clear He™ has been developed for use in Heliox gas applications (e.g.
Saturation diving).
For a detailed explanation of what the helium effect is and how it affects the measurements of
carbon monoxide please refer to document ACO-MISC01-00 Helium sensitivity effect
available from Analox.
The basic effect of He in the sample gas is to increase the carbon monoxide sensitivity. This
means that as the amount of He increases the sensitivity of the CO cell increases by what we
call the ‘compensation factor’ (see Table 1).
For example, if a CO Clear He™ measured 3ppm CO in a tank containing 99% He, the actual
CO content would be 2.1ppm (3 x 0.7 = 2.1ppm).
The look-up table below (Table 2) shows a simplified representation of the helium effect to
quickly identify the compensation factor to be applied to your gas measurement.
NOTE: The compensation factors in Table 1 are based on a CO Clear He™ calibrated with a
mix containing 79% He balance as provide in the CO Clear He™ calibration kit (see
calibration section for details)
% Helium
in mix
79 to 83
83 to 89
89 to 94
94 to 99
Compensation
factor
1.0
0.9
0.8
0.7
Table 1
The helium effect increases as the He content in the sample gas increases, so it is important
that the correct calibration gases are used. For this reason the instrument MUST be
calibrated using 21% O2 in He balance calibration gas (see Calibration section for details).
This ensures that any measurement errors due to the helium effect are fail-safe.
Document Ref: ACO-810-20 - November 2012
Page 7
CO Clear
User Manual
5 Installation of the product
Wall mounting
The Analox CO Clear™ should be mounted onto a wall or vertical flat surface using the
mounting lugs; a paper drilling template is included in Section 12 of this manual. Use the
paper template to drill the 4 required holes in the wall and use the Rawl plugs and screws
provided to mount the unit. It is not necessary to dismantle the Analox CO Clear™ main unit
in any way prior to installation. You need to ensure the mains plug, fused at 3 amps is in easy
reach of a power socket.
The Alarm Repeater housing also has wall mounting lugs.
Wiring installation
It is necessary to identify the model of Analox CO Clear™ prior to installation. The Calibration
Certificate accompanying each instrument will clearly identify the information required.
***
ENSURE THAT THE
ELECTRICAL SUPPLY TO THE INSTRUMENT
IS SWITCHED OFF
WHILST INSTALLING ANY WIRING
***
Document Ref: ACO-810-20 - November 2012
Page 8
CO Clear
User Manual
6
Option available
AC supply models
A mains powered Analox CO Clear™ is pre-wired with a mains cable, fitted with a plug suited
to the destination country. Where internal plug fuses are fitted, these are 3 Amp. Ensure that
the unit is connected to the correct supply voltage (i.e. 110 or 230V AC). Where no fuse is
fitted in the plug, the instrument should be powered from a 3 Amp fused outlet. The Analox
CO Clear™ is fitted with an internal fuse, which is rated at 500mA.
DC supply models
A DC powered Analox CO Clear™ require a DC supply in the range 9-24V DC. A 2m cable is
factory fitted to the instrument. The DC supply should be connected to this cable as follows:
1) Blue wire negative (0Volts)
2) Red wire positive (+9-24Volts)
Alarm repeaters
The Alarm Repeater has four status indicators and a Mode button, which mimic the button
and indicators on the main Analox CO Clear™ enclosure.
An 8 metre, 8 core cable is pre-wired to the Analox CO Clear™ on units to be fitted with an
alarm repeater. This ensures that for a basic installation, there is no need to dismantle the
Analox CO Clear™ main unit. A maximum of three repeaters may be fitted in a daisy chain
configuration.
To connect and disconnect a “Quick Connect” Repeater:
1) Disconnect the power supply from the Analox CO Clear™.
2) Insert the connector on the end of the cable into the socket on the base of the Alarm
Repeater.
3) Restore power to the Analox CO Clear™. Press the mode button on the repeater once,
and ensure that the four indicators flash. Note that in the presence of a genuine alarm,
the test feature is disabled.
Alarm relay output models
You may have ordered your Analox CO Clear™ with a relay. The relay contacts are ‘VoltFree’ single pole Changeover, rated 250vAC/30vDC 2 Amps. The relay is non-latching. This
means the relay will only initiate when gas is present. As standard the relays are setup in a
Fail-Safe configuration. This means that the relay is energised during normal operation.
Please note that on power up the relay is only energised after the 40 second warm-up period.
See Figure 1 for details of how the relay should be connected.
Relay wiring
The cable gland is for cables of outside diameter between 5 and 7mm, if cable fitted is outside
that range, a suitably specified cable gland must be used. Ensure that the gland is properly
tightened. Test that the cable is adequately gripped by the cable gland. Ensure that the cable
is suitable for purpose, the load is within the limits of the relay, 240VAC/28VDC, 2Amps, and
the insulation of the external circuit meets the requirements for basic insulation
240VAC/28VDC, 2 Amps. After completing wiring, ensure that the terminal box cover is
securely replaced.
Document Ref: ACO-810-20 - November 2012
Page 9
CO Clear
User Manual
RELAY TERMINAL BOX TERMINATIONS
Figure 1 – Relay Connections
Battery back-up
When this option is fitted the Analox CO Clear™ should remain powered for at least 30 hours
to ensure the Battery Back-up is fully charged and will provide back-up power for a minimum
of 4 hours in the event of Mains power failure.
Once the Analox CO Clear™ installation has been completed a calibration should be
performed in accordance with section 9 of this manual.
Document Ref: ACO-810-20 - November 2012
Page 10
CO Clear
User Manual
4 to 20mA output models
You may have ordered your Analox CO Clear™ with a 4 to 20mA output. A 2m cable is
factory fitted to the instrument. The 4 to 20mA output current is generated by the instrument.
The customer system should be connected to this cable as follows and as per the following
drawing:
3) Blue wire 4 to 20mA negative
4) Red wire 4 to 20mA positive
(Max load 150 Ω)
Document Ref: ACO-810-20 - November 2012
Page 11
CO Clear
User Manual
7
Operation
Normal operation
When the Analox CO Clear™ is turned on it will take approximately 40 seconds to warm up
and stabilise. During this period, the 'Good/OK' and 'Fault' status indicators will be turned on.
After the initial stabilising period has expired, the 'Fault' status indicator will turn off. The
'Good/OK' status indicator will be illuminated and flash off briefly every few seconds,
indicating normal operation. The status indicators on any Alarm Repeaters will mimic this
operation. On display models the display will briefly read ‘.8.8.8.8’ on power up before
reverting to the CO reading.
Alarm indications
If the Analox CO Clear™ detects a CO concentration which is greater than the first alarm
level, then the 'Alarm 1' indicator will begin to flash and the buzzer will sound at its slow
speed.
If the measured concentration of CO continues to rise above the second alarm level, then the
‘Alarm 2' indicator will begin to flash and the buzzer will sound at its medium speed. The
'Alarm 1' indicator will continue to flash.
Mode Button
OK Indicator
Alarm 1 Indicator
LCD Display
Alarm 2 Indicator
Fault Indicator
On standard units the alarms are self-cancelling when the CO level drops below the alarm
limits.
Momentarily pressing the 'Mode' button on either the Analox CO Clear™ or any Alarm
Repeaters, in the absence of any alarm conditions, causes an alarm test to be performed.
The indicator lamps will flash 4 times and the buzzer will sound.
In all circumstances the Alarm repeater will mimic the status indications and buzzer of the
main unit.
Units fitted with relays are configured such that relays may operate in conjunction with Alarm1
or Alarm2. They are factory set to be energised in the absence of alarms, and de-energised in
the presence of alarms. They may be factory configured in the opposite sense if required.
Document Ref: ACO-810-20 - November 2012
Page 12
CO Clear
User Manual
8
Compressor connection
Connection of the Analox CO Clear™ to the compressor will require a pressure regulator. The
pressure regulator must fit the following specifications:
Maximum inlet pressure 200Bar
Outlet pressure 0-3 BarG
For systems where 1/4" pipe work is used the push fitting in the sensor housing must be
swapped out.
Remove the sensor housing as described on page 15 and carefully remove the 6mm push
fitting and replace with the provided 1/4" push fitting and tighten, replace the sensor housing
into the bulkhead.
Document Ref: ACO-810-20 - November 2012
Page 13
CO Clear
User Manual
To ensure trouble free operation of the CO Clear™ a 2 stage pressure regulation should be
used. The recommended pressure regulator can be obtained from The West Group Ltd
whose contact details are listed below.
The West Group Ltd
29 Aston Road
Waterlooville
Hampshire
United Kingdom
PO7 7XJ
Tel:
Fax:
Web:
+44 (0)2392 266 031
+44 (0)2392 240 323
www.westgroup.co.uk
UK Version 2 Stage Regulator for the Analox CO Clear
Inlet – 200Bar, ¼” BSPP
Outlet – 2Bar, 6mm Push In
West Group Part Number – TPN-0967
US Version 2 Stage Regulator for the Analox CO Clear
Inlet – 200Bar, ¼” NPT
Output – 2Bar, ¼” Push In
West Group Part Number – TPN-0966
If different inlet or outlet pressures are required please contact Steve Elliott at The West
Group Ltd for more technical information using the above telephone number.
Document Ref: ACO-810-20 - November 2012
Page 14
CO Clear
User Manual
9
Maintenance
Recommended calibration interval
The Analox CO Clear™ should be calibrated on a regular basis to maintain measurement
accuracy. It is recommended that a calibration should be performed every six months.
Carbon Monoxide sensor replacement
The Carbon Monoxide sensor is mounted in a special housing on the under-side of the
Analox CO Clear™ enclosure. This housing allows the Carbon Monoxide sensor to be easily
replaced when necessary. To ensure continuous operation it is recommended to replace the
sensor at 18 month intervals.
The procedure for replacing the cell is as follows:
PLEASE NOTE: Do not pull on hose connection to remove the sensor. Use a flat blade
screw driver as described below.
1) Switch off the instrument
2) Use a large flat blade screw driver to release the sensor housing. This is done by
inserting the blade into the recess under the flange of the housing and twisting the
screwdriver.
3) The top of the Carbon Monoxide sensor will now be visible. Gently pull the sensor
housing downwards to release it from the bulkhead. It will be retained by an electrical
connector.
4) Carefully pull the electrical connector from the rear of the Carbon Monoxide sensor.
Document Ref: ACO-810-20 - November 2012
Page 15
CO Clear
User Manual
5) Fit the new Carbon Monoxide sensor to the connector, note it will only connect in one
orientation.
Note: The new Carbon monoxide sensor is supplied in a housing, ready to be fitted.
6) Carefully feed the sensor wire and sensor housing through into the bulkhead and then
firmly push the housing into the Bulkhead on the under-side of the Analox CO Clear™
enclosure.
7) Switch the instrument back on.
8) Allow the sensor to settle for 1 hour.
9) Perform a Zero and Span Calibration Check to calibrate the new sensor.
10) Test the operation of the Carbon Monoxide alarms (see Alarm Check section).
The sensor in the Analox CO Clear™ is an electrochemical device and contains a caustic
Electrolyte, which can have the following effects:
Skin
Ingestion
Eye
-
First Aid Procedures
Skin
Ingestion
-
Eye
-
Skin contact could result in a chemical burn
Can be harmful or fatal if swallowed
Contact can result in permanent loss of sight
Wash the effected area with lots of water and remove
contaminated clothing. If stinging persists get medical attention
Drink a lot of fresh water. Do not induce vomiting. Seek medical
attention.
Wash with a lot of water for at least 15 minutes and get medical
help immediately.
Document Ref: ACO-810-20 - November 2012
Page 16
CO Clear
User Manual
10 Calibration
The Analox CO Clear™ should be calibrated on a regular basis to maintain measurement
accuracy. It is recommended that a calibration should be performed every six months.
In order to perform a calibration check, you will need the following equipment:
Air and Nitrox Kit (for use with Analox CO Clear™)
1)
Zero Gas, 20.9% O2 in N2 balance – (Part No. SA7L2003)
2)
Span Gas, 10ppm CO/20.9% O2 in N2 balance - (Part No. SA7L20153)
3)
Control valve
Heliox Kit (for use with Analox CO Clear He™)
1)
Zero Gas, 20.9% O2 in He balance – (Part No. SA7L2009)
2)
Span Gas, 10ppm CO/20.9% O2 in He balance - (Part No. SA7L20154)
3)
Control valve
Connecting of the gas cylinder
Correct flow rate
Zero calibration
Note: When setting the gas flow rate on the control valve, so long as the flow indication ball
is raised off the bottom of the gas flow indicator this is sufficient flow to calibrate the
instrument accurately.
1) Fit the control valve to the zero gas.
2) Push the calibration valve pipe fully into the elbow push-fit connector of the sensor
housing of the unit.
3) Fully open the control valve by turning the control knob anti-clockwise.
4) Allow the gas to flow for 2 minutes.
5) Enter Technician Mode by pressing the mode switch 3 times. If entered successfully the
green LED will flash off for 1.5 seconds and on for 0.5 of a second.
6) Select Zero Calibration by pressing the mode switch 5 times. The Red Alarm 1 LED will
light up to show you are now in this mode.
7) Press the mode switch 2 times to start the Zero Calibration, the Red Alarm 1 LED will
turn off and the Green LED will continue to flash.
8) Wait one minute for the instrument to adjust. When the instrument has a new calibration
value, the buzzer will sound one bleep and all the LED’s will be off.
9) Accept this new calibration value by pressing the mode switch 2 times. The green LED
will flash to show the instrument has accepted the new Carbon Monoxide value.
10) To return to normal operation, press the mode switch once. The LED’s and buzzer will
illuminate / sound 4 times before returning to normal operation.
11) Fully close the control valve by turning the control knob clockwise.
Document Ref: ACO-810-20 - November 2012
Page 17
CO Clear
User Manual
12) Remove the calibration valve pipe from the elbow push-fit connector of the sensor
housing of the unit.
Note: If at any time you would like to abort Zero Calibration, press the mode switch once
after step 9), this will bring you back to technician mode without accepting the new
Carbon Monoxide value. Press the mode switch once again, this will bring you back
to normal operation, the LED’s and buzzer will illuminate / sound 4 times.
Alternatively, disconnect the power supply to the Analox CO Clear™, wait a moment
and re-connect power.
Span calibration
Note: When the span calibration gas is applied both Alarm 1 and Alarm 2 will be activated.
When setting the gas flow rate on the control valve, so long as the flow indication ball
is raised off the bottom of the gas flow indicator this is sufficient flow to calibrate the
instrument accurately.
1) Fit the control valve to the span gas.
2) Push the calibration valve pipe fully into the elbow push-fit connector of the sensor
housing of the unit.
3) Fully open the control valve by turning the control knob anti-clockwise.
4) Allow the gas to flow for 2 minutes.
5) Enter Technician Mode by pressing the mode switch 3 times. If entered successfully
the green LED will flash off for 1.5 seconds and on for 0.5 of a second.
6) Select Span Calibration by pressing the mode switch 4 times. The Red Alarm 2 LED
will light up to show you are now in this mode.
7) Press the mode switch 2 times to start the Span Calibration, the Red Alarm LED will
turn off and the Green LED will continue to flash.
8) Wait one minute for the instrument to adjust. When the instrument has a new
calibration value, the buzzer will sound one bleep and all the LED’s will be off.
9) Accept this new calibration value by pressing the mode switch 2 times. The green LED
will flash to show the instrument has accepted the new Carbon Monoxide value.
10) To return to normal operation, press the mode switch once. The LED’s and buzzer will
illuminate / sound 4 times before returning to normal operation.
11) Fully close the control valve by turning the control knob clockwise.
12) Remove the calibration valve pipe from the elbow push-fit connector of the sensor
housing of the unit.
Note: If at any time you would like to abort Span Calibration, press the mode switch once
after step i), this should bring you back to technician mode without accepting the new
Carbon Monoxide value. Press the mode switch once again, this should bring you back to
normal operation, the LED’s and buzzer will illuminate / sound 4 times. Alternatively,
disconnect the power supply to the Analox CO Clear™, wait a moment and re-connect
power.
Alarm check
To verify that the indicators and the audible alarms are working, press the Mode switch on
the Analox CO Clear™. The indicators and the audible alarm will pulse four times.
To verify that the alarm levels are correctly set, you will need the following equipment:
1)
2)
Test Gas cylinder containing 10ppm Carbon Monoxide, 21% Oxygen in the
appropriate balance gas for that particular instrument
Control valve
Document Ref: ACO-810-20 - November 2012
Page 18
CO Clear
User Manual
Then follow the procedure below:
1) Fit the control valve to the test gas cylinder.
2) Push the calibration valve pipe fully into the elbow push-fit connector of the sensor
housing of the unit.
Fully open the control valve by turning the control knob anti-clockwise.
After a short time the 'Alarm 1' alarm should operate.
After further period of time the ‘Alarm 2’ alarm should operate.
Fully close the control valve by turning the control knob clockwise.
Remove the calibration valve pipe from the elbow push-fit connector of the sensor
housing of the unit.
3)
4)
5)
6)
7)
Adjusting alarm set points
The following procedure is very similar for setting either Alarm 1 or Alarm 2:
1) Whilst the Analox CO Clear™ is switched on, enter Technician Mode by pressing the
2)
3)
4)
5)
6)
7)
8)
mode switch 3 times. If entered successfully the green LED will flash off for 1.5 seconds
and on for 0.5 of a second.
From Technician Mode, press the Mode switch 2 times to set Alarm 1 or 3 times to set
Alarm 2. The buzzer will bleep on each press. If this is done successfully, the instrument
will show the Fault indicator and the appropriate Alarm indicator. If this is done
inadvertently, or if another mode is selected, press the Mode switch once to return to
Technician Mode and then repeat this selection.
The display will indicate the present value of the alarm.
Press the Mode switch twice to proceed to define a new setting, or once to abort and
return to Technician Mode.
When setting Alarm 1 or Alarm 2, the display will show the maximum display value (full
scale).
Press and hold the Mode switch. The displayed value will count down at approximately
one count per second. Release the switch when the displayed value is equal to the
desired alarm value.
Upon release of the Mode switch, the display will continue to show the new value. Accept
the new setting by pressing the Mode switch twice, or alternatively ignore the new setting
by pressing the switch once. This will return to the Technician Mode.
To exit from Technician Mode, press the Mode switch once. The Analox CO Clear™ then
restarts by performing the normal power on sequence (4 flashes).
Document Ref: ACO-810-20 - November 2012
Page 19
CO Clear
User Manual
11 Fault conditions
During normal operation, the instrument carries out a continuous self-test procedure. If
operation is satisfactory, the ‘OK’ status indicator will be on, blinking off momentarily every
few seconds.
1) If there are no indicator lamps lit on the Analox CO Clear™, check that power is
2)
connected and that the fuses are OK.
If the 'OK' indicator is off, and the alarm indications are believed to be incorrect, carry out
a calibration as described in section 5. If this fails to correct the problem contact your
qualified service engineer.
A summary of the indicator lamps and buzzer operations is shown below.
OK LAMP
(GREEN)
ALARM1 LAMP
(RED)
ALARM2 LAMP
(RED)
FAULT LAMP
(YELLOW)
MEANING
OFF
OFF
OFF
OFF
Power Off
ON/ BLIP OFF
OFF
OFF
OFF
Normal Operation
OFF
FLASHING AND
SLOW BUZZER
OFF
OFF
CO Level is
> 3.0ppm
*
FLASHING
FLASHING AND
MED. BUZZER
OFF
CO Level is
> 5.0ppm
*
OFF
*
**
***
OFF
OFF
OFF
FLASHING AND
SLOW BUZZER
Calibration Error
at Switch On
**
OFF
FLASHING
OFF
FLASHING AND
FAST BUZZER
CO Cell Fault
Output too High
OFF
FLASHING
FLASHING
FLASHING AND
FAST BUZZER
System Fault ***
Note that Alarm levels may be set at different values, depending on customer
requirement
A Calibration error or a Cell fault requires the attention of a Service Engineer. A
recalibration procedure may overcome the problem.
Only when Alarm 1 and Alarm 2 are enabled
Document Ref: ACO-810-20 - November 2012
Page 20
CO Clear
User Manual
12 Specifications
CO Range
Inlet Pressure Range
0.0 to 10.0ppm
1 – 3 Bar Gauge (14.5 - 42.5 PSI)
Calibration gas flow rate
0.5-1.0 Litres/min (approx.)
Sensor Accuracy
Response Time (T90)
Operating Temperature
Temperature Effect
Atmospheric
Pressure
Range
Warm Up Time
Weight (without cables)
Better than ±1ppm at Constant Temperature and Pressure*
<90 Seconds
0 - 40 C (32 – 104 F)
0.04% of Reading/ C
800mbar to 1200 mbar
Dimensions
Analox CO Clear
IP Rating
Analox CO Clear
2 Minutes
Analox CO Clear
400g (0.8lbs)
175x130x70 mm
(6.8x5.11x2.75inches)
IP65
Sensor Type
Sensor Life (Expected)
Sensor Warranty
Electronics Warranty
Display
Alarms
Electro-Chemical Cell
2 years at Standard Temperature and Pressure
9 months graded
1 year
4 digit Liquid Crystal Display
2 x Alarm Visual Indicators
1 x System Fault Indicator
1 x Status Indicator
Common Audible Alarm
Relays
One or Two Optional Alarm Relays with changeover contacts assigned
to Alarm 1, Alarm 2 or System Fault.
Contact Rating 230V AC or 30V DC at up to 2A.
Contacts are non-latching Fail-Safe.
Outputs
2 wire 4 to 20mA (Max load 150 Ω)
Power Supply Options
Option selected at time of manufacture/order
a) 210/250V A.C. supply
b) 110/120V A.C. supply
c) 9-24V DC supply
• This accuracy applies to an instrument calibrated using Nitrogen balance gas and the
monitoring of Nitrogen balance gas only.
Document Ref: ACO-810-20 - November 2012
Page 21
CO Clear
User Manual
13 Disposal
According to WEEE regulation this electronic product can not be placed in household waste
bins. Please check local regulations for information on the disposal of electronic products in
your area.
Document Ref: ACO-810-20 - November 2012
Page 22
CO Clear
User Manual
14 Declaration of conformity
Number:
Manufacturers name:
Manufacturers address:
ACO-902-01
Analox Sensor Technology Ltd
15 Ellerbeck Court
Stokesley Business Park
Stokesley
North Yorkshire
TS9 5PT
It is declared that the following product:
Product name:
Product code:
Conforms to all applicable requirements of:
Analox CO Clear
ACO
EN50270:1999
EN61000-6-3:2001+A11:2004
BS EN 61010-1:2001
IEC 61010-1(2ed)
AS61610.1-2003 (Australia & New Zealand)
The above product complies with the requirements of the EMC Directive 89/336/EEC, as
amended.
The above product complies with the requirements of the Low Voltage Directive 73/23/EEC, as
amended.
The above product is approved for use in the USA and Canada. CCSAUS, Master Contract
239512, Certificate 1909026
The above product is approved for use in Europe, CB Test Certificate NO44944
The above product complies with the Australian and New Zealand EMC requirements for CTick marking
Signed on behalf of:
Date:
Analox Sensor Technology Ltd
02 June 2008
Signed:
Name:
Position:
Mark Lewis
Managing Director
Document Ref: ACO-810-20 - November 2012
Page 23