1
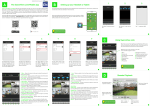
NHD-POE Series 720p Network Video Camera For use with Swann 720p POE NVRs EN INSTRUCTION MANUAL 1 Before You Begin Limited Warranty Terms & Conditions Swann Communications warrants this product against defects in workmanship and material for a period of one (1) year from its original purchase date. You must present your receipt as proof of date of purchase for warranty validation. Any unit which proves defective during the stated period will be repaired without charge for parts or labor or replaced at the sole discretion of Swann. The end user is responsible for all freight charges incurred to send the product to Swann’s repair centers. The end user is responsible for all shipping costs incurred when shipping from and to any country other than the country of origin. The warranty does not cover any incidental, accidental or consequential damages arising from the use of or the inability to use this product. Any costs associated with the fitting or removal of this product by a tradesman or other person or any other costs associated with its use are the responsibility of the end user. This warranty applies to the original purchaser of the product only and is not transferable to any third party. Unauthorized end user or third party modifications to any component or evidence of misuse or abuse of the device will render all warranties void. By law some countries do not allow limitations on certain exclusions in this warranty. Where applicable by local laws, regulations and legal rights will take precedence. For Australia: Our goods come with guarantees which cannot be excluded under Australian Consumer Law. You are entitled to a replacement or refund for a major failure and for compensation for any other reasonably foreseeable loss or damage. You are also entitled to have the goods repaired or replaced if the goods fail to be of acceptable quality and the failure does not amount to major failure. Introduction Congratulations on your purchase of this Swann 720p Network Video Camera with Power Over Ethernet. You’ve made a fine choice for keeping a watchful eye over your home or business. The NHD-POE cameras deliver brilliant and amazingly clear high definition images and videos in both day and nighttime conditions even in complete darkness. Designed in an elegant, unobtrusive weatherproof casing with an integrated 3-axis mounting bracket, the NHD camera is versatile enough to be installed on walls and ceilings - indoors or outdoors and will be an excellent addition to your Swann POE NVR monitoring solution. Layout of the Camera FCC Verification NOTE: This equipment has been tested and found to comply with the limits for Class B digital device, pursuant to part 15 of the FCC Rules. These limits are designed to provide reasonable protection against harmful interference in a residential installation. This equipment generates, uses and can radiate radio frequency energy and, if not installed and used in accordance with the instructions, may cause harmful interference to radio or television reception, which can be determined by turning the equipment off and on, the user is encouraged to try to correct the interference by one or more of the following measures: • Reorient or relocate the receiving antenna • Increase the separation between the equipment and the receiver • Connect the equipment into an outlet on a circuit different from that to which the receiver is connected • Consult the dealer or an experienced radio/TV technician for help These devices comply with part 15 of the FCC Rules. Operation is subject to the following two conditions: • These devices may not cause harmful interference, and • These devices must accept any interference received, including interference that may cause undesired operation. Important Note: All jurisdictions have specific laws and regulations relating to the use of cameras. Before using any camera for any purpose, it is the buyer’s responsibility to be aware of all applicable laws and regulations that prohibit or limit the use of cameras and to comply with the applicable laws and regulations. WARNING Modifications not approved by the party responsible for compliance could void user’s authority to operate the equipment. IMPORTANT SAFETY INSTRUCTIONS • • 2 Make sure product is fixed correctly and stable if fastened in place. Do not operate if wires and terminals are exposed. 1 3 4 2 1 Mounting Bracket - Allows the camera to installed either on a wall or ceiling. 2 Camera Housing - Contains the camera, associated circuitry and electronic components. 3 IR LEDs - These infrared LEDs are used by the camera to illuminate targeted areas when in complete or near-total darkness. 4 Illumination Sensor - Detects the amount of incoming light and turns on the IR LEDs for night vision when necessary. Quick Reference Default Camera Account Configuration Username:admin Password:12345 3 Connection Guide Installation Connecting the Camera POE: This camera uses Power Over Ethernet. This technology allows the camera to be directly powered over the LAN cable from the NVR itself. Reset button 1.Connect the camera’s Network (LAN) port to the extension cable’s Ethernet plug. Then connect the other end of the Ethernet extension cable to any available POE Network Camera port on the back of your POE NVR. Note: If for some reason you cannot use POE you will need to use a 12volt 2amp DC (Center Pin Positive) PSU (not supplied) connected to the camera’s DC Power Socket. The camera is very flexible, and can be installed practically anywhere. Some of the things you’ll have to consider when choosing a location are: • What you want to monitor, and where you’ll get the best view of it. • How you’re going to connect the camera to your monitoring system. Remember that cables and connections should be kept out of the weather. • How to keep the camera out of harm’s way. Tips & Tricks • Try to place the camera in a position that a potential security threat will find it difficult to avoid detection. A strategy which is often effective is to monitor entrances and exits after all, a security threat has to get in somewhere. • Ensure the camera is located close enough to what you want to monitor to capture the required details. For example, if you wish to capture the details of a face, the camera may need to be located within fifteen feet (about 5m) of the subject. This is also true if trying to read printed information - such as a vehicle’s registration plate. • Install the camera where it’s out of reach or not easily accessible by vandals. For example, under the eaves of a roof or high up in protected corners of a wall. The higher the camera is mounted, the harder it’ll be for vandals to interfere with it. • Typically, the best view is obtained approximately 7ft (2m) to 10ft (3m) high, looking slightly downwards. • While the camera is sealed, robust and able to handle the weather, long-term exposure to direct sunlight (particularly UV) and moisture will eventually cause a degradation in performance, so if it’s going to be installed outdoors, make sure it’s in a sheltered spot. • The camera’s night vision will give well-exposed images if the area is dark. However, if there’s a bright light source in the camera’s view (a streetlight, car headlights or similar) then it might not engage night vision mode. DC Power Socket (Optional) IMPORTANT! When connecting network cables: 4 Choosing a Location • When plugging or unplugging the network cable, hold the plug portion of the cable. When unplugging, do not pull on the network cable but unplug while pressing down on the lock. • Never place strain of any kind on the network cable connection. It’s designed to clip into place to prevent slippage, but it won’t support any weight and can be easily broken by a sharp tug. Exercise caution. • Ensure that cables are sheltered from moisture, weather and sunlight. The network cable connection was designed and intended for indoor use with computer networking - while it’s ideal for handling the massive data loads that network cameras require, it’s not weatherproof. • If you install the camera outside of your home, we highly recommend using waterproof tape to wrap the cable connection area between the camera’s Network (LAN) port and the extension cable’s Ethernet plug. Use as much as is necessary for the layer of tape to protect the connection. This will help prevent water or moistuire from leaking into the cable which can cause the network cable connection to degrade over time or stop working. Mounting Instructions The camera can be mounted onto a flat surface using screws. The surface must have sufficient strength to hold the camera. Materials such as hardwood, brick or masonry are good options, and we’ve included all the gear you’ll need to mount it there (except the tools - sorry, you’ll still need your own drill). You can mount the camera onto a metal surface, but you’ll need to supply your own mounting hardware. To mount the camera: • Position the camera in the location you want to mount it, and mark the screw holes on the surface to position the screws. Then, using appropriate screws for the surface you’re fixing the camera to, screw the camera into place. • If you’re mounting to a wooden surface, then screw the camera directly to the surface. • If you’re mounting to a masonry surface (bricks, concrete or similar) then you’ll need to use the included wall plugs. 5 Installation Camera Configuration Adjusting the Camera Settings Adjusting the Camera Angle Use the supplied L-wrench to loosen the hex screws on the stand: • To tilt up and down, loosen the screw indicated by 1 . • To rotate left and right, loosen the two screws indicated by 2. • To adjust orientation, loosen screws indicated by 3 (hidden behind the lens hood). This enables you to spin the camera so no matter what direction the camera is facing, your images will be oriented correctly. 3 Viewing the Camera on your Swann NVR • After you’ve connected the camera to your Swann NVR, the camera will be automatically detected and assigned an IP address when you turn on your NVR. If the camera is not detected, check that you have the Ethernet cable inserted correctly. • Provided if all network connections have been correctly set up, the camera should automatically appear on-screen shortly after being plugged in. Cameras are assigned to the first available channel by your NVR in this case, irregardless of which Network Camera port that it was connected to. You can still, however, display the camera on a different channel via the NVR Menu -> IP Camera -> Edit menu. Please consult your NVR’s user manual for an explanation on how to assign cameras to available channels. If you want to remove the camera from your NVR display, you can either physically disconnect the camera from your NVR or go to the NVR Menu -> IP Camera -> Edit menu to manually remove it from your NVR display. Please consult your NVR’s user manual for an explanation on how to remove cameras from channels. Viewing the Camera on SwannView Link PC Software 6 • Please consult the user manual included with your NVR to learn more about what setting does. 2 Camera Configuration • If your PC connects to the same local network as the camera and has SwannView Link software installed, you can access the camera via its IP address using SwannView Link. If you don’t know what the camera’s IP address is, go to your NVR’s IP Camera menu to find out. • To log on to the camera via SwannView Link: In Connect Mode, select IP Address, enter the IP address in the IP Address box and then enter the camera’s username and password. The default user name and password are admin and 12345. • On the NVR Menu screen, click Display, select camera and then click Camera Parameter Set button to display the Camera Parameter Setting window. On this window, you can customize how the camera captures images according to the environment where it is installed. The settings which are available for you to configure are as follows: Anti-flicker, Exposure Mode, Contextual, Day/Night, Backlight, Mirroring and Rotation. 1 Remember to tighten the screws back securely to lock the camera’s position in place after you’ve finished adjusting the viewing angle of the camera. • • When you’re finished, click Login. The camera’s live video feed will appear on the SwannView Link interface. SwannView Link provides a quick and easy way for you to configure many aspects of the camera as well as create and manage user accounts for access to the camera. Resetting the Camera • If you’ve changed the Admin account’s password on your camera and forgotten it, you can always use the Reset button to default the camera’s Admin password back to its factory default. • To reset the camera: Unplug the camera’s LAN connector from the extension cable, then press and hold the Reset button and plug the LAN connector back into the extension cable (while still holding down the Reset button), wait a couple of seconds then release the button and the cameras settings will be reset to factory default. Troubleshooting Q: The NVR is not detecting the camera. A: Ensure that the connection between the camera and NVR is direct - i.e. no hubs, switches, adapters or other devices. Ensure you’re using only the supplied cable. Ensure that all cables are properly connected and secure. If this doesn’t work, try using a different channel on the NVR - reboot the system between connections to ensure a proper IP address refresh. If this doesn’t work, then try a different network cable - there may be a breakage. Q: I can’t see anything at night! A: There are a few possible solutions to this problem. Here are some of the most common. • If the image is mostly black, then this may indicate that the night vision isn’t turning on. A bright light source somewhere in the picture can fool the light sensor into thinking it’s still daytime - try re-aiming the camera. • If the image is mostly white, then this indicates that the IR light from the night vision is bouncing back into the lens. • At night, the infrared light the camera uses to see in the dark can ‘bounce back’ off a reflective surface (such as glass, water, spider webs, some ceramics and so on) and effectively blind the camera. If you want to see outside, then the camera itself needs to be outside! 7 Helpdesk / Technical Support Details Swann Technical Support All Countries E-mail: [email protected] Telephone Helpdesk USA Toll Free 1-800-627-2799 USA Exchange & Repairs 1-800-627-2799 (Option 1) (M-F, 9am-5pm US PT) AUSTRALIA 1300 138 324 NEW ZEALAND Toll Free 0800 479 266 UK0203 027 0979 MPOECAM171213E 8 © Swann Communications 2013