1
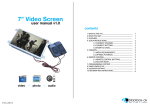
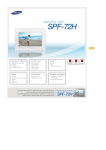
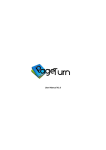
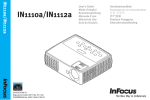
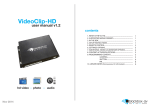
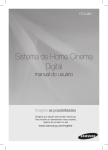
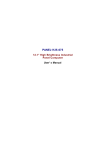
22” Video Screen
user manual v1.0
CONTENTS
1. WHAT IS THE 22VS.......................................................................
2. WHAT YOU GET.............................................................................
3. FEATURES.......................................................................................
4. SETUP INSTRUCTIONS................................................................
4.1 CONNECT SPEAKERS................................................
4.2 CONNECT/WIRE BUTTONS....................................
4.3 INSERT SD CARD........................................................
5. FORMATS........................................................................................
5.1 MEDIA REQUIREMENTS...........................................
5.2 OPTIMAL PLAYBACK.................................................
6. REMOTE CONTROL......................................................................
6.1 REMOTE CONTROL BUTTONS...............................
6.2 SCREEN SETTINGS.....................................................
7. PROGRAMMING CONTENT...........................................................
8. TIMER POWER SETUP..............................................................................
9. SLIDESHOW OPTIONS............................................................................
10. REFORMATTING INSTRUCTIONS......................................................
video
JUNE 2015
-
photo
-
audio
1
1
1
2
2
2
2
3
3
3
3
4
4
5
5
5
6
WELCOME
Page 1
Thank you for purchasing 22” Video Screen.
The 22” Video Screen is one of a range of products we offer specific to the
heritage marketplace. We are confident that we have other products you will
find useful and look forward to dealing with you again soon.
T: +44 (0) 1639 767007
W: www.blackboxav.co.uk
1.WHAT IS THE 22VS
22VS is an all in one digital media player and screen. It’s used to display and
distribute media communication, videos and images in a small compact
manner. Thanks to the open frame design and inbuilt mounting wings it can be
built into signage or other such installations. The 22VS supports a wide range
of digital media files which are stored on an SD card. A remote is also supplied
for easy player control, it can be looping or use up to 4 buttons to activate
content not including 2 volume buttons.
2.WHAT YOU GET
3.FEATURES
Media Format Compatibility
Image: JPEG, BMP
Audio: MP3, WMA, AAC, OGG
Video: MPEG-1, MPEG-2, AVI
Media Storage and Playback Source
High Speed Compact Flash (CF) Card
High Speed Secure Digital (SD) Card
USB 2.0 Drive (Thumb Drive/Flash Drive)
Playback Modes
Audio Playback
Video with Music or
Picture with Background Music
On-Screen Display Languages
English
Chinese
Japanese
Image Slideshow Playback
Picture Rotation
Portrait-Vertical or Landscape-Horizontal
Slideshow Transitions
14 Different Transition Effects
Slide Intervals: 1 to 60 seconds
Speakers Inbuilt
21.6” Screen and
Player
3
Power Supply
6x Button Cables
SD Card
Remote Control
Page 2
4.SETUP INSTRUCTIONS
4.1 CONNECT SPEAKERS
Mounting holes:
185x100mm
The 22VS is supplied with 2 inbuilt speakers located in the rear. There is
also an audio out which can be used highlighted in the image to the right;
SD Card Slot
USB Slot
4.2 CONNECT/WIRE BUTTONS
If you wish to use button activated
content attach the required amount
of buttons using the button wires
supplied to the appropriate button
inputs.
1234-
+ 12v
Button (no)
Button (com)
0v
LED
4 3 2 1
4.3 INSERT SD CARD OR USB
See Programming Instructions for information on how to program your SD
Card or USB. Once programmed place them into the appropriate slots;;
Button
Connections 1 - 4
4.4 MOUNTING THE SCREEN
The screen can be mounted via the fixing holes located around the frame or
via the mounting holes located on the rear;
3.5mm
Audio Out
Fixing Wings
5.2 Optimal Playback
5.FORMATS
An SDHC card or USB can be used as the storage medium for the 22VS. The
card must be formatted to FAT 32.
Converting your video Content
Before putting the content onto the SD card or USB it needs to be in the right
format as listed below, for reformating instructions see ‘Reformating’ section.
Page 3
Image Playback
For optimal image playback we recommend images be 1920 x 1080 pixels at 300
DPI and saved as a jpeg.
Video Playback
For optimal video playback it is recommended that your video is 1920 x 1080
pixels and runs at a frame rate of 30 frames per second in MP4 Format.
5.1 MEDIA REQUIREMENTS
Video
Category
Format
MP4
MP4/AVI
1920x1080 30fps
20Mbit/s
MPG/MPEG
MPG,MPE
1920x1080 30fps
20Mbit/s
MKV
H.264,
MPEG1,2,4
1920x1080 30fps
20Mbit/s
Sub Type
Photo
Audio
Audio Playback
JPG
Baseline
Codec
YUV400
YUV420
YUV422
YUV440
YUV444
Category
Codec
MP2
MP3
PCM (wav)
AC3
WMA
MP2
MP3
PCM (wav)
AC3
WMA
Maximum Resolution Maximum Video Bitrate
Maximum Resolution
Size
8000x8000
No Limit
Sample Rate
8-320KHz
Bitrate
32Kbps - 448Kbps
For optimal audio playback it is recommended that your audio file is of MP3
format and has a bit rate of 44.1Khz
6.REMOTE CONTROL
A remote control is supplied with the 22VS, this enables you to set a range of
functions which are explained over the next few pages.
To access the menu press the ‘Menup’ button on the remote. Please note the IR
sensor is located on the rear base of the unit next to the ‘power in’ cable.
To exit press the ‘Exit’ button.
6.1 REMOTE CONTROL BUTTONS
POWER
MUTE
MENU
VOL+
VOL-
EXIT
DEL
Turn the power on or off
Mute the audio
Fast-forward
Fast-rewind
PLAY/PAUSE
Move the pointer up (Pop up control menu when playing)
Move the pointer left
Move the pointer right
Move the pointer down (Pop up control menu when playing)
Enter setting menu
Volume up
Volume down
Next item when playing
Previous item when playing
Escape from the menu and playing state
Delete video/image files via pop up menu.
6.2 SCREEN SETTINGS
If you would like to adjust the screen settings such as brightness, contrast,
colour or backlight you can adjust these here:
Menu > Screen Set >
Page 4
7.PROGRAMMING CONTENT
8.TIMER POWER SETUP
Once you have edited and converted your video or images into the correct
format you will need to put them onto an SDHC card/USB. The way you store
content (in folders) will determine how it is activated.
A useful feature of the 22VS is that you can programme it to power up and
turn off at a set time each day.
1. The included SD Card is a pre-loaded template (it comes with each folder
already set-up) If you are not using a button you must delete the folder. To
use other SDHC cards make sure they are formated to FAT32 first, then create
the appropriate folders.
Page 5
Menu> Time Set > enter in the details using arrow buttons </> to change
digits then v/^ to change detail. Once correct exit the time set.
If you would like the screen to turn On/Off at a set time go into Timer1 Set
Menu> Time Set > Timer 1 Set > select the option eg everyday / Mon-Fri /
Sat-Sun. You can set your on and off times.
2. Each folder represents a button, except ‘00’ - This is for looping content.
00 - Looping folder (content in here plays automatically on startup on loop)
01 - Button 1, 02 - Button 2 , 03 - Button 3 , 04 - Button 4
It is possible to set multiple on/off times.
Eg Mon - Fri 9am on 5pm off. Sat-Sun 10am on 3pm off.
Once confirmed click exit to return.
3. Put your converted video or images within each folder, name them 00, 01,
02 etc. for the order you want them to play when the button is pressed (for
single files in each folder they can be named anything).
Example looping folder (button folders are the same)
9.SLIDESHOW OPTIONS
The player will play a slide show of images. The order will be in name order.
Folder
Files in Folder
Eg: Within the root of folder 00 put the files:
01.jpg, 02.jpg, 03.jpg, 04.jpg, 05.jpg
The player will scroll trough these images and then loop back to the start.
Within the above configuration the player will play: video 00.mpg, image 001,
image 002 and then loop back video 00 until somebody presses a button.
Note: The looping folder is designed to be used for creating an attractor
screen (image/video).
When a button is pressed, every file in that folder will be played, then the
22VS will return to the looping folder.
Image Transitions/ Timings
Menu > Preferences > Photo Slide Mode > You can select the image transition
Menu > Preferences > Photo Show Time > You can select the image time.
Selections range between 5-150 seconds
10.REFORMATTING INSTRUCTIONS
Page 6
If your video content isn’t in the correct format to play on the 22VS then you
will need to reformat it as follows;
Step 1) Download Format Factory
Format Factory is a free convertor tool for Windows - it can be downloaded
from here: http://www.formatoz.com/
Settings:Select
output settings
Run the programme and follow the screens:
Click Convert to MP4
from within
the video tab on the
left hand side.
Select:
Video Size: 1920x1080
Aspect Ratio: 16:9
Then OK.
Page 7
Click Add File
Select the file you
would like to convert.
Note or change the
output folder where
you would like the
converted file to go.
Click OK
Click to Start
the conversion.
The converted files will be stored in the folder where the original files are located.
Use these converted files as explained in section 7.Programming content.