1
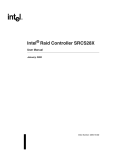
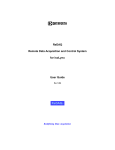
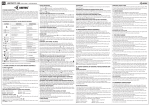
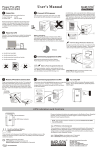
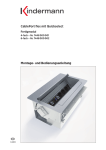
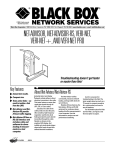
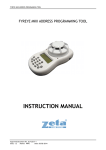
User manual for the QG65 configurator
Rev
: 1.1
Date
: 20101006
Authors
: P. van Wees
Content
1.
Introduction ..................................................................................................................................... 2
2.
Getting started ................................................................................................................................ 2
A.
Serial port settings....................................................................................................................... 2
B.
Sensor information ...................................................................................................................... 3
C.
Sensor measurement values ....................................................................................................... 3
D.
Settings ........................................................................................................................................ 3
3.
4.
Settings ............................................................................................................................................ 3
A.
Sensor .......................................................................................................................................... 3
B.
Configuration ............................................................................................................................... 5
C.
Zero calibration ........................................................................................................................... 5
D.
Output1/2 .................................................................................................................................... 6
E.
LED’s .......................................................................................................................................... 12
Specification .................................................................................................................................. 13
QG65 configurator manual
1
User manual for the QG65 configurator
1.
Introduction
The QG65 configurator is a tool which can be used to configure QG65 sensors with RS232
communication. The complete configuration of a QG65 sensor can be downloaded from the sensor
to a file. At a later time the configuration of the sensor can be restored by uploading this
configuration file to the sensor. The QG65 configurator tool can also be used to log the measuring
values into a log file.
What is needed:
- PC running MS-Windows with the QG65 configurator tool installed
- free serial port (COM port; RS232 port) or USB-to-serial converter
- Connection cable
- QG65 sensor with M12 8-pins connector
2.
Getting started
After starting the application the following screen will be shown:
A. Serial port settings
Select the COM port which is connected to the QG65 sensor (COM1 to COM24 are supported)
and press the Open button. The QG65 configurator will start communicating with the sensor. If
no sensor is found ‘Communication Error’ is shown in red in the status bar at the bottom of the
window. The QG65 sensor communicates at a fixed baud-rate of 38400 Baud.
QG65 configurator manual
2
User manual for the QG65 configurator
B. Sensor information
This part of the window shows some information of the connected sensor. The following
information is available: Device name, software version and serial number.
C. Sensor measurement values
This part of the window shows the output values of the connected sensor. Also the state of the
output is shown behind the measured value.
D. Settings
In this part of the screen some tab-pages are shown where the configuration parameters can be
changed. Also the sensor configuration can be stored or restored to or from a file.
3.
Settings
The following tab pages are available: Sensor, Configuration, Zero calibration, Output1, Output2 and
LED’s.
A. Sensor
In this tab page general sensor settings can be made.
-
Temp. Compensation Switch OFF/ON the internal temperature compensation algorithm
-
Temperature offset
QG65 configurator manual
The offset in degrees °C. Please keep in mind that the temperature is
the internal sensor temperature. This temperature is about 8 to 10
degrees °C higher than the environment temperature.
3
User manual for the QG65 configurator
-
Filter time [ms]
Setting for the internal 1st order low-pass filter. The time is given in
milliseconds. The cut-off (-3dB) frequency is the reverse of the filter
time and can be calculated as follows: fcut-off = 1000 / filter-time [Hz].
Eg. A filter time of 2000 ms is equal to a cut-off frequency of 0,5 Hz.
-
Start/stop logging
By pressing the ‘Start logging’ button the sensor values are logged to
a file. The file is in plain text format and the values are tab-separated.
The log file can be easily imported in Microsoft Excel.
Example:
09:51:30,11
09:51:30,21
09:51:30,30
09:51:30,39
09:51:30,49
00:00:00,07
00:00:00,17
00:00:00,26
00:00:00,35
00:00:00,45
1
2
3
4
5
0,36
0,31
0,37
0,32
0,33
0,02
0,02
0,01
0,03
0,00
31
31
31
31
31
The following values are available:
column1: absolute time of sample (hh:mm:ss,ss)
column2: relative time of sample (hh:mm:ss,ss)
column3: sample number
column4: measurement value output1
column5: measurement value output2
column6: temperature in degrees °C
The sample rate is approximately 10 Hz.
-
Sensitivity
Reads the sensitivity of the internal g-sensor. This setting is readonly.
-
Measurement type
Reads the measurement type of the sensor. The following
measurement types are available: Horizontal angle (2-axis), Vertical
angle (1-axis), Acceleration (2-axis). This setting is read-only.
-
X/Y direction
With this setting the sign of the measurement value can be reversed.
-
Output mode (1-axis) With this setting the output range of the measurement value can be
switched from -180°-+180° to 0°-360°.
QG65 configurator manual
4
User manual for the QG65 configurator
B. Configuration
With this tab page the complete configuration of a sensor can be stored/restored to/from a file.
The serial number of the sensor is stored in the file. During a restore it is checked that the serial
number matched with the configuration file. If there is a mismatch the user can choose to upload
the configuration to the sensor, although some settings in the sensor will not be overwritten.
C. Zero calibration
(or called Center calibration for 1-axis 0° to 360°, because it calibrates the 180° point)
QG65 configurator manual
5
User manual for the QG65 configurator
In this tab page the sensor can be calibrated.
-
Zero calibration
By pressing this button a zero calibration is started. After a few
seconds the calibration is done. The offset values for output1 and
output2 are automatically updated. When the new calculated offset
is outside limits, the old offset is used.
-
Offset output1/2
These values are automatically updated by doing a zero calibration.
Additionally these values can be changed when needed. The effect of
the new offset can be noticed in the sensor values.
-
Offset limit output1/2 During a zero calibration is checked if the new calculated offset is
within this limit. A limit of 5.00° means that the offset may be
between -5.00° and +5.00°. When the measurement type is “Vertical
angle (1-axis)” this setting is not available.
D. Output1/2
The QG65 sensor can be provided with a few different outputs. The output type is fixed and is
determined during manufacturing. Different output types are: current output (0-20mA), voltage
output (0-5V or 0-10V), PWM output or NPN alarm output.
Current output (0-20mA)
QG65 configurator manual
6
User manual for the QG65 configurator
-
Edit DAC values
To enable changes in the DAC settings. Normally this is not necessary.
Please be carefull when changing these values.
-
Low value DAC
The lowest value that the output of the sensor can drive. The DAC
resolution is 16 bits (0-65535). The lowest value corresponds with
0mA, the highest value corresponds with 25mA. The default value for
this setting is 10486, which is 4mA.
-
High value DAC
The highest value that the output of the sensor can drive. The default
value for this setting is 52428, which is 20mA.
-
Error value DAC
When an error occurs in the sensor, like a failing self-test or a
EEPROM checksum error, the output of the sensor can be driven to a
specific error value. The default value for this setting is 7864, which is
3mA.
-
Low limit output
The lowest value the sensor can measure (normally the 4mA value)
-
High limit output
The highest value the sensor can measure (normally the 20 mA value)
-
Direction
Normal:
Reversed:
low limit output is 4mA; high limit output is 20mA
low limit output is 20mA; high limit output is 4mA
Voltage output (0-5V)
QG65 configurator manual
7
User manual for the QG65 configurator
-
Edit DAC values
To enable changes in the DAC settings. Normally this is not necessary.
Please be carefull when changing these values.
-
Low value DAC
The lowest value that the output of the sensor can drive. The DAC
resolution is 16 bits (0-65535). The lowest value corresponds with 0V,
the highest value corresponds with 5V. The default value for this
setting is 6554, which is 0,5V.
-
High value DAC
The highest value that the output of the sensor can drive. The default
value for this setting is 58982, which is 4,5V.
-
Error value DAC
When an error occurs in the sensor, like a failing self-test or a
EEPROM checksum error, the output of the sensor can be driven to a
specific error value. The default value for this setting is 3277, which is
0,25V.
-
Low limit output
The lowest value the sensor can measure (normally the 0,5V value)
-
High limit output
The highest value the sensor can measure (normally the 4,5V value)
-
Direction
Normal:
Reversed:
low limit output is 0,5V; high limit output is 4,5V
low limit output is 4,5V; high limit output is 0,5V
Voltage output (0-10V)
QG65 configurator manual
8
User manual for the QG65 configurator
-
Edit DAC values
To enable changes in the DAC settings. Normally this is not necessary.
Please be carefull when changing these values.
-
Low value DAC
The lowest value that the output of the sensor can drive. The DAC
resolution is 16 bits (0-65535). The lowest value corresponds with 0V,
the highest value corresponds with 10V. The default value for this
setting is 6554, which is 1,0V.
-
High value DAC
The highest value that the output of the sensor can drive. The default
value for this setting is 58982, which is 9,0V.
-
Error value DAC
When an error occurs in the sensor, like a failing self-test or a
EEPROM checksum error, the output of the sensor can be driven to a
specific error value. The default value for this setting is 3277, which is
0,5V.
-
Low limit output
The lowest value the sensor can measure (normally the 1,0V value)
-
High limit output
The highest value the sensor can measure (normally the 9,0V value)
-
Direction
Normal:
Reversed:
low limit output is 1,0V; high limit output is 9,0V
low limit output is 9,0V; high limit output is 1,0V
PWM output
QG65 configurator manual
9
User manual for the QG65 configurator
-
Low value PWM
The lowest value that the output of the sensor can drive in PWM
counts. Default is 0 (0% duty-cycle).
-
High value PWM
The highest value that the output of the sensor can drive in PWM
counts. Default is Maximum PWM (100% duty-cycle).
-
Maximum PWM
With this parameter the resolution and the frequency of the PWM
signal is set. The higher the resolution, the lower the output
frequency. This maximum value is 65535 (16-bit resolution).The
output frequency can be calculated as follows:
foutput = 8MHz / Maximum PWM (In the screenshot above, f = 250Hz)
-
Low limit output
The lowest value the sensor can measure (normally the lowest dutycycle)
-
High limit output
The highest value the sensor can measure (normally the highest dutycycle)
-
Direction
Normal:
Reversed:
QG65 configurator manual
low limit output is lowest duty-cycle
high limit output is highest duty-cycle
low limit output is highest duty-cycle
high limit output is lowest duty-cycle
10
User manual for the QG65 configurator
Alarm output (NPN)
-
Alarm type
Low alarm, High alarm, Low+High alarm, or disabled.
-
Setpoint Low
The switching point of the Low alarm. When the sensor value is lower
than this value the alarm is activated.
-
Hysteresis Low
When the sensor value becomes higher than Setpoint Low +
Hysteresis Low the alarm is deactivated.
-
Delay OFF Low
Delay time in milliseconds before the output is deactivated when a
low alarm situation has disappeared.
-
Delay ON Low
Delay time in milliseconds before the output is activated when a low
alarm situation has appeared.
-
Mode
Normally OFF No alarm: NPN output is not conducting
Alarm active: NPN output is conducting
Normally ON No alarm: NPN output is conducting
Alarm active: NPN output is not conducting
-
Setpoint High
The switching point of the High alarm. When the sensor value is
higher than this value the alarm is activated.
-
Hysteresis High
When the sensor value becomes lower than Setpoint High Hysteresis High the alarm is deactivated.
-
Delay OFF High
Delay time in milliseconds before the output is deactivated when an
high alarm situation has disappeared.
QG65 configurator manual
11
User manual for the QG65 configurator
-
Delay ON High
Delay time in milliseconds before the output is activated when an
high alarm situation has appeared.
E. LED’s
When the QG65 sensor is provided with LED’s the behaviour of the LED’s can be changed with
the settings on this tab page. When no LED’s are mounted this tab page can be ignored. When
the sensor value is between limits the colour of the LED is steady GREEN. When an alarm
condition is reached the LED can change colour and/or start flashing. LED1 is the LED next to the
connector. LED2 is the LED opposite to the connector.
-
Function
OFF, the LED will always be steady GREEN
OUTPUT1 ALARM, the LED will show the state of output1
OUTPUT2 ALARM, the LED will show the state of output2
OUTPUT1+2 ALARM, the LED will show the state of both output1 and
output2.
-
Flashing
When an alarm condition is reached, the LED will start flashing. The
flashing frequency can be set to the following values:
NO FLASHING, the LED will be steady.
SLOW FLASHING, the LED will flash 1x per second.
MEDIUM FLASING, the LED will flash 3x per second
FAST FLASHING, the LED will flash 5x per second
-
Colour
GREEN, in an alarm condition the LED will flash GREEN
RED/GREEN, in an alarm condition the LED will flash RED and GREEN
RED, in an alarm condition the LED will flash RED
QG65 configurator manual
12
User manual for the QG65 configurator
4.
Specification
Supported Operating Systems: Windows NT, Windows XP, Windows Vista and Windows 7.
To use the QG65 configurator utility at least one free serial port (COM) is needed. If a serial port is
not available, an USB-to-serial converter can be used.
The QG65 configurator is a MS-Windows application written in C# with Microsoft Visual Studio 2008.
The .NET framework 3.5 has to be installed. The installer will check if the correct .NET framework is
installed. It will download and install a newer version of the .NET framework if necessary.
Connection diagram:
To serial port of PC
(DB9 female)
Connection cable
cableport of PC
DIS
M12 8p. connector
QG65 sensor
Power supply
10 – 30 Vdc
QG65 configurator manual
13