1
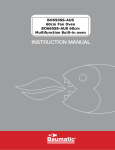
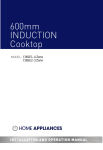
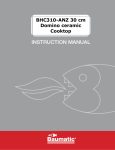
BHI300-AUS Domino
touch control induction
zone hob
1
User Manual for your Baumatic
BHI300-AUS
30 cm 2 induction zone domino
hob
NOTE: This User Instruction Manual contains important
information, including safety & installation points, which will
enable you to get the most out of your appliance. Please keep it
in a safe place so that it is easily available for future reference; for
you or any person not familiar with the operation of the appliance.
GS 21/08/12
2
Contents
Environmental note
4
Important safety information
5–8
Specifications
Product and aperture dimensions
Product specifications
Standard accessories
Electrical details
Ceramic hob surface layout
Control panel layout
9 - 11
9
9
9
10
10
11
Using the ceramic hob
Before first use
Touch controls
Induction cooking
Cooking on an induction zone
Power level settings
Turning off the induction zone after cooking
Residual heat indicator
Locking the hob top
Using the timer as a minute minder
Setting the timer to turn one cooking zone off
High temperature protection
Detection of foreign objects
Automatic safety cut-off
Suitable cookware
Cooking tips
Hob guidelines
11
11
11
12
12
13
14
15
15
15
16
17
17
18
18
19
21
Cleaning and maintenance
Cleaning the ceramic hob top
After each use
Cleaning table
Using a ceramic hob scraper
Using a specialist ceramic hob cleaner
22 - 23
22
22
22 - 23
23
23
Installation
Positioning
Unpacking the appliance
Installing the appliance
Electrical connection
Replacing the mains supply cable
24 - 28
24
24
25 – 27
27
28
My appliance isn’t working correctly
Error codes
General troubleshooting
29 – 31
29
29 - 30
Contact details
32
4
- 22
– 12
– 13
– 14
– 16
– 17
– 19
- 20
- 22
Environmental note
o The packaging materials that Baumatic uses are environmentally
friendly and can be recycled.
o Please discard all packaging material with due regard for the
environment.
5
Important safety information
Your safety is of the utmost importance to Baumatic.
Please make sure that you read this instruction booklet
before attempting to install or use the appliance. If you
are unsure of any of the information contained in this
booklet, please contact the Retailer where you
purchased your unit from.
General Information
o This appliance is designed for domestic household use and for
the cooking and frying of domestic foodstuffs.
o IMPORTANT: The adjacent furniture and all materials used in
the installation must be able to withstand a minimum
temperature of 85°C above the ambient temperature of the
room it is located in, whilst in use.
o Certain types of vinyl or laminate kitchen furniture are
particularly prone to heat damage or discolouration at
temperatures below the guidelines given above.
o Any damage caused by the appliance being installed in
contravention of this temperature limit, will be the liability of
the owner.
o Your new appliance is guaranteed against electrical or
mechanical defects, subject to certain exclusions that are noted
in the Conditions Of Guarantee. The foregoing does not affect
your statutory rights.
o The use of this appliance for any other purpose or in any other
environment without the express agreement of Baumatic Ltd.
will invalidate any warranty or liability claim.
o You should not use this appliance to store items on or as a work
surface.
o No modifications to the appliance are permitted by Baumatic Ltd.
o You should not store or place flammable or highly flammable
liquids/materials on top of or near the appliance. Items made
from aluminium, plastic or plastic film should also be kept away
from the appliance, as they may fuse to the surface.
o Repairs may only be carried out by an authorised service
agent..
6
Child Safety
o Baumatic strongly recommend that babies and young children
are prevented from being near to the appliance and should not
be allowed to touch the appliance at any time.
o If it is necessary for younger family members to be in the
kitchen, please ensure that they are kept under close supervision
at all times.
o Older children should only be allowed to utilise the appliance
when supervised.
General Safety
The appliance should only be installed and connected by a
suitably qualified person.
Care should be taken to ensure that the units and work surfaces
that you build the appliance into, meet with the relevant
standards.
If you notice any scratches, splits or cracks in the ceramic glass,
you should immediately switch off the appliance and disconnect
it from your mains supply. Otherwise there is the risk of electric
shock occurring.
During use
Any film or stickers that are present on the hob surface when it
is delivered should be removed before use.
Care should be taken when utilising the appliance, otherwise
there is a risk of burns being caused.
o You should not allow the electrical connection cables to come
into contact with the hob surface when it is hot or any hot
cookware.
o If fat and oil overheats, then it can ignite extremely quickly. For
this reason, when cooking with fat and oil the appliance should
not be left unattended.
Make sure that all of the cooking zones are switched off after
use.
7
o IMPORTANT: This ceramic induction hob fully complies
with current legislation regarding electro-magnetic
interference and is designed not to interfere with other
electronic appliances providing these comply with the
same legislation.
o As the hob generates magnetic fields in its immediate
vicinity, pacemakers and active heart implants must be
designed to comply with relevant regulations. If in doubt,
you should consult the manufacturer of your device or
your Doctor. In this respect, Baumatic can only guarantee
the conformity of our own product.
o If an object made of metal, (e.g. saucepan lid, knife, fork
or spoon) is placed on a cooking zone that is switched on,
it can get hot.
Cleaning
o Cleaning of the hob should be carried out on a regular basis.
o IMPORTANT: Before attempting to clean the appliance, it
should be disconnected from the mains and allowed to cool.
o Great care should be taken whilst using this appliance and when
following the cleaning procedure.
o You should not use a steam jet or any other high pressure
cleaning equipment to clean the appliance.
Installation
This appliance must be correctly installed by a
suitably qualified person, strictly in accordance
with the manufacturer’s instructions. Please see
the specific section of this booklet that refers to
installation.
Baumatic Ltd. declines any responsibility for injury or damage,
to person or property, as a result of improper use or incorrect
installation of this appliance.
8
Declaration of conformity
This appliance complies with the following European Directives:
-2006/95/CE General regulations / Low tension
-1935/2004/CE 90/128/EEC This appliance is suitable to come in
contact with food
-2004/108/CE Electromagnetic compatibility
o The manufacturer declares that the hob is built using certified
materials and requires the appliance to be installed in
accordance with the standards currently in force. This appliance
must be used by a trained person for domestic purposes only.
To avoid damaging your appliance
o The ceramic glass can be damaged by objects falling onto it.
o The ceramic glass edge can be damaged by knocks from
cookware.
o Cast iron and cast aluminium cookware with damaged bases
may scratch the ceramic surface if they are dragged across it.
o Pans should be lifted on and off the hob surface and not
dragged.
o Cooking zones should not be switched on without cookware
placed on it. Also the cookware should not be empty.
o Food or liquid that has high sugar content may damage the hob
top, if it comes into contact with the ceramic hob surface. Any
spillages should be wiped up immediately, however this may not
prevent the hob surface from becoming damaged.
9
Specifications
Product dimensions
Depth:
Width:
Height:
520 mm
288 mm
56 mm
Aperture dimensions
Depth:
Width:
Height:
505 mm
273 mm
106 mm
Product specifications:
o
o
o
o
o
o
o
o
1 x 2.00 kW induction zone (Ø 180 mm)
1 x 1.50 kW induction zone (Ø 140 mm)
Front touch control operation
2 individual residual heat indicators
2 independent induction generators
Electronic timer
Pan compatibility detection
Safety lock
Standard accessories
o Ceramic hob scraper
10
Electrical details
Rated Voltage:
Supply Connection:
220 - 240 Vac 50 Hz
20 A (double pole switched fused
outlet with 3mm contact gap)
3.50 kW
3 core x 1.5 mm²
Max Rated Inputs:
Mains Supply Lead:
For future reference please record the following information which can
be found on the rating plate and the date of purchase which can be
found on your sales invoice. The rating plate of your hob is located on
the underneath of the appliance. Therefore it is a good idea to record
this information before you install your appliance.
Model Number
……………………………….
Serial Number
……………………………….
Date of Purchase
……………………………….
Ceramic hob surface layout
1)
2)
3)
4)
5)
1
3
2
4
5
11
1 x 2.00 kW induction zone
1 x 1.50 kW induction zone
Ceramic hob surface
ON / OFF button
Control panel
Control panel layout
5
1.
2.
3.
4.
5.
4
3
2
1
ON/OFF button
Power / timer plus and minus buttons
Heating zone selection buttons
Timer button
Safety lock button
Using the ceramic hob
Before first use
IMPORTANT: You should clean the ceramic hob surface (see
“Cleaning and maintenance” section).
o You should switch on one cooking zone at a time, for 5 minutes
at the maximum setting. This will help to eliminate any new
smell that exists and evaporate any humidity that has formed on
the heating elements during transit.
o Do not burn off more than one zone at once.
o You must place a saucepan filled half full with cold water on
each zone as you burn it off. Otherwise the induction zone will
not operate.
Touch controls
o All operations are performed by means of the touch controls that
can be found on the control panel. The controls respond to touch
so you don’t need to apply any pressure.
o A beep will sound each time a touch is registered.
o Take care to ensure the controls are always clean and dry and
that there are no objects such as utensils and cloths covering
12
them. Even a thin film of water can make the control difficult to
operate.
o Use the ball of your finger to press a control, not the tip.
Induction cooking
o Induction cooking is a safe, advanced, efficient and economical
cooking technology.
o It works by electromagnetic vibrations generating heat directly in
the pan, rather than indirectly through heating the glass surface.
The only heat present on the glass surface is from the pan which
warms it up.
Cooking on an induction zone
o Press the ON/OFF button (1). A buzzer will
beep once and all the displays will show - indicating that the induction hob has
entered stand-by mode.
13
o Place a suitable pan on the cooking
zone that you wish to use. Make sure
that the bottom of the pan and the
surface of the cooking zone are clean
and dry.
o Press the relevant heating zone
selection button (3) and an indicator
next to the key will flash.
o Select a power level using the plus
and minus buttons (2).
o If you don’t choose a heat setting
within 1 minute, the induction hob
will automatically switch off and you
will need to start again.
o You can adjust the heat setting at any time during the
cooking process.
IMPORTANT: If the display flashes
heat setting this means that:
alternatively with the
o The pan is not placed on the correct cooking zone
o The pan you are using is not suitable for induction cooking. No
heating will occur unless there is a suitable pan on the cooking
zone.
o The pan is too small or not properly centred on the cooking
zone. The display will automatically turn off after 2 minutes if no
suitable pan is placed on it.
Power level settings
o The settings on the next page are to be used as a guideline only.
The exact setting required will depend on several factors,
including your cookware and the amount of food that you are
cooking.
o You should experiment with the induction hob power levels to
find the best settings to suit you.
14
Power
setting
1–2
3–4
5–6
7–8
9
Suggested use
o Delicate warming for small amounts of food.
o Melting chocolate, butter and foods that burn
quickly.
o Gentle simmering.
o Slow warming.
o Reheating.
o Rapid simmering.
o Cooking rice.
o Pancakes.
o Sautéing.
o Cooking pasta.
o Stir-frying.
o Searing.
o Bringing soup to the boil.
o Boiling water.
Turning off the induction zone after cooking
o Press the relevant heating zone selection
button for the zone that you wish to turn
off.
o Turn the cooking zone off by setting the power level to 0 using
the plus and minus buttons (2) or by pressing both of these
buttons together. You should ensure that the display shows 0.
o Switch the whole hob off by pressing the
ON/OFF button (1).
15
Residual heat indicator
o After a zone is switched off, the display will
show the letter “H”. This means that the
temperature of the indicated zone is still high
enough to cause injury.
o When the temperature falls to a safe temperature, then the
letter “H” will go out.
o The residual heat can also be used to continue heating pans on
the cooking zone that is still hot to save energy.
o IMPORTANT: The residual heat indicator will disappear if your
mains supply is cut.
Locking the hob top
o You can lock the control panel to prevent unintended use by
other persons such as children.
o When the safety lock is turned on, all the buttons except the
ON/OFF button (1) will be disabled.
o To turn the safety lock on, press the safety lock button (5). The
timer display will show “Lo” to indicate that the lock has been
activated.
o To unlock the controls you need to ensure that the hob is turned
on. Then, press and hold the safety lock button (5) for a few
seconds. The safety lock will then be deactivated.
Using the timer as a minute minder
It is possible to use the minute minder even if you do not turn on a
cooking zone.
o Turn the hob on by pressing the ON/OFF button (1).
o Press the timer button (4) and the minute
minder indicator will start flashing. “10” will
show in the timer display.
o Set the required countdown time using the plus
and minus buttons (2). The maximum time that
can be set is 99 minutes.
16
o Press the plus or minus button once to increase or decrease by 1
minute. Hold the plus or minus button down to increase or
decrease by 10 minutes.
o If the setting time exceeds 99 minutes, the timer display will
automatically return to 00 minutes.
o If you press the plus and minus buttons (2) together, the timer
is cancelled and the display will show 00.
o When the required time is set, the
countdown will begin immediately. The
display will show the remaining time and
the indicator will flash for 5 seconds.
o When the set countdown time is reached, the
buzzer will sound for 30 seconds and the timer
indicator will show - -.
Setting the timer to turn one cooking zone off
You are able to link the timer to a cooking zone so after the countdown
time is complete, the cooking zone will turn off automatically.
o Turn the hob on by pressing the ON/OFF button (1).
o Press the relevant heating zone selection button
(3) for the zone that you wish to set the timer
for.
o Touch the timer button (4) and the minute
minder indicator will start flashing. “10” will show
in the timer display.
o Set the required countdown time using the plus and minus
buttons (2). The maximum time that can be set is 99 minutes.
17
o By pressing the plus or minus button once,
the time will increase or decrease by 1
minute. Hold the plus or minus button
down to increase or decrease the time by
10 minutes.
o If the set time exceeds 99 minutes, the display will automatically
return to 00 minutes.
o If you press the plus and minus buttons (2) together, the timer
will be cancelled and the display will show 00.
o Once the required time is set, the
countdown will begin immediately. The
display will show the remaining time
and the indicator will flash for 5
seconds.
o A red dot next to the power level indicator
will illuminate to show the cooking zone
that has the linked timer.
o When the countdown time is complete, the
corresponding cooking zone will switch off
automatically.
IMPORTANT: If in use, the other cooking zone will remain on.
High temperature protection
o A temperature sensor in the hob can monitor the temperature
inside of the hob. When an excessively high temperature is
detected, the induction hob will turn off automatically.
Detection of foreign objects
o When an unsuitable size or non-magnetic pan, such as
aluminium, or another small item, such as a knife, fork or key,
has been left on the hob, the hob will automatically go into
stand-by mode for 1 minute.
o The hob will continue cooling down for a further minute if the
temperature of the hob is high.
18
Automatic safety cut-off
o The automatic safety cut-off is activated when a cooking zone
has been left on longer than the maximum default working
time. This is a safety function in the event of the hob being left
on accidentally.
o The default working times for the various power levels are
shown in the table below.
Power level
1 2 3 4 5 6 7 8 9
Default working time (hours) 8 8 8 4 4 4 2 2 2
o If the pot has been removed from the cooking zone, the
induction hob will stop heating immediately and the hob will
automatically switch off after 2 minutes.
Suitable cookware
o You should only use cookware with a base that is suitable for
induction cooking. Look for the induction symbol on the
packaging or on the bottom of the pan.
o You can check whether your cookware is
suitable by carrying out a magnet test.
Move a magnet towards the base of the
pan. If it is attracted, the pan is suitable
for induction.
o If you do not have a magnet, you can fill the pan with water and
does not flash in the display
place it on a cooking zone. If
and the water is heating, the pan is suitable.
o Cookware made from pure stainless steel, aluminium or copper
without a magnetic base, glass, wood, porcelain, ceramic and
earthenware are not suitable.
o Do not use cookware with jagged edges or a curved base.
o Make sure that the base of your pan is smooth, sits flat against
the glass and is the same size as the cooking zone.
19
o Use pans with a diameter as large as the zone selected. By using
a slightly wider pot, energy will be used at its maximum
efficiency. If you use a smaller pot, the efficiency of the hob
could be less than expected.
o Pots that are less than 140 mm in diameter could be undetected
by the hob. Always centre your pan on the cooking zone.
o Always lift pans off the induction hob, do not slide them as they
may scratch the glass.
Cooking tips
o IMPORTANT: Take care when frying as the oil and fat heat
up very quickly. At very high temperatures, oil and fat will
ignite spontaneously which presents a serious fire risk.
o When food comes to the boil, reduce the power level setting.
o Using a lid on pans will reduce cooking times and save energy by
retaining the heat.
o Minimise the amount of liquid or fat used to reduce cooking
times.
o Start cooking on a high power setting and reduce the power level
when the food has heated through.
Simmering, cooking rice
o Simmering occurs below boiling point, at around 85°C, when
bubbles are just rising occasionally to the surface of the cooking
liquid.
o This process is the key to delicious soups and tender stews
because the flavours develop without overcooking the food.
20
o You should also cook egg-based and flour-thickened sauces
below boiling point.
o Some tasks, including cooking rice by the absorption method,
may require a slightly higher power setting to ensure the food is
cooked properly in the recommended time.
Searing steak
o To cook juicy and flavoursome steaks, you should stand the
meat at room temperature for about 20 minutes before cooking.
o Heat up a heavy-based frying pan.
o Brush both sides of the steak with oil. Drizzle a small amount of
oil into the hot pan and then lower the meat into the hot pan.
o Turn the steak only once during cooking. The exact cooking time
will depend on the thickness of the steak and how well cooked
you want it. Times may vary from about 2 – 8 minutes per side.
Press the steak to gauge how cooked it is. The firmer it feels the
more “well done” it will be.
o Leave the steak to rest on a warm plate for a few minutes to
allow it to relax and become tender before serving.
Stir-frying
o Choose an induction compatible flat-based wok or a large frying
pan.
o Have all the ingredients and equipment ready. Stir-frying should
be quick so if you are cooking large quantities, cook the food in
several smaller batches.
o Preheat the pan briefly and add two tablespoons of oil.
o Cook any meat first, then put it aside and keep warm.
o Stir-fry the vegetables. When they are hot but still crisp, turn
the cooking zone to a lower power setting. Return the meat to
the pan and add your sauce.
o Stir the ingredients gently to make sure they are heated
through.
o Serve immediately.
21
Hob guidelines
o The first few times the hob top is used, it may give off an acrid,
burning smell. This smell will disappear completely with repeated
use.
o The hob surface is fitted with cooking areas of different diameter
and power.
o The positions where the heat will radiate from are clearly marked
on the hob top. The saucepans must be positioned exactly on
these zones for efficient heating to occur. Pans should have the
same diameter as the cooking zone that they are being used on.
o You should not use saucepans with rough bottoms, as this can
scratch the ceramic surface.
o Before use, make sure that the bottoms of the saucepans are
clean and dry.
o When cold, the bottom of the pans should be slightly concave, as
they expand when hot and lie flat on the surface of the hob. This
will allow the heat to transfer more easily.
o The best thickness for the bottom of the pans is 2 – 3 mm of
enamelled steel and 4 – 6 mm for stainless steel with sandwich
type bottoms.
o If these rules are not followed, then there will be a great loss of
heat and energy. Heat not absorbed by the saucepan, will spread
to the hob, frame and surrounding cabinets.
o Preferably cover pans with a lid to permit cooking at a lower
heat.
o Always cook vegetables and potatoes, etc. in as little water as
possible, to reduce cooking times.
o Food or liquid that has high sugar content may damage the hob
top if it comes into contact with the ceramic hob surface. Any
spillages should be wiped up immediately, however this may not
prevent the hob surface from becoming damaged.
o IMPORTANT: The ceramic hob surface is tough; however it is
not unbreakable and can be damaged. Especially if pointed or
hard objects are allowed to fall on it with some force.
22
o DO NOT USE THE HOB IF THE SURFACE BECOMES BROKEN
OR CRACKED. YOU SHOULD CONTACT THE BAUMATIC
SERVICE DEPARTMENT IMMEDIATELY.
Cleaning and maintenance
Cleaning operations must only be carried out
when the oven is cool.
The appliance should be disconnected from your
mains supply before commencing any cleaning
process.
Cleaning the ceramic hob top
Any residues that are left on the hob top surface from cleaning
agents will damage it. You should remove any residues with
water and a little washing up liquid.
Abrasive cleaners or sharp objects will damage the hob surface;
you should clean it using water and a little washing up liquid.
Although it is easier to clean some deposits whilst the hob
surface is still warm. You should take care not to burn yourself if
cleaning the hob surface when it is still warm.
After each use
o Wipe the appliance over with a damp cloth.
o Dry the appliance by rubbing the surface with a clean cloth.
Cleaning table
Sugar or
food/liquid
containing sugar
Tin foil or plastic
Yes
Remove
when the
appliance
has cooled
down?
No
Yes
No
Fat splashes
No
Yes
Metallic
No
Yes
Type of deposit
Remove
immediately?
23
What should I
use to remove
the deposit?
Ceramic hob
scraper
Ceramic hob
cleaner
Ceramic hob
Ceramic hob
scraper
discolorations
Water splashes or
water rings
No
Yes
cleaner
Ceramic hob
cleaner
Using a ceramic hob scraper
Your appliance will be provided with a scraper. The following guidelines
should also be followed when using the ceramic hob scraper:-
o The scraper should be placed on the ceramic surface at an angle.
o Residues should be removed by sliding the blade carefully over
the ceramic surface.
o The ceramic surface should be wiped with a damp cloth that has
been dipped in warm, soapy water.
o Dry the appliance by rubbing the surface with a dry clean cloth.
Using a specialist ceramic hob cleaner
It is possible to purchase specialist ceramic hob cleaner/conditioner.
You should follow the instructions given by the manufacturer of the
specialist ceramic hob cleaner. You should ensure that it is suitable for
use on your appliance.
24
Installation
The installation must be carried out by a suitably
qualified person, in accordance with the current
version of the following.
o AS/NZS 3000:2007 Wiring Regulations
o 2010 Electricity Safety Regulations
Positioning
The adjacent furniture must be able to withstand a
minimum temperature rise of 85°C above the ambient
temperature of the room it is located in, during
periods of use.
This appliance is classified as Class 3 and therefore is to be built into a
kitchen unit (depending on size) or 600 mm worktop, providing the
following minimum distances are allowed:
o 700 mm between the hob surface and the underside of any
horizontal surface above it.
o 50 mm clearance around the front, back and sides of the
appliance and between the hob surface and any combustible
materials, measured from the cut out.
Unpacking the appliance
When unpacking the appliance please check that the following items
are contained within the packaging:
1
1
1
1
4
4
Baumatic hob
Ceramic hob scraper
Installation and instruction manual
Baumatic guarantee card
Fixing brackets
Fixing screws
25
Installing the appliance
o Cut a hole in the worktop that corresponds with the drawing
shown above.
o IMPORTANT: You must
observe the ventilation
requirements shown in
the drawing opposite.
26
o IMPORTANT: There are ventilation
holes around the outside of the hob.
YOU MUST ensure that these holes are
not blocked by the work top, when you
put the hob into position (see drawing
opposite).
o Carefully turn the hob upside down and
place it on a cushioned mat.
o Apply the sealing strip provided around
the edge of the appliance.
o The protective covering
removed from both sides.
must
be
o Do not leave a gap in the sealing agent
or overlap the thickness.
o IMPORTANT: Do not use a silicon sealant to seal the appliance
against the aperture. This will make it difficult to remove the hob
from the aperture in future, particularly if it needs to be
serviced.
o The supplied brackets need to be fitted to the fixing points on
the underside of the hob.
o Place a bracket onto each fixing, ensuring that the outer hole
lines up with the hole on the hob.
27
o Fasten the bracket to the position on the hob with a screw.
Adjust the bracket position to suit different table top thicknesses.
o Place the long screw into the fixing hole on the outer edge of the
bracket but do not fully tighten.
o Carefully turn the hob back over and then gently lower it into the
aperture hole that you have cut out.
o When the hob is correctly positioned, tighten the long screws to
fix the hob securely in the aperture hole. These screws MUST
be securely tightened.
Electrical connection
Before connecting the appliance, make sure that the supply voltage
marked on the rating plate corresponds with your mains supply
voltage.
WARNING: THIS APPLIANCE MUST BE EARTHED.
o This appliance should be wired into a 20A double pole
switched fused spur outlet, having 3 mm contact
separation and placed in an easily accessible position
adjacent to the appliance. The spur outlet must still be
accessible even when your hob is located in its housing.
o THIS APPLIANCE MUST NOT BE CONNECTED TO A 10 AMP
SUPPLY.
o If you have to change the hob power cord, the earthing
(yellow/green) conductor must always be 10 mm longer than the
line conductors.
o Care must be taken to ensure that the temperature of the mains
supply cable does not exceed 50°C.
o If the mains supply cable is damaged, then it must be replaced
by an appropriate replacement.
o Cable type: H05 RRF 3 core x 1.5 mm²
28
Replacing the mains supply cable
If the mains supply cable is damaged, then it must be replaced by an
appropriate replacement.
The mains supply cable should be replaced in accordance with the
following instructions:
o Switch the appliance off at the control switch.
o Open the terminal block on the underside of the hob.
o Unscrew the terminal screws fixing the cable.
o Replace the cable with one of the same length and specification.
o The “green-yellow” earth wire must be connected to the terminal
. It must be about 10 mm longer than the live and
marked
neutral wires.
o The “blue” neutral wire must be connected to the terminal
marked with letter the (N) - the live wire must be connected to
the terminal marked with the letter (L).
29
My appliance isn’t working correctly
Error codes
If you appliance senses an abnormality, the hob will enter stand-by
mode and will display a corresponding error code.
Error
code
F3 – F8
F9 - FE
E1 / E2
E3 / E4
E5 / E6
Possible causes
Temperature sensor
failure.
Temperature sensor of
the IGBT failure.
Abnormal supply
voltage.
Abnormal temperature.
Bad induction hob heat
radiation.
What to do
Contact the Customer Care
Department.
Contact the Customer Care
Department.
Check if the power supply is
normal and correct. Restart the
hob.
Check the pot in use.
Restart after the induction hob has
cooled down.
General troubleshooting
If your hob does not appear to be operating correctly, please refer to
the table below before contacting the Customer Care Department.
Problem
The induction hob cannot be
turned on.
Possible causes
No power.
The touch controls are
unresponsive.
The controls are locked.
The touch controls are
difficult to operate.
There may be a slight film
of water over the controls
or you may be using the
tip of your finger when
touching the controls.
Rough-edged cookware.
Unsuitable, abrasive
scourer or cleaning
products being used.
The glass is being scratched.
30
What to do
Make sure that the
induction hob is
connected to the power
supply and that it is
switched on.
Check whether there is a
power outage in your
home or area. If you’ve
checked everything and
the problem persists, call
the Customer Care
Department.
Unlock the controls. See
the section on locking
the hob top in this
manual.
Make sure the touch
control area is dry and
use the ball of your
finger when touching the
controls.
Use cookware with flat
and smooth bases. See
the section on cookware
in this manual.
Some pans make crackling or
clicking noises.
The induction hob makes a
low humming noise when
used on a high heat setting.
Fan noise coming from the
induction hob.
Pans do not become hot and
appears in the display.
The induction hob or a
cooking zone has turned
itself off unexpectedly, a
tone sounds and an error
code is displayed (typically
alternating with one or two
digits in the cooking timer
display).
This may be caused by
the construction of your
cookware (layer of
different metals vibrating
differently).
This is caused by the
technology of induction
cooking.
A cooling fan built into
your induction hob has
come on to prevent the
electronics from
overheating. It may
continue to run even after
you’ve turned the
induction hob off.
The induction hob cannot
detect the pan because it
is not suitable for
induction cooking.
The induction hob cannot
detect the pan because it
is too small for the
cooking zone or not
properly centred on it.
Technical fault.
31
This is normal for
cookware and does not
indicate a fault.
This is normal, but the
noise should quieten
down or disappear
completely when you
decrease the power
level.
This is normal and needs
no action. Do not switch
the power to the
induction hob off at the
wall while the fan is
running.
Use cookware suitable
for induction cooking.
See the section on
cookware in this manual.
Centre the pan and
make sure that its base
matches the size of the
cooking zone.
Note down the error
letters and numbers,
switch the power to the
induction hob off at the
wall and contact the
Customer Care
Department.
IMPORTANT: If your appliance appears not to be
operating correctly, then you should disconnect it
from your mains supply and then contact the
Customer Care Department on telephone number
1800 444 357.
DO NOT ATTEMPT TO REPAIR THE APPLIANCE YOURSELF.
Please note that if an engineer is asked to attend whilst the product is
under guarantee and finds that the problem is not the result of an
appliance fault, then you may be liable for the cost of the call out
charge.
The appliance must be accessible for the engineer to perform
any necessary repair. If your appliance is installed in such a
way that an engineer is concerned that damage will be caused
to the appliance or your kitchen, then he will not complete a
repair.
This includes situations where appliances have been tiled in,
sealed in with sealant, have wooden obstructions placed in
front of the appliance, like plinths. Or any installation other
than the one specified by Baumatic Ltd. has been completed.
Please refer to the conditions of guarantee that appear on the
warranty card that you receive with the appliance.
32
Think Appliances Pty Ltd.
416-424 Barry Rd
Coolaroo VIC 3048
Sales Telephone
1300 132 824
Service Telephone
1800 444 357
Website
www.thinkappliances.com
Applico Ltd.
Private Bag 92900
Onehunga, Auckland 1061,
New Zealand
Website
www.baumatic.co.nz
United Kingdom
Baumatic Ltd.,
Baumatic Buildings,
6 Bennet Road,
Reading, Berkshire
RG2 0QX
United Kingdom
Sales Telephone
(0118) 933 6900
Website:
www.baumatic.co.uk
33
34
35
SERVICING:
For Service & Spare Parts
please call 1800 444 357
36