1
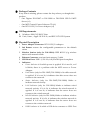
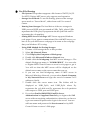
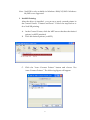
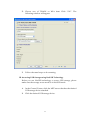
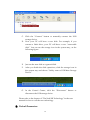
Digitus DN-13007 / DN-13008 / DN-13018 USB 2.0 Hi-Speed MFP Server Quick Installation Guide ①. Introduction This document describes the steps for installing and configuring Digitus DN-13007/DN-13008/DN-13018 USB 2.0 MFP server as a Print/File/Scan server in the Windows environment. Digitus DN-13007/DN-13008 uses LAN (standard Ethernet) to access network, while Digitus DN-13018 uses LAN or wireless module (802.11b/g) to access network. The following table shows the differences among DN-13007, DN-13008, and DN-13018. Model LAN Wireless USB Port(s) DN-13008 Yes No 1 DN-13007 Yes No 2 DN-13018 Yes Yes 2 Except for the wireless configuration, most configuration and operations are the same for DN-13007/DN-13008 and DN-13018. Similarly, almost all of the configuration and operations are the same for DN-13007 and DN-13008 except that only one USB device can be connected to DN-13008 while at most two USB devices can be connected to DN-13007. Please refer to the User’s Manual in the bundled CD-ROM for more details. - This Setup Guide is only for Windows users. If you use the MFP server in Unix/Linux, please refer to the User’s Manual in the bundled CD-ROM for more details. 1 ②. Package Contents If any item is missing, please contact the shop where you bought this product. - One Digitus DN-13007 or DN-13008 or DN-13018 USB 2.0 MFP Server (x1) - One MFP Control Center Software CD (x1) One DC IN 12V/1A Power Adaptor (x1) ③. OS Requirements I. Windows 2000/XP/2003/Vista II. Unix, Linux , Apple OS X 10.3x, and RFC-1179 LPD System ④. Physical Description 1. Power Adaptor Connector: DC IN 12V/1A adaptor 2. Init Button: restore the configurable parameters to the default values 3. Wireless Station (only for DN-13018): IEEE 802.11 b/g wireless station with antenna inside 4. Ethernet Connector: a twisted pair category 5 cable 5. USB Host Ports: USB 1.1/2.0 low, full, and Hi-Speed compliant 6. Indicators Power Indicator is lit while power is applied. If it is not lit, or if it blinks, there is a problem with the MFP server or Power Adapter. Link Status (only for DN-13007/DN-13008) is lit while network is applied. If it is not lit, it indicates that this server does not connect to the network. Status Indicator (only for DN-13007/DN-13008) blinks to indicate network activity. LAN Indicator (only for DN-13018) blinks to indicate wired network activity. If it is lit, it indicates the wired network is applied. If it is not lit, it indicates that the server does not connect to the wired network. WLAN Indicator (only for DN-13018) blinks to indicate wireless network activity. If it is lit, it indicates the wireless network is applied. If it is not lit, it indicates that the server does not connect to the wireless network. USB1 Indicator is lit while a USB device connects to USB1 Port 2 of the MFP server. If it is not lit, or if it blinks, there is a problem with the USB device or the MFP server. USB2 Indicator is lit while a USB device connects to USB2 Port of the MFP server. If it is not lit, or if it blinks, there is a problem with the USB device or the MFP server. Note : There is only one USB LED indicator for DN-13008. ⑤. Connect Digitus MFP Server to Your Wired Network I. Connect the MFP server to the wired network, such as a LAN switch or a LAN hub, using a LAN cable. II. Connect USB printers, hard drives or flash ROM disks, or all-in-one series printers (AIO/MFP) to the MFP server using USB cables. III. Plug in the power adaptor (included in this package) to power on the MFP server. ⑥. Connect Digitus DN-13018 to Your Wireless Network Just skip this step if you are using DN-13007 or DN-13008. I. Follow Step 5. II. Properly set up wireless configuration as Step 8. III. Plug-off the LAN (Ethernet) cable. IV. Plug-off the power adapter and then plug-in the power adapter to restart server. DN-13018 will connect to your wireless network. ⑦. Install Utility I. Insert the included CD-ROM into the personal computer. The Autorun screen as Fig1 should appear. 3 Figure 1 Autorun II. Click Install Product button. III. Click Next, if you see any Next button in installation windows. IV. Click Finish. ⑧. Configure Digitus MFP Server with Utility Using MFP Control Center Software (Fig2): 1. Open the Digitus MFP Control Center. It will automatically search the existing servers and display their statuses. 2. Select the server that you want to configure. Double click the selected server and enter Administrator (default: admin) and Password (default: admin). Figure 2 Control Center 3. Name your Digitus MFP server and select a codepage for file server function as Fig3. Please enter the server name and the workgroup name for Windows networking by SMB protocol. The default server name is the model name (DN-13007 or DN-13008 or DN-13018) and the workgroup name is “ARBEITSGRUPPE”. If you want to use the file server function, you have to set the same codepage as the one that your Windows PC is using. 4. Assign IP address to Digitus MFP server as Fig4. Please choose the one method to set the IP address of the server. You can automatically get IP by using DHCP or manually assign an IP to the server. 4 Figure 3 Set Server Name and Codepage 5. Set up wireless configuration (only for DN-13018): - Select the Network Type: Ad-Hoc mode - no Access Point is used or Infrastructure mode (Default) - all Wireless stations connect to the Access Point. - Set SSID, Channel, and Security according to the table below 5 SSID Ad-hoc Mode Infrastructure Mode The Server will join any group with Must match the Access the same SSID. Point. If there is no Ad-Hoc group available, the Server will create the group using the SSID assigned to it. Channel The Server will join any group with Access Point sets the the same Channel number. Channel used. If there is no existing Ad-Hoc Wireless stations group available, the Server will automatically locate the create the group using its own correct channel. Channel number. WEP Must match the other Wireless Must match the Access Settings stations. Point. Figure 4 TCP/IP Setting 6 ⑨. Use File Sharing - - - - File System: This product supports a file format of FAT12/16/32. For NTFS, Digitus MFP server only supports read operation. Storage Access Mode: To use file sharing, please set the storage access mode to “Server Mode”, either from web UI or control Center. Naming Your Storages: The local drives of the two storages in USB1 port and USB2 port are named as USBx_DyPz, where USBx represents the USBx port, Dy represents the the y-th Disk and Pz represents the z-th partition. Setting MFP Server Code Page: MFP Server supports Windows code pages. If you want to communicate files with MFP server, you have to set your MFP server codepage to be same as the codepage that your Windows PC is using. Using SMB Method for Sharing Storages 1. Connect a USB storage device to this product. 2. Select My Network Places 3. Click Display the Computers of Workgroup 4. Double click Microsoft Windows Network icon. 5. Double click the Workgroup that MFP server belongs to. The default Workgroup name is “WORKGROUP”. You can refer to Digitus MFP Control Center or server’s web pages to get it. You will see that the MFP server will be displayed as the default server name or the server name that you set. 6. If you can not find Workgroup name of MFP server in Microsoft Windows Network, you can select Search Computer in My Network Places and type the server’s hostname or IP address to find it. 7. Double click this server name icon. The folders will be displayed as USB1_DyPz, and USB2_DyPz where Dy represents the y-th disk and Pz represents the z-th partition with respect to USB1 port and USB2 port. 8. If you clear Enable SMB/CIFS Print/File Server Authentication in Supported Protocols, you login to the SMB server without requiring authentication; otherwise you have to type user name and password to login to the server. You can add user name and password in User Account box by MFP Control Center or server’s Web page. 7 # If you use SMB on Windows 98 SE/ME, you must login to your Windows 98 SE/ME using the same user name as in server’s User Account. 9. Perform Open, Paste, Remove or Copy the files to the shared folders. - Using FTP Method for Sharing Storages 1. Open Microsoft IE 2. In Web Address List, type command: “ftp://server’s server name “ or “ftp:// server’s IP address”. If you have changed the default FTP port : 21, you have to add the new port number in the tail of the command as “ftp://server’s server name:ftp port” or “ftp://IP address of server: ftp port” 3. The shared folders will be listed in IE. 4. If you set Enable Server Authentication in FTP server protocol settings you have to type user name and password to login to the server; if you set Allow Anonymous Login, you can use the user name “anonymous” to login with Read-only permission. If you clear server authentication, you do not need username or password to login to the server. You can add user name and password in User Account box by MFP Control Center or server’s Web page. 5. Perform Open, Paste, Remove or Copy the files to the shared folders. ⑩. The NetUSB Technology “NetUSB” technology allows you to use USB printers or USB MFPs and USB storage devices as if they were connected directly to your PC although they are actually connected to the Digitus MFP server. The “connect” operation is a software operation that simulates an actual USB device plug-in. That is to say, when you do a “connect” operation in the Control Center, PC can then detect a USB device’s plug-in, although actually you do not plug in any USB device. Similarly, the “disconnect” operation is a software operation that simulates the disconnection of the USB device. Once the connect operation is successful, the operations to use that USB device are just the same as if the USB device is directly connected to the PC. 8 Note : NetUSB is only available in Windows 2000/XP/2003. Windows 98/ME is not supported. I. NetUSB Printing After the driver is installed , you can see a newly created printer in the Control Panel’s “Printers and Faxes”. Follow the steps below to do a NetUSB printing. A. In the Control Center, click the MFP server that has the desired printer (or MFP) attached. B. Click the desired printer (or MFP). C. Click the “Auto Connect Printer” button and choose “Set Auto-Connect Printer”. The following figure will appear. 9 D. Choose the desired printer. The desired printer must be the Windows printer (this is a logical printer) that matches the printer attached on the MFP server (this is a physical printer). Then click the “Apply” button. E. Then, the printer will be marked as an “Auto-Connected Printer” in red. F. Then try to issue a print job to the desired printer using the usual steps. II. NetUSB Scanning A. In the Control Center, click the MFP server that has the desired MFP attached. B. Click the desired MFP. C. Click the “Network Scanner” button. The following window will appear. 10 D. Choose one of TWAIN or WIA item. Click “OK”. The following window will appear. E. Follow the usual steps to do scanning. III. Accessing USB Storage using NetUSB Technology Before you use NetUSB technology to access USB storage, please make sure the storage access mode is in NetUSB mode. A. In the Control Center, click the MFP server that has the desired USB storage device attached. B. Click the desired USB storage device. 11 C. Click the “Connect” button to manually connect the USB storage device. D. Now your PC will have a new disk. For example, if you connect a flash drive, your PC will have a new “removable disk”. You can see the storage icon in the system tray, as the following figure. E. F. Just use the new disk as a general disk. After you finish the disk operations, click the storage icon in the system tray and choose “Safely remove USB Mass Storage Device”. G. In the Control Center, click the “Disconnect” button to disconnect the USB storage device. Please refer to the chapter of “The NetUSB Technology” in the user manual for how to use the new technology. ⑪. Default Parameters 12 Some of the important default parameters are shown below. - Administrator: admin - Password: admin - Server Name: DN-13007 (for DN-13007) or DN-13008 (for DN-13008) or DN-13018 (for DN-13018) - Workgroup: ARBEITSGRUPPE - Static IP: 192.168.1.100 - DHCP: enabled 13