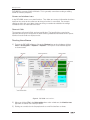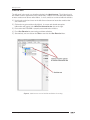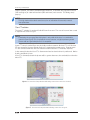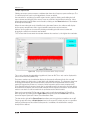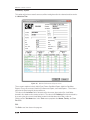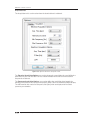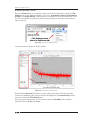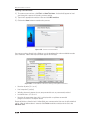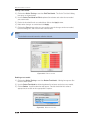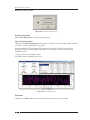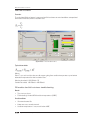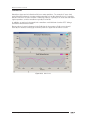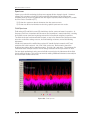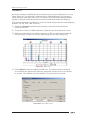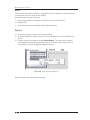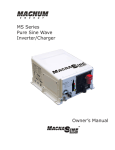
1
User manual
SKF Dynamic Motor Analyzer
EXP4000
SKF Dynamic Motor Analyzer
EXP4000
User manual
Part number: 71-005 EN
Revision: V6
Copyright © 2012 by Baker Instrument Company, an SKF Group Company
All rights reserved.
Baker Instrument Company, an SKF Group Company
4812 McMurry Ave. Suite 100
Fort Collins, CO 80525
(970) 282-1200
(970) 282-1010 (FAX)
800-752-8272 (USA Only)
http://www.skf.com/group/products/condition-monitoring/electric-motor-testing/index.html
Information furnished in this manual by Baker Instrument Company, an SKF Group Company,
is believed to be accurate and reliable. However, Baker Instrument Company, an SKF Group
Company, assumes no responsibility for the use of such information or for any infringements
of patents or other rights of third parties that may result from its use. No license is granted
by implication or otherwise under any patent rights of Baker Instrument Company, an SKF
Group Company.
No part of this document may be reproduced in part or in full by any means, such as
photocopying, photographs, electronic recording, videotaping, facsimile, and so on without
written permission from Baker Instrument Company, an SKF Group Company, Fort Collins,
Colorado.
NOTICE
Baker Instrument Company—an SKF Group Company—assumes no
liability for damages consequent to the use of this product.
SKF Patents
#US04768380 • #US05679900 • #US05845230 • #US05854553 • #US05992237 •
#US06006164 • #US06199422 • #US06202491 • #US06275781 • #US06489884 •
#US06513386 • #US06633822 • #US6,789,025 • #US6,792,360 • US 5,633,811 • US
5,870,699 • #WO_03_048714A1
Notices
CAUTION
This equipment has been tested and found to comply with the limits for a
Class A digital device, pursuant to Part 15 of the FCC rules. These limits are
designed to provide reasonable protection against harmful interference with
the equipment is operated in its installation.
This equipment generates, uses, and can radiate radio frequency energy
and, if not installed and used in accordance with the product manual, could
cause harmful interference to radio communications. If this equipment
does cause harmful interference, the user will be required to correct the
interference. Due to the phenomena being observed and the material
properties being measured, this equipment radiates radio frequency energy
while in the active test mode. Care should be taken to ensure this radio
frequency energy causes no harm to individuals or other nearby equipment.
Intended use of instrument
The EXP4000 is intended for detection motor efficiency and physical performance
deterioration, and other electrical problems within electric machines by trained professionals.
It is intended to perform only the specified tests that this manual explains in detail. Please
refer to chapters in this manual concerning specific operation of the instrument.
Note on software
While the UNIT is a Microsoft Windows® based instrument, it is specially configured and
optimized to perform the functions for which it was designed. The loading or operation of
unauthorized software may cause the instrument to malfunction or cease functioning and
may void the manufacturer’s warranty.
ii
Dynamic Motor Analyzer—EXP4000 User Manual
Notices
Declaration of conformity
Manufacturer’s Name & Address:
Baker Electrical Instrument Company, an SKF Group Company
4812 McMurry Ave
Fort Collins, CO 80525 USA
Equipment Description: On-Line Motor Monitor
Equipment Model Designations: EXP4000
Application of Council Directive 72/23/EC on the harmonization of the laws related to
Member States relating to electrical equipment designed for use within certain voltage limits,
as amended by: Council Directive 93/68/EC and Council Directive 2004/108/EC on the
approximation of the laws related to Member States relating to the electromagnetic
compatibility, as amended by: Council Directive 93/68/EC. Note: due to the phenomena
being observed and the material properties being measured, this equipment does radiate
radio frequency energy while in the active test mode.
Referenced Safety Standards:
EN 61010-1
Referenced EMC Standards:
EN 61326:2001
EN 55011 Class A
EN 61000-3-2
EN 61000-3-3
EN 61000-4-2
EN 61000-4-3
EN 61000-4-4
EN 61000-4-5
EN 61000-4-6
EN 61000-4-8
EN 61000-4-11
I, the undersigned, hereby declare that the equipment specified above conforms to the above
Directives and Standards.
Signature:
Printed Name: Erik A. Stolz
Title: Electrical Engineer
Dynamic Motor Analyzer—EXP4000 User Manual
iii
Notices
Software License Agreement
UNIT—test equipment and desktop versions
Carefully read the following terms and conditions before opening the software envelope or
operating the UNIT. Either opening the envelope or using the software constitutes your
acceptance of these terms and conditions on behalf of any party using the instrument (the
“User”). If you or the User do not agree with these terms, promptly return the instrument
with the envelope unopened for a full refund.
1. Definitions
(a) Computer Software: A Software program provided with the Instrument on CD or other
physical medium for installation and use on the User’s desktop computer(s) or servers, and
all updates, upgrades, enhancements and modifications provided directly or indirectly to the
User from time to time.
(b) Documentation: This User Manual and other manuals and documentation relating to the
Instrument and provided directly or indirectly to the User in the original Instrument carton or
from time to time thereafter.
(c) Instrument: The unit of test equipment with which this User Manual was provided to the
User.
(d) Instrument Software: The software program pre-loaded on the Instrument, and all
updates, upgrades, enhancements and modifications provided directly or indirectly to the
User from time to time.
(e) Software: The Instrument Software and/or Computer Software, as the context requires.
(f) Intellectual Property Rights: All rights arising or protectable under the copyright,
trademark, patent, or trade secrets laws of the United States or any other nation, including
all rights associated with the protection of computer programs and/or source code.
(g) Person: An individual, a partnership, a company, a corporation, an association, a joint
stock company, a trust, a joint venture, an unincorporated organization, or a governmental
entity (or any department, agency, or political subdivision thereof).
2. License; Related Terms
(a) Grant of License. SKF grants the User, pursuant to the terms and conditions of this
Software License, a non-exclusive, non-transferable, and revocable license to (i) use the
Instrument Software only on the Instrument, (ii) the Computer Software(s) on the numbers
and types of desktop and/or other computers specified elsewhere in this User Manual, (iii)
reproduce the Software only as necessary to use it and create no more than two copies of the
Software in machine readable form for back-up purpose only; provided in each case that the
copy shall include SKF CMC-Fort Collins (formerly Baker Instrument Company)’s copyright
and any other proprietary notices, and (iv) utilize the Documentation only in conjunction with
the use of the Software.
(b) Restrictions on Use. The User shall not (i) permit any parent, subsidiaries, affiliated
entities or third parties to use the Software; (ii) grant third parties use of the Software on a
service bureau, application service provider or other similar basis; (iii) rent, resell, lease,
timeshare or lend the Software to any Person; (iv) sublicense, assign, or transfer the
Software or this license for the Software to any third party, (v) reproduce the Software other
than as expressly authorized herein, or distribute, or publicly display the Software; (vi) make
the Software accessible to any Person by any means, including posting on a web site or
through other distribution mechanisms over the Internet; (vii) reverse assemble,
disassemble, reverse engineer, reverse compile, decompile, or otherwise translate the
Software or prepare Derivative Works based on the Software; (viii) place, reproduce, or make
available the Software on the User’s computer network if the User is only authorized by this
Software License to operate the Software on a single workstation; (ix) exceed at any given
iv
Dynamic Motor Analyzer—EXP4000 User Manual
Notices
point in time the total number of network clients authorized by the applicable purchase order
or ordering document to use or access the Software; or (x) edit or modify the Software except
as expressly authorized by SKF CMC-Fort Collins (formerly Baker Instrument Company),
including altering, deleting, or obscuring any proprietary rights notices embedded in or
affixed to the Software.
(c) Protection of Software. The User will take action by instruction, written agreement, or
otherwise as appropriate with any person permitted access to the Software to enable the
User to comply with its obligations hereunder.
(d) Material Terms and Conditions. The User acknowledges that each of the terms and
conditions of this Section 2 is material and that failure of the User to comply with these terms
and conditions shall constitute sufficient cause for SKF to terminate this Software License
and the license granted hereunder immediately and without an opportunity to cure. This
subsection 2(d) shall not be construed to preclude, or in any way effect, a finding of
materiality with respect to any other provision of this Software License.
3. Ownership
SKF CMC-Fort Collins (formerly Baker Instrument Company), as between SKF and the User,
owns all Intellectual Property Rights related to the Software, including custom modifications
to the Software, whether made by SKF or any third party. The User agrees that this Software
License effects a license, not a sale, of the Software and that the first sale doctrine, as
codified in 17 U.S.C. § 109, does not apply to the transaction effected by this Software
License.
4. Confidential Information
The Software contains proprietary information, including trade secrets, know-how and
confidential information (hereinafter referred to collectively as the “Confidential Information”),
that is the exclusive property of SKF CMC-Fort Collins (formerly Baker Instrument Company).
During the period this Software License is in effect and at all times after its termination, the
User and its employees and agents shall maintain the confidentiality of the Confidential
Information and shall not sell, license, publish, display, distribute, disclose or otherwise make
available the Confidential Information to any Person nor use the Confidential Information
except as authorized by this Software License. The User shall not disclose the Confidential
Information concerning the Software, including any flow charts, logic diagrams, user
manuals and screens, to persons not an employee of the User without the prior written
consent of SKF CMC-Fort Collins (formerly Baker Instrument Company).
5. Limited Warranties; Disclaimer
(a) SKF CMC-Fort Collins (formerly Baker Instrument Company)’s sole and exclusive
warranties with respect to the Instrument and Software are set forth in this User Manual.
(b) EXCEPT AS SET FORTH IN THIS User Manual AND TO THE EXTENT PERMITTED BY
APPLICABLE LAW, ALL EXPRESS AND/OR IMPLIED WARRANTIES OR CONDITIONS,
INCLUDING BUT NOT LIMITED TO IMPLIED WARRANTIES OR CONDITIONS OF
MERCHANTABILITY, MERCHANTABILITY OF A COMPUTER PROGRAM, INFORMATIONAL
CONTENT, SYSTEM INTEGRATION, FITNESS FOR A PARTICULAR PURPOSE, AND NONINFRINGEMENT, ARE HEREBY DISCLAIMED AND EXCLUDED BY SKF CMC-FORT COLLINS
(FORMERLY BAKER INSTRUMENT COMPANY).
6. Limitations on Liability
(a) Limitations and Exclusions. IN NO EVENT WILL SKF BE LIABLE TO LICENSEE FOR ANY
DIRECT, INDIRECT, INCIDENTAL, CONSEQUENTIAL, PUNITIVE OR OTHER SPECIAL
DAMAGES, LOST PROFITS, OR LOSS OF INFORMATION SUFFERED BY LICENSEE ARISING
OUT OF OR RELATED TO THE INSTRUMENT OR THE USE OF THE INSTRUMENT, FOR ALL
CAUSES OF ACTION OF ANY KIND (INCLUDING TORT, CONTRACT, NEGLIGENCE, STRICT
LIABILITY, BREACH OF WARRANTY OR CONDITION, AND STATUTORY) EVEN IF SKF HAS
Dynamic Motor Analyzer—EXP4000 User Manual
v
Notices
BEEN ADVISED OF THE POSSIBILITY OF SUCH DAMAGES. THE PRECEDING EXCLUSION
AND DISCLAIMER OF DAMAGES SHALL APPLY TO ALL CLAIMS MADE BY LICENSEE
RELATED TO OR ARISING OUT OF LICENSEE’S USE OF THE SOFTWARE, INCLUDING, BUT
NOT LIMITED TO, CLAIMS ALLEGING THAT THE SOFTWARE, OR ANY COMPONENT
THEREOF, FAILED OF ITS ESSENTIAL PURPOSE OR FAILED IN SOME OTHER RESPECT.
(b) Acknowledgment. The User agrees that the limitations of liability and disclaimers of
warranty set forth in this Software License will apply regardless of whether SKF has tendered
delivery of the Software or the User has accepted the Software. The User acknowledges that
SKF has set its prices and granted the licenses contemplated herein in reliance on the
disclaimers of warranty and the limitations and exclusions of liability set forth in this
Software License, and that the same form an essential basis of the bargain between the
Parties.
7. Term and Termination
(a) Term. The licenses granted herein shall commence on the User’s acceptance of the terms
of this Software License, and shall continue in existence until it is terminated in accordance
with Section 7(b) below.
(b) Termination. SKF may terminate this Software License and the license conveyed
hereunder in the event that the User breaches any provision, term, condition, or limitation set
forth in this Software License, including but not limited to the license restrictions set forth in
Section 2(b) of this Software License.
(c) Effect of Termination. Within ten (10) days after termination of this Software License and
the licenses granted hereunder, the User shall return to SKF CMC-Fort Collins (formerly
Baker Instrument Company), at the User’s expense, the Computer Software and all copies
thereof, and deliver to SKF a certification, in a writing signed by an officer of the User, that all
copies of the Computer Software have been returned to SKF and that the User has complied
with the requirements of this Section 7(c).
8. Assignment
The User may assign this Software License in connection with the sale or other transfer of
the Instrument, provided, that the transferee agrees in writing to be bound by the terms of
this Software License. Except as authorized by the preceding sentence, the User shall not
assign or otherwise transfer the Software or this Software License to anyone, including any
parent, subsidiaries, affiliated entities or third Parties, or as part of the sale of any portion of
its business, or pursuant to any merger, consolidation or reorganization, without SKF CMCFort Collins (formerly Baker Instrument Company)’s prior written consent. Any assignment
or transfer effected in violation of this Section 8 shall be void ab initio and of no force or
effect.
9. General
The validity and interpretation of this Software License shall be governed by Colorado Law
except as to copyright and other proprietary matters, which may be preempted by United
States laws and international treaties. In the event of any violation of this Software License,
SKF reserves the right to pursue any state law remedies (including contractual remedies) or
remedies under federal laws or both. The User consents to exclusive jurisdiction in either
state or federal courts in Colorado or both as appropriate and agrees that the prevailing party
shall be entitled to its attorney fees and costs. No decision, act or inaction of SKF CMC-Fort
Collins (formerly Baker Instrument Company), shall be construed to be a waiver of any right
or remedy, and pursuit of any state or federal causes shall not be deemed an election or
remedies. In the event of any provision of this Software License shall be deemed
unenforceable, or void, or invalid, such provision shall be modified so as to make it valid and
enforceable and as so modified the entire agreement shall remain in full force and effect.
This Software License sets forth the entire understanding and agreement between the
vi
Dynamic Motor Analyzer—EXP4000 User Manual
Notices
parties and no written or oral representative of any kind whatsoever shall in any way modify
or expand the terms of this User Manual.
In the event of any conflict or inconsistency between the terms of this Software License and
any Documentation, this agreement shall preempt such documentation to the extent
inconsistent.
Important notice concerning warranty and repairs
The warranty is void if (i) the UNIT is shipped without shock absorbing packing material, (ii)
the UNIT is damaged by improper use, (iii) any party other than SKF modifies the Software or
loads or operates unauthorized software programs on the UNIT, or (iv) the User has breached
the Software License set forth above. The User assumes all responsibility and expense for
removal, reinstallation, freight, or on-site service charges in connection with the foregoing
remedies.
SKF CMC-Fort Collins (formerly Baker Instrument Company)’s liability to purchaser relating to
the product whether in contract or in part arising out of warranties, representations,
instructions, installations, or defects from any cause, shall be limited exclusively to correcting
the product and under the conditions as aforesaid.
If the UNIT fails, whether it is under warranty or not, call the SKF service department before
returning the unit for repair. If the unit needs in-house repair, our service staff might direct
you to ship the unit to the authorized service center closest to you. This might save both time
and money. When calling the Baker service department or one of the service centers, please
have the model and serial numbers available. These numbers are located on the rear of the
instrument. If the unit is out of warranty, a purchase order will be required if the unit is
returned for repair.
Virus alert
The UNIT contains computer software that is vulnerable to damage from computer viruses.
Before shipping, SKF scanned all data to ensure the UNIT is virus-free. Before inserting any
disks into the disk drive or connecting the UNIT to a computer network, scan all disks for
viruses.
Trademarks
All other trademarks, service marks or registered trademarks appearing in this manual are
the trademarks, service marks or registered trademarks of their respective owners.
Dynamic Motor Analyzer—EXP4000 User Manual
vii
Notices
viii
Dynamic Motor Analyzer—EXP4000 User Manual
Table of contents
1 About this manual
1
Formatting ............................................................................................................................. 1
Information devices............................................................................................................... 1
2 Safety and general operating information
3
General safety precautions................................................................................................... 3
Symbols and labels used on equipment............................................................................. 3
Safety warnings..................................................................................................................... 4
Operational safety warnings................................................................................................. 5
Accessory interconnection and use..................................................................................... 5
Cleaning and decontamination............................................................................................ 5
Installation requirements...................................................................................................... 6
Environment conditions/storage.......................................................................................... 6
Unpacking the unit................................................................................................................. 6
Shipping the unit.................................................................................................................... 6
3 Getting started
7
Configuring software for motor data................................................................................... 7
Database features................................................................................................................. 7
EXP4000 software-specific features.................................................................................. 7
Starting the software............................................................................................................ 8
Test domain buttons............................................................................................................10
Results panels and windows..............................................................................................10
Machine tree.........................................................................................................................12
Keyboard shortcuts..............................................................................................................13
Software tips........................................................................................................................13
4 Connecting the EXP4000
15
Physical setup of EXP4000 with portable sensors..........................................................15
EXP4000 connections to motor terminals.......................................................................16
Connection Setup window..................................................................................................16
Manual phasor adjustments...............................................................................................18
5 EXP4000 tests
19
Test domains and testing theory........................................................................................19
Power Quality domain.........................................................................................................20
Harmonics............................................................................................................................25
Table of Contents
Machine Performance domain...........................................................................................26
Current domain....................................................................................................................31
Spectrum domain................................................................................................................33
Torque domain.....................................................................................................................37
Connection domain..............................................................................................................40
6 EXP4000 software overview
43
File menu..............................................................................................................................43
Summary Report.................................................................................................................45
Machine menu.....................................................................................................................46
Thresholds menu ...............................................................................................................51
Tools menu...........................................................................................................................54
Help menu............................................................................................................................64
7 VFD4000 analysis software option
65
Operation details..................................................................................................................65
Waveforms............................................................................................................................66
VFD Details domain.............................................................................................................67
8 Continuous Monitoring Software option
69
File menu..............................................................................................................................70
Machine menu.....................................................................................................................70
Tools menu...........................................................................................................................70
View menu............................................................................................................................71
Options menu.......................................................................................................................72
General operation icons......................................................................................................73
Modifying the continuous monitoring tool........................................................................74
Channel descriptions...........................................................................................................77
9 Vibration software option
79
Viewing results.....................................................................................................................82
Tools to enhance viewing graphs.......................................................................................89
10 DC4000 software overview
91
DC4000 Machine Dynamic Analysis software tests and features.................................91
DC4000 Machine Dynamic Analysis software problem types identified......................91
DC connections for the EXP4000 portable sensors........................................................92
DC4000 software navigation and overview.....................................................................94
Software testing screen................................................................................................... 105
Test domains .................................................................................................................... 108
x
Dynamic Motor Analyzer—EXP4000 User Manual
Table of Contents
Drive domain..................................................................................................................... 109
Machine domain............................................................................................................... 116
Load.................................................................................................................................... 121
Torque ripple...................................................................................................................... 122
Load level .......................................................................................................................... 123
Waveforms......................................................................................................................... 124
Spectrum........................................................................................................................... 125
Harmonics......................................................................................................................... 128
Reports............................................................................................................................... 129
11 Example test and report generation
131
Motor monitoring ........................................................................................................... 131
Looking at data collected.................................................................................................. 132
Creating reports from the report generator.................................................................. 135
Automatic generation of reports..................................................................................... 136
Appendix A — Default settings
137
Default settings................................................................................................................. 137
Appendix B — Connection troubleshooting
139
General............................................................................................................................... 139
Non-VFD mode................................................................................................................. 139
Frequently asked questions............................................................................................. 140
Appendix C — Blue results
143
Appendix D — EP4000 installation 145
What to do first:................................................................................................................. 145
Safety precautions for EP installation............................................................................ 146
Choosing a suitable location for the EP.......................................................................... 147
EP4000 ratings................................................................................................................. 150
Appendix E — References and glossary
151
Standards........................................................................................................................... 151
Literature........................................................................................................................... 151
Glossary of terms.............................................................................................................. 152
Appendix F — Technical specifications
155
Index
159
Dynamic Motor Analyzer—EXP4000 User Manual
xi
Table of Contents
xii
Dynamic Motor Analyzer—EXP4000 User Manual
1
About this manual
This manual uses the following conventions in formatting, and informational devices to help
you more clearly identify specific elements and information.
Formatting
Interface items are set in Initial Caps and Bold.
Page or window names are set in italics.
File names are set in courier font.
Information devices
Information requiring special attention is set in the following format and structure:
NOTE
Indicates additional information about the related topic that deserves closer
attention or provides a tip for using the product.
NOTICE
Indicates information about product usage that can result in difficulty using
product, a loss of data, or minor equipment damage if not heeded.
CAUTION
Indicates a hazardous situation with potential for minor to moderate injury
or property damage, or moderate to severe damage to the product.
WARNING
Indicates a hazardous situation with risk of serious bodily injury or
death.
About this manual
2
Dynamic Motor Analyzer—EXP4000 User Manual
2
Safety and general operating information
General safety precautions
The general safety information presented here is for operating and service personnel.
NOTICE
If the equipment is used in any manner not specified by SKF the safety
protection provided by the equipment may be impaired.
Symbols and labels used on equipment
Figure 1. EXP 4000 safety labels.
Safety and general operating information
Safety warnings
WARNING
The instrument is not waterproof. Do not allow the opened instrument
to be exposed to water. Water in contact with the interior of the
instrument compromises protection features and could result in serious
injury or death.
Because of the voltages present, testing should be conducted only
by trained personnel. Adequate safety precautions must be taken to
minimize the risk of serious injust, death, or property damage.
Because of the dangerous currents, voltages, and forces encountered
when operating, testing or repairing rotating equipment, safety
precautions must be taken for all tests. Follow all safety precautions in
this manual and required by your employer. Due to the wide diversity
of machine applications, it is impossible to list all general safety
precautions. However, this manual includes special safety precautions
applicable to the use of the EXP4000.
The maximum rating of the EXP4000 is 1,000 V (500 V for DC
operation). 1,000 V (500 V DC operation) is the maximum allowable
voltage between any two of the three voltages and the ground clip.
Under no circumstances connect the voltage sensing circuit to higher
voltage levels. Doing so will cause severe damage to instrument and
can seriously injure you.
4
Dynamic Motor Analyzer—EXP4000 User Manual
Safety and general operating information
Operational safety warnings
Any operator of this unit must comply with the following safety precautions:
• Comply with your facility’s safety practices at all times.
• Ensure physical setup does not interfere with your facility’s current or intended
operation.
Additionally, operators of this unit must adhere to the following safety precautions to
minimize the potential for any dangerous shock hazard conditions:
• Use whatever safety equipment required by your organization, including eye
protection, high voltage gloves, arc-flash rated masks, hoods and any required PPC.
Prior to opening any Motor Control Cabinet (MCC), ensure that appropriate arc-flash
protection clothing is worn.
• Ensure that appropriate lockout / tag-out procedures are properly understood and
implemented by all personnel.
• Every connection at MCC must be performed ONLY when rotating system is powered
down or off.
• Depending on the kind of test to be run, ensure no one is in close physical proximity
to the shaft of the motor or any other moving part of the machinery.
• Do not position motor phase connections near ground or near each other.
• Do not touch the connections, PT’s, CT’s or any component under test while a test is
being made.
• This product is grounded through the grounding conductor of the power cord if
running on AC power.
• Voltage ground clip must be connected to ground when the unit is running on
battery power.
• If you will be running the unit on battery power, ensure that you remove the power
cord from the wall outlet and the unit before using.
• Do not coil power cord or test leads near motor leads.
• During repairs, do not substitute any parts. Use only factory-supplied parts.
• This instrument is NOT approved for use in an explosive environment.
Accessory interconnection and use
Several accessories are available for the EXP4000. These accessories are listed in following
chapters in the manual. They are to be used only as directed.
Cleaning and decontamination
The EXP4000 should be kept clean and in a dry environment. To clean the unit, wipe with a
clean, water-dampened cloth. Do not submerge in water or other cleaners or solvents. To
clean the screen, take a soft, water-dampened cloth and gently wipe the surface.
Dynamic Motor Analyzer—EXP4000 User Manual
5
Safety and general operating information
Installation requirements
The unit may be operated flat on its bottom with the lid open. There are no ventilation
requirements.
The unit is intended for use in Installation Category II (Portable Equipment), Measurement
Category III areas ,and pollution Degree II Environments where occasional non-conducting
condensing pollution can be encountered.
Power requirements
Using the provided AC power cord, connect the unit to a grounded AC power source. The
unit’s power requirements are 100-240 V AC, 50-60 Hz, 3 A AC maximum current draw.
Environment conditions/storage
The unit is designed for indoor use. If used outdoors, the unit must be protected from rain,
snow and other contaminants. Store instrument inside in order to avoid water
contamination.
The unit has been tested for use up to 2,000 m altitude.
The tester should only be operated in temperatures ranging from 41 to 104 degrees
Fahrenheit (5° C to 40° C). This unit is for use at a maximum relative humidity of 80% for
temperatures up to 31 °C decreasing linearly to 50% relative humidity at 40°C.
Unpacking the unit
Carefully remove the following items from the shipping boxes.
• EXP4000
• Power cord
• CTs
• PTs
• Cabling
• User manual
Shipping the unit
The EXP4000 is shipped in factory foam-filled containers. Should the tester need to be
returned to SKF, we recommend using the unit’s original packaging or any equivalent casing
that meets the following specifications:
• Corrugated cardboard package containers, double-walled, with a minimum burst
test of 275 pounds per square inch and,
• Two to three inches of shock-absorbent material surrounding the entire unit.
NOTE
Cardboard, newspapers, and similar materials are not considered good shock
absorbers.
6
Dynamic Motor Analyzer—EXP4000 User Manual
3
Getting started
Configuring software for motor data
Database management
Database management is highly important in a good predictive maintenance program. It
facilitates organization of periodic maintenance data. The database section of the EXP4000
software allows the entry of identifications to help clarify the location of specific motors. It
can maintain multiple databases for organization of overall program maintenance. For
example, if a facility has two buildings with a number of motor sights in each, it may work
best if there were a database created for each building.
Consequences of not organizing data into databases
Since the EXP4000 can be configured to store every test it ever performs, an organized
structure is needed to facilitate data integrity and usefulness. Also, creating multiple
databases allows easier management of file size and archiving.
Plant maintenance
It is common for plants to have duplicate processes, with identically named motors in each
process. (ex: intake pump) This can cause confusion, since the motors are in different
locations, but have the same motor ID. Take steps to make motor ID’s unique.
For example, the motor ID for process 1 should be intake pump P1 while the motor ID for
process 2 should be intake pump P2.
Database features
The records that are stored by the EXP4000 are linked to each other hierarchically. The
principle record, which serves as the base for linking associated records, is the machine ID.
Information entered into machine ID and test ID records become part of the database. Like
other database information, it can be transferred to other computer programs or other
computers.
Navigating the software interface
Familiarity with Windows 98se®, Windows NT SP4®, Windows 2000®, Windows XP®, or
Windows 7® and basic computer skills is assumed. Working with the EXP4000 software
requires a general understanding of using multiple windows, a variety of keyboard
commands, and a pointer device (mouse).
EXP4000 software-specific features
Grey-shaded fields
Gray-shaded fields are generally not editable. Fields with white backgrounds are editable.
Text fields
Text fields are areas that contain editable words or numbers. To edit text fields, press or click
in them and type. The software will prompted you for missing information required by the
Getting started
EXP4000 if a necessary field is left blank. This is generally seen when creating or editing
motor or machine properties.
Arrows and windows icons
In the EXP4000, arrows serve two functions. They allow you to access information that does
not fit on the screen or they allow you to change numbers in a text field. For example,
clicking on either the up or down arrow can change a caution threshold for the voltage
unbalance test in an electrical test model.
Numeric fields
The two types of numeric fields are input and display. The input fields are required to
calculate portion of the result panels or allow entering additional information to the reports.
All other numeric fields are display results.
Starting the software
1) To start the EXP4000 software, click on the Explorer icon on the desktop or click on
Start-> All Programs-> Explorer-> Explorer. The Explorer main window appears
as shown below.
Figure 1. EXP4000 user interface.
2) When you click on File in the Main toolbar then select a database, the Machine tree
populates as shown in the example above.
3) Clicking on a machine in the list populates the rest of the interface as shown.
8
Dynamic Motor Analyzer—EXP4000 User Manual
Getting started
• The Main toolbar, located a the top of the interface, provides the primary controls
for access to test and machine information, along with tools used to conduct tests.
• The Machine information bar identifies the current motor or device under test
along with the basic nameplate information for the machine.
• The Waveform display provides the primary graphical representation of the
waveforms saved for the related measurement. The voltage waveform display can
be set to Line to Line or Line to Ground mode via the Options Display tab under the
Tools menu.
• The Test domain buttons provide access to specific test results and indicate the
status of test results.
• The Torque time/speed display shows the torque/time measurement acquired in
VFD operation mode or the torque/speed measurement acquired in line operation
mode.
• The Display phasor icon open a new window showing the Phasor diagram for the
related machine.
• Numerical display fields to the left of the Waveform display provide measurements
collected for the single phase to neutral voltages or line-to-line voltages (depending
on the setting in the Tools Options menu), single-phase currents, average, power
factors, average current, total electrical input power and average line-to-line
voltage. These fields include:
–– Voltage [V]—average line-to-line voltage.
–– Current [A]—average line current.
–– PF—power factor.
–– V Unbal [%]—voltage unbalance percentage.
–– I Unbal [%]—current unbalance percentage.
• Numerical display fields to the right of the Torque time/speed display provide
measurements collected for the motor’s mechanical and electromechanical
operating condition. These fields include:
–– Efficiency [%]—efficiency percentage
–– Torque [ft-lb]—motor torque in foot-pounds (or Nm if set to metric).
–– Load [%]—percent load to the motor under test.
–– Load [hp]—energy load to the motor under test.
–– Speed [RPM]—speed of the motor.
• Sensor—portable (internal) or EP (external).
• CTs—current rating of the CTs.
• Auto-Phase—used during line operation to set up the line and current inputs.
• Test date/time dropdown menu and controls— This text field displays the time of the
current and previous test data.
NOTE
Pressing the [F1] key on your keyboard opens context help for the window.
Dynamic Motor Analyzer—EXP4000 User Manual
9
Getting started
Test domain buttons
Each test domain button provides access to its specific test results.
Because each threshold equates to a specific color, the software assigns a color to the
domain and the testing domain buttons depending on the test result. For example, if the
result of the voltage unbalance test falls below the established caution thresholds, the
software would assign the color green to the voltage unbalance button.
Results panels and windows
Clicking on any of the test domains opens a test results panel that you can use to select test
results to display in a window like the one shown in the example below.
Figure 2. Selecting test results to display using Results panels.
The contents of the results dialog box varies depending on the related test type. Many
include two tabs—Result and Trend—as shown in the example above.
Result tab
In this example of the Result tab, we see three main sections.
The Measurement display indicates the severity of the test results compared to the
threshold indicators.
10
Dynamic Motor Analyzer—EXP4000 User Manual
Getting started
The Threshold bars display the current threshold level. The threshold is user specified in the
electric or vibration models. Each bar has an associated color level:
• Red = warning
• Yellow = caution
• Green = good
• Blue = no applicable threshold
The numeric display in the lower panel presents relevant test result data such as the NEMA
percentage derating factor, the percentage load, and amplitudes for the voltage phasors.
Trend tab
The Trend tab displays trending data for the relevant test. It displays the value of the
monitored quantity (y-axis) against the test numbers (x-axis). The x-axis shows the number
of measurements performed for that particular motor ID.
Figure 3. Trend tab.
The Trend tab allows you to access specific test results by clicking and holding the left mouse
button on the marker and dragging it to a new location. Each test result contains the date
and time for the test and important numeric results, which will change to display the new
test results data when you release the mouse button.
Dynamic Motor Analyzer—EXP4000 User Manual
11
Getting started
Machine tree
The left panel in the main user interface window is the Machine tree. The highest level is
the database name (depicted by a file cabinet icon). Folders are used below each database
to store machine test data or other folders. In turn, machines are stored within the folders.
1) Use the plus and minus icons to the left of tree elements to locate the machine that
you want to test.
2) Click on the target machine to highlight it. Its name and related nameplate
information will appear in the Machine information bar just to the right.
3) Ensure that the EXP4000 is properly connected to the machine.
4) Press Run Electrical to start testing and data collection.
5) Alternatively, you can click on the Tools menu then the Run Electrical item.
Figure 4. Machine tree used to find files and folders for testing.
12
Dynamic Motor Analyzer—EXP4000 User Manual
Getting started
Upgrading databases from previous software versions
Before the EXP4000 software can open a database from previous versions of the software, it
must upgrade the database. This upgrade tool will pop up whenever you open a database
that can be upgraded. It will place the file in a default directory. This directory must be a
separate database from the one where existing data is stored. After the database is
upgraded, it will automatically open in the software.
NOTICE
Upgrading a database does not delete the old database. It allows
expanded capabilities within the new software to be used, while permitting
the use of older versions of software on the old database.
An application is available to automatically update all databases at once. Contact CMC-Fort
Collins support for information on obtaining and using this application.
Keyboard shortcuts
• F1 key on the keyboard opens the loaded Help environment.
• F2 key opens the machine properties.
• F3 key operates the New AC Machine function.
• F5 key operates the Run Electrical function.
• F7 key opens the Virtual Scope feature.
• F8 key displays the View Connections function.
• F9 key operates the Transient Analysis Dialog
• Ctrl A – About
• Ctrl M – User Manual
• Ctrl O – Open Database
• Ctrl N – New Database
Software tips
Popup panels require you to immediately interact with dialogs that affect displayed data
(loaded or part of a test).
The time required to load a machine with a large number of tests has been decreased by
internally connecting or threading the test logs.
When the machine is loaded, but the thread is not completed the message “Test log is
Loading” appears instead of the test log graphs. This can cause a perceived lag if you quickly
switch machines or delete test results from motors with more than 100 stored tests. This lag
time will also be noticeable if you load a machine with a large number of tests and then exit.
At this publishing, we recommend keeping the number of tests per motor to a maximum of
2000.
Dynamic Motor Analyzer—EXP4000 User Manual
13
Getting started
14
Dynamic Motor Analyzer—EXP4000 User Manual
4
Connecting the EXP4000
NOTICE
Ensure that all safety warning and procedures have been read and are
understood before proceeding with any setup process.
Refer to the “Safety and general operating information” chapter for details.
WARNING
For all connection procedures: to minimize risk of injury or death from
electric shock, make sure the motor iis turned off before opening panels
or making connections.
NOTE
Make sure the current direction arrow points in the direction of the load when
connecting current clamp-ons. Voltage clip-ons and current clamp-ons should be
connected to the cold side of the breakers.
Physical setup of EXP4000 with portable sensors
1) Connect the marked voltage clip-ons to the voltage port on the EXP4000.
2) Connect the marked current clamp-ons to the current signal port on the EXP4000.
3) Turn on power to the laptop.
4) Double click the EXP4000 icon to start the program.
Connecting the EXP4000 to the MCC
1) Open the panel of the MCC.
2) Connect a voltage clip-on to each phase of the breaker.
3) Attach one current clamp-on per phase.
Both the current and the voltage sensors of the EXP4000 are designed for low voltage. AC
voltage sensors are rated for 1000 VAC. DC voltage sensors are rated for 500 VDC Attach
Hall Effect CTs and DC Voltage Sensors for DC Motor testing applications. In order to measure
medium or high voltage motors, additional CTs and PTs are required. In this case, the current
clamp-ons and voltage clip-ons have to be connected to the CTs and PTs on your site.
4) The voltage clip-ons and current clamp-ons should match color-wise on each phase.
Ex. The yellow voltage clip-on should be attached to the same phase as the yellow
current clamp-on.
Connecting the EXP4000
EXP4000 connections to motor terminals
1) Connect the current clamp-ons and voltage clip-ons to the terminal box.
2) The voltage clip-ons and current clamp-ons should match color-wise on each
phase; for example, the yellow voltage clip-on should be attached to the same phase
as the yellow current clamp-on.
3) Attach one voltage sensor to each phase.
4) Exercise extreme caution to make sure that no terminals or clip-ons touch each
other or touch ground when energized.
5) Prior to energizing the motor, exercise extreme caution to make sure that no
terminals or clip-ons touch each other or touch ground. Energize the motor.
Physical setup of the EXP4000 with EPs
See Appendix D for installation instructions for EPs.
1) Connect the EXP4000 end of the mixed AD cable to the MCC port on the EXP4000.
2) Connect the other end of the mixed AD cable to the MCC plug.
3) Set the Sensors option of the main panel to EP.
4) Click on Run Electrical.
Connection Setup window
When performing an electrical test on a line operated motor, one of two warnings can
appear. The first warning will appear if the Auto-Phase feature is not activated (box checked
in the main window), and the EXP4000 realizes that the connection is mistaken (for example,
having the current and voltage connections being in acb and abc sequence, respectively).
The second warning will appear if Auto-Phase has failed due to excessive unbalances on the
measured currents or voltages. This can be from lacking one voltage signal, not having
properly closed a CT.
Clicking on Yes will take you into the connection setup wizard. Clicking on Continue Test will
continue testing using the physical setup. Clicking on Abort Test will stop the test without
saving any information to the database.
Setup wizard/suggest button
Figure 5. Connection Setup window showing Suggest button.
When the connection setup wizard appears the Suggest button is available. The Suggest
button’s purpose is to offer reasonable solutions in error mitigation. If there is more that one
16
Dynamic Motor Analyzer—EXP4000 User Manual
Connecting the EXP4000
realistic solution, you will be prompted about load level. A selection of a high load scenario
(90% and higher) or a low load scenario (20% and lower) can be made. This dialog rarely
pops up.
NOTE
This high load and low load scenario may be an indication of incorrectly entered
nameplate data.
Two-CT solution
The two-CT solution is based on Kirchhoff’s law of currents: The sum of currents into a node
is equal to zero, Ia+Ib+Ic+Ig=0.
NOTE
Calculating the current of the third phase is only valid while there is no noticeable
ground current (Ig=0). This is typically the case; however, a high impedance ground
system with one grounded phase is an exception.
A two-CT setup is needed if you are physically unable to connect all three CTs, or if all three
CTs are connected, but one did not close or it is connected to a wrong wire. If two or more
CTs are not connected then the test should be aborted and the CTs manually adjusted.
In the example below, the blue CT is disconnected and an electrical test is performed. Notice
that the amplitude is zero.
If the CT is not totally closed the phasor will be greater than zero, but noticeably less than the
other CTs.
Figure 6. Connection Setup window indicating connections need to be checked.
Figure 7. Connection Setup window indicating connection are good.
Dynamic Motor Analyzer—EXP4000 User Manual
17
Connecting the EXP4000
Manual phasor adjustments
Manually adjusting the phasors can quickly become confusing. If the Suggest button does
not provide a solution, or if there is not a unique setup, then manually adjusting the phasors
might be necessary.
Adjustments are exactly the same as those made in the MCC when properly connecting the
EXP4000. There are two rules for adjusting phasors:
1) All Phasors (currents and voltages) should have an angle between them of 120
degrees ± 5.
2) For all induction motors, the current phasor must follow the voltage phasor by a
maximum of 90 degrees.
The graphic below illustrates all phasor positions. All three current phasors must be in the
same area in order for the setup to be correct. For example if the Ia phasor is in the high load
position, Ib and Ic must also be in the high load position. The dark shaded are non-phasor
positions. Although this can be done mathematically, phasors cannot physically reside in the
dark shaded areas (three phase induction motors) without PF correcting devices.
Figure 8. Phasor diagram.
There is the possibility that phasors can reside in the high load position or be rotated 180
degrees and be in the low load position. In order to minimize potential errors, we have
provided a load estimate. If the phasors are setup in the high load position and the load
estimate is 300 percent or higher, then the most likely correct solution is to rotate the phasors
to the low load position.
NOTE
To go from a high-load position to a low-load position, rotate each dial one position
to the left. To go from a low load position to a high load position: rotate each dial to
the right one position.
18
Dynamic Motor Analyzer—EXP4000 User Manual
5
EXP4000 tests
Test domains and testing theory
The EXP4000 utilizes a multitude of tests to determine the power condition, health, load, and
energy profile of machines.
The following test domains describe the functionality of the instrument along with a
description of each test.
Testing capabilities
The EXP4000 is equipped with standard software to initiate testing. Additional software can
be purchased if necessary to complete the program you deems necessary. This additional
software is explained in chapters later in this manual. The standard software includes the
following domains and tests:
• Power Quality: Voltage Level, Voltage Unbalance, Harmonic Distortion, Total
Distortion, Power, Harmonics
• Machine Performance: Effective Service Factor, Load, Operating Condition,
Efficiency, Payback Period
• Current: Over Current, Current Unbalances
• Spectrum: Rotor bar, V/I Spectrum, Harmonics
• Connection: Waveforms, ABC/SYM Comp., Phasors
To view any of these tests, click on the associated domain and then on the associated test.
Many of these viewable panels will have results and test log views.
Each domain test window includes a Result tab and a Trend tab. The Result tab displays
results of the current test. The Trend tab graphically displays the current test results along
with previous test results.
EXP4000 tests
Power Quality domain
Voltage Level
• Identifies over- and under-voltage conditions.
• Compares measured voltage levels with user-defined thresholds.
Figure 9. Voltage level test within the Power Quality domain.
20
Dynamic Motor Analyzer—EXP4000 User Manual
EXP4000 tests
Voltage Unbalance
• Examines the single-phase voltage in the motor by calculating its percentage
unbalance via NEMA derating.
• Compares the voltage unbalance level with the stored threshold.
• An unbalanced voltage condition causes negative sequence currents within the
stator, resulting in excessive heat. The voltage unbalance test determines if an
unbalanced voltage condition exists in the machine. The EXP4000 utilizes the
NEMA derating curve that specifies a maximal load for each type of unbalance.
Figure 10. Voltage unbalance within the Power Quality domain.
NOTE
The value in the NEMA Derating field will equal 1 unless there is voltage unbalance
and 5,7,11,13 order voltage harmonics are present.
Dynamic Motor Analyzer—EXP4000 User Manual
21
EXP4000 tests
Harmonic Distortion
The harmonic distortion function examines the total harmonic distortion of the three single
phases to neutral voltages. It compares the level of total harmonic distortion to the threshold
values that you define.
Figure 11. Harmonic distortion.
Stator current, torque, and operating speed typically describe the health of a machine. For
example, maintenance personnel should be alerted if a machine needs to run at a lower
speed in order to provide the same torque. The machine may have an issue caused by
broken rotor bars, excessive heat, or varying voltage conditions.
22
Dynamic Motor Analyzer—EXP4000 User Manual
EXP4000 tests
Total Distortion
Both Total Harmonic Distortion (THD) and Total Distortion (TD) deal with quantifying the
effect of nonfundamental components to the voltage and current waveform. Whereas the
Harmonic Distortion focuses on the harmonic content alone, Total Distortion focuses on all
nonfundamental components.
Figure 12. Total distortion within the Power Quality domain.
The commonalities and differences between THD and TD are:
• THD adds only harmonic components and divides by the fundamental.
• TD subtracts the fundamental from the RMS and divides by the fundamental.
• THD is defined in IEEE and NEMA standard, whereas, TD is not defined in these
standards.
• THD delivers reliable results for line-operated machines.
• TD delivers reliable results for all machines.
• For all applications, TD values must always result in higher values than THD.
Dynamic Motor Analyzer—EXP4000 User Manual
23
EXP4000 tests
Power
The Power window provides information to define power qualities for each phase along with
the average / sum values.
The window has five major sections.
The first section displays kilowatts (kW), kilovolt amperes (kVAr), and kilvolt amperes (kVA).
The next section displays the power factor (PF), voltage (V), and current (I) values.
Total harmonic distortion voltage (THD V) and total harmonic distortion current (THD I) are
presented in the third section.
The crest factor voltage (Cf V) and crest factor current (Cf I) values are shown in the fourth
section.
The voltage unbalance percentage, current unbalance percentage, and frequency are
presented in the last section.
Figure 13. Power data displayed within the Power Quality domain.
24
Dynamic Motor Analyzer—EXP4000 User Manual
EXP4000 tests
Harmonics
The Harmonic components compare the magnitude of the harmonic components to the
fundamental currents and voltages of the system. The bar chart displays the distribution of
the harmonic content on the different frequency bands for all currents and voltages.
Figure 14. Harmonics within the Power Quality domain.
1) Select the voltage and current channels that you want to display by checking the
boxes next to the desired channels in the Select Channels section.
2) Adjust the harmonics range that you want to displayed by using the From and To
combo boxes found in the Show Harmonics section.
3) Click on the Export button to export the data collected to a comma separate values
(.CSV) file.
Dynamic Motor Analyzer—EXP4000 User Manual
25
EXP4000 tests
Machine Performance domain
Effective Service Factor
• Graphically displays the estimated percentage load derated with the NEMA derating
factor,
The Effective Service Factor test identifies how closely the motor is operating to its effective
service factor. The test predicts heat-based deterioration and provides an accurate thermal
assessment of the motor.
Figure 15. Effective Service Factor within the Machine Performance domain.
26
Dynamic Motor Analyzer—EXP4000 User Manual
EXP4000 tests
Load
This displays the estimated load for the machine, and compares it with defined thresholds. A
100% threshold is commonly used since operating above that level may rapidly thermally
deteriorate the machine. However, a combination of environmental conditions and criticality
of the machine may warrant moving the threshold level to a higher or lower value. For
example, additional cooling of the machine may be a reason for allowing a higher load level
prior to issuing an alarm.
Figure 16. Load test within the Machine Performance domain.
Dynamic Motor Analyzer—EXP4000 User Manual
27
EXP4000 tests
Operating condition (OpCond)
Each induction motor has a torque-speed and current-speed characteristic operation curve.
These curves will vary their signature if an induction motor’s operation changes from healthy
to a faulted condition. For example, increased operation temperature, fluctuating
environmental conditions, varied power supply conditions, or broken rotor cages can alter a
motor’s operating condition.
Differences in operating condition could indicate two things:
• a change in the operating process, or
• a condition that may influence the motor’s operation.
A resultant warning does not necessarily imply a defect in the machine, load or power supply.
However, it is important to monitor the machine’s operating condition. Any identifiable
changes could affect the future operation of the motor.
Figure 17. Operating condition test within the Machine Performance domain.
Efficiency
Efficiency is the ratio of the mechanical output of the motor’s power to the electrical input
power to the motor.
Where:
Ploss = the power that dissipates (mainly heat)
Pin = input power
Ploss can bee seen as potential energy waste in the power bill and it degrades motor health.
28
Dynamic Motor Analyzer—EXP4000 User Manual
EXP4000 tests
The efficiency test displays the motor’s operating efficiency and previously measured motor
efficiencies. Low results in the efficiency test suggest that motor retrofits may be advisable.
A decline in efficiency may indicate an increase in the motor’s operating temperature, causing
faster motor degradation.
A manufacturer database with more than 20,000 different motor designs is provided. This
database compares existing motors with similar designs that perform at or above EPAct’92.
These motors are compared with respect to current operating load point, and their resulting
efficiencies. If the efficiency of the motor under test is significantly lower than the target
efficiency found on a EPAct motor, a warning or caution flag is issued.
If an efficiency warning or caution flag is issued, the following steps should be taken:
1) Check that the correct stator and lead line-to-line resistances have been entered into
the Create Motor or Edit Motor panels in the EXP4000 software.
2) Motors can operate at low efficiencies because of their design, or poor power
conditions. Check that the voltage level is appropriate for the motor tested. Make
sure voltage unbalance and voltage distortion are acceptable.
NOTE
To ensure the accuracy of the efficiency estimation, the correct stator resistance
must be entered for the motor when the new AC machine is created.
Figure 18. Efficiency test within the Machine Performance domain.
Dynamic Motor Analyzer—EXP4000 User Manual
29
EXP4000 tests
Payback period
This test searches the database for motors, and compares the energy expenses of the motor
under test with higher efficiency motors. Payback period is calculated, based on the
compared motor’s list price, the energy savings calculated according to the specified duty
cycle of the motor, the entered $/kWh, and the latest calculated input power of the motor.
This test uses the premise that the comparison motor operates, on average, on a load point
similar to the one measured. All prices are in USD, so the energy costs have to be specified in
USD. List prices are motor manufacturers’ data, and are based upon the U.S. market. If the
EXP4000 is used in countries outside of the U.S., the list price should be adjusted accordingly.
Figure 19. Payback period within the Machine Performance domain.
30
Dynamic Motor Analyzer—EXP4000 User Manual
EXP4000 tests
Current domain
Current Level
The current level function compares the single-phase current with the stator current listed on
the tested motor’s nameplate. Too much current can overstress particular phases in the
machine. The current level test determines if the machine might be drawing more than its
rated current on one or more phases. This causes excessive heat and decreasing life of the
insulation.
Figure 20. Current level test within the Current domain.
Dynamic Motor Analyzer—EXP4000 User Manual
31
EXP4000 tests
Current Unbalance
Unbalanced currents are frequently caused by unbalanced voltages. A common rule of
thumb is that voltage unbalance can be the cause of up to eight times larger current
unbalances. Machines will also show very large current unbalances under very light, or no
load conditions—even when driven by a balanced voltage. These no-load current unbalances
are common in healthy machines, and they vanish rapidly when the machine is loaded.
Figure 21. Current unbalances within the Current domain.
32
Dynamic Motor Analyzer—EXP4000 User Manual
EXP4000 tests
Spectrum domain
Rotor Bar
The rotor bar function records the relative amplitude of the rotor-bar sideband, and
compares the rotor cage signature to stored thresholds.
Figure 22. Rotor bar within the Spectrum domain.
The rotor bar test evaluates the overall condition of the machine. Broken rotor bars cause
excess heat on the machine, decreasing efficiency, shortening insulation life, and possibly
causing core damage.
Dynamic Motor Analyzer—EXP4000 User Manual
33
EXP4000 tests
V/I Spectrum
The V/I Spectrum window analyzes the frequency spectra of the three line-to-neutral voltage
waveforms and the three line currents independently of each other. The current spectra have
shown to contain information related to the vibration spectra of the machine; roller-bearing
faults can be identified by using the frequency marker controls on the lower left. The feature
can also help you find deteriorating alignment problems, load unbalances, looseness,
eccentricity, and cavitation by analyzing these spectra.
Figure 23. V/I spectrum within the Spectrum domain.
You can zoom in on (enlarge) specific regions on the graph by clicking and holding the left
mouse button and dragging your mouse cursor to select the desired area to enlarge. More
information about how to zoom can be found by clicking on the Zoom Info item in the toolbar
at the top of the window.
V/I Spectrum graphs also have a Graph Options item in the menu bar, which you can use to
define masking preferences of the electrical frequencies. In addition, the width of the mask (in
Hertz) can be defined.
Just below the Zoom Info menu, you will see two icons. The first one allow you to export the
spectra data to a spreadsheet. The second icon enables the display of time waveform data
below the spectrum graph.
34
Dynamic Motor Analyzer—EXP4000 User Manual
EXP4000 tests
Demodulated Spectrum (option)
Available with the purchase of the T4000 Torque analysis software option, the Demodulated
spectrum feature calculates the three-dimensional demodulated spectrum of the torque
signature. With the channel control, this signal can be changed from torque to current or
voltage of any one of the phases. The demodulated spectra tool analyzes the dynamic
behavior profile of the motor load system.
Figure 24. Demodulation Spectra window elements.
The main information of the Demodulated Spectra window is the three-dimensional
demodulated spectrum graphic and the frequency of spectrum graph.
The Marker can be moved by a simple drag-and-drop operation.
1) Hover the mouse cursor above the marker, which changes to a pointing finger.
2) Click on hold down the left mouse button then move the cursor to the new point of
interest and release the button.
The marker’s location determines the projections plotted on the Frequency of spectrum and
Band projection graphs. It shows the relative amplitudes of the frequency for the different
bands of AM demodulation.
The Frequency scale at the bottom of the three-dimensional graph has the same meaning as
the scale below the projection. Typically, frequency components of interest are read on these
scales.
The Channel selector position determines the demodulation algorithm that needs to be run
for voltage or current of the phases (A, B, or C), or over the default torque setting. The graph
amplitude is displayed in volts, amps, or Newton meters.
The Frequency Range setting allows for zooming in or out on the display.
The Band scale identifies the different AM demodulation bands that have been analyzed via
the DFLL.
The Viewing controls change the three-dimensional graph settings. Disabling the Projection
Only view and enabling the Zoom/Rotate options allows changes to viewing the threedimensional graph. The particular keys for zooming, panning and restoring, are described in
the Zoom Info link found in the top left corner of the window.
Dynamic Motor Analyzer—EXP4000 User Manual
35
EXP4000 tests
Harmonics
The Harmonic components compare the magnitude of the harmonic components to the
fundamental currents and voltages of the system. Bar charts display the distribution of the
harmonic content on the different frequency bands for all currents and voltages.
Figure 25. Harmonics within the Spectrum domain.
36
Dynamic Motor Analyzer—EXP4000 User Manual
EXP4000 tests
Torque domain
Also made available with the purchase of the T4000 torque analysis software option is access
to the Torque testing domain, which provides access to the Torque Ripple and Torque
Spectrum testing features.
Torque Ripple Results tab
The Torque Ripple window has two tabs: Results and Trend. The Results tab shows the
measured torque over time compared to the rated torque calculated from the motor
nameplate information.
Figure 26. Torque Ripple window—Results tab— within the Torque domain.
Dynamic Motor Analyzer—EXP4000 User Manual
37
EXP4000 tests
Torque Ripple Trend tab
The Trend tab shows a graphical comparison of the torque results for the current and
previous measurements.
Figure 27. Torque Ripple window—Trend tab—within the Torque domain.
38
Dynamic Motor Analyzer—EXP4000 User Manual
EXP4000 tests
Torque Spectrum
Clicking on torque spectrum opens a window that shows the frequency spectra of torque. The
Y-scale display units can be set to logarithmic, linear, or decibel.
You can zoom in on (enlarge) specific regions on the graph by clicking and holding the left
mouse button and dragging your mouse cursor to select the desired area to enlarge. More
information about how to zoom can be found by clicking on the Zoom Info item in the toolbar
at the top of the window.
When the new enlarged area is identified using the zoom feature, the software will display
the frequency components of the signal located between the vertical markers.
Markers in the graph can be moved by clicking and holding the left mouse button and
dragging the marker to a desired new location.
This means that the narrower the window between the markers is, the higher the resolution.
Figure 28. Torque Spectra window within Torque domain.
The y-axis scale can be set to either logarithmic, linear or dB. The x-axis can be displayed in
either Hertz or KCPM (1000 CPM).
Frequency markers can be added to display the frequencies of known faults. You can add
bearing markers by clicking the + below the list of available markers. The frequency band can
be changed and allows you to control which harmonic of the fundamental will be used to
mark the frequencies of interest. In torque, fault frequencies will be most prevalent at DC
(Freq. Band 0), other frequency bands can be selected to verify the presence of a fault. Using
the harmonics multiples you can mark N multiples of the frequency of interest and sideband
markers can also be used to examine the haystack around a Nth harmonic.
Data can be exported to CSV format so that in can be easily imported into MS Excel® or
other programs by clicking on the Export Data icon found just below Zoom Info. You can
choose to export Spectrum Data or Time Waveform Data.
The icon to the right of the Export Data icon allows you to toggle time waveforms on or off.
Torque graphs also have a Graph Options item in the menu bar, which you can use to define
masking preferences of the electrical frequencies. In addition, the width of the mask (in
Hertz) can be defined.
Dynamic Motor Analyzer—EXP4000 User Manual
39
EXP4000 tests
Connection domain
Waveforms
The Waveforms window displays the waveforms for all three current and voltage
measurements for line operated mode. If the EXP4000 is operated in VFD mode (not
available in basic software), it shows the voltage and current measurements for phase A.
Figure 29. Waveforms in the connections domain.
1) Use the dropdown list just above the display area to select how the data will be
displayed: line-to-line or line-to-neutral.
2) The data can be exported to a comma separated values (.csv) file by clicking on the
Export Data icon just to the right of the dropdown list.
3) Zoom in on the graph by pressing and holding the left mouse button and drawing a
rectangle around the area of interest. Zoom characteristics are described in the
Zoom Info menu found just above the display area
4) Checking the boxes below the display area tells the software which measurements it
needs to display. Measurements are color-coded to ease identification.
40
Dynamic Motor Analyzer—EXP4000 User Manual
EXP4000 tests
Symmetrical Components (Sym. Components)
The Symmetrical Components window displays the voltage, current and impedance
unbalance, the positive sequence (accelerating), and the negative sequence (retarding)
current, voltage, and impedance information.
Figure 30. ABC/SYM Comp within the Connection domain.
Phasors
The Phasors window shows the a,b,c phasors for voltages and the current in line operated
mode.
Figure 31. Phasors within the Connection domain.
Dynamic Motor Analyzer—EXP4000 User Manual
41
EXP4000 tests
42
Dynamic Motor Analyzer—EXP4000 User Manual
6
EXP4000 software overview
This chapter is intended to convey a general knowledge of how to use and navigate EXP4000
software, with a step-by-step guide through the software menus and procedures for data
collection and management.
File menu
The File menu is used to upload and save motor data files. It includes the following items:
Database, Report Generator, Summary Report, and Exit.
Figure 32. EXP4000 software File menu.
Database
Selecting the Database menu item provides you with options to open an existing database
file, create a new file, or close an existing file.
To create a new database, perform the following steps:
1) Click on the File menu, Database then New.
2) Type the name of the new database in the File name field.
3) Click on the Save button.
To open an existing database, perform the following steps:
1) Click on the File menu, Database then Open.
2) If needed, locate the database in the file structure then click on the database to be
opened. Its name should appear in the File name field.
3) Click on the Open button.
NOTE
Changing databases during operation is allowed by using the preceding procedure.
To close an existing database
1) If multiple databases are open, select the one you want to close.
2) Click on the File menu, Database then Close. This will automatically close the
database.
EXP4000 software overview
Report Generator
The reports section offers the ability to customize reports to see multiple tests with different
filters and trending options.
The Filter On option helps you select good, caution and/or warning results. It also allows you
to select a date range to request specific tests for the report.
The Select options helps you select results via All, All Good, All Caution, All Warning, All
Warning and Caution, or None parameters.
The Trending option provides parameter selection by choosing All Machine Results, Selected
Results Only, and Plot Mode. Plot Mode provides further resolution by allowing you to select
Line or Point + Line.
Figure 33. Select Results dialog for generating reports.
The EXP4000 software generates an .rtf file that can be opened in Microsoft Word®,
WordPad or other word processing programs for editing. Remember that report page count
will increase dramatically with the addition of multiple tests. This can increase time in report
generation and printing.
44
Dynamic Motor Analyzer—EXP4000 User Manual
EXP4000 software overview
Summary Report
This option will print an overall summary of the testing done for the selected machine test in
the Machine Tree.
Figure 34. Machine Performance Report screen.
These reports options include: Main Panel, Power Condition Report, Machine Condition
Report, Energy Assessment, Machine Performance Report, and Load Reports. These items
will print the panel page for that specific test.
The value in the Location field is determined by the name given to the first-level folder
located in the database the motor resides in. The value in the Building field is determined by
the name given the second-level folder located in the database the motor resides in.
Clicking on the Test Notes item in the Tools menu populates the Memo, Test by, and Test
For fields.
Exit
The Exit menu item closes the program.
Dynamic Motor Analyzer—EXP4000 User Manual
45
EXP4000 software overview
Machine menu
The Machine menu provides you with the tools to assign, create, edit, or delete particular
motors or other devices to be tested. Under the Machine menu are the following options:
New AC Machine, Machine Properties, Acquire EP Serial Number, and Reset EP Serial
Number.
Figure 35. Machine menu.
New AC Machine
Clicking on the New AC Machine menu item opens a dialog box used to generate a new
machine ID, which is required to run electrical or vibration tests. The Machine Properties
dialog box includes three tabs: Name Plate, Machine Information, and Dynamic Testing.
Fields within the Name Plate and Machine Information tabs appear in red when required
information is needed. All fields in red must be filled with appropriate data before the
software will allow you to continue with the process.
Fields marked in yellow can affect the results the EXP4000 can generate. Remember that
the more information that is accurately entered, the more comprehensive the results will be.
The software prompts you for missed information. The EXP4000 software also includes
IntelliCreate technology, which checks the applicability of entered data. IntelliCreate identifies
the majority of typos and omissions of data fields during machine creation.
46
Dynamic Motor Analyzer—EXP4000 User Manual
EXP4000 software overview
Name Plate tab
As indicated by the red fields when first opening, data entry is required for nearly all fields in
this tab.
Figure 36. Create Machine Name Plate tab.
1) Click in the Name field and give the motor/device an appropriate name, typically
reflecting the process that it is running.
2) Use the Tab key on your keyboard to move between the fields in the Name Plate tab
and enter values for each required field.
3) Enter values in other fields to provide more resolution and to improve report quality.
4) Some items will be automatically calculated and their values automatically entered
in the appropriate related fields. For example, the corresponding Power Out [kW]
data will be automatically entered to complement the Power Out [hp] entered.
5) Check the VFD box if the motor is being driven by a variable frequency drive device.
6) Continue with the Sensor Rations button instructions if you are connecting to the
secondaries of CTs and PTs; otherwise, proceed with entering data in the Machine
Information tab.
Dynamic Motor Analyzer—EXP4000 User Manual
47
EXP4000 software overview
Sensor Ratios dialog box
When connecting to the secondaries of CTs and PTs (typically done when working in the field),
click on the Sensor Ratios button to open a dialog box like the one shown below.
Enter the voltage and current ratios as needed, then click on OK.
Figure 37. Sensor Ratios dialog box.
NOTE
This needs to be set up with the ratios of the PTs and CTs whenever a motor is
tested at the low voltage side of PTs and CTs
Machine information tab
The only required element in the Machine Information tab is the machine Name. This will
automatically filled from your entry in the Name Plate tab. The location and building will be
filled in from the default database items. All other information is optional; however, it can be
important for tracking instrumentation and report generation.
After you enter data in this tab, continue with data entry in the Dynamic Testing tab.
Figure 38. Machine Information tab.
48
Dynamic Motor Analyzer—EXP4000 User Manual
EXP4000 software overview
Dynamic Testing tab
The information entered into the Dynamic Testing tab of the create machine section are
optional items. Remember that the more information that is entered, the more accurate the
results will be.
Figure 39. Dynamic Testing tab.
When an EP has been assigned to a motor, the serial number of the EP will appear in the EP
Serial Number field.
Assigning an EP to a motor
1) From the Tools menu, click on EP, Mode, then Auto Assign.
2) Select the motor in the Machine Tree.
3) Set the main panel Sensor field to “EP.”
4) Connect the EXP 4000 to the EP.
5) From the Machine menu, click on Acquire EP Serial Number.
6) A message dialog will pop up to let you know that the EP was successfully assigned.
Dynamic Motor Analyzer—EXP4000 User Manual
49
EXP4000 software overview
Machine Properties
Clicking on the Machine Properties menu item opens a the Machine Properties dialog box as
shown below to help you make changes to existing machine information on the machine
selected in the Machine Tree. The same tabs and features used in the process to create new
machines are available. You can add or change data as needed to correct or complete your
information.
Figure 40. Machine Properties dialog box.
Acquire EP Serial Number
When the EXP4000 is connected to an external EP device, clicking on the Acquire EP Serial
Number item permits association of a particular EP with a Motor ID. This will enable the
direct storing of data taken via an EP without the need of selecting the motor prior to testing.
After you click on this menu item, the software checks for the requested information and
notifies you if the procedure was successfully completed.
Reset EP Serial Number
Clicking on the Reset EP Serial Number item disassociates a machine with an EP serial
number so the EP can be re-associated with a newly-installed machine. After you click on
this menu item, the software completes the disassociation and you an then re-associate
another machine with this EP by clicking on the Acquire EP Serial Number item.
50
Dynamic Motor Analyzer—EXP4000 User Manual
EXP4000 software overview
Thresholds menu
An electrical test model is a set of thresholds used as a guide against which the machines will
be tested. The EXP4000 compares test results with the electrical model’s predetermined
tolerances.
Figure 41. Thresholds Menu
Select Test Model
Clicking on the Select Test Model menu item opens a dialog box like the one shown below,
which you will use to designate the model you will use to test your motors.
Figure 42. Select Test Model dialog box.
1) Click on the Thresholds menu.
2) Click on Select Test Model.
3) Select a test model from the Select Test Model dropdown list.
4) When you find the test model you need, click on it then click on the OK button.
Dynamic Motor Analyzer—EXP4000 User Manual
51
EXP4000 software overview
Create Test Model
When you click on the Create Test Model item, a new window opens as shown below. You
will use this window to define the thresholds for the test model. This is useful for creating
templates for motors in different service environments.
1) Click on the Thresholds menu.
2) Click on Create Test Model.
3) Type a name for the model in the Test Model Name field.
4) For each test type, enter the caution and warning thresholds. Adjust thresholds by
clicking the up and down arrows or by entering numbers directly in the fields.
NOTE
For the Voltage Level test, enter caution and warning level thresholds for over and
under voltages independently from each other.
5) After you have entered your criteria, click on the Create button. This will save the
new test model and return to the EXP4000 window.
Figure 43. Create Test Model dialog box.
52
Dynamic Motor Analyzer—EXP4000 User Manual
EXP4000 software overview
Edit Test Model
Clicking on the Edit Test Model menu item re-opens the Select Test Model dialog box so you
can select the model to edit. After selecting the model and clicking on OK, the Create
Threshold window opens so you can revise the thresholds for a particular electrical test
model.
Delete Test Model
Clicking on the Delete Test Model menu item opens the Select Test Model dialog box so you
can select the model to delete.
NOTE
Test models that are currently assigned and the default test model (default elec)
cannot be deleted.
6) When you attempt to delete a test model, a warning dialog opens to ensure that you
want to complete the operation.
Dynamic Motor Analyzer—EXP4000 User Manual
53
EXP4000 software overview
Tools menu
The Tools menu has a number of items that will assist in monitoring machines.
Figure 44. Tools menu.
Scope
Clicking on the scope menu displays a virtual oscilloscope. The virtual scope displays
currents, voltages, or acceleration as a function of time and frequency. It provides
information on:
• Phase-to-phase voltage
• Phase-to-phase current
Figure 45. Virtual Scope tool.
54
Dynamic Motor Analyzer—EXP4000 User Manual
EXP4000 software overview
Items found in the Settings menu provide you with options for defining the scope’s display
properties.
Figure 46. Scope tool Settings menu items.
Tools found in the bar below the Settings menu allow you to pause the scope display. When
the display is paused, you can click on the icons that appear to export data or save a screen
shot of the displayed waveforms
View Connections
This tools helps you view displays connections currently used. Check Connections appears in
red in the lower right corner (as in this example) if the connections are incorrect. When the
connections are correct, the Connections OK appears in green.
Figure 47. View Connections window.
Dynamic Motor Analyzer—EXP4000 User Manual
55
EXP4000 software overview
Transient Analysis
The Transient Analysis tools helps you capture startup transients via voltage and current vs.
time, and torque vs. time.
A button at the top left of the Transient Analysis window provides you with two options to
acquire transient data: Triggered Acquisition and Acquire Now.
Selecting Triggered Acquisition opens a dialog box of the same name that helps you select
the trigger source and level along with the acquisition time, CT, and pre-trigger time.
Figure 48. Triggered Acquisition dialog box.
Selecting Acquire Now opens the Manual Acquisition dialog box, which you can use to specify
the Acquisition time and CT selection. After specifying these parameters, clicking on OK
starts the acquisition process.
Figure 49. Manual acquisition dialog box.
56
Dynamic Motor Analyzer—EXP4000 User Manual
EXP4000 software overview
Figure 50. Transient Analysis—Voltage and current vs. time.
Figure 51. Transient Analysis—Torque vs. time.
When clicking on any point on either the voltage or the current displays, a marker depicts the
point in both panels, and the voltage and current data are displayed for that instant in time.
The Torque vs. Time tab displays two different views of the instantaneous torque. The
unfiltered torque displays in red showing the air gap torque’s highest level of dynamic
behavior calculated from the currents and voltages collected. The filtered torque displays as a
blue line showing the same information, but with a lower dynamic resolution. The blue line
can be considered the short time average of the red line. Additionally, the blue line describes
the fundamental behavior of the torque versus time while the unfiltered red line describes the
highest level of dynamic torque.
NOTE
Click the right mouse button over the cursor to open a dialog box that allows you to
delete data to right or left of the cursor.
Dynamic Motor Analyzer—EXP4000 User Manual
57
EXP4000 software overview
EP
The EP menu item gives you access to calibrate the EP and view the EP calibration. You can
also select the EP mode to use auto assign (when acquiring an EP serial number) or not, or to
use caching only.
Checking the Use EP Caching menu item reduces the time needed to begin acquiring EP
readings. Start of acquisition without EP caching is approximately 45 seconds. Enabling
caching reduces start of acquisition time to approximately six seconds.
Figure 52. EP menu items.
To view the EP calibration information, connect the EP to the Surveyor EXP AC then click on
View EP Cal.
Clicking on Calibrate EP opens the EP Calibration Wizard as shown below. Use the wizard to
facilitate calibration procedures and to configure CT connections. For more information on
EP calibration, click on Help then EP Calibration.
Figure 53. EP Calibration Wizard.
58
Dynamic Motor Analyzer—EXP4000 User Manual
EXP4000 software overview
Run Electrical
This tool is an alternate method for starting the electrical data collection. This option has the
same effect on the application as clicking the Run Electrical button found in the lower right
section of the Explorer window.
Looped Acquisition
The Looped Acquisition menu item contains two sub-items: Continuous and Timed.
Continuous mode will run as many consecutive tests as specified, with no interval between
tests.
Figure 54. Continuous Looped Acquisition.
Timed mode allows you to specify a number of continuous looped acquisitions to be repeated
in intervals that you specify.
Figure 55. Time-Looped Acquisition.
Dropdown lists help you select the starting and ending time conditions.
Vibration (option)
This tool is an alternate method for starting the vibration data collection. This option has the
same effect on the application as clicking the Run Vibration button found in the lower right
section of the Explorer window.
Dynamic Motor Analyzer—EXP4000 User Manual
59
EXP4000 software overview
Operating Curves
The Operating Curves tool provides you with options for graphically viewing the electrical data
for a particular test. The tool has three options: Torque vs. Speed, Efficiency vs. Load, and PF
vs. Load.
Figure 56. Torque vs. Speed operating curve display.
Figure 57. Efficiency vs. Load operating curve display.
Figure 58. PF vs. Load operating curve display.
60
Dynamic Motor Analyzer—EXP4000 User Manual
EXP4000 software overview
Raw to CSV
This tool provides you with the means to convert .raw test files to comma separate value
(CSV) files.
Speed Override
The Speed Override tool is used to manually enter the operating speed prior to performing
electrical measurements.
Figure 59. Speed Override selection dialog box.
Test Notes
The Test Notes menu item opens a dialog box that helps you create memos and identifies
who tested the motor ID.
Figure 60. Test Notes dialog box.
Dynamic Motor Analyzer—EXP4000 User Manual
61
EXP4000 software overview
Options
The Options tool provides you with the means to customize the data displayed and how the
electrical data is collected. Clicking on the Options tool opens the Options window, which
includes two tabs: Display and Acquisition.
Display tab
Use the Display Units field to define whether values will be displayed in Imperial (U.S.) or
Metric mode. The differences lie in that Imperial (U.S.) prefers Hp and lb-in for output power
of the motor and torque, respectively; the metric system chooses to display kW and Nm for
the same physical quantities.
The Voltage field allows you to select line to line or line to ground values when displaying
voltages.
The Database Directory field and Browse button help you select the location of the test
database.
Figure 61. Options window—Display tab.
62
Dynamic Motor Analyzer—EXP4000 User Manual
EXP4000 software overview
Acquisition tab
The Acquisition tab is used to select how the electrical data is collected.
Figure 62. Options window—Acquisition tab.
The Electrical Acquisition Options are used to change the acquisition time and define the
harmonics to save. You will also use this section to define the minimum and maximum
frequencies of interest.
The Spectrum Acquisition Options are used to define the acquisition time length, the
maximum frequency of the spectrum displayed, and the lines of resolution (LOR) to display.
The LOR controls the number of frequency bins (lines) that are displayed in the initial
spectrum presentation.
Dynamic Motor Analyzer—EXP4000 User Manual
63
EXP4000 software overview
Help menu
The Help menu provides access to several information resources to help you learn how to use
the product more effectively and to assist you in your testing efforts.
An electronic copy of the user manual can be access along with additional supporting help
targeted at the window currently opened when the Help item is selected.
Click on the About menu item to access current version information and a tool to check for
software updates.
The Release Notes menu item opens a document showing details about recent software
improvements.
Clicking on the EP Calibration item opens a document describing the EP calibration process
in detail.
The Motor Master+ item provides a link to the Motor Master+ website, which is an outside
resource for learning more about motor testing, repair, and replacement technology and
options.
Figure 63. Help menu.
64
Dynamic Motor Analyzer—EXP4000 User Manual
7
VFD4000 analysis software option
Variable-frequency drives (VFDs) are commonly used and highly useful. However, they can
be difficult to analyze due to their inherent variable nature.
Operation details
The VFD Details window can only be activated if the measurements were taken in VFD mode.
This window displays the dynamic behavior of voltage level, torque, frequency and speed as a
function of time.
1) To activate VFD mode, click on the Machine menu, Machine Properties item.
2) In the Machine Properties window Name Plate tab, check the VFD box.
VFD mode
The EXP4000 has two modes of operation: VFD, and non-VFD (60Hz or 50Hz) line operated.
For these two modes the connection requirements are slightly different. In VFD mode, the
Autophasing feature is off. Correct phasing of CTs with respect to voltage leads needs to be
ensured by the operator.
Each CT must be connected to the correct phase and with the correct polarity; otherwise, the
results displayed will not be correct. The following table displays issues and their
corresponding solutions.
Table 1. Testing Issues, possible connection causes, and actions.
Issue
Possible Causes
Action
V- and I- sequence do not coincide.
Voltage is connected in abc and current
in acb sequence, or vice versa.
Swap two CT connections (for example,
swap red and yellow CT positions).
Speed negative, Torque negative, kW
positive, pf positive.
Voltage and currents are connected acb
with respect to electrical hardware.
Displays that the VFD is turning in
negative direction, motoring.
To obtain positive rotation data,
exchange Voltage clip from red to
yellow, and exchange CT from red to
yellow. Keep orientation of CT the
same.
Three power factors (shown in Power
Quality domain, power result) are
negative or load is very wrong (FAR too
high or FAR too low).
CTs are facing the wrong direction or
connected to the wrong phase.
a) Turn the three CTs around (reverse
direction of arrow).
b) Exchange cyclical locations of CTs
(red to yellow, yellow to blue, blue to
red). If results still not correct, perform
this step one more time; otherwise
check a).
Speed negative, torque positive (or vice
versa).
a) Connected to a generator and not to
a motor.
b) CTs polarity is wrongly connected.
a) Everything is fine
b) Turn the CTs around (reverse
direction of arrow).
NOTE
If in VFD mode, the voltage level is only displayed as a function of time. This mode
of operation is not a pass/caution/warning mode any longer. All voltage level tests
performed in VFD mode will yield a blue color.
VFD4000 analysis software option
Waveforms
In VFD mode, voltage and current for a phase is shown.
1) To open this window, click on the Connection domain button.
2) Click on the Waveforms button in the Connection domain panel.
In VFD mode, the voltage and current measurements can be displayed for only one phase at
a time, as you can see in the example below.
Figure 64. VFD waveform display.
66
Dynamic Motor Analyzer—EXP4000 User Manual
VFD4000 analysis software option
VFD Details domain
In VFD mode,this window displays the dynamic behavior of voltage level, torque, frequency,
and speed as a function of time.
As with any graphical display within the EXP4000 software, zoom and printing features are
available.
Figure 65. VFD Details window.
Dynamic Motor Analyzer—EXP4000 User Manual
67

68
Dynamic Motor Analyzer—EXP4000 User Manual
8
Continuous Monitoring Software option
Using a streaming process, the CM4000 Continuous Monitoring Software evaluates
important operating values of a machine application including triggered acquisition and
recording. It acquires 11 samples per second on 41 parameters.
The graphical user interface can be rearranged during operation to suit your particular
analysis needs. If recording, it stores all available channels, not only the ones displayed.
Figure 66. Continuous Monitoring – Main Panel
A large number of independently operating triggers can be set and the stored data can be
viewed.
NOTICE
Because the data generated over several days by the Continuous
Monitoring software is larger than what a Microsoft Access database can
accommodate, it is stored as a separate file within the same folder as
the motor database file. The external data files generated for each CM
recording event contain the motor database name suffixed with a recording
event number. The data files must be kept together with the motor
database for any data backup/move operations.
Continuous Monitoring Software option
File menu
The File menu is directly linked to the EXP4000 software. You can create a new database,
open an existing database, close an existing database, or exit the program.
Figure 67. File menu.
Machine menu
The Machine menu is interlinked with the EXP4000 software.
Figure 68. Machine menu.
Using the items in this menu, you can open the machine tree, create a machine, edit a
machine, and acquire or reset the EP serial number. Gathered information is recorded to the
database.
Tools menu
The Tools menu allows you to access the virtual scope or view the connections. Like other
menus, the Tools menu is directly linked to the EXP4000 software.
Figure 69. Tools menu.
70
Dynamic Motor Analyzer—EXP4000 User Manual
Continuous Monitoring Software option
View menu
Several preset views are available to evaluate data. Change views by clicking on the related
item in the View menu.
You can use the views as they are configured, or you can customize them by hovering the
mouse cursor over the view you want to customize, then click the right mouse button to open
dialog boxes used to modify the related view.
Figure 70. View menu.
View menu item
Description
Volts/currents
Root mean square of the current through phases A, B, and C. This number should be between
30% and 110% of the name plate current.
Voltages
Displays the root mean square of the voltage for phase A, B, and C in volts.
Currents
The displays the root mean square of the current through the phase A, B, and C CTs in amperes
along with the average of the root mean square values of the 3 phase currents in amperes.
Power factor
The displays the power factor and the average power factor of phases A, B, and C . These values
are always equal to or smaller than one, and they increase with the load.
Power
This displays the single-phase real power for phase A, B, and C and the total power in kilowatts.
Apparent power
Displays single-phase complex power (9 kVA) values for phases A, B, and C in kilovolt amperes.
Reactive power
Displays single-phase complex power for phases A, B, and C along with the sum of the thee
phases in kilovolt amperes.
Displays the angle between and the current phasors of phase A, B, and C and the average angle.
This number will typically vary between 90 degrees at no load to 20 degrees at full load for
induction motors.
This view displays power out, torque, speed, and percent load. The power out is the mechanical
output power. The torque is the estimated torque in Nm or lb-in. The speed is the estimated
speed of ration of the shaft in RPM. The percent load is the output load with respect to the
motor’s rating in percentage.
Z angles
Machine
New view
You can create a custom view to display the items necessary to your operation.
Dynamic Motor Analyzer—EXP4000 User Manual
71
Continuous Monitoring Software option
Options menu
The Options menu has two items to choose from: Graph Plot Mode, and Event Triggers.
Graph Plot Mode
Within the graph plot mode, choose from sweep or continuous. When operating in sweep
mode, a red bar will sweep from left to right across the screen.
Figure 71. Options menu.
In continuous mode the tool will continue to gather data and the screen will change as it
reaches the far side and continues forward.
Event Triggers
Event triggers are useful for monitoring data for predefined machine events. When the
chosen condition exists, the data will be recorded for review. The software will continue to
record all channels until all triggers have been recorded. At that point, the software will stop
and all events can be reviewed. The software can monitor any or all of the 41 active triggers
listed. All channels are continuously monitored and each trigger creates a separate event,
even if the time is overlapping.
Figure 72. Event Triggers window.
72
Dynamic Motor Analyzer—EXP4000 User Manual
Continuous Monitoring Software option
1) To set up event triggers, click on Options, then Event Triggers.
2) Check the box for each trigger needed.
3) Set the parameters needed for each trigger:
4) Click on OK to save your settings.
Parameter
Description
Start Condition
Set this to either greater than or less than the value. Click on down arrow to
reveal other choices.
Start Value
Type the number value appropriate for this trigger.
Stop Condition
Set this to either greater than or less than the value. Click on down arrow to
reveal other choices. Remember this must be different from the start condition.
Stop Value
Type the number value appropriate for this trigger. Remember this must be
different then the start value.
Pre-Trigger (sec)
Number of seconds prior to event the software records data.
Post-Trigger (sec)
Number of seconds post to the event the software records data.
NOTE
If the Pre- and Post-Triggers are set to zero, the data that is recorded is just the
event. If these are set to greater than zero, data will be recorded that gives
information on what led up to the event and what happen after if occurred.
General operation icons
The CM4000 software has a few built-in icons that provide shortcuts to specific operations.
They are shown in the graphic below.
Figure 73. CMS general operation icons.
Dynamic Motor Analyzer—EXP4000 User Manual
73
Continuous Monitoring Software option
Modifying the continuous monitoring tool
The continuous monitoring software tool is customizable. It features 41 different gauges and
graphs that can be added to your display or modified to enhance the value of information
being collected.
You can set up the tool with as many of the graphs and gauges as you prefer; and you can
change these elements to suit your needs. This is accomplished by hovering the mouse
cursor over specific areas of the window and clicking on the right mouse button.
Adding a new gauge or graph
1) With the cursor in a white space around the existing gauges, right-click the mouse
button and a menu will pop up for adding a new gauge or graph.
2) Click on either New Gauge or New Graph.
3) A list of available object will appear. A few of the options are shown in the example
below.
4) Click on the desired gauge or graph to be added.
5) The new object will appear on your display and can be positioned as needed within
the window.
Figure 74. New Gauge / New Graph menu with sample items.
74
Dynamic Motor Analyzer—EXP4000 User Manual
Continuous Monitoring Software option
Moving gauges and graphs
1) Hover the mouse cursor over the item you want to move and click on the right
mouse button. The menu shown below appears.
2) Click on Move. A hand graphic appears over the object to move.
3) Drag the object to the new location and click the left mouse button to set the object
in place.
Figure 75. Move menu item—right mouse button click.
Setting gauge and graph scales
1) Hover the mouse cursor over the object you for which you want to define scales then
right-click the mouse.
2) Click on AutoScale or Manual as desired. The dialog box shown in the example
below appears when AutoScale is selected. The Manual scale selection will have a
similar dialog.
3) Set the values for scaling as needed then click OK.
Figure 76. Scale menu item—AutoScale.
Dynamic Motor Analyzer—EXP4000 User Manual
75
Continuous Monitoring Software option
Defining channel for the graph or scale
1) Hover your mouse cursor over the object for which you want to define the channel
then click on the right mouse button. A menu like the one shown below appears.
2) You can click on any of the channels and the graph or gauge will automatically
change to that item. Descriptions for the available channels are provided in the table
on the next page.
Figure 77. Channel menu.
76
Dynamic Motor Analyzer—EXP4000 User Manual
Continuous Monitoring Software option
Channel descriptions
The table below contains channel descriptions that include input data to the CMS software
along with data calculated by the CMS software.
Table 2. CMS channel descriptions.
Channel
Description
IA RMS [A]
Root mean square of the current through the phase A-CT in
amperes. This number is typically between 30% and 110% of the
nameplate current.
IB RMS [A]
Root mean square of the current through the phase B-CT in
amperes. This number is typically between 30% and 110% of the
nameplate current.
IC RMS [A]
Root mean square of the current through the phase C-CT in
amperes. This number is typically between 30% and 110% of the
nameplate current.
VA RMS [V]
Root mean square of the phase A voltage.
VB RMS [V]
Root mean square of the phase B voltage.
VC RMS [V]
Root mean square of the phase C voltage.
I Avg RMS [A]
Average of the root mean square values of the three phases’ currents
in amperes.
V Avg RMS [V]
Average of the root mean square values of the three phases’
voltages.
I Imbal [%]
Current imbalance percentage. For machines under load, this value
is typically smaller than one eighth of the voltage unbalance
percentage.
V Imbal [%]
Voltage imbalance percentage.
IA Angle [deg]
Angle between the current phasor of phase A with respect to the
voltage phasor of phase A (which is locked at 0 degrees). This
number is equal to Za angle.
IB Angle [deg]
Angle between the current phasor of phase B with respect to the
voltage phasor of phase A—in degrees). This number is Zb angle
degrees away from Vb angle.
IC Angle [deg]
Angle between the current phasor of phase C with respect to the
voltage phasor of phase A—in degrees). This number is Zc angle
degrees away from Vc angle.
VB Angle [deg]
Angle between the voltage phasor of phase B with respect to the
voltage phasor of phase A—in degrees. This number typically should
be within three degrees of either 120 or 240 degrees.
VC Angle [deg]
Angle between the voltage phasor of phase C with respect to the
voltage phasor of phase A—in degrees. This number typically should
be within three degrees of either 120 or 240 degrees.
Dynamic Motor Analyzer—EXP4000 User Manual
77
Continuous Monitoring Software option
Channel
Description
ZA Angle [deg]
Angle between the voltage and current phasors of phase A, in
degrees. This number will typically vary between 90 degrees at no
load to 20 degrees at full load for induction motors.
ZB Angle [deg]
Angle between the voltage and current phasors on phase B, in
degrees. This number will typically vary between 90 degrees at no
load to 20 degrees at full load for induction motors.
ZC Angle [deg]
Angle between the voltage and current phasors on phase C, in
degrees. This number will typically vary between 90 degrees at no
load to 20 degrees at full load for induction motors.
Z Angle Avg [deg]
Average angle between the voltage and current phasors on their
respective phases, in degrees. This number will typically vary
between 90 degrees at no load to 20 degrees at full load for
induction motors.
Power A [Kw]
Single phase real power for phase A, in kilowatts.
Power B [Kw]
Single phase real power for phase B, in kilowatts.
Power C [Kw]
Single phase real power for phase C, in kilowatts.
Total Power [Kw]
Total real power, in kilowatts. It is equal to Pa + Pb = Pc.
Reactive Power C [kVAr]
Single phase reactive power for phase C, in kilovolt amperes.
Reactive Power Avg [kVAr]
Sum of the three phases’ reactive power, in kVAr.
V over F
It displays the instantaneous ratio of voltage level divided by
fundamental frequency of the voltages. For all line-driven
machinery, this must be a constant. For most VFD applications, it
also needs to be near a constant value.
78
Dynamic Motor Analyzer—EXP4000 User Manual
9
Vibration software option
The vibration software allows you to collect and analyze vibration probe data. The software
can be accessed in two ways: from the Run Vibration button in the Explorer window (lower
right), or from the Tools menu.
When the Vibration window opens, the last vibration scan is displayed on the screen.
Figure 78. Vibration window.
Controls found at the top of the window help you select test results for viewing, set
parameters for the display, and perform other related functions with the test data.
Figure 79. Vibration window controls.
Clicking on the down arrow to the right of the Run Vibration icon opens a menu so you can
choose how you want the test to run. Options include: Run 1 Now, Looped Acquisition, and
Time Looped Acquisition.
Clicking on the Run Vibration icon initiates the data acquisition process. The instrument
acquires data for 10 seconds then automatically save the results and displays the scan in the
window’s display area.
The Test Selection dropdown list and the Next/Previous Record arrows help you select
previously recorded data files for viewing.
Clicking on the Export Data icon opens a window so you can save the data to the location of
your choice as either a comma separated values (CSV) or tab delimited (TXT) file.
Vibration software option
Clicking on the Plot Settings icon opens the Graph Settings dialog box as shown below.
Figure 80. Graph Settings dialog box.
This dialog box helps you select the parameters and options that will be used to display the
related vibration scan.
Clicking on the Vibration Gain Multiplier icon opens a dialog box in which you can specify
the gain to be used for the related vibration scan.
Running a looped acquisition scan
1) To run a looped acquisition, click on the down arrow next to the Run Vibration icon
then click on Looped Acquisition. A dialog box like the one shown below appears.
2) Type in the number of tests to be conducted (the default is 10).
3) Click Start and the instrument will loop through the given number of tests at
10-second intervals, automatically saving the results as each test completes.
Figure 81. Looped Acquisition dialog box.
80
Dynamic Motor Analyzer—EXP4000 User Manual
Vibration software option
Running a time-looped acquisition
1) To run a time-loop acquisition, click on the down arrow next to the Run Vibration
icon then click Time Looped Acquisition. A dialog box like the one shown below
appears.
2) Type in the number of tests to be conducted along with the time intervals.
3) Click Start and the instrument will run the required number of tests at the time
interval specified, automatically saving the results as each test completes.
Figure 82. Time Looped Acquisition dialog box.
Dynamic Motor Analyzer—EXP4000 User Manual
81
Vibration software option
Viewing results
Several options are available for viewing vibration test data, starting with selecting one of the
window tabs: Time Waveform, Spectrum, and Trending. In addition, clicking on the Plot
Settings icon reveals additional options depending on the tab selected. The display area in
the Vibration window changes to match each viewing option selected.
Viewing Time Waveform results
For the Time Waveform tab, clicking on the Plot Settings icon reveals three additional
options: Acceleration, Velocity, and Displacement.
Figure 83. Time Waveform display options.
A Time Waveform acceleration example display is shown below.
Figure 84. Time Waveform—Acceleration.
82
Dynamic Motor Analyzer—EXP4000 User Manual
Vibration software option
Viewing Spectrum results
Using the Spectrum tab as an example, clicking on the small arrow to the right of the Plot
Settings icon reveals additional options: in this case, Acceleration, Velocity, Displacement,
Markers, and Graph Settings. Not all options are available for every test conducted. Those
that are not available are grayed out; other that do not apply to the mode selected will not
appear in the list.
Figure 85. Spectrum display options.
Several examples of Spectrum displays follow.
Figure 86. Spectrum—Acceleration.
Notice that the Spectrum tab features a graph settings pane to the left, which provides
control over additional graph settings to those controlled from the Graph Settings dialog
box accessed from the Plot Settings icon.
Using the graph settings pane, you can quickly switch the Plot Mode, and the display
parameters for the X-axis and Y-axis.
Dynamic Motor Analyzer—EXP4000 User Manual
83
Vibration software option
Using the Markers section, you can select markers to display by checking the box next to the
marker(s). In the Spectrum Velocity example below, the Speed marker box is checked and
the marker appears in the display. In addition, the example shows how you can move the
marker’s location to enhance the view.
1) Hover the mouse cursor over the marker then click and hold down the left mouse
button. A four-cornered arrow appears indicating that the object can be moved.
2) Continue to hold down the mouse button and drag the object to its new location
then release the mouse button.
This feature can be used for any of the objects in the display.
Figure 87. Spectrum—Velocity.
84
Dynamic Motor Analyzer—EXP4000 User Manual
Vibration software option
In the Spectrum Displacement example shown below, we see that several markers are used
and have been moved to new locations to improve viewing. In addition, this example
demonstrates how the green and black cursors can be moved within the display.
1) To move either of these cursors, hover the mouse cursor over one until you see a
four-way arrow.
2) Click and hold the left mouse button and drag the cursor along the waveform to the
desired location then release the mouse button.
NOTE
The green cursor is a differences cursor, which displays differences in X and Y values
between its location and that of the black point of interest cursor.
Figure 88. Spectrum—Displacement.
Dynamic Motor Analyzer—EXP4000 User Manual
85
Vibration software option
If you look closely at the preceding example, you will notice that a new set of markers has
been added to the list—the “SKF” markers. These markers are added by clicking on the
green plus ( + ) icon just below the Markers list. The Select Marker Type dialog box like the
one shown below opens to help you make your selection.
Use the dropdown lists to select the marker type, company, and model.
Figure 89. Setting marker types and harmonic settings.
To set the Harmonics settings for a marker, click on the check box next to the marker in the
Markers list then used the From and To selection boxes in the Harmonics setting pane to
define your parameters.
86
Dynamic Motor Analyzer—EXP4000 User Manual
Vibration software option
Viewing Trending results
For the Trending tab, clicking on the Plot Settings icon reveals three additional options:
Acceleration, Velocity, Displacement, and Speed. Not all options are available for every test
conducted. Those that are not available are grayed out.
Figure 90. Trending display options.
Examples of Trending display options follow.
Figure 91. Trending—Acceleration.
Dynamic Motor Analyzer—EXP4000 User Manual
87
Vibration software option
Figure 92. Trending—Velocity.
Figure 93. Trending—Displacement.
88
Dynamic Motor Analyzer—EXP4000 User Manual
Vibration software option
Figure 94. Trending—Speed.
Tools to enhance viewing graphs
You have many options available to you to help inspect your graphs more closely. Zoom
features help you enlarge specific sections of the display as described below:
• Zoom: Click and hold the left mouse button then drag the cursor to define the area
to zoom in on. As you drag the cursor, a line shows the area that will be enlarged
when you release the mouse button.
• Zoom X-axis only: Click and hold the left mouse button and drag the cursor parallel
to the X axis. Vertical guide lines will show the portion of the X axis that will be
zoomed in on.
• Zoom Y-axis only: Click and hold the left mouse button and drag the cursor parallel
to the Y axis. Horizontal guide lines will show the portion of the X axis that will be
zoomed in on.
• Undo Zoom: Press the Space bar.
• Reset from Zoom: Press the Control key and Space bar simultaneously.
NOTE
If a box appears when zooming in on X- or Y-axis only, ensure that you are
dragging the cursor straight with either the X- or Y-axis to get the horizontal or
vertical guide lines.
Dynamic Motor Analyzer—EXP4000 User Manual
89
Vibration software option
90
Dynamic Motor Analyzer—EXP4000 User Manual
10 DC4000 software overview
DC4000 Machine Dynamic Analysis software tests and features
• Collect and graph field voltage
• Collect and graph field current
• Collect and graph armature voltage
• Collect and graph armature current
• Collect and graph transient data including start-up transient
• Calculate instantaneous torque and graph torque ripple and torque spectrum
• Calculate harmonics on all voltage and current data
• Calculate current spectrum
• Calculate voltage spectrum
• Cursors available to analyze torque and current spectrum data
• Data can be exported for additional analysis with programs such as Matlab or Excel
DC4000 Machine Dynamic Analysis software problem types identified
• Firing sequence and firing angle issues
• Voltage unbalance issues
• Voltage level issues
• Analyze voltage form factor
• Measure incoming power condition
• Failed SCR’s or IGBT’s
• Diagnose brush fire
• Diagnose brush chatter
• Diagnose drive issues
• Diagnose commutator problems
• Analyze/troubleshoot response of motor circuit
• Analyze/troubleshoot load issues
• Analyze/troubleshoot I2R issues
• Assists in setting neutral plane
DC4000 software overview
DC connections for the EXP4000 portable sensors
DC sensor voltage ratings
CAUTION
The maximum rating of the EXP4000 DC voltage circuit is 500V. A voltage
of 500V is the maximum allowable voltage between any two of the four
voltages and the ground clip. Under no circumstance connect the voltage
sensing circuit to higher voltage levels. This will cause severe damage to
the EXP4000.
Terminology
Va – Armature Voltage
Vf – Field Voltage
Ia – Armature Current
If – Field Current
Figure 95. Basic Diagram—separated excited DC motor.
Connection cases
Current sensor connections
1) Ia ≤ 600A, If ≤ 100A - Standard DC portable sensors
Standard DC4000 current sensors have two ranges:
60 A/600 A
-
Ia
10 A/100 A
-
If
CAUTION
The maximum insulation voltage rating of the EXP4000 DC current
transformer (CT) is up to 500 V, CAT III. Under no circumstance connect
the current sensors to circuits of any higher voltage. This will cause severe
damage to the EXP4000.
2) 600 A ≤ Ia ≤ 15,000 A, or If > 100 A – Optional DC portable sensors
Optional DC current sensors are available, extending the current range above 600 A for the
armature, and/or above 100 A for the field.
92
Dynamic Motor Analyzer—EXP4000 User Manual
DC4000 software overview
Figure 96. Connection diagram portable.
Voltage sensor connections
V ≤ 500 V
The EXP voltage connection is made directly across the armature voltage, or field voltage.
The graphic below shows the field voltage connections.
Figure 97. Portable field voltage connection (less than or equal to 500V).
V > 500 V
If the DC motor’s voltage exceeds 500 V, then a resistive bridge can be used to supply a lower,
proportional voltage to the EXP4000. The graphic below shows this done for the field
voltage circuit.
Figure 98. Portable field voltage connection (greater than 500V).
Dynamic Motor Analyzer—EXP4000 User Manual
93
DC4000 software overview
DC4000 software navigation and overview
Navigating the DC4000 software is accomplished via the main menu bar, the icon toolbar,
and the Navigation Pane.
Figure 99. DC4000 navigation tools and options.
File menu
The File menu is used to initiate database and folder management functions.
Figure 100. File menu.
94
Dynamic Motor Analyzer—EXP4000 User Manual
DC4000 software overview
Creating a new database
1) Click File, then New Database. The Create New Database dialog box appears as
shown below.
2) Type a name for the new database that is relative to the operation then click OK.
This database will now appear in the tree view on the navigation pane on the screen.
3) There are three types of database structures; choose the database structure
appropriate to the application.
Figure 101. Create new database dialog box.
Opening a database
1) To open a database, click File and Open Database. A new window appears like the
one shown below.
2) Choose the appropriate database then click Open. The database opened will be the
active database used by the software.
Figure 102. Window used to open database.
Dynamic Motor Analyzer—EXP4000 User Manual
95
DC4000 software overview
Closing a database
To close a database, click File, then Close Database. The database is automatically saved
when you close it.
Creating a new folder
To create a new folder, click File then New Folder; the new folder will be added to the Tree
View.
Figure 103. New folder.
Renaming a folder
To rename a new folder, right-click on the new folder and then on Rename in the dropdown
box. The software will place a box around the new folder. Type in the appropriate name and
press enter or click outside the folder.
Figure 104. Rename folder.
96
Dynamic Motor Analyzer—EXP4000 User Manual
DC4000 software overview
Creating a new test item
1) To create a new test item, click File then New Test Item. A wizard will appear to lead
you through the process of creating a new machine.
2) Type in the appropriate machine name and click DC machine.
3) Click on the Next button to continue the process.
Figure 105. Create test item wizard.
You can type values directly in the fields or use the dropdown lists when available to make
your selections. Notice that required fields appear in bold type:
Figure 106. Create Machine window; entering nameplate information.
• Number of poles (2, 4, or 6)
• Has interpoles? (yes/no)
• Winding: chooses between shunt, compensated shunt, or permanently excited
• Insulation class: A, F, B, or H
• Number of commutator bars; this is a display with an up/down arrow with
progressive values in multiples of two
Required fields are listed in bold. Yellow fields are recommended, but may be left at default
values. After all information is entered, click Finish to add the machine to the list in the
Machine Tree.
Dynamic Motor Analyzer—EXP4000 User Manual
97
DC4000 software overview
Using the icons toolbar for feature access alternatives
Some of the features accessed from the File and Tools menus can also be accessed via the
icons found in the toolbar just above the Navigation Pane. These features are identified in
the graphic below.
Figure 107. Icons used to access DC4000 features.
To enable the Create a New Folder and Create a New Dc Machine icons and their related
functions, a folder must be highlighted. After you click on an icon, the related features work
essentially the same as using the main menu access with the exception of the Create a New
Dc Machine icon.
Figure 108. Create New Dc Machine icon in toolbar.
When you click on this icon, rather than starting the Create Test Item wizard, a new folder is
added below the highlighted folder when the icon is clicked.
Enter a name for the folder/machine then press Enter on your keyboard. The Create Machine
dialog appears for you to complete the nameplate information as described earlier.
98
Dynamic Motor Analyzer—EXP4000 User Manual
DC4000 software overview
Viewing properties
Clicking on the View Properties icon opens a window like the one shown below.
For Database and Folder levels, the window shows only the Location tab, providing the name
and the modified date and time.
At the machine level, additional tabs provide information about the nameplate, machine
application, manufacturer, online testing, and bearings. Some items within these tabs can be
edited.
Figure 109. Right-click menu properties.
Dynamic Motor Analyzer—EXP4000 User Manual
99
DC4000 software overview
Online testing menu
Before testing can begin, you need to provide the software with information needed to
establish an understanding of what is being tested. The Online Testing menu provides
access to the tools needed to provide this information.
Figure 110. Online testing menu.
Creating a DC test model
1) Click on the Online Testing menu then Create Dc Test Model. The Create Test
Model dialog box appears as shown below.
2) Type a name for the new model in the Test Model Name field.
3) Change threshold levels as needed by highlighting the threshold level and typing in
the appropriate values. Ensure that warning levels are higher than the caution
levels.
Figure 111. Create new test model.
100
Dynamic Motor Analyzer—EXP4000 User Manual
DC4000 software overview
Editing a test model
1) Click on the Online Testing menu then Edit Test Model. The Select Test Model dialog
box opens as shown below.
2) Use the Select Test Model to Edit dropdown list to locate and select the test model
you want to edit.
3) Revise the threshold levels as needed then click on the Apply button.
4) Make other changes as needed and click Apply.
5) Click on the Close button when you are ready to save the changes to the test model,
leave the dialog box, and return to the main window.
NOTE
The default test model cannot be edited or deleted.
Figure 112. Edit test model.
Deleting a test model
1) Click on the Online Testing menu then Delete Test Model. A dialog box appears like
the one shown below.
2) Use the Select Test Model to delete dropdown list to locate and select a test model.
3) Click on Delete. A confirmation box will appear. Double check that this action is
appropriate, then click on the appropriate response.
Figure 113. Delete test model.
Dynamic Motor Analyzer—EXP4000 User Manual
101
DC4000 software overview
Using looped acquisition
The equipment can be set to continually run in a looped mode for a specified number of tests.
1) To access the looped acquisition mode, click on the Online Testing menu then
Looped Acquisition.
2) Highlight and type in the appropriate number of tests or use the up and down arrows
to select the desired number.
3) Click Start after set up is complete.
Figure 114. Looped acquisition.
Timed mode allows you to specify a number of continuous looped acquisitions, to be repeated
in intervals between tests that are user specific.
Figure 115. Time-Looped Acquisition.
You can chose the start time to either be immediate, or at a specific time and date. Ending
the testing can be similarly chosen.
102
Dynamic Motor Analyzer—EXP4000 User Manual
DC4000 software overview
Tools menu
There are two choices in the Tools menu. The Motor Master+ tool gives you a research tool
for motor efficiencies and workability. It helps you find motors of like size, capabilities, and
efficiencies. It will also allow you to research motor details to see if it is working within
prescribed tolerances.
Figure 116. Tools menu.
Motor Master+ (option)
This option is available for download from the U.S. Department of Energy and is not installed
at the factory.
Options
The Online Testing menu Options item provides access to three options that allow
customization of several system parameters and database features: general, database, and
archive.
General tab
Use the General Options tab to set several system parameters.
The Calculator Path field and Browse button are use to identify the path to system’s
calculator.
The currency type can be set from here. The default is “USD” (US dollars). Type in the
currency name, then use the dropdown list to select the symbol that represents the currency
chosen.
Figure 117. User Options/general options.
Use the Unit dropdown list to select either US or Metric.
Screen colors can be changed by clicking on any of the color schemes listed in the Display
Style dropdown.
Dynamic Motor Analyzer—EXP4000 User Manual
103
DC4000 software overview
When you are satisfied with your changes, click Apply, and then OK.
Database tab
Use the Database tab to set the location for the database files along with the type of
database is to be used as the default. For database types, you can select from Access
Database (*mdb), Sql Express Database (*.mdf), or Sql CE Database (*.bic).
Figure 118. User options/database.
Archive tab
Use the Archive tab to set the location of where archives will be stored. This is an important
feature to remember if you ever need to locate an archive. Also, the EXP4000 creates a large
amount of data points. These data points can create large databases of many mega-bytes.
Using this tab, you can define the Max Archive Size so that the data can be sent to different
devices without issue. If the database is larger than the archive max size, the software will
break the file size into appropriate pieces and archive all of the data.
Figure 119. Options menu/archive.
104
Dynamic Motor Analyzer—EXP4000 User Manual
DC4000 software overview
Software testing screen
The following description of the DC4000 software will aid in understanding how data is
gathered.
Figure 120. DC4000 main screen.
CT selection
On the top of the screen is a row of CT selections; one for the Field CT and one for the
Armature CT. There are two selections in each. The Field CT is either 10A or 100A, whereas
the Armature CT is either 60A or 600A.
Figure 121. CT selection.
Nameplate Information
The information listed in the top portion of the screen is from the nameplate information that
was entered when the machine was created. This information is for reference for what was
originally entered for the machine.
Figure 122. Nameplate Information.
Dynamic Motor Analyzer—EXP4000 User Manual
105
DC4000 software overview
Center of screen
Figure 123. Center of screen.
Parameters
•
VA[%] = Armature voltage percentage
• VF[%] = Field voltage percentage
• IA[%] = Armature current percentage
• IF[%] = Field current percentage
• Torque [ft-lb] = Torque in foot pounds (torque [N-m] = Torque in Newton meters)
• Load [HP] = Load in horse power (load [kW] = load in kilowatts)
• Load [%] = Percentage load
• Va/If [%] = Percentage of synchronous speed equivalent
Waveforms can be zoomed in on to display cycles.
• Zoom in – Shift and hold left click button then drag box around area of interest.
• Zoom out – Ctrl and right click button will return screen to original zoom level.
Practical data resulting from the waveforms
• Firing sequence
• Fining angles determined by amplitude of waveform
• Broken SCR-extreme firing angle
• Input voltage unbalance – Phases may be off; lack of symmetry in waveforms
• 3 phase (3+, 3-) SCR switching – symmetrical waveforms, unless too much ripple is
present
• Typical DC drives will not have a flat waveform, due to six-pulse rectifiers or lack of
ripple capacitors.
NOTE
The field circuit does not interact with the load. All load-related signatures will
make it into the armature, but not the field.
106
Dynamic Motor Analyzer—EXP4000 User Manual
DC4000 software overview
Bottom of main screen
Figure 124. Bottom of main screen.
Run Electrical button
Click on Run Electrical to run the programmed tests.
View Connections button
Clicking on the View Connections button opens the View Connections window, which provides
you with a real-time look at the input signals.
Armature voltage (Va), field voltage (Vf), armature current (Ia), and field current (If) are
displayed in terms of average along with RMS, min/max, peak-to-peak, and percent of
nameplate values.
The graph shows the waveform shape.
Load and torque are plotted versus time.
Figure 125. View Connections.
Exit button
Clicking on the Exit button closes the software and returns you to your desktop.
Dynamic Motor Analyzer—EXP4000 User Manual
107
DC4000 software overview
Test domains
The right side of the screen has a set of test buttons known as domains. Click on each
individual button to see a subset of buttons and several test results screens.
Figure 126. Test Domains.
• Drive: Armature voltage level, field voltage level, armature voltage form factor,
armature current ripple.
• Machine: Armature current level, high field resistance, low field resistance, field
current level.
• Load: Torque ripple, load level.
• Waveforms: Results only.
• Spectrum: Field spectrum, armature spectrum, torque spectrum.
• Harmonics: Results only.
Meaning of button color code
• Green: Machine running within tolerances. No action needed.
• Yellow: Machine has exceeded a caution threshold. Action should be taken to avoid
future problems.
• Red: Machine has exceeded a warning threshold. Action needs to be taken to
correct problem.
• Blue: No applicable thresholds.
108
Dynamic Motor Analyzer—EXP4000 User Manual
DC4000 software overview
Drive domain
The Drive domain observes the upstream power. Poor power condition will expose the
motor to unnecessary stress.
1) Click the Drive button to view the domain tests.
2) Click on any test to view the results or test logs.
Armature voltage level (Va)
Function
Armature voltage level is the main variable to control speed. It is always created by the drive;
speed varies proportionally to Va.
1) To change speed, change Va.
2) To reverse direction of rotation, reverse Va.
and
Figure 127. Armature Voltage Level.
Typical threshold
Nominal:-Va_Nameplate < Va < Va_Nameplate
Warning threshold: 120% Va_Nameplate
Caution threshold: 110% Va_Nameplate
Standards: NEMA MG-1 Section 1-12.64
Dynamic Motor Analyzer—EXP4000 User Manual
109
DC4000 software overview
DC machine Va troubleshooting
Result: |Va| > Va nameplate
Possible problem root causes
• Drive settings and motor nameplate data do not coincide.
• Drive or sensor problem.
• Malfunctioning control circuit or feedback.
• Neutral plane is off.
Possible effects
• Operates over rated speed motor.
• Brush fire – Excessive brush sparking due to armature over voltage.
• Commutator/brush damage.
Field voltage level (Vf)
Function
Connecting field voltage (Vf) onto the field winding causes the flow of field current (If). This
creates the magnetic field necessary for torque generation.
Figure 128. Field Voltage Level.
Typical thresholds
Nominal: |Vf_field_weakening| < |Vf| < |Vf_base_speed|
Warning Thresholds: 120% |Vf_base_speed|
80%f_field_weakening|
Caution Thresholds: 110% |Vf_base_speed|
90% |Vf_field_weakening|
Standards: NEMA MG1 Section 1-12.64
110
Dynamic Motor Analyzer—EXP4000 User Manual
DC4000 software overview
DC machine VF troubleshooting
Result: |Vf| > |Vf_base_speed|:
Possible problem root cause
Case I: If <= If_base_speed
• The field circuit’s resistance is higher than nameplate suggests.
• The field winding is running too hot.
• Excessive contact resistance in the field circuit.
• The field circuit’s lead lengths cause additional voltage drop prior to reaching field
winding terminals.
• Error entering the nameplate information when creating the motor.
Possible effects
• Contact resistances tend to increase over time. Following this trend, the worsening
contact resistance will lead to over speed trip, or over speed damage to the motor.
• The field winding’s resistance varies too much from the drive’s motor model, which
may introduce stability problems to speed or torque control.
• On inexpensive motors with no speed control, the motor can overspeed, possibly
causing damage.
• Field lead lengths cause additional voltage drop prior to reaching field winding
terminals.
• Many drives have motor models used to offer higher quality speed/torque controls.
The field’s resistance varying too much from the drive’s motor model may introduce
stability problems to speed or torque control.
Possible problem root cause
Case II: If > If_base
• Drive setup problem.
• Drive or sensor malfunction.
• Short in field.
Possible effects
Many drives have motor models used to offer higher quality speed/torque controls. The field’s
resistance varying too much from the drive’s motor model may introduce stability problems to
speed or torque control.
Results: |Vf| < |Vf_field_weakening|
Possible problem root cause:
Case I: If < If_field_weakening
• Drive setup problem.
• Drive or sensor malfunction.
Possible effects
• Over speed trip.
• Over speed damage.
Dynamic Motor Analyzer—EXP4000 User Manual
111
DC4000 software overview
• Series poles connected in series have been removed from the circuit.
Possible problem root cause
Case II: If >= If_field_weakening
• Field circuit’s resistance is lower than nameplate suggests.
• Field winding’s temperature is below standard ambient (40º C) or motor may not
have warmed up yet.
• Series elements of the field winding are not part of the circuit (turn-turn faults)
• Nameplate vs. motor issue:
• Error entering the nameplate when creating the motor.
• Motor’s nameplate does not properly represent the field circuit.
• If the field circuit’s resistance is lower than the nameplate suggests.
Possible effects
If the field winding has a turn-turn fault, and if the field voltage has noticeable harmonic
components, the shorted turns are being overheated. The field’s ground-wall insulation will
fail prematurely. The amount of overheating due to the harmonic current content depends
upon the amount of Vf_ripple/Vf.
If the ambient temperature is below standard ambient (40º C), and the motor has not
operated for a long enough time, then the field winding is still in the process of heating up. If
the drive does not change the Vf, then It will keep falling until the field winding reaches a
steady state temperature.
Many drives have motor models used to offer higher quality speed/torque controls. Varying
the field winding’s resistance too much from the drive’s motor model could introduce stability
problems to speed or torque control.
• If the motor’s nameplate does not properly represent the field circuitry the field’s
resistance varies too much from the drive’s motor model, which can introduce
stability problems to speed or torque control.
112
Dynamic Motor Analyzer—EXP4000 User Manual
DC4000 software overview
Armature voltage form factor
Function
Form Factor is defined as:
Figure 129. Armature Voltage Form Factor.
This is a representation of how much armature voltage (Va) differs from a pure DC signal.
The closer the armature voltage form factor is to 1.0, (the theoretical minimum), the cleaner
the signal. An armature voltage form factor greater than 1.0 indicates AC current
components in the armature and could mean more losses.
Typical thresholds
The following boundaries apply to DC motors operating from a rectified AC supply.
Warning thresholds: 120% Va_Rated
80% Va_Rated
Caution thresholds:
110% Va_Rated
90% Va_Rated
Standard: NEMA MG-1 Section 1-12.64
DC Machine Va form factor troubleshooting
Result: Va form factor is too high
Possible problem root cause
• Excessive voltage unbalance feeding the drive.
• Unsymmetrical firing of the drive’s armature circuit switches.
• The number of pulses generated by the drive is too low.
Dynamic Motor Analyzer—EXP4000 User Manual
113
DC4000 software overview
Possible effects
The drive’s supply introduces excessive variations in the motor’s armature current. This
creates excessive torque ripple for applications defined as essentially torque ripple free.
Some applications (for example, extruders) function properly only if the supplied torque is
sufficiently constant. An excessive armature voltage form factor can cause excessive
armature current ripple, resulting in additional commutator sparking.
Armature Current Ripple
Function
This is current that produces no torque, yet produces heat. Primarily, armature current ripple
is the response of the circuit to the armature voltage AC components. The inductance of the
motor (and any additional users supplied inductance) can smooth out the armature current
ripple at least to some extent. A reduction in the RMS armature current ripple reduces the
heating of the motor, while a reduction in peak-to-peak armature current ripple improves the
commutating ability of the motor.
Figure 130. Armature Current Ripple.
Typical thresholds
Warning threshold: 2.5 < Ia ripple factor
Caution threshold: 6.0 < Ia ripple factor < 2.5
Standards: NEMA MG-1 Section 1-14.61
DC machine Ia ripple troubleshooting
Result: Armature current ripple is too high
Possible root cause
• Va Form Factor is too high:
• Drive malfunction.
• Timing of SCR’s is wrong.
• High AC voltage unbalance.
• Armature circuit’s inductance too small.
114
Dynamic Motor Analyzer—EXP4000 User Manual
DC4000 software overview
Possible effects
• The drive’s supply introduces excessive variations in the motor’s armature current.
This creates excessive torque ripple for applications defined as essentially torque
ripple free. Some applications (for example, extruders) function properly only if the
supplied torque is sufficiently constant.
• AC current components contribute more to heating than to torque generation –
aging the armatures prematurely. Additionally, AC armature current components
diminish the commutation capacity.
Dynamic Motor Analyzer—EXP4000 User Manual
115
DC4000 software overview
Machine domain
The Machine domain displays the issues directly related to the motor’s health. A machine can
be a motor or a generator.
Figure 131. Machine domain tests.
1) Click on the Machine domain button.
2) Click on any of the machine domain tests to view the test results or logs available.
116
Dynamic Motor Analyzer—EXP4000 User Manual
DC4000 software overview
Armature Current Level
Function
The armature current (Ia) level represents the current flowing through the armature winding.
Figure 132. Armature Current Level.
Typical thresholds
Warning threshold: 120% rated < Ia
Caution threshold: 110% rated <Ia<120% rated
DC machine Ia troubleshooting
Possible problem root cause
• Va level is too high.
• Excessive torque is demanded by the load.
• Armature may have stalled.
• No current in the field.
Possible effects
• Brush fire.
• Commutator/brush damage.
Dynamic Motor Analyzer—EXP4000 User Manual
117
DC4000 software overview
High Field Resistance
Function
The calculated field resistance is compared to field resistance at rated conditions extrapolated
to the upper boundary of the insulation class.
Figure 133. High Field Resistance.
Typical thresholds
Typical thresholds
Warning thresholds: 120% RfHot < Rf
Caution thresholds: 110% RfHot , Rf , 120% RfHot
Result: Field resistance is too high
DC machine Field Resistance troubleshooting
Possible problem root cause
• High temperature.
• High contact resistance.
• Gauge of copper wire used for winding is too small.
Possible effects
• Shortened insulation life.
118
Dynamic Motor Analyzer—EXP4000 User Manual
DC4000 software overview
Low field resistance
Function
The calculated field resistance is compared to field resistance at rated conditions extrapolated
to the lower boundary of the insulation class.
Figure 134. Low Field Resistance.
Typical thresholds
Where:
Delta T = per unit resistive increase for copper going from ambient temperature up to hottest
allowable temperature for that insulation class.
Warning threshold: 80% Rfcold > Rf
Caution threshold: 90% Rfcold > 80% Rfcold
DC machine low field resistance troubleshooting
Result
• Turn-to-turn short
• Field winding is below NEMA ambient temperature (400C)
Possible effects
• Shortened motor life.
• Motor was very recently started.
• Ambient temperature is very much below 400C.
Dynamic Motor Analyzer—EXP4000 User Manual
119
DC4000 software overview
Field Current Level
Function
Field current (If) level corresponds to the current flowing through the field winding. Note: It
is critical that the field current never falls too low or moves through the zero point, otherwise,
the motor could over speed or stall.
Figure 135. Field Current Level.
Typical thresholds
Warning threshold: 120% rated < If
Caution threshold: 100% rated < If<120% rated
DC machine If troubleshooting
Result: Field current level is too high
Possible problem root cause
• Vf too high.
• Field circuit resistance too low or cold field windings.
• Short in field windings.
Possible effects
• Too many I2R losses.
Result: Field current level is too low.
Possible problem root cause
• High temperature.
• High contact resistance.
• Long leads of small diameter copper.
Possible effects
• Over speed.
• Stalling.
120
Dynamic Motor Analyzer—EXP4000 User Manual
DC4000 software overview
Load
The load domain uses the motor as a sensor to look at the driven load. To fully describe the
steady state behavior two components are supplied.
Figure 136. Load domain tests.
Torque ripple: Imaged data short-term behavior as well as load signature.
Load level history: long-term behavior is made viewable.
1) Click on the Load domain to view tests.
2) Click one either of the domain tests buttons to view the test results or logs available.
Dynamic Motor Analyzer—EXP4000 User Manual
121
DC4000 software overview
Torque ripple
Torque ripple is defined as the division of maximal torque divided by average torque during
the acquisition period.
Figure 137. Torque ripple.
Function
Torque ripple is a measure of how small the torque band is that surrounds a steady state
average torque. An important feature of the graph is the overall signature of the
instantaneous torque (torque versus time plot). This signature is the result of the load
requirements of the drive.
Boundaries: N/A – blue results
Results: Torque ripple is too high
A torque ripple in a ripple-free application indicates a problem.
Possible problem root cause
• Load problem.
• Drive problem.
122
Dynamic Motor Analyzer—EXP4000 User Manual
DC4000 software overview
Load level
The motor is required to deliver the load level requested by the load. If there is a change in
the load level, the root cause of that change lies in the driven load, not in the motor’s
capabilities.
Figure 138. Load Level.
Function
Load level displays the test history of the load Dynamic monitoring identifies deterioration,
which in most cases is gradual making trending important. A gradual increase of load can be
a sign of additional friction in the driven belt system. A decrease can be traced back to a
gradual blockage of the inlet of a fan or a pump. Changing loads can only be diagnosed with
detailed knowledge of the operating process. Expertise in the particular driven load is
necessary to determine whether the measured change is meaningful for predictive
maintenance.
Typical thresholds
Warning threshold: 120%<load
Caution threshold: 110%<load<120%
Possible problem root cause
In case load level is too high:
• Load level problems are always caused by the load.
Possible effects
• Overheating.
Dynamic Motor Analyzer—EXP4000 User Manual
123
DC4000 software overview
Waveforms
Waveform shape can be indicative of drive or motor problems. For example, if every sixth
peak of the field voltage or armature voltage waveform is smaller than the rest, it is possible
that one SCR on a six-pulse rectifier is not firing properly. Typically, a DC drive does not utilize
ripple capacitors, so these waveforms typically are not flat.
In addition, an entire missing tooth in the waveform could indicate a broken SCR. Voltage
unbalance should also be visible.
Because there is more inductance in the field than in the armature, field current should
normally be relatively small (high resistance) with less ripple than armature current.
Figure 139. Waveforms.
124
Dynamic Motor Analyzer—EXP4000 User Manual
DC4000 software overview
Spectrum
Spectra are useful for analyzing the frequency content of time-domain signals. Armature
voltage (Va), armature current (Ia), field current (If), field voltage (Vf) and torque are
transformed to the frequency domain with the Digital Frequency Locked Loop (DFLL) and/or
the Fast Fourier Transform (FFT).
1) Click on the spectrum domain button to view the spectrum tests.
2) Click on any of the test buttons to view the graphical spectrum test results.
Field Spectrum
Field voltage (Vf) and field current (If) should have similar spectra at lower frequencies. As
frequency increases, impedance also increases (the impedance is mostly inductive), resulting
in the field current spectrum beginning to decrease in amplitude at higher frequencies.
The field circuit does not interact with the load, so any issues found in the field spectra have
to be the result of the voltage sources, the field winding resistance, or the field winding
inductance.
A field circuit powered by rectified three-phase AC should display harmonics at DC and
multiples of the 6th harmonic: 6th, 12th, 18th, and so on. No harmonics should be
displayed at multiples of the second harmonic: 2nd, 4th, 8th, and so on. The presence of a
second harmonic multiple could be due to voltage unbalance at the input of the DC drive.
For low ripple applications having excessive field current ripple, the inductance of the field
circuit could be too low. This can be corrected by adding additional inductance externally to
the drive and/or motor field circuits.
Figure 140. Field Spectra.
Dynamic Motor Analyzer—EXP4000 User Manual
125
DC4000 software overview
Armature spectrum
As with the field spectrum, armature voltage (Va) and armature current (Ia) should have
similar spectra at lower frequencies. However, as frequency increases, impedance also
increases (the impedance is mostly inductive). As a result, the armature current spectrum
should decrease in amplitude at higher frequencies. If this is not the case, it is due to the
machine.
The armature spectra is useful in identifying the following problems.
• Raised bar.
• Raised Mica.
• Chattering.
• Neutral plane problems.
Figure 141. Armature Spectra.
126
Dynamic Motor Analyzer—EXP4000 User Manual
DC4000 software overview
Torque spectrum
The torque spectrum is composed of both electrical and mechanical components. The
electrical component can be reduced by addressing issues pertaining to the armature voltage
form factor and armature current ripple—voltage unbalance, unsymmetrical firing of SCRs,
and insufficient drive pulses. Some applications (for example, such as extruders) require very
little torque ripple. In these applications, it is critical that the ripple be addressed. When the
electrical components of the torque spectrum have been isolated, whatever is left is a
mechanical signature.
Figure 142. Torque Spectra.
Dynamic Motor Analyzer—EXP4000 User Manual
127
DC4000 software overview
Harmonics
Harmonics provide an indication of how much alternating current is feeding the DC current
motor. When a DC current motor is operated from a rectified alternating current source,
rather than from a low ripple source such as a battery, the performance could be affected,
possibly resulting in increased temperature and decreased commutation and efficiency.
A DC motor operated from rectified three-phase AC should display harmonics at the following
locations: DC, 6th, 12th, 18th, and so on.
1) Click on the Harmonics domain button to view the harmonics involved with the
machine under test.
2) To view the harmonics in different formats, click on the tabs at the top of the screen.
3) Click on the check box to view all four channels or as few as needed for each channel:
field current (If), armature current (Ia), field voltage (Vf), armature voltage (Va).
Figure 143. Harmonics.
4) Click on Export to view the available data formats. This allows data to be displayed
in several formats, copied to the clipboard, exported to a file for email, or sent directly
to a printer. Size definitions are also available. The unit of measure is pixels.
Figure 144. Export Harmonics.
128
Dynamic Motor Analyzer—EXP4000 User Manual
DC4000 software overview
Result
The presence of any other harmonic—particularly the 2nd—indicates a lack of symmetry
(except for the case of a single-phase rectifier).
Unusually large harmonics represent:
• On armature voltage can indicate an unbalance on the rectified supply.
• A blown SCR.
• On armature current can indicate a high contact resistance.
Reports
1) To generate a report, select the test records desired.
2) To select multiple test records simply use the Ctrl or Shift Keys as in any Windows®
format.
3) Click the right mouse button and select Add to Report. The report will be created
and a popup box will appear to save the report in a .rtf (rich text format), which can
be opened in a number of different software packages.
Figure 145. Right-Click Menu/Reports.
Report examples are shown on the next page.
Dynamic Motor Analyzer—EXP4000 User Manual
129
DC4000 software overview
Figure 146. Sample reports
130
Dynamic Motor Analyzer—EXP4000 User Manual
11 Example test and report generation
This chapter provides general guidelines for using the EXP4000 dynamic motor monitor; it
does not cover all of the capabilities of the instrument.
NOTICE
Ensure that all safety procedures have been read and understood before
making any connections to or attempting to use the EXP4000. Refer to
the “Safety Operating Information” chapter for details.
Motor monitoring
1) Prior to testing, ensure that the software has been set up properly along with an
appropriate database structure.
2) Ensure that machines have been accurately input and that all thresholds for each test
have been established. Refer to the “Basic Software Overview” chapter for
procedures and details.
3) Connect the EXP4000 to the machine to be tested as described in “Connecting the
EXP4000.”
4) After hookup has been completed, click on the Check Connections icon located on
the main screen of the software.
Figure 147. Check Connections icon.
5) If the connections are not correct and the machine is not a VFD machine the
autophasing will automatically correct the connections.
6) If the machine is a VFD machine, autophasing is automatically turned off. The
connections must be manually corrected.
7) Click Run Electrical. This will run all preprogrammed settings for the machine
connected.
8) When testing is done, scan the front panel results for accuracy. If all is fine, write the
testing to the database.
Example test and report generation
Looking at data collected
It is important to look at the data gathered prior to writing it to the database. If the data is
deemed inadequate or mistaken, it can lead to misinterpretation of results. Parameters can
be adjusted and the testing redone if the front panel results are not reasonable for the
machine.
Adjusting parameters
If the torque-speed curve has a red dot appearing in the graph area it can be from a speed
miscalculation, rotor bar problems, an incoming voltage problem or another cause. Check
the speed in the nameplate.
Figure 148. Torque speed parameter adjustment.
If the current draw is incorrect, check the CT selection from the front panel or the
connections button. The physical connection might not be right or there could be a bad
connection.
Override speed
If the speed is wrong, it can be overridden. Click on the Tools menu then select the Speed
Override item. Enter the appropriate speed in the field and ensure the On box is checked.
Figure 149. Override speed.
132
Dynamic Motor Analyzer—EXP4000 User Manual
Example test and report generation
Adjusting electrical acquisition time
This will affect absolute test time and increase rotor bar test resolution. If rotor bar problems
are suspected, it can be helpful to increase the acquisition time to obtain more data.
Figure 150. Electrical Acquisition options.
Spectrum Acquisition options
This adjustment allows you to change the frequency range being monitored along with the
resolution. This affects the voltage, current and the torque spectrums.
Figure 151. Spectrum Acquisition options.
Dynamic Motor Analyzer—EXP4000 User Manual
133
Example test and report generation
Looped Acquisition/Timed Acquisition
In the Tools menu, there are two types of loop acquisition modes: continuous and time
looped. In continuous looped acquisition mode a set amount of tests must be completed
prior to the instrument stopping. You should run a minimum of five tests, but 10 is the
optimal amount.
Figure 152. Continuous Looped Acquisition dialog box.
The second acquisition mode is time looped acquisition, which uses a defined time and date
as the trigger.
Figure 153. Time Looped Acquisition dialog box.
134
Dynamic Motor Analyzer—EXP4000 User Manual
Example test and report generation
Creating reports from the report generator
You can select multiple machines and results to generate a report, but only machines with a
stored result can generate a report.
1) Click on the File menu then Report Generator to open the Select Results window
shown below.
2) Select the results to be included in the report by checking the box(es) next to the test
result listed in the tree.
3) A machine summary page is automatically generated for each unique machine that
is being included in the report.
Figure 154. Select Results window.
4) Use the Filter On menu to filter the displayed results by result status or by a specific
data range.
Figure 155. Select Results—Filter On menu.
Dynamic Motor Analyzer—EXP4000 User Manual
135
Example test and report generation
5) Click on the Select menu to select the displayed results for reporting based on
result status.
Figure 156. Select Results—Select menu,
6) Click on the Trending On menu to view trending parameters. By clicking on the
words “Trending On,” the filtering parameters for the menu toggle on and off.
Figure 157. Select Results—Trending On menu.
7) Click on OK after all parameters for the report have been developed. The report
wizard will now create the report you can save it as a .rtf type file. It can then be
reviewed in an assortment of software.
8) A window appears to select the location for the report. Enter the name and select
the proper location then click Save.
The software will create a Rich Text Format (.rtf) document and automatically open it in
your default text editor program. This document can be edited to suit your needs (for
example, you can add logos, notations of tests, network capable, and more.) These
annotations can be made in the report through normal text editor functionality.
Automatic generation of reports
Results for tests conducted with the EXP4000 are automatically saved. Reports can be
generated from this data, providing pass/fail data, numeric data, and appropriate waveforms
from tests. Charts trend this data, which is logged with test dates. Analysis of test results
over time is a key tool in a predictive maintenance program.
136
Dynamic Motor Analyzer—EXP4000 User Manual
Appendix A — Default settings
• Database Directory [InstallDir]\dB
• Archive Directory [InstallDir]\Archives
• EP Acquisition—Find machine associated with EP and auto assign it
• Elec Acquisition Options: 10 Sec.
NOTE
Two-pole machines are always acquired with at least 30 seconds despite the Elec
Acquisition options setting.
Default settings
Table 3. Default settings.
Test
Electrical
Vibration
Machine Tree
Yellow
Red
Over voltage
10%
20%
Under voltage
5%
10%
Unbalance
3%
5%
Distortion
5%
8%
Rotor Condition
45 dB
36 dB
Operating Condition
5%
10%
Service Factor
1
11
Over current
100%
110%
Efficiency
5%
10%
Payback Period
24 months
12 months
Spectrum Acquisition
3000FMax
1.37 Acq Time
Vibration (in/sec)
0.15
0.35
Operating Condition
10%
20%
Tree Level 1 Name
Location
Tree Level 2 Name
Building
Voltage Level
Units
US Customary
Currency
Dollars ($)
Voltage
Line to Ground

Test
Yellow
Machine Tree Filters Show Machines with
No Tests
Show Tests with a Good
rating
Show Tests with a
Caution rating
Show Tests with a
Warning rating
Do NOT Filter test by
Date
138
Dynamic Motor Analyzer—EXP4000 User Manual
Red
Appendix B — Connection troubleshooting
General
The EXP4000 has two different modes of operation: Non-VFD (60Hz or 50Hz line operated)
and VFD (Variable Frequency Drive mode). The connection requirements for each of these
modes differ slightly. For VFD connection troubleshooting, refer to chapter 7, “VFD anaylsis
software option.
Non-VFD mode
This mode is operated in two different ways, with or without autophasing. Autophasing
allows for automatic correction for proper phasing of the current transformers (CTs) with
respect to the connected voltage phases. The autophasing feature is designed to recognize
which CT signals belong with which polarity, and to which connected voltage signal. It
requires that the observed three-phase load be only an induction motor without power factor
correction downstream of the point of connection. If any other device is being observed, the
autophasing feature needs to be turned off.
Table 4. Non-VFD issues, causes, and actions with autophasing feature turned on.
Issue
Possible Cause
Action
Monitored speed is wrong
The device connected is either
not a three-phase induction
motor, or there are power factor
correcting capacitors down the
line from the point of
connection.
Turn the autophase feature off
and be aware that portions of
the data (ind, speed, torque,
rotor bar, efficiency) will be
compromised.
Motor is running at high load,
yet EXP4000 is displaying low
load.
Autophasing failed (rare).
Turn autophasing feature off.
Ensure proper phasing in
connection. Save data and
send to SKF support for further
tuning of autophasing feature.
Motor is running at no load, yet
EXP4000 is displaying high
load.
Autophasing failed (rare).
Turn autophasing feature off.
Ensure proper phasing in
connection. Save data and
send to SKF support for further
tuning of autophasing feature.

Frequently asked questions
The EXP4000 shows the wrong speed. It displays the operating speed as synchronous
speed (3600, 1800, 1200, 900 rpm, and so on for 60Hz operation; or 3000, 1500, 1000
rpm, and so on for 50Hz operation). However, the motor is running at speeds lower than
that. What is the problem?
When creating a new machine, the nameplate speed needs to be entered into the Speed
[RPM] field in the Machine Properties dialog box. If the synchronous speed was entered,
the EXP4000 expects to be testing a synchronous machine—not an induction machine. For
a synchronous machine, displaying the synchronous speed is correct.
1) To edit the properties, click on the Machine menu then Machine Properties.
2) If desired, enter a new name in the Name field.
3) Click on the Apply button. A confirmation dialog will pop up saying “Machine Name
has changed. Create a New Machine?”
4) Select No to update the existing machine.
5) Clicking on Yes will create a new machine.
6) All nameplate fields will now become editable. Make changes as appropriate and
click Apply. This will create a new machine without any test data.
7) To view this new machine, click on its name in the Machine Tree.
8) You can now perform tests again.
NOTE
An existing machine with recorded tests cannot be edited. In order to edit this
machine, you must delete all tests and then edit the machine.
How do I connect the EXP4000 to the secondaries of PTs if I have an open delta
configuration?
Open delta configurations are very common in the field for medium-voltage or high-voltage
motors.
1) Ensure that all safety precautions are being followed when working with live voltage.
Refer to the “Safety Operating Information” chapter for details.
2) Identify the three different points in the MCC that show the same voltage (typically
100–200 volts) when connecting A–B, B–C, and C–A. One of these pins typically is
the ground pin.
3) Clip the ground connection to a viable ground in the MCC.
NOTE
Typically, this will be one of the three pins previously identified.
4) Connect the three phase clip-ons to each of the identified pins.
140
Dynamic Motor Analyzer—EXP4000 User Manual

How do I connect the EXP4000’s portable CTs if I have only 2 CTs installed in my medium
or high voltage motor?
The sum-of-currents concept applies in this situation.
1) Connect the first two portable CTs to phases A and B.
2) The third CT needs to be connected to both CTs around the other phases. Make
sure that the third CT totally closes around both currents of phases A and B. If the CT
doesn’t totally close, it will monitor much less current.
NOTICE
The third CT needs to be monitoring the SUM of both currents, and not
the subtraction. This means that the orientation of the wires through the
CT has to be such that the currents add and do not subtract. If the wires
are set such that the currents subtract, the EXP4000 will monitor a very
high current unbalance through that CT. If this is the case, take one of
the two wires out of the CT; and introduce it into the CT in the opposite
direction with respect to the CTs arrow.
Dynamic Motor Analyzer—EXP4000 User Manual
141

142
Dynamic Motor Analyzer—EXP4000 User Manual
Appendix C — Blue results
Blue results are results that have no threshold comparison but give valuable information
about the machine.
Table 5. Conditions under which tests show blue results.
Test
Result
Voltage Level
Always for VFD mode; never in non-VFD mode.
Efficiency
No entry of stator resistance.
No comparable motor found in database.
Payback Period
Efficiency blue condition.
Missing data of a lest one of the following:
–– Hours per day
–– Days per year
–– $ per kWh
Torque ripple
Always
Details (all)
Always
Current Imbalance
Load <= 25

144
Dynamic Motor Analyzer—EXP4000 User Manual
Appendix D — EP4000 installation
To obtain complete installation drawings and templates, please contact Baker Instrument
Company, an SKF Group Company and ask for document number: 71-028
What to do first:
Please verify all needed materials are in package:
• EP4000
• 3 CTs
• Terminal block cover and hardware
• MCC cable
• EP mounting hardware
• Template for EP enclosure mounting
Tools Needed:
• Small flathead screwdriver
• Pencil or felt-tip pen
• Phillips Screwdriver
• Hand drill
• Set of Drill bits
• Greenlee 2-1/2” punch.
Materials Needed:
• Switchboard wire, SIS #14, 600 V
• Wire lugs, 14-16 AWG, #8
• Splice sleeves 14-16 AWG
• Ty-wraps, T&B 7”
• Wire, #14, 600 V color green (Ground Connection)
• Control Cable, 3/C #14 AWG, 600 V, EPR/CPE
• Tag Book, ABC (T&B)
• Fuse Block (PT) 600 V/2 Amp

Safety precautions for EP installation
WARNING
Because of the dangerous currents, voltages, and forces encountered,
safety precautions must be taken for all tests. Follow all corporate
guidelines and those included here. Due to the wide diversity of
machine applications, no attempt is made here to list or review all
specific manifold general safety precautions. However, this manual
includes special safety precautions applicable to the use of the EXP4000
CAUTION
The maximum rating of the EXP4000 is 1,000 V (500 V for DC operation).
1,000 V (500 V DC operation) is the maximum allowable voltage between
any two of the four voltages and the ground clip. Under no circumstances
connected the voltage sensing circuit to higher voltage levels, this will cause
severe damage to instrument.
The maximum voltage rating of the EXP4000 DC current meters is 600
V. Under no circumstances connect the current sensors to circuits of any
higher voltage, this will cause sever damage to instrument
Installation safety warnings
Baker Instrument Company, an SKF Group Company recommends the following safety
precautions:
• Comply with all your facility’s safety practices at all times.
• Ensure physical setup does not interfere with your facility’s current or intended
operation.
Additionally, these safety precautions must be followed, otherwise dangerous shock hazards
may exist:
• Use whatever safety equipment required by your organization including eye
protection, high voltage gloves, arc-flash rated masks, hoods and any required PPC.
Prior to opening any MCC (Motor Control Cabinet), ensure that appropriate arc-flash
protection clothing is worn.
• Ensure that appropriate lockout / tag-out procedures are properly understood and
implemented by all personnel.
• Ensure motor’s phase connections are not positioned near ground or near each
other.
146
Dynamic Motor Analyzer—EXP4000 User Manual

Hardware installation
NOTE
It is necessary that each EP is provided 3 phase voltage (not in excess of 1,000 V
AC) and a good ground. Some switchgear installations will require this voltage to
be wired from the bus cabinet to each cabinet being outfitted with an EP. For
motors rated at voltages higher than 1,000 V AC, secondary output voltage from
the PT’s are acceptable as long as all three phases are present as line to line
voltages, and are lower than 1,000 V AC. .
Choosing a suitable location for the EP
The EP may be mounted in a variety of locations as long as the following criteria are met.
1) The EP must be installed in a cabinet or enclosure that is secured with a tool or key
lock.
2) Voltage and Current lines can be easily and safely ran to the EP in accordance with
applicable electrical codes.
3) The connector cable can reach the cabinet door, and the movement of the door is
not restricted.
4) The EP does not interfere with or complicate the mechanical operation of the cabinet
(for example, doors opening, terminal blocks covered, slide rack interference).
5) The physical location of the EP does not cause an electrical, environmental, or safety
hazard.
6) An Earth ground from the motor cabinet to the EP ground stud is installed.
The EP may be affixed to the interior of the cabinet by any means deemed appropriate;
however, it is recommended that a positive mounting system such as metal screws be
utilized. Supplied with the EP is a mounting template for the enclosure, as well as self
tapping metal screws. The template is a 1:1 representation of the EP enclosure, and can be
used for location assessment as well as mounting hole placement. Once the location is
decided:
1) Mark the mounting holes from the template to the cabinet.
2) Remove the template.
3) Drill the mounting pilot holes.
4) The EP enclosure may now be mounted to the cabinet with the screws provided.
Dynamic Motor Analyzer—EXP4000 User Manual
147

Choosing a suitable location for the panel plug
The panel plug is to be mounted on the door of the cabinet. The location should be easily
accessible from the outside of the cabinet, providing the user an easy and obvious hookup
scheme. Once the location is decided:
1) Mark the center hole to the cabinet.
2) Drill the center hole.
3) Using whatever means deemed appropriate, remove the center cutout. It is
recommended a 2-½” Greenlee style punch be used to create the cutout.
4) Once the cutout is removed, place the plug over the hole, and mark the four
mounting holes.
5) Remove the plug, and drill the four outer mounting holes.
6) Mount the plug and the backplate using the supplied hardware.
7) Provide strain relief for the cabling attached to the panel plug.
Current transformer (CT) connections
1) Verify that all three CTs are marked with the same bin number; this is a number
between 1 and 5.
2) The supplied CT donuts are to be placed on the three voltage feeds to the motor.
3) These should be placed on the load-side of any line protection devices (circuit
breakers). Care should be taken to ensure the dots on the CTs point toward the load
(motor). Red is phase A, blue is phase B, and yellow is phase C.
4) The Baker CTs should be installed on the output of existing CTs in the system for all
motors operated at voltages above 1,000 V. Check that the output of the secondary
is less than or equal to the rating of the Baker CTs.
5) Ensure there is enough wire length to connect to the EP. If installed CTs are used, be
sure to note the ratio, as this information will be needed when creating a motor ID.
148
Dynamic Motor Analyzer—EXP4000 User Manual

Voltage connections
NOTE
IOn motors with input voltages higher than 1,000 VAC it will be necessary to make
the connection after a Power Transformer (PT) located between the voltage source
and the EP.
Three-phase voltage should be connected to the EP once it is installed. Installing a fuse block
near the EP, connected in-line between the EP and the voltage source, is recommended.
Ensure there is enough wire length to connect to the EP.
Electrical connections
Once the EP has been mounted, CTs have been installed, and three-phase voltage lower than
1,000 VAC is made available, the electrical connections may be made.
1) Connect the three CT twisted pairs to the EP current terminal block corresponding to
the appropriate phase, marked Ia, Ib and Ic (from right-to-left); white wire on the
right and black wire on the left for each phase. Tightening torque is 0.5 N-m.
2) Connect the three voltage leads to the EP voltage terminal block corresponding to
the appropriate phase, marked Va, Vb and Vc, being sure to connect a ground to the
ground position of the voltage plug. Tightening torque is 9 in-lb. Additionally, the
MCC ground should be connected to either of the ground studs on the EP enclosure.
CAUTION
Make sure that the voltage wiring for each phase is completely captured by
its corresponding phase in the EP voltage plug (that is, no wire strands poke
out).
3) Mount the cover over the top of the voltage terminal block by either using the
supplied screws and nylon spacers (plexiglass cover only), or by snapping in place.
For the plexiglass cover, the screws thread directly into mounting holes in the EP
case, 0.437 inches above and below the top and bottom voltage terminal block
mounting screws, respectively.
4) Connect the MCC cable (the end opposite the panel plug) to the A/D Bus DB25
receptacle of the EP, and secure in place with the captive screws.
5) Provide strain relief for all current and voltage wiring, as well as the DB25 cabling at
the EP enclosure.
Verification of installation
1) Energize cabinet.
2) Connect umbilical cable between Explorer and EP panel plug.
3) Open the Explorer software and create a new motor ID.
4) Set Sensors switch to EP position.
5) Press Run Electrical button.
Dynamic Motor Analyzer—EXP4000 User Manual
149

EP4000 ratings
• Voltage Terminal: 1,000 V AC, CAT III
• Current Terminal: Use Specified Current Transformers
• A/D Bus Connector: Use Specified Umbilical Cable
• Input: 5 V DC 105 mA
• Connect Only to EXP4000 or Similar
150
Dynamic Motor Analyzer—EXP4000 User Manual
Appendix E — References and glossary
Standards
6) NEMA Std. MG 1 2003, Motors and Generators
Literature
1) Mohan, Underland, Robbins, Power Electronics, Wiley & Sons, 1989, second edition,
ISBN 0-471-58408-8.
2) El-Hawary, Electrical Power Systems, Reston Publishing Company, 1983, ISBN
0-8359-1627-4.
3) Gross, Power System Analysis, John Wiley & Sons, 1979, ISBN 0-471-01899-6.
4) Stevenson, Elements of Power System Analysis, 1982, fourth edition, ISBN
0-07-061278-1.
5) Fink, Beaty, Standard Handbook for Electrical Engineers, McGraw Hill, 2000,
fourteenth edition, ISBN 0-07-022005-0.
6) Dorf, The Electrical Engineering Handbook, CRC Press, 1993, ISBN
0-8493-0185-8.
7) Fitzgerald, Kingsley, Electrical Machinery. The Dynamics and Statics of
Electromechanical Energy Conversion, McGraw-Hill, 1961, New York, Toronto,
London, second edition.
8) Wiedenbrug, ‘Measurement Analysis and Efficiency Estimation of Three Phase
Induction Machines Using Instantaneous Electrical Quantities’, Dissertation
submitted to Oregon State University September 24th, 1998.
9) Buscarello, ‘Practical Solutions to Machinery and Maintenance Vibration Problems’,
Revised Edition, Update International, Inc., 1997.
10)O’Flynn, Moriarty, ‘Linear Systems Time Domain and Transform Analysis’, Harper &
Row, 1987, ISBN 0-06-044925
11)Lüke, ‘Signalübertragung, Grundlagen der digitalen und analogen
Nachrichtenübertragungssystheme’, Springer Verlag, third edition, 1988, ISBN
3-540-19435-5.
12)Gabel, Roberts, ‘Signals and Linear Systems’, John Wiley and Sons, second edition,
1980, ISBN 0-471-04958-1
13)Karni, Byatt, ‘Mathematical Methods in Continuous and Discrete Systems’, Holt,
Rinehart and Winston, 1982, ISBN 0-03-057038-7

Glossary of terms
Average Power Factor: Average of three single phase power factors.
Clampons: Split core clamp on CT’s.
Clipons: Clips for voltage pickup.
Crest Factor: Difference between the sine wave peak and the RMS value.
Current: The time rate of flow of electric charge, in the direction that a positive moving
charge would take and have magnitude equal to the quantity of charge per unit time:
measured in amperes.
Efficiency: Defined as output power divided by input power.
Electrical Model: A group of Electrical thresholds.
EP: External Port
Harmonics: Periodic motion consisting of one or more vibratory motions that are symmetric
about a region of equilibrium, as the motion of a vibrating string of a musical instrument.
Haystack: Name of the NEMA guideline to Vibration. Speed versus Frequency in a double
logarithmic scale.
Horsepower: A foot pound second unit of power, equivalent to 550 foot pounds per second or
745.7 watts.
Kilowatt: A unit of power equal to 1000 Watts.
Load: What the motor drives.
MCC: Motor Control Cabinet
Motor ID: Unique name tot he motor to be tested.
NEMA Derating Factor: Factor between 1 and 0. Displays how much a motor has to be
derated, according to NEMA, to accommodate for sub-optimal voltage conditions.
NEMA Unbalance: Number commonly defined in percent according to an algorithm specified
by NEMA. Displays how much of relative unbalance is part of the voltage condition.
Newton-Meters: Metric unit of torque.
Overcurrent: Measure of operating current in percent, comparing to the motor’s nameplate.
Phasors: A vector that represents a sinusoidal varying quantity, as a current or voltage, by
means of a line rotating about a point in a plane, the magnitude of the quantity being
proportional to the length of the line and the phase of the quantity being equal to the angle
between the line and a reference line.
Pound-Feet: English system.
Power Factor: Relative amount of operating current and voltage used to transmit power. It is
defined as the division of real power by the multiplication of current and voltage.
Service Factor: Specified on the nameplate, displays the amount with which the rating of the
motor may be multiplied for transient operation.
Test Domains: The five testing regions within the EXP4000.
Thresholds: The point at which a stimulus is of sufficient intensity to produce an affect.
Torque Ripple: Measure of time-varying torque divided by steady state, or average torque.
Total Harmonic Distortion: Measure of harmonic content to a signal when compared to the
amount of fundamental.
Triggering: Method with which it is possible to start data acquisition when certain conditions
of the signals are met.
152
Dynamic Motor Analyzer—EXP4000 User Manual

VFD: Variable Frequency Drive.
Vibration Model: Defined as a group of mechanical thresholds.
Waveform: Displays the shape of a signal with respect to time.
Dynamic Motor Analyzer—EXP4000 User Manual
153

154
Dynamic Motor Analyzer—EXP4000 User Manual
Appendix F — Technical specifications
Table 6. General specifications.
CD/RW
EXP4000 is shipped with either an internal or external USB interface CD
R/W.
Computer OS
Microsoft Windows XP Professional® or equivalent.
Battery
Run time up to 3 hours.
Networking
Compliant standards: IEEE 802.11b and IEEE 802.11g
Data link protocol: Ethernet, Fast Ethernet, Gigabit Ethernet, IEEE 802.11b
and IEEE 802.11g.
Power
Power device is external.
Voltage requirements: 110/230Vac (50/60Hz).
Processor
Data bus speed: 400 MHz.
Processor 1.4 GHz.
RAM
Install size: 512 MB (upgradeable to 2GB).
Storage
Hard drive: 40GB running at 4200 RPM.
Video
Graphics processor.
Maximum resolution (external): 800 x 600 pixels.
Sensors
Current transformer (clamp on, Hall effect): 60/600A DC, 10A/100A DC,
4000A/7500A DC.
Current transformer (clamp on): 10A AC, 150A AC, 1000A AC.
Current transformers: 3000A AC.
AC voltage clips (1000V).
DC voltage clips.
Vibration probe with magnet (optional).
Grounding clip.
AC Voltage Clips
One set of three voltage clips plus one ground connection—color coded.
Maximum rated voltage: 1000V.
DC Voltage Clips
Set of four—color coded.
Maximum rated voltage: 500V.

Vibration Sensor
(optional)
Sensitivity: 100m (20%).
Acceleration range: 50g peak.
Amplitude non-linearity: 1%>
Frequency response: 1.6Hz–7kHz (10dB).
Connector: MIL-C-5015.
Splash-proof cable.
Rare Earth mounting magnet.
Case
Dust proof, crush resistant.
Dimensions: 15.11 x 12.40 x 6.94 inches.
Power Supply
Requirement
Input voltage: 100–240Vac.
Input current: 3.0A.
Input frequency: 50–60Hz
Table 7. AC current transformer (CT) specifications.
Current Clamp 10A (AC)
On
150A (AC)
1000A (AC)
3000A (AC)
Output Signal
10A/1V
150A/1.5V
1000A/2.5V
0.3 mV/A
Measurement
Range
.01A–10A
.01A–150A
.1A–1000A
5–3000A
Insulation
600V RMS
600V RMS
600V RMS
1000V
Jaw Opening
20mm
20mm
57mm
8 inches
Accuracy
R = Reading
0.1–0.5A < 2.5% of 0.1–1A: 2.0% of R +
R+ 0.1mV
0.2mV
0.1–10A < 3% +
0.1A of R
1% of R
0.5–1A < 2.5% of R 10–80A: 1%of R+
0.2mV
1–10A < 1% of R
80–150A: 1.5%R +
0.2mV
10A < 3% of R
50A < 1.5% of R
200A < 0.75% of R
1000A < 0.5% of R
Weight
3 x 180g
3 x 180g
3 x 550g
Dimensions
139 x 51 x 30mm
ea
139 x 51 x 30mm ea
111 x 216 x 45
mm ea
156
Dynamic Motor Analyzer—EXP4000 User Manual

Table 8. DC current transformer (CT) specifications.
10A/100ADC
60A/600ADC
4000A/7500ADC
Output
10A: 100mV/A
100A: 10mV/A
60A: 10/mV/A
600A: 1mV/A
4000A/2V
7500A/1.5V
Measurement
Range
100mA–100A
0.2A–600A
40A–7500A
Overload
Red LED indicates
overload
2000ADC continuous
up to 1 kHz
Working Voltage
600Vrms
600Vrms
600V
Accuracy
50mA–10A: 3% of R +
50mA
60A:
0.5–40A: 1.5% of R +
0.5A
1.5%
500mA–40A: + 4% of
R +50mA
40–60A: 1.5% of R
40A–100A: + 15% max 600A:
@ 100A
0.5–100A: 1.5% of R +
1A
100–400A: 2% of R
Weight
11.6 oz
15 oz
4.25 lbs
Dimensions
231 x 36 x 67 mm
224 x 97 x 44 mm
13.23 x 5.4 x 2.0
inches
Table 9. Connector specifications.
Function
Number
Type
AC/DC Voltage Port
1
Cannon Jack
AC/DC Current Port
1
Cannon Jack
Source Outlet
1
Standard 110–230V
EP/Vib Port
1
Cannon Jack
Dynamic Motor Analyzer—EXP4000 User Manual
157

158
Dynamic Motor Analyzer—EXP4000 User Manual
Index
A
Accessory interconnection and use 5
Acquire EP Serial Number 50
Acquisition tab 63
Adding a new gauge or graph 74
Adjusting electrical acquisition time 133
Adjusting parameters 132
Armature Current Level 117
Armature Current Ripple 114
Armature spectrum 126
Armature voltage form factor 113
Armature voltage level (Va) 109
Arrows and windows icons 8
Assigning an EP to a motor 49
Automatic generation of reports 136
B
Blue results 143
Bottom of main screen 107
C
Calibrate EP 58
Center of screen 106
Channel descriptions 77
Choosing a suitable location for the EP 147
Choosing a suitable location for the panel plug
148
Cleaning and decontamination 5
Closing a database 96
Index
Configuring software for motor data 7
DC connections for the EXP4000 portable
Connecting the EXP4000 15
Connecting the EXP4000 to the MCC 15
sensors 92
DC machine Field Resistance troubleshooting
Connection domain 40
118
Connection Setup window 16
DC machine Ia ripple troubleshooting 114
Connection troubleshooting 139
DC machine Ia troubleshooting 117
Consequences of not organizing data into
DC machine If troubleshooting 120
databases 7
DC machine low field resistance troubleshooting
Continuous Monitoring Software option 69
119
Create Test Model 52
DC Machine Va form factor troubleshooting 113
Creating a DC test model 100
DC machine Va troubleshooting 110
Creating a new database 95
DC machine VF troubleshooting 111
Creating a new test item 97
DC sensor voltage ratings 92
Creating reports from the report generator 135
Default settings 137
CT selection 105
Defining channel for the graph or scale 76
Current domain 31
Delete Test Model 53
Current Level 31
Deleting a test model 101
Current Transformer (CT) connections 148
Demodulated Spectrum 35
Current Unbalance 32
Display tab 62
D
Drive domain 109
Database 43
Dynamic Testing tab 49
Database features 7
E
Database management 7
Editing a test model 101
DC4000 Machine Dynamic Analysis software
Edit Test Model 53
problem types identified 91
DC4000 Machine Dynamic Analysis software
tests and features 91
Effective Service Factor 26
Efficiency 28
Electrical connections 149
DC4000 software navigation and overview 94
Environment conditions/storage 6
DC4000 software overview 91
EP 58
160
Dynamic Motor Analyzer—EXP4000 User Manual
Index
EP4000 installation 145
Harmonics 25, 36, 128
EP4000 ratings 150
Help menu 64
EP Caching 58
High Field Resistance 118
EP Calibration 64
I
EP Calibration Wizard 58
information devices 1
Event Triggers 72
Installation requirements 6
Example test and report generation 131
Installation safety warnings 146
Exit 45
K
Exit button 107
Keyboard shortcuts 13
EXP4000 connections to motor terminals 16
L
EXP4000 software overview 43
Load 27, 121
EXP4000 software-specific features 7
Load level 123
EXP4000 tests 19
Looking at data collected 132
F
Loop acquisition 59
Field Current Level 120
Looped Acquisition/Timed Acquisition 134
Field Spectrum 125
Low field resistance 119
Field voltage level (Vf) 110
M
File menu 43, 70
Machine domain 116
formatting 1
Machine information tab 48
Frequently-Asked Questions 140
Machine menu 46, 70
G
Machine Performance domain 26
General operation icons 73
Machine Properties 50
General safety precautions 3
Machine tree 12
Glossary of terms 152
Manual phasor adjustments 18
Graph Plot Mode 72
Meaning of button color code 108
Grey-shaded fields 7
Modifying the continuous monitoring tool 74
H
Motor monitoring 131
Hardware installation 147
Moving gauges and graphs 75
Harmonic Distortion 22
N
Dynamic Motor Analyzer—EXP4000 User Manual
161
Index
Nameplate Information 105
Report Generator 44
Name Plate tab 47
Reports 129
Navigating the software interface 7
Reset EP Serial Number 50
New AC Machine 46
Result 129
Numeric fields 8
Results panels and windows 10
O
Result tab 10
Online testing menu 100
Rotor Bar 33
Opening a database 95
Run Electrical 59
Operating condition (OpCond) 28
Run Electrical button 107
Operating Curves 60
Running a looped acquisition scan 80
Operational safety warnings 5
Running a time-looped acquisition 81
Operation details 65
S
Options 62, 103
Safety and general operating information 3
Options menu 72
Safety precautions for EP installation 146
Override speed 132
Safety warnings 4
P
Scope 54
Parameters 106
Select Marker Type dialog box 86
Payback Period 30
Select Test Model 51
Phasors 41
Sensor Ratios dialog box 48
Physical setup of EXP4000 with portable sensors
set the Harmonics settings for a marker 86
15
Setting gauge and graph scales 75
Physical setup of the EXP4000 with EPs 16
Setup wizard/suggest button 16
Plant maintenance 7
Shipping the unit 6
Power 24
Software testing screen 105
Power Quality domain 20
Software tips 13
R
Spectrum 125
Raw to CSV 61
Spectrum Acquisition options 133
References and glossary 151
Spectrum Displacement 85
Renaming a folder 96
Spectrum domain 33
162
Dynamic Motor Analyzer—EXP4000 User Manual
Index
Speed Override 61
Unpacking the unit 6
Starting the software 8
Upgrading databases from previous software
Summary Report 45
versions 13
Symbols and labels used on equipment 3
Using looped acquisition 102
Symmetrical Components (Sym. Components)
Using the icons toolbar for feature access
41
alternatives 98
T
V
Technical specifications 155
Verification of installation 149
Test domain buttons 10
VFD4000 analysis software option 65
Test domains 108
VFD Details domain 67
Test domains and testing theory 19
VFD mode 65
Testing capabilities 19
Vibration 59
Test Notes 61
Vibration software option 79
Text fields 7
View Connections 55
Thresholds menu 51
View Connections button 107
Tools menu 54, 70, 103
Viewing properties 99
Tools to enhance viewing graphs 89
Viewing results 82
Torque domain 37
Viewing Spectrum results 83
Torque ripple 122
Viewing Time Waveform results 82
Torque Ripple Result tab 37
Viewing Trending results 87
Torque Ripple Trend tab 38
View menu 71
Torque spectrum 127
View menu item descriptions 71
Torque Spectrum 39
V/I Spectrum 34
Total Distortion 23
Voltage connections 149
Transient Analysis 56
Voltage Level 20
Trend tab 11
Voltage sensor connections 93
Trigger parameter descriptions 73
Voltage Unbalance 21
Two-CT solution 17
W
U
Waveforms 40, 66, 124
Dynamic Motor Analyzer—EXP4000 User Manual
163
Index
164
Dynamic Motor Analyzer—EXP4000 User Manual
The Power of Knowledge Engineering
Seals
Bearings
and units
Mechatronics
Lubrication
systems
Services
Drawing on five areas of competence and application-specific expertise amassed over more than 100
years, SKF brings innovative solutions to OEMs and production facilities in every major industry worldwide. These five competence areas include bearings and units, seals, lubrication systems, mechatronics
(combining mechanics and electronics into intelligent systems), and a wide range of services, from 3-D
computer modelling to advanced condition monitoring and reliability and asset management systems.
A global presence provides SKF customers uniform quality standards and worldwide product availability.
®SKF is a registered trademark of the Baker Instrument Company, an SKF Group Company
©SKF Group 2013
The contents of this publication are the copyright of the publisher and may not be reproduced
(even extracts) unless prior written permission is granted. Every care has been taken to ensure
the accuracy of the information contained in this publication but no liability can be accepted for
any loss or damage whether direct, indirect or consequential arising out of the use of the
information contained herein.
UB 71-131-V2 EN Surveyor DX User Manual · April 2013
skf.com