1
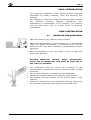
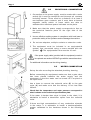
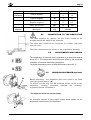
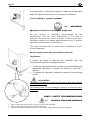
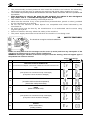
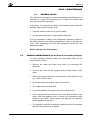
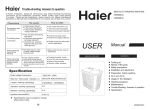
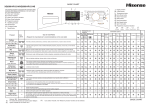
GB
Pag. 1
CONTENTS
CHAP.1 INTRODUCTION .......................................................................................... 3
CHAP.2 INSTALLATION............................................................................................ 3
2.1
2.2
2.3
2.4
2.5
2.6
2.7
HANDLING AND UNPACKING. ...................................................................................... 3
ELECTRICAL CONNECTION.......................................................................................... 4
WATER CONNECTION. ................................................................................................... 4
DRAIN CONNECTION. ..................................................................................................... 5
ADJUSTMENTS ................................................................................................................. 5
RINSE-AID DISPENSER ...................................................................................................... 5
DETERGENT ........................................................................................................................ 6
CHAP.3 SAFETY RECOMMENDATIONS.................................................................... 6
3.1
3.2
RESIDUAL RISKS AND WARNINGS ................................................................................... 6
SAFETY DEVICE.................................................................................................................. 7
CHAP. 4 USE OF MACHINE ....................................................................................... 8
4.1
4.2
4.3
DESCRIPTION OF THE COMMANDS ................................................................................. 8
USING THE MACHINE. ........................................................................................................ 9
END OF CYCLE OPERATIONS. ........................................................................................ 10
CHAP.5 MAINTENANCE.......................................................................................... 11
5.1
5.2
GENERAL RULES. .......................................................................................................... 11
PERIODIC MAINTENANCE (TO BE DONE AT LEAST EVERY 20 DAYS) ....................... 11
CHAP.6 DISMANTLING ........................................................................................... 12
6.1
DISMANTLING THE MACHINE .................................................................................... 12
Pag. 2
GB
GB
Pag. 3
CHAP.1 INTRODUCTION
The warnings contained in this manual provide important
information for safely installing, using and servicing this
machine.
The operator is required to read this manual before starting
any
operation
involving
handling,
installation,
use,
maintenance or disassembly of the machine. This manual
must be kept intact and in a safe place for frequent
consultation.
CHAP.2 INSTALLATION
2.1
HANDLING AND UNPACKING
x
Move the machine very carefully using a forklift.
x
Make sure the equipment is not damaged, if it is immediately
inform the dealer and shipper. If in doubt do not use the
machine until it has been checked by professionally trained
personnel.
x
Move the machine to the site where it will be used and
remove the packing.
Packing materials (plastic bags, polystyrene,
nails) can be dangerous and must be kept out of
the reach of children.
x
x
x
x
x
The installation must be carried out according to the
manufacturer’s instructions and by professionally trained
personnel.
Only a fixed connection is suitable for this equipment.
Position the machine and level it perfectly using the feet.
The flooring must be suitable for the overall weight of the
machine.
Follow the indications on the installation drawing and set-up
the electrical, water and drain systems in the wash area.
GB
Pag. 4
2.2
H
ELECTRICAL CONNECTION
1. Connection to the power supply must be made with a main
switch (H) it must be omnipolar and interrupt all contacts
including neutral. There must be a distance of at least 3
mm between open contacts, and it must have a thermal
magnetic safety switch or fuses which are able to
withstand the maximum power indicated on the plate.
2. Make sure that the power supply corresponds to that on
the technical features plate on the right side of the
machine.
3. Use an effective earthing system in compliance with local laws to
protect the safety of the operators and not damage the machine.
4.
Do not use adapters, multiple sockets or extension cords.
5. The equipment must be included in an equipotential
system, and connected using a screw marked with the
symbol.
The equipotential wire must be 10 mm² .
If the power supply cable (provided with the equipment) needs to
be replaced use another H07RN-F type with the same dimensions.
For additional information see the wiring drawing.
2.3
WATER CONNECTION
Set-up the site according the attached plumbing drawing.
E
Before connecting the equipment make sure that a gate valve
has been placed between the water supply and the
equipment so that the water can be turned off if required or
for repair work.
Use a hose to connect the solenoid valve (E) to the gate
valve (V) and make sure that the delivery is not less than
20l/min.
Check that the temperature and water pressure correspond to
what is shown on the technical specifications plate.
V
If the water is harder than what is listed in the chart, it is
advisable to install a decalcifier upline from the solenoid
valve.
If there are high concentrations of very conductive minerals
in the water, it is advisable to install a demineralization
system calibrated to the hardness shown in the following
chart.
GB
Pag. 5
Specification
Hardness
Residual
Minerals
From
To
French degrees
f
5
10
German degrees
°dH
4
7’5
English degrees
°e
5
9,5
Parts per million
ppm
70
140
Maximum
mg/l
2.4
300/400
CONNECTION TO THE DRAIN LINE
The tank empties by gravity, so the drain needs to be
situated below the base of the machine.
The drain pipe needs to be connected to a drain- trap built
into the floor.
The drain dimensions are shown in the installation drawing.
2.5
ADJUSTMENTS AND CHECKS
The temperature of the wash tank is regulated by a fixed thermostat at
about 55° C. This temperature ensures proper action by the chemicals
contained in industrial dishwashing detergents.
The boiler temperature set by a fixed thermostat is about 85° C.
2.6
A
RINSE-AID DISPENSER (optional)
Before adjusting, the dispenser and hose need to be filled
using the primer button (A).
To adjust use the ring nut (B) situated at the center of the
dispenser,
rotating
clockwise
reduces
the
quantity,
counterclockwise increases it.
The dispenser must not operate empty
An excessive amount of rinse agent causes bluish stripes on the
dishes and creates foam in the wash tank.
B
GB
Pag. 6
If the glassware is covered with droplets of water and it dreis rather
slowly this means that the amount of rinse agent is insufficient.
7 cm. of tubing = 1 gram of product
2.7
DETERGENT
Equipment without a detergent dispenser
Put the amount of detergent recommended by the
manufacturer into the tank. Depending on the type of
detergent this may vary from 2 to 4 gr/lt of water in the tank.
Detergent needs to be added approximately every 5 washes
as per the manufacturer’s instructions.
The above amounts are for water with a hardness of 5-10°F
(French degrees).
Machine equipped with detergent dispenser (optional)
Regulations:
A trimmer (A) allows to determine the «ON-OFF» time and
consequently the amount of detergent required.
x
x
A
Turning the adjustment trimmer clockwise or counter-clockwise will
respectively decrease or increase the amount of rinse aid it
delivers.
To optimise the calibration, evaluate the results of some washing
cycles.
BE CAREFUL!
The level in detergent tank must not get empty or filled with corrosive
or inadequate products.
The warranty does not cover damages caused by an improper use of
dispenser.
CHAP.3 SAFETY RECOMMENDATIONS
3.1
x
x
x
RESIDUAL RISKS AND WARNINGS
Never open the door quickly if the cycle has not finished.
Do not put bare hands into the wash solution.
Never remove the machine panels if the power upline has not been turned off.
GB
x
Pag. 7
The professionally trained personnel who install the machine and connect the electricity,
will explain to the user how to operate the machine and which safety measures to use.
The installer will provide practical demonstrations and leave written instructions which are provided with
the machine.
This machine is only to be used for the purpose for which it was designed.
Any other use is considered improper and dangerous.
The machine is not to be used by untrained personnel.
Never use the machine if any of the protections (microswitches, panels or other) provided
by the manufacturer are missing.
Do not use the machine to wash objects not compatible with those indicated by the
manufacturer.
All repair work must be done by the manufacturer or an authorized service center using
original spare parts.
Failure to observe this may affect the safety of the machine.
The power supply should be turned off when the machine is not being used.
x
x
x
x
x
x
x
x
3.2
6
SAFETY FEATURES
The board can recognize various breakdowns.
Faults are easily seen from the messages on the screen (5 and 6) and from any interruption of the
operations in progress only in cases (1 and 3) listed below
WARNING! Turning the machine off and then on again resets the warning, which will appear again if
the problem has not been resolved.
Display on the Message
PROBLEM:
TANK NOT FILLED OR OVERFILLED
1
(if t10 min have elapsed, correct level of water has not been reached in the
tank)
BOILER PROBE FAILURE
2
(if the probe is not connected correctly or damaged)
(if the probe is short circuited or damaged)
OVERTEMPERATURE
3
4
(excessive boiler and tank temperature)
(intervention safety thermostat)
RINSE
(Boiler has failed to fill).
TANK PROBE FAILURE
5
(if the probe is not connected correctly or damaged)
(if the probe is short circuited or damaged)
BOILER
6
(Boiler resistor failure)
(Heating overtime)
Boiler (6)
Tank (5)
GB
Pag. 8
Chap. 4 USE OF MACHINE
1
4.1
DESCRIPTION OF THE COMMANDS
1. To turn the machine on, press the button
indicated
at
left/right
(the corresponding warning light will light
up).
2
2. The machine is ready to use when the
light comes on.
3
3. Press the button indicated at right/left to
select the cycle.
2’
Short cycle
4’
Medium cycle
6’
Ciclo intensive
The light that corresponds to the type of
product lights up.
NB: choose the " v " for longer wash
cycles.
4
1)
Close the door and push the button
indicated, the machine will start
automatically.
For subsequent washes push the button.
NB: press the button to interrupt the "
v " cycle (repeat sequence 3 for new
wash programs).
GB
Pag. 9
4.2
OK!
USE OF THE MACHINE
x Pour the proper amount of detergent in the wash tank according to
the producer’s instructions.
x The detergent must be the industrial type or possibly
foamless.
x Never put your bare hands in the wash water; place the cups and
the glasses upside down in the baskets. Place the dishes in the proper
basket with support pins and their inner surface must be facing up.
OK!
x Place the silverware and the coffee spoons with the handles facing
down.
x Never place silverware and stainless steel cutlery in the same
basket. This could cause the silver to burnish and the stainless steel to
corrode.
OK!
x Use the proper baskets specifically designed for the different type
of glassware (dishes, glasses, cups, silverware etc.). To save on
detergent and electricity only wash when the baskets are full, but do not
overload them. Avoid stacking glassware.
x WE RECOMMEND TO PRE-CLEAN the glassware in order to
minimize maintenance. The quality of final wash results will be greatly
improved by first removing food particles, lemon peels, toothpicks, olive
pits, etc. which could partially clog the pump filter and impair washing
efficiency.
OK!
We recommend washing the glassware before food particles dry
on its surface. It is good practice, when dried food waste is
involved, to first soak the glassware and silverware before
introducing them into the machine.
GB
Pag. 10
4.3
FINAL OPERATIONS
x
Remove tension from the machine.
x
Open the door and remove the rack with clean dishes.
x
Drain the water from the tank by lifting the overflow-pipe. For the
model with drain pump please follow the operations described in the
«Use instructions» paragraph.
x
Disconnect the main switch of the equipment.
x
Close the «rolling shutter valve» for the hydraulic connection.
x
Remove the filters clean them under a water jet with a nylon brush.
x Pay attention not to let any dirtiness rests on the bottom of the
drain pump filter inside the tank. Clean the tank with a moderate water
jet. Wash outside surfaces when are cold with non-abrasive products
which are especially studied for steel maintenance.
REMARK: Do not wash the equipment with direct jet or at
another pressure because eventual infiltrations to the electric
components may harm the regular working of the equipment or
of the single safety systems, and penalty for this would be the
loss of guarantee.
GB
Pag. 11
CHAP. 5 MAINTENANCE
5.1
GENERAL RULES
The machine are designed to reduce maintenance requirements. It is
necessary to observe the following rules to make the machine last
long, and work without problems.
In any case, it is necessary to observe the following rules to make the
machine stay in perfect working order:
x
keep the machine clean and in good condition
x
avoid making temporary or urgent repairs frequently
It is very important to observe the maintenance directions; check all
the different parts of the machine periodically, so that no anomaly can
occur, thus anticipating the time and equipment needed for any
maintenance work.
Before cleaning turn off the power.
5.2
PERIODIC MAINTENANCE (to be done at least every 20 days)
To make operations following easier, the rack-holder frame can be
removed from its seat.
x
Remove the upper and lower rinse arms, by unscrewing the
fastening.
x
Unscrew and clean all the sprayers and put them back in their
place.
x
Remove the upper and lower wash-arms by unscrewing the rinse
pin , clean and rinse them.
x
Remove the wash pump filter, clean it and rinse it.
x
Thoroughly clean the wash tank.
x
Leave the appliance lid open for the whole resting period.
x
Lime deposits and scale will build up on the inner surfaces of the
boiler, tank and pipelines due to calcium and magnesium salts
present in the water. These scales and deposits can prejudice
proper apppliance operation.
x
The appliance must be periodically descaled and we recommend
that this must be done by an expert.
GB
Pag. 12
x
Grease steel surfaces with vaseline oil whenever the appliance will
be inactive for a long period of time.
x
Have an expert drain all the water out from the boiler and the wash
pump to avoid the danger of ice formation.
x
If the machine does not operate properly or in case of trouble,
call a service center authorized by the manufacturer of the
appliance or by his Dealer.
CHAP. 6 RECYCLING AND DISPOSAL
6.1
DISPOSAL THE MACHINE
Our machines are not made of materials that require particular
disposal procedures.