1
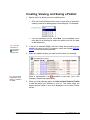
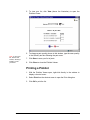
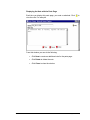
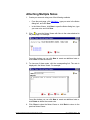
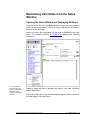
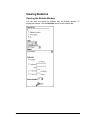
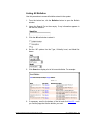
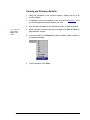
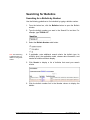
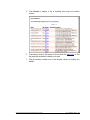
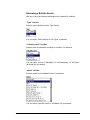
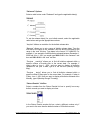
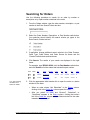
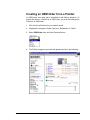
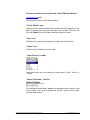
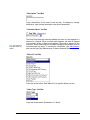
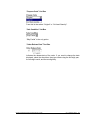
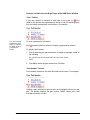
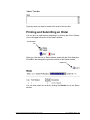
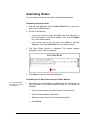
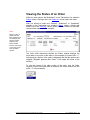
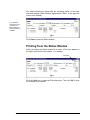
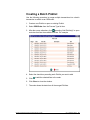
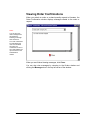
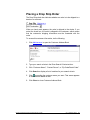
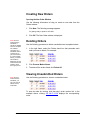
9. Selecting Parts for a Picklist
At a parts page, each part entry in the bill of materials (BOM) corresponds
to a callout from the illustration. You can create a Picklist to accumulate
part numbers you need for a specific job and save the list for later use.
Viewing Information for a Part
To view information for a part before adding it to your Picklist, click the
part number link. Information is displayed in the lower left frame. In this
example, clicking part number 3EC-30-33110 displays the following:
To add the part to your Picklist:
Type the quantity you want in the Order Quantity text box and click
48
Komatsu Forklift Parts and Service Web Site User’s Guide
.
V2.1 (September 2002)
To view additional information for the part:
1. Click Detail… to open the Detail Information window. For example:
2. To list all models in all catalogs that contain this part number, click
(in the upper left portion of the window).
3. When you finish viewing information, click Close.
To attach a note to the part number:
1. Click Add Note... to open the Notes Viewer window.
2. Type your note in the Note Text box.
3. Click Save.
4. Click Close to close the window.
Komatsu Forklift Parts and Service Web Site User’s Guide
V2.1 (September 2002)
49
To list models containing the part number:
to open an index of links to all models in all catalogs
1. Click
containing the part number you selected. For example:
Note: The number
in parentheses
after each link
indicates how
many matches
were found for
your search.
Result Indexes
FG(D)35,40,45S (T) -7
FG(D)35,45BCS -7
FG(D)40,45 (C) (T) (Z) -7
Price File
(1)
(1)
(1)
(1)
2. Click a link to display the corresponding parts page.
50
Komatsu Forklift Parts and Service Web Site User’s Guide
V2.1 (September 2002)
Creating, Viewing, and Saving a Picklist
1. Specify the list to which you want to add the parts.
Note: You can
also select a
part by clicking
preceding
the part entry.
Note: See "Viewing
Supersession Information" in chapter 8
for details.
•
Click the Current Picklist list box arrow to open a list of options for
creating a new list or adding parts to an existing list. For example:
•
If you are creating a new list, select New. If you are adding one or
more parts to an existing list, select the name of the list you want
to add the parts to.
2. In the bill of materials (BOM), select the check box preceding a part
number you want to add. For example, select part number 3EC-3033100, the left-hand brake assembly.
3. Select any additional parts you need from this listing. For example:
When a supersession icon
precedes a part entry (as in this
example), the part has supersession.
4. When you finish selecting parts, click Add checked items to Picklist
to add the part(s) you selected to your list. The check marks are
cleared and the name of your list is displayed in the Current Picklist
list box.
Komatsu Forklift Parts and Service Web Site User’s Guide
V2.1 (September 2002)
51
5. To view your list, click View (above the illustration) to open the
Picklists Viewer.
Note: To print your
list, see the next
section, "Printing a
Picklist", for the
procedure.
6. To change a part quantity shown in this window, type the new quantity
in the Quantity text box following the part name.
7. Click Save to save your list of parts.
8. Click Close to close the Picklists Viewer.
Printing a Picklist
1. With the Picklists Viewer open, right-click directly in the window to
display a shortcut menu.
2. Select Print from the shortcut menu to open the Print dialog box.
3. Click OK to print the list.
52
Komatsu Forklift Parts and Service Web Site User’s Guide
V2.1 (September 2002)
10. Adding Notes to Parts
Pages
You can create your own notes and attach them to parts pages to
supplement information from Komatsu. This chapter explains how to
create, view, and delete user notes.
Creating a Note
1. From the parts page, click Add Note... to open the Notes Viewer.
2. Type your note in the Note Text box. For example:
3. In the “Save As” area, select the distribution level for the note.
•
If the note is for internal use, select Internal Only.
•
If the note can be viewed by all users, select Release to All.
•
If the note is for a particular dealer, select Specific Dealer and
select the dealer’s name from the list box.
4. Click Save to attach your note to the parts page. A blinking
icon
appears to the right of Add Note, indicating that a note is available.
5. Click Close to close the Notes Viewer.
Komatsu Forklift Parts and Service Web Site User’s Guide
V2.1 (September 2002)
53
Displaying the Note with the Parts Page
Each time you display this parts page, your note os attached. Click
view the note. For example:
to
From this window you can do the following:
54
•
Click New to create an additional note for the parts page.
•
Click Delete to delete the note.
•
Click Close to close the window.
Komatsu Forklift Parts and Service Web Site User’s Guide
V2.1 (September 2002)
Attaching Multiple Notes
1. Create your new note using one of the following methods.
•
From the parts page, click Add Note..., type your note in the Notes
dialog box, and click Save.
•
In the Notes Viewer, click New to open the Notes dialog box, type
your new note, and click Save.
2. Click
to open the Notes Viewer with links to the notes attached to
the parts page. For example:
From this window you can click New to create an additional note or
click Close to close the window.
3. To view one of these notes, click the corresponding link. The note is
displayed in the Notes Viewer. For example:
From this window you can click New to create an additional note or
click Delete to delete the current note.
4. Click Close to close the Notes Viewer or click Back to return to the
previous Notes Viewer.
Komatsu Forklift Parts and Service Web Site User’s Guide
V2.1 (September 2002)
55
Deleting Notes
Deleting a Note
1. At a parts page showing
the Notes Viewer.
to the right of Add Note, click
to open
2. Click Delete to display a prompt.
Are you sure you want to delete this note?
3. Click OK to delete the note and
.
Deleting Multiple Notes
1. At an parts page showing
open a Note List window.
to the right of Add Note, click
to
2. Click the X preceding the note you want to delete to display a prompt.
Are you sure you want to delete this note?
3. Click OK.
56
Komatsu Forklift Parts and Service Web Site User’s Guide
V2.1 (September 2002)
Maintaining User Notes from the Notes
Window
Opening the Notes Window and Displaying All Notes
From the button bar, click the Notes button to open the Notes window.
When you open this window, links to all notes in the system are listed by
name in the top left frame.
When you click a link, information for that note is displayed in the right
frame. For example, clicking JB 09-04-11:45 displays the following
information.
Note: To detach a
page, see the next
section, "Detaching a
Note from a Part
Number at the Notes
Window".
Pages to which the note is attached are listed in the lower left frame
under “Attached to”.
The name of the note, how it was attached and saved, and the content of
the note appear in the right frame.
Komatsu Forklift Parts and Service Web Site User’s Guide
V2.1 (September 2002)
57
Detaching a Note from a Part Number at the Notes
Window
You can detach a note from a part number at the Notes window.
1. Click the note you want to detach. The status of the note is displayed
in the “Attached to” (lower left) frame. For example:
X Page: GEAR BOXFIG.4101
STEERING GEAR BOX
2. Click the X preceding the entry. The following confirmation prompt
appears.
Are you sure you want to delete this attachment?
3. Click OK.
Attaching a Note to a Part Number from the Notes
Window
You can attach a note directly to a part number from the Notes window.
1. Click the note you want to attach.
2. Select the Attach radio button in the top portion of the right frame.
3. Select the check box preceding “Part Number”.
4. Type the part number to which you want to attach the note.
5. Click Add. Then click Save.
Creating a Note from the Notes Window
1. Click New.
2. Type your note.
3. Make the applicable selections from the right frame.
4. Click Add. Then click Save.
Deleting a Note from the Notes Window
1. Click the note to select it.
2. Click Delete.
58
Komatsu Forklift Parts and Service Web Site User’s Guide
V2.1 (September 2002)
11. Viewing and Searching for
Bulletins
Use the procedures in this chapter to review new bulletins, to locate all
bulletins stored in the system, and to search for a specific bulletin by
number or description. You can narrow a search by the bulletin type and
date and by model.
Reviewing New Bulletins
Opening the Bulletin Window
You can review new bulletins from the Bulletin window. To display this
window, click the Bulletins button from the button bar. If any new
bulletins have been posted since the last time you displayed the Bulletin
window, information similar to the following appears in the main portion of
the window.
To review new bulletins:
1. Click a link in the Name column to view the corresponding bulletin.
2. When you finish viewing the bulletin, select the check box in the
Reviewed column.
3. Repeat steps 1 and 2 for each new bulletin.
4. When you finish reviewing all new bulletins, click the icon that
precedes "Yes, I have reviewed the checked items".
Komatsu Forklift Parts and Service Web Site User’s Guide
V2.1 (September 2002)
59
Viewing Bulletins
Opening the Bulletin Window
You can view and search for bulletins from the Bulletin window. To
display this window, click the Bulletins button from the button bar.
60
Komatsu Forklift Parts and Service Web Site User’s Guide
V2.1 (September 2002)
Listing All Bulletins
Use this procedure to access all bulletins stored in the system.
1. From the button bar, click the Bulletins button to open the Bulletin
window.
2. Leave the Search For text box empty. If any information appears in
the text box, delete it.
3. Click the All radio button to select it.
4. Set the “All” options from the Type, Criticality Level, and Model list
boxes.
5. Click Search to display a list of all current bulletins. For example:
6. If necessary, scroll to the bottom of the list and click Next 25 > until
you find the page that lists the bulletin you want.
Komatsu Forklift Parts and Service Web Site User’s Guide
V2.1 (September 2002)
61
Viewing and Printing a Bulletin
1. Using the procedure in the previous section, display the list of all
current bulletins.
2. If necessary, scroll to the bottom of the list and click Next 25 > until
you find the page that lists the bulletin you want.
3. Click a bulletin number link in the Number column to view the bulletin.
Note: You can
also click the
Page: 1 of 2
button.
4. When a bulletin contains more than one page, click Next and Prev to
page between screens.
5. To zoom in and out, click Zoom% to open a window. Make a selection
to change the setting.
6. To print a bulletin, click Print.
62
Komatsu Forklift Parts and Service Web Site User’s Guide
V2.1 (September 2002)
Searching for Bulletins
Searching for a Bulletin by Number
Use the following guidelines to find a bulletin by typing a bulletin number.
1. From the button bar, click the Bulletins button to open the Bulletin
window.
2. Type the bulletin number you want in the Search For text box. For
example, type TB2000-017.
3. Select the Bulletin Number radio button.
Note: See "Narrowing
a Bulletin Search" for
details on using these
criteria.
4. If applicable, enter additional search criteria: the bulletin type, its
criticality level, the applicable model, release date information, and
number of bulletin records to display.
5. Click Search to display a list of bulletins that meet your search
criteria.
6. Click the bulletin number link in the Number column to display the
bulletin.
Komatsu Forklift Parts and Service Web Site User’s Guide
V2.1 (September 2002)
63
Searching for a Bulletin by Description
Use the following guidelines to find a bulletin by typing a bulletin
description.
1. From the button bar, click the Bulletins button to open the Bulletin
window.
2. Type a word from a bulletin title in the Search For text box. For
example, type engine.
3. Select the Description radio button.
Note: See "Narrowing
a Bulletin Search" for
details on using these
criteria.
64
4. If applicable, enter additional search criteria: the bulletin type, its
criticality level, the applicable model, release date information, and
number of bulletin records to display.
Komatsu Forklift Parts and Service Web Site User’s Guide
V2.1 (September 2002)
5. Click Search to display a list of bulletins that meet your search
criteria.
6. If necessary, scroll to the bottom of the list and click Next 25 > to find
the page that includes the bulletin you want.
7. Click the bulletin number link in the Number column to display the
bulletin.
Komatsu Forklift Parts and Service Web Site User’s Guide
V2.1 (September 2002)
65
Narrowing a Bulletin Search
Use any or all of the following methods to limit a search for a bulletin.
“Type” List Box
Select a type of bulletin from the Type list box.
You can select “Parts” bulletins or “All Types” of bulletins.
“Criticality Level” List Box
Select a level to indicate the criticality of a bulletin. For example:
You can select a level of “Mandatory” or “Not Mandatory” or “All Types”
(all levels) for your search.
“Model” List Box
Select a model from the Model list box. For example:
You can select a specific model or “All Models” for your search.
66
Komatsu Forklift Parts and Service Web Site User’s Guide
V2.1 (September 2002)
“Released” Options
Select a radio button under "Released" and type the applicable date(s).
To set the release date(s) for your bulletin search, select the applicable
radio button and type the appropriate numbers.
“Anytime” defines no restriction for the bulletin release date.
“Between” allows you to set a range of bulletin release dates. Type the
first date of the range in the “between” text box and the last date of the
range in the “and” text box. Type dates in the format YYYY-MM-DD. For
example, if you wanted to find all bulletins released between December 1,
2000 and June 1, 2001 you would type 2000-12-01 in the “between” text
box and 2001-06-01 in the “and” text box.
“Previous _ month(s)” allows you to find all bulletins released within a
specific number of months prior to the current date. For example, if
today’s date is June 1, 2001, and you want to display all bulletins
released for the year to date, type 5 in the text box (January through
May).
“Previous _ day(s)” allows you to find all bulletins released within a
specific number of days prior to the current date. For example, if today is
Friday, June 1, 2001, and you want to display all bulletins released since
Monday, type 4 (Monday through Thursday).
“Return Results” List Box
Select a number from the Return Results list box to specify how many
bulletin records you want to display at a time.
In the Return Results number list box, select a different number only if
you want to list more than the default number of 25 bulletin records.
Komatsu Forklift Parts and Service Web Site User’s Guide
V2.1 (September 2002)
67
12. Working With Orders
Important Information About Ordering
This chapter explains how to use all available Ordering features.
However, Ordering is not enabled for all users. And even if Ordering has
been enabled for you, you can submit orders only if you have been
granted the necessary permission to do so.
If you have not been granted full Ordering permissions, you will not be
able to do the following:
•
Submit orders.
•
Change a Picklist to an OEM order or a split order.
•
View OEM orders or split orders.
Overview
The Ordering portion of the parts and service application allows you to
create orders from your Picklists and include them in the Komatsu
Ordering process. The application allows you to do the following:
•
Search for specific orders.
•
Create new orders.
•
View individual orders.
•
View the status of orders.
•
Submit individual or multiple orders to Komatsu.
•
Modify and delete orders that have not yet been submitted.
•
Request on-hand part quantities with up-to-date price information
from Komatsu.
All of this starts at the Orders window. To find out how to display the
Orders window and begin working with orders, proceed to the next
section, "Getting Started at the Orders Window".
68
Komatsu Forklift Parts and Service Web Site User’s Guide
V2.1 (September 2002)
Getting Started at the Orders Window
From the button bar, click the Orders button to open the Orders window.
The left frame of the window allows you to search for orders. The right
frame shows all open orders you have created or the results of a search.
In this example, 28 orders are listed, 25 of which are currently displayed.
To view the other three orders, you would click Next 25 >.
Komatsu Forklift Parts and Service Web Site User’s Guide
V2.1 (September 2002)
69
Features Available from the Left Frame of the Orders Window
“New” Icon
Click this icon to open the New Orders window. You can create a new
order from the New Orders window.
“Messages” Icon
Click this icon to open the Order Confirmation window.
“Enter Search Criteria” Text Box
Type the order number, order description, or part number you are
searching for in this text box.
“Sort By” Radio Buttons
Use these radio buttons to sort the order in which entries appear in the
right frame of the window. For example, to sort orders by order number,
select the “Sort By” radio button that follows “Order Number”. To sort
orders by order description, select the “Sort By” radio button that follows
“Description”. To sort orders by status, select the “Sort By” radio button
that follows the Status list box.
“Order Number”, “Description”, and “Part Number” Radio Buttons
Select a radio button to identify the search criteria you typed in the Enter
Search Criteria text box. Your selection must match the type of criteria
you entered.
70
Komatsu Forklift Parts and Service Web Site User’s Guide
V2.1 (September 2002)
“Order Process” List Box
From this list box, select one of the following options.
Option
Description
Search All Processes
Any type of available order
OEM Order
An order placed with Komatsu
Split
An order partially from stock and partially from
Komatsu
Business System
An available business system list
Quote
An available quote
Picklist
An available Picklist
“Order Type” List Box
From this list box, select “Search All Types”, “Breakdown”, or “Stock”.
Komatsu Forklift Parts and Service Web Site User’s Guide
V2.1 (September 2002)
71
“Order Status” List Box
From this list box, select one of the following options.
Option
72
Description
Search All Statuses
Search for all orders regardless of status.
Completed
Search for all completed orders. When an order
shows “Completed”, all items in the order have
been shipped and the order is closed.
Confirmed
Search for all orders that have been confirmed.
When an order shows “Confirmed”, Komatsu has
sent a confirmation that the order was received and
read.
Not Submitted
Search for all orders that have not yet been
submitted. When an order shows “Not Submitted”,
you can still view, modify, or delete it.
Queued
Search for all orders that are in the queue. When
an order shows “Queued”, a request has been
made that the order be submitted and it is “in line”
for submission.
Status Received
Search for all orders for which a status update has
been received. When an order shows “Status
Received”, a status request has been answered.
Submitted
Search for all orders that have been submitted.
When an order shows “Submitted”, it has been
transmitted successfully to the Komatsu system.
Komatsu Forklift Parts and Service Web Site User’s Guide
V2.1 (September 2002)
“Order Source” List Box
From this list box, select the user that is the source of the order. Your
choices are “Search All Users” or any specific users listed in the box.
“Created” Radio Buttons and Text Boxes
To set the creation date(s) for your order search, select the applicable
radio button and type the appropriate numbers.
“Anytime” defines no restriction for the order creation date.
“Between” allows you to set a range of order creation dates. Type the first
date of the range in the “between” text box and the last date of the range
in the “and” text box. Type dates in the format YYYY-MM-DD. For
example, if you wanted to find all orders created between December 1,
2000 and June 1, 2001 you would type 2000-12-01 in the “between” text
box and 2001-06-01 in the “and” text box.
“Previous _ month(s)” allows you to find all orders created within a
specific number of months prior to the current date. For example, if
today’s date is June 1, 2001, and you want to display all orders created
for the year to date, type 5 in the text box (January through May).
“Previous _ day(s)” allows you to find all orders created within a specific
number of days prior to the current date. For example, if today is Friday,
June 1, 2001, and you want to display all orders created since Monday,
type 4 (Monday through Thursday).
Komatsu Forklift Parts and Service Web Site User’s Guide
V2.1 (September 2002)
73
Features Available from the Right Frame of the Orders Window
“Process Marked Items” Icon
Click this icon to process each order in the Orders window that is
preceded by a check mark in the Delete or Submit column. Each order
selected in the Delete column is deleted. Each order selected in the
Submit column is submitted.
“Delete” and “Submit” Check Boxes
Select the check box preceding each order you want to delete or submit.
Then click the Process Marked Items icon to delete or submit the
selected order(s).
Next 25 > Link
The Orders window displays a maximum of 25 orders at a time. When
more than 25 are available, click this link to view the additional orders.
Sorting Orders
You can sort the order in which entries appear in the Orders window by
either of these methods.
Method #1: In the left frame, select a radio button in the Sort By column.
Method #2: In the right frame, click a column header according to the
following guidelines.
74
•
To sort orders by date, click Date.
•
To sort orders by order number, click Order No.
•
To sort orders by description, click Description.
•
To sort orders by process, click Process.
•
To sort orders by type, click Type.
•
To sort orders by status, click Status.
•
To sort orders by user, click User.
•
To sort orders by order ID, click Order ID.
Komatsu Forklift Parts and Service Web Site User’s Guide
V2.1 (September 2002)
Searching for Orders
Use the following procedure to search for an order by number or
description or by a part number contained in the order.
1. From the Orders window, type the order number, description, or part
number in the Enter Search Criteria text box.
2. Select the Order Number, Description, or Part Number radio button.
Your selection should identify the search criteria you typed in the
Enter Search Criteria text box.
3. If applicable, change additional search criteria in the Order Process,
Order Type, Order Status, and Order Source list boxes and the
“Created” radio buttons and text boxes.
4. Click Search. The results of your search are displayed in the right
frame.
For example, type 3EB-63-16560, click the Part Number radio button,
and click Search to list the orders that include this part number.
Delete
Note: See "Viewing
the Status of an
Order" for details.
Submit
Date
OrderNo.
10/08/2001
10/11/2001
Description
Process
Type
Status
User
Order ID
TW 10-08-12:45
OEM Order
Stock
Completed
Tech Writ
33
TW 10-11-10:30
Split
Stock
Completed
Tech Writ
38
5. Click the appropriate order number link to open the order or a status
window for the order.
•
When an order shows “Not Submitted” in the Status column,
clicking a link in the Order No. column opens the order.
•
After you submit an order and “Queued”, “Submitted”, or
“Completed” appears in the Status column, clicking that order’s
link in the Order No. column opens a Status window for the order
instead of the order itself.
Komatsu Forklift Parts and Service Web Site User’s Guide
V2.1 (September 2002)
75
Creating an OEM Order from a Picklist
An OEM order is an order that is submitted to and filled by Komatsu. To
submit the items in a Picklist as an OEM order, you must first change the
Picklist to an OEM order.
1. Click a link to a Picklist from your search results.
2. If applicable, change the Order Type from "Breakdown" to "Stock".
3. Select OEM Order from the Order Process list box.
4. The Picklist changes to an order that appears similar to the following:
76
Komatsu Forklift Parts and Service Web Site User’s Guide
V2.1 (September 2002)
Features Available from the Left Frame of the OEM Order Window
Transaction List Link
Click this link to return to the Orders window.
“Print & Submit” Icon
Click this icon to open the order Status window and Print dialog box. Click
OK in the dialog box to print the contents of the window. Then you can
click the Submit icon in the Status window to submit the order.
“Save” Icon
Click this icon to save any changes you make to the current order.
“Delete” Icon
Click this icon to delete the current order.
“Order Process” List Box
From this list box you can change the current order to “Split”, Quote”, or
“Picklist”.
“Dealer PO Number” Text Box
The application automatically displays the purchase order number for the
current order. If you want to change the number, type the new number
over the older number.
Komatsu Forklift Parts and Service Web Site User’s Guide
V2.1 (September 2002)
77
“Description” Text Box
Type a description for the order in this text box. To change an existing
description, type the new description over the old description.
“Customer Name” List Box
Note: See "Placing a
Drop Ship Order" for
details.
The Drop Ship check box indicates whether an order is to be shipped to a
dealer or a customer. When no check mark appears, the order is shipped
to the dealer. When a check mark appears, the order is shipped to the
customer, which means that the customer’s shipping information must be
forwarded with the order. To access this information, click Maintenance
and use the Drop Ship Maintenance Customer Address Book.
“Ship Via” List Box
From this list box select “Best Method” or a specific delivery service.
“Order Type” List Box
From this list box select “Breakdown” or “Stock”.
78
Komatsu Forklift Parts and Service Web Site User’s Guide
V2.1 (September 2002)
“Purpose Code” List Box
From this list box select “Original” or “On Hand Quantity”.
“Sale Condition” List Box
“Ship Partial” is the only option.
“Order Release Date” Text Box
Indicates the release date of the order. If you need to change the date
displayed, select the check box; then type a date using the four-digit year,
the two-digit month, and the two-digit day.
Komatsu Forklift Parts and Service Web Site User’s Guide
V2.1 (September 2002)
79
Features Available from the Right Frame of the OEM Order Window
“Line” Column
A line item number is assigned to each item in the order. An
icon
(when a part number has supersession) and an X icon (for deleting items
from the order) are displayed in this column. For example:
Note: See "Viewing
Supersession Information" in chapter 8
for details on using
a supersession
window.
To view supersession information:
Click
preceding the line number to display a supersession window.
To delete a part number:
1. Click X preceding the part description to display a message similar to
the following:
Are you sure you want to delete 3EC-30-11810 from current
order?
2. Click OK to delete the part number from the order.
“Part Number” Column
Part numbers included in the order are listed in this column. For example:
Clicking a part number link opens a price and availability window for that
part. The window displays the part number, MSRP, dealer price, and
Komatsu’s quantity on hand.
80
Komatsu Forklift Parts and Service Web Site User’s Guide
V2.1 (September 2002)
“Quantity On This Order” Columns
Quantities are displayed in text boxes in the applicable columns, in this
case, the OEM column. If you want to change a quantity, type the new
quantity over the old one. The Unit Cost, Extended Cost, and Total fields
update automatically.
“OEM Quantity On Hand” Column
Notes:
See also "Requesting
On-Hand Quantities"
for information about
requesting Komatsu’s
on-hand quantity for a
part.
For information about
entering and trying to
submit invalid part
numbers, see
"Entering Invalid Part
Numbers" at the end
of this chapter.
This column displays Komatsu’s on-hand quantity for each part.
The “Enter Part Number” Text Box and Add Multiple Parts Link
Add Multiple Parts
To add one part number to the order:
1. Type the number in the larger text box.
2. Type a quantity in the smaller text box.
3. Click
.
Komatsu Forklift Parts and Service Web Site User’s Guide
V2.1 (September 2002)
81
To add multiple numbers to the order:
1. Click Add Multiple Parts to open the Add Multiple Parts to Order
window.
2. Type the first part number in the larger text box.
3. Type a quantity in the smaller text box.
4. Repeat steps 2 and 3 for each additional part number you want to add
to the order.
5. Click
.
“Add Picklist(s)” Icon
Note: See "Creating
a Batch Picklist" for
details.
82
The Add Picklist(s) icon allows you to batch (merge) Picklists before
submitting them. Click
to open a window that lists the available
Picklists.
Komatsu Forklift Parts and Service Web Site User’s Guide
V2.1 (September 2002)
“Notes” Text Box
Type any notes you want to attach to the order in this text box.
Printing and Submitting an Order
You can print an order before submitting it by clicking the Print & Submit
icon in the upper left portion of the Orders window.
Print & Submit
icon
When you click the icon, a Status window opens with the Print dialog box.
Click OK in the dialog box to print the contents of the Status window.
Submit icon
You can then submit the order by clicking the Submit icon in the Status
window.
Komatsu Forklift Parts and Service Web Site User’s Guide
V2.1 (September 2002)
83
Submitting Orders
You can submit an order by using either of the following methods.
Submitting a Displayed Order
1. With the order displayed, click the Print & Submit icon in the top left
portion of the Orders window.
2. Do one of the following:
•
If you want to print the order, click OK in the Print dialog box to
print the contents of the Status window. Then click the Submit
icon in the Status window.
•
If you do not want to print the order, click Cancel in the Print
dialog box. Then click the Submit icon in the Status window.
3. The Order Submit Monitor is displayed. This window displays
messages as your order is processed.
4. Click Close to close the Order Submit Monitor.
Submitting One or More Orders from the Orders Window
Note: See "Searching
for Orders" to view the
full procedure.
84
1. If the order you want to submit is not displayed in the Transaction List
(the right frame of the Orders window), search for it by doing the
following:
•
Type the order number in the Enter Search Criteria text box.
•
Select the Order Number radio button.
•
Select your user name from the Order Source list box.
•
Click Search.
Komatsu Forklift Parts and Service Web Site User’s Guide
V2.1 (September 2002)
2. When your order appears in the Transaction List, select the check box
in the Submit column that precedes each order you want to submit.
For example:
Note: If you select
more than one order,
clicking the Process
Marked Items icon
will submit all the
orders you selected.
3. Click Process Marked Items.
4. The Order Submit Monitor is displayed. This window displays
messages as your order is processed.
5. Click Close to close the Order Submit Monitor.
Creating a Split Order from a Picklist
A split order is an order that is filled partially from stock and partially from
Komatsu. To submit the items in a Picklist as a split order, you must first
change the Picklist to a split order.
Using the sample order from the section “Searching for Orders”, select
Split from the Order Process list box.
Komatsu Forklift Parts and Service Web Site User’s Guide
V2.1 (September 2002)
85
Requesting On-Hand Quantities
Note: See "Creating
an OEM Order from a
Picklist" for details on
selecting order options.
Use this procedure to request an on-hand quantity for a part from
Komatsu.
1. From the Order Process list box select OEM Order or Split.
2. Type the number of the order in the Order Number text box.
3. From the Purpose Code list box select On Hand Quantity.
4. Click Submit. A confirmation message window displays the on-hand
quantity information you requested.
86
Komatsu Forklift Parts and Service Web Site User’s Guide
V2.1 (September 2002)
Viewing the Status of an Order
When an order shows “Not Submitted” in the Transaction List window’s
Status column, clicking a link in the Order No. column opens the order.
After you submit an order and “Queued”, “Submitted”, or “Completed”
appears in the Transaction List window’s Status column, clicking that
order’s link in the Order No. column opens a Status window for the order
instead of the order itself. For example:
Notes:
When an order or
partial order has
been shipped (as in
this example), the
tracking number
appears in the
Status window.
See the next section
to see how to print
from the Status
window.
The order suffix determines whether the Status window displays the
entire order or a portion of the order. In this example, the order suffix “-1”
indicates that a portion of the order is displayed and that this portion was
shipped (“Shipped” appears after “State:” in the upper left corner of the
window).
To view the status of the other portion of the order, click the Order
Number list box arrow and make a selection (the order number with the
suffix “-2” in this example).
Komatsu Forklift Parts and Service Web Site User’s Guide
V2.1 (September 2002)
87
The Status window now shows that the remaining portion of the order
was back-ordered (“Back Ordered” appears after “State:” in the upper left
corner of the window).
Note: Because
this portion of the
order has not
been shipped, no
tracking number is
available.
Click Close to close the Status window.
Printing from the Status Window
When you display the Status window for an order, a Print icon appears in
the upper right corner of the window. For example:
Print icon
Click the Print icon to open the Print dialog box. Then click OK to print
the contents of the window.
88
Komatsu Forklift Parts and Service Web Site User’s Guide
V2.1 (September 2002)
Creating a Batch Picklist
Use the following procedure to merge multiple transactions into a batch
transaction to submit as an OEM order.
1. Create a new Picklist or open an existing Picklist.
2. Select OEM Order from the Process Type list box.
3. After the screen refreshes, click
preceding “Add Picklist(s)” to open
a window that lists the available Picklists. For example:
4. Select the check box preceding each Picklist you want to add.
5. Click
to add the selected lists to the order.
6. Click Close to close the window.
7. The order shows the data from all the merged Picklists.
Komatsu Forklift Parts and Service Web Site User’s Guide
V2.1 (September 2002)
89
Viewing Order Confirmations
When you submit an order or on-hand quantity request to Komatsu, the
Order Confirmation window displays messages related to the order or
request.
Notes:
You can also view
older messages from
this window by
selecting a message
from the list box.
An e-mail confirmation
is transmitted to the
user who submitted
the order. The
confirmation is sent to
the e-mail address set
up for that user in the
Administration
module.
When you are finished viewing messages, click Close.
You can also view messages by returning to the Orders window and
clicking the Messages icon in the top left corner of the window.
90
Komatsu Forklift Parts and Service Web Site User’s Guide
V2.1 (September 2002)
Placing a Drop Ship Order
The Drop Ship check box indicates whether an order is to be shipped to a
dealer or a customer.
When no check mark appears, the order is shipped to the dealer. If you
select the check box, the order is shipped to the customer, which means
that the customer’s shipping information must be forwarded with the
order.
To access this customer information, do the following:
1. Click Maintenance to open the Customer Address Book.
2. Type your search criteria in the Enter Search Criteria text box.
3. Click “Customer Name”, “Contact Person”, or “Zip Code/Postal Code”.
4. Click Search to display a list of matches for your search criteria.
5. Click
preceding the customer name you want. That name appears
in the Customer Name list box.
6. Click Close to close Customer Address Book.
Komatsu Forklift Parts and Service Web Site User’s Guide
V2.1 (September 2002)
91
Alternative Method of Locating Customer Information
You can also click any letter that appears as a link below “Drop Ship
Maintenance” in the Customer Address Book to list customers filed under
that letter. Using the sample address book on the previous page, clicking
M displays the following:
Click
preceding the customer name you want. That name appears in
the Customer Name list box.
92
Komatsu Forklift Parts and Service Web Site User’s Guide
V2.1 (September 2002)
Adding a Customer to the Address Book
1. Click New (in the upper left corner of the Customer Address Book) to
open the following window.
Notes:
You must enter
information in all
fields marked with
an asterisk (*).
Click the Close
icon only if you
want to close the
window without
creating a new
customer entry.
2. Type the appropriate information in the text boxes.
3. Select the two-letter state abbreviation from the State/Province list
box.
4. If necessary, make a selection from the Country list box.
5. Click Save.
Komatsu Forklift Parts and Service Web Site User’s Guide
V2.1 (September 2002)
93
Creating New Orders
Opening the New Order Window
Use the following information to help you create a new order from the
Orders window.
1. Click New. The following message appears.
I’m getting ready to produce a Picklist.
2. Click OK. The New Order window is displayed.
Note: Once an
order has been
submitted, it
cannot be deleted
until it is complete.
The "Delete"
check box for a
submitted order is
"grayed out" so
you cannot select
it. In the example
above, you would
not be able to
delete the second
order because the
"Delete" check
box is grayed out.
Deleting Orders
Use the following procedure to delete unsubmitted and completed orders.
1. In the right frame, select the Delete check box that precedes each
order you want to delete. For example:
2. Click Process Marked Items.
3. To delete all the orders listed, click Delete All.
Viewing Unsubmitted Orders
Note: Once an
order has been
submitted, you
can only view its
status, not the
order itself.
Use the following procedure to view an unsubmitted order.
To open an order for viewing, click the entry’s order number link. In the
example above, clicking GH 08-17-15:28 displays the corresponding
order.
94
Komatsu Forklift Parts and Service Web Site User’s Guide
V2.1 (September 2002)
Entering Invalid Part Numbers
If you type an invalid part number in the Enter Part Number text box from
a Picklist or Order, the number is displayed in red, italicized text and no
pricing information is available. In the following example, a user typed the
invalid part number 12345-00, which appears as a red, italicized link in
the Part Number column.
If you try to submit an order that includes an invalid part number, a
message similar to the following is displayed.
If a message similar to this appears, do the following:
1. Click Close to close the Order Submit Monitor message.
2. Delete the invalid part number from the order (click X in the Line
column).
3. Type the correct part number in the Enter Part Number text box.
4. Resubmit the order.
Komatsu Forklift Parts and Service Web Site User’s Guide
V2.1 (September 2002)
95