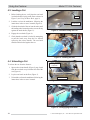
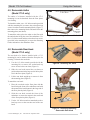
1
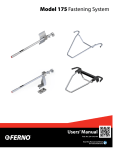
Users’ Manual
Model 173
Cot Fastening System
September 2007 GLO
Pub. No. 234-1826-02
Model 173 Cot Fastener
Disclaimer
This manual contains general instructions for the use, operation and
care of this product. The instructions are not all-inclusive. Safe and
proper use of this product is solely at the discretion of the user. Safety
information is included as a service to the user. All other safety
measures taken by the user should be within and under consideration
of applicable regulations. It is recommended that training on the proper
use of this product be provided before using this product in an actual
situation.
Retain this manual for future reference. Include it with the product in
the event of transfer to new users. Additional free copies are available
upon request from Customer Relations.
Proprietary Notice
The information disclosed in this manual is the property of FernoWashington, Inc., Wilmington, Ohio, USA. Ferno-Washington, Inc.
reserves all patent rights, proprietary design rights, manufacturing
rights, reproduction use rights, and sales use rights thereto, and to any
article disclosed therein except to the extent those rights are expressly
granted to others or where not applicable to vendor proprietary parts.
Additional Instructional Material
for the Model 173 Cot Fastener System:
173-2 Installation Manual (Permanent Mounting) ...... 234-1827
173-3 Installation Manual (Removable Mounting) ..... 234-1828
© Copyright Ferno-Washington, Inc. All Rights Reserved.
Ferno-Washington, Inc.
70 Weil Way
Wilmington, OH 45177-9371 U.S.A.
Telephone (Toll Free) ......................... 1.877.733.0911
Telephone ........................................ +1.937.382.1451
Fax (Toll Free) ................................... 1.888.388.1349
Fax .................................................. +1.937.382.6569
Internet ............................................... www.ferno.com
2
© Ferno-Washington, Inc. 234-1826-02 September 2007
Model 173 Cot Fastener
TABLE OF CONTENTS
Section
Page
1 - Safety Information ................................................. 4, 5
1.1 Warning ................................................................ 4
1.2 Important .............................................................. 4
1.3 Bloodborne Disease Notice ................................. 4
1.4 Cot and Fastener Compatibility ........................... 4
1.5 Symbol Glossary .................................................. 4
1.6 Responsibility of User to Maintain
A Safe Fastener System ....................................... 5
2 - Operator Skills and Training .................................... 6
2.1 Skills .................................................................... 6
2.2 Training ................................................................ 6
3 - About the Fastener .................................................. 6-8
3.1 Cot Fastener Description ..................................... 6
3.2 Installation Standards .......................................... 7
3.3 Mounting Kit Features ......................................... 7
3.4 Before You Use the Fastener ............................... 7
3.5 Components ......................................................... 8
4 - Using the Fastener ................................................ 9-11
4.1 General Guidelines for Use ................................. 9
4.2 Using the Rear Hook ........................................... 9
Section
Page
4.3 Loading a Cot .................................................... 10
4.4 Unloading a Cot ................................................. 10
4.5 Removable Antler (Model 173-3 Only) ............. 11
4.6 Removable Rear Hook (Model 173-3 Only) ...... 11
5 - Maintenance ........................................................ 12-14
5.1 Maintenance Schedule ....................................... 12
5.2 Disinfecting and Cleaning the Fastener ............. 12
5.3 Lubricating the Fastener .................................... 12
5.4 Inspecting the Fastener ...................................... 13
5.5 Adjusting the Rear Hook ................................... 14
6 - Parts and Service ..................................................... 15
6.1 U.S.A. and Canada ............................................ 15
6.2 Worldwide .......................................................... 15
6.3 Parts List ............................................................ 15
7 - Ferno Customer Relations ...................................... 16
8 - Limited Warranty .................................................... 17
Training Record ............................................................. 18
Maintenance Record ..................................................... 19
ILLUSTRATIONS
Symbol Glossary ............................................................... 4
Components ....................................................................... 8
Figure 1 - Raising the Rear Hook ................................... 9
Figure 2 - Engaging the Rear Hook ................................ 9
Figure 3 - Fastener Ready for Cot ................................. 10
Figure 4 - Loading the Cot ............................................ 10
Figure 5 - Cot Head End in Antler ................................ 10
Figure 6 - Disengaging the Rear Hook ......................... 10
© Ferno-Washington, Inc. 234-1826-02 September 2007
Figure 7 - Detaching the Removable Antler .................. 11
Figure 8 - Removing the SHCS ...................................... 11
Figure 9 - Detaching/Attaching Removable Rear Hook .... 11
Maintenance Table .......................................................... 12
Figure 10 - Lubricate the Rear Hook Shaft ..................... 12
Figure 11 - Loosening the Set Screw .............................. 14
Figure 12 - Adjusting the Shaft ....................................... 14
Serial Number Location .................................................. 16
3
Safety Information
Model 173 Cot Fastener
1 - SAFETY INFORMATION
1.1 Warning
1.3 Bloodborne Disease Notice
Warning notices indicate a potentially hazardous situation
which, if not avoided, could result in injury or death.
To reduce the risk of exposure to bloodborne diseases
such as HIV-1 and hepatitis when using the fastener,
follow the disinfecting and cleaning instructions in
this manual.
WARNING
Improper or inadequate installation can cause injury.
The installer must test the fastener setup to meet or
exceed all applicable guidelines before using the
setup in an ambulance.
A fastener installed without backing plates can fail
in a crash. Use properly installed backing plates to
secure the fastener at all mounting points.
Improperly installed backing plates can fail in a
crash. Secure the backing plates to primary
structural members of the ambulance at all
mounting points.
Untrained operators can cause injury or be injured.
Permit only trained personnel to operate the fastener.
Improper use can cause injury. Use the fastener only
for the purpose described in this manual.
Using a cot not designed for this fastener can cause
injury. Use only compatible Ferno cots with the fastener.
A weakened fastener can cause injury. Removing
and reinstalling a fastener can weaken the fastener.
Install a new fastener when remounting an
ambulance box.
1.4 Cot and Fastener Compatibility
Combining different manufacturers’ products into a
“mixed-component” cot/cot fastener system can
increase the user’s risk of injury and damage.
Ferno-Washington, Inc. strongly recommends that only
Ferno-manufactured cots be used in Fernomanufactured cot fasteners, and that only Fernomanufactured cot fasteners be used for securing Fernomanufactured cots in ambulances.
ANY COMBINATION OF A FERNO COT OR COT
FASTENER WITH A NON-FERNO COT OR COT
FASTENER IS MISUSE OF THE FERNO PRODUCT.
Responsibility for the outcome of known, intentional
misuse rests squarely on the misuser.
For additional information, see the Cot Fastener
Disclaimer or contact Ferno Customer Relations
(page 16).
A damaged fastener can cause injury. An ambulance
accident can cause hidden fastener damage.
Replace any fastener involved in an accident.
Improper operation can cause injury. Operate the
fastener only as described in this manual.
1.5 Symbol Glossary
Improper maintenance can cause injury. Maintain the
fastener only as described in this manual.
The symbols defined below are used in this users’
manual. Ferno uses symbols recognized by the
International Standards Organization (ISO), American
National Standards Institute (ANSI) and the
emergency medical services industry.
Improper parts and service can cause injury. Use only
Ferno parts and Ferno-approved service on the fastener.
Modifying the fastener can cause injury and damage. Use the fastener only as designed by Ferno.
1.2 Important
Important notices emphasize important usage or
maintenance information.
General Warning Potential Injury
Product meets
European Union
Standards
Lock
Do Not Lubricate
Lubricate
Unlock
Important
4
© Ferno-Washington, Inc. 234-1826-02 September 2007
Model 173 Cot Fastener
Safety Information
1.6 Responsibility of User to Maintain a Safe Fastener System
WHAT YOU MUST KNOW AS A USER:
The integrity of the fastener system relies heavily on:
• the installer to meet all required installation
standards.
• the user to regularly inspect and maintain the system.
USER REQUIREMENTS:
1. Inspect the fastener monthly (minimum) or
more often with frequent use. Check under the
ambulance to see if exposure to the environment
has damaged the backing plates, nuts or bolts.
Replace the fastener if its integrity is in question.
2. During inspections, verify that all fastener
components are tight but DO NOT repeatedly
tighten the bolts with powered equipment. Over
time, using powered tools to repeatedly tighten
connections can cause damage to the fastener by
compressing the nut and bolt through the backing
plate. If inspection indicates the components are
“pulling through” the backing plate, immediately
take the ambulance out of service and install a
new fastener with new backing plates.
3. Consult your installer to ensure your fastener
meets all applicable standards.
° In the U.S.A., the installer must install a test
fastener and test the installation setup to MEET
OR EXCEED the pull test stipulated in AMD
Standard 004. Your installer should be able to
show that your fastener has been installed using
a method that is equal to one that passes this test.
° In other nations, the installer must show that
the fastener has been installed in a way that meets
all standards and regulations for the country in
which the fastener will be used.
4. Make sure your fastener has been installed
with backing plates beneath the ambulance
floor at all mounting points. If the backing plates
are not present, immediately take the ambulance
out of service and have a new fastener with
backing plates installed.
© Ferno-Washington, Inc. 234-1826-02 September 2007
U.S.A. STANDARDS NOTICE
The fastener is designed to securely hold a Ferno®
chair cot inside an ambulance (See page 6 for a list
of compatible cots). It has been designed and tested
by Ferno to meet or exceed existing ambulance
standards from:
• Ambulance Manufacturer’s Division (AMD) of
the National Truck Equipment Association.
• Federal Ambulance Specification KKK-A-1822.
Ferno’s fasteners, when installed properly, meet or
exceed all applicable U.S. standards.
Note: AMD and KKK-A-1822 standards are updated
periodically. Current guidelines are available from
these organizations. See page 7.
WARNING
Improper or inadequate installation can
cause injury. The installer must test the
fastener setup to meet or exceed all
applicable guidelines before using the setup
in an ambulance.
WARNING
A fastener installed without backing plates
can fail in a crash. Use properly installed
backing plates to secure the fastener at all
mounting points.
WARNING
Improperly installed backing plates can fail
in a crash. Secure the backing plates to
primary structural members of the
ambulance at all mounting points.
5
Operator Skills and Training, About the Fastener
Model 173 Cot Fastener
2 - OPERATOR SKILLS AND TRAINING
2.1 Skills
Operators using the fastener need:
a working knowledge of emergency patienthandling procedures.
a complete understanding of the procedures
described in this manual.
be trained on fastener and cot operation before
the vehicle with the fastener is placed in service.
practice with the fastener before using it in regular
service.
be tested on their understanding of the fastener.
record their training information. A sample
training record sheet is provided on page 18.
2.2 Training
Trainees need to:
follow a training program designed by their
training officer.
read this manual. For additional free users’
manuals, contact your Ferno distributor or Ferno
Customer Relations (page 16).
WARNING
Untrained operators can cause injury or be
injured. Permit only trained personnel to
operate the fastener.
3 - ABOUT THE FASTENER
3.1 Cot Fastener Description
The Model 173 Cot Fastener (called the fastener in
this manual) is a device designed to secure a Ferno®
chair cot inside the patient compartment of a groundbased ambulance. See Cot and Fastener Compatibility,
page 4 for compatibility information.
WARNING
Improper use can cause injury. Use the
fastener only for the purpose described in
this manual.
The fastener is for professional use only.
The fastener is a two-part system consisting of an antler
and a rear hook (Model 173). Installation and mounting
kits (Model 173-2 and 173-3) are sold separately.
Fastener features include:
• Front antler secures cot loading wheels.
• Adjustable rear hook fastens directly to the cot
frame.
• Optional removable mounting assemblies allow
easy removal of antler and rear hook for cleaning.
WARNING
Using a cot not designed for this fastener
can cause injury. Use only compatible Ferno
cots with the fastener.
COMPATIBLE COTS
•
•
6
Ferno® Model 28 Chair Cot
Ferno® Model 28-Z PROFlexx® Chair Cot
© Ferno-Washington, Inc. 234-1826-02 September 2007
Model 173 Cot Fastener
3.2 Installation Standards
In the United States, the fastener is designed for use with
ambulances that conform to the Star of Life certification
(meets Federal KKK-A-1822 Specifications and AMD
standards).
In other nations, the fastener must be installed in a way
that meets all local and national standards and
regulations for the country in which the fastener will
be used.
3.3 Mounting Kit Features
Two mounting kits are available to attach the Model
173 antler and rear hook to the ambulance floor:
•
•
About the Fastener
U.S.A. INSTALLERS:
When installed properly, this fastener meets or
exceeds all applicable KKK-A-1822 specifications
and AMD standards.
For information about AMD standards, contact:
Ambulance Manufacturer’s Division
National Truck Equipment Association
37400 Hills Tech Drive
Farmington Hills, MI, 48331-3414
For information about Federal Ambulance Specifications:
Federal Supply Services
Specifications Section
Suite 8100, 470 E. L’Enfant Plaza, SW
Washington, DC 20407
Model 173-2 Mounting Kit: The antler and the
rear hook are permanently mounted to the floor.
Model 173-3 Mounting Kit: The antler and the
rear hook mount to aluminum floor plates. The
floor plates allow the antler and rear hook to be
easily removed for cleaning.
3.4 Before You Use the Fastener
To install the fastener, read and follow the instructions
in the installation manual for your cot and mounting
kit setup. As a user, be aware of the following:
U.S.A. installers conforming to Star of Life
certification must comply with Federal KKK
Specifications and AMD standards (see “U.S.A.
Installers,” this page).
Fastener installation requires the use of backing
plates at all mounting points. If your ambulance
does not have the required backing plates, have
them installed.
Inspect the fastener regularly to ensure it is
crashworthy. See Inspecting the Fastener, page 13.
WARNING
A weakened fastener can cause injury.
Removing and reinstalling a fastener can
weaken the fastener. Install a new fastener when
remounting an ambulance box.
WARNING
A damaged fastener can cause injury. An
ambulance accident can cause hidden fastener
damage. Replace any fastener involved in an
accident.
Install a new fastener when remounting an
ambulance box. Removing and reinstalling an old
fastener can weaken the fastener.
If the ambulance is involved in a traffic accident,
the fastener could sustain hidden damage
(damage that is not visible to the eye). Replace
the fastener if the ambulance is involved in a
traffic accident.
© Ferno-Washington, Inc. 234-1826-02 September 2007
7
About the Fastener
Model 173 Cot Fastener
3.5 Components
This section shows the components of the two fastener setups. Your fastener setup will match one of the component
drawings.
Model 173 Cot Fastener with a 173-2 Mounting Kit
Antler Hook
Antler Mounting Block
(2 ea)
Release Handle
Antler
Rear Hook
Model 173 Cot Fastener with a 173-3 Mounting Kit
Antler Mounting Block
(2 ea)
1/2"-13 x 1"
Socket-Head Cap Screw (3 ea)
Nut
Release
Handle
Antler Floor
Plate (2 ea)
1/2"-13 x 1-1/4"
Socket-Head Cap Screw
Rear Hook
8
Rear Hook Floor Plate
Antler
Also provided:
1/4" Allen Wrench (not shown)
© Ferno-Washington, Inc. 234-1826-02 September 2007
Model 173 Cot Fastener
Using the Fastener
4 - USING THE FASTENER
4.1 General Guidelines for Use
•
Personnel who will work with the fastener must be
trained. See Operator Skills and Training, page 6.
•
Use the fastener only when it has been installed
properly for your cot.
•
Confirm that the fastener operates properly. See
Inspecting the Fastener, page 13.
•
Use the fastener according to your local protocols
and EMS guidelines.
WARNING
Improper operation can cause injury. Operate
the fastener only as described in this manual.
4.2 Using the Rear Hook
The rear hook attaches to the cot foot-end frame and
helps secure the cot in the fastener. To operate the hook:
•
To engage the rear hook: Raise the hook upright
(Figure 1) and push the hook forward (Figure 2)
to engage the frame of the cot.
After securing the cot, verify that the hook is
locked by attempting to pull the hook away from
the cot without using the release handle. The hook
should remain locked against the cot frame.
° If the cot is loose in the fastener after engaging
the rear hook:
1. Push the cot further into the antler if possible,
then press the rear hook firmly against the cot
frame to engage the next locking tooth.
2. Adjust the hook. See Adjusting the Rear Hook,
page 14. Note: only fasteners with serial numbers
higher than JJ 324105 have adjustable rear hooks.
•
To disengage the rear hook: Squeeze the
release handle (Figure 2) and pull the hook away
from the cot (toward the rear of the ambulance),
then lay the hook on the floor (Figure 1).
Figure 1 - Raising the Rear Hook
Squeeze
to Release
Engage
Note: Roll the cot into or out of the ambulance only
with the rear hook disengaged and laying flat on
the floor.
Figure 2 - Engaging the Rear Hook
© Ferno-Washington, Inc. 234-1826-02 September 2007
9
Using the Fastener
Model 173 Cot Fastener
4.3 Loading a Cot
1. Before loading the cot, verify that the rear hook
is unlocked and is laying on the floor as shown in
Figure 3 (see Using the Rear Hook, page 9).
Antler
2. Load the cot into the ambulance, following the
instructions in the cot users’ manual (Figure 4).
3. Guide the head end of the cot into the antler until
the loading wheel crosstube on the cot rests firmly
against the antler hooks (Figure 5).
Rear Hook
On the Floor
Figure 3 - Fastener Ready for Cot
4. Engage the rear hook (Figure 6).
5. Check that the rear hook is locked by attempting
to pull the hook away from the cot without
squeezing the release handle. The rear hook
should remain locked against the cot.
Figure 4 - Loading the Cot
4.4 Unloading a Cot
To release the cot from the fastener:
Loading Wheel
Crosstube
1. Squeeze the release handle (Figure 2, page 9) and
slide the rear hook away from the foot end of the
cot (Figure 6).
2. Lay the rear hook on the floor (Figure 3).
3. Unload the cot from the ambulance following the
instructions in the cot users’ manual.
Antler Hook
Figure 5 - Cot Head End in Antler
Figure 6 - Disengaging Rear Hook
10
© Ferno-Washington, Inc. 234-1826-02 September 2007
Model 173 Cot Fastener
Using the Fastener
4.5 Removable Antler
(Model 173-3 only)
* Antler Floor Plates Not Shown
in This Photo
The antler of a fastener installed with the 173-3
mounting kit can be detached from the floor plates
for cleaning.
To detach the antler, use a 1/4" Allen wrench (provided
with the mounting kit) to remove the socket-head cap
screws from the two antler mounting blocks (Figure 7),
then remove the mounting blocks and antler from the
mounting plates (not shown).
To attach the antler, place the antler on the floor with
the antler hooks facing the rear of the ambulance. Use
the 1/4" Allen wrench and the socket-head cap screws
(provided in the mounting kit) to secure the mounting
blocks and antler to the ambulance floor.
Antler
Mounting
Block
Figure 7 - Detaching the Removable Antler
4.6 Removable Rear Hook
(Model 173-3 only)
The rear hook of a fastener installed with a 173-3
mounting kit can be detached from the floor plate for
cleaning. To detach the rear hook:
1. Use the 1/4" Allen wrench (provided with the
mounting kit) to remove the socket-head cap
screw closest to the rear doors (Figure 8).
Figure 8 - Removing the SHCS
2. Slide the rear hook toward the rear doors to
position the mount in the large end of the keyhole
slot in the floor plate (Figure 9).
3. Lift the rear hook straight up to remove it from
the mounting plate (Figure 9).
To attach the rear hook:
1. Place the rear hook on the floor plate with the
hook facing the front of the ambulance and with
the mount on the hook bottom in the large end of
the floor plate keyhole (Figure 9).
2. Slide the rear hook toward the front of the
ambulance to secure the mount in the small end
of the floor plate keyhole (Figure 9).
Mount
Keyhole on
Floor Plate
3. Use the 1/4" Allen wrench to reattach the sockethead cap screw at the rear-door end of the rear
hook.
Figure 9 - Detaching/Attaching
Removable Rear Hook
© Ferno-Washington, Inc. 234-1826-02 September 2007
11
Maintenance
Model 173 Cot Fastener
5 - MAINTENANCE
5.2 Disinfecting and Cleaning
the Fastener
To disinfect: Wipe all surfaces with disinfectant.
Follow disinfectant manufacturer’s directions. Ferno
recommends inspecting the fastener for obvious damage
as you disinfect it.
To clean: Hand wash all parts of the fastener with warm
water and a mild detergent. Use a brush with stiff
bristles to remove stains. Do not use a metal wire brush.
Rinse with warm, clear water. Dry with a towel or allow
the fastener to air-dry.
The antler, rear hook, and mounting hardware installed
with a Model 173-3 mounting kit can be removed for
easier cleaning (see page 11).
Improper maintenance can cause injury.
Maintain the fastener only as described in
this manual.
Minimum
Maintenance Intervals
Disinfecting (this page)
Cleaning (this page)
Lubricating (this page)
Inspecting (page 13)
Adjusting (page 14)
Each Month
When using maintenance products, follow the
manufacturers’ directions and read the manufacturers’
material safety data sheets. You can purchase a
recommended disinfectant from your Ferno distributor
or Ferno Customer Relations (page 16).
WARNING
As Needed
The fastener requires regular maintenance. Set up and
follow a maintenance schedule. A sample maintenance
record sheet is provided on page 19. The table at right
represents minimum intervals for maintenance.
Each Use
5.1 Maintenance Schedule
•
•
•
•
•
•
Important
Disinfectants and cleaners containing bleach,
phenolics, or iodines can harm the fastener.
Use caution when disinfecting and cleaning
with products containing these chemicals.
5.3 Lubricating the Fastener
As needed, apply a small amount of a lubricant such as
EZ-1 or white lithium grease to the rear hook shaft
(Figure 10).
Important
Water under high pressure penetrates joints,
flushes away lubricant, and causes corrosion.
Do not use a high-pressure washer, or steam,
to clean the fastener.
Important
Using abrasive cleaning compounds or
applicators on the fastener can cause damage.
Do not use abrasive materials to clean the
fastener.
Figure 10 - Lubricate the Rear Hook Shaft
12
© Ferno-Washington, Inc. 234-1826-02 September 2007
Model 173 Cot Fastener
5.4 Inspecting the Fastener
Have your service’s equipment maintenance personnel
inspect the fastener. Follow the checklist at right and
work the fastener through all its functions as described
in this manual.
If the inspection shows damage or excessive wear,
remove the fastener from service until repair is made.
See Parts and Service, page 15.
Important
If the required backing plates are not installed,
immediately take the fastener out of service and
have the backing plates installed. Then, install
a new fastener.
Important
Make sure all connections are tight, but do not
overtighten the hardware. Overtightening,
especially with powered tools, can cause the
nut and bolt beneath the ambulance floor to
pull through the backing plate.
Maintenance
INSPECTION CHECKLIST
Are all parts in good condition (no cracks,
corrosion, or damage)?
Do all moving parts operate smoothly and
properly?
Does the cot load and unload properly?
Do the antler hooks properly engage the cot’s
head-end crosstube?
Does the rear hook properly engage the cot?
For removable components: Does the fastener
lock properly to the floor mounting plates?
Monitor the ambulance floor, including beneath
the ambulance, and check for fastener integrity.
Is the fastener setup worn? Has exposure to the
environment caused visible damage?
Are the required backing plates present, and are
they securely welded to a primary structural
member of the ambulance floor?
Is all the hardware tight?
If inspection indicates the components are
pulling through the backing plate, immediately
take the fastener out of service and install a
new fastener with new backing plates.
© Ferno-Washington, Inc. 234-1826-02 September 2007
13
Maintenance
Model 173 Cot Fastener
5.5 Adjusting the Rear Hook
The rear hook of fasteners with Serial Numbers JJ 324105 and higher is adjustable. To adjust the rear hook, first
place the cot in the fastener and verify that the head-end crosstube is engaged in the fastener antler. Then engage the
rear hook as closely as possible against the cot. Follow the appropriate instructions below to adjust the hook
forward or rearward on the ratchet bar shaft.
ADJUSTING THE HOOK FORWARD:
ADJUSTING THE HOOK REARWARD:
1. Lower the hook momentarily and use a 3/32"
Allen wrench to loosen the set screw located on
top of the ratchet bar shaft (Figure 11). Do not
remove the set screw - loosen it only. Then raise
and engage the hook. (If you can’t raise the hook,
the set screw is too loose.)
1. Lower the hook momentarily and use a 3/32"
Allen wrench to loosen the set screw located on
top of the ratchet bar shaft (Figure 11). Do not
remove the set screw - loosen it only. Then raise
and engage the hook. (If you can’t raise the hook,
the set screw is too loose.)
2. Use a 5/32" Allen wrench to loosen the socket
head cap screw at the rear of the ratchet bar,
Figure 11. (To loosen: turn counter-clockwise).
2. At the front of the ratchet bar shaft, use a 7/16"
socket or box wrench to loosen the hex-head cap
screw and shaft, Figure 12. (To loosen: turn
counter-clockwise).
3. At the front of the ratchet bar shaft, use a 7/16"
socket or box wrench to tighten the hex-head cap
screw and shaft, Figure 12. (To tighten: turn
clockwise).
3. At the rear of the ratchet bar shaft, use a 5/32"
Allen wrench to tighten the socket head cap
screw, Figure 11. (To tighten: turn clockwise).
4. Repeat Steps 2 and 3 until the cot is held firmly
in place by the hook with no front-to-back slack
or wiggling.
4. Repeat Steps 2 and 3 until the cot is held firmly
in place by the hook with no front-to-back slack
or wiggling.
Note: If the shaft cannot be adjusted any further forward,
move the hook itself forward by one locking ratchet
position, then adjust the shaft using this position.
Note: If the shaft cannot be adjusted any further
rearward, move the hook itself rearward by one locking
ratchet position, then adjust the shaft using this position.
5. Use the 5/32" Allen wrench to tighten the socket
head cap screw at the rear of the ratchet bar. Verify
that both front and rear screws are tight.
5. Use the 7/16" wrench to tighten the hex-head cap
screw at the front of the ratchet bar. Verify that
both front and rear screws are tight.
6. Disengage the hook and tighten the set screw with
the 3/32" Allen wrench.
6. Disengage the hook and tighten the set screw with
the 3/32" Allen wrench.
Tighten (Adjust
Hook Forward)
Set Screw
Ratchet Bar
Shaft
Socket Head
Cap Screw
Figure 11 - Adjusting the Set Screw and
Socket Head Cap Screw
14
Loosen (Adjust
Hook Rearward)
Ratchet Bar
Shaft
Figure 12 - Adjusting the Shaft
© Ferno-Washington, Inc. 234-1826-02 September 2007
Model 173 Cot Fastener
Parts and Service
6 - PARTS AND SERVICE
6.1 U.S.A. and Canada
To order parts or for professional cot fastener repair,
contact EMSAR® - the only agent authorized by Ferno
to manage, service, and repair Ferno products. EMSAR
factory-trained technicians use Ferno-approved parts and
repair procedures. EMSAR has a franchise location
serving you. For details, please contact EMSAR.
Telephone (Toll-free) ................ 1.800.73.EMSAR
Telephone (Worldwide)................. 1.937.383.1052
Fax (Worldwide) ........................... 1.937.383.1051
Internet .................................... www.EMSAR.com
WARNING
Improper parts and service can cause injury.
Use only Ferno parts and Ferno-approved
service on the fastener.
WARNING
Modifying the fastener can cause injury and
damage. Use the fastener only as designed
by Ferno.
6.2 Worldwide
To order Ferno parts and for professional cot fastener
repair, contact your Ferno distributor. Your distributor
is the only agent authorized by Ferno to manage,
service, and repair Ferno products.
6.3 Parts List
Description
Part #
Installation Template ............................................ 082-2205
Rear Hook ............................................................. 090-3513
Rear Hook Floor Plate (1 ea.) .............................. 090-0266
Antler .................................................................... 090-3512
Antler Floor Plate (1 ea.) ...................................... 090-0265
Antler Mount. Block (Removable, 2 ea.) ............. 090-4055
Small Parts Kit* .................................................... 090-5523
*Includes 1/2"-13 jam nut (1 ea.) and 1/2"-13 x 1" sockethead cap screws (4 ea.).
© Ferno-Washington, Inc. 234-1826-02 September 2007
15
Ferno Customer Relations
Model 173 Cot Fastener
7 - FERNO CUSTOMER RELATIONS
Customer service and product support are important
aspects of each Ferno product.
Please have the serial number of your Ferno cot fastener
available when calling Ferno Customer Relations, and
include it in all written communications.
For assistance, please contact Ferno Customer
Relations:
Telephone (Toll-free).......................... 1.877.733.0911
Telephone ........................................... 1.937.382.1451
Fax (Toll-free) .................................... 1.888.388.1349
Fax ...................................................... 1.937.382.6569
Internet ............................................... www.ferno.com
Serial Number ________________________
Cot Fastener Disclaimer
Ferno-Washington, Inc. (Ferno), cot fasteners are designed for use only with Ferno cots. NO WARRANTY OR REPRESENTATION IS
MADE WITH RESPECT TO THE ADAPTABILITY OR SUITABILITY OF COT FASTENERS FOR USE WITH COTS (OTHER
THAN FERNO COTS), AND ALL SUCH WARRANTIES, INCLUDING WARRANTIES OF MERCHANTABILITY OF FITNESS
FOR SUCH PURPOSES, ARE EXPRESSLY DISCLAIMED. FOR WARRANTY AND DISCLAIMER INFORMATION OF COT
FASTENERS USED WITH FERNO COTS SEE FERNO’S WARRANTY AND DISCLAIMER STATEMENT.
16
© Ferno-Washington, Inc. 234-1826-02 September 2007
Model 173 Cot Fastener
Limited Warranty
8 - LIMITED WARRANTY
Ferno products are warranted to be free from defects in material and workmanship for a period of one year, except as follows:
• External finishes (gelcoat, paint, powdercoat, decals, etc.) are warranted for 90 days.
• Soft goods (webbing, vinyl, fabric, foam, etc.) are warranted for 90 days.
• Stainless whirlpool tanks are warranted against tank shell leakage and corrosion for 5 years.
• Mortuary products (except hydraulic parts and soft goods) are warranted for 2 years.
• Ambulance cots and ambulance transporters (except external finish and soft goods) are warranted for 2 years.
• EZ Glide™ Chairs are warranted for 2 years.
• 59-E Evacuation Chairs are warranted for 15 years.
• EMS bags (replaceable bottom excluded) and backboards are warranted for lifetime replacement. (Damage caused
by accident, abuse, misuse or improper care will be repaired at a reasonable charge for which you will be informed
prior to the repair work being done.)
• Integrated Charging System (ICS) is warranted for 2 years.
• Fiberglass pools have a structural warranty of 5 years against leaking through the vinyl ester resin. Fading is
specifically excluded from the structural warranty. Chips and/or scratches caused by accident, abuse and misuse
are specifically excluded from the structural warranty.
• Vinyl pool liner welded seams are warranted to be free of defects in manufacturing or workmanship for a period of 5
years. Vinyl pool liner welded seam warranty specifically excludes non-Ferno labor charges, cost of replacement
water, replacement chemicals, or any owner-related damage that may occur. Warranty is void if the liner is
exposed to excessive heat or cold, chemical abuse or lack of proper chemical maintenance. Chemicals should not
be allowed to settle onto the liner as chemicals can bleach the color. The pH of the pool water must be properly maintained
and balanced. Fading, wrinkling and liner slippage are specifically excluded from this warranty.
Ferno repairs are warranted for 90 days from the date of repair.
This limited warranty applies only when you use and care for the product as described in the instructions provided with the
product. Improper use and care may void this warranty. The warranty period begins the day the product is shipped from Ferno
or the day you receive it if you have proof of the delivery date. Shipping charges are not covered by this limited warranty. Ferno
is not liable for shipping damages or damages sustained through using the product.
Non-Ferno products sold by Ferno retain the product manufacturer’s original warranties and guarantees. Such warranties and
guarantees, if any, are solely those of the product manufacturer. Ferno offers no warranties or guarantees of any kind additional
to those of the product manufacturer, nor does Ferno assume any liability for products manufactured by others.
Limitation of Liability
If a product is proven defective, Ferno will repair or replace it, or, at our option, refund the item’s purchase price. In no event
is Ferno liable for more than the selling price of the product. The purchaser accepts these terms in lieu of all damages.
Except for the limited warranty above, Ferno makes no other warranties, either expressed or implied. Ferno makes no implied
warranties of merchantability and fitness for a particular purpose for its own product or for the products of others. In no event
will Ferno be liable for any indirect or consequential damages sustained in connection with the delivery, use, or performance of
its products.
Under breach of limited warranty any legal action for breach of the limited warranty must be filed within one year of the date
the breach is or should have been discovered.
Limited Warranty Claims and Disputes
Contact Ferno Customer Service promptly if you receive a product from Ferno that you suspect is defective. A representative
will assist you with the claim procedure. Before sending any product to Ferno obtain a return authorization number from Ferno
Customer Service.
Ferno-Washington, Inc.
70 Weil Way
Wilmington, OH 45177-9371
© Ferno-Washington, Inc. 234-1826-02 September 2007
Telephone
Fax
Email
1.800.733.3766
1.800.388.1349
www.ferno.com
17
Model 173 Cot Fastener
TRAINING RECORD
Date
18
Name
Training Method
© Ferno-Washington, Inc. 234-1826-02 September 2007
Model 173 Cot Fastener
MAINTENANCE RECORD
Date
Maintenance Performed
© Ferno-Washington, Inc. 234-1826-02 September 2007
By
19