1
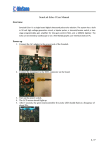
Covaris S220 Ultra-Sonicator – Guidelines for Use Listing of Current Protocols [i.e. Shearing Protocols]: http://covarisinc.com/resources/protocols/ Start-Up Procedure Chiller Turn ON the chiller at the back of the unit (toggle switch). Turn ON the chiller at the front of the unit and check the SET temperature. Adjust the temperature, as required for the protocol, using the up/down arrows. The maximum bath temperature in the software may be set to any value between 5°C and 40°C. Note: Typically, set the chiller to a temperature about 2-3°C below the bath temperature indicated in any protocol. The software high temperature alarm can be set to a value several degrees above expected bath temperature to alert in case of any chiller failure. Water Bath Each day when starting up the system, add fresh deionized water (Milli Q ddH₂0) to the tank. IF the S220 has been turned ON before filling the water bath, you MUST verify that the degassing pump is turned OFF before proceeding! Carefully lift the acoustic assembly arm to raise the transducer. (Fig: 2) Carefully pull out the acrylic water tank from the instrument base plate, wipe any residual water with a lint free cloth (Kimwipes). (The tank should be empty & dry, as it will be emptied after every day of use.) Fill the water tank (Milli Q ddH₂0) using the water level indicator on the front of the tank to the appropriate FILL column (left side of scale). The water bath holds approximately 1.6 L. Water Level Indicator Place the tank, properly oriented, back into the instrument and carefully lower the acoustic assembly. When the transducer is lowered into the tank, the water will be appropriately displaced to the RUN level indicated on the right side of the gauge/scale. If the system has been used previously the same day and the water level needs to be adjusted for the current application, the system will have to be degassed again. First verify that the degassing pump is OFF before lifting the acoustic assembly. Note: The water level is dictated by the application. If Covaris has provided an Instruction for Use (IFU) for your application, please refer to it for the recommended water level. If no water level is specified, fill the water bath to the “0” level. Computer & SonoLab Software Turn ON the S220 (wait at least 10 seconds). Turn ON the computer & initiate the SonoLab 7 software. If the system indicates “Disconnect”, contact Tech. Support (613-882-3290 or 613-668-4482). Note: Do not disconnect the USB cable or power OFF the S220 while the SonoLab software is running. Loss of communication with the instrument may cause the software to become unresponsive, forcing the user to close the application via Windows Task Manager. Degassing Prior to running a method, degas the water bath for ½ hour. To degas the system click the “Degas Pump” button on the Instrument Status Panel of the RUN screen; the indicator will turn green. When the system is degassed, a green light will appear in the Instrument Status Panel. Note: The degassing system also circulates the water past the sample vessel being processed during the treatment. During normal operation, there should be an intermittent stream of bubbles coming from the hole at the end of the outlet nozzle. If there are no bubbles, then some of the six small holes in the dip tube may be plugged. This may happen if the water bath becomes contaminated with particulate materials. Note: The degassing pump will turn OFF after 10 seconds if the water tank is not filled with water to the appropriate FILL line for the required application i.e. selected tube holder. Instrument Status Panel (RUN Screen) Note: The Instrument Status Panel MUST indicate all green check marks before a Method can be initiated. Loading the Sample Holder into the Acoustic Assembly Raise the sample cover & place the sample holder [mimi, micro, 12x12] into the water bath through the aperture. Close the cover to ensure that the Safety Cover status turns green on the Instrument Status Panel. Loading /Unloading Tubes into the Sample/Tube Holder To Load: Depress the stainless steel or plastic plunger into the body of the TUBE holder. To load the tube, grip the glass (not the cap) and insert the body of the TUBE against or between the two plastic prongs with the cap positioned above the prongs. If required, as for the microTUBE holder: Press against the middle of the glass tube (not the cap) and with a single motion, push the tube between the prongs Caution: Do not press against the cap to load or unload the TUBE vials, as this may dislodge or damage the cap! Release the plunger. It will push the tube down until the base of the cap rests against the prongs. Inset the tube and holder into the S220. To Unload: Push the stainless steel or plastic plunger into the body of the TUBE holder to relieve pressure on the cap. Press against the side of the glass tube (not the cap) release the TUBE from the grip of the holder. Note: Ensure that the sample is seated flush in the holder so that it is correctly aligned with the focal point of the transducer. Processing the Sample Create or load a Method. A Method consists of one or more treatments/delays/message prompts. A Treatment has 4 Parameters: Note: These parameters are specific to a protocol and are provided by Covaris at the link indicated previously! 1. Peak Incident Power (Watt) – instantaneous ultrasonic power applied to the sample 2. Duty Factor (percent) – percentage of time that the ultrasound signal is applied to the sample 3. Cycle/Bursts (count) – number of cycles of ultrasonic energy to deliver during the ON portion of the duty cycle 4. Duration (seconds) – amount of time (seconds) that treatment is applied to the sample 5. Average Incident Power (Watt) – approximately the Peak Power X Duty Factor Press the RUN button on the Run screen. The method will start and a PAUSE button will be enabled. To pause the process, press the PAUSE button. You may choose to Resume or Abort the process. CAUTION: Never run a method without a water bath; this will permanently damage the transducer. Fig: 1 System with Acoustic Assembly Lowered Safety Cover with TUBE holder placed inside aperture Tank Lid Dip Tube Water Level Indicator Transducer Water Bath Tank Shutdown Procedure If the system will be idle for an extended time (i.e. overnight or a weekend) it should be shut down. Turn OFF the chilling system at the front and then turn OFF the toggle switch at the back of the unit. Turn OFF degassing and raise the acoustic assembly to lift the transducer out of the water. Empty the water bath, place it back into the instrument and lower the acoustic assembly. Click ON the Degas Pump to restart the pump and purge the pump and water lines. The pump will automatically stop within 10 seconds. Remove the tank again, dry the tank with a lint-free cloth and place it back in the system. CAUTION: Leaving water in the water bath or degassing lines for an extended time may allow biological growth in the tank and lines which will interfere with sample processing. Exit SonoLab software Shutdown the laptop from Shutdown, from the START menu on the Windows screen. Power OFF the instrument AFTER the SonoLab software has closed; switch located near top/right of S220. Fig: 2 System with Acoustic Assembly & Transducer Raised Main ON/OFF switch Acoustic Assembly Transducer Water Bath Tank *Please review the PDF version of the S220 Series User Manual on the desk top, or a hypertext version of the manual in the HELP tab of the SonoLab Software. Application Support contact: [email protected] Please check the Desktop for the following: 1. Current Protocols (April 2013) for DNA Shearing using microTUBES, miniTUBES & 12x12 tubes with various sample volumes for resulting various fragment sizes. 2. Facts and Questions 3. Copy of Guidelines for Use 4. Covaris Link has additional information from posters & publications etc.