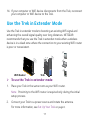
1
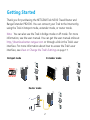
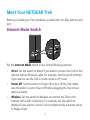
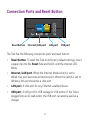
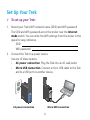
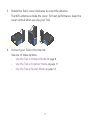
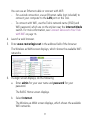
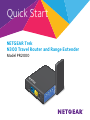
Quick Start
NETGEAR Trek
N300 Travel Router and Range Extender
Model PR2000
R
EA
G
ET
N
t
ern
et/
N
LA
US
USB
N
B
WiFi
LA
Internet
Int
Power
Re
se
Getting Started
Thank you for purchasing the NETGEAR Trek N300 Travel Router and
Range Extender PR2000. You can connect your Trek to the Internet by
using the Trek in hotspot mode, extender mode, or router mode.
Note:  You can also use the Trek in bridge mode or AP mode. For more
information, see the user manual. You can get the user manual online at
http://downloadcenter.netgear.com or through a link in the Trek’s user
interface. For more information about how to access the Trek’s user
interface, see View or Change the Trek’s Settings on page 17.
Hotspot mode
Extender mode
WiredOff s
PowerWirele
WiredOff es
PowerWirel
r
Powe
NET
r
Powe
net
GE
AR
Inter
NET
net
GEA
WiFi
Inter
R
USB
WiFi
USB
Router mode
WiredOff s
PowerWirele
r
Powe
NE
et
TG
Intern
EA
R
WiFi
USB
2
Meet Your NETGEAR Trek
Before you install your Trek, familiarize yourself with its LEDs, buttons, and
port.
Internet Mode Switch
Put the Internet Mode switch in one of the following positions:
•
Wired. Set the switch to Wired if you want to connect the Trek to the
Internet with an Ethernet cable. For example, set the switch to Wired
if you want to use the Trek in router mode or AP mode.
•
Power off. Set the switch to Power off to turn off the Trek. Make
sure the switch is set to Power off before plugging the Trek into an
electrical outlet.
•
Wireless. Set the switch to Wireless to connect the Trek to the
Internet with a WiFi connection. For example, set the switch to
Wireless if you want to use the Trek in hotspot mode, extender mode,
or bridge mode.
3
Connection Ports and Reset Button
Reset button
Internet/LAN port
LAN port
USB port
The Trek has the following connection ports and reset button:
•
Reset button. To reset the Trek to its factory default settings, insert
a paper clip into the Reset hole and hold it until the Internet LED
blinks.
•
Internet/LAN port. When the Internet Mode switch is set to
Wired, this port becomes an Internet port. When the switch is set to
Wireless, this port becomes a LAN port.
•
LAN port. A LAN port for any Ethernet-enabled device.
•
USB port. A USB port for USB storage or USB printer. If the Trek is
plugged into an AC wall outlet, the USB port can also be used as a
charger.
4
Indicator LEDs
Monitor the status of your Trek using the following LEDs:
Power LED
•
Green. The Trek is powered on.
•
Off. The Trek is powered off.
Internet LED •
WiFi LED
USB LED
Green. The Trek is connected to the Internet.
•
Blinking green. One of the following occurred:
• The Reset button was pressed longer than five
seconds.
• A firmware upgrade is in progress.
• The bandwidth limit was exceeded.
•
Off. The Trek is not connected to the Internet.
•
Green. The WiFi radio is operating.
•
Off. The WiFi radio is off.
•
Green. A USB device is connected and ready.
•
Off. No USB device is connected.
5
Set Up Your Trek
¾¾ To set up your Trek:
1. Record your Trek’s WiFi network name (SSID) and WiFi password.
The SSID and WiFi password are on the sticker near the Internet
mode switch. You can write the WiFi settings from the sticker in this
space for easy reference.
SSID:
WiFi password:
2. Connect the Trek to a power source.
Use one of these options:
• AC power connection. Plug the Trek into an AC wall outlet.
• Micro USB connection. Connect a micro USB cable to the Trek
and to a USB port on another device.
d
Wirer Off
les
PoweWire
ed
Wir Off s
er
Pow Wirele
net
Inter via
r
Powe
NE
et
TG
Intern
EA
R
NE
WiFi
TG
USB
AC power connection
EA
R
Micro USB connection
6
3. Rotate the Trek’s cover clockwise to orient the antenna.
The WiFi antenna is inside the cover. For best performance, keep the
cover vertical when you use your Trek.
net
Inter via
d
Wire Off
er
les
Pow Wire
N
ET
R
G
EA
R
EA
G
ET
N
Int
ern
Power
Internet
WiFi
USB
USB
i
WiF
B
R
US
rnet
Inte
GEA
LAN
B
NET
N
US
USB
N
WiFi
LA
LA
AN
et/
t/L
Internet
erne
set
Int
Power
set
Re
er
Pow
Re
4. Connect your Trek to the Internet.
Use one of these options:
• Use the Trek in Hotspot Mode on page 8
• Use the Trek in Extender Mode on page 11
• Use the Trek in Router Mode on page 14
7
Use the Trek in Hotspot Mode
Use the Trek in hotspot mode to connect to a public hotspot. The Trek’s
firewall protects your devices from known DoS attacks and port scans
from the Internet.
CAUTION: Most public WiFi hotspots offer no security. NETGEAR
recommends that you do not send personal information over the Internet
when using a public WiFi hotspot.
d
Wire Off
er
les
Pow Wire
er
Pow
NET
rnet
GEA
Inte
R
WiFi
USB
Trek
¾¾ To use the Trek in hotspot mode:
1. Connect your Trek to a power source and rotate the antenna.
For more information, see Set Up Your Trek on page 6
2. Set the Internet Mode switch to Wireless.
3. Connect your computer or WiFi device to the Trek.
8
You can use an Ethernet cable or connect with WiFi:
• For a wired connection, use an Ethernet cable (not included) to
connect your computer to the LAN port on the Trek.
• To connect with WiFi, use the Trek’s network name (SSID) and
WiFi password, which are on the sticker near the Internet Mode
switch. For more information, see Connect Devices to Your Trek
with WiFi on page 16.
4. Launch a web browser.
5. Enter www.routerlogin.net in the address field of the browser.
The Wireless as WAN screen displays, which shows the available WiFi
networks.
6. If a login screen displays, do the following:
a. Enter admin for your user name and password for your
password.
The BASIC Home screen displays.
b. Select Internet.
The Wireless as WAN screen displays, which shows the available
WiFi networks.
9
7. Clear the Extend my current wireless router’s range check box.
8. Select a radio button next to the WiFi network to which you want to
connect.
9. From the Security list, select the WiFi network’s security option.
10. In the Password (Network Key) field, type the WiFi network’s
password.
11. For the Internet IP Address setting, select one of the following radio
buttons:
• Get Dynamically. The Internet service provider (ISP) uses DHCP
to assign your IP address. Your ISP automatically assigns these
addresses.
• Use Static IP Address. Enter the IP address, IP subnet mask, and
the gateway IP address that your ISP assigned. The gateway is
the ISP’s gateway to which your Trek connects.
12. To be able to use these settings again without having to reenter them,
select the To save a name for profile check box and in the field
provided, type a name for the profile.
Create a descriptive name for the profile to help you remember the
settings. For example, if you visit a hotel frequently, you might use the
hotel name as the profile name.
13. Click the Apply button.
It might take up to two minutes before the Trek connects to the WiFi
network.
10
14. If your computer or WiFi device disconnects from the Trek, reconnect
your computer or WiFi device to the Trek.
Use the Trek in Extender Mode
Use the Trek in extender mode to boosting an existing WiFi signal and
enhancing the overall signal quality over long distances. NETGEAR
recommends that you use the Trek in extender mode when a wireless
device is in a dead zone where the connection to your existing WiFi router
is poor or nonexistent.
d
Wire Off
er
les
Pow Wire
er
Pow
NET
rnet
GEA
WiFi Router
Trek
Inte
R
WiFi
USB
¾¾ To use the Trek in extender mode:
1. Place your Trek in the same room as your WiFi router.
Note:  Proximity to the WiFi router is required only during the initial
setup process.
2. Connect your Trek to a power source and rotate the antenna.
For more information, see Set Up Your Trek on page 6.
11
3. Set the Internet Mode switch to Wireless.
4. Connect your computer or WiFi device to the Trek.
You can use an Ethernet cable or connect with WiFi:
• For a wired connection, use an Ethernet cable (not included) to
connect your computer to the LAN port on the Trek.
• To connect with WiFi, use the Trek’s, network name (SSID) and
WiFi password, which are on the sticker near the Internet Mode
switch. For more information, see Connect Devices to Your Trek
with WiFi on page 16.
5. Launch a web browser.
6. Enter www.routerlogin.net in the address field of the browser.
The Wireless as WAN screen displays, which shows the available WiFi
networks.
7. If a login screen displays, do the following:
a. Enter admin for your user name and password for your
password.
The BASIC Home screen displays.
12
b. Select Internet.
The Wireless as WAN screen displays, which shows the available
WiFi networks.
8. Select the Extend my current wireless router’s range check box.
9. Select a radio button next to a WiFi network you want to connect to.
10. From the Security list, select the WiFi network’s security option.
11. In the Password (Network Key) field, type the WiFi network’s
password.
12. To be able to use these settings again without having to reenter them,
select the To save a name for profile check box and in the field
provided, type a name for the profile.
Create a descriptive name for the profile to help you remember the
settings. For example, if you might use Extender Mode as the name
for your extender profile settings.
13. Click the Apply button.
It might take up to two minutes before the Trek connects to the WiFi
network.
14. Unplug the Trek and move it to a new location closer to the area with
a poor WiFi signal.
The location that you choose must be within the range of your
existing WiFi router network.
13
15. Connect your Trek to a power source and rotate the antenna.
For more information, see Set Up Your Trek on page 6
16. If your computer or WiFi device disconnects from the Trek, reconnect
your computer or WiFi device to the Trek.
Use the Trek in Router Mode
You can connect the Trek to a DSL or cable modem and use the Trek as a
router.
Internet
d
Wire Off
er
les
Pow Wire
DSL or
cable
er
Pow
NET
rnet
GEA
Inte
R
WiFi
USB
Trek
Modem
Ethernet cable
¾¾ To use the Trek in router mode:
1. Connect you Trek to a power source and rotate the antenna.
For more information, see Set Up Your Trek on page 6
2. Connect your DSL or cable modem to the Internet/LAN port on the
Trek with an Ethernet cable.
14
3. Set the Internet Mode switch to Wired.
4. Connect your computer or WiFi device to the Trek.
You can use an Ethernet cable or connect with WiFi:
• For a wired connection, use an Ethernet cable (not included) to
connect your computer to the LAN port on the Trek.
• To connect with WiFi, use the Trek’s network name (SSID) and
WiFi password, which are on the sticker near the Internet Mode
switch. For more information, see Connect Devices to Your Trek
with WiFi on page 16.
5. Launch a web browser.
6. Enter www.routerlogin.net in the address field of the browser.
NETGEAR genie displays.
7. If a login screen displays, do the following:
a. Enter admin for your user name and password for your
password.
The BASIC Home screen displays.
b. Select ADVANCED > Setup Wizard.
The Setup Wizard screen displays.
8. Follow the onscreen instructions.
NETGEAR genie guides you through connecting the Trek to the
Internet.
15
Connect Devices to Your Trek with WiFi
To use WiFi to connect your computer or WiFi device (such as a
smartphone or gaming device) to your Trek’s WiFi network, use the Trek’s
network name (SSID) and WiFi password on the sticker near the Internet
Mode switch.
Note:  You can also use WPS to connect WiFi devices to your Trek. For
more information, see the user manual. You can get the user manual
online at http://downloadcenter.netgear.com or through a link in the Trek’s
user interface. For more information about how to access the Trek’s user
interface, see View or Change the Trek’s Settings on page 17
¾¾ To connect devices to your Trek with WiFi:
1. Open the software utility that manages your WiFi connections on the
computer or WiFi device that you want to connect to your Trek.
This utility scans for all wireless networks in your area.
2. Find and select your Trek’s SSID.
The SSID is on the sticker near the Internet Mode switch.
3. Enter the Trek’s WiFi password (or your custom password if you
changed it) and click the Connect button.
The WiFi password is on the sticker near the Internet Mode switch.
4. Repeat Step 1 through Step 3 to add other computers or WiFi devices.
16
View or Change the Trek’s Settings
After you use genie to set up the Trek, you can log in to the Trek to view or
change its settings.
¾¾ To log in to the Trek:
1. Connect your computer or WiFi device to the Trek.
You can use an Ethernet cable or connect with WiFi:
• For a wired connection, use an Ethernet cable (not included) to
connect your computer to the LAN port on the Trek.
• To connect with WiFi, use the Trek’s network name (SSID) and
WiFi password, which are on the sticker near the Internet Mode
switch. For more information, see Connect Devices to Your Trek
with WiFi on page 16.
2. Launch a web browser.
3. Enter www.routerlogin.net in the address field of the browser.
A login screen displays.
4. Enter admin for your user name and password for your password.
The BASIC Home screen displays.
17
18
19
Technical Support
Thank you for purchasing this NETGEAR product.
After installing your device, locate the serial number on the label of your product and
use it to register your product at https://my.netgear.com.
You must register your product before you can use NETGEAR telephone support.
NETGEAR recommends registering your product through the NETGEAR website.
For product updates and web support, visit http://support.netgear.com.
NETGEAR recommends that you use only the official NETGEAR support resources.
You can get the user manual online at http://downloadcenter.netgear.com or through a
link in the product’s user interface.
Trademarks
NETGEAR, the NETGEAR logo, and Connect with Innovation are trademarks and/or registered
trademarks of NETGEAR, Inc. and/or its subsidiaries in the United States and/or other
countries. Information is subject to change without notice. © NETGEAR, Inc. All rights
reserved.
Compliance
For the current EU Declaration of Conformity, visit
http://support.netgear.com/app/answers/detail/a_id/11621/.
For regulatory compliance information, visit:
http://www.netgear.com/about/regulatory/.
See the regulatory compliance document before connecting the power supply.
NETGEAR, Inc.
350 East Plumeria Drive
San Jose, CA 95134, USA
August 2014