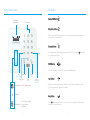
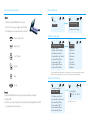
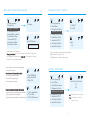
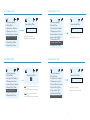
1
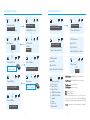
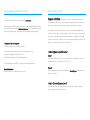
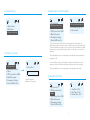
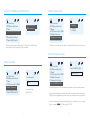
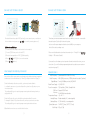
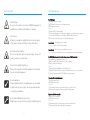
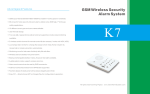
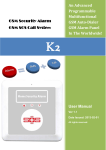
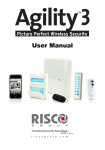
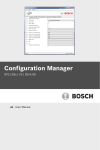
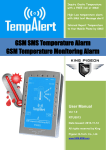
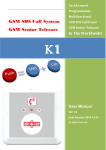
Advantages & Features
◇ 2G/3G mobile frequency enable K9 works great in worldwide.
GSM/3G Wireless
Security Alarm System
◇ 99 zones for security intrusion alarm, elderly care, SOS help, 7*24 hours safety,
door bell, on site alarm applications.
◇ 10 different zone types and zone name editable.
K9
◇ Multiple status optional: Stay, Away, Bypass, Schedule Arm/Disarm.
◇ User friendly menu with more than 12 languages selectable.
◇ Visible information on big LCD screen, easy setting and operation by touch keypad.
◇ Two way voice communications, regular phone call as hand set supported.
◇ 2 wireless switch channel for remote control & door access (*works with WS1,WS2).
◇ Just simply dial in to the K9, change the status to Arm / Stay / Disarm by missed call,
or create two way talk automatically.
◇ Monitoring zone for take care of elderly daily life activities.
◇ Temperature monitoring alarm.
◇ Wireless sensors battery low power alarm SMS.
1. Basic Setting
2. Edit Zones
3. Advance Settings
◇ Backup rechargeable battery inside, AC power lost alert available.
◇ Audible alarm inside, support wireless siren too.
◇ Ademco Contact ID protocol over GPRS/UMTS/HSDPA data supported.
◇ Fashion design of sleek panel with a classic elegant piano finish.
◇ Easy DIY--Smart phone APP for remote configuration & operation.
◇ Up to 999 alarm event logs and 99 operation logs for review.
All rights reserved King Pigeon. www.GsmAlarmSystem.com
How the system works for your family?
How the system works for your family?
Security Protection
Elderly Daily Life Care
Press
to arm the system when leaving home.
Press
to arm the system when at home.
System sends alert SMS text if no activities detected by the 5th zone's PIR/Door sensor
during the monitoring time period.
For example, install one wireless door sensor at your Dad's bed room, setting the
monitoring time period as 05:30~09:00 am, if he didn't get up (didn't open his door)
during that time, system sends alert SMS to the you says “Monitor Zone Alarm”---you
can edit this SMS text for sure.
You will receive SMS text only for this event, no calls or audible alarm.
7* 24 hours Home Safety Guard
When smoke, gas, CO or water flood detected, system makes audible alarm, send alert SMS
text and call to the alarm receivers/Call center/Firefighting or other CMS system.
Door Bell
Install and connect one door bell button to the system, setting the zone function as “10.
Door bell”, when someone push the button, system makes 6 bell sound.
SOS Alarm & Call
Press SOS button more than 3 seconds to make SOS Call.
System dial the 1st receiver number and then next numbers if no answering, totally
repeat twice, and SOS alert SMS send to receivers at same time for asking SOS help.
Temperature Monitoring
System sends alert SMS text to you when indoor temperature too hot or too cold.
Other Wireless SOS button or fall detectors optional.
Other Living Care
System sends alert SMS text to you when AC/DC power lost (default: more than 30
minutes) and recovery, and when the wireless sensor's battery low power(if have).
Make Phone Call
Dial phone number and then press Call button to start talk, when alert receiver’s
phone call in, you can press call button to answer and talk.
Remote Control
You can also press Call button to end the talk.
Connect with the alarm interlock relay, system will switch on/off your equipments automatically when alarm triggered.
Open the Door
Press 0 1 and Key button to open your door (*if you have installed the WS1
wireless switch on your electronic lock).
1
Call in to control
Connect with the WS2 wireless switch, you can remote switch on/off your equipments
by phone call.
2
Key Buttons
Control Panel Layout
Away Arm Button
LCD Display
Setting Menu
Touch Keypad
Stay Arm Button
All the sensors are Armed except the sensors in Inner zones which disarmed so that
users can move freely at home.
1. Basic Setting
2. Edit Zones
3. Advance Settings
Disarm Button
Press Disarm button and 4 digits password (default: 1234), and press
to disarm
the system after two beeps.
SOS Button
Press the SOS button more than 2 seconds to make SOS alarm.
Key
Back/Delete
Away Arm
Left
Stay Home
Up
Disarm
Right
SOS
Down
Alarm indicator-- Flash Red lights : alarm
Microphone
Menu
Enter/OK/
Call/End
Call Button
Dial phone number and then press Call button to start talk or answer phone call in.
You can also press the Call button to end talk.
Key Button
Green: Stay Home Arm
Arm indicator-- Red : Away Arm
Off: Disarm
3
Press
and Key button to open your door (*if you have installed the WS1 wireless
switch on your electronic lock).
4
Bottom View
Wiring Connections
Mount Socket
SIM Card Slot
Power Switch
Terminal cover
Speaker
Reset button
Alarm Interlock
Relay Output
Wired Zone 1/2
Tamper Switch Temperature Sensor
+
-
DIN1
DIN2
NC COM NO
Screw hole
Alarm Output
Mounting Bracket
Install the bracket on the wall by using screws, after wiring connection
and power on, plug the socket to the bracket tightly, make the tamper
switch close. When plug out the socket, tamper switch will make alarm.
1A 2B
IP Camera
Door sensor
5
6
Light
L N
100~240V AC
Easy Setting by Keypad
Basic Settings
Start:
◇ Put the mobile SIM Card to the slot.
1. View
2. Setup
1. Basic Setting
2. Edit Zones
3. Advance Settings
◇ Connect the power supply, Switch ON.
◇ On Setup mode, below buttons used for:
Select Language
Menu, Enter, OK
1. English
2. Espanol
3. Deutsch
4. Pyccknn
5. Italiano
6. Dansk
7. Cestina
8. Francais
9. Bahasa
1. Setup Language
2. Setup Time
3. Setup Alert Number
4. Temperature Alert
5. Armed Alert by Sound
6. Armed Delay Time
7. Armed Alert Tel 1
8. Alarm Sound Time
9. Alarm Delay Time
Back, Exit
Left, Delete
Right
If you changed menu language, you should reset the system and reboot again.
Caution: All settings and sensors are lost after reset except language.
Up
Setup Date & Time
Down
Reset:
◇ Open the SIM Card cover, press and hold the Reset button.
◇ Switch ON.
◇ After 5 seconds, release the Reset button, LCD display “Reset OK”,
system back to factory mode.
7
1. Setup Language
2. Setup Time
3. Setup Alert Number
4. Temperature Alert
5. Armed Alert by Sound
6. Armed Delay Time
7. Armed Alert Tel 1
8. Alarm Sound Time
9. Alarm Delay Time
Setup Time
06 -23-15 10: 33: 26
Month-Day-Year
8
Setup Alert Number (Alarm Receiver)
1. Setup Language
2. Setup Time
3. Setup Alert Number
4. Temperature Alert
5. Armed Alert by Sound
6. Armed Delay Time
7. Armed Alert Tel 1
8. Alarm Sound Time
9. Alarm Delay Time
Temperature Alarm Threshold
01. Empty
Input Tel Number
008613510150873
1. Total 9 Alert receiver numbers.
2. Country code issue : If you can't received the alert SMS or call, please
try to change the country code as 0086 , 86 or just remove the country
code on front of your phone number.
Receiver's phone number can be programming
1. Setup Language
2. Setup Time
3. Setup Alert Number
4. Temperature Alert
5. Armed Alert by Sound
6. Armed Delay Time
7. Armed Alert Tel 1
8. Alarm Sound Time
9. Alarm Delay Time
1. High:99
2. Low:99
High:
+99
99 means disable the temperature alarm function.
Up/Down button to adjust + and -.
Left/Right button to select number position.
Arm Sound Notification
to below major functions:
Function code 1 (alarm notify method) :
1. Send SMS&Call
2. Only Send SMS
3. Only Call
1. receive SMS and call when alarm.
2. receive SMS only when alarm.
3. receive call only when alarm.
Function code 2 (when this number call to system):
1. system changes status from Away Arm to Stay Arm.
1. Call to Armed/Stay
2. Call to Talk
3. system needs to press Call button to answer the call in. 3. Call to Wait Answer
2. system answers the call automatically.
9
1. Setup Language
2. Setup Time
3. Setup Alert Number
4. Temperature Alert
5. Armed Alert by Sound
6. Armed Delay Time
7. Armed Alert Tel 1
8. Alarm Sound Time
9. Alarm Delay Time
Armed Alert by Sound
No
Yes
No: Silent when Arm the system.
Yes: Short alarm sound when
Arm the system.
10
Arm Delay Time
Alarm Sound Time
1. Setup Language
2. Setup Time
3. Setup Alert Number
4. Temperature Alert
5. Armed Alert by Sound
6. Armed Delay Time
7. Armed Alert Tel 1
8. Alarm Sound Time
9. Alarm Delay Time
Armed Delay Time
30
Default: 30 seconds.
Optional: 0~99 seconds.
Alarm Sound Time
180
Default: 180 seconds.
Alarm Delay Time
Arm Notify SMS
1. Setup Language
2. Setup Time
3. Setup Alert Number
4. Temperature Alert
5. Armed Alert by Sound
6. Armed Delay Time
7. Armed Alert Tel 1
8. Alarm Sound Time
9. Alarm Delay Time
1. Setup Language
2. Setup Time
3. Setup Alert Number
4. Temperature Alert
5. Armed Alert by Sound
6. Armed Delay Time
7. Armed Alert Tel 1
8. Alarm Sound Time
9. Alarm Delay Time
Armed Alert Tel 1
No
Yes
No: The 1st receiver will not get
notify SMS when system Armed.
Yes: The 1st receiver will get
notify SMS when system Armed.
11
1. Setup Language
2. Setup Time
3. Setup Alert Number
4. Temperature Alert
5. Armed Alert by Sound
6. Armed Delay Time
7. Armed Alert Tel 1
8. Alarm Sound Time
9. Alarm Delay Time
Alarm Delay Time
20
Default: 20 seconds.
Optional: 0~999 seconds.
12
Add Remote Control
Edit Wired Zone 1 & 2
1.Basic Setting
2. Edit Zones
3. Advance Settings
1. Edit Remote
2. Edit Wired Zones
3. Edit RF Detector
1. Edit Remote
2. Edit Wired Zones
3. Edit RF Detector
1' SOS Button
Type: 24Hr Silent Zone
Name: SOS Help!
3' Wired Zone 1
Edit Remote
Add
Delete
1. Delete All
2. Used
3. Empty
Input: NO
2' Tamper Switch
Type:24Hr Sound Zone
Name: Tamper Switch
Type: Not Use
Name: Wired Zone 1 Alarm
4' Wired Zone 2
Turn On Device
Press OK Key
Input: NO
Wired Zone 1
NC
NO
Type: Not Use
Press a button on
remote control
Rec Code: 0B85BD
Name: Wired Zone 2 Alarm.
The 1st zone: the SOS button on the keypad.
Press OK Key
Repeat do
Rec Code: 0B85BD
Press a button on
remote control
Press OK Key
Operation OK
13
1. Entrance Zone
2. Outer Zone
3. Inner Zone
4. Onsite Zone
5. 24Hr Sound Zone
6. 24Hr Silent Zone
7. Armed
8. Stay
9. Not Use
10. Door Bell
The 2nd zone: the tamper switch on back side.
The 3rd zone: the Wired Zone 1.
th
The 4 zone: the Wired Zone 2.
NC: Normally Close
NO: Normally Open
If you setting the Wired Zone 1/2 as NC, then you
have to connect NC sensor on the DIN1/DIN2 port,
otherwise system will make alarm once switch ON.
1~10: Zone type see below explanation on page 16.
14
Zone Type Explanation
Add Wireless Sensors
Zone Type
1. Edit Remote
2. Edit Wired Zones
3. Edit RF Detector
1. Delete All
2. Used
3. Empty
Turn On Device
Edit RF Detector
Add
Delete
Trigger the sensor
1. Entrance
2. Outer
3. Inner
4. Onsite
Press OK Key
Repeat do
Rec Code: 0B85BD
Trigger the sensor
1. Entrance Zone
2. Outer Zone
3. Inner Zone
Zone type refer to next page.
1. Entrance Zone
2. Outer Zone
Operation OK
15
Used for
When you arm system: 30 seconds
delay enter to arm mode, so you
have time to leave home.
Main gate or lobby
When you back home: 20 seconds
delay alarm, so you have time to
disarm the system.
Stay Home Arm: Alarm
Away Arm: Alarm.
Intrusion protection
outside of the house
Stay Home Arm: No alarm.
Away Arm: Alarm.
Stay Home Arm: alarm sound only
Away Arm: alarm sound, alert SMS
and dial
Sensors
Door sensors,
PIR sensors
Door, PIR, Been,
Vibration, Glass
breakage sensors.
Intrusion protection
inside the house
CPIR, Door,
PIR sensors
Windows or rear
gate
Windows contact,
Curtain PIR
5. 24Hr Sound
Make alarm whenever Away,
Smoke fire, Gas,
Stay Home or Disarm. System
Water, CO leakage
sends alert SMS, dial and audible
detection
alarm sound at same time.
Smoke, Heat,
Gas, Water,
CO detectors
6. 24Hr Silent
Make alarm whenever Away,
Stay Home or Disarm. System
sends alert SMS and dial only,
no audible alarm sound.
Emergency help
SOS alarm
Fall detector,
Panic buttons
7. Armed
Shift to Away Arm mode.
Press to Arm the
system, no need
remote control.
Wireless buttons
8. Stay
Shift to Stay Home Arm mode.
Press to Stay Arm,
no need remote
control
Wireless buttons
9. Not Use
Disabled the sensor function.
Disabled the zone
10. Door bell
Make 6 door bell sounds.
Door bell
Press OK Key
Rec Code: 0B85BD
When sensor triggered,
the alarm system will
16
Door bell buttons
Unique Monitoring Zone (the 5th zone)
The special zone type for take care of elderly, FIXED in the 5th zone only.
System sends alert SMS to the 1st receiver if the sensor did not triggered during monitoring
time period, this function works on Stay Home Arm mode only, if you changed the system
to Away Arm or Disarm status, the monitoring function will be ignored automatically.
Bypass Zone Function
Bypass definition: A bypassed zone will not set off the alarm no matter how
often it is tripped. With this function, you can bypass an upstairs window so that you can
leave it open during the day without having to worry about it setting off your alarm.
For example, you want to be able to open and close a specific window during the night,
while your system is armed; You want to bypass a certain motion sensor so that a person
or pet can move through an area without creating an alarm event; While you are making
repairs or renovations to your home, a sensor may be temporarily displaced - and you still
want to use your system to protect the rest of the house.
The purpose of this Monitoring Zone:
Take care of elder people’s activities on daily life.
For example, install one wireless door sensor at your Dad’s bed room,
How to Bypass a specific zone?
setting the monitoring time period at 05:30~09:00,
Step 1
If he didn’t get up (didn’t open his door) during that time,
The monitoring alarm send SMS only, no alarm call or audible alarm sound.
Enter the two-digit number for the zone you want to bypass, single digit zones must be
preceded by a zero, for example, "03", "06", or "09", etc.
Step 2
Recommend sensors:
Wireless door sensors, Curtain PIR motion sensors.
Press the Disarm button, wait for the LCD display a "Zone xx Bypass" message, the zone
bypassed confirmed.
How to Cancel a Bypass zone?
Press the Arm or Stay Home Arm button to arm your system as usual and enter the
password, bypass zone function canceled.
17
18
Advance Settings
Remote Access Control Interlock
1. AC Loss Alert
2. RF Opener Interlock
3. Timer
4. CID Protocol Over GPRS
5. Modify Password
6. Transmitter Coding
7. Panel’s SIM Card No.
1.Basic Setting
2. Edit Zones
3. Advance Settings
1. Interlock Armed by call
2. Interlock Stay by call
3. Not Interlock
The system can open your electronic lock by pressing 01 and Key button, or
interlock with your phone call in (your phone number must on the alert numbers list).
1. Interlock Armed by call: when you call in, system reject and recall back to confirm
the arm success (you should reject the system’s recall), and open your door at
same time.
AC Power Lost Alarm
This setting will help you to open the garage or main gate when leaving home by a
single phone call.
2. Interlock Stay by call: you should call the system twice within 30 seconds, to
change the system to Stay Home Arm mode, and open your door at same time.
1. AC Loss Alert
2. RF Opener Interlock
3. Timer
4. CID Protocol Over GPRS
5. Modify Password
6. Transmitter Coding
7. Panel’s SIM Card No.
AC Loss Alert
This setting will help you to open the garage or main gate when back home.
30
Schedule Arm/Disarm
Default: 30 minutes.
Optional: 0~99 minutes.
1. AC Loss Alert
2. RF Opener Interlock
3. Timer
4. CID Protocol Over GPRS
5. Modify Password
6. Transmitter Coding
7. Panel’s SIM Card No.
19
1. Arm Time: 22:58
2. Stay Time: 99:99
3. Disarm Time: 01:01
20
Contact ID Protocol over GPRS/3G Data
1. AC Loss Alert
2. RF Opener Interlock
3. Timer
4. CID Protocol Over GPRS
5. Modify Password
6. Transmitter Coding
7. Panel’s SIM Card No.
Please Setup it by
SMS command
The alarm system supports CID protocol to CMS center over GPRS data
communication, please setting it by SMS commands.
Wireless Switch Code
1. AC Loss Alert
2. RF Opener Interlock
3. Timer
4. CID Protocol Over GPRS
5. Modify Password
6. Transmitter Coding
7. Panel’s SIM Card No.
1. Coding 1
2. Coding 2
3. Coding 3
3 wireless code on the system, coding 1 is the default for wireless siren (*optional).
Panel’s SIM Card Number
Modify Password
1. AC Loss Alert
2. RF Opener Interlock
3. Timer
4. CID Protocol Over GPRS
5. Modify Password
6. Transmitter Coding
7. Panel’s SIM Card No.
New Password:
9527
Password: 4 digits
Default: 1234
1. AC Loss Alert
2. RF Opener Interlock
3. Timer
4. CID Protocol Over GPRS
5. Modify Password
6. Transmitter Coding
7. Panel’s SIM Card No.
Panel’s SIM Card No.
00861351015
Enter the Alarm panel’s SIM Card number for gain date & time from mobile network.
Alarm system will get mobile operator's date & time according to the phone number,
LCD will correct and display the real date & time after few minutes when setting done.
If system can't get date & time automatically, please try to add or remove the country
code, for example, 0086 1351015 instead of 1351015.
21
22
Alarm Event Logs
Setting & Operation by SMS commands
1. View
2. Setup
1. Alarm Record
2. Operation Record
999 alarm event logs for review.
The alarm system cab be easily setting by Smart phone APP or SMS
commands with password protection remotely.
* The SMS commands should with password, 1234 is the default
password on below context, please change it to new password if you
had changed already.
* The command body AA, EE, etc. must be Caps Lock.
* No space and “(” or “)” on the SMS commands, the space on
command list just for reading purpose.
Function
3' 15-06-23 14:53:10
Entrance Alarm!
Operation Logs
1. Alarm Record
2. Operation Record
Arm
1234AA
Away Arm system without arm delay.
Disarm
1234BB
Disarm system.
Alarm sound ON 1234CC
Make audible alarm on
Alarm sound OFF 1234DD
Make audible alarm off
Inquiry status
K9 sends back the current status:
AC/DC power status
GSM Value: xx (01~31, less than 17
means mobile signal weak.)
Arm/Disarm status
IMEI code: xxx
1234EE
1' 15-06-23 15:04:10
Disarmed by Keypad
99 operation event logs for review.
23
Description & Example
SMS Commands
Modify password 1234P new password
1234P6666
1234 position(1~9) A
function code 1(1~3)
Add alert number
#function code 2(1~3)
(alarm receiver)
#phone number#
12343A1#2#00861351015#
Function code 1/2 refer to page 9.
Inquiry alert
number
1234A#
Delete alert
number
1234position(1~9)A #
12343A#
24
Setting & Operation by SMS commands
Wired zone 1
sensor type
123403 zone type
(NC or NO)#
123403NC# to set wired zone 1 sensor
as NC connection.
Wired zone
2 sensor type
123404 zone type
(NC or NO)#
123404NO# to set wired zone 1 sensor
as NO connection.
Edit zone
alert content
1234B zone number#
alert SMS content#
1234B05#Dad did not got up yet!#
Alert SMS content: Max. 40 characters,
can’t be empty.
Inquiry zone
alert content
1234Bzone number#
1234B06#
Modify zone
function
1234D zone number
(01~99)#function
code(0~9)#
1234D06#1#
The 5th zone can’t change zone function.
One SMS setting more zones available,
e.g.: 1234D06#1#07#2#
Alarm sound
time
1234E sound time
(001~999)#
1234E120#
Unit: second, Default is 180 seconds.
Alarm delay
time
1234F alarm delay
time (000~999)#
Arm delay
time
Setting & Operation by SMS commands
AC power
lost alarm
1234M time(00~99)#
1234M10#
Default: 30 minutes, when AC/DC power
lost more than 30 minutes, system sends
SMS to the alarm receivers.
Monitoring
time
1234Q start (hh:mm)#
end(hh:mm)#
1234Q05:30#09:00#
Monitoring time period from 05:30 am to
09:00 am, for the Zone number 5 only.
Wireless
Access
Control time
1234GT time
(000~999)
1234GT030
Default: 1 second.
To set the Wireless access control time,
when press 01 and Key button, how long
the wireless signal keep sending to the
wireless switch to open the door(or other
devices).
1234F030#
Default: 20 seconds
Alarm interlock
relay working
time
1234RT time
(000~999)
1234G arm delay
time (00~99)
1234G15#
Default: 30 seconds
Tips: When using remote control to Arm
the system, press then Arm(A) button
and then press the SOS(D) button
immediately, K9 system will enter to
Arm status without any delay.
Reboot
remotely
1234RESTART
Arm notify
SMS
1234H#
System sends “Arm by xxx”,“Disarm
by xxx” to the 1st receiver when Armed/
Disarmed by SMS command.
Arm notify
SMS disable
1234J#
No SMS notification when system Armed/
Disarmed by SMS commands.
Monitor on
site voice
1234K#
System calls back for on site voice
monitoring
25
1234RT030
Default: 1 second.
To set the alarm interlock relay closure
time, how long the relay keep close after
alarm occurrence.
To reboot the alarm system by SMS.
26
SMS Content list
GPRS Data Function (for engineer only)
Event
For engineer and remote server system only.
Please ignore this part if the total quantity of the alarm system deployed less than 200pcs.
1234 APN apn name ;
user name ; password #
Data Function
Setup
Contact ID server 1234 IP IP address ;
IP and Port
port number#
1234APNeverywhere;
eesecure;secure#
1234IP175.164.49.20;4005#
SMS Content
Remarks
AC/DC power lost
AC Power Goes off
AC/DC power recovery
AC Power Goes on
Remote Control SOS
Remote Key SOS Help!
SOS button on remote control pressed.
Zone #1 alarm
SOS Help!
SOS button on panel pressed.
Zone #2 alarm
Tamper Switch Alarm
Tamper switch on the back side triggered.
Zone #3 alarm
Wired Zone 3 Alarm!
Wired zone 1 sensor triggered.
Zone #4 alarm
Wired Zone 4 Alarm!
Wired zone 2 sensor triggered.
Wireless zone #5 alarm
Monitor Zone Alarm!
For monitoring zone only.
Wireless zone #6 alarm
Entrance Alarm!
Wireless zone #7 alarm
Zone 7 Alarm!
Wireless zone #8 alarm
Zone 8 Alarm!
Wireless zone #9 alarm
Zone 9 Alarm!
Default: AC Power Goes off 30minutes
Wireless zone #10 alarm Zone 10 Alarm!
Alarm Process
Alert SMS
Wireless zone #11 alarm Zone 11 Spot Alarm!
GPRS data to CID Server system
Alarm dial out
GPRS/UMTS data upload to server system depends on the alarm events(trigger)
automatically, data connection off line when data send complete.
The alarm system can't receive data from server.
GPRS/UMTS data following the Contact ID (SIA DC-9) protocol.
Wireless zone #12 alarm Smoke Detector Alarm!
For SM-100 or other smoke detector (*optional)
Wireless zone #13 alarm Water Leakage Alarm!
For WL-100 (*optional)
Wireless zone #14 alarm Gas Leakage Alarm!
For GL-100/GL-100A (*optional)
Wireless zone #15 alarm Panic Help Alarm!
For EM-60/EM-100 (*optional)
Wireless zone #16 alarm Emergency Silent Alarm! For EM-70/EM-90 (*optional)
Wireless zone #16 alarm Zone 16 Alarm!
Wireless zone #17 alarm Zone 17 Alarm!
…
…
Wireless zone #99 alarm Zone 99 Alarm!
Wireless sensor’s battery
low power alert
27
Zone xx low voltage alert!
28
Works for the sensors with low
batter alarm functions only.
Connect with Wireless Siren
Connect with Wireless Switch
1. Coding 1
2. Coding 2
3. Coding 3
1. Coding 1
2. Coding 2
3. Coding 3
Works with the wireless switch WS1 (optional), you can remote open your electronic
The alarm system inbuilt audible alarm function, in addition, you can also connect with
lock or other devices by pressing
the wireless siren (*optional) for the whole system.
or control by incoming phone call.
Just connect the power adapter of wireless siren is OK, then you can press
for test if the siren is working or not.
Add wireless switch steps:
1. Connect WS1 relay output to the electronic lock as a switch.
2. Connect 12VDC from your lock to the WS1.
Please note that the wireless siren function works only on “Coding 1" on “Advanced
3. Press the learning button on WS1, LED flash quickly.
Setting”-- “RF Interlock Switch”.
4. Press
, WS1 LED off, connection created.
5. Press
for test.
If you want to use the alarm system to operate other device but not the siren, you can
select code 2 or code 3 and then programming the wireless switch as same as above
mentioned on page 31.
How to open the door by phone call
You can also call in to open your door or other devices by interlock settings(your phone
number must on the alert numbers list, Caller-ID), setting method refer to page 20.
Specifications
GSM Frequency
Radio Frequency
Digital Output
1. Interlock Armed by call: when you call in, system reject and recall back
to confirm the arm success (you should reject the system’s recall), and open your
door at same time.
This setting will help you to open the garage or main gate when leaving home by a
single phone call.
Rated Power Supply
Power Consumption
SIM Card
Antenna
Temperature Range
2. Interlock Stay by call: you should call the system twice within 30 seconds
to change the status to Stay Home Arm mode, and open your door at same time.
This setting will help you to open the garage or main gate when back home.
3. Disabled the remote access control interlock function.
29
Quad-band 850/900/1800/1900 MHz
433.92MHz for sensors, 315MHz for wireless switch (*optional)
1 relay, NC/NO dry contacts,3A/240VAC
9~24V DC/1A
12V input Max. 270mA, Standby 30mA
Support 3V SIM Card
50 Ω SMA Antenna interface
-20~+60 °C
Humidity Range
Relative humidity 90% (condensing free)
Backup Battery
3.7V/900mAH Li-ion rechargeable
Exterior Dimension
Net Weight
18.8*13.1*2.8 cm (7.4*5.1*1.1 inch)
320 g (0.7 lb)
30
Trouble Shooting
Specifications
Safe Startup
Do not use the alarm system when GSM/3G equipment is
prohibited or might bring disturbance or danger.
Interference
All wireless equipment might interfere network signals
No GSM signal
1)Backup battery low voltage.
2)GSM Module connection loose in transportation.
3)GSM Signal is too weak.
Solution
1)Plug the AC/DC Power adapter.
2)Please take the panel to a mobile phone repair store, and then ask the engineer
to check the GSM Module socket and the GSM Module connection.
3)Please change another location to install the alarm panel.
of the alarm system and influence its performance.
Auto Restart– Backup battery low voltage.
Solution – Plug the AC/DC Power adapter.
Avoid Use at Gas Station
False Alarm – PIR Motion sensor installation incorrect.
Solution -- Please install the PIR sensor according to the user manual carefully.
Do not use the alarm system at a gas station. Power off
it when near fuels or chemicals.
Power it off near Blasting Places
Please follow relevant restrictive regulations. Avoid using
the device in blasting places.
Reasonable Use
Please install the product at suitable places as described
in the product documentation. Avoid signal shielded by
covering the mainframe.
Use Qualified Maintenance Service
Maintenance can be carried out only by qualified person.
31
No SMS/Call when alarm,No action when you send SMS command
1)GSM Operator communication protocol.
2)Didn’t setup SMS Alert/Call receiver’s phone umbers.
3)Caps Lock letters in the SMS.
Solution
1)Change another GSM Operator SIM Card for test.
2)Setting SMS Alert/Call receiver’s phone umbers correctly, e.g.: country code.
3)Check the commands with CAPS LOCK and correct format.
Can not call in to the alarm panel
1)Country code incorrect.
2)GSM Signal too weak.
Solutions
1)Check and ensure the country code format, e.g.: 0086 or +86.
2)Please put the alarm panel in strong signal coverage area.
Big noise while two way talk
1)Near-Cross interference.
2)GSM Signal too weak.
Solutions
1)Please make sure the other phone is far away from the panel.
2)Please put the panel in strong signal coverage area.
32