1
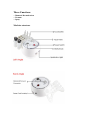
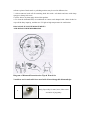
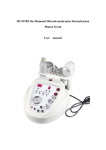
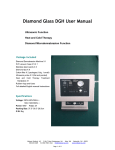
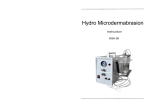
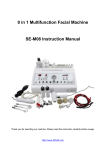
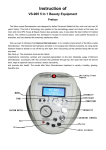
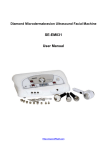
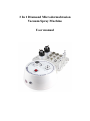
3 In 1 Diamond Microdermabrasion
Vacuum Spray Machine
User manual
Three Functions
-- Diamond Dermabrasion
-- Vacuum
-- Spray
Machine structure
Package include
Diamond Dermabrasion Machine Mode number 108 x1
PVC vacuum hose 6*4 x1
Aluminum wands x3
Diamond tips x9
Cotton filter x2 pack
Connector, tube rings & fuses
Spray bottles x2
Specifications
Voltage: 110V-240V
Power: 22W
Packing Size: 30x26x24
G.W: 2.2kg
Diamond Microderbrasion
Function
The Diamond Microdermabrasion provided a non-surgical skin refinish procedure, by
using sterile diamond heads to abrade or rub off the top skin layer, then Vacuuming
out the particles along with any dirt and dead skin back up. This procedure removes
skin debris, imperfection, blemishes, wrinkles and unwanted Micordermabrashion,
accompany with skin products that penetrate through top skin layer that reach the
dermis level, helps to replenish natural nutrients, restore cell activity, and promote
skin health. The results after Diamond Microdermabrasion treatment is usually a
healthy, glowing, beautiful skin.
Accessories
PVC hose
Rubber rings
& Fuses
Big cotton
filter
Small cotton
filter
Preparation before treatment
1. A consultation included the examination of the skin, a plan for treatment.
2. Operation should wear vinyl gloves and a facemask.
3. On oily or acne skin, a steamer may be used prior to the cleanser.
Color Box
4. Cleansing the skin with cleaning gel or water, then wipe off with cotton pad. Allow the skin
to dry.
Operation instruction
1. Connect all accessories to the machine.
⑴Unscrew the vacuum connector, make sure a big cotton filter is in the center & a large
black ring is around connection head.
⑵Screw down the connector after check. Then attach the PVC hose to the connector.
⑶Place the other end of PVC hose in the end of wand.
⑷Place a small cotton filter on the head of wand.(a small black ring is around the head)
⑸Screw the diamond tip into the wand.
2. Put the plug into the power socket and turn in the power button. Turn the intensity knob to
left side.
3. Adjust the vacuum intensity slowly from minimum to maximum, the vacuum meter will
show the date of pressure. For commonly use, do not set the intensity to maximum unless
necessary.
Recommended Vacuum intensity in treatment area
Treatment area
Normal skin (in Hg)
Sensitive skin(in Hg)
Face
12-22
8-12
Forehead
12-22
10-12
Chest
15-20
15-18
Nose
10-15
10-14
Neck
18-18
10-15
Near Eye Area
8-12
8-10
Treatment
Frequency
Total Visits
Face Peeling
6-10
3-5
Fine Lines
7-13
6-8
Neck
12-14
3-5
Acne Scar
7-12
8-10
Hyperpigmentation
7-12
8-10
4. treatment schedule table
5. Place the diamond had on skin surface(start from forehead), proceed with a slow sliding
motion. Do not leave the diamond tip at on spot for too long, doing so will cause harm to
skin.
6. Gently stetch the skin with thumb and finger and glide the hand-piece 2 to 3 times over the
area being treated. Then cross again in different directions to prevent streaking lines as in the
reference picture. Brush stock or polishing motions may be used in different sites.
7. After treatment, brush off all remaining dead skin with a soft brush and rinse with damp
sponges or damp cool towel.
8. Allow skin to dry then apply desired skin product.
9. To clean the diamond head, use toothbrush or cotton swab damped with a little alcohol to
wipe off the dirty impurity, and then use UV light or high temperature for sterilization.
DIAGAM OF SUGGESTED MOVEMENTS
AND AREAS FOR DERMABRASION
Diagram of Diamond Dermabrasion Tips & Wands Set
2 stainless steel wands which are used with 9 interchangeable diamond tips.
1
Body, Especially for acne, knee, elbow areas
and striae of pregnancy.
2
Face. For the large blemishes.
3
For Scars, fine lines and imperfections.
4
Used on the eyes and both sides of nose. For
wrinkles, oil tablets, blackheads and acne.
5
After the D tips peeling procedure, use this
smooth tip to vacuum/clear away the dead
abraded skin.
1. Clean diamond tips with alcohol, then sterilize them with UV light or high temperature.
2. Replace the big cotton filter inside the vacuum connector after every five to six treatment.
3. Replace the small cotton filter on the wand head after every treatment.
Safety Warming
Never operate this equipment on a person that suffer form the following:
A. Heart disease
B. Sensitive skin
C. Damaged skin
D. Inflamed skin
E. Inflected skin
Do not use on the following areas:
1. Sensitive skin
2. Skin rash
3. Damaged, inflamed, or infected skin
4. Surgical scar that is less than 12 months old
5. Swollen skin
6. The probes should not point directly towards the eyeball
7. Do not use on the genitals
Vacuum/Spray Function
Function
The vacuum function is used to clean the dirt in the pores through suctioning tubes. It can also
increase blood circulation of the skin. It helps improving the skin elasticity and can decrease
discoloration from acne and scars.
Spray function is ideal for spraying lotion, scented water or essential oils. It can clean, purify,
smooth, and stimulate the skin.
Accessories
Spray Bottles x 2
(For spray)
Glass ventouse x 3
(For vacuum)
Hoses
(For spray)
Operation Instruction
Do not connect the hose of spray bottle to vacuum socket, otherwise the toner will be sucked
into pump and shorten the life of machine. Do not operate vacuum and spray at the same time.
Vacuum function
1. Attach the hose to the vacuum connector(OUPUT), connect the other end with glass
ventouse.
2. Adjust the vacuum intensity knob for the suction you want.
3. Use your finger to press the pore in glass ventouse, suction force comes up.
Notice:
1. Glass ventouse is shaped three kinds, different areas different shaped glass ventouse is
adopted.
2. When suck black spot, you should better put cotton film in glass ventouse to avoid dirt
damaging main machine.
3. Do not use it on face too long, otherwise face would be gored.
4. Glass ventouse should be clean and dry.
Spray Function
1. Attach the red hose to the spray connector, connector the other end with spray bottle.
2. Use finger to press top of bottle, toner is atomized.
3. Spray down from customer's forehead. Let customer close eyes and mouth avoiding liquid
into, at the same time do not let liquid flow into customer's nose. Please keep bottle from face
in proper distance.
4. Spaying mouth should be clear, do not spray toner with impurity or deposition.
5. After using, please turn off power supply.