1
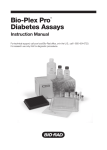
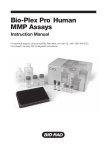
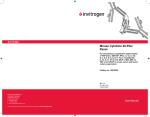
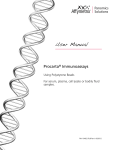
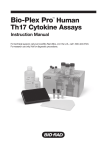
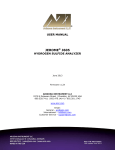
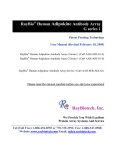
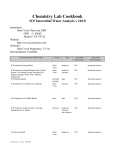
Bio-Plex Pro Cytokine,
Chemokine, and Growth
Factor Assays
™
Instruction Manual
For technical support, call your local Bio-Rad office, or in the U.S., call 1-800-424-6723.
For research use only. Not for diagnostic procedures.
Table of Contents
Introduction1
Principle2
Kit Contents and Storage
4
Recommended Materials
5
Assay Workflow
6
Important Considerations
7
Detailed Instructions
1. Plan Plate Layout
8
2. Prepare Instrument
9
3. Prepare Wash Method
10
4. Prepare Standards
11
5. Prepare Samples
16
6. Prepare Coupled Beads
19
7. Run Assay
22
8. Read Plate
28
Troubleshooting Guide
35
Plate Layout Template
40
Calculation Worksheet
41
Safety Considerations
45
Legal Notices
45
Ordering Information
46
Introduction
Cytokines, chemokines, and growth factors are a diverse group of cell
signaling proteins expressed and secreted by virtually all cell types,
including cells of endothelial, epithelial, and immune origin. These proteins
interact with specific receptors on target cells to mediate important
physiological responses such as growth, immunity, inflammation,
and hematopoiesis. Dysregulation of expression is associated with
pathological conditions ranging from cancer and diabetes to infection and
autoimmune disease.
Bio-Plex Pro™ assays enable researchers to quantify multiple protein
biomarkers in a single well of a 96-well plate in 3–4 hours. These robust
immunoassays require as little as 12.5 μl serum or plasma or 50 μl cell
culture supernatant or other biological fluid. The use of magnetic (MagPlex)
beads allows researchers to automate wash steps on a Bio-Plex Pro (or
similar) wash station. Magnetic separation offers greater convenience and
reproducibility compared to vacuum filtration.
For more information please visit www.bio-rad.com/bio-plex.
1
Principle
Technology
The Bio-Plex® multiplex system is built upon the three core elements of
xMAP technology:
n
n
n
Fluorescently dyed microspheres (also called beads), each with a distinct
color code or spectral address to permit discrimination of individual
tests within a multiplex suspension. This allows simultaneous detection
of up to 500 different types of molecules in a single well of the 96-well
microplate on the Bio-Plex® 3D system, up to 100 different types of
molecules on the Bio-Plex® 200 system, and up to 50 different types
of molecules on the Bio-Plex® MAGPIX™ system
On the Bio-Plex 200 and Bio-Plex 3D systems, a dedicated flow
cytometer with two lasers and associated optics to measure the
different molecules bound to the surface of the beads. In the
Bio-Plex MAGPIX, the entire sample load volume is injected into a
chamber where the beads are imaged using LED and CCD technology
A high-speed digital signal processor that efficiently manages the
fluorescence data
Assay Format
Bio-Plex Pro™ assays are essentially immunoassays formatted on
magnetic beads. The assay principle is similar to that of a sandwich ELISA
(Figure 1). Capture antibodies directed against the desired biomarker are
covalently coupled to the beads. Coupled beads react with the sample
containing the biomarker of interest. After a series of washes to remove
unbound protein, a biotinylated detection antibody is added to create
a sandwich complex. The final detection complex is formed with the
addition of streptavidin-phycoerythrin (SA-PE) conjugate. Phycoerythrin
serves as a fluorescent indicator or reporter.
2
Biomarker
of Interest
Streptavidin
Magnetic Bead
Capture
Antibody
Biotinylated
Detection
Antibody
Phycoerythrin
Fluorescent
Reporter
Fig. 1. Bio-Plex sandwich immunoassay.
Data Acquisition and Analysis
Data from the reactions are acquired using a Bio-Plex system or similar
Luminex-based reader. When a multiplex assay suspension is drawn into
the Bio-Plex 200 reader, for example, a red (635 nm) laser illuminates the
fluorescent dyes within each bead to provide bead classification and thus
assay identification. At the same time, a green (532 nm) laser excites PE
to generate a reporter signal, which is detected by a photomultiplier tube
(PMT). A high-speed digital processor manages data output, and
Bio-Plex Manager™ software presents data as median fluorescence
intensity (MFI) as well as concentration (pg/ml). The concentration of
analyte bound to each bead is proportional to the MFI of reporter signal.
Using Bio-Plex Data Pro™ software, data from multiple instrument runs
can be combined into a single project for easy data management, quick
visualization of results, and simple statistical analysis.
3
Kit Contents and Storage
Reagents Supplied
Bio-Plex Pro™ cytokine assays are offered in a convenient kit format that
includes assay, reagent, and diluent components in a single box (Table 1).
Table 1. Contents of Bio-Plex Pro cytokine, chemokine, and growth factor assays.*
1 x 96-Well
10 x 96-Well
Component
Format
Format
Standard diluent*
10 ml
Sample diluent*
40 ml
80 ml
Assay buffer
50 ml
500 ml
Wash buffer
200 ml
1.5 L
5 ml
50 ml
Detection antibody diluent
100 ml
Streptavidin-PE (100x)
1 tube
1 tube
Filter plate and/or flat bottom plate (96-well)
1 plate
10 plates
1 pack of 4
10 packs of 4
1 booklet
1 booklet
1 vial
10 vials
Sealing tape
Assay Quick Guide
Standard
Human and Mouse Cytokine (Group I and II)
Coupled magnetic beads (10x)
1 tube
1 tube
Detection antibodies (10x)
1 tube
1 tube
Mouse Cytokine (Group III) and Rat Cytokine (Group I)
Coupled magnetic beads (20x)
1 tube
1 tube
Detection antibodies (20x)
1 tube
1 tube
* Bio-Plex Pro high dilution reagent kit, 1 x 96-well, contains 70 ml serum-based diluent in lieu of
standard diluent and sample diluent.
Storage and Stability
Kit contents should be stored at 4°C and never frozen. Coupled magnetic
beads and streptavidin-PE should be stored in the dark. All components
are guaranteed for a minimum of six months from the date of purchase
when stored as specified.
4
Table 2. Recommended materials.
Item
Ordering Information
Bio-Plex Pro Assays Quick Guide 4
Bulletin #10024985 (download
at www.bio-rad.com/bio-plex)
Bio-Plex® 200 system or Luminex system with HTF
Bio-Rad catalog #171-000205
Bio-Plex validation kit
Bio-Rad catalog #171-203001
Run the validation kit monthly to ensure optimal performance
of fluidics and optics systems
Bio-Plex calibration kit
Run the calibration kit daily to standardize
fluorescence signal
Bio-Rad catalog #171-203060
Bio-Plex Pro wash station
For use with magnetic bead-based assays only
Bio-Rad catalog #300-34376
Bio-Plex Pro II wash station
For use with both polystyrene (nonmagnetic) and magnetic
bead-based assays
Bio-Rad catalog #300-34377
Bio-Plex handheld magnetic washer
For use with magnetic bead–based assays only
Bio-Rad catalog #170-20100
Bio-Plex Pro flat bottom plates (40 x 96-well)
For magnetic separation on the Bio-Plex Pro wash station
Bio-Rad catalog #171-025001
Microtiter plate shaker
IKA MTS 2/4 shaker for 2 or 4 microplates
or
Barnstead/Lab-Line Model 4625 plate
shaker (or equivalent capable of 300–1,100 rpm)
IKA catalog #320-8000
VWR catalog #57019-600
Bio-Rad® Aurum™ vacuum manifold
For vacuum filtration
Bio-Rad catalog #732-6470
BR-2000 vortexer
Bio-Rad catalog #166-0610
Reagent reservoirs, 25 ml
For capture beads and detection antibodies
VistaLab catalog #3054-1002
or
VistaLab catalog #3054-1004
Reagent reservoir, 50 ml (for reagents and buffers)
VistaLab catalog #3054-1006
Pall Life Science Acrodisc: 25 mm PF syringe filter
(0.8/0.2 µm Supor membrane)
Pall Life Sciences
catalog #4187
Filter plate, 1 x 96-well, with clear plastic lid and tray
Bio-Rad catalog #171-304502
Titertube micro test tube
Bio-Rad catalog #223-9390
®
Other: 15 ml polypropylene tubes for reagent dilutions, calibrated pipets, pipet tips, sterile
distilled water, aluminum foil, absorbent paper towels,1.5 or 2 ml microcentrifuge tubes, and
standard flat bottom microplate (for calibrating vacuum manifold).
5
Assay Workflow
Prewet wells
(for filter plate only)
Add 50 μl 1x beads to wells
Wash 2 x 100 μl
Add 50 μl standards, blank, samples,
incubate at RT with shaking at 850 rpm
(incubation time varies by assay)
Wash 3 x 100 μl
Add 25 μl 1x detection antibody, incubate
30 min at RT with shaking at 850 rpm
Wash 3 x 100 μl
Add 50 μl 1x streptavidin-PE, incubate
10 min at RT with shaking at 850 rpm
Wash 3 x 100 μl
Resuspend in 125 μl assay buffer,
shake at 850 rpm for 30 sec
Read plate on Bio-Plex system
6
Important Considerations
Instruments and Software
The cytokine assays described in this manual are compatible with all
currently available Luminex-based life science research instruments.
Assays can be read and analyzed with either Bio-Plex Manager™ software
or Luminex xPonent software.
Assay Procedures
Pay close attention to vortexing, shaking, and incubation times and to
Bio-Plex® reader PMT (RP1) setting, as these have been optimized
specifically for each assay panel.
Assay Quick Guide
Each assay kit includes a printed Bio-Plex Pro™ Assay Quick Guide (bulletin
#10024985), which can be used to prepare and run a full 1 x 96-well assay
plate. Users can also download a copy at www.bio-rad.com/bio-plex.
Bead Regions
Bead regions for all analytes are listed in the Read Plate section.
Multiplexing Compatibility
For human and mouse, the maximum number of singleplex diabetes
and cytokine analytes that may be mixed is limited by the 10x cytokine
antibody stock concentrations as shown in the table below.
Table 3. Maximum number of singleplex cytokine and diabetes analytes that may
be multiplexed.
Human, mouse, and rat diabetes 0
Mouse cytokine (group III) analytes (20x)
2
4
6
8
10
Human and mouse cytokine (groups I, II)
10 analytes (10x) 9
8
7
6
5
7
1. Plan Plate Layout
Prior to running the assay, determine the total number of wells in the
experiment using the Plate Layout Template on page 40 or the Plate
Formatting tab in Bio-Plex Manager™. A suggested plate layout is shown
in Figure 2, with all conditions in duplicate.
1. Assign standards to columns 1 and 2, with the highest
concentration in row A and the lowest concentration in row H.
2.Assign the blank to wells A3 and A4. The blank should consist of your
chosen standard diluent. Note that Bio-Plex Manager automatically
subtracts the blank (B) MFI value from all other assay wells.
3.User-defined controls are assigned to wells in columns 3 and 4.
4. The remainder of the plate is available for samples.
5. Once the total number of wells is known, you can calculate the
required volumes of beads, detection antibody, and streptavidin-PE.
Use Tables 10–14, 18–22, and 23, respectively, or the Calculation
Worksheet on page 41.
Legend
S
Standard
B
Blank
X
Samples
C
Controls
Fig. 2. Suggested plate layout. For detailed instructions on plate formatting in Bio-Plex Manager, see section 8.
8
2. Prepare Instrument
Start up and calibrate the Bio-Plex® 100/200 or similar system with
Bio-Plex Manager™ software prior to setting up the assay. The calibration kit
should be run daily or before each use of the instrument to standardize the
fluorescent signal. To prepare either a Bio-Plex 3D or Bio-Plex® MAGPIX™
reader, consult its respective user manual.
The validation kit should be run monthly to ensure performance of fluidics
and optics systems. Refer to either the software manual or online Help for
directions on how to conduct validation.
Start Up System (Bio-Plex 100, 200, or Similar)
1.Empty the waste bottle and fill the sheath fluid bottle before starting
if high throughput fluidics (HTF) are not present. This will prevent
fluidic system backup and potential data loss.
2. Turn on the reader, XY platform, and HTF (if included). Allow the
system to warm up for 30 min (if not already done).
3.
Select Start up
and follow the instructions. If the system is idle
for 4 hr without acquiring data, the lasers will automatically turn off. To reset the 4-hr countdown, select Warm up
and wait for the lasers/ optics to reach operational temperature.
Calibrate System
1.
Select Calibrate
and confirm that the default values for CAL1 and CAL2 are the same as the values printed on the bottle of
Bio-Plex calibration beads. Use the Bio-Plex system low RP1
target value even if assays will be run at high RP1.
2. Select OK and follow the software prompts for step-by-step
instructions for CAL1 and CAL2 calibration.
Note: In Bio-Plex Manager version 6.1 and higher, startup, warm up,
and calibration can be performed together by selecting the “Start up and
calibrate” icon.
9
3. Prepare Wash Method
Bio-Plex Pro™ assays are compatible with both magnetic separation and
vacuum filtration methods. However, for best results, we recommend
performing the assays in a flat bottom plate with magnetic separation.
Table 4. Summary of compatible wash stations and plate types.
Wash Method
Wash Station
Assay Plate
Magnetic separation
Bio-Plex Pro Bio-Plex Pro II (use MAG programs)
Bio-Plex ® handheld magnetic washer
Flat bottom plate
Vacuum filtration
Bio-Plex Pro II (use VAC programs)
Vacuum manifold (manual)
Filter plate
Setting up the Bio-Plex Pro or Bio-Plex Pro II
Wash Station
The wash station does not require calibration; however, it should be primed
before use. For more information, refer to the Bio-Plex Pro and Pro II wash
station quick guide (bulletin #5826).
1.Install the appropriate plate carrier on the wash station.
2. Use the prime procedure to prime channel 1 with wash buffer.
Setting Up the Bio-Plex Handheld Magnetic Washer
Place an empty flat bottom plate on the magnetic washer by sliding
it under the retaining clips. Push the clips inward to secure the plate.
Make sure the plate is held securely. If needed, the clips can be adjusted
for height and tension. For detailed instructions, refer to the user guide
(bulletin #10023087).
Setting up a Vacuum Manifold
Calibrate the vacuum manifold by placing a standard 96-well flat bottom
plate on the unit and adjusting the pressure to –1 to –3" Hg. In general,
100 µl liquid should take 3–4 sec to clear the well. For more detailed
instructions, refer to bulletin #10005042.
10
4. Prepare Standards
General Instructions
n
n
n
It is essential to reconstitute and dilute standards exactly as
described in this section. Incorrect preparation may lead to low signal,
high background, or inconsistent measurements from plate to plate
The peel-off label provided with the standards lists the concentration
of the most concentrated dilution point, S1. Enter this information into
Bio-Plex Manager™ software as instructed in Section 8
For users who wish to mix assays from different panels, such as
diabetes assays with group I cytokines, guidance is provided here for
mixing 2 different lyophilized standards. Bead regions were chosen to
avoid overlap whenever possible. However, performance of multiplexes
containing assays from different groups have not been extensively
validated. Therefore, users must confirm that the assay performance is
still fit for purpose
Selecting a Diluent for Standards
Refer to Table 5 for recommended diluents based on different sample types.
As a general rule, reconstitute and dilute standards in a diluent similar to
the final sample type or sample matrix.
Table 5. Summary of recommended diluents for standards.
Sample Type
Diluent for Standards Add BSA
Serum and plasma
Culture media, with serum
Culture media, serum-free
Lavage, sputum, other fluids
Lysate
Standard diluent
Culture media
Culture media
Bio-Plex® sample diluent
Bio-Plex sample diluent
None
None
To 0.5% final
To 0.5% final*
To 0.5% final*
* At least 0.5% final w/v BSA is recommended to stabilize analytes and reduce absorption
to labware.
11
RP1 (PMT) Setting for Standard Curves
The Bio-Plex 200 and 3D systems have two RP1 (PMT or photomultiplier
tube) setting options, while the Bio-Plex® MAGPIX™ has no PMT and
therefore no PMT setting options. Instead, MAGPIX uses default instrument
settings similar to low PMT on the Bio-Plex 200 (Table 6).
Table 6. Overview of PMT setting options on Bio-Plex systems.
Instrument
RP1 (PMT)
Bio-Plex 100, 200*
Low, high
Bio-Plex 3D*
Standard, enhanced
Bio-Plex MAGPIX*
N/A, use default instrument settings
* Or similar Luminex-based system.
The Bio-Plex Pro™ human and mouse cytokine assays were developed
on the low PMT setting using the Bio-Plex 200 system, while the rat
cytokine assays were developed on the high PMT setting. Protocols using
alternative standard dilution series or different PMT settings should be
validated by the end user, for example when mixing the cytokine assays
with diabetes assays (Table 7 and Table 24).
Table 7. Settings for optimal sensitivity on the Bio-Plex 200 system*.
Assay
Low RP1 (PMT)
High RP1 (PMT)
•
•
User validation required*
User validation required*
User validation required*
•
Low RP1 (PMT), broad
Cross-panel mixing
range cytokine curve
High RP1 (PMT), narrow
range cytokine curve
Human cytokines (group l, ll)
Mouse cytokines (group l, ll, III)
Rat cytokines (group l)
Human cytokines + diabetes Mouse cytokines + diabetes User validation required*
Rat cytokines + diabetes
•
•
•
* Contact Bio-Rad technical support for the most up to date recommendations on PMT
settings and cross-panel multiplexing compatibility.
Reconstitute a Single Vial of Standards
This procedure prepares enough material to run each dilution in duplicate.
1. Gently tap the vial containing the lyophilized standard.
12
2. Add 500 μl of the appropriate diluent (see Table 5). Do not use assay
buffer to reconstitute the standards.
3. Gently vortex the reconstituted standard for 5 sec then incubate on
ice for 30 min. Be consistent with the incubation time in every
assay to ensure best results.
4. During the incubation period, prepare the samples as instructed in the
Prepare Samples section.
Prepare Standard Dilution Series From a Single
Antigen Vial
The following procedure produces an eight-point standard curve with a
fourfold dilution between each point. Pipet carefully using calibrated pipets
and use new pipet tips for every volume transfer.
1. Label nine 1.5 ml polypropylene tubes S1 through S8 and Blank.
2. Add the specified volume of standard diluent to each tube
(Figures 3 and 4).
3. V
ortex the reconstituted standards gently for 5 sec before removing
any volume. Add 128 µl into the S1 tube containing 72 µl of standard
diluent. Vortex at medium speed for 5 sec, then use a new pipet tip
to transfer 50 µl from S1 tube to S2 tube. Vortex.
4. Continue with 1:4 (fourfold) serial dilutions from tube S2 to S8 as
shown in Figure 3. Use reconstituted and diluted standards
immediately. Do not freeze for future use.
12850505050505050
Reconstituted Standard
72 150150150150150150150150
S1S2S3S4S5S6S7S8
Blank
Fig. 3. Preparing a fourfold dilution series of cytokine standards.
13
Transfer Volume (µl)
Diluent (µl)
Reconstituting Standards for Cross-Panel Plexing
Follow these directions when mixing human or mouse cytokine and
diabetes assays. Note that rat diabetes and cytokine standards are
premixed into one standard vial. Therefore, no extra mixing is required.
Two mixing scenarios are provided in Figures 4 and 5 for detection at high
and low PMT respectively. One results in a narrow range cytokine standard
curve for detection at high RP1 (PMT); the other gives a broad range
cytokine standard curve for detection at low RP1 (PMT).
1. Gently tap both vials of lyophilized cytokine and diabetes standards.
2. For high PMT setting/narrow range cytokine standard curve, add
500 μl of the appropriate standard diluent to each vial. For low PMT
setting/broad range cytokine standard curve, add 250 µl of diluent to
each vial. Do not use assay buffer or sample diluent to reconstitute
the standards.
3. Gently vortex the reconstituted standards for 5 sec then
incubate on ice for 30 min. Be consistent with the incubation
time in every assay to ensure best results.
4. During the incubation period, prepare the samples as instructed in the Prepare Samples step.
Preparing Serial Dilutions
Pipet carefully with a calibrated pipet, and use new pipet tips for every
volume transfer.
1. Label nine 1.5 ml polypropylene tubes S1 through S8 and Blank.
2. For high PMT/narrow range cytokine standard curve, add 59.2 µl
of standard diluent to the S1 tube. For low PMT/broad range
cytokine standard curve, add 72 µl of diluent to S1 (Figures 4 and 5).
3.For high PMT/narrow range cytokine standard curve, add 12.8 μl
of the reconstituted cytokine standard and 128 μl of the
reconstituted diabetes standard to the S1 tube for a total volume
of 200 μl (Figure 4). Vortex for 5 sec.
14
4. Add 150 μl of standard diluent to the remaining tubes, as shown
in Figure 4.
50
12.8 µl
500 µl
Reconstituted
Cytokine
Standard
50 50 505050 50
Transfer
Volume (µl)
128 µl
500 µl
Reconstituted
Diabetes
Standard
59.2 µl
150150 150150150150150150
Diluent (µl)
Standard Diluent
“S1” Tube, 200 µl Total S2S3 S4S5S6S7S8
Blank
Fig. 4. S1 mixture and fourfold dilution series of diabetes and cytokine standards for
detection at high PMT. Produces a narrow range cytokine standard curve.
5. For low PMT/broad range cytokine standard curve, add 64 µl of each
standard to the S1 tube, total volume 200 μl (Figure 5). Vortex for 5 sec.
6. Use a new pipet tip to transfer 50 μl from the S1 tube to the S2 tube
containing standard diluent. Vortex for 5 sec.
7. Continue with 1:4 (fourfold) serial dilutions from tube S2 to S8 as
shown in Figure 5, vortexing after each volume transfer.
50
64 µl
250 µl
Reconstituted
Cytokine
Standard
50 50 505050 50
Transfer
Volume (µl)
64 µl
250 µl
Reconstituted
Diabetes
Standard
72 µl
150150 150150150150150150
Diluent (µl)
Standard Diluent
“S1” Tube, 200 µl Total S2S3 S4S5S6S7S8
Blank
Fig. 5. S1 mixture and fourfold dilution series of cytokine and diabetes standards for
detection at low PMT. Produces a broad range cytokine standard curve.
15
5. Prepare Samples
General guidelines for preparing different sample types are provided here.
For more information, contact Bio-Rad Technical Support.
n
n
Once thawed, keep samples on ice. Prepare dilutions just prior to the
start of the assay and equilibrate to room temperature before use
Do not freeze diluted samples
Table 8. Summary of recommended sample diluents and dilution factors.
Culture Sup and
Cell and Tissue
Serum and Plasma
Other Fluids
Lysates
Assay
Dilution
Diluent
Dilution
Diluent
Dilution
Diluent
Human, mouse,
and rat cytokines
1:4
Bio-Plex
sample
diluent
User
optimized
1:100
Bio-Plex
sample,
standard
diluent*
User
optimized
User
optimized
(at least
1:2 of
lysates at
200–900
ug/ml
protein)
Bio-Plex
sample
diluent**
Human
ICAM-1/VCAM-1
Cell
culture
medium
or buffer
similar to
sample**
Mouse ICAM-1
1:200
Bio-Plex
serumbased
diluent*
User
optimized
®
* Requires a two-step dilution scheme as described on pages 18–19. Due to differences in
dilution factors, it is not possible to multiplex ICAM-1 or VCAM-1 with other assays.
** If samples are serum-free, add BSA to at least 0.5% final w/v to stabilize analytes and reduce
adsorption to labware.
Sample Preparation
Serum and Plasma
EDTA or citrate is preferred as an anticoagulant. Heparin-treated plasma,
while compatible with Bio-Plex Pro™ assays, may absorb certain soluble
proteins of interest. Avoid using hemolyzed samples as this may lead to
false positive results.
1.Draw whole blood into collection tubes containing anticoagulant.
Invert tubes several times to mix.
16
2.For serum, allow blood to clot at room temperature for 30 to 45 min.
For plasma, proceed directly to the centrifugation steps.
3.Perform centrifugation at 1,000 x g for 15 min at 4°C and transfer the
serum or plasma to a clean polypropylene tube.
4.To completely remove platelets and precipitates, centrifuge again at
10,000 x g for 10 min at 4°C.
5.Dilute samples fourfold (1:4) by adding 1 volume of sample to 3
volumes of Bio-Plex sample diluent (for example, 40 µl sample
+ 120 µl sample diluent).
6.Assay samples immediately or aliquot into single-use tubes and store
at –70°C. Avoid repeated freeze-thaw cycles.
Cell Culture Supernatant
1. Collect supernatants and centrifuge at 1,000 x g for 15 min at 4°C.
For cell lines cultured in serum-free culture media, collect samples and
add BSA as a carrier protein to a final concentration of at least 0.5% to
stabilize protein analytes and to prevent adsorption to labware.
2. Transfer to a clean polypropylene tube. If cellular debris or precipitates are present, centrifuge again at 10,000 x g for 10 min at 4°C.
3.We recommend testing undiluted samples first. If levels are
anticipated to be high, samples can be further diluted in culture
medium. Rarely would samples need to be diluted greater than 1:10.
4. Assay immediately or store samples in single-use aliquots at –70°C.
Avoid repeated freeze-thaw cycles.
Lavage, Sputum, and Other Biological Fluid Samples
Keep all samples on ice until ready for use. The appropriate sample
dilution factor should be optimized by the user.
1.If required, dilute the sample in Bio-Plex sample diluent with BSA
added to a final concentration of 0.5%.
2.Centrifugation at 10,000 x g for 10 min at 4°C may be required to
clarify the sample.
17
Lysates
The Bio-Plex cell lysis kit is required for lysate preparation (available
separately, catalog #171-304011 and #171-304012). Refer to bulletin #5297
for a list of published articles on cytokine analysis in tissue samples.
1.Prepare the cell or tissue lysates according to the instructions
provided with the Bio-Plex cell lysis kit. The protease inhibitors factor I
and factor II are included in the kit. PMSF needs to be added to lysis
buffer at a final concentration of 2 mM. The lysates should be free of
particulate matter.
2.Determine the total protein concentration of the lysate. It may be
necessary to test lyse your samples with different volumes of lysing
solution to obtain the specified protein concentration range.
3.Dilute at least 1:2 in sample diluent + 0.5% BSA, to a final protein
concentration of 200–900 µg/ml. For analytes with high expression, a
lysate protein concentration as low as 50 μg/ml may be sufficient.
Note: For optimum antibody binding during sample incubation, it
is important to dilute lysates as much as possible to reduce the
detergent concentration.
4.If the lysate is not tested immediately, store at –20°C to -70°C. Avoid
repeated freeze-thaw cycles.
Sample Dilution for ICAM-1 and VCAM-1
ICAM-1 and VCAM-1 are typically found at high concentrations in the
blood; therefore, higher sample dilutions are required to achieve measurable
concentrations within the standard curve range.
For human ICAM-1 and VCAM-1 assays, dilute serum or plasma 1:100.
For example:
n
n
First dilution (1:4)—10 µl sample + 30 µl Bio-Plex sample diluent
Second dilution (1:25)—5 µl from the first dilution + 120 µl
Bio-Plex standard diluent
18
For the mouse ICAM-1 assay, dilute serum or plasma 1:200 in Bio-Plex
serum-based diluent, which is included in the Bio-Plex Pro high dilution
reagent kit, catalog #171-304080M.
For example:
n
First dilution (1:10)—10 µl sample + 90 µl diluent
n
Second dilution (1:20)—10 µl from the first dilution + 190 µl diluent
6. Prepare Coupled Beads
Instructions are provided for diluting the coupled beads to a 1x
concentration. When mixing cytokine and diabetes assays, keep in mind
the stock concentrations of coupled beads as listed in Table 9.
Table 9. Stock concentration of coupled beads.
Assay
Stock Concentration of Coupled Beads
Human and mouse cytokines (groups I, II)
10x
Rat cytokines (group I)
20x
Mouse cytokines (group III)
20x
Human, mouse, and rat diabetes
20x
Note: When using 10-pack reagents, ensure that only the required volumes
of coupled beads, detection antibodies, streptavidin-PE, and buffers have
been removed from the tubes or bottles. For example, transfer a one-time
volume of assay buffer, sufficient to perform all steps of the assay procedure
(that is, prewetting the filter plate, diluting coupled beads, diluting
streptavidin-PE, and resuspending the beads) into a 50 ml reservoir.
1.Use Tables 10–14 to calculate the volume of coupled beads and
assay buffer needed.
2.Add the required volume of Bio-Plex assay buffer to a 15 ml
polypropylene tube.
19
3. Vortex the stock coupled beads at medium speed for 30 sec.
Carefully open the cap and pipet any liquid trapped in the cap back
into the tube. This is important to ensure maximum bead recovery.
Do not centrifuge the vial; doing so will cause the beads to pellet.
4.Dilute coupled beads to 1x by pipetting the required volume into the 15 ml
tube. Vortex.
Each well of the assay plate requires either 2.5 µl (20x stock) or 5.0 µl (10x
stock) adjusted to a final volume of 50 µl in assay buffer.
5. Protect the beads from light with aluminum foil. Equilibrate to room
temperature prior to use.
Note: To minimize volume loss, use a 200–300 μl capacity pipet
to remove beads from the stock tube. If necessary, perform the
volume transfer in two steps. Do not use a 1,000 μl capacity pipet
and/or wide bore pipet tip.
Preparing 1x coupled beads from 10x stock (includes 20% excess volume)
Table 10. Premixed panel or one singleplex assay.
# of Wells
10x Beads, µl Assay Buffer, µl Total Volume, µl
96
575
5,175
5,750
48
288
2,587
2,875
Table 11. Mixing two singleplex assays or a premixed panel + singleplex assay.
# of Wells
10x Beads, µl Singleplex #1
10x Beads, µl Singleplex #2
Assay Buffer, µl Total Volume, µl
96
575
575
4,600
5,750
48
288
288
2,300
2,876
20
Preparing 1x coupled beads from 20x stock (includes 20% excess volume)
Table 12. Premixed panel or one singleplex assay.
20x Beads, µl Assay Buffer, µl 96
# of Wells
288
5,472
Total Volume, µl
5,760
48
144
2,736
2,880
Table 13. Mixing two singleplex assays or a premixed panel + singleplex assay.
# of Wells
20x Beads, µl Singleplex #1
20x Beads, µl Singleplex #2
Assay Buffer, µl Total Volume, µl
96
288
288
5,184
5,760
48
144
144
2,592
2,880
Table 14. Preparing 1x beads from two stocks at different concentrations. Mixing human
insulin (20x) with human IL-6 (10x) is one example*.
# of Wells
20x Beads, µl Diabetes
10x Beads, µl Cytokines
Assay
Buffer, µl Total
Volume, µl
96
288
576
4,896
5,760
48
144
288
2,448
2,880
* Due to differences in dilution factors, it is not possible to multiplex adiponectin, adipsin,
VCAM-1, or ICAM-1 with other diabetes or cytokine assays.
21
7. Run Assay
Considerations
n
n
n
n
Bring all assay components and samples to room temperature before use
Use calibrated pipets and pipet carefully, avoiding bubbles. Use new
pipet tips for every volume transfer
Pay close attention to vortexing, shaking, and incubation instructions.
Deviation from the protocol may result in low assay signal and
assay variability
Assay incubations are carried out in the dark on a shaker at
850 ± 50 rpm. Cover the plate with sealing tape and protect from
light with aluminum foil
Table 15. Summary of wash options and protocols. After each assay step, select the
appropriate Bio-Plex Pro™ wash station program or perform the appropriate manual wash step
as summarized below.
Bio-Plex Pro or Pro II Wash Station
Bio-Plex Pro II
Wash Station Handheld Magnet or
Vacuum Manifold
Assay Step
Manual Wash Steps
Magnetic Program
Vacuum Program
Add beads to plate
MAG x2
VAC x2
2 x 100 μl
Sample incubation
Detection Ab incubation
SA-PE incubation
MAG x3
MAG x3
MAG x3
VAC x3
VAC x3
VAC x3
3 x 100 μl
3 x 100 μl
3 x 100 μl
Considerations when Using a Vacuum Manifold
n
n
n
n
After each incubation, place the filter plate on a calibrated vacuum
apparatus and remove the liquid by vacuum filtration
To wash, add 100 μl wash buffer to each well and remove the liquid as
before. Ensure that all wells are exposed to the vacuum
Thoroughly blot the bottom of the filter plate with a clean paper towel
between each vacuum step to prevent cross contamination
Place the assay plate on the plastic plate holder/tray as needed
Before each incubation, gently cover the plate with a new sheet of
sealing tape. Avoid pressing down over the wells to prevent leaking
from the bottom
22
n
Add Coupled Beads, Standards, and Samples
1. Cover unused wells with sealing tape.
2. Prewet the filter plate. Skip this step if using a flat-bottom plate.
Prewet the wells using 100 µl assay buffer and remove the liquid
by vacuum filtration. Dry the bottom of the filter plate thoroughly by
blotting on a clean paper towel.
3. Vortex the diluted (1x) coupled beads for 30 sec at medium speed.
Pour the diluted coupled beads into a reagent reservoir and transfer
50 µl to each well of the assay plate.
Tip: A multichannel pipet is highly recommended for ease of use
and efficiency.
4.Wash the plate two times with 100 µl Bio-Plex® wash buffer using
the wash method of choice.
5.Gently vortex the diluted standards, blanks, samples, and controls (if applicable) for 5 sec. Transfer 50 µl to each well of the assay plate,
changing the pipet tip after every volume transfer.
6. Cover plate with a new sheet of sealing tape and protect from light
with aluminum foil. Incubate on shaker at 850 ± 50 rpm at room
temperature (RT). See Table 16 for incubation time.
Note: 850 rpm provides equivalent performance to shaker settings
recommended in previous manuals (1,100 rpm for 30 sec, 300 rpm
for incubation).
Table 16. Sample incubation times.
Assay
Incubation Time
Bio-Plex Pro human cytokine (group I and II)
30 min
Bio-Plex Pro mouse cytokine (group I and II)
30 min
Bio-Plex Pro mouse cytokine (group III)
1 hr
Bio-Plex Pro rat cytokine (group I)
1 hr
Note: Be consistent with this incubation time for optimal assay performance and reproducibility.
23
Prepare and Add Detection Antibodies
Instructions are provided for diluting the detection antibodies to a 1x
concentration. When mixing diabetes and cytokine assays, keep in mind
the stock concentrations of detection antibodies as shown below.
Table 17. Stock concentration of detection antibodies.
Stock Concentration of
Detection Antibodies
Assay
Human and mouse cytokines (groups I, II)
10x
Mouse cytokines (group III)
20x
Rat cytokines (group I)
20x
Human, mouse, and rat diabetes
20x
1. While the samples are incubating, use Tables 18–22 or the
Calculation Worksheet on page 41 to calculate the volume of
detection antibodies and detection antibody diluent needed.
Detection antibodies should be prepared 10 min before use.
2. Add the required volume of Bio-Plex detection antibody diluent to a
15 ml polypropylene tube.
3. Vortex the stock detection antibodies for 15–20 sec at medium
speed, then perform a 30 sec spin to collect the entire volume at the
bottom of the tube.
4. Dilute detection antibodies to 1x by pipetting the required volume into
the 15 ml tube.
Each well of the assay requires either 1.25 μl (20x stock) or 2.5 µl (10x
stock) adjusted to a final volume of 25 μl in detection antibody diluent.
Preparing 1x detection antibodies from 10x stock (includes 25% excess volume)
Table 18. Premixed panel or one singleplex assay.
# of Wells
10x Detection Antibodies, µl
Detection Antibody
Diluent, µl
Total Volume, µl
96
300
2,700
3,000
48
150
1,350
1,500
24
Table 19. Mixing two singleplex assays or a premixed panel + singleplex assay.
# of Wells
96
48
10x Detection Antibodies, µl
Singleplex #1
10x Detection Antibodies, µl
Singleplex #2
Detection
Antibody
Diluent, µl Total Volume, µl
300
3002,4003,000
150
150
1,200
1,500
Preparing 1x detection antibodies from 20x stock (includes 25% excess volume)
Table 20. Premixed panel or one singleplex assay.
# of Wells
20x Detection Antibodies, µl
Detection Antibody
Diluent, µl
Total Volume, µl
96
150
2,850
3,000
48
75
1,425
1,500
Table 21. Mixing two singleplex assays or a premixed panel + singleplex assay.
# of Wells
96
48
20x Detection Antibodies, µl
Singleplex #1
20x Detection Antibodies, µl
Singleplex #2
150
75
Detection
Antibody
Diluent, µl Total Volume, µl
150 2,7003,000
75
1,350
1,500
Table 22. Preparing 1x detection antibodies from two stocks at different concentrations.
Mixing human insulin (20x) with human IL-6 (10x) is one example.*
# of Wells
20x Detection Antibodies, µl
Diabetes
10x Detection Antibodies, µl
Cytokines
Detection
Antibody
Diluent, µl Total Volume, µl
96
150
300 2,5503,000
48
75
150
1,275
1,500
* Due to differences in dilution factors, it is not possible to multiplex adiponectin, adipsin,
VCAM-1, or ICAM-1 with other diabetes or cytokine assays.
5. After incubating the beads, samples, standards, and blank, slowly
remove and discard the sealing tape.
6. Wash the plate three times with 100 µl wash buffer.
7. Vortex the diluted (1x) detection antibodies gently for 5 sec. Pour
into a reagent reservoir and transfer 25 μl to each well using a
multichannel pipet.
25
8. C
over plate with a new sheet of sealing tape and protect from light
with aluminum foil. Incubate on shaker at 850 ± 50 rpm for 30 min at
room temperature.
Prepare and Add Streptavidin-PE (SA-PE)
1.While the detection antibodies are incubating, use Table 23 or the
Calculation Worksheet on page 41 to calculate the volume of SA-PE
(100x) and assay buffer needed. Streptavidin-PE should be prepared
10 min before use.
2.Add the required volume of assay buffer to a 15 ml polypropylene
tube.
3. Vortex the 100x SA-PE for 5 sec at medium speed.
Perform a 30 sec spin to collect the entire volume at the bottom of
the tube.
4.Dilute SA-PE to 1x by pipetting the required volume into the 15 ml
tube. Vortex and protect from light until ready to use.
Each well of the assay requires 0.5 µl (100x stock) adjusted to a final
volume of 50 µl in assay buffer.
Table 23. Preparing 1x SA-PE from 100x stock (includes 25% excess volume).
# of Wells
100x SA-PE, µl
Assay Buffer, µl
Total Volume, µl
96
60
5,940
6,000
48
30
2,970
3,000
5.After the detection antibody incubation, slowly remove and discard
the sealing tape.
6. Wash the plate three times with 100 µl wash buffer.
7. V
ortex the diluted (1x) SA-PE at medium speed for 5 sec. Pour
into a reagent reservoir and transfer 50 µl to each well using a
multichannel pipet.
26
8.
Cover plate with a new sheet of sealing tape and protect from light
with aluminum foil. Incubate on shaker at 850 ± 50 rpm for 10 min at
room temperature.
9. After the streptavidin-PE incubation step, slowly remove and discard
the sealing tape.
10. Wash the plate three times with 100 µl wash buffer.
11.To resuspend beads for plate reading, add 125 µl of assay buffer to
each well. Cover the plate with a new sheet of sealing tape. Shake at
room temperature at 850 ± 50 rpm for 30 sec, and slowly remove the
sealing tape. Ensure that the plate cover has been removed before
placing the plate on the reader.
12.Remove the sealing tape and read the plate using the settings
below. Refer to section 8 for details.
Note: Reading at alternative PMT settings on the Bio-Plex 100,
200, or Bio-Plex 3D (for example when mixing diabetes assays with
cytokine assays) requires validation by the end user to ensure that
results meet the user’s acceptance criteria.
Table 24. Read the plate using the appropriate instrument settings.
Bio-Plex Pro Assay
Bio-Plex 100/200*
RP1 (PMT) Setting
Bio-Plex 3D*Bio-Plex® MAGPIX™*
Human cytokines (group l, ll) Low
Mouse cytokines (group l, ll, III) Low
Standard
Rat cytokines (group l) High
Cross-Panel Mixing
N/A,
Human cytokines + diabetes
Mouse cytokines + diabetes High
Standard
Rat cytokines + diabetes
Other Instrument Settings
DD gates5,000–25,000Select MagPlex
beads
Bead events5050
* Or similar Luminex-based system.
27
Use
default
settings
8. Read Plate
Bio-Plex Manager™ software is recommended for all Bio-Plex Pro™ assay
data acquisition and analysis. Instructions for Luminex xPONENT software
are also included. For instructions using other xMAP system software
packages, contact Bio-Rad Technical Support or your regional Bio-Rad
field applications specialist.
Prepare Protocol in Bio-Plex Manager
Software v 6.0 and Higher
The protocol should be prepared in advance so that the plate is read as
soon as the experiment is complete.
A protocol file specifies the analytes used in the reading, the plate wells
to be read, sample information, the values of standards and controls, and
instrument settings.
Bio-Plex Manager software contains protocols for most Bio-Plex® assays.
Choose from available protocols or create a new protocol. To create a new
protocol, select File, then New from the main menu. Locate and follow the
steps under Protocol Settings.
1.Click Describe Protocol and enter information about the
assay (optional).
28
2.Click Select Analytes and create a new panel. Visually confirm the
selected analytes and proceed to step 3.
a. Click the Add Panel button
in the Select Analytes toolbar. Enter a new panel name. Select Bio-Plex Pro Assay Magnetic
from the assay pull-down menu. If using Bio-Plex Manager version 5.0 or lower, select MagPlex from the assay pull-down menu.
b.
Click the Add button. Enter the bead region number and name
for the first analyte. Click Add Continue to repeat for each
analyte in the assay.
For reference, bead regions are shown in Table 25.
c. Click the Add button when the last analyte has been added and
click OK to save the new panel.
d. Highlight analytes from the Available list (left) and move to the
Selected list (right) using the Add button. To move all analytes at
once, simply click the Add All button.
e.
If some of the analytes need to be removed from the Selected
list, highlight them and select Remove. If desired, it is possible to
rename the panel by clicking on Rename Panel and entering a
new panel name.
Note: Do not use preset panels found in Bio-Plex Manager
software version 5.0 or earlier as the bead regions are not up to date.
29
Table 25. Bead regions for Bio-Plex Pro cytokine assays.
Human Cytokines
Mouse Cytokines
Rat Cytokines
Bead
Bead
Bead
Bead
Bead
Group I
Group II
Group I
Group II
Group I
Region
Region
RegionRegion
Region
IL-1b
IL-1ra
IL-2
IL-4
IL-5
IL-6
IL-7
IL-8
IL-9
IL-10
IL-12p70
IL-13
IL-15
IL-17
Eotaxin
Basic FGF
G-CSF
GM-CSF
IFN-y
IP-10
MCP-1
MIP-1a
MIP-1b
PDGF-BB
RANTES
TNF-a
VEGF
39 IL-1a
63IL-1a
53IL-15
42
IL-1a21
25 IL-2Ra 13
IL-1b
19IL-18*
20
IL-1b28
38 IL-3
64
IL-2
36Basic FGF 25
IL-222
52 IL-12p40** 28
IL-3
18LIF
45
IL-433
33 IL-16
27
IL-4
39M-CSF
26
IL-552
19 IL-18*
42
IL-5
52MIG
44
IL-656
74 CTACK
72
IL-6
38MIP-2
27
IL-738
54 GRO-a
61
IL-9
33PDGF-BB 35
IL-1019
77 HGF
62
IL-10
56VEGF
47
IL-12p40**76
56 IFN-a2
20
IL-12p40
76
IL-12p70
78
75 LIF
29
IL-12p70
78 Group III IL-13
15
51 MCP-3
26
IL-13
37
IL-17A
72
73 M-CSF
67
IL-17
72CD40L30IL-18*
20
76 MIF
35 Eotaxin
74IL-17F28EPO
14
43 MIG
14
G-CSF
54IL-2114
G-CSF
54
44 b-NGF
46 GM-CSF 73IL-2215
GM-CSF 37
57 SCF
65
IFN-g
34IL-23p1961 GRO/KC 57
34 SCGF-b 78
KC
57IL-3129
IFN-g
34
21 SDF-1a 22 MCP-1(MCAF) 51IL-3313
M-CSF
26
48 TNF-b
30 MIP-1a
77MIP-3a12 MCP-1
51
53 TRAIL
66 MIP-1b
75
MIP-1a
77
55
RANTES
55
MIP-2*** 27
Group III
18 Group II
TNF-a
21Singleplexes
MIP-3a
36
Singleplexes
47
RANTES 55
37 ICAM-1 12 ICAM-1
22
TNF-a
43
36 V-CAM1 15 IL-25 (IL-17E) 67
VEGF
47
45 IL-27p28
43
* IL-18 is not available as a singleplex assay but only as part of an assay panel.
** IL-12p40 cannot be multiplexed with IL-12p70.
*** MIP-2 cannot be multiplexed with GRO/KC.
3.Click Format Plate and format the plate according to the plate layout
created in Section 1 (Plan Plate Layout). To modify the plate layout,
follow the steps below (see Figure 6).
a. Select the Plate Formatting tab.
b. Select the standards icon S and drag the cursor over all the wells that contain standards. Repeat this process for
blanks B , controls C , and samples X .
30
Fig. 6. Plate formatting.
4.Click Enter Standards Info in the Protocol Settings bar.
a. Enter the highest concentration of each analyte in the top row
(labeled S1) of the table. S1 concentration information is included
on the peel-off sticker provided with each vial of standards.
b. Enter a dilution factor of 4 and click Calculate. The concentrations
for each standard point will be populated for all analytes in the table.
c. Optional: enter the lot number of the vial of standards into the
Standard Lot box and click Save.
5.Click Enter Controls Info, and for user-defined controls, select
an analyte from the dropdown menu, then enter a description and
concentration. Repeat for each additional analyte in the assay.
6. Click Enter Sample Info and enter sample information and the
appropriate dilution factor.
31
7. Click Run Protocol and confirm that the assay settings are correct.
a. Refer to Table 24 for the recommended RP1 (PMT) setting.
Protocols using alternative PMT settings should be validated
by the end user, for example when mixing diabetes assays with
cytokine assays.
b. Confirm data acquisition is set to 50 beads per region. In
Advanced Settings, confirm that the bead map is set to 100
region, the sample size is set to 50 μl, and the DD gates are set to 5,000 (Low) and 25,000 (High). In Bio-Plex Manager software versions 4.0, 4.1, and 4.1.1, check Override Gates
and set the DD gate values as indicated.
c. Select Start, name and save the .rbx file, and begin data
acquisition. The Run Protocol pop-up screen will appear. Click
Eject/Retract to eject the plate carrier.
Acquire Data
1.Shake the assay plate at 850 ± 50 rpm for 30 sec and visually
inspect the plate to ensure that the assay wells are filled with buffer.
Slowly remove the sealing tape and any plate cover before placing
the plate on the plate carrier.
2.Click Run Protocol — on the pop-up screen, select Load Plate and
click OK to start acquiring data.
3. Use the Wash Between Plates
command after every plate run
to reduce the possibility of clogging the instrument.
4.If acquiring data from more than one plate, empty the waste bottle
and refill the sheath bottle after each plate (if HTF are not present).
Select Wash Between Plates and follow the instructions. Then
repeat the Prepare Protocol and Acquire Data instructions.
5. When data acquisition is complete, select Shut Down
follow the instructions.
32
and
Reacquire Data
It is possible to acquire data from a well or plate a second time using the
Rerun/Recovery mode located below Start in the Run Protocol step.
Any previous data will be overwritten.
1. Check the wells from which data will be reacquired.
2. Remove the buffer with the wash method of choice.
3.Add 100 µl assay buffer to each well. Cover the filter plate with a
new sheet of sealing tape. Shake the plate at 850 ± 50 rpm for
30 sec. Slowly remove the sealing tape before placing the plate on
the plate reader.
4. Repeat the Acquire Data steps to reacquire data. The data acquired
should be similar to those acquired initially; however, the acquisition
time will be extended because the wells have fewer beads.
Data Analysis: Removing Outliers
Outliers are identified as standard data points that do not meet accuracy
or precision requirements and should be considered invalid when
performing curve fitting. As such, they should be removed to generate a
more realistic and accurate standard curve. This may result in an extended
assay working range and allow quantitation of samples that might
otherwise be considered out of range (OOR).
In Bio-Plex Manager software version 6.0 and higher, outliers can be
automatically removed by selecting the Optimize button in the Standard
Curve window. In Bio-Plex Manager software 6.0 and earlier versions,
outliers also can be manually selected in the Report Table. Visit online Help
to learn more about the standard curve optimizer feature and how outliers
are determined.
Previous Versions of Bio-Plex Manager Software
For instructions on using previous versions of Bio-Plex manager software,
please contact Bio-Rad Technical Support.
33
Luminex xPONENT Software
Although guidelines are provided here, consult the xPONENT software
manual for more details. Perform a system initialization with Luminex’s
calibration and performance verification kit, as directed by Luminex. Select
Batches to set up the protocol and follow the information under Settings.
Note: The instrument settings described below apply to Luminex 100/200
and FLEXMAP 3D or Bio-Plex® 3D instruments. For the Bio-Plex®
MAGPIX™ reader, use the default instrument settings.
1. Select MagPlex as the bead type for magnetic beads, which
automatically sets the DD gates.
2. Volume = 50 µl.
3.Refer to Table 24 to select the appropriate PMT setting for
your instrument.
4. Plate name: 96-well plate.
5. Analysis type: Quantitative; 5PL Curve Fit.
6. Number of standards: 8.
Select Analytes to set up the panel.
1. Enter pg/ml in the Units field.
2. Enter 50 in the Count field.
3. Select the bead region and enter the analyte name.
4. Click Apply all for Units and Count.
Select Stds and Ctrls.
1. Enter standard concentrations, lot number, dilution factor, and other
information as applicable.
After the assay is complete, select Results, then select Saved Batches.
34
Troubleshooting Guide
This troubleshooting guide addresses problems that may be encountered
with Bio-Plex Pro™ assays. If you experience any of the problems listed
below, review the possible causes and solutions provided. Poor assay
performance may also be due to the Bio-Plex® suspension array reader.
To eliminate this possibility, use the validation kit to assist in determining if
the array reader is functioning properly.
Possible Causes
Standards were not reconstituted
consistently between assays
Possible Solutions
Reconstituted standards and
diluted samples were not stored
properly
Reconstituted standards and diluted
samples should be prepared on ice
as instructed. Prior to plating, the
reconstituted standards and diluted
samples should be equilibrated to
room temperature.
Bottom of filter plate not dry
Dry the bottom of the filter plate with
absorbent paper towel (preferably
lint-free) to prevent cross-well
contamination.
High Inter-Assay CV
Incubate the reconstituted
standards for 30 min on ice. Always
be consistent with the incubation
time and temperature.
35
Possible Causes
Possible Solutions
High Intra-Assay CV
Pipet carefully when adding
standards, samples, detection
antibodies, and streptavidin-PE,
especially when using a multichannel
pipet. Use a calibrated pipet. Change
pipet tip after every volume transfer.
Reagents and assay components
not equilibrated to room
temperature prior to pipetting
All reagents and assay components
should be equilibrated to room
temperature prior to pipetting.
Improper pipetting technique
Contamination with wash buffer
during wash steps
During the wash steps, be careful
not to splash wash buffer from one
well to another. Be sure that the
wells are filtered completely and that
no residual volume remains. Ensure
that the microplate shaker setting is
not too high. Reduce the microplate
shaker speed to minimize splashing.
Slow pipetting of samples and
reagents across the plate
Sample pipetting across the entire
plate should take less than 4 min.
Reagent pipetting across the entire
plate should take less than 1 min.
Bio-Plex wash station:
insufficient washing due to
clogged pins
Clean dispensing pins with the thicker
of the two cleaning needles provided
with washer. Perform regular rinses to
minimize salt buildup.
36
Possible Causes
Possible Solutions
Low Bead Count
Miscalculation of bead dilution
Check your calculations and be
careful to add the correct volumes.
Beads clumped in multiplex
bead stock tube
Vortex for 30 sec at medium speed
before aliquoting beads.
Vacuum on for too long when
aspirating buffer from wells
Do not apply vacuum to the filter
plate for longer than 10 sec after the
buffer is completely drained from
each well.
Filter plate not shaken enough
before incubation steps and prior
to reading
Shake the filter plate at
850 ± 50 rpm for 30 sec before
incubation steps and immediately
before reading the plate.
Reader is clogged
Refer to the troubleshooting guide
in the Bio-Plex system hardware
instruction manual (bulletin
#10005042).
Low Signal or Poor Sensitivity
Standards reconstituted
incorrectly
Follow the standard preparation
instructions carefully.
Detection antibody or streptavidin-PE diluted incorrectly
Check your calculations and be
careful to add the correct volumes.
37
Possible Causes
Possible Solutions
Incorrect buffer was used
(for example, assay buffer used
to dilute standards)
Use standard diluent or diluent
similar to final sample matrix to dilute
standards.
High Background Signal
Accidentally spiked blank wells
Do not add any antigens to the
blank wells.
Detection antibodies or
streptavidin-PE incubated
too long
Follow the procedure incubation
time precisely.
Poor Recovery
Expired Bio-Plex reagents
were used
Check that reagents have not
expired. Use new or nonexpired
components.
Incorrect amounts of components
were added
Check your calculations and be
careful to add the correct volumes.
Microplate shaker set to an
incorrect speed
Check the microplate shaker speed
and use the recommended setting.
Setting the speed too high may
cause splashing and contamination.
Use the recommended plate shaker.
38
Possible Causes
Possible Solutions
Poor Recovery
Improper pipetting
technique
Pipet carefully when adding standards,
samples, detection antibodies, and
streptavidin-PE, especially when using a
multichannel pipet. Use a calibrated pipet.
Change pipet tip after every volume transfer.
Impact of Sample Matrix
Negative MFI values in
samples or standards
If samples contain little or no analyte, negative
values observed may be due to statistical
variation. If assay drift is suspected, retest
the samples by positioning them next to the
standards. If contamination of standards
is suspected, check the standard replicate
value and be careful when adding samples to
the wells. Matrix effects could also produce
negative sample values.
Bio-Plex Manager™ software automatically
subtracts the blank (B) FI value from all other
assay wells. While this has no impact on
observed concentrations of samples within the
assay working range, it may result in a negative
FI value if the blank’s FI value is greater than
either the standard or sample value. If this is
undesirable, then assign wells as a sample (X) or
control (C) in the protocol or results file.
Poor precision in serum
and plasma sample
measurements
Check if any interfering components such as
heparin-based anticoagulant, additives, or
gel from separators were introduced into the
samples. Avoid using hemolyzed and heavily
lipemic samples. Remove visible particulate
in samples by centrifugation. Avoid multiple
freeze-thaw cycles of samples.
39
Plate Layout Template
40
Calculation Worksheet
If using either a premixed panel or one singleplex assay with 20x stocks of beads
and detection antibodies, follow these directions. If using 10x stocks, divide by 10
instead of 20 in steps 1d and 2d.
.
Plan the plate layout and enter the number of wells to be used in the assay:_______
1
1. Determine the volume of 1x coupled beads needed.
a. Each well requires 50 µl of coupled beads (1x): _______ x 50 µl = _______ µl
12
b. Include 20% excess to ensure enough volume: _______ µl x 0.20 = _______ µl
23
c. Total volume of 1x coupled beads: _______ µl + _______ µl = _______ µl
234
d. Volume of 20x coupled beads required: _______ µl /20 = _______ µl
45
e. Volume of assay buffer required: _______ µl – _______ µl = _______
456
2. Determine the volume of 1x detection antibody needed.
a. Each well requires 25 µl detection antibodies (1x): _______ x 25 µl = _______ µl
17
b. Include 25% excess to ensure enough volume: _______ µl x 0.25 = _______ µl
78
c. Total volume of 1x detection antibodies: _______ µl + _______ µl = _______ µl
78 9
d. Volume of 20x detection antibodies required: _______ µl /20 = _______ µl
910
e. Volume of detection antibody diluent required: _____ µl – _____ µl = _____ µl
91011
3. Determine the volume of 1x streptavidin-PE needed.
a. Each well requires 50 µl streptavidin-PE (1x): _______ x 50 µl = _______ µl
112
b. Include 25% excess to ensure enough volume: _______ µl x 0.25 = _______ µl
1213
c. Total volume of 1x streptavidin-PE: ______ µl + ______ µl = ______ µl
121314
d. Volume of 100x streptavidin-PE required: _______ µl / 100 = _______ µl
1415
e. Volume of assay buffer required: _______ µl – _______ µl = _______ µl
14 1516
41
If mixing singleplex assays with 20x stocks of beads and detection antibodies, follow
these directions. If using 10x stocks, divide by 10 instead of 20 in steps 1e and 2e.
Enter the number of wells to be used in the assay: _______
1
1. Determine the volume of 1x coupled beads needed.
a. Each well requires 50 µl coupled beads (1x): _______ x 50 µl = _______ µl
12
b. Include 20% excess to ensure enough volume: _______ µl x 0.20 = _______ µl
23
c. Total volume of 1x coupled beads: _______ µl + _______ µl = _______ µl
234
d. Enter the number of singleplex sets (or analytes) tubes that will be multiplexed = _______
5
e. Volume of 20x coupled beads required from each stock tube:
_______ µl / 20 = _______ µl
46
f. Total volume of combined bead stocks: _______ x _______ µl = _______ µl
56
7
g. Volume of assay buffer required: _______ µl – _______ µl = _______ µl
478
2. Determine the volume of 1x detection antibody needed.
a. Each well requires 25 µl detection antibodies (1x): _______ x 25 µl = _______ µl
19
b. Include 25% excess to ensure enough volume: _______ µl x 0.25 = _______ µl
910
c. Total volume of 1x detection antibodies: _______ µl + _______ µl = _______ µl
9
1011
d. Enter the number of singleplex sets (or analytes) that will be multiplexed = _______
5
e. Volume of 20x detection antibodies required from each stock tube:
_______ µl / 20 = _______ µl
1112
f. Total volume of combined detection antibody stock: _____ µl x _____ = _____ µl
12 513
g. Volume of detection antibody diluent required: ____ µl – ____ µl = ____µl
111314
3. Determine the volume of 1x streptavidin-PE needed.
a. Each well requires 50 µl streptavidin-PE (1x): _______ x 50 µl = _______ µl
115
b. Include 25% excess to ensure enough volume: _______ µl x 0.25 = _______ µl
1516
c. Total volume of 1x streptavidin-PE: ______ µl + ______ µl = _______ µl
1516 17
d. Volume of 100x streptavidin-PE required: _______ µl / 100 = _______ µl
1718
e. Volume of assay buffer required: _______ µl – _______ µl = _______ µl
1718 19
42
If mixing diabetes assays (20x bead and detection antibody stocks) with cytokine assays
(10x stocks), follow these directions.
Note: Refer to Table 26 for the maximum number of diabetes and cytokine assays
that may be multiplexed. Mixing across panels is not applicable to NHP diabetes assays.
Table 26. Maximum number of singleplex diabetes and cytokine analytes that may be multiplexed.
Human, mouse, and rat diabetes Mouse cytokine (group III) analytes (20x)
Human and mouse cytokine (groups I, II) analytes (10x) 0
2
4
6
8
10
10 9
8
7
6
5
Enter the number of wells to be used in the assay:_______
1
Enter the number of diabetes tubes (either singleplex or multiplex) that will be mixed: ______
2
Enter the number of cytokine tubes (either singleplex or multiplex) that will be mixed: _______
3
1. Determine the volume of 1x diabetes and cytokine coupled beads needed.
a) Each well requires 50 µl of coupled beads (1x): _______ x 50 µl = _______ µl
14
b) Include 20% excess to ensure enough volume: _______ µl x 0.20 = _______ µl
45
c) Total volume of 1x coupled beads: _______ µl + _______ µl = _______ µl
45 6
d) Volume of 20x beads required from each diabetes tube(s): _______ µl /20 = _______ µl
67
e) Volume of 10x beads required from each cytokine tube(s): ______ μl / 10 = ______ μl
68
f) Total volume of diabetes bead stock required: ______ μl x _______ = _______ μl
7 29
g) Total volume of cytokine bead stock required: ______ μl x _______ = _______ μl
8 310
h) Total volume of combined bead stocks required: _____ μl + ______ = _____ μl
9 1011
i) Volume of assay buffer required: _______ µl - _______ µl = _______
6 1112
43
2. Determine the volume of 1x diabetes and cytokine detection antibodies needed.
a) Each well requires 25 μl of detection antibodies (1x): _______ x 25 μl = ______ μl
113
b) Include 25% excess to ensure enough volume: _______ μl x 0.25 = ______ μl
1314
c) Total volume of 1x detection antibodies: ______ μl + ______ μl = ______ μl
13 1415
d) Volume of 20x detection antibodies required from each diabetes tube(s):
______ μl / 20 = ______ μl
1516
e) Volume of 10x detection antibodies required from each cytokine tube(s):
______ μl / 10 = ______ μl
1517
f) Total volume of diabetes detection antibodies stock required: ____ μl x ____ =_____ μl
16 218
g) Total volume of cytokine detection antibodies stock required: ____ μl x ____ =_____ μl
17 319
h) Total volume of combined detection antibodies required:
_____ μl + ______ = _____ μl
18 1920
i) Volume of detection antibody diluent required: ______ μl – _____ μl = _____ μl
15 2021
3. Determine the volume of 1x streptavidin-PE needed.
a) Each well requires 50 μl of streptavidin-PE (1x): _________ x 50 μl = _________ μl
115
b) Include 25% excess to ensure enough volume: _______ μl x 0.25 = ______ μl
1516
c) Total volume of 1x streptavidin-PE: ______ μl + ______ μl = ______ μl
15 1617
d) Volume of 100x streptavidin-PE required: _______ μl / 100 = ______ μl
1718
e) Volume of assay buffer required: ______ μl – ______ μl = __________ μl
1718
19
44
Safety Considerations
Eye protection and gloves are recommended when using these products.
Consult the MSDS for additional information. The Bio-Plex Pro™ assays
contain components of animal origin. This material should be handled as
if capable of transmitting infectious agents. Use universal precautions.
These components should be handled at Biosafety Level 2 containment
(U.S. government publication: Biosafety in Microbiological and Biomedical
Laboratories (CDC, 1999)).
Legal Notices
Acrodisc and Supor are trademarks of Pall Corporation. MagPlex, xMAP,
xPONENT, FLEXMAP 3D, and Luminex are trademarks of Luminex
Corporation.
The Bio-Plex suspension array system includes fluorescently labeled
microspheres and instrumentation licensed to Bio-Rad Laboratories, Inc.
by the Luminex Corporation.
45
Ordering Information
Detailed ordering information can be found at www.bio-rad.com/bio-plex.
Premixed All-In-One Multiplex Assays
Catalog #
Bio-Plex Pro Human Cytokine 8-Plex Panel, 1 x 96
M50-000007A
Bio-Plex Pro Human Cytokine 17-Plex Panel, 1 x 96
M50-00031YV
Bio-Plex Pro Human Cytokine 21-Plex Panel, 1 x 96
MF0-005KMII
Bio-Plex Pro Human Cytokine 27-Plex Panel, 1 x 96
M50-0KCAF0Y
Bio-Plex Pro Human Cytokine Th1/Th2 Panel, 1 x 96
M50-00005L3
Bio-Plex Pro Mouse Cytokine 8-Plex Panel, 1 x 96
M60-000007A
Bio-Plex Pro Mouse Cytokine 9-Plex Panel, 1 x 96
MD0-00000EL
Bio-Plex Pro Mouse Cytokine 23-Plex Panel, 1 x 96
M60-009RDPD
Bio-Plex Pro Mouse Cytokine Th1/Th2 Panel, 1 x 96
M60-00003J7
Bio-Plex Pro Mouse Th17 Cytokine Panel A 6-Plex, 1 x 96
M60-00007NY
Bio-Plex Pro Mouse Th17 Cytokine Panel B 8-Plex, 1 x 96
171-FA001M
Bio-Plex Pro Mouse Cytokine Th1 Panel, 1 x 96 L60-00004C6
Bio-Plex Pro Mouse Cytokine Th2 Panel, 1 x 96 L60-000UKVT
Bio-Plex Pro Rat Th1/Th2 Panel, 1 x 96
171-K1002M
Bio-Plex Pro Rat 24-Plex Panel, 1 x 96
171-K1001M
Bio-Plex® x-Plex™ Assays (We Mix)
Premium custom assay service using the Bio-Plex Assay Builder,
www.bio-rad.com/bio-plex/assaybuilder, to select analytes and plate
type of interest. Assays are supplied as premixed coupled beads and
detection antibodies in the all-in-one kit format.
Bio-Plex Express Assays (You Mix)
Fast and economical custom assay service using the Bio-Plex Assay
Builder, www.bio-rad.com/bio-plex/assaybuilder, to select analytes and
plate type of interest. Assays are supplied as individual sets of coupled
beads and detection antibodies in the all-in-one kit format.
Singleplex Sets and Individual Components
A host of singleplex sets and individual assay components are available. For
more information, refer to bulletin #5507 or go to www.bio-rad.com/bio-plex.
46
Bio-Rad
Laboratories, Inc.
Life Science
Group
10014905 Rev D
Web site www.bio-rad.com USA 800 424 6723 Australia 61 2 9914 2800
Austria 01 877 89 01 Belgium 09 385 55 11 Brazil 55 11 5044 5699
Canada 905 364 3435 China 86 21 6169 8500
Czech Republic 420 241 430 532 Denmark 44 52 10 00
Finland 09 804 22 00 France 01 47 95 69 65 Germany 089 31 884 0
Greece 30 210 9532 220 Hong Kong 852 2789 3300
Hungary 36 1 459 6100 India 91 124 4029300 Israel 03 963 6050
Italy 39 02 216091 Japan 03 6361 7000 Korea 82 2 3473 4460
Mexico 52 555 488 7670 The Netherlands 0318 540666
New Zealand 64 9 415 2280 Norway 23 38 41 30
Poland 48 22 331 99 99 Portugal 351 21 472 7700
Russia 7 495 721 14 04 Singapore 65 6415 3188
South Africa 27 861 246 723 Spain 34 91 590 5200
Sweden 08 555 12700 Switzerland 026 674 55 05
Taiwan 886 2 2578 7189 Thailand 800 88 22 88
United Kingdom 020 8328 2000
10-0021
0213
Sig 1212