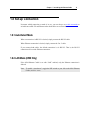
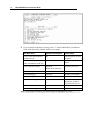
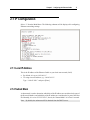
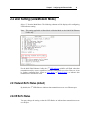
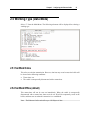
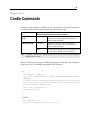
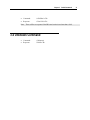
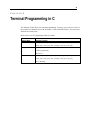
1
User Guide 8001/8300/8500 Ethernet Cradle Version 1.04 Printed on 3 March, 2007 Copyright Notice Copyright © 2007 CIPHERLAB CO., LTD. All rights reserved The software contains proprietary information of CIPHERLAB CO., LTD.; it is provided under a license agreement containing restrictions on use and disclosure and is also protected by copyright law. Reverse engineering of the software is prohibited. Due to continued product development this information may change without notice. The information and intellectual property contained herein is confidential between CIPHERLAB and the client and remains the exclusive property of CIPHERLAB CO., LTD. If you find any problems in the documentation, please report them to us in writing. CIPHERLAB does not warrant that this document is error-free. No part of this publication may be reproduced, stored in a retrieval system, or transmitted in any form or by any means, electronic, mechanical, photocopying, recording or otherwise without the prior written permission of CIPHERLAB CO., LTD. For product consultancy and technical support, please contact your local sales representative. Also, you may visit our web site for more information. The CipherLab logo is a registered trademark of CIPHERLAB CO., LTD. Microsoft, Windows, and the Windows logo are registered trademarks of Microsoft Corporation in the United States and/or other countries. Bluetooth is a trademark of Bluetooth SIG, Inc., U.S.A. Other product names mentioned in this manual may be trademarks or registered trademarks of their respective companies and are hereby acknowledged. The editorial use of these names is for identification as well as to the benefit of the owners, with no intention of infringement. CIPHERLAB CO., LTD. Website: http://www.cipherlab.com II FCC Regulations This equipment has been tested and found to comply with the limits for a Class B digital device, pursuant to Part 15 of the FCC Rules. These limits are designed to provide reasonable protection against harmful interference in a residential installation. This equipment generates, uses and can radiate radio frequency energy and, if not installed and used in accordance with the instructions, may cause harmful interference to radio communications. However, there is no guarantee that interference will not occur in a particular installation. If this equipment does cause harmful interference to radio or television reception, which can be determined by turning the equipment off and on, the user is encouraged to try to correct the interference by one or more of the following measures: Reorient or relocate the receiving antenna. Increase the separation between the equipment and receiver. Connect the equipment into an outlet on a circuit different from that to which the receiver is connected. Consult the dealer or an experienced radio/TV technician for help. Care & Maintenance This cradle is intended for indoor use only. It may do damage to the cradle when being exposed to extreme temperatures or soaked wet. When the body of the cradle gets dirty, use a clean and wet cloth to wipe off the dust. DO NOT use/mix any bleach or cleaner. Always keep the cradle dry. If you shall find the cradle malfunctioning, write down the specific scenario and consult your local sales representative. III i Contents Copyright Notice II FCC Regulations III Care & Maintenance III Preface 1 Revision History ...........................................................................................................................................1 CHAPTER 1 - Introducing the Ethernet Cradle 3 1.1 Unpacking the package...........................................................................................................................3 1.2 Features...................................................................................................................................................3 1.3 Nomenclature..........................................................................................................................................4 1.4 Data Flow Diagram.................................................................................................................................5 1.5 Working Modes ......................................................................................................................................6 1.5.1 Data Mode ................................................................................................................................6 1.5.2 Transparent Mode.....................................................................................................................7 1.5.3 Modem Mode ...........................................................................................................................8 1.6 Related Setting......................................................................................................................................10 1.6.1 Baud Rate ...............................................................................................................................10 1.6.2 Settings by Working Mode.....................................................................................................10 1.7 Status LEDs ..........................................................................................................................................11 1.7.1 8001/8300 Ethernet Cradle .....................................................................................................11 1.7.2 8500 Ethernet Cradle ..............................................................................................................12 1.8 Set-up Connection ................................................................................................................................13 1.8.1 Auto-Detect Mode ..................................................................................................................13 1.8.2 LAN Mode (8500 Only) .........................................................................................................13 CHAPTER 2 - Configuring the Ethernet Cradle 15 2.1 IP Configuration ...................................................................................................................................17 2.1.1 Local IP Address ....................................................................................................................17 2.1.2 Subnet Mask ...........................................................................................................................17 2.1.3 Default Router IP....................................................................................................................18 2.1.4 DHCP .....................................................................................................................................18 2.1.5 DNS Server.............................................................................................................................18 2.2 LED Setting (Data/Modem Mode) .......................................................................................................19 2.2.1 Network Rx/Tx Status (default)..............................................................................................19 2.2.2 IR Rx/Tx Status ......................................................................................................................19 2.3 Connection Settings (Data Mode).........................................................................................................20 2.3.1 Connection Type, Remote IP Address, Local Port & Remote Port ........................................20 ii Contents 2.3.2 Timer & Line Terminator .......................................................................................................22 2.3.3 Echo Settings ..........................................................................................................................24 2.4 Working Mode......................................................................................................................................25 2.4.1 Data Mode ..............................................................................................................................25 2.4.2 Transparent Mode...................................................................................................................25 2.4.3 Modem Mode (default)...........................................................................................................26 2.5 Working Type (Data Mode)..................................................................................................................27 2.5.1 Set Work Online .....................................................................................................................27 2.5.2 Set Work Offline (default)......................................................................................................27 2.6 Reset to Default ....................................................................................................................................28 2.7 Modem Configuration...........................................................................................................................28 2.8 Save and Exit ........................................................................................................................................28 CHAPTER 3 - Cradle Commands 29 3.1 Select Modem (=Ethernet)....................................................................................................................30 3.2 Select RS-232 .......................................................................................................................................30 3.3 Get Version Information .......................................................................................................................30 3.4 Unknown Command .............................................................................................................................31 CHAPTER 4 - Terminal Programming in C 33 CHAPTER 5 - Firmware Upgrade 35 5.1 Over Ethernet Connection ....................................................................................................................35 5.2 Over Terminal.......................................................................................................................................36 Specifications 37 1 Preface Seeing the need to connect CipherLab portable terminals to your existing Ethernet networks, CipherLab is now providing an easy solution by introducing the Ethernet Cradle for the 8000/8300/8500 Series portable terminals. This manual serves to guide you through how to install, configure, and operate the Ethernet Cradle. We recommend you to keep one copy of the manual at hand for quick reference or maintenance purposes. To avoid any improper disposal or operation, please read the manual thoroughly before use. Thank you for choosing CipherLab products! Revision History Version Release Date 1.04 Mar. 03, 2007 Notes Modified: section 3 Cradle Commands 1.03 Nov. 27, 2006 Modified: section 1.7.1 8001/8300 Ethernet Cradle – LED 3 1.02 Nov. 06, 2006 New: section 1.5.3 Escape Sequence <+++> Timeout – 10 seconds New: section 1.5.3 “AT+IDLETIMEOUT=”, “AT+IDLETIMEOUT?” Modified: section 1.3 Cradles’ drawing – “AC” to “DC” (Power Jack) 1.01 Oct. 09, 2006 1.00 Sep. 18, 2006 Official release 2 8001/8300/8500 Ethernet Cradle User Guide 3 CHAPTER 1 Introducing the Ethernet Cradle For connecting to your existing networks, the Ethernet Cradle is an ideal companion for the 8000/8300/8500 Series portable terminals. 1.1 Unpacking the package The following items are included in the package. Save the box and packaging material for future use in case you need to store or ship the product. Product Package Contents 8001 Ethernet Cradle or Complete set of the Ethernet Cradle 8300 Ethernet Cradle or Power adaptor & power supply cord 8500 Ethernet Cradle Software CD-ROM including this User Guide 1 m Cat. 5 cable Spare battery pack (for 8500 only) 1.2 Features 16-bit CMOS CPU, low power consumption Firmware upgradeable 10/100 Mbps auto-switching mechanism Front panel LED indicators for monitoring status of operation Supports 3 operation modes: Data/Modem/Transparent Supports DHCP IP Allocation Supports TCP/UDP, Server/Client Reserves Cradle-IR functionalities for switching to Ethernet by cradle commands Supports Name Resolution via DNS in modem mode 4 8001/8300/8500 Ethernet Cradle User Guide 1.3 Nomenclature Chapter 1 Introducing the Ethernet Cradle 1.4 Data Flow Diagram 5 6 8001/8300/8500 Ethernet Cradle User Guide 1.5 Working Modes This section mainly describes the three modes that the Ethernet Cradle supports when working over Ethernet. Refer to Configuring the Ethernet Cradle for details. 1.5.1 Data Mode Pros This working mode is exactly the same as supported on CipherLab 350 Ethernet Box. No modification to the current program code is needed. It can automatically connect to any specific IP via assigned port number. It will automatically reconnect to the target device when disconnection occurs. It supports TCP/UDP, server/client mode. Cons The terminal cannot detect the connection status. Noise is also packed into a complete data packet. No configuration is allowed because everything is treated as a data packet. Chapter 1 Introducing the Ethernet Cradle 7 1.5.2 Transparent Mode The Ethernet Cradle acts as a physical layer bridge. Everything is controlled by the terminal or remote computer. It is possible for the terminal to work as a FTP client. Virtual MAC ID & Software MAC ID Filter In transparent mode, the terminal will use a virtual MAC ID that is defined by the Ethernet Cradle to transmit/receive data. This virtual MAC ID is a number, which is based on and add one to the MAC ID of the Ethernet Cradle. For example, if the MAC ID of the Ethernet Cradle is 0x00d017c00100, the virtual MAC ID will be 0x00d017c00101. In order to reduce the traffic of communications on the IR side, a software filter is implemented so that packets destined to any MAC ID other than that of the terminal will be discarded. Only DHCP broadcasting packets or packets for the specified MAC ID (the virtual one) will be forwarded to the terminal. The Ethernet Cradle will automatically detect the transaction from the terminal. Note: For the 8001/8300 Ethernet Cradle, once the transaction is confirmed, LED 1 will flash to indicate that (1) the terminal is connected to Ethernet through the cradle, and (2) the filter is active. For infrared safety concerns, the cradle will stop forwarding packets after 3 minutes when there is no packet received from the terminal. LED 1 will become solid red to indicate the status is “waiting to connect”. 8 8001/8300/8500 Ethernet Cradle User Guide 1.5.3 Modem Mode It works almost the same as a modem device. It can connect to any specific IP via assigned port number. (IP address/host name: port number). It supports TCP server/client mode. It supports AT commands to configure the cradle. It supports “+++” to escape to command mode. AT Commands The Ethernet Cradle can be controlled via the use of a DTE (Data Terminal Equipment) platform. Issue the AT commands via IR interface in Modem Mode. The attention: “AT” prefix is required prior to entering any command. All commands require a carriage return or <CR> following the entry of the desired command, and are case insensitive. All command responses are encapsulated by a carriage return and line feed or <CR><LF>. The ASCII display of these characters is suppressed with only the modem response being presented. The Ethernet Cradle does not support multiple command such like “ATE0=1&W”. Normally, the cradle is in TCP server mode and waiting for the connection request call from a remote device. When “\r\nRING\r\n” is received, the terminal has to accept it by issuing “ATA”. Note: The “RING” message will be sent to the terminal up to ten times at an interval of 7.5 seconds. The terminal has to respond before the counter times out. However, when the terminal issues “ATDT xxx.xxx.xxx.xxx:kkkk” to create a connection with a remote device, the cradle will be in TCP client mode. Escape Sequence <+++> The escape sequence consists of three characters (+++). Once a connection has been established, type the escape sequence to return to command state. Note: The escape sequence will break the connection. Chapter 1 Introducing the Ethernet Cradle 9 When entering the next command after an escape sequence, always wait to receive “\r\nOK\r\n”. An escape attempt in the interval may fail because the modem is not in on-line data state. There are equal guard time periods before (leading) and after (trailing) the “+++”Timing for this escape sequence as illustrated below. If the escape sequence is not followed by another command within 50 milliseconds (trailing guard time), the cradle will hang up after another 10 seconds. Normally, the terminal will receive “\r\nOK\r\n” during the 10-second interval unless the line is abnormally busy. Note: The Guard Time is 50 milliseconds and cannot be changed. AT Commands Tasks ATDT The Ethernet Cradle will create a connection with a remote PC: By IP address – e.g. 192.168.6.123, via port 5000: ATDT192.168.6.123:5000 By host name – e.g. www.cipherlab.com.tw, via port 1024. The IP address associated with the host name will be obtained from the DNS server: ATDT www.cipherlab.com.tw:1024 AT+MACID? The Ethernet Cradle will respond with its MAC ID to the terminal. AT+GCI? The Ethernet Cradle will respond with its country code, which is fixed to FE (=Taiwan), to the terminal. ATXX… The Ethernet Cradle will simply respond with “\r\nOK\r\n” to the terminal. AT+DHCP? The Ethernet Cradle will respond with “\r\nENABLE\r\n” to the terminal when DHCP is enabled; otherwise, it will respond with “\r\nDISABLE\r\n”. ATA The terminal accepts the connection request when it receives “\r\nRING\r\n”. AT+IP? The Ethernet Cradle will respond with its IP address to the terminal. AT+DNS= The Ethernet Cradle will be assigned with the IP address of DNS server. AT+DNS? The Ethernet Cradle will respond with the IP address of DNS server. AT+GWY= The Ethernet Cradle will be assigned with the IP address of Gateway. AT+GWY? The Ethernet Cradle will respond with the IP address of Gateway. ATS7= The Ethernet Cradle will wait for the specified period of time (5~50 sec.) for receiving a carrier from the remote modem before hanging up. By default, it is set to 10 seconds. S7 – wait for carrier after dialing (ATDT…) ATS7? The Ethernet Cradle will respond with the current setting of waiting time for receiving a carrier from the remote modem before hanging up. AT+IDLETI MEOUT= The Ethernet Cradle will wait for the specified period of time (10~180 sec.) for sending/receiving data before hanging up. 10 8001/8300/8500 Ethernet Cradle User Guide By default, it is set to 30 seconds. AT+IDLETI MEOUT? For the Ethernet Cradle to wait permanently, set 0. The Ethernet Cradle will respond with the current setting of waiting time for sending/receiving data before hanging up. Note: New settings are only valid for the current configuration if you are using AT commands. They will be reset to defaults after re-connecting the power to the cradle. To change settings permanently, access the configuration menus. 1.6 Related Setting 1.6.1 Baud Rate The Ethernet Cradle is set to work at the baud rate of 115,200 bps by default. For the Cradle-IR functionality, you have to set the terminal to 115,200 bps or change the baud rate setting of the Ethernet Cradle by using the software utility. Note: The baud rate setting of the Ethernet Cradle will be reset to “115,200 bps” automatically upon re-connecting to the power. 1.6.2 Settings by Working Mode Refer to Configuring the Ethernet Cradle for the configuration menus. Modem Mode (Default) Description 1. Set Local IP, Subnet Mask & Default Router IP View IP settings 2. Set LED Indicator Setting (8001/8300 Ethernet Cradle only) Select status for Network or IR 3. Set Connection Settings > 2. Timer & Line Terminator Configure Timer setting only! 4. Set Working mode Select working mode 7. Set Modem Configuration Configure dialing/idle time-out Data Mode Description 1. Set Local IP, Subnet Mask & Default Router IP View IP settings 2. Set LED Indicator Setting (8001/8300 Ethernet Cradle only) Select status for Network or IR 3. Set Connection Settings Configure connection settings 4. Set Working mode Select working mode Chapter 1 Introducing the Ethernet Cradle 11 5. Set Working type Select Work Online/Offline Transparent Mode Description 1. Set Local IP, Subnet Mask & Default Router IP View IP settings 4. Set Working mode Select working mode 1.7 Status LEDs 1.7.1 8001/8300 Ethernet Cradle The cradle provides three LED indicators on the front panel to indicate connection status. Front Panel LEDs Tasks Indication of connection status LED 1: Line status Solid red Waiting to connect Flashing Connected Off Hardware initializing Flashing red Data transmission LED 2: Tx / Rx status *Configurable when working mode set to Data or Modem Mode LED 3: LAN status Off No activity Flashing green A 10 Mbps connection is available Flashing red A 100 Mbps connection is available Off No activity 12 8001/8300/8500 Ethernet Cradle User Guide 1.7.2 8500 Ethernet Cradle The cradle provides four LED indicators on the front panel to indicate connection and charging status. Front Panel LEDs : RX: TX: POWER: Tasks Indication of connection status Spare battery charging status Solid red Charging Solid green Charging done Flashing (red/green) Error occurs Off Battery not ready (No redundant battery) Solid red Receiving data from Ethernet or host Off No activity Solid red Transmitting data to Ethernet or host Off No activity Solid red Ethernet connection via RJ-45 Solid green Direct connection via RS-232 Off Power off Receiving status Transmitting status Line status Chapter 1 Introducing the Ethernet Cradle 13 1.8 Set-up Connection No matter which connection or mode is in use, you can always use cradle commands to switch between RS-232 and Ethernet when both cables are connected. 1.8.1 Auto-Detect Mode When a connection via RS-232 is desired, simply connect the RS-232 cable. When Ethernet connection is desired, simply connect the Cat. 5 cable. If you connect both cables, the default connection is via RS-232. That is, the RS-232 connection will override Ethernet connection. 1.8.2 LAN Mode (8500 Only) If the 8500 Ethernet Cradle is set with “LAN” enabled, only the Ethernet connection is allowed. Note: To enable “Auto-detect”, toggle the DIP switch to your left on the 8500 Ethernet Cradle; and vice versa. 14 8001/8300/8500 Ethernet Cradle User Guide 15 CHAPTER 2 Configuring the Ethernet Cradle The Ethernet Cradle can be configured through the provided Main Menu over Ethernet connection. You can configure related networking parameters, as well as working mode or type over the networks. 1. Connect a Cat. 5 crossover cable from the cradle to the computer 2. Connect the power supply cord from the Ethernet cradle to a nearby outlet. If you forgot the current IP of the cradle, you will need to press the “IP Reset” switch when connecting the power cord to the cradle. This toggle switch is right next to the RJ-45 port at the back panel of the Ethernet Cradle. The IP address of the cradle will be reset to 192.168.1.1 (default) temporarily for configuration. Note: This default IP is used for accessing the Main Menu and will not override the current IP. 3. Run a telnet client program on your computer and connect to the cradle via port 8000. Ethernet Cradle as a telnet server Current IP or default 192.168.1.1 Port: 8000 Default Settings: Working mode set to Modem Mode DHCP enabled 4. The Main Menu is displayed for configuring the cradle. Proceed with related settings for a specific working mode. 16 8001/8300/8500 Ethernet Cradle User Guide 5. If you are satisfied with the new settings, select “7” from the Main Menu. The Ethernet Cradle will reboot and re-initialize with the new settings. Main Menu Options Applicable to Working Mode Default Settings 1. Set Local IP, Subnet Mask & Default Router IP Any Check local IP if you don’t remember 2. Set LED Indicator Setting Data mode or Modem mode Default to Network Rx/Tx Status Data mode Default to TCP Server… (8001/8300 Ethernet Cradle only) 3. Set Connection Settings Modem mode: Timer only 4. Set Working mode Select working mode Default to Modem mode 5. Set Working type Data mode Default to Work Offline 6. Reset Configuration to Default Any 7. Set Modem Configuration Modem mode 8. Save and Exit Any 0. Exit without Saving Any Default to 10 seconds for dialing time-out and 30 seconds for idle time-out Note: In the sample screenshots, the default settings are highlighted in red box. Chapter 2 Configuring the Ethernet Cradle 17 2.1 IP Configuration Select “1” from the Main Menu. The following submenu will be displayed for configuring Ethernet networking settings. 2.1.1 Local IP Address This is the IP address of the Ethernet Cradle on your local area network (LAN). By default, it is set to “192.168.1.1”. To assign a new IP address, e.g. “168.95.192.1”: Type “1 168.95.192.1” and press [Enter]. 2.1.2 Subnet Mask A subnet mask is used to determine which bits of the IP address are considered to be part of the Network Number, and which bits of the IP address are considered to be part of the Host ID. Normally, it is set to “255.255.255.0”; that is, the “Natural Mask” of a Class C network. Note: By default, the subnet mask IP is obtained from the DHCP server. 18 8001/8300/8500 Ethernet Cradle User Guide 2.1.3 Default Router IP If the remote IP is not on the same segment of the network, data will need to be transmitted through a router. When DHCP is disabled, you need to specify the IP address for the router (Gateway). For example, type “3 192.168.1.254” and press [Enter]. Note: By default, the router IP is obtained from the DHCP server. 2.1.4 DHCP By default, DHCP is enabled and all of the settings can be obtained from the DHCP server. If static IP addresses are desired, disable the DHCP server by typing “4 DISABLE” and pressing [Enter]. 2.1.5 DNS Server When DHCP is disabled, you need to specify the IP address for the DNS server. For example, type “5 192.168.70.1” and press [Enter]. Note: By default, the DNS server IP is obtained from the DHCP server. Chapter 2 Configuring the Ethernet Cradle 19 2.2 LED Setting (Data/Modem Mode) Select “2” from the Main Menu. The following submenu will be displayed for configuring LED indicators setting. Note: This setting applicable to Data Mode or Modem Mode on the 8001/8300 Ethernet Cradle only. For the 8001/8300 Ethernet Cradle, the 2nd LED indicator (middle) will flash when data transmission activity occurs, regardless of which working mode you select. However, it can be further configured here, when in Data Mode or Modem Mode, to indicate data transmission over Ethernet or IR. 2.2.1 Network Rx/Tx Status (default) By default, the 2nd LED flashes to indicate data transmission occurs over Ethernet port. 2.2.2 IR Rx/Tx Status You may change the setting so that the LED flashes to indicate data transmission occurs over IR port. 20 8001/8300/8500 Ethernet Cradle User Guide 2.3 Connection Settings (Data Mode) Select “3” from the Main Menu. The following submenu will be displayed for configuring connection settings. Note: Only the Timer setting is applicable to Modem mode as well. 2.3.1 Connection Type, Remote IP Address, Local Port & Remote Port Select “1” from the Setup Connection menu. The following submenu will be displayed. Chapter 2 Configuring the Ethernet Cradle 21 Connection Type The cradle can be configured as a server or client, and you can choose to use TCP or UDP as the transport layer protocol of data communications. By default, the connection type of the cradle is TCP Server. To change the connection type, e.g. to UDP SERVER, type “1 2” and press [Enter]. Connection Type: Local Port Remote IP Address Remote Port 0= TCP Server Available N/A N/A 1= TCP Client N/A Available Available 2= UDP Server Available N/A N/A 3= UDP Client N/A Available Available Local Port When the cradle is configured as a TCP server or UDP server, you have to define a port number for the clients to connect. Note: Port 8000 is reserved for the use of configuring the cradle over Ethernet connection. Port 3000 is reserved for downloading, such as a firmware download. Remote IP & Port When the cradle is configured as a TCP client or UDP client, you have to define the remote IP and port number for setting up a connection. For example, type “3 192.168.6.36” and press [Enter]. 22 8001/8300/8500 Ethernet Cradle User Guide 2.3.2 Timer & Line Terminator Select “2” from the Setup Connection menu. The following submenu will be displayed. Data sent to the cradle over IR is first buffered in the memory. The cradle will then transmit the buffered data to a remote host when any of the following conditions is met: The amount of data reaches the maximum data byte count that can be held in an IP packet. The cradle has not received any data for a period of time longer than the value of the Timer setting. The Line Terminator configured is received. Timer Specify a timer setting from 1 to 10,000, in units of millisecond. By default, the timer is set to 10 milliseconds. To change the timer setting, e.g. to 20 milliseconds, type “1 20” and press [Enter]. Transmit on Line Terminator By default, this setting is enabled so that data received over IR will not be sent out as a TCP/IP packet until the Line Terminator character is received. To disable it, type “2 0” and press [Enter]. Chapter 2 Configuring the Ethernet Cradle 23 Transmit Line Terminator By default, this setting is enabled so that the Line Terminator character will be included in the TCP/IP packet and sent out. To disable it, type “3 0” and press [Enter]. The Line Terminator character will be discarded from the received buffer before transmission. Line Terminator Specify a Line Terminator character from 00h to FFh. By default, the Line Terminator is “0Dh” (Carriage Return). Below are examples for setting a new Line Terminator character. - To set “$” as the Line Terminator, type “4 24” and press [Enter]. - To set “A” (41h) as the Line Terminator, type “4 41” and press [Enter]. 24 8001/8300/8500 Ethernet Cradle User Guide 2.3.3 Echo Settings Select “3” from the Setup Connection menu and press [Enter]. The following submenu will be displayed. Note: The cradle must be configured as a TCP server or UDP server. Client Echo By default, this setting is disabled. To enable Echo, type “1 1” and press [Enter]. Echo String When Echo is enabled, the cradle will send a predefined string to a remote device (client) as soon as the connection is established. The client will then start to communicate with the cradle after it receives the Echo String. By default, the Echo String is “Connection OK!” You can specify a new string, which allows 31 characters at most. Type “2 NewString” and press [Enter]. Chapter 2 Configuring the Ethernet Cradle 25 2.4 Working Mode Select “4” from the Main Menu. The following submenu will be displayed for selecting a working mode. The cradle supports three working modes. Note: By default, the cradle is set to Modem Mode. 2.4.1 Data Mode If you select Data Mode, proceed to configure the following items in the Main Menu: LED Indicator Setting (for 8001/8300 Ethernet Cradle only) Connection Settings Working Type 2.4.2 Transparent Mode If you select Transparent Mode, you only need to configure general settings in the Main Menu, such as Local IP, Subnet Mask, Router IP, etc. Either the terminal or the remote computer will control and handle data. 26 8001/8300/8500 Ethernet Cradle User Guide 2.4.3 Modem Mode (default) This is the default mode. Proceed to configure the following items in the Main Menu: LED Indicator Setting (for 8001/8300 Ethernet Cradle only) Working Type Chapter 2 Configuring the Ethernet Cradle 27 2.5 Working Type (Data Mode) Select “5” from the Main Menu. The following submenu will be displayed for selecting a working type. 2.5.1 Set Work Online This refers to real-time transmission. However, data loss may occur because the buffer will be cleared in the following conditions: Timer times out. The cradle is unexpectedly disconnected with a remote host. 2.5.2 Set Work Offline (default) This means data will not be sent out immediately. When the cradle is unexpectedly disconnected with a remote host, data received over IR will be temporarily saved in the buffer, and then sent out when the connection is re-established. Note: The Ethernet Cradle can buffer up to 128 Kbytes of data. 28 8001/8300/8500 Ethernet Cradle User Guide 2.6 Reset to Default Select “6” from the Main Menu. This will restore the default settings. 2.7 Modem Configuration Select “7” from the Main Menu. The following submenu will be displayed for changing the elapsed time before hanging up. Dialing time-out: 10 seconds by default. Idle time-out: 30 seconds by default. 2.8 Save and Exit Select “8” from the Main Menu. This will save the current settings and exit the configuration mode. If you want to abort the current settings and exit the configuration mode, simple select “0”. 29 CHAPTER 3 Cradle Commands No matter which connection or mode is in use, you can always use cradle commands to switch between RS-232 and Ethernet when both connections are ready. When both RS-232 cable & Ethernet cable are present… 8001 / 8300 Ethernet Cradle Auto-detect: The RS-232 connection will override Ethernet connection. To enable the Ethernet connection, you must use cradle commands. 8500 Ethernet Cradle Auto-detect: The RS-232 connection will override Ethernet connection. To switch to Ethernet connection, you must use cradle commands. LAN: Only the Ethernet connection can be established unless you use cradle commands to switch to RS-232. Note: To enable “Auto-detect”, toggle the DIP switch to your left on the 8500 Ethernet Cradle; and vice versa. Below are functions provided in C and BASIC languages for enabling cradle commands. Please refer to our C and BASIC Programming Guide for details. C SetCommType(1, COMM_IR); open_com(1, COMMAND); Baud|DATA_BIT8| PARITY_NONE|HANDSHAKE_NONE|CRADLE_ // Unless you have changed the baud rate setting via the DIP switch onboard, pass the factory setting BAUD_115200 for Ethernet Cradle and BAUD_57600 for Modem Cradle. write_com(1, “#vErSiOn?\r”); while(!com_eot(1)); … BASIC SET_COM_TYPE(1, 3) SET_COM(1, Baudrate%, Parity%, Data%, 1); 30 8001/8300/8500 Ethernet Cradle User Guide // Unless you have changed the baud rate setting via the DIP switch onboard, pass the factory setting 1 (115200 bps) for Ethernet Cradle and 3 (57600 bps) for Modem Cradle. // Parity% = 4 for cradle commands // Data% = 2 for 8 data bits OPEN_COM(1) Sendbase$ = ”#vErSiOn?” WRITE_COM(1, Sendbase$) … 3.1 Select Modem (=Ethernet) After issuing the command, the baud rate of the cradle will be reset to the DIP switch setting Command: #mOdEm<CR> Response: #DONE<CR> Note: “Select Modem” here actually means “Select Ethernet” because the Modem Board has been replaced by the Ethernet Board. 3.2 Select RS-232 After issuing the command, the baud rate of the cradle will be reset to the DIP switch setting Command: #SeRiAl<CR> Response: #DONE<CR> OK #CABLE!<CR> No RS-232 cable detected! Note: Baud rate will be reset to the DIP switch setting when the RS-232 cable is plugged or unplugged. 3.3 Get Version Information You can retrieve the version of IR board. Chapter 3 Cradle Commands Command: #vErSiOn?<CR> Response: #Ver02.20<CR> Note: There will be no response if the IR board version is no later than v3.00! 3.4 Unknown Command Command: (Unknown) Response: #NAK<CR> 31 32 8001/8300/8500 Ethernet Cradle User Guide 33 CHAPTER 4 Terminal Programming in C The Ethernet Cradle allows for terminal programming. You may write your own code for the terminal to communication with the cradle via the Cradle-IR interface. The associated functions are listed below. Please refer to our C Programming Guide for details. Working Mode Available Functions Data Mode open_com(), read_com(), nwrite_com(), write_com(), close_com(), clear_com(), com_eot(), com_overrun(), com_cts(), com_rts() Transparent Mode NetInit(6L) Socket programming NetClose() Modem Mode open_com(), read_com(), nwrite_com(), write_com(), close_com(), clear_com(), com_eot(), com_overrun(), com_cts(), com_rts(), AT Commands 34 8001/8300/8500 Ethernet Cradle User Guide 35 CHAPTER 5 Firmware Upgrade The Ethernet Cradle allows for firmware upgrade over the Ethernet connection or the terminal. We suggest that you first download the kernel program (Kernel.SHX), and then the user program (User.SHX). Warning: DO NOT upgrade firmware unless the version of new firmware is greater than that of your cradle. For information of the current firmware version, check the Main Menu for configuration. 5.1 Over Ethernet Connection 1. Connect a Cat. 5 crossover cable from the cradle to the computer. When in “Auto-detect” mode, you must disconnect the RS-232 connection or use cradle command to switch to Ethernet. 2. Connect the power supply cord from the Ethernet Cradle to a nearby outlet. If you forgot the current IP of the cradle, you will need to press the “IP Reset” switch when connecting the power cord to the cradle. This toggle switch is right next to the RJ-45 port at the back panel of the Ethernet Cradle. The IP address of the cradle will be reset to 192.168.1.1 (default) temporarily for configurations. Note: This default IP is used for accessing the Main Menu and will not override the current IP you set. 3. Run CipherLab utility on your computer and connect to the cradle via port 3000 for updating firmware. UDP_Load.exe Ethernet Cradle as a UDP server Current IP or default 192.168.1.1 Port: 3000 36 8001/8300/8500 Ethernet Cradle User Guide 4. During downloading, LED 1 and LED 2 will be flashing by turns on the 8001/8300 Ethernet Cradle. Then, they will become solid red for approximately 3 seconds. 5. The downloading process will not be completed until LED 1 turns solid red and LED 2 goes off. Note: There is no such LED indication on the 8500 Ethernet Cradle. After the “Download Successfully” message appears on your computer, wait for approximately 5 seconds. 6. The cradle will reboot itself. Warning: DO NOT disconnect the power to the cradle before the downloading process is completed. 5.2 Over Terminal 1. Download the latest version of Ethernet Cradle firmware from our website to a specific terminal (8000/8300/8500). The terminal will display a selection menu. 2. Disconnect the power supply cord to the cradle. 3. Press the “IP Reset” switch while re-connecting the power cord to the cradle. 4. Seat the terminal in the cradle. 5. From the terminal menu, select “Kernel (version x.xx)” to download new kernel or select “User (version x.xx)” to download new user program. 37 Specifications General 8001 Ethernet Cradle 8300 Ethernet Cradle 8500 Ethernet Cradle Power Adaptor 5V DC 5V DC 6V DC Charging Current 500 mA 500 mA 1.5 A CPU 16-bit CMOS, low power consumption Memory Firmware upgrade Up to 128K bytes of buffer provided in Data mode when only one connection is established and set to work offline Programming Terminal programming, cradle commands Physical 8001 Ethernet Cradle 8300 Ethernet Cradle 8500 Ethernet Cradle 110 mm (L) 110 mm (L) 190 mm (L) 100 mm (W) 100 mm (W) 125 mm (W) 60 mm (H) 78 mm (H) 124 mm (H) Weight: Approx. 220g Approx. 230g Approx. 730g Indicators: 3 LEDs to indicate connection status Same as 8001 Ethernet Cradle 3 LEDs to indicate connection status, 1 LED to indicate charging status Communications Ethernet (TCP/UDP, Server/Client) Enclosure Material: ABS plastic Dimensions: RS-232 (Peer-to-peer) Transmission Rate 115,200 bps IP Reset Toggle IP address set to 192.168.1.1 by default Environmental Humidity Temperature EMC Certification Operating: 5% to 90% non-condensing Storage: 5% to 95% non-condensing Operating: -20 to 50 °C Storage: -20 to 70 °C FCC, CE, C-tick