1
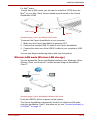
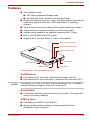
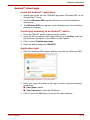
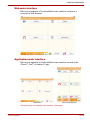
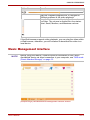
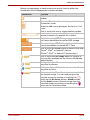
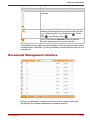
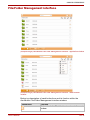
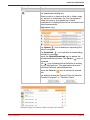
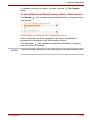
User’s Manual
CANVIO AEROMOBILE
EN
CANVIO AEROMOBILE
Regulatory statements
User’s Manual
CE Compliance
Toshiba Europe GmbH hereby declares that the Canvio
AeroMobile is in compliance with the essential
requirements and other relevant provisions of Directive
1999/5/EC. Responsible for CE marking is Toshiba
Europe GmbH, Hammfelddamm 8, 41460 Neuss,
Germany. A copy of the official Declaration of Conformity
can be obtained from following website:
http://epps.toshiba-teg.com.
Working Environment
The Electromagnetic Compliance (EMC) of this product has been verified
typically for this product category for a so called Residential, Commercial &
Light Industry Environment. Any other working environment has not been
verified by Toshiba and the use of this product in these working
environments is maybe restricted or cannot be recommended. Possible
consequences of the use of this product in non verified working
environments can be: Disturbances of other products or of this product in
the nearby surrounding area with temporarily malfunction or data loss/
corruption as result. Example of non verified working environments and
related advices:
■ Industrial environment (e. g. where 3-phase 380V mains is being used
mainly): Danger of disturbances of this product due to possible strong
electromagnetic fields especially near to big machinery or power units.
■ Medical environment: The compliance to the Medical Product Directive
has not been verified by Toshiba, therefore this product cannot be used
as a medical product without further verification. The use in usual office
environments e.g. in hospitals should be no problem if there is no
restriction by the responsible administration.
■ Automotive environment: Please search the owner instructions of the
related vehicle for advices regarding the use of this product (category).
■ Aviation environment: Please follow the instructions of the flight
personnel regarding restrictions of use.
Additional Environments not Related to EMC
■ Explosive atmosphere: The use of this product in such special working
environment (Ex) is not allowed.
User’s Manual
EN-2
CANVIO AEROMOBILE
Following information is only valid for EU-member
States:
REACH - Compliance Statement
The new European Union (EU) chemical regulation, REACH (Registration,
Evaluation, Authorization and Restriction of Chemicals), entered into force
on 1 June 2007.
Toshiba will meet all REACH requirements and is committed to provide our
customers with information about the chemical substances in our products
according to REACH regulation.
Disposal of products
The use of the symbol indicates that this product may not be
treated as household waste. By ensuring this product is disposed
of correctly, you will help prevent potential negative consequences
for the environment and human health, which could otherwise be
caused by inappropriate waste handling of this product.
For more detailed information about recycling of this product,
please contact your local city office, your household waste
disposal service or the shop where you purchased the product.
Disposal of batteries and/or accumulators
The crossed out wheeled dust bin symbol indicates that batteries
and/or accumulators must be collected and disposed of separately
from household waste. By participating in separate collection of
batteries, you will help to assure the proper disposal of products
and thus help to prevent potential negative consequences for the
environment and human health. For more detailed information
about the collection and recycling programs available in your
country, please contact your local city office or the shop where you
purchased the product.
The following information is valid only for Turkey:
Compliant with AEEE Regulation.
Safety icons
This manual contains safety instructions that must be observed to avoid
potential hazards that could result in personal injuries, damage to your
equipment, or loss of data. These safety cautions have been classified
according to the seriousness of the risk, and icons highlight these
instructions as follows:
User’s Manual
EN-3
CANVIO AEROMOBILE
Signal Words
Meaning
DANGER
Indicates an imminently hazardous situation which, if
not avoided, will result in death or serious injury.
WARNING
Indicates a potentially hazardous situation which, if not
avoided, could result in death or serious injury.
CAUTION
Indicates a potentially hazardous situation which, if not
avoided, may result in minor or moderate injury.
CAUTION
Indicates a potentially hazardous situation which, if not
avoided, may result in property damage.
NOTE
Provides important information.
Other icons used
Additional icons highlight other helpful or educational information:
TECHNICAL NOTE: This icon indicates technical
information about the device.
HINT: This icon indicates helpful hints and tips.
DEFINITION: This icon indicates the definition of a
term used in the text.
Battery safety precautions
DANGER
Do not immerse the device (with the internal battery in it) in liquid such
as water, beverages, or other fluids.
The battery (including protection circuit) may catch on fire, smoke,
explode, or cause heat generation by unexpected electrical load.
DANGER
Keep the device (with the internal battery in it) away from heat and fire.
Heat will damage the battery and may cause it to generate heat,
smoke, catch fire, or explode.
User’s Manual
EN-4
CANVIO AEROMOBILE
DANGER
Do not disassemble the device and the internal battery.
Disassembly or modification of the battery may damage the protection
circuit. This may cause the battery to generate heat, smoke, catch fire,
or explode.
WARNING
Keep away from small children.
Keep the battery away from small children. If the battery or any of its
component parts is swallowed, seek medical attention immediately.
WARNING
Stop charging if the charging process cannot be finished.
If the battery can not finish the charging process within the specified
time, halt the charging process. The battery may generate heat,
smoke, catch fire, or explode.
WARNING
This device has a rechargeable battery inside. Do not throw away used
batteries as home rubbish.
Please bring them to a recycle agency or put in a recycle box for
portable rechargeable batteries. If used batteries are thrown away as
home rubbish, there is a possibility that they may cause the rubbish
collection to catch fire or smoke.
CAUTION
Only charge the battery in temperatures between 5º C and 35º C.
Charging outside of this temperature range may cause the battery to
leak, generate heat, or result in serious damage. It may also cause the
battery's performance and life to deteriorate.
Safety information and Rules and
Regulations for wireless LAN
CAUTION
Wireless LAN devices may cause interference with medical equipment
such as cardiac pacemakers. If you use personal medical equipment,
consult with your physician and medical equipment instructions before
using the Product. The Product should not be used in environments
with medical equipment such as hospitals and medical offices, or near
users of personal medical equipment, as use of this Product may
cause injury in such environments.
CAUTION
Always turn off wireless functionality if the computer is near automatic
control equipment or appliances such as automatic doors or fire
detectors. Radio waves can cause malfunction of such equipment,
possibly resulting in injury.
User’s Manual
EN-5
CANVIO AEROMOBILE
■ Do not use the Wireless LAN functionality near a microwave oven or in
areas subject to radio interference or magnetic fields. Interference from
a microwave oven or other source can disrupt Wireless LAN operation.
■ The transmission speed over the wireless LAN, and the distance over
which the wireless LAN can reach, may vary depending on surrounding
electromagnetic environment, obstacles, access point design and
configuration, client design and software/hardware configurations. The
transmission rate described is the theoretical maximum speed as
specified under the appropriate standard – the actual transmission
speed will be lower than the theoretical maximum speed.
Notice
The information contained in this manual, including but not limited to any
product specifications, is subject to change without notice.
TOSHIBA EUROPE GMBH PROVIDES NO WARRANTY WITH REGARD
TO THIS MANUAL OR ANY OTHER INFORMATION CONTAINED
HEREIN AND HEREBY EXPRESSLY DISCLAIMS ANY IMPLIED
WARRANTIES OF MERCHANTABILITY OR FITNESS FOR ANY
PARTICULAR PURPOSE WITH REGARD TO ANY OF THE FOREGOING.
TOSHIBA ASSUMES NO LIABILITY FOR ANY DAMAGES INCURRED
DIRECTLY OR INDIRECTLY FROM ANY TECHNICAL OR
TYPOGRAPHICAL ERRORS OR OMISSIONS CONTAINED HEREIN OR
FOR DISCREPANCIES BETWEEN THE PRODUCT AND THE MANUAL.
IN NO EVENT SHALL TOSHIBA BE LIABLE FOR ANY INCIDENTAL,
CONSEQUENTIAL, SPECIAL, OR EXEMPLARY DAMAGES, WHETHER
BASED ON TORT, CONTRACT OR OTHERWISE, ARISING OUT OF OR
IN CONNECTION WITH THIS MANUAL OR ANY OTHER INFORMATION
CONTAINED HEREIN OR THE USE THEREOF.
GNU General Public License (“GPL”)
Firmware incorporated into this product may include third party copyrighted
software licensed under the GPL or Lesser General Public License
(“LGPL”) (collectively, “GPL Software”) and not Toshiba's End User License
Agreement. A copy of that license may be obtained at http://www.gnu.org,
and www.toshiba.eu/externalstorage/support. With respect solely to the
GPL Software, no warranty is provided, to the extent permitted by
applicable law. Modification of or tampering with the Software is solely at
your own risk and will void the product warranty. Toshiba is not responsible
for any such modification or tampering. Toshiba will not support any product
in which you have or have attempted to modify the Software supplied by
Toshiba.
User’s Manual
EN-6
CANVIO AEROMOBILE
Copyright
This manual may not be reproduced in any form without the prior written
permission of Toshiba. No liability is assumed with respect to the use of the
information contained herein.
©2014 Toshiba Europe GmbH, All Rights Reserved.
Trademarks
Canvio AeroMobile is a trademark of Toshiba America Information
Systems, Inc. and/or Toshiba Corporation.
Google, Google Play and Android are trademarks of Google Inc.
Mac, Mac OS, iPad, iPhone and Time Machine are trademarks of Apple
Inc., registered in the U.S. and other countries.
IOS is a trademark or registered trademark of Cisco in the U.S. and other
countries and is used under license.
Wi-Fi® is a registered trademark of the Wi-Fi Alliance®.
Windows is a registered trademark of Microsoft Corporation in the United
States and other countries.
All other brand and product names are trademarks or registered
trademarks of their respective companies.
User’s Manual
EN-7
CANVIO AEROMOBILE
Table of Contents
Introduction. . . . . . . . . . . . . . . . . . . . . . . . . . . . . . . . . . . . . . . . . . . . . . . . 10
Overview . . . . . . . . . . . . . . . . . . . . . . . . . . . . . . . . . . . . . . . . . . . . . . . . . . . . . . 10
Components . . . . . . . . . . . . . . . . . . . . . . . . . . . . . . . . . . . . . . . . . . . . . . . . 10
Hardware specifications . . . . . . . . . . . . . . . . . . . . . . . . . . . . . . . . . . . . . . . 10
Software specifications . . . . . . . . . . . . . . . . . . . . . . . . . . . . . . . . . . . . . . . . 11
Chapter 1 Getting Started . . . . . . . . . . . . . . . . . . . . . . . . . . . . . . . . . . . . . . . . . . . . . 12
Charging the Canvio AeroMobile . . . . . . . . . . . . . . . . . . . . . . . . . . . . . . . . . . . 12
Function modes . . . . . . . . . . . . . . . . . . . . . . . . . . . . . . . . . . . . . . . . . . . . . . . . . 12
DAS mode (Direct-Attached Storage) . . . . . . . . . . . . . . . . . . . . . . . . . . . . . 12
Wireless LAN mode (Wireless LAN storage) . . . . . . . . . . . . . . . . . . . . . . . 13
Features . . . . . . . . . . . . . . . . . . . . . . . . . . . . . . . . . . . . . . . . . . . . . . . . . . . . . . 14
Chapter 2 AeroMobile Software Utility. . . . . . . . . . . . . . . . . . . . . . . . . . . . . . . . . . . . 16
AeroMobile System login. . . . . . . . . . . . . . . . . . . . . . . . . . . . . . . . . . . . . . . . . . 16
Connect wirelessly to a PC/Mac® . . . . . . . . . . . . . . . . . . . . . . . . . . . . . . . . 16
Web browser login . . . . . . . . . . . . . . . . . . . . . . . . . . . . . . . . . . . . . . . . . . . 16
Client login for iPhone® or iPad® . . . . . . . . . . . . . . . . . . . . . . . . . . . . . . . . . 17
Android™ client login . . . . . . . . . . . . . . . . . . . . . . . . . . . . . . . . . . . . . . . . . 18
AeroMobile main interface. . . . . . . . . . . . . . . . . . . . . . . . . . . . . . . . . . . . . . . . . 19
Web main interface . . . . . . . . . . . . . . . . . . . . . . . . . . . . . . . . . . . . . . . . . . . 20
Application main interface . . . . . . . . . . . . . . . . . . . . . . . . . . . . . . . . . . . . . . 20
Pictures Management interface. . . . . . . . . . . . . . . . . . . . . . . . . . . . . . . . . . . . . 22
Picture Viewer interface . . . . . . . . . . . . . . . . . . . . . . . . . . . . . . . . . . . . . . . 23
Videos Management interface. . . . . . . . . . . . . . . . . . . . . . . . . . . . . . . . . . . . . . 24
Video Playback interface
(iPhone®, iPad®, and Android™ device only) . . . . . . . . . . . . . . . . . . . . . . . 26
Music Management interface . . . . . . . . . . . . . . . . . . . . . . . . . . . . . . . . . . . . . . 27
Music Player interface
(iPhone®, iPad®, and Android™ device only) . . . . . . . . . . . . . . . . . . . . . . . 29
Documents Management interface . . . . . . . . . . . . . . . . . . . . . . . . . . . . . . . . . . 31
Document Viewer interface
(iPhone®, iPad®, and Android™ device only) . . . . . . . . . . . . . . . . . . . . . . . 32
File/Folder Management interface. . . . . . . . . . . . . . . . . . . . . . . . . . . . . . . . . . . 33
Chapter 3 SD™ Card Management . . . . . . . . . . . . . . . . . . . . . . . . . . . . . . . . . . . . . 37
Unmount SD card . . . . . . . . . . . . . . . . . . . . . . . . . . . . . . . . . . . . . . . . . . . . . . . 37
Access to SD Card . . . . . . . . . . . . . . . . . . . . . . . . . . . . . . . . . . . . . . . . . . . . . . 37
Chapter 4 Backup Management . . . . . . . . . . . . . . . . . . . . . . . . . . . . . . . . . . . . . . . . 38
Using the SD™ Card . . . . . . . . . . . . . . . . . . . . . . . . . . . . . . . . . . . . . . . . . . . . . 38
Manual backup . . . . . . . . . . . . . . . . . . . . . . . . . . . . . . . . . . . . . . . . . . . . . . 38
Automatic backup . . . . . . . . . . . . . . . . . . . . . . . . . . . . . . . . . . . . . . . . . . . . 38
Using the Backup Management . . . . . . . . . . . . . . . . . . . . . . . . . . . . . . . . . . . . 38
User’s Manual
EN-8
CANVIO AEROMOBILE
Chapter 5 Settings Management. . . . . . . . . . . . . . . . . . . . . . . . . . . . . . . . . . . . . . . . 40
Using the Settings Management . . . . . . . . . . . . . . . . . . . . . . . . . . . . . . . . . . . . 40
Configurations . . . . . . . . . . . . . . . . . . . . . . . . . . . . . . . . . . . . . . . . . . . . . . . 40
Wireless LAN settings for the Application . . . . . . . . . . . . . . . . . . . . . . . . . . 41
Wireless LAN settings for a Web browser. . . . . . . . . . . . . . . . . . . . . . . . . . 43
Internet Settings (application) . . . . . . . . . . . . . . . . . . . . . . . . . . . . . . . . . . . 45
Internet Settings (Web browser) . . . . . . . . . . . . . . . . . . . . . . . . . . . . . . . . . 46
System settings. . . . . . . . . . . . . . . . . . . . . . . . . . . . . . . . . . . . . . . . . . . . . . 47
DHCP Settings (Web browser only) . . . . . . . . . . . . . . . . . . . . . . . . . . . . . . . . . 51
User image and name management . . . . . . . . . . . . . . . . . . . . . . . . . . . . . . . . . 52
Cache (Applications only) . . . . . . . . . . . . . . . . . . . . . . . . . . . . . . . . . . . . . . . . . 53
Language (Applications only) . . . . . . . . . . . . . . . . . . . . . . . . . . . . . . . . . . . . . . 53
Logout . . . . . . . . . . . . . . . . . . . . . . . . . . . . . . . . . . . . . . . . . . . . . . . . . . . . . . . . 53
TOSHIBA Support . . . . . . . . . . . . . . . . . . . . . . . . . . . . . . . . . . . . . . . . . . . . . . . 54
Index . . . . . . . . . . . . . . . . . . . . . . . . . . . . . . . . . . . . . . . . . . . . . . . . . . . . . 55
User’s Manual
EN-9
CANVIO AEROMOBILE
Introduction
Overview
The Toshiba Canvio AeroMobile allows you to wirelessly access your
music, videos, pictures, and data, streaming it to your iPad®, iPhone®,
tablets, smartphones, and notebooks, no longer requiring you to tangle with
cords or cables. With the internal SSD storage, there is no need to worry
about running out of space on your mobile devices and the built-in USB 3.0
port makes file transfer easier and much faster.
Components
The Canvio AeroMobile includes the following components:
■ AC adapter
■ USB 3.0 cable
■ Quick Start guide
■ Pouch
Hardware specifications
Product dimension: 123.5 mm (L) x 63.0 mm (W) x 12.5 mm (H)
[4.9 in (L) x 2.5 in (W) x 0.5 in (H)]
Weight:
approx. 120 g
Battery:
3100mAh Li-ion type
(Charging time: max. 3 hours)
Environmental requirements:
Wireless LAN
Standard:
802.11 b/g/n
Frequency:
2.4 GHZ
Speed:
1T1R up to 150 Mbps
Operating:
5 to 35º C (41 to 95º F)
Storage:
-20 to 60º C (-4 to 140°F)
Operating:
20-80%
Storage:
8-90%
Temperature
Humidity
User’s Manual
EN-10
CANVIO AEROMOBILE
Software specifications
Compatible file types:
Videos:
mp4, 3gp, m4v, mov, avi
Music:
mp3, m4a, aac, wav
Pictures:
jpg, bmp, png, gif, tif
Documents:
pdf, doc, docx, ppt, pptx, xls, xlsx, txt, rtf
Others:
Opens in external software
System requirements:
Operating System
iPhone®
system:
or
Android™:
User’s Manual
iPad®
Windows®:
Windows® 7, Windows 8,
Windows 8.1
Mac OS:
X 10.7, 10.8
operating 5.1 to 7
2.3 to 4.2
EN-11
CANVIO AEROMOBILE
Chapter 1
Getting Started
Charging the Canvio AeroMobile
The Canvio AeroMobile can be charged via the AC adaptor and USB cable.
Charge the Canvio AeroMobile when you see that the battery indicator is
Yellow (indicates low battery charge).
USB 3.0 port
AC adaptor
USB cable
(Sample Image) Canvio AeroMobile charging
To charge the Canvio AeroMobile:
1. Attach the USB cable to the AC adaptor.
2. Plug the USB cable into the USB 3.0 Host port on the Canvio
AeroMobile.
3. Plug the AC adapter into a live electrical wall outlet.
While charging, the battery indicator light will blink slowly (interval time
is 2 seconds).
Function modes
There are two available function modes on the Canvio AeroMobile. You can
either connect to it directly with the included USB cable (DAS mode) or
connect wirelessly (Wireless LAN mode).
DAS mode (Direct-Attached Storage)
To operate via DAS mode, connect the Canvio AeroMobile to the
computer’s USB port using the included USB cable.
User’s Manual
EN-12
CANVIO AEROMOBILE
For Mac® users:
To write files in DAS mode, you will need to install the “NTFS driver for
Mac®” to your Mac. Refer the pre-loaded manual stored on the Canvio
AeroMobile’s SSD.
USB 3.0 port
USB cable
USB port
(Sample Image) Canvio AeroMobile DAS mode
To connect the Canvio AeroMobile to your computer:
1. Make sure the Canvio AeroMobile is powered OFF.
2. Connect the included USB 3.0 cable to the Canvio AeroMobile.
3. Connect the other end of the USB 3.0 cable to your computer’s USB
port.
You can now begin transferring data to and from the product.
Wireless LAN mode (Wireless LAN storage)
You can access the Canvio AeroMobile wirelessly from Windows®, Mac®,
iPhone®, iPad®, and Android™ mobile devices using the AeroMobile
Client™.
Router
(Sample Image) Canvio AeroMobile Wireless LAN mode
Press the ON/OFF button to power on the system.
The Canvio AeroMobile automatically functions in Wireless LAN mode
once the AeroMobile Client™ has been set up, see “Connect wirelessly to
a PC/Mac®” on page 16.
User’s Manual
EN-13
CANVIO AEROMOBILE
Features
■ Two available modes:
■ DAS (Direct-Attached Storage) mode
■ Wireless LAN mode (Wireless LAN Storage mode)
■ Access and stream your music, videos, pictures and data using the free
Application supporting iPhone®, iPad®, and Android™ operating
systems.
■ Up to 8 Hours of continuous battery life in video streaming condition.
■ Search function to locate and access your files much faster.
■ Internet access capability via wireless, supporting 802.11 b/g/n.
■ Built-in 128 GB SSD with NTFS format.
■ Supports SD™ memory, SDHC™, Class 10 compatible.
SD™ Card indicator light
Wi-Fi®/SSD indicator light
Battery indicator light
On/Off button
SD™ Card slot
USB 3.0 Host
Reset button
(Sample Image) Canvio AeroMobile features
On/Off button:
■ Press and hold for 2 seconds, (Wireless LAN mode turns ON).
■ Press and hold for 2 seconds again, (Wireless LAN mode turns OFF).
NOTE
If the battery is too low, you cannot turn the AeroMobile ON. The battery
indicator will blink Orange for 6 seconds, and then off.
Reset button:
■ In Wireless LAN mode, press and hold for 5 seconds. The system will
restore to its factory settings.
USB 3.0 Host:
■ Compatible with USB 3.0 and USB 2.0.
■ Allows for data transfer between a computer and the Canvio
AeroMobile, when connected.
User’s Manual
EN-14
CANVIO AEROMOBILE
■ Allows you to charge the product battery when connected to the AC
adapter.
SD™ Card Slot:
■ Class 10 compatible, supports SD™ flash memory and SDHC™.
■ In Wireless LAN mode, you can access the SD™ Card.
Battery Indicator light:
■ Green: The battery power is ≥ 30%.
■ Yellow: The battery power is < 30% and > 10%.
■ Orange (blinking fast): the product is out of battery power or the
operating temperature is too high. the product will shut down after 30
seconds.
■ Green or Yellow (blinking slowly): The battery is charging.
■ Green (Not blinking): Finish charging.
■ Green or Yellow (blinking fast): The product is shutting down or turning
ON.
■ LED Off: The device is powered OFF.
Wireless LAN/SSD indicator:
■ Wireless LAN Mode
■ Blue: Wireless LAN is ON (no data access).
■ Blue (blinking): Wireless LAN is ON (accessing storage).
■ Blue (turned off): Wireless LAN is OFF.
■ DAS Mode
■ White: No data access.
■ White (blinking): Accessing data.
■ White (turned off): “Safely Remove”, system “Sleep” or “Standby.”
SD™ Card indicator:
■ Only glows in Wireless LAN Mode
■ Violet: No SD™ Card access.
■ Violet (blinking): Accessing SD™ Card.
■ Violet (turned off): SD™ Card enters into standby.
User’s Manual
EN-15
CANVIO AEROMOBILE
Chapter 2
AeroMobile Software Utility
AeroMobile System login
Connect wirelessly to a PC/Mac®
1. Press the ON/OFF button to power on the system.
2. Once the Wi-Fi® indicator light stops blinking, enable the Wireless LAN
feature on your PC/Mac and open the Wireless Network connection.
3. Select the Toshiba wssd xxxx wireless connection (default wireless
SSID: Toshiba wssd xxxx), and then enter the default password
12345678.
Web browser login
1. Once you have successfully connected to your Canvio AeroMobile,
open a Web browser and enter the "http://10.10.10.254" or
"http://wirelessssd/" URL.
(Sample Image) Web browser address field
If an Internet connection is not available, input any URL and the Web
browser will take you to the above page.
(Sample Image) Log in screen
User’s Manual
EN-16
CANVIO AEROMOBILE
2. Enter your login information in the Log In screen, using the following
credentials:
■ User Name: admin
■ User Password: Leave the field blank
3. Click or touch the Log In button to access the main Web Interface.
Client login for iPhone® or iPad®
Install the application for iPhone® and iPad®
1. Search and locate the free TOSHIBA app called “Wireless SSD” in the
Apple® Store.
2. Install the Wireless SSD app and follow the on-screen installation
instructions.
3. The Wireless SSD icon appears on the Desktop once the installation
process is complete.
Connecting wirelessly to an iPhone® or iPad®
1. Press the ON/OFF button to power on the system.
2. Once the Wi-Fi® indicator light stops blinking, go to Setting, and then
the Wireless LAN option in your iPad®/iPhone®.
3. Click or touch Toshiba wssd xxxx.
4. Enter the default password 12345678.
Application login
1. Run the “Wireless SSD” applet, and then log into the “Wireless SSD.”
(Sample Image) iPhone® or iPad® Log in screen
2. Enter your login information in the Log In screen, using the following
credentials:
■ User Name: admin
■ User Password: Leave the field blank
3. Click or touch the OK button to access the main interface.
User’s Manual
EN-17
CANVIO AEROMOBILE
Android™ client login
Install the Android™ application
1. Search and locate the free TOSHIBA app called “Wireless SSD” in the
Google Play™ Store.
2. Install the Wireless SSD app and follow the on-screen installation
instructions.
3. The Wireless SSD icon appears on the Desktop once the installation
process is complete.
Connecting wirelessly to an Android™ device
1. Press the ON/OFF button to power on the system.
2. Once the Wi-Fi® indicator light stops blinking, go to Setting, and then
the Wireless LAN option in your tablet or smart phone.
3. Click or touch Toshiba wssd xxxx.
4. Enter the default password 12345678.
Application login
1. Run the “Wireless SSD” applet, and then log into the “Wireless SSD.”
(Sample Image) Android™ Log in screen
2. Enter your login information in the Log In screen, using the following
credentials:
■ User Name: admin
■ User Password: Leave the field blank
3. Click or touch the OK button to access the main interface.
User’s Manual
EN-18
CANVIO AEROMOBILE
AeroMobile main interface
When entering the main interface, AeroMobile may inform you if a new
Firmware is available. The following 3 options are available:
■ OK to update
■ Cancel
■ Do not prompt
(Sample Image) Firmware update screen
If you select OK to update, the system will inform you to wait 5 minutes.
(Sample Image) Firmware update - wait 5 minutes screen
If you select Cancel, you may be informed of any available upgrades the
next time you login and enter the AeroMobile main interface.
If you select Do not prompt, AeroMobile will never again automatically
inform you of a firmware upgrade, however, you can manually upgrade the
firmware on the Setting page, see “Upgrade the Firmware:” on page 50.
User’s Manual
EN-19
CANVIO AEROMOBILE
Web main interface
Below is an example of the AeroMobile main interface viewed in a
computer’s Web browser.
(Sample Image) AeroMobile main interface - Web browser
Application main interface
Below is an example of the AeroMobile main interface viewed in the
iPhone®, iPad®, or Android™ app.
Tablet/iPad®
Smart phone/iPhone®
(Sample Image) AeroMobile main interface - application
User’s Manual
EN-20
CANVIO AEROMOBILE
AeroMobile main interface functionality
Below is a description of each button/icon and its function within the
AeroMobile main interface:
Button/Icon
Function
Displays the picture preview.
Click or touch the Picture button to enter Pictures
Management.
Displays the video files preview. If no videos are
available, the default image is used.
Click or touch the Videos button to enter Videos
Management.
Displays the document files preview. If no
documents are available, the default image is used.
Click or touch the Documents button to enter
Documents Management.
Click or touch the File/Folder button to enter the
File/Folder Management Interface. This is where
you can create folder(s), copy file(s)/folder(s),
delete file(s)/folder(s), share file(s), upload/
download file(s) etc.
Click or touch Back up data button to access Back
up menu, see “Backup Management” on page 38.
The SD™ Card is available.
Internet connection is available.
No Internet connection is available.
Displays the current battery level of the Canvio
AeroMobile.
Click or touch the Settings button to enter the
Canvio AeroMobile system settings.
Click or touch the SSD Storage icon to switch to
the Canvio AeroMobile’s internal SSD storage.
Click or touch the SD Card button to switch to the
Canvio AeroMobile’s inserted SD™ Card.
User’s Manual
EN-21
CANVIO AEROMOBILE
Pictures Management interface
NOTE
Before using this feature, content should be transferred to the Canvio
AeroMobile device via direct connection to your computer, see “DAS mode
(Direct-Attached Storage)” on page 12.
When you click or touch the Picture button the Pictures Management
window appears.
Below is an example of the Pictures Management interface window.
(Sample Image) AeroMobile Pictures Management interface window
Below is a description of each button/icon and its function within the
AeroMobile Pictures Management interface window:
Button/Icon
Function
Click or touch the Back button to return to the main
window.
When the Sort by name icon is displayed, the list is
in “sort by name” mode.
When the Sort by date icon is displayed, the list is
in “sort by date” mode.
Click or touch the icon to toggle between modes.
When the Thumbnail icon is displayed, the list is in
“Thumbnail” mode.
When the List icon is displayed, the list is in “List”
mode.
Click or touch the icon to toggle between modes.
User’s Manual
EN-22
CANVIO AEROMOBILE
Button/Icon
Function
You can choose picture files from the Calendar
menu.
Enter key letters or numbers in the search box to
perform a search of a specific file or folder.
Click or touch the SSD Storage icon to switch to
the Canvio AeroMobile’s internal SSD storage.
Click or touch the SD Card button to switch to the
Canvio AeroMobile’s inserted SD™ Card.
Click or touch the Local button to switch to the local
iPhone®, iPad®, or Android™ device.
(iPhone®, iPad®, or Android™ devices only.)
When switching to the Canvio AeroMobile's internal
SSD storage, you can choose pictures from one of
4 users. The 4 user default names are: Default,
Owner1, Owner2, and Owner3.
Picture Viewer interface
Click or touch a picture file to enter the Picture Viewer interface. Below is
an example of the Picture Viewer interface window.
(Sample Image) AeroMobile Picture Viewer interface window
Below is a description of each button/icon and its function within the
AeroMobile Pictures Management interface window:
User’s Manual
EN-23
CANVIO AEROMOBILE
Button/Icon
Function
Click or touch the Back button to return to the
Pictures Management interface window.
Click or touch the Download button to download
the current picture to the local album.
Click or touch the Upload button to upload the
current picture from local to AeroMobile device.
Click or touch the Play/Pause button to start/stop
the photo slide show.
When the Loop playback icon is displayed, the
photo slide show plays in “Loop playback” mode.
When the Sequential icon is displayed, the photo
slide show plays in “Sequential” mode.
Click or touch the icon to toggle between modes.
Click or touch the Share button to share the current
picture to social media or email.
Videos Management interface
NOTE
Before using this feature, content should be transferred to the Canvio
AeroMobile device via direct connection to your computer, see “DAS mode
(Direct-Attached Storage)” on page 12.
When you click or touch the Videos button the Videos Management window
appears.
Below is an example of the Videos Management interface window.
(Sample Image) AeroMobile™ Videos Management interface window
User’s Manual
EN-24
CANVIO AEROMOBILE
Below is a description of each button/icon and its function within the
AeroMobile Videos Management interface window:
Button/Icon
Function
Click or touch the Back button to return to the main
window.
When the Sort by name icon is displayed, the list is
in “sort by name” mode.
When the Sort by date icon is displayed, the list is
in “sort by date” mode.
Click or touch the icon to toggle between modes.
When the Thumbnail icon is displayed, the list is in
“Thumbnail” mode.
When the List icon is displayed, the list is in “List”
mode.
Click or touch the icon to toggle between modes.
Enter key letters or numbers in the search box to
perform a search of a specific file or folder.
You can choose picture files by this Calender
menu.
Click or touch the SSD Storage icon to switch to
the Canvio AeroMobile’s internal SSD storage.
Click or touch the SD Card button to switch to the
Canvio AeroMobile’s inserted SD™ Card.
Click or touch the Local button to switch to the local
iPhone®, iPad®, or Android™ device.
(iPhone®, iPad®, or Android™ devices only.)
When switching to the Canvio AeroMobile's internal
SSD storage, you can choose pictures from one of
4 users. The 4 user default names are: Default,
Owner1, Owner2, and Owner3.
User’s Manual
EN-25
CANVIO AEROMOBILE
Video Playback interface
(iPhone®, iPad®, and Android™ device only)
Click or touch a video file to enter the Video Playback interface. Below is an
example of the Video Playback interface window.
(Sample Image) AeroMobile Video Playback interface window
Below is a description of each button/icon and its function within the
AeroMobile Video Playback interface window:
Button/Icon
Function
Click or touch the Back button to return to the main
window.
Click or touch the Zoom button to adjust the
playback screen size.
Click or touch the Previous button to switch to the
previous video playback.
Click or touch the Next button to switch to the next
video playback.
Click or touch the Rewind button to rewind the
video 20 seconds.
Click or touch the Forward button to forward the
video 20 seconds.
Click or touch the Play/Pause button to play/pause
the currently playing video.
Click or touch the Download button to download
the current picture to the local album.
Click or touch the upload button to upload the
current picture from local to AeroMobile device.
User’s Manual
EN-26
CANVIO AEROMOBILE
Button/Icon
Function
Drag the Playback progress bar, to navigate to
different positions in the video playback.
Drag the Volume control bar to adjust the volume of
the video. The volume is divided into four states:
Quiet, Small, Medium, and Maximum volume.
If the Web browser supports video playback, you can play the video within
a Web browser, otherwise, you will be asked to download the video to a
local device.
Music Management interface
NOTE
Before using this feature, content should be transferred to the Canvio
AeroMobile device via direct connection to your computer, see “DAS mode
(Direct-Attached Storage)” on page 12.
(Sample Image) AeroMobile Music Management interface window
User’s Manual
EN-27
CANVIO AEROMOBILE
Below is a description of each button/icon and its function within the
AeroMobile Music Management interface window:
Button/Icon
Function
Click or touch the Back button to return to the main
window.
When the Thumbnail icon is displayed, the list is in
“Thumbnail” mode.
When the List icon is displayed, the list is in “List”
mode.
Click or touch the icon to toggle between modes.
Enter key letters or numbers in the search box to
perform a search of a specific file or folder.
Click or touch the SSD Storage icon to switch to
the Canvio AeroMobile’s internal SSD storage.
Click or touch the SD Card button to switch to the
Canvio AeroMobile’s inserted SD™ Card.
Click or touch the Local button to switch to the local
iPhone®, iPad®, or Android™ device.
(iPhone®, iPad®, or Android™ devices only.)
Click or touch the All Songs button to view all of
the song files available on the Canvio AeroMobile
(default mode).
Click or touch the Albums button to view all of the
song files by albums.
Click or touch the Artist button to view all of the
song files by Artist.
Click or touch the Favorites button to view all of
your favorite songs. You can add songs to the
favorites screen by clicking or touching the ( )
button on the All music screen, Album screen,
and the Artist screen. Remove songs from the
Favorites screen by clicking or touching the ( )
button on the Favorites screen.
User’s Manual
EN-28
CANVIO AEROMOBILE
Music Player interface
(iPhone®, iPad®, and Android™ device only)
Click or touch a music file to enter the Music Player interface. Below is an
example of the Music Player interface window.
(Sample Image) AeroMobile Music Player interface window
Below is a description of each button/icon and its function within the
AeroMobile Music Player interface window:
Button/Icon
Function
Click or touch the Back button to return to the
Music Management interface window.
The Favorites icon displays in the Music Player
interface window when playing in Favorites mode.
Return to the begininng or previous music playback
Click or touch the Next button to switch to the next
song.
Click or touch the Rewind button to rewind the
song 20 seconds.
Click or touch the Forward button to forward the
song 20 seconds.
Click or touch the Play/Pause button to play/pause
the currently playing song.
Drag the Playback progress bar, to navigate to
different positions in the music playback.
User’s Manual
EN-29
CANVIO AEROMOBILE
Button/Icon
Function
Drag the Volume control bar to adjust the volume of
the music.
Click or touch the Music mode button to switch
between the following four musical modes: Shuffle
(
) (default mode), Loop Playback ( ), Order
Play ( ), and Single Cycle ( ).
Click or touch the Favorites button to add the
currently playing music to your Favorites.
If the Web browser supports music playback, you can play the music within
a Web browser, otherwise, you will be asked to download the music file to a
local device.
Documents Management interface
(Sample Image) AeroMobile Documents Management interface window
Below is a description of each button/icon and its function within the
AeroMobile Documents Management interface window:
User’s Manual
EN-30
CANVIO AEROMOBILE
Button/Icon
Function
Click or touch the Back button to return to the main
window.
When the Sort by name icon is displayed, the list is
in “sort by name” mode.
When the Sort by date icon is displayed, the list is
in “sort by date” mode.
Click or touch the icon to toggle between modes.
When the Thumbnail icon is displayed, the list is in
“Thumbnail” mode.
When the List icon is displayed, the list is in “List”
mode.
Click or touch the icon to toggle between modes.
You can choose picture files by this Calender
menu.
Enter key letters or numbers in the search box to
perform a search of a specific file or folder.
Click or touch the SSD Storage icon to switch to
the Canvio AeroMobile’s internal SSD storage.
Click or touch the SD Card button to switch to the
Canvio AeroMobile’s inserted SD™ Card.
Click or touch the Local button to switch to the local
iPhone®, iPad®, or Android™ device.
(iPhone®, iPad®, or Android™ devices only.)
User’s Manual
EN-31
CANVIO AEROMOBILE
Document Viewer interface
(iPhone®, iPad®, and Android™ device only)
Click or touch a document file to enter the Document Viewer interface.
Below is an example of the Document Viewer interface window.
(Sample Image) AeroMobile Document Viewer interface window
Below is a description of each button/icon and its function within the
AeroMobile Document Viewer interface window:
Button/Icon
Function
Click or touch the Back button to return to the
Documents Management interface window.
Click or touch the Share button to share the current
document by email.
If the Web browser supports file view, you can display the document within
a Web browser, otherwise, you will be asked to download the document file
to a local device.
User’s Manual
EN-32
CANVIO AEROMOBILE
File/Folder Management interface
(Sample Image) AeroMobile File/Folder Management interface - Application window
(Sample Image) AeroMobile File/Folder Management interface - Web browser
window
Below is a description of each button/icon and its function within the
AeroMobile File/Folder Management interface window:
Button/Icon
Function
Click or touch the Back button to return to the main
window.
User’s Manual
EN-33
CANVIO AEROMOBILE
Button/Icon
Function
When the Thumbnail icon is displayed, the list is in
“Thumbnail” mode.
When the List icon is displayed, the list is in “List”
mode.
Click or touch the icon to toggle between modes.
Enter key letters or numbers in the search box to
perform a search of a specific file or folder.
Click or touch the SSD Storage icon to switch to
the Canvio AeroMobile’s internal SSD storage.
Click or touch the SD Card button to switch to the
Canvio AeroMobile’s inserted SD™ Card.
Click or touch the Local button to switch to the local
iPhone®, iPad®, or Android™ device.
(iPhone®, iPad®, or Android™ devices only.)
Click or touch the Refresh button to refresh the
screen.
Click or touch the Share button to share the current
document by email.
(Within an Application only.)
A Checkmark icon indicates that the file or folder is
selected.
Click or touch the Setting button to display the
following options:
Application
User’s Manual
Web browser
EN-34
CANVIO AEROMOBILE
Button/Icon
Function
Click or touch the Transmission button to enter the
File transmission dialog box.
When an action is taken with a file or folder (copy,
cut, upload, or download), the File transmission
dialog box opens. A progress bar of each
transmission is displayed as well as successful and
failed transmissions.
(Application only.)
The Upload ( ) icon indicates an uploading file/
folder in progress.
The Download ( ) icon indicates a downloading
file/folder in progress.
Touch the Upload/Download icon to pause the
upload/download process. The Pause ( ) icon is
displayed.
The ( ) icon indicates that a file/folder is waiting
for upload/download. This application allows for
individual file/folder upload/download.
Touch the Cancel ( ) icon to cancel all queued
files.
The buttons above the Queued Files list indicate
“Transfer Complete” or “Transfer Failed.”
(Sample Image) Document Viewer Queued Files window
User’s Manual
EN-35
CANVIO AEROMOBILE
If a transfer fails and you wish to try again, click the (
button.
) Re-Transfer
To upload/download file(s)/folder(s) within a Web browser:
The Upload (
local system.
) icon indicates an uploading file/folder in progress from a
(Sample Image) Upload progress bar - Web browser window
When a selected local file is uploaded to the Canvio AeroMobile, a
progress bar is displayed in the Web browser window.
The Download ( ) icon indicates a downloading file/folder in progress
from the Canvio AeroMobile.
NOTE
User’s Manual
The downloading method may vary, depending on the Web browser used.
EN-36
CANVIO AEROMOBILE
Chapter 3
SD™ Card Management
Unmount SD card
Click or touch SD card button, open the pop up menu to unmount SD Card.
Access to SD Card
Click or touch SD Card button to access the SD Card.
User’s Manual
EN-37
CANVIO AEROMOBILE
Chapter 4
Backup Management
Using the SD™ Card
You can back up the files on the SD™ Card to one of the four user
directories: Default, Owner1, Owner2, or Owner3. The backup is an
incremental backup.
You can backup the SD™ card manually or use the automatic backup
function.
If the size of the backup files are larger than the available space on the
Canvio AeroMobile’s SSD, you will see a warning message before the
backup process begins.
Manual backup
You can select a backup user. Click or touch Start Copy. Videos and
pictures from the SD™ Card will be backed up to the selected user
directory. The backup progress is displayed at the bottom of the interface
window.
Automatic backup
You also have the option to select Automatic backup. The next time you
insert the SD™ Card, all of the videos and pictures on the SD™ Card will
be automatically backed up to the selected user directory.
Using the Backup Management
(For iPhone®, iPad®, and Android™ devices only.)
You can back up the videos and pictures on your iPhone®, iPad®, and
Android™ device to one of the Canvio AeroMobile's four user directories:
Default, Owner1, Owner2, or Owner3.
User’s Manual
EN-38
CANVIO AEROMOBILE
Click or touch the Start Backup button to start the backup process.
(Sample Image) Back up data window
The backup progress bar is displayed in the bottom of the interface window.
(Sample Image) Back up data window
If the size of the backup files are larger than the available space on the
Canvio AeroMobile’s SSD, you will see a warning message before the
backup process begins.
User’s Manual
EN-39
CANVIO AEROMOBILE
Chapter 5
Settings Management
Using the Settings Management
Click or touch the Setting button on the upper-right corner of the Main
interface window to enter the setting interface window. The following
modules are available:
■ Configurations
■ User image and name
■ Cache (Application only)
■ Language (Application only)
■ About
■ Logout
Configurations
Below is an example of the Settings Configuration window for the
Application.
(Sample Image) Settings Configurations - (Application) window
User’s Manual
EN-40
CANVIO AEROMOBILE
Below is an example of the Settings Configuration window for a Web
browser.
(Sample Image) Settings Configurations - (Web browser) window
Wireless LAN settings for the Application
Click or touch WiFi Setting to enter the Wireless LAN settings window.
(Sample Image) Settings Configurations - Wi-Fi® window
The following options are available:
■ SSID
■ Channel
■ Mode
■ Security
User’s Manual
EN-41
CANVIO AEROMOBILE
SSID:
1. Click or touch the SSID button to enter the SSID settings window.
(Sample Image) Settings Configurations - SSID settings window
2. Enter your SSID. The default SSID is “Toshiba wssd xxxx.”
3. Click or touch the Save button.
Channel:
1. Click or touch the Channel button to enter the Wireless LAN Channel
window.
2. Select the desired Wireless LAN channel, or set it to Auto.
3. Click or touch the Save button.
Mode:
1. Click or touch the Mode button to enter the Wireless LAN mode
window.
(Sample Image) Settings Configurations - Select Mode window
2. Select the desired Wireless LAN mode.
3. Click or touch the Save button.
User’s Manual
EN-42
CANVIO AEROMOBILE
Security:
1. Click or touch the Security button to enter the Wireless LAN security
window.
(Sample Image) Settings Configurations - Security window
2. Select the desired Wireless LAN security setting.
NOTE
Password authentication is required if you select WPA-PSK, WPA2-PSK
or Mixed WPA/WPA2- PSK. The default password is “12345678.”
No password is needed if None is selected.
3. Enter your password, if requested.
4. Click or touch the Save button.
Wireless LAN settings for a Web browser
The setting functions within the Web browser version of this software are
similar to the Application Wireless LAN settings, however, there are design
differences in the screen designs.
User’s Manual
EN-43
CANVIO AEROMOBILE
In the Web browser, you can elect to Show or Hide the SSID settings.
1. To Show the SSID settings move the switch in the upperright corner of
the screen to the ON position. To Hide the SSID settings move the
switch to the OFF position.
(Sample Image) Settings Configurations - SSID window
2. Click or touch the Save button.
LAN Settings:
1. Click or touch the LAN setting to enter LAN setting window.
(Sample Image) Settings Configurations - LAN Setting (Application) window
(Sample Image) Settings Configurations - LAN Setting (Web browser) window
■ MAC address: This is for your reference and cannot be changed.
■ IP Address: Click or touch the field to modify the IP address of
device.
User’s Manual
EN-44
CANVIO AEROMOBILE
■ Subnet Mask: Click or touch the field to modify the Subnet Mask of
device.
2. Click or touch the Save button.
Internet Settings (application)
Click or touch Internet Settings to enter the Internet setting window.
You can configure your network connection between the Canvio
AeroMobile and Wireless LAN router.
(Sample Image) Settings Configurations - Internet Setting (Application) window
1. Select your router from the Access Points list.
NOTE
You may be asked to input a password for the connection.
(Sample Image) Internet Setting - password window
If connected successfully, a checkmark appears next to the access
point.
2. Set the Dynamic IP or static IP as desired within the Internet setting.
User’s Manual
EN-45
CANVIO AEROMOBILE
3. Click or touch OK.
(Sample Image) Dynamic IP or static IP Settings windows
NOTE
Be careful when connected to network in a public place.
Other person can connect to your device.
Internet Settings (Web browser)
The setting functions within the Web browser version of this software are
similar to the Application Internet settings, however, there are design
differences in the screen designs.
(Sample Image) Settings Configurations - Internet Setting (Web browser) window
User’s Manual
EN-46
CANVIO AEROMOBILE
System settings
In the System settings, you can modify the user’s password, change the
host name, and check the Canvio AeroMobile's SSD capacity and
remaining capacity, and upgrade the firmware.
(Sample Image) System Settings window
Modify Admin Password:
1. In the System Settings window click or touch Modify Admin Password
to open the Modify Admin Password window.
(Sample Image) Modify Admin Password window
2. Enter your new login information in the following fields:
■ User Name
■ User Password
■ Confirm Password
3. Click or touch the Save button.
User’s Manual
EN-47
CANVIO AEROMOBILE
Host Name:
1. In the System Settings window click or touch Host Name to open the
Host Name window.
(Sample Image) Host Name window
2. Enter your new Host Name.
3. Click or touch the OK button.
Time Settings (Web browser only):
You can manually select the time zone, date, and time for your AeroMobile.
You can also set your AeroMobile to synchronize the date and time with
your mobile device or the Internet.
1. In the System Settings window click or touch Time Settings to open the
Time Settings window.
(Sample Image) Time Settings window
2. Click or touch the Time Zone button to choose your desired location.
3. Move the switch to the ON/OFF position to choose the appropriate
Daylight Saving Time setting.
4. Move the switch to the ON/OFF position for the Automatically
synchronize with an internet time server selection.
User’s Manual
EN-48
CANVIO AEROMOBILE
5. In the Date fields, enter the Year, Month, and Day.
6. In the Time fields, enter the Hours, Minutes, and Seconds.
7. Click or touch the Save button.
Disc Information:
In the System Settings window click or touch Disk Information to open the
Disk Information window.
(Sample Image) Disk Information window
This window shows the amount of available disk space remaining on your
AeroMobile.
Reset the Settings/Restore the factory setting
(Web browser only):
1. In the System Settings window click or touch Reset Settings to open
the Reset Settings window.
(Sample Image) Reset Settings window
CAUTION
All information stored on the AeroMobile will be erased during this
formatting process.
Be sure to save your data to another storage device before executing
this procedure.
2. To restore your AeroMobile to its original Factory Default settings, move
the switch to the ON position.
3. Click or touch the Save button.
User’s Manual
EN-49
CANVIO AEROMOBILE
Upgrade the Firmware:
1. In the System Settings window click or touch Upgrade Firmware to
open the Upgrade Firmware window.
2. Click or touch the Online Upgrade button.
If new Firmware is available, the following screen appears.
(Sample Image) Upgrade Firmware window
3. Click or touch the OK button.
If no new Firmware is available, the screen below appears.
(Sample Image) No detected firmware window
If you are in a Web browser, you will have the option to upgrade
manually with the screen below.
(Sample Image) Manual Upgrade window
4. Click or touch the Upgrade button.
The following screen appears.
(Sample Image) Wait 5 minutes window
5. Reconnect your AeroMobile.
User’s Manual
EN-50
CANVIO AEROMOBILE
DHCP Settings (Web browser only)
You can set up the DHCP server information.
1. Click or touch Settings.
2. Click or touch Configuration, and then DHCP server.
(Sample Image) DHCP Server window
3. Enter the required information.
You can also check the client list.
(Sample Image) Client list window
User’s Manual
EN-51
CANVIO AEROMOBILE
User image and name management
Enter the user symbol and name page to see the window below.
(Sample Image) User image and name management window
On the following screen, you can change the four user’s Icon and name.
This change will reflect on the picture management screen, video
management screen, SD™ card screen, and Backup screen.
(Sample Image) User image and name management window
There are a total of 12 icons to choose from.
You can also type a new name for each user.
1. Click or touch Settings.
2. Click or touch a User icon, and then Name. In this window, you can
change the User icon and User name, (e.g. “Default” to “Father”).
User’s Manual
EN-52
CANVIO AEROMOBILE
Cache (Applications only)
Applying caches settings on your local device will improve the response
speed of the Canvio AeroMobile. You can adjust the size of the caches,
which increases the performance.
1. Click or touch Settings.
2. Click or touch Cache.
(Sample Image) Cache window
3. Select the desired Cache size.
Language (Applications only)
You can select the desired language for your Canvio AeroMobile. The
default language is English.
(Sample Image) Language window
Logout
To logout the current user, go to the login screen.
For security reasons, if you log out after you set a password, you will be
required to use the password when logging back in.
User’s Manual
EN-53
CANVIO AEROMOBILE
TOSHIBA Support
Need help?
Please contact TOSHIBA’s hard drive and storage products support page:
www.toshiba.eu/externalstorage/support
For warranty claims, please check: computers.toshiba.eu/options-warranty
User’s Manual
EN-54
CANVIO AEROMOBILE
Index
A
F
AeroMobile
System login . . . . . . . . . . . 16
AeroMobile main interface
Application . . . . . . . . . . . . . 20
Functionality. . . . . . . . . . . . 21
Web browser . . . . . . . . . . . 20
AeroMobile Software Utility
Main interface . . . . . . . . . . 19
Android™ device
Application login. . . . . . . . . 18
Connect wirelessly. . . . . . . 18
Install application . . . . . . . . 18
File/Folder Management
interface . . . . . . . . . . . . . . . . . . .33
Function modes
DAS mode . . . . . . . . . . . . .12
Wireless LAN mode . . . . . .13
B
Backup
Management . . . . . . . . . . . 39
C
Cache . . . . . . . . . . . . . . . . . . . . 54
Canvio AeroMobile
Charging . . . . . . . . . . . . . . 12
Features. . . . . . . . . . . . . . . 14
Function modes . . . . . . . . . 12
Client login
Android™. . . . . . . . . . . . . . 18
Components . . . . . . . . . . . . . . . 10
Contacting Toshiba . . . . . . . . . . 55
D
DHCP settings . . . . . . . . . . . . . 52
Document Viewer interface. . . . 32
Documents Management
interface . . . . . . . . . . . . . . . . . . 31
H
Hardware specifications. . . . . . .10
I
Icon
Safety . . . . . . . . . . . . . . . . . .3
iPhone® and iPad®
Install application . . . . . . . .17
iPhone® or iPad®
Application login . . . . . . . . .17
Client login . . . . . . . . . . . . .17
Connect wirelessly . . . . . . .17
L
Language. . . . . . . . . . . . . . . . . .54
Logout . . . . . . . . . . . . . . . . . . . .54
M
Management
Name . . . . . . . . . . . . . . . . .53
User image . . . . . . . . . . . . .53
Music Management interface. . .27
Music Player interface . . . . . . . .29
O
Overview . . . . . . . . . . . . . . . . . .10
P
Picture Viewer interface. . . . . . .23
Pictures Management
interface . . . . . . . . . . . . . . . . . . .22
User’s Manual
EN-55
CANVIO AEROMOBILE
S
Safety
Icons . . . . . . . . . . . . . . . . . . 3
SD™ Card
Automatic backup . . . . . . . 37
Manual backup . . . . . . . . . 37
Using . . . . . . . . . . . . . . . . . 37
Settings
Management . . . . . . . . . . . 41
Settings Management
Configurations . . . . . . . . . . 41
Internet Settings
(application) . . . . . . . . . . . . 46
Internet Settings
(Web browser) . . . . . . . . . . 47
Wireless LAN
(Application). . . . . . . . . . . . 42
Wireless LAN
(Web browser) . . . . . . . . . . 44
Software specifications . . . . . . . 11
System login
Web browser login . . . . . . . 16
T
Trademarks. . . . . . . . . . . . . . . . . 7
V
Video Playback interface . . . . . 26
Videos Management interface . 24
W
Wireless connection
PC/Mac® . . . . . . . . . . . . . . 16
User’s Manual
EN-56