1
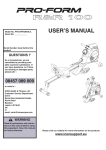
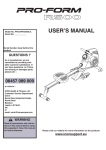
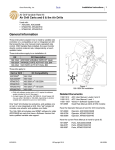
380 mm
47 mm
Note :
Color is
Green 397C
Blue 284 C
Model number : K9200Me
Serial No. ___________
Made by Claude CEARD
USER’S MANUAL
Brand Name sticker
REVISION A
2008-02-27
Serial Number decal
QUESTIONS ?
As a manufacturer, we are committed
to providing complete
customer satisfaction. If you
have questions, or if there are
missing or damaged parts,
please call:
08457 089 009
Or write:
ICON Health & Fitness, Ltd.
Unit 4
Revie Road Industrial Estate
Revie Road, Beeston
Leeds, LS11 8JG
UK
email: [email protected]
www.iconeurope.com
Visit
! CAUTION
Read all precautions and instructions in this manual before using
this equipment. Keep this manual
for future reference.
Visit our website at
www.iconsupport.eu
TABLE OF CONTENTS
IMPORTANT PRECAUTIONS . . . . . . . . . . . . . . . . . . . . . . . . . . . . . . . . . . . . . . . . . . . . . . . . . . . . . . . . . . . . 2
BEFORE YOU BEGIN . . . . . . . . . . . . . . . . . . . . . . . . . . . . . . . . . . . . . . . . . . . . . . . . . . . . . . . . . . . . . . . . . . 3
ASSEMBLY . . . . . . . . . . . . . . . . . . . . . . . . . . . . . . . . . . . . . . . . . . . . . . . . . . . . . . . . . . . . . . . . . . . . . . . . . . .4
console DETAILS . . . . . . . . . . . . . . . . . . . . . . . . . . . . . . . . . . . . . . . . . . . . . . . . . . . . . . . . . . . . . . . . . . . 6
CONDITIONING GUIDELINES. . . . . . . . . . . . . . . . . . . . . . . . . . . . . . . . . . . . . . . . . . . . . . . . . . . . . . . . . . . 7
EXPLODED DRAWING . . . . . . . . . . . . . . . . . . . . . . . . . . . . . . . . . . . . . . . . . . . . . . . . . . . . . . . . . . . . . . . 8
PART LIST. . . . . . . . . . . . . . . . . . . . . . . . . . . . . . . . . . . . . . . . . . . . . . . . . . . . . . . . . . . . . . . . . . . . . . . . . . . 9
ORDERING REPLACEMENT PARTS. . . . . . . . . . . . . . . . . . . . . . . . . . . . . . . . . . . . . . . . . . . . . .Back Cover
1
IMPORTANT PRECAUTIONS
!
WARNING :
ATTENTION : To reduce the risk of serious injury, read the following important precautions
before using the elliptical exerciser.
1. Read all instructions in this manual and all
warnings on the elliptical exerciser before
using the elliptical exerciser. Use the elliptical
exerciser only as described in this
manual.
9. Hold the handgrip pulse sensor or the handlebars when mounting, dismounting, or
using the elliptical exerciser.
10. The pulse sensor is not a medical device.
Various factors may affect the accuracy of
heart rate readings. The pulse sensor is
intended only as an exercise aid in determining
heart rate trends in general.
2. It is the responsibility of the owner to ensure
that all users of the elliptical exerciser are
adequately informed of all precautions.
3. The elliptical exerciser is intended for
home use only. Do not use the elliptical
exerciser in a commercial, rental, or institutional
setting.
4. Keep the elliptical exerciser indoors, away
from moisture and dust. Place the elliptical
exerciser on a level surface, with a mat
beneath it to protect the floor or carpet.
Make sure that there is enough clearance
around the elliptical exerciser to mount, dismount, and use it.
11. Keep your back straight when using the elliptical exerciser; do not arch your back.
12. If you feel pain or dizziness at any time
while exercising, stop immediately and cool
down.
13. When you stop exercising, allow the pedals
to slowly come to a stop.
5. Inspect and properly tighten all parts regularly. Replace any worn parts immediately.
6. Keep children under 12 and pets away from
the elliptical exerciser at all times.
7. The elliptical exerciser should not be used
by persons weighing more than 250 lbs. (113
kg).
8. Wear appropriate exercise clothes while
using the elliptical exerciser. Always wear
athletic shoes for foot protection while exercising.
! WARNING: Before beginning this or any exercise program, consult your physician.
This is especially important for persons over the age of 35 or persons with pre-existing health problems.
Read all instructions before using. ICON assumes no responsibility for personal injury or
property damage sustained by or through the use of this product.
2
BEFORE YOU BEGIN
Thank you for selecting the revolutionary WESLO® ELITE GEAR 3.0 elliptical exerciser. The
GEAR 3.0 elliptical exerciser provides a wide array of features designed to make your workouts at
home more effective and enjoyable.
have questions after reading this manual, please
see the front cover of this manual. To help us assist you, note the product model number and serial
number before contacting us. The model number
is K9200Me.0. The serial number can be found on
a decal attached to the elliptical exerciser (see the
front cover of this manual for the location of the
decal).
For your benefit, read this manual carefully
before you use the elliptical exerciser. If you
3
ASSEMBLY
Step 1
Attach the Front stabilize (3) and Rear stabilize(2)
to the Main frame (1),
Using 4 sets of key head bolts M8x60 (43), curved
Washer (15) and Domed nuts (41).
Step 2
Attach pedals (10R & 10L) to pedal tubes (4R & 4L) with
6sets Allen key bolt M8 x 45 (23), washer (21), nylock
nut (22)
Notes: the pedals have 2 position available. Please
keep pedal (left & right) on same position.
Step 3
Fix the pedal tube (4R & 4L) to axle on round
disc, with 2sets of Allen key bolt M10 x 25(18),
Spring Washer ф10 (19), fixing washer (20), wave
washer(27).
Step 4
Take the front post(6), join upper Sensor wire(35),
lower sensor wire(38), Slide the Front Post into
the front post housing Then fix it with 4sets Allen
key bolt M8x15(42), Curved washer(15).
4
ASSEMBLY
Step 5
Slide the handlebar left & right (7L & 7R) to
connecting bar left and right (5L & 5R), with
4sets of Allen key bolt M8 x 40 (14), curved
washer(15),Nylock nut M8 (16).
Step 6
Slide connecting bar (5R & 5L) to the axle,
fix it with 2sets of Allen key bolt M10x25(18),
Spring washer ф10(19), fixing Washer (20),
wave washer(27).
Step 7
Fix the lower handlebar (5R & 5L) and pedal
tube(4R & 4L) with 2sets of Bolt(M), screw M8 x
20 (28), Spring washer ф8(29), Allen key bolt M8 x
20(39).
Then fix plastic cover of pipe(11R & 11L) with 2pcs
Screws ф4 x 20(17).
5
ASSEMBLY
Step 8
Attach the pulse handlebar(8) to front post(6),
fix it with 4 sets of screwф6x12(31), washer
ф6(32).
Attach computer (13) to computer holder, fix it
with 4pcs screws (33), connect the upper sensor wire(35) and pulse wire(34) to computer.
PROGRAMS
KEY FUNCTIONS
A. ENTER(PROGRAM): Chooses the functions from PROGRAM, GENDER, TIME, HEIGHT,
WEIGHT, DISTANCE, WATT, TARGET HEART RATE, AGE, and 10 columns. The chosen function
shall flash. Please note that not all the functions can be selected in every program according to the
type of each program.
B. START/PAUSE: Starts or stops the program chosen, and resets the monitor by pressing and holding for 2 seconds.
C. MODE: Changes the displays of the values between RPM and SPEED, between CAL and WATT.
The values of RPM and WATT show at the same time, or the values of SPEED and CAL do by pressing it.
D. UP (┼): Selects or increases the values of PROGRAM, GENDER, TIME, HEIGHT, WEIGHT, DISTANCE, WATT, TARGET HEART RATE, AGE, and 10 columns.
E. DOWN (─): Selects or decreases the values of PROGRAM, GENDER, TIME, HEIGHT, WEIGHT,
DISTANCE, WATT, TARGET HEART RATE, AGE, and 10 columns.
F: RECOVERY(If have): Press this button going into pulse recovery detecting.
ABOUT DISPLAYS
A. START: Indicates the program selected has started.
B. STOP: Indicates the program selected has stopped. Users are free to change the programs and
the value of functions applied.
C. PROGRAM n: Indicates the program selected from Program 1 to Program 16.
D. LEVEL n: Indicates the level of loading selected from Level 1 to Level 16.
E. Indicates the gender selected (Male or Female).
F. Loading Profile: There are 10 columns of loading bars, and 8 bars in each column. Each column
represents 3 minutes workout (without setting of TIME value), and each bar represents 2 levels of
loading.
6
PROGRAMS
THINGS YOU SHOULD KNOW BEFORE EXERCISING
A. The values calculated or measured by the computer are for exercise purpose only, not for medical purpose.
B. Variables that may need to change in the programs:
Programs P1-P7 : P8 :
P9 :
P10-P12 : P13-P16 :
Variables
TIME, DISTANCE, AGE
GENDER, HEIGHT, WEIGHT, AGE
TIME, DISTANCE, TARGET H.R.
TIME, DISTANCE, AGE
TIME, DISTANCE, AGE, 10 COLUMNS
Please note that only 1 value of TIME or DISTANCE can be adjusted. Both adjustments do not exist at the
same time. For example, the value of DISTANCE is “0.0” while the value of TIME is adjustable to be any number except “00:00”.
C. Program Selection:
There are 16 programs including 1 Manual Program, 6 Preset Programs, 1 Body Fat Program, 4 Heart Rate
Control Programs, 4 User Setting Programs.
D. Program Graph:
Each graph shown is the profile of loading in each interval (column). With the value of TIME counting up, each
interval is 3 minutes and all the columns make up a total of 30 minutes. With the value of TIME counting down,
each interval is the value of setup TIME divided by 10. For example, if the time value is setup to 40 minutes,
each interval will be 40 minutes divided by 10 (40/10=4). Namely, each interval will be 4 minutes.
The brief descriptions of the profile of each graph are as follows:
Program 1: Manual
Program 2: Rolling
Program 3: Valley
Program 4: Fat Bum Program 5: Ramp
Program 6: Fitness Test
Program 7: Random
Program 8: Body Fat Program 9: Target H.R.
Program 10: 60% H.R.C. Program11: 75% H.R.C. Program 12: 80% H.R.C.
Program 13-16: User Setting
E. Body Types:
There are 9 body types divided according to the FAT% calculated.
Type 1: 5~9% Type 2: 10~14% Type 3: 15~19%
Type 4: 20~24% Type 5: 25~29% Type 6: 30~34%
Type 7: 35~39% Type 8: 40~44% Type 9: 45~50%
F. BMR: Basal Metabolism Ratio
G. BMI: Body Mass Index
7
EXPLODED DRAWING A—Model No.K9200Me
8
PART LIST—Model No K9200Me.0
Item
1
2
3
4L
4R
5L
5R
6
7L
7R
8
9
10L
10R
11L
11R
12L
12R
13
14
15
16
17
18
19
20
21
22
23
Description
Main frame
Rear stabilising bar
Front stabilising bar
Left pedal pipe
Right pedal pipe
Left connecting bar
Right connecting bar
Front post
Left handlebar
Right handlebar
Pulse handlebar
Form grip
Pedals left
Pedal right
Left plastic cover
Right plastic cover
Left plastic cover of pipe
Right plastic cover of pipe
Computer
Allen key bolt M8 x 40
Curved washer ф8
Nylock nut M8
Screw ф4x20
Allen key bolt M10 x 25
Spring washer ф10
Fixing washer ф28x5
Washer ф8
Nylock nut M8
Allen key bolt M8 x 45
Item
24
25L
25
26L
26R
27
28
29
30
31
32
33
34
35
36
37
38
39
40
41
42
43
9
Description
Adaptor
Rear end cap left
Rear end cap right
Front end cap left
Front end cap right
Wave washer ф16
Screw
Spring washer ф8
Axle 370mm
Screw M6 x 12
Washer ф6
Screw of computer
Lower pulse wire
Upper sensor wire
Upper pulse wire
Form grip
Lower sensor wire
Allen key bolt M8 x 20
Chain cover
Domed nut M8
Allen key bolt M8 x 15
Key head bolt M8 x 60
CONDITIONING GUIDELINES
It is recommended that you warm up and stretch your body before working on the Body Slimmer.The following warm up is for your reference:
1. Calf Stretch
Hands up and lean your body to a wall, with one of your foot in the front and
the other behind (see the photo illustration). Keep your back and your back
leg in a line. Then bend your front leg and move your body towards the wall.
Stay as close to the wall and keep this position for 10~15 seconds. Relax and
repeat it for another 2 times.
2. Thigh Stretch
Put your right hand on the wall for balance and grab your left foot with your left
hand. Pull your heel towards your buttocks and keep your balance. Stay there
for about 10~15 seconds.Then relax and repeat it for another 2 times.
3. Upper Body Stretch
Stand on the ground, open your legs a bit, put your hands on top of your head
as shown in the photo, stretch your back and waist, keep it for 10~20 seconds.
Relax and repeat it for another 2 times.
4.Kicking Stretch
Lie on the ground, hold your thighs and then kick your legs. Keep legs up high
for 10~15 seconds, relax and repeat it for another 2 times.
5.Waist and Bottom Stretch
Step one feet forward and bend your body down, hands down, keep your back
leg straight,balance your body,push down and stretch your bottom part, remain
the position for 10~15 seconds, change legs and repeat it for another 2 times.
6.Back Stretch
Sit down with your thighs and legs on the ground. Move your upper body
towards your legs, touching your toes. Keep this position for 10~15 seconds.
Relax a bit and repeat for another 2 times.
10
ORDERING REPLACEMENT PARTS
To order replacement parts, contact the ICON Health & Fitness, Ltd. office, or write:
ICON Health & Fitness, Ltd.
Customer Service Department
Unit 4, Revie Road Industrial Estate
Revie Road
Beeston
Leeds, LS118JG
UK
Tel:
08457 089 009
Outside the UK: 0 (044) 113 387 7133
Fax: 0 (044) 113 387 7125
To help us assist you, please be prepared to give the following information:
• the MODEL NUMBER of the product (K9200Me.0)
• the NAME of the product (WESLO ELITE GEAR 3.0 elliptical exerciser)
• the SERIAL NUMBER of the product (see the front cover of this manual)
• the KEY NUMBER and DESCRIPTION of the part(s)
Important Recycling Information for
E. U. Customers
This electronic product must not be disposed of in municipal waste. To
preserve the environment, this product must be recycled after its useful life as required by law. Please use recycling facilities that are authorized
to collect this type of waste in your area. In doing so, you will help to conserve
natural resources and improve European standards of environmental protection. If you require more information about safe and correct disposal methods,
please contact your local city office or the establishment where you purchased
this product.
Printed in China © 2008 Icon Health & Fitness, Inc.
11