1
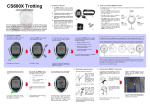
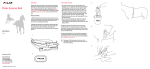
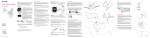
POLAR EQUINE
CS600X TROTTING
Getting Started Guide
CONTENTS
1. INTRODUCTION. . . . . . . . . . . . . . . . . .
3
7. PLACING THE BELT. . . . . . . . . . . . . . 12
2. CONTENTS OF THE SET . . . . . . . . .
4
8. PAIRING SENSORS WITH THE
TRAINING COMPUTER. . . . . . . . . . . 14
3. BUTTON FUNCTIONS . . . . . . . . . . . .
6
4. STARTING THE CS600X . . . . . . . . .
Sulky Settings . . . . . . . . . . . . . . . . . . .
Measuring Wheel Size . . . . . . . . . . .
Basic Settings . . . . . . . . . . . . . . . . . . .
7
7
8
9
5. PLACING THE SPEED
SENSOR . . . . . . . . . . . . . . . . . . . . . . . . . 10
6. PLACING THE CS600X ON THE
SULKY . . . . . . . . . . . . . . . . . . . . . . . . . . . 11
9. STARTING TRAINING
RECORDING . . . . . . . . . . . . . . . . . . . . . 15
10. IMPORTANT INFORMATION . . . . . 17
Care and Maintenance. . . . . . . . . . . 17
Service . . . . . . . . . . . . . . . . . . . . . . . . . . 17
Guarantee . . . . . . . . . . . . . . . . . . . . . . . 18
Disclaimer . . . . . . . . . . . . . . . . . . . . . . . 21
1. INTRODUCTION
The Polar Equine CS600X Trotting is the most complete trotting training system for
horses available. It is developed from the CS600X training system for people. Read the
user manual carefully to use all system features fully.
Download the full user manual and this getting started guide in other languages from the CD
(available in English, German, French, Italian, Spanish, Finnish and Swedish). The latest version
of the full user manual and this getting started guide can be downloaded at
www.polar.com/support.
For video tutorials, go to http://www.polar.com/en/polar_community/videos.
ENGLISH
3
2. CONTENTS OF THE SET
1.
2.
3.
4
CS600X training computer:
receives, displays and records all
the data measured by the H3
heart rate sensor and the speed
sensor.
Belt:The plastic electrode areas
(A, B) on the reverse side of the
belt detect heart rate. The
pocket (C) protects the heart rate
sensor from shocks and
scratches and prevents it from
falling off the belt.
H3 heart rate sensor: The H3
heart rate sensor sends the heart
rate signal to the training
computer.
ENGLISH
4.
5.
6.
7.
8.
Speed sensor: measures speed
and distance in real time.
ProTrainer 5 Equine edition
software: displays a training log,
graphs, tables and reports on
your PC to further analyse the
data recorded during training.
IrDA USB adapter: uses infrared
connection to transfer the
recorded data from the training
computer to the PC.
Strap: If needed, use the strap to
keep the belt in front of the
harness.
Wrist band: By using the wrist
band, you can carry the training
computer on your wrist instead of
attaching it on the sulky.
ENGLISH
5
3. BUTTON FUNCTIONS
The CS600X training computer has five navigation buttons and an infrared window to
communicate with the PC via the IRDA adapter.
• UP/DOWN: Scroll through menus
and adjust values.
• OK: Enter a menu, confirm a
selection and start an exercise.
• STOP: Exit a menu, return to the
previous display, leave settings
unchanged, cancel selections,
pause and stop the exercise.
• LIGHT: Press once and the
backlight is activated for 5
seconds when you press any other
button. You can also lock the
buttons by pressing and holding
the LIGHT button for two seconds.
6
ENGLISH
4. STARTING THE CS600X
Sulky Settings
1.
2.
By default, the CS600X training
computer is switched off to save the
battery. Press OK twice to activate it.
Press UP or DOWN to select language.
Press OK to confirm.
Enter the sulky settings to ensure the
speed measurements are accurate. If you
do not enter the settings, the CS600X
training computer will remind you to set
them before every exercise.
Use the UP and DOWN buttons to
customize the following sulky settings.
Press OK to confirm your settings.
•
•
•
•
Number of sulkies (1, 2 or 3)
Wheel size for Sulky 1 (in mm)
Wheel size for Sulky 2 (in mm) if
you use a second sulky.
Wheel size for Sulky 3 (in mm) if
you use a third sulky.
If you want to re-enter settings, press
STOP to return to the previous setting.
ENGLISH
7
Measuring Wheel Size
Use the following method to measure the wheel size accurately: use the valve to mark
the point where the wheel touches the ground. Draw a line on the ground to mark that
point.
Move your sulky forward on a flat surface for one complete rotation. The tire should be
perpendicular to the ground. Draw another line on the ground at the valve to mark a full
rotation. Measure the distance between the two lines. Subtract 4 mm to account for your
weight on the sulky to get your wheel circumference. Enter this value in the CS600X
training computer.
Wheel size settings are a prerequisite for correct speed information!
8
ENGLISH
Basic Settings
You must enter the basic settings, even
though they don’t concern the horse. If
you don't enter the basic settings, the
CS600X training computer will remind
you to set them before every exercise.
Once the settings are done, the CS600X
training computer returns automatically
to the time display.
Use the UP and DOWN buttons to
customize the following basic settings.
Press OK to confirm your settings.
•
•
•
•
Time display (24h/12h)
Time
Date (day/month/year or
month/day/year)
Units (kg/cm/km or lb/ft/mi)
Select Yes: Settings are accepted and
saved. The CS600X training computer
displays the time. Select No if settings
are incorrect and need to be changed.
Press STOP to return to the data you want
to change.
ENGLISH
9
5. PLACING THE SPEED SENSOR
1.
2.
3.
4.
5.
10
Attach the rubber part to the sensor.
Pass the cable ties through the speed
sensor and rubber part holes. Adjust the
sensor to the sulky bar so that the
POLAR logo faces outwards.
Adjust the ties loosely. Do not tighten
them yet.
Attach the magnet to a spoke at the
same level as the sensor. Fasten the
magnet to the spoke and tighten it with
a screwdriver.
Fine-tune the positioning of both the
magnet and the speed sensor so that the
magnet passes close to the sensor but
does not touch it.
ENGLISH
6. PLACING THE CS600X ON THE SULKY
The support has been designed so that the CS600X training computer is always facing
you (not perpendicular) wherever you install it on the sulky.
1.
2.
3.
4.
Place the rubber part on the sulky bar or
stem and insert the support on top of it.
Pass the cable ties over the support and
adjust them around the sulky bar/stem.
Secure the bike mount firmly and cut off
any excess cable tie ends.
Position the CS600X training computer
on to the support. Turn the CS600X
training computer clockwise until you
hear a click. It is now ready for use!
You can release the CS600X training
computer by pressing it down and
simultaneously turning it counter clockwise.
Alternatively you can use the wrist band to
carry the training computer on your wrist.
ENGLISH
11
7. PLACING THE BELT
1.
For the heart rate sensor to read the heart rate properly, ensure a
good contact between the plastic electrode areas and the horse’s
skin. Wet the belt properly, for example in a bucket of water (1).
2.
Also wet the horse’s hair from the areas where the electrodes of the
belt are placed (2). If your horse has long or thick hair, you can
clip those areas. This greatly improves the heart rate signal quality.
3.
Attach the heart rate sensor to the pocket (3). Close the pocket
firmly.
12
ENGLISH
4.
Place the belt as indicated (4), with the heart rate
sensor pocket on the left side of the horse. This
ensures that the electrode areas of the belt are in
the right position.
The range of the heart rate sensor is over 10 m.
Therefore, you can monitor your horse's heart rate
also when lunging.
For the video, go to
http://www.polar.com/en/polar_community/videos.
For instructions on displaying the horses's heart rate
and recording a training session, see the training
computer's user manual. The user manual can be
downloaded at www.polar.com/support.
ENGLISH
13
8. PAIRING SENSORS WITH THE TRAINING
COMPUTER
If you purchase a new heart rate sensor or Equine speed kit sensor, it must be paired to
your training computer. For instructions on pairing the heart rate sensor, see Using a
New Heart rate Sensor. For instructions on pairing the speed sensor W.I.N.D., see Using
a New Accessory in the full user manual of the training computer. Please note that
pairing may be referred to as teaching in the user manual.
If you purchased the sensor and training computer together, as a set, the sensor is
already paired to the training computer. In this case, you will only need to activate the
sensor in your training computer. For more information, see Feature Settings in the user
manual.
14
ENGLISH
9. STARTING TRAINING RECORDING
1.
Start the heart rate measurement by
pressing OK. Within five to ten
seconds, the horse's heart rate
appears on the display.
2.
Press OK to start recording the
exercise.
3.
You can view three lines of exercise
information simultaneously in the
CS600X training computer. Press UP
or DOWN to change the view. The
name of the display appears for a few
seconds. The name indicates the
information on the lowest row.
You can customize the CS600X
display to view the information you
need the most during training, either
by using the training computer or the
ProTrainer 5 software. The information
available depends on the features that
are activated. For instructions, see the
full user manual at
www.polar.com/support.
You can also zoom the display. Press
and hold UP to zoom into the upper
row, and DOWN to zoom into the
middle row. Return to the normal
display by pressing and holding the
buttons again.
ENGLISH
15
4.
To stop the exercise, press STOP
twice. The CS600X returns to the time
display.
To view detailed information on the
exercise session, select File.
• The Exercise Log lists a
maximum of 99 exercise files.
• The Weekly summary displays
summaries for the past 16 weeks.
• Totals include cumulative values
recorded during training sessions.
• In the Delete menu, you can
delete exercise files.
For a deeper analysis, transfer the
data to Polar ProTrainer 5. The
software offers you different options to
analyze the data. For instructions,
download the full user manual from
the CD or at www.polar.com/support.
16
ENGLISH
You can also transfer the data to
polarpersonaltrainer.com web service by
using the WebLink sofware. Download the
software from Downloads at
www.polar.com/support.
For more detailed information on using
the CS600X training computer, download
the full user manual from the CD or at
www.polar.com/support.
10. IMPORTANT INFORMATION
Care and Maintenance
Follow the caring instructions to ensure reliable
measurement and to maximize the life span of
the belt and the heart rate sensor. The following
instructions will help you fulfill the guarantee
obligations.
Heart rate sensor: Detach the heart rate sensor
from the belt after every use and dry it with a
soft towel. Clean the heart rate sensor with a
mild soap and water solution when needed.
Never use alcohol or any abrasive material (e.g.
steel wool or cleaning chemicals).
Belt: Rinse the belt under running water after
every use and hang to dry. Clean the belt gently
with a mild soap and water solution when
needed. Do not use moisturizing soaps, because
they can leave residue on the belt. Do not soak,
iron, dry clean or bleach the belt. Do not stretch
the belt or bend the electrode areas sharply.
Dry and store the belt and the heart rate sensor
separately to maximize the heart rate sensor
battery lifetime. Keep the heart rate sensor in a
cool and dry place. To prevent snap oxidation,
do not store the heart rate sensor wet in
non-breathing material, such as a sports bag.
Do not expose the heart rate sensor to direct
sunlight for extended periods.
Service
During the 12-month guarantee/warranty period
we recommend that you have service, other than
battery replacement, done by an authorized
Polar Service Center only. The warranty does not
cover damage or consequential damage caused
by service not authorized by Polar Electro. For
contact information and all Polar Service Center
addresses, visit www.polar.com/support and
country specific websites.
ENGLISH
17
Guarantee
•
Limited International Polar Guarantee for
Equine Products
•
•
•
•
•
18
Polar Equine products are developed and
manufactured for the usage in equine sports.
Each product endures rigorous testing before
it leaves the factory.
This guarantee does not affect the customer’s
statutory rights under applicable national or
state laws in force, or the customer’s rights
against the dealer arising from their
sales/purchase contract.
This limited Polar international guarantee is
issued by Polar Electro Inc. for customers who
have purchased this product in the USA or
Canada. This limited Polar international
guarantee is issued by Polar Electro Oy for
customers who have purchased this product in
other countries.
Polar Electro Oy/Polar Electro Inc. guarantees
the original customer/purchaser of this device
that the product will be free from defects in
material or workmanship for twelve (12)
months from the date of purchase.
The receipt of the original purchase is your
proof of purchase!
ENGLISH
•
•
•
The guarantee does not cover the battery,
normal wear and tear, damage due to misuse,
abuse, accidents or non-compliance with the
precautions; improper maintenance, cracked,
broken or scratched cases/displays, modified
or altered products or their parts and
electrode belt and strap of sensors.
The guarantee does not cover any damage/s,
losses, costs or expenses, direct, indirect or
incidental, consequential or special, arising
out of, or related to the product.
Items purchased second hand are not covered
by warranty, unless otherwise stipulated by
local law.
During the guarantee period, the product will
be either repaired or replaced at any of the
authorized Polar Service Centers regardless of
the country of purchase.
Guarantee with respect to any product will be
limited to countries where the product has been
initially marketed.
Regulatory information is available at
www.polar.com/support.
Compliance Statement
Canada
Polar Electro Oy has not approved any changes
or modifications to this device by the user. Any
changes or modifications could void the user’s
authority to operate the equipment.
Polar Electro Oy n’a approué aucune
modification apportée à l’appareil par
l’utilisateur, quelle qu’en soit la nature. Tout
changement ou toute modification peuvent
annuler le droit d’utilisation de l’appareil par
l’utilisateur.
Industry Canada (IC) regulatory information
Under Industry Canada regulations, this radio
transmitter may only operate using an antenna
of a type and maximum (or lesser) gain
approved for the transmitter by Industry
Canada. To reduce potential radio interference
to other users, the antenna type and its gain
should be so chosen that the equivalent
isotropically radiated power (e.i.r.p.) is not more
than that necessary for successful
communication.
This device complies with Industry Canada
licence-exempt RSS standard(s). Operation is
subject to the following two conditions: (1) this
device may not cause interference, and (2) this
device must accept any interference, including
interference that may cause undesired operation
of the device.
Avis de conformité à la réglementation
d’Industrie Canada
Conformément à la réglementation d'Industrie
Canada, le présent émetteur radio peut
fonctionner avec une antenne d'un type et d'un
gain maximal (ou inférieur) approuvé pour
l'émetteur par Industrie Canada. Dans le but de
réduire les risques de brouillage radioélectrique
à l'intention des autres utilisateurs, il faut
choisir le type d'antenne et son gain de sorte
que la puissance isotrope rayonnée équivalente
(p.i.r.e.) ne dépasse pas l'intensité nécessaire à
l'établissement d'une communication
satisfaisante.
Le présent appareil est conforme aux CNR
d'Industrie Canada applicables aux appareils
radio exempts de licence. L'exploitation est
autorisée aux deux conditions suivantes : (1)
l'appareil ne doit pas produire de brouillage, et
ENGLISH
19
(2) l'utilisateur de l'appareil doit accepter tout
brouillage radioélectrique subi, même si le
brouillage est susceptible d'en compromettre le
fonctionnement.
Class B digital device notice
This Class B digital apparatus complies with
Canadian ICES-003, RSS-Gen and RSS-210.
Cet appareil numérique de la classe B est
conforme à la norme NMB-003, CNR-Gen et
CNR-210 du Canada.
USA
Polar Electro Oy has not approved any changes
or modifications to this device by the user. Any
changes or modifi cations could void the user’s
authority to operate the equipment.
FCC regulatory information
This device complies with part 15 of the FCC
rules. Operation is subject to the following two
conditions: (1) This device may not cause
harmful interference, and (2) This device must
accept any interference received, including
interference that may cause undesired
operation.
20
ENGLISH
Note: This equipment has been tested and
found to comply with the limits for a Class B
digital device, pursuant to part 15 of the FCC
Rules. These limits are designed to provide
reasonable protection against harmful
interference in a residential installation. This
equipment generates, uses and can radiate
radio frequency energy and, if not installed and
used in accordance with the instructions, may
cause harmful interference to radio
communications. However, there is no
guarantee that interference will not occur in a
particular installation.
If this equipment does cause harmful
interference to radio or television reception,
which can be determined by turning the
equipment off and on, the user is encouraged to
try to correct the interference by one or more of
the following measures:
1.
2.
3.
4.
Reorient or relocate the receiving antenna.
Increase the separation between the
equipment and receiver.
Connect the equipment into an outlet on a
circuit different from that to which the
receiver is connected.
Consult the dealer or an experienced radio/
TV technician for help.
This product emits radio frequency energy, but
the radiated output power of this device is far
below the FCC radio frequency exposure limits.
This equipment complies with FCC RF radiation
exposure limits forth for an uncontrolled
environment. Nevertheless, the device should
be used in such a manner that the potential for
human contact with the antenna during normal
operation is minimized.
This marking shows that the product is
protected against electric shocks.
Copyright © 2012 Polar Electro Oy, FI-90440
KEMPELE.
Polar Electro Oy is a ISO 9001:2008 certified
company.
This crossed out wheeled bin marking shows
that Polar products are electronic devices and
are in the scope of Directive 2002/96/EC of the
European Parliament and of the Council on
waste electrical and electronic equipment
(WEEE) and batteries and accumulators used in
products are in the scope of Directive
2006/66/EC of the European Parliament and of
the Council of 6 September 2006 on batteries
and accumulators and waste batteries and
accumulators. These products and
batteries/accumulators inside Polar products
should thus be disposed of separately in EU
countries.
All rights reserved. No part of this manual may
be used or reproduced in any form or by any
means without a prior written permission of
Polar Electro Oy. The names and logos marked
with a ® symbol in this user manual or in the
package of this product are registered
trademarks of Polar Electro Oy.
Disclaimer
Please note that these guarantee terms shall be
applied to Polar Equine products instead of any
other Polar Electro guarantee term, even if other
terms may appear in some product
documentation.
ENGLISH
21
Manufactured by
Polar Electro Oy
Professorintie 5
FIN-90440 KEMPELE
Tel +358 8 5202 100
Fax +358 8 5202 300
www.polar.com