1
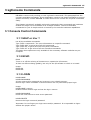
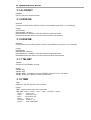
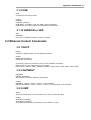
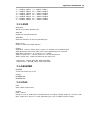
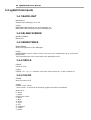
DELGEN
X-Graph Software Module
xgCONSOLE Users Manual
Version 1.0 – August 14, 2007
The information in this document can be adapted without previous notice and does not
contain any obligation for DELGEN. Except for the exceptions of the Law on Copyright of
1912, nothing from this edition may be multiplied and/or made public through press,
photocopy, and microfilm or inserted in a database without previous written consent of
DELGEN.
© Copyright DELGEN 2005-2007. All rights reserved.
Rabbit, Rabbit 2000, Rabbit 3000 and Rabbit 4000 are registered trademarks of Rabbit
Semiconductor.
Dynamic C and OP7200 are registered trademarks of Z-World Inc.
Softools and WinIDE are registered trademarks of Softools Inc.
easyGUI is a registered trademark of IBIS Solutions ApS
X-Graph, XG5000, XG4100, XG4000, XG3000, XG2000 and XG1000 are registered
trademarks of DELGEN.
DELGEN reserves the right to make changes and improvements to its products without
providing notice.
If you have any remarks on this document, please report them to DELGEN.
Printed in Luxembourg.
Document Nr: XGCONSOLE-001
Content 3
Content
Content...............................................................................................................3
Figures................................................................................................................5
Tables.................................................................................................................7
1 Welcome.........................................................................................................9
1.1 Introduction....................................................................................................9
1.1.1 Batch Files................................................................................................9
1.1.2 Applications...............................................................................................9
1.1.3 Limitations / xgBASIC...............................................................................10
1.2 How This Book Is Organized............................................................................10
1.3 More Questions..............................................................................................10
2 Installation....................................................................................................13
2.1 Ethernet / Telnet............................................................................................13
2.2 RS232C........................................................................................................14
2.3 USB..............................................................................................................14
3 xgConsole Commands....................................................................................15
3.1 Console Control Commands.............................................................................15
3.1.1 HELP or H or ?.........................................................................................15
3.1.2 ECHO......................................................................................................15
3.1.3 LOGIN.....................................................................................................15
3.1.4 LOGOUT..................................................................................................16
3.1.5 RS232A...................................................................................................16
3.1.6 RS232B...................................................................................................16
3.1.7 TELNET...................................................................................................16
3.1.8 TIME.......................................................................................................16
3.1.9 USB........................................................................................................17
3.1.10 VERSION or VER.....................................................................................17
3.2 Ethernet Control Commands............................................................................17
3.2.1 DHCP......................................................................................................17
3.2.2 GATEWAY................................................................................................17
3.2.3 ICMP.......................................................................................................17
3.2.4 ICMP RESET.............................................................................................18
3.2.5 IP...........................................................................................................18
3.2.6 MAIL FROM..............................................................................................18
3.2.7 MAIL TO..................................................................................................18
3.2.8 MAILSERVER............................................................................................18
3.2.9 MTU........................................................................................................19
3.2.10 NAMESERVER.........................................................................................19
3.2.11 NETMASK..............................................................................................19
3.2.12 NETWORK..............................................................................................19
3.2.13 NETWORK MULTI....................................................................................19
3.3 X-Graph Hardware Control Commands..............................................................20
3.3.1 1WIRE....................................................................................................20
3.3.2 ADC........................................................................................................20
3.3.3 ASIX.......................................................................................................21
3.3.4 BUZZER..................................................................................................21
3.3.5 DAC........................................................................................................21
3.3.6 EEPROM..................................................................................................22
3.3.7 HVOUT....................................................................................................22
3.3.8 I2C.........................................................................................................22
3.3.9 KEYBOARD..............................................................................................23
3.3.10 KEYPAD.................................................................................................23
3.3.11 RABBIT.................................................................................................23
3.3.12 RESET...................................................................................................24
3.3.13 SD........................................................................................................24
3.3.14 SLAVE...................................................................................................24
3.3.15 SFLASH.................................................................................................25
4 xgCONSOLE Users Manual
3.3.16 SUART..................................................................................................25
3.3.17 TOUCHSCREEN.......................................................................................25
3.4 xgGUI Commands..........................................................................................26
3.4.1 BACKLIGHT.............................................................................................26
3.4.2 BLANK SCREEN........................................................................................26
3.4.3 BRIGHTNESS...........................................................................................26
3.4.4 CIRCLE...................................................................................................26
3.4.5 COLOR....................................................................................................26
3.4.6 CONTRAST..............................................................................................27
3.4.7 DOT........................................................................................................27
3.4.8 FILL CIRCLE.............................................................................................27
3.4.9 FILL POLYGON.........................................................................................27
3.4.10 FILL RECTANGLE....................................................................................28
3.4.11 FILL SCREEN..........................................................................................28
3.4.12 FONT....................................................................................................28
3.4.13 GPRINT.................................................................................................28
3.4.14 HLINE...................................................................................................28
3.4.15 INVERT RECTANGLE................................................................................28
3.4.16 LCD......................................................................................................29
3.4.17 LINE.....................................................................................................29
3.4.18 POLYGON..............................................................................................29
3.4.19 RECTANGLE...........................................................................................29
3.4.20 VLINE...................................................................................................29
3.5 xgFAT File System Commands.........................................................................29
4 Compiling a Custom xgConsole Version.........................................................31
4.1 User Interface Console....................................................................................31
4.2 xgConsole Macro's..........................................................................................31
Warranty...........................................................................................................33
Notice to Users..................................................................................................35
Software License Agreement.............................................................................37
Change List.......................................................................................................39
Figures 5
Figures
Figure
Figure
Figure
Figure
1:
2:
3:
4:
Telnet Console..........................................................................................9
Windows XP Command Prompt.................................................................13
Tera Term Configuration..........................................................................14
Tera Term with xgCONSOLE started..........................................................14
Tables 7
Tables
Welcome 9
1 Welcome
1.1 Introduction
You’re not familiar with programming or don’t want to spend time and/or resources on C
programming. The X-Graph Telnet Console, nickname xgConsole, is a solution for you.
Each X-Graph module is shipped with the xgConsole firmware pre-installed. You just need
to connect the X-Graph module with either an Ethernet cable, a RS232C cable or a USB
cable to your PC. Launch a terminal emulator and start typing high level commands to
control your X-Graph module. Just type ‘help’ to see a full list of available commands.
xgConsole has commands to control all features of the X-Graph modules. X-Graph events
(i.e. keyboard, touchscreen, RC-5, …) can be used to automatically execute commands or
batch files. All xgGUI, xgFAT, … features are accessible.
Figure 1: Telnet Console
1.1.1 Batch Files
Batch files can be stored on an xgFAT compatible device (SDCard, CF, Flash disc, …).
These are used to automate returning tasks and handle events. The AUTOEXEC.BAT
batch file is executed automatically on power-up. This feature is used to auto-start a
standalone module. Batch files can be used to handle a series of complex tasks without
the need for C programming.
1.1.2 Applications
With the xgConsole you do not need to run or purchase Dynamic C to operate the module
in this mode. It takes no more then 5 minutes before you can discover the advanced
features of the X-Graph module.
10 xgCONSOLE Users Manual
The xgConsole can simple be used to execute commands entered on a terminal.
A batch file driven module can be used to handle events and execute commands. This
allows users to build complex stand-alone applications.
The xgConsole can also be used to build a remote controllable graphic terminal. The XGraph is used as a graphic terminal and a PC application controls the GUI and
input/output. Such a PC application only needs a serial port driver to send the xgConsole
commands.
1.1.3 Limitations / xgBASIC
The xgConsole does not support variables, constants, operators and program flow
control.
If your project gets too complex for the xgConsole commands and you don’t want to learn
C programming and/or use DynamicC, DELGEN offers the xgBASIC interpreter (product
under development).
Anybody whom has ever used QBASIC will feel comfortable immediately with the
xgBASIC interpreter. Also new programmers will find xgBASIC a lot easier to learn
compared to DynamicC.
xgBASIC is pre-installed on all X-Graph modules (once available, contact DELGEN about
the release date). Best of all, it’s totally free. You don’t need to purchase DynamicC or
any other programming tool.
There is a separate manual on xgBASIC.
xgBASIC is basically an expansion of the xgConsole batch system. It adds variables,
constants, operators and program flow control. And a lot of extra commands are added to
access many of the DynamicC functions.
1.2 How This Book Is Organized
You can find following chapters in it:
Chapter 1 contains a view on all the information in this book.
Check Chapter 2 for installation instructions. Find out how easy it us to get the
xgConsole operational.
Chapter 3 contains a list of all available xgConsole commands. Use this chapter as a
command reference.
Chapter 4 gives information on how to design and compile a custom version of the
xgConsole.
1.3 More Questions
If you have questions while using your X-Graph module or one of the X-Graph Software
Modules, check first if the information is available in this book of the other X-Graph Users
Manuals. If you cannot find the answer check the information and forum on the X-graph
website (www.x-graph.be). Finally you can also contact your local distributor or the XGraph technical support by e-mail ([email protected]).
Welcome 11
This manual includes information on the X-Graph modules. It is strongly advised to
download and read documentation on the Rabbit processor from the Rabbit
Semiconductor (www.rabbitsemiconductor.com) website.
This manual is complimentary to the documentation found on these websites.
Installation 13
2 Installation
2.1 Ethernet / Telnet
Figure 2: Windows XP Command Prompt
Connect the X-Graph Ethernet port with your local network. The default IP address of the
X-Graph module is 192.168.1.97. The first time you use the module, your PC’s IP address
must be in the same range. If needed change the IP address of your PC. Contact your
network administrator if you’re unsure about this. Once you get the xgConsole running,
change the X-Graph IP address (IP command). Then you can restart the X-Graph module
and reset your PC’s network configuration.
You will need a telnet client. A basic client is included with Microsoft Windows.
Open a command window (Start button, Run). Then type ‘cmd’ and click the OK button.
Once the command prompt is available type: ‘telnet 192.168.1.97’ to start the
xgConsole.
DELGEN includes a copy of the freeware terminal emulator “TeraTerm Pro Web 3.1.3”
with the X-Graph libraries. You can this program as a telnet client. The same program
can also be used for the serial port terminal emulator.
The program does not need to be installed. Just launch “ttermpro.exe” (located the
Utilities directory of your DynamicC installation root directory). First enter the correct IP
address and press ok. Or if you prefer to use a serial port, select 'Serial' and the correct
com port number.
14 xgCONSOLE Users Manual
Figure 3: Tera Term Configuration
Figure 4: Tera Term with xgCONSOLE started
2.2 RS232C
Connect a null-modem cable between your pc and the X-Graph RS232C port. Then start a
terminal program on your PC and set it for 9600 baud, 8 bits, no parity, 1 stop bit.
Start the X-Graph module and you’ll see the xgConsole welcome message and prompt.
You can change the default baudrate with the RS232A/B BAUD command.
On X-Graph modules with 2 level-converted serial ports, both can be used. They are
identified as RS232A (Ser Port C on XG5000) and RS232B (Ser Port D on XG5000).
Important: the RS232C ports of all shipped X-Graph module are not enabled for
xgConsole operation. This is done to prevent problems with already connected RS232C a
hardware. You will need to start the xgConsole via either the Ethernet port or USB port.
On modules without an ethernet and USB port, the RS232A is enabled as the default
xgConsole port. You can enable one or both RS232C ports for xgConsole operation with
the RS232A/B ON command.
2.3 USB
Because the USB port is normally the Rabbit debugging port, it's not available as a
xgConsole console during debugging. When the X-Graph debugging port is not used (i.e.
in standalone mode) the USB port is automatically enabled as a xgConsole port. The
console functionality can be disabled with the USB OFF command.
Read the 'X-Graph and Dynamic C Users Manual' for more information on how to install
the FTDI USB drivers on your PC. Once the drivers are installed, follow the same
instructions as for the RS232C port.
xgConsole Commands 15
3 xgConsole Commands
DELGEN is continuously working on new xgConsole commands. This paragraph lists the
currently available commands. If your application requires not listed commands to control
specific functions, contact DELGEN. In most cases we can include the required commands
easily.
This chapter includes all available xgConsole commands. Many commands are hardware
related and might not be available in all X-Graph modules. The list of available
commands for your X-Graph module is limited by the modules hardware capabilities.
3.1 Console Control Commands
3.1.1 HELP or H or ?
List all the available commands.
Type “HELP <command>” for more information on a specific command.
Type “HELP GUI” to get a list of all GUI commands.
Type “HELP FS” to get a list of all file system commands.
Type “HELP UI” to get a list of all user interface commands.
The latter three options are only available if the necessary software modules are precompiled.
3.1.2 ECHO
ECHO
Turns on or off the echoing of characters on a particular I/O stream.
It does not affect echoing globally, but only for the I/O stream on which it is issued.
Usage:
ECHO ON
ECHO OFF
3.1.3 LOGIN
LOGIN NAME
LOGIN PASSWORD
A login name and/or password can be store in non-volatile memory.
Once a login name is enabled a console session will only start after proper login.
Usage:
LOGIN NAME <name>
Enable console session login and set the login <name>
LOGIN PASSWORD
Follow the instructions to enter a new password
LOGIN DELETE
Remove the login name and password
Important: Do not forget your login name and/or password. It is impossible to logon
without the proper values.
16 xgCONSOLE Users Manual
3.1.4 LOGOUT
LOGOUT
Exit the current console session
3.1.5 RS232A
RS232A
Configures the primary RS232 console using Rabbit serial port C (on XG5000)
Usage:
RS232A
RS232A
RS232A
RS232A
ON
OFF (default)
BAUD <variable> sets the RS232 console baudrate
shows the RS232 console communication parameters
3.1.6 RS232B
RS232B
Configures the secondary RS232 console using Rabbit serial port D (on XG5000)
Usage:
RS232B ON
RS232B OFF (default)
RS232B BAUD <variable> sets the RS232 console baudrate
RS232BA shows the RS232 console communication parameters
3.1.7 TELNET
TELNET
Configures the TELNET console
Usage:
TELNET
TELNET
TELNET
TELNET
ON
OFF
PORT <variable> sets the TELNET console port to <variable>
shows the TELNET console parameters
3.1.8 TIME
TIME
Display or set the system time and date
Usage:
TIME - Display the system time and date
TIME SET <hour> <min> <sec> <day> <month> <year>
<hour> - hour 0-23
<min>
- minutes 0-59
<sec>
- seconds 0-59
<day>
- day 1-31
<month> - month 1-12
<year> - year 1980-2047
xgConsole Commands 17
3.1.9 USB
USB
Configures the USB console
Usage:
USB ON
USB OFF (default)
USB BAUD <variable> sets the USB console baudrate
USB shows the USB console communication parameters
3.1.10 VERSION or VER
VER
VERSION
Print the X-GRAPH firmware version numbers
3.2 Ethernet Control Commands
3.2.1 DHCP
DHCP
Enable or disable DHCP on the default interface.
Usage:
DHCP ON [interface]
DHCP OFF [interface]
[interface] (optional) should be one of the available interfaces
Depending on your hardware you can select:
ETH0, ETH1, WIFI0, WIFI1, PPPOE0, PPPOE1, PPP0, PPP1, PPP2, PPP3, PPP4, PPP5
3.2.2 GATEWAY
GATEWAY
DELETE GATEWAY
Set/reset the network gateway IP address
Usage:
GATEWAY <value> where <value> is the gateway
DELETE GATEWAY <value> where <value> is the gateway to be deleted
3.2.3 ICMP
ICMP
Allow the IP address of an interface to be set by a directed ping
Usage:
ICMP ON [interface]
ICMP OFF [interface]
The optional parameter [interface] can be ETH0 or ETH1.
18 xgCONSOLE Users Manual
3.2.4 ICMP RESET
ICMP RESET
Allows reconfiguration via directed ping
Usage:
ICMP RESET
If ping config is on and the config has already been set, this allows the ping config to be
set again.
3.2.5 IP
IP
Sets the IP address of an interface
Usage:
IP <value> [interface] where <value> is the IP address
[interface] (optional) should be one of the available interfaces
Depending on your hardware you can select:
ETH0, ETH1, WIFI0, WIFI1, PPPOE0, PPPOE1, PPP0, PPP1, PPP2, PPP3, PPP4, PPP5
3.2.6 MAIL FROM
MAIL FROM
Sets the return address for all email messages.
Usage:
MAIL FROM <address>
This address will be added to the outgoing e-mail and should be valid in case the e-mail
needs to be returned.
3.2.7 MAIL TO
MAIL TO
Sends an e-mail to the server specified by MAILSERVER and with the return address
specified by MAIL FROM.
Usage:
MAIL TO [email protected]
Opens a line editor
The first line of the message will be used as the subject, and the other lines
are the body. The body is terminated with a ^D or ^Z (0x04 or 0x1A).
3.2.8 MAILSERVER
MAILSERVER
Sets the IP address or name of the SMTP mailserver used to send mails.
Usage:
MAILSERVER <value> where <value> is the mailserver
xgConsole Commands 19
3.2.9 MTU
MTU
Sets the MTU value for an interface
Usage:
MTU <value> [interface]
<value> is the new MTU value
[interface] (optional) should be one of the available interfaces
Depending on your hardware you can select:
ETH0, ETH1, WIFI0, WIFI1, PPPOE0, PPPOE1, PPP0, PPP1, PPP2, PPP3, PPP4, PPP5
3.2.10 NAMESERVER
NAMESERVER
ADD NAMESERVER
REMOVE NAMESERVER
Manages a list of IP addresses for name servers
Usage:
NAMESERVER <value> where <value> is the name server
ADD NAMESERVER <value> where <value> is added to the list of name servers
REMOVE NAMESERVER <value> where <value> is removed from the list of name servers
3.2.11 NETMASK
NETMASK
Sets the netmask used for an interface
Usage:
NETMASK <value> [interface] where <value> is the netmask
[interface] (optional) should be one of the available interfaces
Depending on your hardware you can select:
ETH0, ETH1, WIFI0, WIFI1, PPPOE0, PPPOE1, PPP0, PPP1, PPP2, PPP3, PPP4, PPP5
3.2.12 NETWORK
NETWORK
Shows the current I/O port, ip, gateway, netmask, ...
3.2.13 NETWORK MULTI
NETWORK MULTI
Shows a list of active interfaces and global network information
NETWORK MULTI [interface]
Shows network interface related information
Depending on your hardware you can select:
ETH0, ETH1, WIFI0, WIFI1, PPPOE0, PPPOE1, PPP0, PPP1, PPP2, PPP3, PPP4, PPP5
20 xgCONSOLE Users Manual
3.3 X-Graph Hardware Control Commands
3.3.1 1WIRE
1WIRE INIT
Initializes the 1-Wire bus
1WIRE SEARCH
Searches the 1-Wire bus for devices and prints a table
1WIRE READ
Reads bytes from the 1-Wire bus
1WIRE WRITE
Write data to the 1-Wire bus
1WIRE SWRITE
Write data to the 1-Wire bus, then switch strong pull-up on
Usage:
1WIRE INIT
1WIRE SEARCH [type] where type is an optional search command. If type is not supplied
0xf0 is used, the default 1-Wire search command.
1WIRE READ <nr> reads <nr> bytes for the 1-Wire bus
1WIRE WRITE <value> writes <value> to the 1-Wire bus
1WIRE SWRITE <value> writes <value> to the 1-Wire bus, the enables a strong-pullup
Example to read temperature with a DS18S20 1-Wire temperature sensor:
> 1WIRE INIT
// Inits the 1-Wire bus
Found 1 1-Wire devices
> 1WIRE WRITE 204
// Skip ROM command
> 1WIRE SWRITE 68
// Start temperature conversion + strong pull-up
(Wait 750 msec)
> 1WIRE INIT
// Re-init = stop strong pull-up
Found 1 1-Wire devices
> 1WIRE WRITE 204
// Skip ROM command
> 1WIRE WRITE 190
// Read scratchpad command
> 1WIRE READ 9
// Read 9 bytes from 1-Wire device
2F-00-4B-46-FF-FF-06-10-A4
// This is the scratchpad of the DS18S20
// The first value (2F) is the temperature in 0.5 deg increments. 0X2F = 47 = 23.5 deg
Celsius.
3.3.2 ADC
ADC
ADC DIFF
Reads an ADC channel.
Usage:
ADC <channel nr> reads a single ADC value with ground reference
<channel nr>: 0->23 corresponds with AINxx input pin of X-Graph module
ADC DIFF <channel nr> reads a differential ADC value
<channel nr>:
0 = +AIN8 -AIN9
8 = -AIN8 +AIN9
xgConsole Commands 21
1
2
3
4
5
6
7
=
=
=
=
=
=
=
+AIN10
+AIN12
+AIN14
+AIN16
+AIN18
+AIN20
+AIN22
-AIN11
-AIN13
-AIN15
-AIN17
-AIN19
-AIN21
-AIN23
9 = -AIN10 +AIN11
10 = -AIN12 +AIN13
11 = -AIN14 +AIN15
12 = -AIN16 +AIN17
13 = -AIN18 +AIN19
14 = -AIN20 +AIN21
15 = -AIN22 +AIN23
3.3.3 ASIX
ASIX OUT
Writes to the asix parallel port
ASIX IN
Reads the asix parallel port
ASIX DIR
Sets the direction of the asix parallel port
ASIX <line>
Reads or writes an ASIX I/O line
Usage:
ASIX OUT <value> where 8-bit <value> is written to the parallel port
ASIX IN where the active 8-bit value of the parallel port is returned
ASIX DIR <direction> is 0 (input) or 1 (output)
ASIX <output line> <value> sets 0 or 1 to the output line
ASIX <input line> reads the status of the input line
<input line>: BUSY, ACK, PE, SLCT and ERR
<output line>: SLCTIN, INIT, ATFD and STRB
3.3.4 BUZZER
BUZZER
Turns the buzzer on or off.
Usage:
BUZZER ON
BUZZER OFF
3.3.5 DAC
DAC
Sets a DAC output level
Usage:
DAC <value>
Range is 0 up to 4095 which corresponds to an output voltage range of 0 to max. Volt.
Max. might be 5 Volt or 3.3 Volt depending on your X-Graph module version.
22 xgCONSOLE Users Manual
3.3.6 EEPROM
EEPROM
Reads or writes in the EEPROM array
Usage:
EEPROM WRITE <address> <value> writes <value> to <address> in the eeprom array
EEPROM READ <address> <nr> reads <nr> bytes starting from <address>
EEPROM ERASE erases the complete eeprom array
3.3.7 HVOUT
HVOUT ON
Enables current sinking on a high-current/high-voltage output
HVOUT OFF
Disables the output
HVOUT PWM
Sets a PWM output value to a high-current/high-voltage output
Usage:
HVOUT ON <channel>
HVOUT OFF <channel>
HVOUT PWM <channel> <pwm value> sets a 10-bit pwm value
3.3.8 I2C
I2C READ
Read data from the I2C interface
I2C WRITE
Writes data to the I2C interface
I2C SPEED
Sets the I2C communication speed
I2C RESET
Resets the I2C interface
I2C ON
I2C OFF
Enable/disables the I2C interface
Usage:
II2C READ <nr> reads <nr> bytes from I2C device
I2C WRITE <nr> <address> <value> ... <value> writes <nr><value>'s to I2C device
<address>
I2C SPEED <speed> sets the speed (in kHz)
I2C RESET
I2C ON
I2C OFF
xgConsole Commands 23
Example to write/read data to a 24C16 type eeprom (device address = 160)
>I2C ON
// Enables I2C (normally 2 ADC lines)
>I2C SPEED 400
// Set speed to 400kHz
>I2C WRITE 2 160 2 23
// Writes value 23 to address 2
>I2C WRITE 1 160 0
// Sets device address to 0
>I2C READ 10
// Read 10 bytes from device
00-00-17-00-00-00-00-00-00-00
// Return data printed in hex
3.3.9 KEYBOARD
KEYBOARD
Enables or disables the PS/2 keyboard interface
Usage:
KEYBOARD ON
KEYBOARD OFF
3.3.10 KEYPAD
KEYPAD
Enables or disables the keypad interface
Usage:
KEYPAD ON
KEYPAD OFF
3.3.11 RABBIT
RABBIT OUT
Sets a rabbit I/O line output level
RABBIT IN
Reads the status of a rabbit I/O line
Usage:
RABBIT OUT <port> <data> [address]
RABBIT IN <port> [address]
<port>
Allowed internal I/O pins:
PD4 - PD5 - PD6 - PD7
PE0 - PE1 - PE2 - PE5 - PE6 - PE7
PF0 -> PF7
PG0 -> PG7
Allowed external I/O ports:
EXT0 - EXT1 - EXT5 - EXT6 - EXT7
<data>
Internal I/O ports:
0 = low
1 = high
2 = open-drain high
External I/O ports: 8-bit data
[address] external sub-address (range 0 up to 63)
24 xgCONSOLE Users Manual
Example 1: Internal I/O pins:
RABBIT OUT PD4 0
// Toggle Rabbit I/O pin PD4
RABBIT OUT PD4 1
// The pin will automatically be set to output
Example 2: External I/O
RABBIT EXT5 178 13
// Send byte 178 to external I/O port 5 sub-address 13
This port used PE5 as an active low CS, Port A as data bus and pins PB2 up to PB7 as
sub-address I/O lines.
With this command up to 5 external devices can be controlled. Such devices should use
an 8-bit databus, maximum 6 address lines and a I/O CS line.
3.3.12 RESET
RESET
Resets the X-GRAPH module.
3.3.13 SD
SD READ
SD WRITE
Read/Write raw single sectors from/to a SD memory card.
SD RESET
Reset the card installed in the SD card reader.
Usage:
SD READ <sector nr> reads a single sector from a SD memory card
SD WRITE <sector nr> <512x value> writes a single sector to the SD memory card
Warning: 512 values MUST be supplied.
3.3.14 SLAVE
SLAVE OUT
Sets a slave processor I/O line output level
SLAVE IN
Reads the status of a slave processor I/O line
SLAVE PULLUP
Enables a pull-up resistor on a slave processor I/O line
SLAVE DIR
Sets the direction of a slave processor I/O line
Usage:
SLAVE OUT <line> <level>
SLAVE IN <line>
SLAVE PULLUP <line>
SLAVE DIR <line> <direction>
<level> is either 0 (low) or 1 (high)
<direction> is either 0 (input) or 1 (output)
<line> is one of the slave processor I/O lines:
1 = AIN2
2 = AIN3
3 = AIN4
4 = AIN5
xgConsole Commands 25
5 = AIN6
6 = AIN7
7 = UART TXD
8 = UART RXD
9 = 1-Wire
10 = RC5
3.3.15 SFLASH
SFLASH
Reads or writes in the Secure FLASH array
Usage:
SFLASH WRITE <address> <value> idem in the secure flash array
SFLASH READ <address> <nr> idem for the secure flash array
SFLASH ERASE erases the complete secure flash array
3.3.16 SUART
SUART TXD
Send data via the slave uart port
SUART <config>
Configure the SUART port
SUART TXD ON
SUART TXD OFF
SUART RXD ON
SUART RXD OFF
Enables or disables the slave uart transmit or receive pin
Usage:
SUART TXD <value> sends one byte <value>
SUART BAUD <value> sets the port baudrate
SUART CONFIG <parity> <stop> <size>
<parity> 0 = none, 1 = even, 2 = odd
<stop> sets the number of stop bits (1 or 2)
<size> sets the character size (5, 6, 7, 8 or 9)
SUART
SUART
SUART
SUART
TXD ON
TXD OFF
RXD ON
RXD OFF
3.3.17 TOUCHSCREEN
TOUCHSCREEN
Enables or disables the touchscreen interface
Usage:
TOUCHSCREEN ON
TOUCHSCREEN OFF
26 xgCONSOLE Users Manual
3.4 xgGUI Commands
3.4.1 BACKLIGHT
BACKLIGHT
Switches the backlight on or off
Usage:
BACKLIGHT ON switches the LCD backlight on
BACKLIGHT OFF switches the LCD backlight off
3.4.2 BLANK SCREEN
BLANK SCREEN
Blank LCD
3.4.3 BRIGHTNESS
BRIGHTNESS
Sets the brightness of the backlight
Usage:
BRIGHTNESS <level> where <level> can be 0 (min. brightness) up to 1023 (max.
brightness)
This command can not be used with CCFL backlight LCD's.
3.4.4 CIRCLE
CIRCLE
Draws a circle
Usage:
CIRCLE <x> <y> <r> draws a circle with center point at x,y and a radius of r
3.4.5 COLOR
COLOR
Sets the active color
Usage:
COLOR <color value>
<color value> is used for all following graphic primitive commands
B/W LCD's:
0: black
1: white
CSTN Color LCD's:
0: black
1: blue
2: green
3: cyan
4: red
5: magenta
6: yellow
7: white
xgConsole Commands 27
8-bit/pixel LCD's: a value between 0 and 255
The top 3 bits of <color value> are the red intensity bits (0 up to 7)
The next 3 bits are the green intensity bits (0 up to 7)
And the lower 2 bits are the blue intensity bits (0 up to 3)
Basic color table:
0: black
3: blue
28: green
31: cyan
224: red
227: magenta
252: yellow
255: white
3.4.6 CONTRAST
CONTRAST
Sets the LCD contrast
Usage:
CONTRAST <value> where <value> can be 0 (min. contrast) up to 100 (max. contrast)
Contrast settings can not be used with TFT LCD's.
3.4.7 DOT
DOT
Draws a dot
Usage:
DOT <x> <y> draws a dot at the x,y coordinates
3.4.8 FILL CIRCLE
FILL CIRCLE
Draws a filled circle
Usage:
FILL CIRCLE <x> <y> <r> draws a filled circle with center point at x,y and a radius of r
3.4.9 FILL POLYGON
FILL POLYGON
Draws a filled polygon
Usage:
FILL POLYGON <nr> <x1> <y1> ... <xn> <yn>
Draws a filled polygon with nr sides.
The coordinate list must contain x,y pairs matching the <nr> of sides.
28 xgCONSOLE Users Manual
3.4.10 FILL RECTANGLE
FILL RECTANGLE
Draws a filled rectangle
Usage:
FILL RECTANGLE <x1> <y1> <x2> <y2> draws a filled rectangle between the x1,y1 and
x2,y2 points
3.4.11 FILL SCREEN
FILL SCREEN
Fill screen with then active color
3.4.12 FONT
FONT
Sets the active font
Usage:
FONT <font> sets the active font
The allowed range depends on the number of loaded fonts.
3.4.13 GPRINT
GPRINT
Print a string on the LCD
Usage:
GPRINT <x> <y> <string>
Prints the string centered around the x,y coordinates.
Currently gprint uses proportional fonts, transparency off, no underlines.
3.4.14 HLINE
HLINE
Draws a horizontal line
Usage:
HLINE <x> <y1> <y2> draws a line from x,y1 to x,y2
3.4.15 INVERT RECTANGLE
INVERT RECTANGLE
Color inverts a rectangular area
Usage:
INVERT RECTANGLE <x1> <y1> <x2> <y2> color inverts the rectangular area
between x1,y1 and x2,y2
xgConsole Commands 29
3.4.16 LCD
LCD
Switches the LCD on or off
Usage:
LCD ON switches the LCD on
LCD OFF switches the LCD off
This command can not be used with TFT LCD's. Use the BACKLIGHT command for these
LCD's.
3.4.17 LINE
LINE
Draws a line
Usage:
LINE <x1> <y1> <x2> <y2> draws a line from x1,y1 to x2,y2
3.4.18 POLYGON
POLYGON
Draws a polygon
Usage:
POLYGON <nr> <x1> <y1> ... <xn> <yn>
Draws a polygon with nr sides.
The coordinate list must contain x,y pairs matching the <nr> of sides.
3.4.19 RECTANGLE
RECTANGLE
Draws a rectangle
Usage:
RECTANGLE <x1> <y1> <x2> <y2> draws a rectangle between the x1,y1 and x2,y2
points
3.4.20 VLINE
VLINE
Draws a vertical line
Usage:
VLINE <x1> <x2> <y> draws a line from x1,y to x2,y
3.5 xgFAT File System Commands
Tbf
Compiling a Custom xgConsole Version 31
4 Compiling a Custom xgConsole Version
The xgConsole library is included in the X-Graph library set. You can easily edit and
change this library to make a custom version of the xgConsole mode. For example you
could limit the number of commands for your specific application. This way your
customers can only access whatever you think is useful to them.
Or new commands can be added for features specific for your application.
The xgConsole uses the standard DynamicC ZCONSOLE.LIB library. But many of the
ZCONSOLE functions are replaced to reduce the root memory usage and add additional
features.
4.1 User Interface Console
The standard library allows a user interface plug-in. Just include a CONSOLE_UI macro in
your source code to plug-in some application dependent macros.
Check the following example:
#ifdef CONSOLE_INCLUDE_HELP
#ximport "C:\X-Graph\Samples\X-Graph\XG5000\Demo\Help\xg_help_demo.txt"
help_demo_txt
#else
#define help_demo_txt 0
#endif
#define CONSOLE_UI_PROTOTYPE int uicon_demo_enable(ConsoleState* state); \
int uicon_demo_disable(ConsoleState* state);
#define CONSOLE_UI { "DEMO ON", uicon_demo_enable, help_demo_txt }, \
{ "DEMO OFF", uicon_demo_disable, help_demo_txt }, \
{ "DEMO", xgcon_ok, help_demo_txt }, \
{ "UI", xgcon_ok, help_demo_txt }
#define CON_INFO_DEMO_EN
#define CON_INFO_DEMO_DIS
#define CONSOLE_UI_INFOCODE
#define CONSOLE_UI_INFO
4.2 xgConsole Macro's
Tbf
CON_INFO_UI
CON_INFO_UI+1
CON_INFO_DEMO_EN, \
CON_INFO_DEMO_DIS
"Demo Mode Enabled\r\n", \
"Demo Mode Disabled\r\n"
Warranty 33
Warranty
DELGEN warrants that the product delivered hereunder shall conform to the applicable
DELGEN datasheet or mutually agreed upon specifications and shall be free from defects
in material and workmanship under normal use and service for a period of 1 year from
the applicable date of invoice. Products which are “samples”, “design verification units”,
and/or “prototypes” are sold “AS IS,” “WITH ALL FAULTS,” and without a warranty.
If, during such warranty period, (1) DELGEN is notified promptly in writing upon
discovery of any defect in the goods, including a detailed description of such defect; (2)
such goods are returned to DELGEN, DDP DELGEN’s facility accompanied by DELGEN’s
Returned Material Authorization form; and (3) DELGEN’s examination of such goods
discloses to DELGEN’s satisfaction that such goods are defective and such defects are not
caused by accident, abuse, misuse, neglect, alteration, improper installation, repair,
improper testing, or use contrary to any instructions issued by DELGEN, DELGEN shall (at
its sole option) either repair, replace, or credit Buyer the purchase price of such goods.
No goods may be returned to DELGEN without DELGEN’s Returned Material Authorization
form. Prior to any return of goods by Buyer pursuant to this Section, Buyer shall afford
DELGEN the opportunity to inspect such goods at Buyer’s location, and any such goods so
inspected shall not be returned to DELGEN without its prior written consent.
DELGEN shall return any goods repaired or replaced under this warranty to Buyer
transportation prepaid. The performance of this warranty does not extend the warranty
period for any goods beyond that period applicable to the goods originally delivered.
The foregoing warranty constitutes DELGEN’s exclusive liability, and the exclusive remedy
of buyer, for any breach of any warranty or other nonconformity of the goods covered by
this agreement. This warranty is exclusive, and in lieu of all other warranties, express,
implied, or statutory, including without limitation any warranties of merchantability or
fitness for a particular purpose. The sole and exclusive remedy for any breach of this
warranty shall be as expressly provided herein.
Limitation on Liability
Notwithstanding anything to the contrary contained herein, DELGEN shall not, under any
circumstances, be liable to Buyer or any third parties for consequential, incidental,
indirect, exemplary, special, or other damages. DELGEN’s total liability shall not exceed
the total amount paid by Buyer to DELGEN hereunder. DELGEN shall not under any
circumstances be liable for excess costs of reprocurement
Notice to Users 35
Notice to Users
DELGEN PRODUCTS ARE NOT AUTHORIZED FOR USE AS CRITICAL COMPONENTS IN
LIFE-SUPPORT DEVICES OR SYSTEMS UNLESS A SPECIFIC WRITTEN AGREEMENT
REGARDING SUCH INTENDED USE IS ENTERED INTO BETWEEN THE CUSTOMER AND
DELGEN PRIOR TO USE.
Life-support devices or systems are devices or systems intended for surgical implantation
into the body or to sustain life, and whose failure to perform, when properly used in
accordance with instructions for use provided in the labeling and user's manual, can be
reasonably expected to result in significant injury.
No complex software or hardware system is perfect. Bugs are always present in a system
of any size. In order to prevent danger to life or property, it is the responsibility of the
system designer to incorporate redundant protective mechanisms appropriate to the risk
involved.
All DELGEN products are 100 percent functionally tested. Additional testing may include
visual quality control inspections or mechanical defects analyzer inspections.
Specifications are based on characterization of tested sample units rather than testing
over temperature and voltage of each unit. DELGEN products may qualify components to
operate within a range of parameters that is different from the manufacturer's
recommended range. This strategy is believed to be more economical and effective.
Additional testing or burn-in of an individual unit is available by special arrangement.
Software License Agreement 37
Software License Agreement
Notice to Users
This is a legal agreement between you (an individual or single entity, referred to
hereinafter as "you") and DELGEN for the computer software product(s)
including any accompanying explanatory written materials (the "Software").
BEFORE INSTALLING, COPYING OR OTHERWISE USING THE SOFTWARE, YOU
MUST AGREE TO THE TERMS AND CONDITIONS OF THIS AGREEMENT.
If you agree, you are allowed to use the software. If you do not agree with the
terms and conditions of this Agreement, you are not allowed to use the software
and must destroy all copies of the software.
DELGEN licenses this software to its customers upon acceptance of all the terms and
conditions of this license agreement. Please read the terms carefully before downloading
or installing the software.
If you do not accept all the terms, you may not install or use this software, and should
contact your sales representative to receive a full refund.
If you have any questions, call +32-475-60.64.33, or write to the DELGEN office at 241,
route de Longwy, LU-1941 Luxembourg, GD-Luxembourg.
1. Definitions. "Software" means the accompanying computer programs, data
compilation(s), and documentation. "You" means the licensee, and are referred to as
"You."
2. Term. The term of the license granted herein shall continue until terminated either (a)
by You, for your convenience, by written notice to DELGEN or (b) automatically if a
material breach by You is not cured within thirty (30) days of such breach. Immediately
upon any termination of this license for any reason, You must return to DELGEN all copies
of the Software.
3. License Grant. You are granted non-exclusive rights to install and use the Software on
a single computer only; however, if the Software is permanently installed on the hard
disk or other storage device of a computer (other than a network server), and one person
uses that computer more than 80% of the time, then that person may also use the
Software on a portable or home computer. You may not install the Software on a network
or transmit the Software electronically from one computer to another or over a network.
You may copy the Software for archival purposes, provided that any copy must contain
the original Software's proprietary notices in unaltered form.
4. Restrictions. You may not: (i) rent, lease, sublicense, loan, timeshare, or permit others
to use the Software, except as expressly provided above; (ii) modify or translate the
Software; (iii) reverse engineer, decompile, or disassemble the Software, except to the
extent this restriction is expressly prohibited by applicable law; (iv) except as permitted
by Section 5 below, create a derivative work based on the Software or merge the
Software with another product; (vi) copy the Software, except that a reasonable number
of copies may be made for archival purposes; or (vii) remove or obscure any proprietary
rights notices or labels.
5. Transfers. You may not transfer or assign, in any manner, including by operation of
law, the Software or any rights under this Agreement without the prior written consent of
DELGEN, which consent shall not be unreasonably withheld. A condition to any transfer or
assignment shall be that the recipient agrees to the terms of this Agreement. Any
attempted transfer or assignment in violation of this provision shall be null and void.
6. Ownership. DELGEN and its suppliers own the Software and all intellectual property
rights embodied therein, including patents, copyrights and valuable trade secrets
embodied in the Software's design and coding methodology. The Software is protected by
38 xgCONSOLE Users Manual
EC and United States patents, copyright and trade secret laws and international treaty
provisions.
Change List 39
Change List
1.0
Initial release