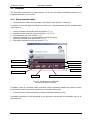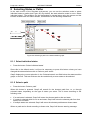
1
Project no.
004074
Project acronym:
NATURNET-REDIME
Project title:
New Education and Decision Support Model for Active Behaviour in
Sustainable Development Based on Innovative Web Services and
Qualitative Reasoning
Instrument:
SPECIFIC TARGETED RESEARCH PROJECT
Thematic Priority:
SUSTDEV-2004-3.VIII.2.e
D4.2.1.
User Manual for Single-User Version of QR Workbench 1
Due date of deliverable: 30/11/2005
Actual submission date: <30/11/2005>
Start date of project: 1st March 2005
Duration: 30 months
Organisation name of lead contractor for this deliverable:
UvA
Revision [final]
Project co-funded by the European Commission within the Sixth Framework Programme
(2002-2006)
Dissemination Level
X
Public
PU
Restricted to other programme participants (including the Commission
PP
Restricted to a group specified by the consortium (including the Commission
RE
Confidential, only for members of the consortium (including the Commission
CO
Services)
1
Authors: Anders Bouwer, Jochem Liem, Bert Bredeweg
Project No. 004074
NATURNET-REDIME
D.4.2.1
Abstract
This document is the user manual for Garp3. The Garp3 software package supports all
operations necessary to build qualitative models and to run and inspect simulations. The
possible operations in Garp3 are divided into three categories, which correspond to the parts in
this document. The first category contains the main operations, such as file operations and
opening the build and simulate environment. The second consists of model building operations
to define building blocks (e.g., entities, quantities and quantity spaces), which are used to create
model fragments and scenarios. Finally, the third category contains the simulation tasks, such
as running a simulation and inspecting the resulting state graph using a variety of visualisations.
The manual provides task-oriented instructions for each available operation in Garp3,
accompanied by clarifying examples throughout the text.
Document history
Version
0.1
0.2
0.3
0.4
0.5
0.6
Status
Draft
Draft based on E. Bakker’s QRM help pages
Draft of table of contents
Draft of more sections
Draft of more sections, and abstract by Liem
and Bouwer
Reshuffle of structure and more sections added
05/10/05
0.7
Corrections, and more text added
06/10/05
0.8
0.9
1.0
Added references, some images, and fixes
More figures added
Corrections, First attempt at completeness
07/10/05
24/10/05
10/11/05
1.1
New Functionality: trace and preferences
22/11/05
1.2
Corrections, Some figures added
24/11/05
1.3
Corrections, added and updated figures
29/11/05
1.4
1.5
Added section about colour, Final corrections
Additions and corrections based on review
comments by T. Nuttle
01/12/05
20/01/06
2
/ 107
Date
6/9/05
7/9/05
26/09/05
03/10/05
04/10/05
Author
Bouwer, A.
Bouwer, A.
Bouwer, A.
Bouwer, A.
Bouwer, A.
Liem, J.
Bouwer, A.,
Liem, J.,
Bredeweg, B.
Bouwer, A.,
Liem, J.,
Bredeweg, B.
Liem, J.
Bouwer, A.
Bouwer, A.,
Bredeweg, B.
Bredeweg, B.,
Bouwer, A.
Liem, J.,
Bouwer, A.
Bredeweg, B,
Liem, J. ,
Bouwer, A.
Bouwer, A.
Bouwer, A.,
Bredeweg, B.
Project No. 004074
NATURNET-REDIME
D.4.2.1
Contents
1
INTRODUCTION ............................................................................................................................................. 9
PART I. GETTING STARTED............................................................................................................................... 10
2
MAIN OPERATIONS IN GARP3 ................................................................................................................. 11
2.1.1
Open main help page........................................................................................................................... 11
2.1.2
Open main Garp3 page ....................................................................................................................... 11
2.1.3
About Garp3........................................................................................................................................ 11
2.2
FILE OPERATIONS ...................................................................................................................................... 12
2.2.1
Show file tasks ..................................................................................................................................... 12
2.2.2
Opening a model from file................................................................................................................... 12
2.2.3
Saving a Model.................................................................................................................................... 13
2.2.4
Starting a New Model.......................................................................................................................... 14
2.2.5
Opening a Model in Legacy Mode ...................................................................................................... 14
2.2.6
Saving a Model in Legacy Mode ......................................................................................................... 14
2.2.7
Error and Warning Messages ............................................................................................................. 15
2.2.8
Keyboard and Mouse Shortcuts .......................................................................................................... 15
2.3
BUILD ....................................................................................................................................................... 16
2.3.1
Show build tasks.................................................................................................................................. 16
2.4
SIMULATE ................................................................................................................................................. 17
2.4.1
Show simulate tasks............................................................................................................................. 17
3
GENERAL ASPECTS OF THE GARP3 INTERFACE.............................................................................. 18
3.1
3.2
3.3
3.4
3.5
GENERAL ACTION BUTTONS..................................................................................................................... 18
GRAPHICAL ICONS .................................................................................................................................... 18
TOOL-TIP TEXTS ....................................................................................................................................... 18
THE TOOLBARS ......................................................................................................................................... 19
THE USE OF COLOUR ................................................................................................................................ 19
PART II. BUILDING MODELS ............................................................................................................................. 21
4
DEFINING BUILDING BLOCKS ................................................................................................................ 22
4.1
4.1.1
4.1.2
4.1.3
4.1.4
4.1.5
4.1.6
4.1.7
4.2
4.2.1
4.2.2
4.2.3
4.2.4
4.2.5
4.2.6
4.2.7
4.2.8
4.2.9
4.3
4.3.1
4.3.2
4.3.3
4.3.4
4.4
4.4.1
4.4.2
4.4.3
4.4.4
4.4.5
ENTITIES ................................................................................................................................................... 22
Working with Entity definitions........................................................................................................... 22
Add an Entity....................................................................................................................................... 22
Delete an Entity................................................................................................................................... 23
Modify an Entity.................................................................................................................................. 23
View: Change the View of the Entity Hierarchy.................................................................................. 23
Error and Warning Messages ............................................................................................................. 24
Keyboard Shortcuts ............................................................................................................................. 25
ATTRIBUTES ............................................................................................................................................. 25
Working with Attributes ...................................................................................................................... 25
Add Attribute Definition ...................................................................................................................... 26
Add Attribute Value............................................................................................................................. 26
Delete Attribute Value......................................................................................................................... 26
Move Attribute Value Up or Down...................................................................................................... 26
Delete Attribute Definition .................................................................................................................. 26
Modify Attribute Definition ................................................................................................................. 26
Copy Attribute Definition .................................................................................................................... 26
Error and Warning Messages ............................................................................................................. 27
CONFIGURATIONS ..................................................................................................................................... 27
Working with Configurations .............................................................................................................. 27
Add Configuration............................................................................................................................... 27
Delete Configuration........................................................................................................................... 28
Modify Configuration.......................................................................................................................... 28
QUANTITIES .............................................................................................................................................. 28
Working with Quantities...................................................................................................................... 28
Create Quantity................................................................................................................................... 28
Delete Quantity ................................................................................................................................... 29
Modify Quantity .................................................................................................................................. 29
Copy Quantity ..................................................................................................................................... 29
3
/ 107
Project No. 004074
NATURNET-REDIME
D.4.2.1
4.4.6
Error and Warning Messages ............................................................................................................. 30
4.4.7
Keyboard and Mouse Shortcuts .......................................................................................................... 30
4.5
QUANTITY SPACES ................................................................................................................................... 30
4.5.1
Working with Quantities Spaces.......................................................................................................... 30
4.5.2
Create Quantity Space ........................................................................................................................ 31
4.5.3
Add a Value ......................................................................................................................................... 31
4.5.4
Delete a Value ..................................................................................................................................... 31
4.5.5
Split Interval........................................................................................................................................ 32
4.5.6
Combine Intervals ............................................................................................................................... 32
4.5.7
Delete Quantity Space......................................................................................................................... 32
4.5.8
Modify Quantity Space ........................................................................................................................ 32
4.5.9
Copy Quantity Space........................................................................................................................... 32
4.5.10
Error and Warning Messages......................................................................................................... 32
4.6
AGENTS .................................................................................................................................................... 33
4.6.1
Working with Agents ........................................................................................................................... 33
4.6.2
Add an Agent ....................................................................................................................................... 34
4.6.3
Delete an Agent ................................................................................................................................... 34
4.6.4
Modify an Agent .................................................................................................................................. 34
4.6.5
View: Change the View of the Agent Hierarchy.................................................................................. 34
4.6.6
Error and Warning Messages ............................................................................................................. 34
4.6.7
Keyboard Shortcuts ............................................................................................................................. 35
4.7
ASSUMPTIONS ........................................................................................................................................... 35
4.7.1
Working with Assumptions .................................................................................................................. 35
4.7.2
Add an Assumption.............................................................................................................................. 36
4.7.3
Delete an Assumption.......................................................................................................................... 36
4.7.4
Modify an Assumption......................................................................................................................... 36
4.7.5
View: Change the View of the Assumption Hierarchy ........................................................................ 37
4.7.6
Error and Warning Messages ............................................................................................................. 37
4.7.7
Keyboard Shortcuts ............................................................................................................................. 37
4.8
ABOUT THIS MODEL .................................................................................................................................. 38
5
SCENARIOS.................................................................................................................................................... 39
5.1
WORKING WITH SCENARIOS ..................................................................................................................... 39
5.1.1
Opening the Scenarios Editor ............................................................................................................. 39
5.1.2
Create a new Scenario ........................................................................................................................ 39
5.1.3
Delete a Scenario ................................................................................................................................ 40
5.1.4
Modify Scenario Properties ................................................................................................................ 40
5.1.5
Copy a Scenario .................................................................................................................................. 40
5.1.6
Editing a Scenario............................................................................................................................... 40
5.1.7
Editing the last changed scenario ....................................................................................................... 41
5.1.8
View: Change the View of the Scenario Editor ................................................................................... 41
5.1.9
Error and Warning Messages ............................................................................................................. 42
5.1.10
Keyboard and Mouse Shortcuts...................................................................................................... 43
5.2
ENTITY INSTANCES IN SCENARIOS ............................................................................................................ 43
5.2.1
Adding an Entity Instance ................................................................................................................... 43
5.2.2
Deleting an Entity Instance ................................................................................................................. 43
5.2.3
Modifying an Entity Instance .............................................................................................................. 44
5.2.4
Error and Warning Messages ............................................................................................................. 44
5.2.5
Keyboard and Mouse Shortcuts .......................................................................................................... 44
5.3
ATTRIBUTES IN SCENARIOS ...................................................................................................................... 45
5.3.1
Adding an Attribute to an Entity Instance ........................................................................................... 45
5.3.2
Deleting an Attribute from an Entity Instance .................................................................................... 46
5.3.3
Modifying an Attribute ........................................................................................................................ 46
5.3.4
Keyboard and Mouse Shortcuts .......................................................................................................... 46
5.4
CONFIGURATIONS IN SCENARIOS .............................................................................................................. 46
5.4.1
Adding a Configuration between two Entity Instances ....................................................................... 46
5.4.2
Deleting a Configuration .................................................................................................................... 47
5.4.3
Modifying a Configuration.................................................................................................................. 47
5.4.4
Keyboard and Mouse Shortcuts .......................................................................................................... 47
5.5
QUANTITIES AND QUANTITY SPACES IN SCENARIOS................................................................................. 47
5.5.1
Adding a Quantity with Quantity space to an Entity Instance............................................................. 47
5.5.2
Deleting a Quantity from an Entity Instance....................................................................................... 48
5.5.3
Modifying a Quantity connected to an Entity Instance ....................................................................... 49
4
/ 107
Project No. 004074
NATURNET-REDIME
D.4.2.1
5.5.4
Keyboard and Mouse Shortcuts .......................................................................................................... 49
5.6
VALUES IN SCENARIOS ............................................................................................................................. 49
5.6.1
Set a Value on a Quantity Magnitude ................................................................................................. 49
5.6.2
Set a Value on a Quantity Derivative .................................................................................................. 50
5.6.3
Delete a Value ..................................................................................................................................... 50
5.6.4
Modify a Value .................................................................................................................................... 50
5.7
DEPENDENCIES IN SCENARIOS................................................................................................................... 50
5.7.1
Inequalities.......................................................................................................................................... 50
5.7.1.1
5.7.1.2
5.7.1.3
5.7.1.4
5.7.1.5
5.7.1.6
5.7.1.7
5.7.1.8
5.7.1.9
5.7.1.10
Add (In)equality between Quantities .....................................................................................................51
Add (In)equality between Quantity Values ...........................................................................................51
Add (In)equality between a Quantity and a Point Value.....................................................................52
Add (In)equality between a Derivative and a Point Value..................................................................52
Add (In)equality between Derivatives of two Quantities.....................................................................52
Delete an (In)equality in a Scenario ......................................................................................................53
Modify an (In)equality in a Scenario......................................................................................................53
Add Calculation (Plus/Min) .....................................................................................................................53
Delete Calculation (Plus/Min).................................................................................................................53
Modify Calculation (Plus/Min) ................................................................................................................53
5.8
AGENTS IN SCENARIOS ............................................................................................................................. 54
5.8.1
Adding a Agent Instance ..................................................................................................................... 54
5.8.2
Deleting a Agent Instance ................................................................................................................... 54
5.8.3
Modifying a Agent Instance................................................................................................................. 54
5.8.4
Keyboard and Mouse Shortcuts .......................................................................................................... 55
5.9
ASSUMPTIONS IN SCENARIOS .................................................................................................................... 55
5.9.1
Adding an Assumption to an Entity ..................................................................................................... 55
5.9.2
Adding a general Assumption ............................................................................................................. 55
5.9.3
Deleting a Assumption ........................................................................................................................ 55
5.9.4
Modifying a Assumption...................................................................................................................... 56
6
MODEL FRAGMENTS.................................................................................................................................. 57
6.1
WORKING WITH MODEL FRAGMENTS ....................................................................................................... 57
6.1.1
Open Model Fragments Editor............................................................................................................ 57
6.1.2
Create a new Model Fragment............................................................................................................ 57
6.1.3
Create a Child of a Model Fragment .................................................................................................. 58
6.1.4
Delete a Model Fragment ................................................................................................................... 58
6.1.5
Modify the Parent of a Model Fragment............................................................................................. 59
6.1.6
Copy a Model Fragment ..................................................................................................................... 59
6.1.7
Editing Model Fragments.................................................................................................................... 59
6.1.8
Editing the last changed Model Fragment .......................................................................................... 60
6.1.9
View: Change the View of the Model Fragment Editor ...................................................................... 60
6.1.10
Error and Warning Messages......................................................................................................... 61
6.1.11
Keyboard and Mouse Shortcuts...................................................................................................... 61
6.2
CONDITIONS AND CONSEQUENCES ........................................................................................................... 61
6.3
ENTITY INSTANCES IN MODEL FRAGMENTS ............................................................................................. 62
6.3.1
Adding an Entity Instance ................................................................................................................... 62
6.3.2
Deleting an Entity Instance ................................................................................................................. 63
6.3.3
Modifying an Entity Instance .............................................................................................................. 63
6.3.4
Error and Warning Messages ............................................................................................................. 63
6.3.5
Keyboard and Mouse Shortcuts .......................................................................................................... 64
6.4
ATTRIBUTES IN MODEL FRAGMENTS ........................................................................................................ 64
6.4.1
Adding an Attribute to an Entity Instance ........................................................................................... 64
6.4.2
Deleting an Attribute from an Entity Instance .................................................................................... 65
6.4.3
Modifying an Attribute connected to an Entity Instance ..................................................................... 65
6.4.4
Keyboard and Mouse Shortcuts .......................................................................................................... 65
6.5
CONFIGURATIONS IN MODEL FRAGMENTS................................................................................................ 66
6.5.1
Add a Configuration between Entities................................................................................................. 66
6.5.2
Delete a Configuration........................................................................................................................ 66
6.5.3
Modify a Configuration....................................................................................................................... 66
6.5.4
Keyboard and Mouse Shortcuts .......................................................................................................... 67
6.6
QUANTITIES AND QUANTITY SPACES IN MODEL FRAGMENTS .................................................................. 67
6.6.1
Adding a Quantity with Quantity space to an Entity Instance............................................................. 67
6.6.2
Deleting a Quantity with Quantity space from an Entity Instance ...................................................... 68
6.6.3
Modifying a Quantity with Quantity space connected to an Entity Instance....................................... 68
6.6.4
Keyboard and Mouse Shortcuts .......................................................................................................... 68
5
/ 107
Project No. 004074
NATURNET-REDIME
D.4.2.1
6.7
VALUES IN MODEL FRAGMENTS ............................................................................................................... 69
6.7.1
Set a Value on a Quantity Magnitude ................................................................................................. 69
6.7.2
Set a Value on a Derivative................................................................................................................. 69
6.7.3
Delete a Value ..................................................................................................................................... 69
6.7.4
Modify a Value .................................................................................................................................... 69
6.8
DEPENDENCIES IN MODEL FRAGMENTS .................................................................................................... 69
6.8.1
Causal Dependencies .......................................................................................................................... 69
6.8.1.1
6.8.1.2
6.8.1.3
6.8.1.4
6.8.1.5
6.8.1.6
6.8.2
Inequalities.......................................................................................................................................... 71
6.8.2.1
6.8.2.2
6.8.2.3
6.8.2.4
6.8.2.5
6.8.2.6
6.8.2.7
6.8.2.8
6.8.2.9
6.8.2.10
6.8.3
Add Influence ...........................................................................................................................................69
Delete Influence .......................................................................................................................................70
Modify Influence.......................................................................................................................................70
Add Proportionality ..................................................................................................................................70
Delete Proportionality..............................................................................................................................71
Modify Proportionality..............................................................................................................................71
Add (In)equality between Quantities .....................................................................................................71
Add (In)equality between a Quantity and one of its Point Values.....................................................71
Add (In)equality between Values of different Quantities ....................................................................72
Add (In)equality between a Quantity Derivative and its Value ..........................................................72
Add (In)equality between Derivatives of two Quantities.....................................................................72
Delete a Inequality or Equality in a Model Fragment..........................................................................73
Modify a Inequality or Equality in a Model Fragment..........................................................................73
Add Calculation (Plus/Min) .....................................................................................................................73
Delete Calculation (Plus/Min).................................................................................................................74
Modify Calculation (Plus/Min) ................................................................................................................74
Correspondences................................................................................................................................. 74
6.8.3.1
6.8.3.2
6.8.3.3
6.8.3.4
Adding a Correspondence between Quantity spaces ........................................................................74
Adding a Correspondence between Quantity values .........................................................................75
Deleting a Correspondence....................................................................................................................75
Modify Correspondence..........................................................................................................................75
6.9
AGENTS IN MODEL FRAGMENTS ............................................................................................................... 76
6.9.1
Adding an Agent Instance ................................................................................................................... 76
6.9.2
Deleting an Agent Instance ................................................................................................................. 76
6.9.3
Modifying an Agent Instance............................................................................................................... 76
6.9.4
Keyboard and Mouse Shortcuts .......................................................................................................... 76
6.10
ASSUMPTIONS IN MODEL FRAGMENTS ..................................................................................................... 77
6.10.1
Adding an Assumption.................................................................................................................... 77
6.10.2
Deleting an Assumption.................................................................................................................. 77
6.10.3
Modifying an Assumption ............................................................................................................... 77
6.10.4
Keyboard and Mouse Shortcuts...................................................................................................... 77
6.11
IMPORTING OTHER MODEL FRAGMENTS ................................................................................................... 77
6.11.1
Add a Model Fragment as a condition ........................................................................................... 78
6.11.2
Deleting a conditional Model Fragment ........................................................................................ 78
6.11.3
Editing a conditional Model Fragment .......................................................................................... 78
6.12
IDENTITY LINKS ........................................................................................................................................ 79
6.12.1
Add Identity .................................................................................................................................... 79
6.13
REFINING A CONDITIONAL MODEL FRAGMENT ........................................................................................ 79
6.14
KEYBOARD AND MOUSE SHORTCUTS ....................................................................................................... 80
6.15
ERROR AND WARNING MESSAGES ............................................................................................................ 80
PART III. RUNNING AND INSPECTING SIMULATIONS .............................................................................. 81
7
RUNNING SIMULATIONS........................................................................................................................... 82
7.1.1
7.1.2
7.1.3
7.1.4
7.1.5
7.1.6
7.1.7
8
Select a scenario to simulate ............................................................................................................... 82
Terminate selected states .................................................................................................................... 82
Order selected states ........................................................................................................................... 83
Find successors for selected states...................................................................................................... 83
Full simulation .................................................................................................................................... 83
Inspect the simulation trace ................................................................................................................ 84
Simulation preferences........................................................................................................................ 86
SELECTING STATES OR PATHS .............................................................................................................. 89
8.1.1
8.1.2
8.1.3
8.1.4
Select individual states ........................................................................................................................ 89
Select a path ........................................................................................................................................ 89
Select a state........................................................................................................................................ 90
Select an additional state .................................................................................................................... 90
6
/ 107
Project No. 004074
8.1.5
8.1.6
8.1.7
9
NATURNET-REDIME
D.4.2.1
Select all states.................................................................................................................................... 90
Deselect a state ................................................................................................................................... 90
Deselect all states................................................................................................................................ 90
INSPECTING SIMULATIONS..................................................................................................................... 91
9.1
THE QUANTITY VALUES VIEW ................................................................................................................. 91
9.1.1
Show quantity values........................................................................................................................... 91
9.1.2
Edit quantity ........................................................................................................................................ 92
9.2
THE VALUE HISTORY VIEW ...................................................................................................................... 92
9.2.1
Open the Value History View for selected States ................................................................................ 92
9.2.2
Select Quantities.................................................................................................................................. 93
9.2.3
Deselect Quantities ............................................................................................................................. 93
9.2.4
Draw a Value History for selected Quantities .................................................................................... 93
9.2.5
Clear the Screen.................................................................................................................................. 93
9.2.6
Sort the List of Quantities.................................................................................................................... 93
9.2.7
Print Value History to File.................................................................................................................. 93
9.2.8
Close the Value History View.............................................................................................................. 93
9.2.9
Keyboard and Mouse Shortcuts .......................................................................................................... 93
9.3
THE EQUATION HISTORY VIEW ................................................................................................................ 93
9.3.1
Open the Equation History View for selected States or Path.............................................................. 94
9.3.2
Select Equations .................................................................................................................................. 94
9.3.3
Deselect Equations.............................................................................................................................. 94
9.3.4
Draw an Equation History for selected Equations.............................................................................. 94
9.3.5
Clear the Screen.................................................................................................................................. 95
9.3.6
Changing the Display Format of Equations........................................................................................ 95
9.3.7
Include/Exclude Derivative Equations ................................................................................................ 95
9.3.8
Print Equation History to File............................................................................................................. 95
9.3.9
Close the Equation History View ........................................................................................................ 95
9.3.10
Keyboard and Mouse Shortcuts...................................................................................................... 95
9.4
THE TRANSITION HISTORY VIEW.............................................................................................................. 95
9.4.1
Open the Transition History View for Selected States ........................................................................ 95
9.4.2
Open the Transition History View for a Selected Path ....................................................................... 95
9.4.3
Inspect the Details of a Selected Transition ........................................................................................ 96
9.4.4
Close the Transition History View ...................................................................................................... 97
9.5
THE ENTITY-RELATIONS VIEW ................................................................................................................. 97
9.5.1
Show entities, configurations and attributes ....................................................................................... 97
9.5.2
Change layout entities......................................................................................................................... 97
9.5.3
Zoom in ............................................................................................................................................... 98
9.5.4
Zoom out ............................................................................................................................................. 98
9.5.5
Print diagram to file (Postscript) ........................................................................................................ 98
9.5.6
Close the Entity-Relations view........................................................................................................... 98
9.6
THE DEPENDENCIES VIEW ........................................................................................................................ 98
9.6.1
Opening the Dependencies View......................................................................................................... 98
9.6.2
Showing or Hiding Structure and Quantities ...................................................................................... 99
9.6.3
Showing or Hiding Causal Dependencies......................................................................................... 100
9.6.4
Showing or Hiding (In)equalities ...................................................................................................... 100
9.6.5
Showing or Hiding Correspondences................................................................................................ 101
9.6.6
View properties of quantities and entities ......................................................................................... 101
9.6.7
Change layout entities....................................................................................................................... 101
9.6.8
Change layout quantities................................................................................................................... 101
9.6.9
Change layout dependencies ............................................................................................................. 102
9.6.10
Zoom in......................................................................................................................................... 102
9.6.11
Zoom out....................................................................................................................................... 102
9.6.12
Print diagram to file (Postscript) ................................................................................................. 102
9.6.13
Close the dependencies view ........................................................................................................ 102
9.6.14
Error and Warning Messages....................................................................................................... 102
9.6.15
Keyboard and Mouse Shortcuts.................................................................................................... 103
9.7
THE MODEL FRAGMENTS VIEWS ............................................................................................................ 103
9.7.1
Opening the Model Fragments Views ............................................................................................... 103
9.7.2
Show Model Fragment in Legacy Mode............................................................................................ 103
9.7.3
Show Model Fragment in Context..................................................................................................... 104
9.7.4
Edit Selected Model Fragment .......................................................................................................... 105
7
/ 107
Project No. 004074
10
NATURNET-REDIME
D.4.2.1
ADDITIONAL MENU OPTIONS ............................................................................................................... 105
10.1
THE FILE MENU ...................................................................................................................................... 105
10.1.1
Save simulation in model.............................................................................................................. 105
10.1.2
Print state-transition graph to file................................................................................................ 106
10.1.3
Error and Warning Messages....................................................................................................... 106
10.2
THE VIEW MENU .................................................................................................................................... 106
10.3
THE DISPLAY MENU ............................................................................................................................... 107
10.3.1
Layout........................................................................................................................................... 107
10.3.2
Layout States ................................................................................................................................ 107
10.3.3
Layout Terminations..................................................................................................................... 107
10.3.4
Hide/Show Input State .................................................................................................................. 107
10.3.5
Show/Hide Termination Nodes..................................................................................................... 107
10.3.6
Show/Hide Internal Quantity Names ............................................................................................ 107
8
/ 107
Project No. 004074
NATURNET-REDIME
D.4.2.1
1 INTRODUCTION
Garp3 is a software package for qualitative reasoning and modelling. It offers an integrated set
of tools for building qualitative models as well as for running and inspecting simulations based
on those models. Qualitative models are formal models which provide insight in the causal
mechanisms behind the simulated behaviour of the system without the need for numerical data
or complex mathematical formulas. This makes Garp3 especially useful in domains such as
ecology and sustainable development, where it is often hard, if not impossible, to acquire
numerical data.
To support modelling, Garp3 offers a graphical workbench that allows the user to build a
qualitative model of a particular system in an intuitive way. A model is built by creating building
blocks, such as entities and quantities, and combining these into aggregates, such as scenarios
and model fragments. The graphical modelling workbench of Garp3 contains multiple screens in
which different parts of the model are specified. This supports users in managing their model
building tasks. Furthermore, restrictions built into the software prevent users from creating
syntactically incorrect models.
When the model is sufficiently specified, it can be used to run simulations. The built-in
simulation engine generates a state-transition graph based on a particular scenario. The statetransition graph represents the possible behaviour(s) of the system, given the knowledge
specified in the model. Each state represents the system at a particular point (or interval) in
time. Garp3 includes adaptable views to inspect this state-transition graph and the contents of
specific states in detail.
While each of the tools in Garp3 has considerable value in itself, the complete set of
tools for model building and inspecting simulation results constitute a uniquely powerful
software package. As a whole, Garp3 allows users to build interactive knowledge
representations which reflect and support their understanding of the behaviour of systems in
ecology and other domains.
9
/ 107
Project No. 004074
NATURNET-REDIME
D.4.2.1
Part I. Getting Started
In this part, you will learn about the main screen of Garp3 and general aspects of the interface.
It consists of two chapters:
•
Chapter 2. Main operations in Garp3
•
Chapter 3. General aspects of the Garp3 interface
10
/ 107
Project No. 004074
NATURNET-REDIME
D.4.2.1
2 Main Operations in Garp3
The main screen of Garp3 offers access to the main operations, which are divided in three
categories: file operations, build operations, and simulate operations. When you start Garp3,
only the toolbar for the file operations is shown, while the build and simulate toolbars are
collapsed (see Figure 1).
Figure 1. The main screen of Garp3. The File operations toolbar
is open, the build and simulate toolbars are collapsed.
You can expand the build or simulate toolbar by pressing the button ‘Show build tasks’ or the
button ‘Show simulate tasks’. The tooltips may help you to find out which button to press:
•
The operation associated to a button and other items in the interface of Garp3 will
appear as a tooltip when you move the mouse over it.
The file operations are described in section 2.2. The build operations are described in section
2.3. The simulate operations are described in section 2.4.
2.1.1 Open main help page
•
Press the owl icon on the top right side of the Garp3 main menu.
An internet browser will appear with additional help information on how to use Garp3.
2.1.2 Open main Garp3 page
•
Press the Garp3 icon on the right side of the Garp3 main menu.
An internet browser will appear with the Garp3 project page. This includes technical
information as well as additional documentation.
2.1.3 About Garp3
•
Press the ‘About’ icon on the bottom right side of the Garp3 main menu.
A window will appear with information about Garp3, including the version number and
information about the developers.
11
/ 107
Project No. 004074
NATURNET-REDIME
D.4.2.1
2.2 File operations
File operations are used to open and save models. When you start Garp3, you can start
modelling from scratch to create a new model, or open an existing model from a file. You can
edit the model and save your changes, or start over with a new model. Users who work with
previous versions of the Garp software (including Homer and VisiGarp) can open and save
models in legacy mode. All file tasks are described in detail in sections 2.2.1 to 2.2.6. Section
2.2.7 deals with error and warning messages, and section 2.2.8 is about keyboard and mouse
shortcuts related to file operations.
2.2.1 Show file tasks
If the file tasks toolbar is collapsed, you will need to show the file tasks first.
•
Press the button ‘Show file tasks’ in the Garp3 main screen, if necessary.
When you first start Garp3, the file tasks toolbar is already expanded, so this will not be
necessary. The file tasks toolbar provides buttons with access to the following operations
(see Figure 2):
• Open model from file
• Save current model to file
• Save current model to new file
• Start new model
• Open model in legacy mode
• Save model in legacy mode
Figure 2. The file tasks toolbar with the operations associated to each of the buttons.
2.2.2 Opening a model from file
You can open one of the example models provided with the Garp3 distribution, or another
existing model.
•
Press the 'Open model from file' button in the Garp3 main screen.
A file browser will appear (see Figure 3). Use the file browser to locate the .hgp file that
contains the model you want to open. If you were working on another model, Garp3 will
present a warning message.
12
/ 107
Project No. 004074
•
NATURNET-REDIME
D.4.2.1
Select the file name and press the 'Ok' button.
The model is opened, and the name of the model is shown at the top of the Garp3 main
screen (replacing the text ‘Empty model’, as shown in Figure 2).
Figure 3. Opening a model from file.
2.2.3 Saving a Model
If you have made changes in a model using Garp3, you can save the model using ‘Save current
model to file’ or ‘Save current model to new file’.
•
•
•
•
Press the button ‘Show file tasks’ in the Garp3 main screen, if necessary.
Press the ‘Save current model to file’ button if you are modifying an existing model and want
to save it in the same file.
Press the ‘Save current model to new file’ button if you have not saved the model before, or
when you want to save it under a different name.
A file browser will appear (see Figure 4).
Type in a file name and select the right directory.
The model is saved. The name of the model can be seen at the top of the main screen.
Note that there are two notions of ‘save’ in Garp3: (1) applying changes within the model, and
(2) saving the model to a file. The file options described in this section are about saving the
model to a file. Throughout the Garp3 application, you will find several buttons with a label
‘Apply changes’. When you press these, your changes will be applied into the model, but this
does not save them to a file. So, when you are editing a model and want to record your changes
before you quit Garp3, you will need to do both: apply your changes within the model (probably
several times), and save the model to a (new or existing) file. It is advised to save your model
regularly to avoid the risk of losing unsaved changes.
13
/ 107
Project No. 004074
NATURNET-REDIME
D.4.2.1
Figure 4. Saving a model to a new file.
2.2.4 Starting a New Model
If you want to start over with a new model, you can close the current model and start a new
model. Press the 'Start New Model' button in the Garp3 main screen. If you have unsaved
changes, Garp3 will present a warning message.
2.2.5 Opening a Model in Legacy Mode
Existing models made for versions of Garp before Garp3 can be opened in legacy mode.
•
•
Press the 'Open model in legacy mode' button in the Garp3 main screen.
If you were busy working on another model Garp3 will prompt you what to do. A file browser
will appear to locate the .gp file that contains the model you want to open.
Select the file name and press the 'Ok' button.
The model is opened. The name of the model can be seen at the top of the Garp3 main
screen.
Note: It is recommended to stop working in legacy mode as soon as possible, because support
for this mode will be discontinued in the future. Simulations run with previous versions of Garp
are not guaranteed to produce the same result (most likely, they will differ). Furthermore, it is
impossible to use the build tasks in legacy mode.
2.2.6 Saving a Model in Legacy Mode
To allow (limited) backwards compatibility, you can also save your model in legacy mode. This
may be useful if you want to compare results with those produced by previous versions of Garp.
•
Press the button 'Save model in legacy mode' in the Garp3 main screen.
14
/ 107
Project No. 004074
•
•
NATURNET-REDIME
D.4.2.1
Locate the directory where the model has to be saved.
Press the button 'Ok' (tiptool: Export).
Now your model is saved in legacy mode and ready to use in earlier versions of Garp,
Homer and VisiGarp (tools which have all been integrated into Garp3).
Note: It is recommended to stop working in legacy mode as soon as possible, because support
for this mode will be discontinued in the future. Simulations run with previous versions of Garp
are not guaranteed to produce the same result (most likely, they will differ). Furthermore, it is
impossible to use the build tasks in legacy mode.
2.2.7 Error and Warning Messages
The error and warning messages which you may encounter during file operations are listed
below, with an explanation of why they occur and how to remedy the problem.
•
•
The current model has changed. Save it?
You have chosen to open another file while you have unsaved changes in the current model
file.You can choose ‘Save’, ‘Skip changes’, or ‘Cancel’.
o ‘Save’ will save your changes in the model file you were working on.
o ‘Skip changes’ will discard your changes.
o ‘Cancel’ will return to the model you were working on.
<FileName> does not exist.
The selected file could not be found in the selected directory. Maybe you forgot to select a
file, or you made a typing mistake in the file name. It is also possible that you are looking in
the wrong directory. Press the ‘Ok’ button and select another file and/or directory to try
again.
2.2.8 Keyboard and Mouse Shortcuts
There are currently no shortcuts for the file operations.
15
/ 107
Project No. 004074
NATURNET-REDIME
D.4.2.1
2.3 Build
The Build environment of Garp3 allows you to build models by defining several types of building
blocks and combining these building blocks in scenarios and model fragments.
2.3.1 Show build tasks
•
Press the button ‘Show build tasks’ in the Garp3 main screen, if necessary.
A number of icons will appear below the build icon, representing the various build tasks (see
Figure 5):
•
•
•
•
•
•
•
•
•
•
•
•
Open entity hierarchy editor (see section 4.1)
Open attribute definitions editor (see section 4.2)
Open configuration definitions editor (see section 4.3)
Open quantity definitions editor (see section 4.4)
Open quantity space definitions editor (see section 4.5)
Open agent hierarchy editor (see section 4.6)
Open assumptions hierarchy editor (see section 4.7)
About this model (see section 4.8)
Open scenarios editor (see section 5.1.1)
Edit last changed scenario (see section 5.1.7)
Open model fragments editor (see section 6.1.1)
Edit last changed model fragment (see section 6.1.8)
Open attribute definitions editor
Open configurations definitions editor
Open quantity definitions editor
Open quantity space definitions editor
Hide/show build tasks
About this model
Open entity hierarchy editor
Open assumptions hierarchy editor
Open scenarios editor
Open agent hierarchy editor
Edit last changed scenario
Open model fragments editor
Edit last changed model fragment
Figure 5. The Garp3 main screen,
with the build toolbar expanded.
•
Press the button ‘Hide build tasks’ to hide the build tasks from view.
A detailed description of the operations in the Build environment is presented in part II of this
document.
16
/ 107
Project No. 004074
NATURNET-REDIME
D.4.2.1
2.4 Simulate
The Simulate environment of Garp3 allows you to run and inspect simulations based on a
particular scenario in your model.
2.4.1 Show simulate tasks
•
Press the button ‘Show simulate tasks’ in the Garp3 main screen, if necessary.
A number of icons will appear below the simulate icon, representing the various simulate tasks
(see Figure 6):
•
•
•
•
•
•
Select a scenario to simulate (see also section 7.1.1)
Simulate current scenario (see also section 7.1.2-7.1.4)
Full simulation (see also section 7.1.5)
Open the simulator to its current state or a saved simulation
Open trace window (see also section 7.1.6)
Simulation preferences (see also section 7.1.7)
Hide/show simulate tasks
Simulate status indication
Simulation preferences
Select a scenario to simulate
Open trace window
Simulate current scenario
Full simulation
Open the simulator to its current state or a saved simulation
Figure 6. The Garp3 main screen with
the Simulate toolbar expanded.
In addition, there is a simulate status indication, which represents whether the model is ready
for simulation, and/or how many scenarios are included in the model.
•
Press the button ‘Hide build tasks’ to hide the simulate tasks from view.
A detailed description of the operations in the Simulate environment is presented in part III of
this document.
17
/ 107
Project No. 004074
NATURNET-REDIME
D.4.2.1
3 General Aspects of the Garp3 Interface
This chapter describes general aspects of the interface of Garp3, including the meaning of
general action buttons and graphical icons, as well as the tool-tip texts and the toolbars.
3.1 General Action Buttons
There are a number of general action buttons, which are used frequently throughout the Garp3
interface, especially in the Build part. These general action buttons are displayed in Table 1. In
these buttons, the blue earth icon stands for the model as a whole, while the part stands for a
model ingredient.
Table 1: Model and model ingredient action buttons
Save changes
to model
Undo or cancel
changes
Edit changes
Clear
Zoom in/out
(+/-)
Close
Window
Create new
ingredient
Show ingredient
properties
Copy
ingredient
Delete
ingredient
Select all
Deselect all
3.2 Graphical Icons
There are a number of graphical icons which signify types of model ingredients in a Garp3
model. These are shown in table 2. In this table, the labels for the dependency (I+) and the
calculation (+) are examples, since there are different types of dependencies and calculations
(e.g., see section 6.8 for more details).
Table 2: Graphical icons for types of model ingredients
Entity
Attribute
Configuration
Model Fragment
Agent
Assumption
Quantity
Value
Derivative
Quantity space Dependency Calculation
3.3 Tool-tip Texts
To allow the user to find out which action is associated with each button or icon, the interface
will display a tool-tip text when the mouse is on top of a button or icon (see Figure 7). In the
case of model ingredient icons, not only type information is displayed, but also the remarks
provided by the modeller (e.g., in the right side of the figure, ‘The size of the population’ is a
remark about the quantity ‘Number of’.
Figure 7. Two examples of tool-tip texts.
18
/ 107
Project No. 004074
NATURNET-REDIME
D.4.2.1
3.4 The Toolbars
The Garp3 interface provides several toolbars which reduce the need to access menus. In
some cases, it is possible to carry out an action using either a menu option or a button in a
toolbar. In such cases, this manual shows only the way to execute the action using the toolbar,
because that is generally the fastest way. The toolbars are context sensitive in the sense that
they provide visual feedback about which actions can be performed at a particular moment. In
the toolbars, only the buttons associated with actions that are possible at that moment are
active; the buttons associated with actions that are impossible at that moment (e.g., because
something else has to be selected first) are greyed out to signify that they are inactive. This
supports the user in selecting possible options, thereby avoiding mistakes. An example is
provided in Figure 8, which shows the scenario editor with its context-sensitive toolbar. In the
toolbar, most of the buttons are inactive; only the top button (Add entity) and the two bottom
buttons (Add assumption, and Add agent) are active, because these signify the only actions
allowed when the scenario is still empty.
Figure 8. The scenario editor with its context-sensitive toolbar.
3.5 The Use of Colour
Throughout the interface of Garp3, colour is used as a distinguishing feature. Buttons and icons
include colour to make them more easily recognizable individually, or as a group. Buttons and
menu options are greyed out when they are inactive. In the Build environment, icons with a
yellow fill denote that relevant information is hidden from view; icons with a grey fill denote that
only irrelevant information is hidden.
19
/ 107
Project No. 004074
NATURNET-REDIME
D.4.2.1
Furthermore, there is a systematic use of colours in model fragments throughout the interface of
Garp3. Although some types of model ingredients have their own default colour, this colour
changes depending on the context in which it occurs in a model fragment. Conditions are shown
in red, while consequences are shown in blue. In the Build environment, additional colours are
used to indicate the status and origin of the information, as shown in Table 3. Green is used for
parent model fragments and their contents. Black is used for contents of imported model
fragments. The icons used in the table are examples.
Table 3: The use of colour in model fragments
Colour
Example
Usage
Red
Conditions
Blue
Consequences
Green
Parent model fragment and its contents
Black
Contents of imported model fragments
Yellow fill
Relevant information is hidden from view
Grey fill
Irrelevant information is hidden from view
Finally, in the Simulate environment, highlighting in red is used to indicate the selection of
states, and the current value in quantity spaces.
20
/ 107
Project No. 004074
NATURNET-REDIME
D.4.2.1
Part II. Building Models
In this part, you will learn how to build models in Garp3. Part II consists of three chapters:
•
•
•
Chapter 4 explains how to define the elementary building blocks for your model.
Chapter 5 describes how these and other elements can be put together into a scenario.
Chapter 6 describes, in a similar way, how to define model fragments.
21
/ 107
Project No. 004074
NATURNET-REDIME
D.4.2.1
4 Defining Building Blocks
Building blocks are the ingredients of your model. There are several types of building blocks
available in Garp3. Entities, configurations, and attributes deal with the structure of the system
you are modelling. Quantities and quantity spaces deal with the behaviour of the system.
Assumptions and agents are building blocks for the advanced modeller. Each of these types of
building blocks is discussed in detail in the following subsections.
4.1 Entities
Entities are the physical objects or abstract concepts that play a role within the system. These
entities are arranged in a subtype hierarchy.
4.1.1 Working with Entity definitions
•
Press the button 'Open entity hierarchy editor' in the Garp3 main screen.
The entity hierarchy editor will appear (see Figure 9).
Figure 9: The entity hierarchy editor (horizontal view).
4.1.2 Add an Entity
•
•
•
•
•
Select the parent entity
Press the button 'Add entity to hierarchy'.
A window will appear, called 'Add a new entity - Build' (see Figure 10).
Type a unique name in the Name field of this window.
Add a remark if desired.
The presence of remarks is signified by a *-symbol following the name of the entity involved.
Press the button 'Apply changes'.
The new entity is added to the hierarchy.
When you make a mistake, you can correct it before applying your changes, or you can cancel
your changes by pressing the button ‘Cancel changes’.
22
/ 107
Project No. 004074
NATURNET-REDIME
D.4.2.1
Figure 10: Adding a new entity.
4.1.3 Delete an Entity
•
•
•
Select the entity that must be deleted.
Press the button ‘Delete entry from hierarchy’.
In the case that deletion of the selected entity will affect other parts of the model, a warning
message will appear, explaining the effects. In that case, it is possible to cancel or apply the
proposed changes.
Press the button ‘Apply changes’ to confirm the deletion, if necessary.
4.1.4 Modify an Entity
•
•
•
•
Select the entity that must be modified.
Press the button 'Show properties'.
You can now change the name of the entity and its parent by selecting another available
entity in the Parent listbox. You may also add comments about the entity, in the 'Remarks'
text field.
In the case that your changes will affect other parts of the model, a warning message will
appear, explaining the effects. In that case, it is possible to cancel or apply the proposed
changes.
Press the button ‘Apply changes’ to confirm your modifications, if necessary.
4.1.5 View: Change the View of the Entity Hierarchy
There are several options to manipulate the view of the hierarchy (see Figure 11):
•
•
•
Press the button ‘Layout hierarchy: list’ to show the hierarchy in an indented list format
Press the button ‘Layout hierarchy: vertical’ to show the hierarchy in a vertical format
Press the button ‘Layout hierarchy: horizontal’ to show the hierarchy in a horizontal format
23
/ 107
Project No. 004074
NATURNET-REDIME
D.4.2.1
Figure 11: Alternative views on the entity hierarchy: the list view (left) and the vertical view (right).
It is also possible to collapse/expand a part of the hierarchy:
• Select the entity to be collapsed/expanded.
• Select the option ‘Collapse’ (or ‘Expand’) from the View menu.
Now all entities that exist below it are hidden from view (or made visible again).
To make sure that the whole hierarchy is visible, you can expand all:
•
Select the option ‘Expand all’ from the View menu.
4.1.6 Error and Warning Messages
The error and warning messages which you may encounter during the operations related to
entities are listed below, with an explanation of why they occur and how to remedy the problem.
•
This action is impossible. Please check the following feedback:
A new entity for instance … in scenario … (now an instance of …)
cannot automatically be determined.
You have chosen to delete an entity which is already instantiated in the scenario and which
cannot be replaced by another.
o Press ‘Cancel’ to abort the delete operation.
•
Please confirm change
Before confirm the following feedback:
The instance … in scenario … will become an instance of …
You have chosen to delete an entity which is already instantiated in the scenario. The
instances of this entity will be replaced by instances of another entity (its parent).
o Press the button ’Apply changes’ if you want to continue.
o Press the button ‘Cancel changes’ if you do not want to save your changes.
•
Please confirm change
Before confirm the following feedback:
This will delete the whole subtree
You have chosen to delete an entity which has subtypes.
o Press the button ’Apply changes’ if you want to continue.
o Press the button ‘Cancel changes’ if you do not want to save your changes.
24
/ 107
Project No. 004074
NATURNET-REDIME
D.4.2.1
4.1.7 Keyboard Shortcuts
There are several keyboard shortcuts in the Entity Hierachy Editor:
• [Del]: Delete
• [Ctrl + A]: Add child
• [Enter] or Double-click on an Entity icon: Properties
• [Ctrl + H]: Horizontal View
• [Ctrl + V]: Vertical View
• [Ctrl + L]: List View
• [Space]: Collapse/Expand
• [*]: Expand All
4.2 Attributes
Attributes are features of entities (or agents) that in principle do not change. An attribute may
have different possible values, but these values do not necessarily have to be ordered, such as
the values in a quantity space.
4.2.1 Working with Attributes
•
•
•
Press the button 'Open attribute definitions editor' in the Garp3 main screen.
The attribute definitions editor will appear (see Figure 12).
Press the button ‘Close this editor’ on the bottom right if you have finished working with the
attribute definitions. When you have unsaved changes, a warning message will appear.
Press the button ‘Undo changes’ if you want to discard the changes in the attribute
definitions since the last time you saved.
Figure 12. Adding a new attribute definition ‘Colour’, with three possible values.
25
/ 107
Project No. 004074
NATURNET-REDIME
D.4.2.1
4.2.2 Add Attribute Definition
•
•
•
•
•
Press the button ‘Add attribute definition’ on the right of the attribute definitions.
Type a unique name for the attribute in the Name field.
Now you can do the following:
o Add one or more attribute values
o Delete attribute values
o Move a value up or down
Add remarks if desired.
Press the button 'Save changes to model' when you are finished.
The new attribute will be added the list of attribute definitions.
Note that an attribute definition requires at least one possible value. A warning message
may appear when this requirement is not fulfilled.
4.2.3 Add Attribute Value
•
•
Press the button 'Add attribute value' on the right of the possible values.
A ‘New value’ will be added to the list of possible values for the attribute that you are
working on.
Change the name of the value in the field below.
4.2.4 Delete Attribute Value
•
Press the button ‘Delete selected attribute value’.
The selected attribute value will be removed from the list of possible values.
4.2.5 Move Attribute Value Up or Down
•
Press the button ‘Move value up’ or ‘Move value down’ to move the position of the selected
attribute value upwards or downwards in the list of possible values.
This allows you to order the list of possible values in a particular way.
4.2.6 Delete Attribute Definition
•
•
•
Select the attribute that must be deleted.
Press the button ‘Delete selected attribute definition’.
Press the button 'Save changes to model' when you are finished.
4.2.7 Modify Attribute Definition
•
•
•
•
Select the attribute that must be modified.
Now you can do the following:
o Change the attribute’s name in the Name field
o Add one or more attribute values
o Delete attribute values
o Move a value up or down
Add or change remarks if desired.
Press the button 'Save changes to model' when you are finished.
4.2.8 Copy Attribute Definition
•
•
•
•
Select the attribute that you want to copy.
Press the button ‘Copy selected attribute definition’.
A copy of the attribute will appear with the same name, followed by (copy), possibly
including a number indicating that it is the nth copy.
Now you can modify the attribute copy, if desired.
Press the button 'Save changes to model' when you are finished.
26
/ 107
Project No. 004074
NATURNET-REDIME
D.4.2.1
4.2.9 Error and Warning Messages
The error and warning messages which you may encounter during the operations related to
attributes are listed below, with an explanation of why they occur and how to remedy the
problem.
•
Conflict
This action is impossible. Please check the following feedback:
The attribute definition has no possible values defined
An attribute definition requires at least one possible value.
o Press the button ‘Cancel changes’ and add at least one possible value before saving
the attribute definition.
•
Confirm changes
You made changes to this attribute definition. Do you want to save them?
Now you have three options:
o Press the button ‘Save changes to model’ if you want to save your changes.
o Press the button ‘Cancel changes’ if you want to discard your changes.
o Press the button ‘Edit changes’ if you want to edit the attribute definition further.
4.3 Configurations
Configurations are used to represent (structural) relations between entities (and/or agents).
First, a configuration has to be defined by assigning a name to it. Later, the configuration can be
used to specify a link between instances of entities (and/or agents) in scenarios (see section
5.4) or model fragments (see section 6.5).
4.3.1 Working with Configurations
•
•
•
Press the button 'Open configuration definitions editor' in the Garp3 main screen.
The configuration definitions editor will appear (see Figure 13).
Press the button ‘Close this editor’ on the bottom right if you have finished working with the
configuration definitions. When you have unsaved changes, a warning message will appear.
Press the button ‘Undo changes’ if you want to discard the changes in the configurations
definitions since the last time you saved.
4.3.2 Add Configuration
•
•
•
•
Press the button ‘Add configuration definition' on the right of the configuration definitions.
Type a unique name in the Name field.
Add a remark if desired.
Press the button 'Save changes to model' when you are finished.
27
/ 107
Project No. 004074
NATURNET-REDIME
D.4.2.1
Figure 13. The configuration editor.
4.3.3 Delete Configuration
•
•
•
Select the configuration that must be deleted.
Press the 'Delete selected configuration definition' button on the right of the configuration
definitions.
Press the button 'Save changes to model' when you are finished.
4.3.4 Modify Configuration
•
•
•
•
Select the configuration that must be modified.
Change the name in the Name field if desired.
Add or change a remark if desired.
Press the button 'Save changes to model' when you are finished.
4.4 Quantities
Quantities represent features of entities and agents which in principle might change from one
state to another.
4.4.1 Working with Quantities
•
•
•
Press the button 'Open quantity definitions editor' in the Garp3 main screen.
The quantity definitions editor will appear (see Figure 14).
Press the button ‘Close this editor’ on the bottom right if you have finished working with the
quantity definitions. When you have unsaved changes, a warning message will appear.
Press the button ‘Undo changes’ if you want to discard the changes in the quantity
definitions since the last time you saved.
4.4.2 Create Quantity
•
•
•
Press the button ‘Add quantity definition’.
Type a unique name in the Name field
Select a Quantity Space from the list with all quantity spaces.
28
/ 107
Project No. 004074
•
•
•
NATURNET-REDIME
Press the button 'Add selected quantity space'.
The quantity space is now added to the list of allowed quantity spaces.
Add a remark if desired.
Press the button 'Save changes' when you are finished.
Figure 14. The quantity definitions editor.
4.4.3 Delete Quantity
•
•
•
Select the quantity that must be deleted.
Press the 'Delete selected quantity definition' button in the dialogue.
Press the button 'Save changes' when you are finished.
4.4.4 Modify Quantity
•
•
•
Select the quantity that must be modified.
Change the name, remark, or the Quantity Space of the selected quantity.
Press the button 'Save changes to model' when you are finished.
4.4.5 Copy Quantity
•
•
•
•
Select the quantity that you want to copy.
Press the button ‘Copy selected quantity definition’.
A copy of the quantity will appear with the same name, followed by (copy), possibly
including a number indicating that it is the nth copy.
Change the name, remark, or the Quantity Space of the selected quantity, if desired.
Press the button 'Save changes to model' when you are finished.
29
/ 107
D.4.2.1
Project No. 004074
NATURNET-REDIME
D.4.2.1
4.4.6 Error and Warning Messages
The error and warning messages which you may encounter during the operations related to
quantities are listed below, with an explanation of why they occur and how to remedy the
problem.
•
Conflict
This action is impossible. Please check the following feedback:
Numbers are not allowed in the name of a quantity definition
o Press the button ‘Cancel changes’ and type a new name without numbers.
•
Conflict
This action is impossible. Please check the following feedback:
The quantity definition has no allowed quantity spaces defined.
A quantity definition requires at least one allowed quantity space.
o Press the button ‘Cancel changes’ and add an allowed quantity space.
4.4.7 Keyboard and Mouse Shortcuts
There is a shortcut in the interface to open the quantity space editor directly from within the
quantity definitions editor.
• Press the button ‘Open quantity space definitions editor’.
The quantity space definitions editor will appear (see Section 4.5).
4.5 Quantity Spaces
A quantity space specifies a range of qualitative values a quantity magnitude or derivative can
have. A quantity space consists of an ordered set of alternating point and interval values. Point
values are used to specify interesting values such as boundaries or landmarks (e.g., zero, or
max), while interval values are used to specify the intervals below, in between, or above point
values.
4.5.1 Working with Quantities Spaces
•
•
•
Press the button 'Open quantity space definitions editor' in the Garp3 main screen.
The quantity space definitions editor will appear (see Figure 15).
Press the button ‘Close this editor’ on the bottom right if you have finished working with the
quantity space definitions. When you have unsaved changes, a warning message will
appear.
Press the button ‘Undo changes’ if you want to discard the changes in the quantity space
definitions since the last time you saved.
30
/ 107
Project No. 004074
NATURNET-REDIME
D.4.2.1
Figure 15. The quantity space definitions editor.
4.5.2 Create Quantity Space
•
•
•
•
•
Press the button 'Add quantity space'.
Type a unique name in the Name field.
Add a value, or more (see section 4.5.3).
Add remarks, if desired.
Press the button 'Save changes'.
4.5.3 Add a Value
•
•
•
•
•
Press the button ‘Add point value’ or ‘Add interval value’, depending on whether you want to
add a point or an interval value to the quantity space.
Note: this only applies to the first value you add. In other cases, do the following:
Press the button 'Add value high' or ‘Add value low’, depending on whether you want to add
a value on top or at the bottom of the quantity space. The new value will automatically be
classified as a point or an interval, because points and intervals have to alternate.
Change the name in the Name field, if desired.
Check the checkbox ‘zero’ if you want to use ‘zero’ as the new value (it must be a point).
Press the button 'Save changes'.
4.5.4 Delete a Value
•
•
Press the button 'Delete value high' or 'Delete value low', depending on whether you want to
delete the value on top or at the bottom of the quantity space.
Press the button 'Save changes'.
31
/ 107
Project No. 004074
NATURNET-REDIME
D.4.2.1
4.5.5 Split Interval
To add a value somewhere in the middle of the quantity space, you have to split an interval.
• Select the interval that you want to split.
• Press the button 'Split interval'.
The interval is split into two intervals, and a point in between.
• Change the names of the new values, if desired.
• Press the button 'Save changes'.
4.5.6 Combine Intervals
To delete a value somewhere in the middle of the quantity space, you have to combine two
intervals.
• Select the point in between the two intervals that you want to combine.
• Press the button 'Combine intervals'.
The point and the intervals surrounding it are combined into one interval.
• Change the name of the new value, if desired.
• Press the button 'Save changes'.
4.5.7 Delete Quantity Space
•
•
•
Select the quantity space that must be deleted.
Press the button ‘Delete selected quantity space’.
Press the button 'Save changes'.
4.5.8 Modify Quantity Space
•
•
•
•
•
Select the quantity space that must be modified.
Change the name of the quantity space, if desired.
Add or change values using one of the operations described above, if desired.
Add or change remarks, if desired.
Press the button 'Save changes'.
4.5.9 Copy Quantity Space
If you need a quantity space that resembles an existing quantity space, it can be efficient to
copy the existing quantity space and modify it, rather than building a new quantity space from
scratch.
• Select the quantity space that you want to copy.
• Modify the quantity space if desired.
• Press the button 'Save changes'.
4.5.10
Error and Warning Messages
The error and warning messages which you may encounter during the operations related to
quantity spaces are listed below, with an explanation of why they occur and how to remedy the
problem.
•
Conflict
This action is impossible. Please check the following feedback:
The quantity space has no values defined.
A quantity space definition requires at least one possible value.
o Press the button ‘Cancel changes’ and add one or more values to the quantity
space.
•
Conflict
This action is impossible. Please check the following feedback:
At least one qs value has an invalid name.
o Press ’Cancel changes’ to continue.
32
/ 107
Project No. 004074
o
•
NATURNET-REDIME
D.4.2.1
Change the name of the culprit value.
It may not contain any forbidden characters, i.e., numbers.
Please confirm change
Before confirm the following feedback:
The quantity space contains points, but not zero. Most quantity spaces that contain points,
contain point zero
Zero is an important value to consider in your quantity space, because it allows the
simulation engine to perform certain calculations.
o Press the button ’Apply changes’ if you want to continue.
o Press the button ‘Cancel changes’ if you do not want to save your changes.
4.6 Agents
Agents are used to model processes that affect the system of interest, but are external to it. For
example, if the system of interest is a river, a polluting factory might be modelled as an agent
that adds pollution to the river, while not being part of the river itself. Agents are labels that are
applied within scenarios and model fragments. If a particular label appears in a scenario, model
fragments that contain that agent label as a condition are applied. If the label does not appear in
the scenario, these model fragments are ignored.
4.6.1 Working with Agents
•
Press the button 'Open agent hierarchy editor' in the Garp3 main screen.
The agent hierarchy editor will appear (see Figure 16).
Figure 16. Adding a new agent in the hierarchy editor.
The agent hierarchy editor works in the same way as the entity hierarchy editor.
33
/ 107
Project No. 004074
NATURNET-REDIME
D.4.2.1
4.6.2 Add an Agent
•
•
•
•
•
Select the parent agent
Press the button 'Add agent to hierarchy'.
A window will appear, called 'Add a new agent - Build'.
Type a unique name in the Name field of this window.
Add a remark if desired.
The presence of remarks is signified by a *-symbol following the name of the agent involved.
Press the button 'Apply changes'.
The new agent is added to the hierarchy.
When you make a mistake, you can correct it before applying your changes, or you can cancel
your changes by pressing the button ‘Cancel changes’.
4.6.3 Delete an Agent
•
•
Select the agent that must be deleted.
Press the button ‘Delete entry from hierarchy’.
4.6.4 Modify an Agent
•
•
•
•
Select the agent that must be modified.
Press the button 'Show properties'.
You can now change the name of the agent and its parent by selecting another available
agent in the Parent listbox. You may also add comments about the agent, in the 'Remarks'
text field.
Press the button 'Apply changes'.
4.6.5 View: Change the View of the Agent Hierarchy
There are several options to manipulate the view of the hierarchy:
•
•
•
Press the button ‘Layout hierarchy: list’ to show the hierarchy in an indented list format
Press the button ‘Layout hierarchy: vertical’ to show the hierarchy in a vertical format
Press the button ‘Layout hierarchy: horizontal’ to show the hierarchy in a horizontal format
It is also possible to collapse/expand a part of the hierarchy:
• Select the agent to be collapsed/expanded.
• Select the option ‘Collapse’ (or ‘Expand’) from the View menu.
Now all agents that exist below it are hidden from view (or made visible again).
To make sure that the whole hierarchy is visible, you can expand all:
•
Select the option ‘Expand all’ from the View menu.
4.6.6 Error and Warning Messages
The error and warning messages which you may encounter during the operations related to
agents are listed below, with an explanation of why they occur and how to remedy the problem.
•
Conflict
This action is impossible. Please check the following feedback::
A new agent for instance … in scenario … (now an instance of …)
cannot automatically be determined.
34
/ 107
Project No. 004074
NATURNET-REDIME
D.4.2.1
You have chosen to delete an agent which is already instantiated in the scenario and which
cannot be replaced by another.
o Press ‘Cancel’ to abort the delete operation.
•
Please confirm change
Before confirm the following feedback:
The instance … in scenario … will become an instance of …
You have chosen to delete an agent which is already instantiated in the scenario and which
cannot be replaced by another.
o Press the button ’Apply changes’ if you want to continue.
o Press the button ‘Cancel changes’ if you do not want to save your changes.
•
Please confirm change
Before confirm the following feedback:
This will delete the whole subtree
You have chosen to delete an agent which has subtypes.
o Press the button ’Apply changes’ if you want to continue.
o Press the button ‘Cancel changes’ if you do not want to save your changes.
4.6.7 Keyboard Shortcuts
There are several keyboard shortcuts in the Agent Hierachy Editor:
•
•
•
•
•
•
•
•
[Del]: Delete
[Ctrl + A]: Add child
[Enter] or Double-click on an Agent icon: Properties
[Ctrl + H]: Horizontal View
[Ctrl + V]: Vertical View
[Ctrl + L]: List View
[Space]: Collapse/Expand
[*]: Expand All
4.7 Assumptions
Assumptions are labels which indicate that certain conditions are presumed to be true. They are
often used to constrain the possible behaviour of a model. Assumptions represent something
about the system of interest, which makes them conceptually different from both entities and
agents.
4.7.1 Working with Assumptions
•
Press the button 'Open assumptions hierarchy editor' in the Garp3 main screen.
The assumption hierarchy editor will appear (see Figure 17).
35
/ 107
Project No. 004074
NATURNET-REDIME
D.4.2.1
Figure 17. The assumption hierarchy.
The assumption hierarchy editor works in the same way as the entity hierarchy editor and the
agent hierarchy editor.
4.7.2 Add an Assumption
•
•
•
•
•
Select the parent assumption
Press the button 'Add assumption to hierarchy'.
A window will appear, called 'Add a new assumption - Build'.
Type a unique name in the Name field of this window.
Add a remark if desired.
The presence of remarks is signified by a *-symbol following the name of the assumption
involved.
Press the button 'Apply changes'.
The new assumption is added to the hierarchy.
When you make a mistake, you can correct it before applying your changes, or you can cancel
your changes by pressing the button ‘Cancel changes’.
4.7.3 Delete an Assumption
•
•
Select the assumption that must be deleted.
Press the button ‘Delete entry from hierarchy’.
4.7.4 Modify an Assumption
•
•
•
•
Select the assumption that must be modified.
Press the button 'Show properties'.
You can now change the name of the assumption and its parent by selecting another
available assumption in the Parent listbox. You may also add comments about the
assumption, in the 'Remarks' text field.
Press the button 'Apply changes'.
36
/ 107
Project No. 004074
NATURNET-REDIME
D.4.2.1
4.7.5 View: Change the View of the Assumption Hierarchy
There are several options to manipulate the view of the hierarchy:
•
•
•
Press the button ‘Layout hierarchy: list’ to show the hierarchy in an indented list format
Press the button ‘Layout hierarchy: vertical’ to show the hierarchy in a vertical format
Press the button ‘Layout hierarchy: horizontal’ to show the hierarchy in a horizontal format
It is also possible to collapse/expand a part of the hierarchy:
• Select the assumption to be collapsed/expanded.
• Select the option ‘Collapse’ (or ‘Expand’) from the View menu.
Now all assumptions that exist below it are hidden from view (or made visible again).
To make sure that the whole hierarchy is visible, you can expand all:
•
Select the option ‘Expand all’ from the View menu.
4.7.6 Error and Warning Messages
The error and warning messages which you may encounter during the operations related to
assumptions are listed below, with an explanation of why they occur and how to remedy the
problem.
•
Please confirm change
Before confirm the following feedback:
This will delete the whole subtree
You have chosen to delete an assumption which has subtypes.
o Press the button ’Apply changes’ if you want to continue.
o Press the button ‘Cancel changes’ if you do not want to save your changes.
•
Please confirm change
Before confirm the following feedback:
The assumption … in scenario … will be deleted.
You have chosen to delete an assumption which is used in a scenario.
o Press the button ’Apply changes’ if you want to continue.
o Press the button ‘Cancel changes’ if you do not want to save your changes.
4.7.7 Keyboard Shortcuts
There are several keyboard shortcuts in the Assumption Hierarchy Editor:
•
•
•
•
•
•
•
•
[Del]: Delete
[Ctrl + A]: Add child
[Enter] or Double-click on an Assumption icon: Properties
[Ctrl + H]: Horizontal View
[Ctrl + V]: Vertical View
[Ctrl + L]: List View
[Space]: Collapse/Expand
[*]: Expand All
37
/ 107
Project No. 004074
NATURNET-REDIME
D.4.2.1
4.8 About this model
This function is meant to provide meta-data about the model, including comments from the
model builder about the goal of the model and other information which might be useful for users
of the model.
•
Press the button ‘About this model’ in the Garp3 main screen.
A window will appear in which you can add several types of meta-data about the model.
38
/ 107
Project No. 004074
NATURNET-REDIME
D.4.2.1
5 Scenarios
Scenarios describe the actual state and configuration of a system, and can contain all the kinds
of building blocks described in chapter 4. Scenarios are used as input for the qualitative
simulator. The qualitative simulator interprets the scenario (finds applying model fragments,
incorporates their consequences, and derives values) to generate one or more start states.
These start states are used to generate the rest of the behavioural graph.
5.1 Working with Scenarios
To work with scenarios, you will need to open the Scenarios Editor, and carry out one of the
tasks described below.
5.1.1 Opening the Scenarios Editor
You can open the scenarios editor to create and edit scenarios.
•
Press the 'Open Scenarios Editor' button in the Garp3 main screen.
A window will appear with a list of available scenarios (see Figure 18).
Figure 18. The list of available scenarios.
5.1.2 Create a new Scenario
You can create a new scenario which you can use to run a simulation.
•
•
•
•
Press the button 'Add scenario' on the top right.
Provide a unique name in the Name field.
Add remarks if desired.
Press the button 'Apply changes'.
39
/ 107
Project No. 004074
NATURNET-REDIME
D.4.2.1
5.1.3 Delete a Scenario
You can delete a scenario too.
•
•
Select the scenario you want to delete.
Press the button ‘Delete selected scenario’ on the bottom right.
5.1.4 Modify Scenario Properties
You can modify a scenario’s properties to change its name or add remarks.
•
•
•
Select the scenario you want to modify.
Press the button 'Show scenario properties'.
Now you can do the following:
o Edit the name of the scenario
o Add or change remarks
Press the button ‘Apply changes’.
5.1.5 Copy a Scenario
You can copy a scenario, and perhaps modify the copy later. This saves time when you want to
create a scenario which has a lot in common with an existing scenario.
•
•
Select the scenario you want to copy.
Press the button 'Copy selected scenario'.
A copy of the scenario is added to the list of scenarios. It has the same name as the original,
followed by a number n, indicating that it is the nth copy .
5.1.6 Editing a Scenario
You can edit the contents of a scenario to adapt it to your needs.
•
•
•
•
•
Select the Scenario you want to edit.
Press the button 'Edit selected scenario'.
The scenario editor will appear with the contents of the selected scenario (see Figure 19).
Now, you can edit the contents of the scenario, including instances of Entities (see section
5.2 for details), Attributes (section 5.3), Configurations (section 5.4), Quantities & Quantity
Spaces (section 5.5), Values (section 5.6), Dependencies (section 5.7), Agents (section
5.8), and Assumptions (section 5.9).
Select 'Save model to disk' from the Edit menu to save the model.
Close the window (in the top right corner) if you are finished editing the scenario.
When you close the window, the scenario will automatically be saved.
40
/ 107
Project No. 004074
NATURNET-REDIME
D.4.2.1
Figure 19. The scenario editor.
5.1.7 Editing the last changed scenario
You can open the scenarios editor for the last changed scenario directly from the main screen.
•
Press the button 'Edit scenario: <ScenarioName>' in the Garp3 main screen.
The scenario editor will appear (see Figure 19).
Note: If there is only one scenario included in the model, it will be automatically selected when
this button is pressed.
5.1.8 View: Change the View of the Scenario Editor
You can change the view of the scenario editor to hide or show parts of the display, as shown in
Figure 20.
•
•
Open the 'View' menu.
Select one of the following options to hide a part of the display:
o Collapse: hide all information attached below the selected model ingredient
o Collapse relations: hide relations attached to the selected model ingredient
o Show relevant: show only information that is used in the current scenario
o Hide: hide the selected model ingredient and its associated relations
41
/ 107
Project No. 004074
NATURNET-REDIME
D.4.2.1
Figure 20. The scenario after ‘Show relevant’, ‘Collapse relations’, and ‘Hide Biomass’.
The visualization will be adapted accordingly. Icons with a yellow fill denote that relevant
information is hidden from view; icons with a grey fill denote that only irrelevant information
is hidden. When relations are hidden, a small icon is displayed near the items involved (e.g.,
see the quantity Number of in Figure 20).
•
Select one of the following options to show a (hidden) part of the display:
o Expand: show all information attached below the selected model ingredient
o Expand relations: show relations attached to the selected model ingredient
o Expand all/tree: show all information (from the selected tree) that was hidden
5.1.9 Error and Warning Messages
The error and warning messages which you may encounter during the operations related to
scenarios are listed below, with an explanation of why they occur and how to remedy the
problem.
•
Please confirm change
Before confirm the following feedback
Warning! You are about to delete the scenario “…”, which already has content.
You have chosen to delete a scenario that has already some content defined in it. Deleting
the scenario would imply that its contents are also deleted.
o Press the button ’Apply changes ’ if you want to continue.
o Press the button ‘Cancel changes’ if you want to abort the delete operation.
42
/ 107
Project No. 004074
5.1.10
NATURNET-REDIME
D.4.2.1
Keyboard and Mouse Shortcuts
There are several keyboard shortcuts for working with scenarios.
•
•
•
•
•
•
•
[Ctrl + S]: Save model to disk
[Ctrl + E]: Add Entity
[Ctrl + A]: Add Agent
[?]: Assumption
[Ctrl + R]: Show Relevant
[Del]: Delete
[Enter]: Properties
5.2 Entity Instances in Scenarios
Entity instances are the parts of the system that play a role in the scenario you are working on.
5.2.1 Adding an Entity Instance
•
•
•
•
•
Press the button 'Add entity'.
A window will appear with the title ‘Add a new entity’ (see Figure 21).
Select the Entity that you want to instantiate.
Type a name for the entity instance in the Name field.
Add remarks in the Remarks field, if desired.
Press the button ‘Apply changes'.
Figure 21. Adding an entity instance to the scenario.
5.2.2 Deleting an Entity Instance
You can delete unwanted entity instances from a model fragment.
43
/ 107
Project No. 004074
•
•
•
NATURNET-REDIME
D.4.2.1
Select the Entity Instance you want to delete.
Select the 'Delete' option from the 'Edit' menu.
If the instance has any other attached elements, a warning will be given.
If a warning message is presented, press the button 'Apply changes' to confirm the deletion.
5.2.3 Modifying an Entity Instance
You can modify an entity instance by changing its name or remarks.
•
•
•
Select the Entity Instance you want to modify.
Select the 'Properties' option from the 'Edit' menu.
Here you can change the parent, name and the remarks of the instance.
Press the button 'Apply changes'.
5.2.4 Error and Warning Messages
The error and warning messages which you may encounter during the operations related to
entity instances in a scenario are listed below with an explanation of why they occur and how to
remedy the problem.
•
Please confirm change
Before confirming, please consider the following:
The/a … will be deleted because … is no longer part of the scenario..
You have chosen to delete something which has other items in the scenario associated to it.
Deleting it would imply that (some of) these connected items are also deleted.
o Press ’Apply changes’ if you want to continue.
o Press ‘Cancel changes’ if you want to abort the delete operation.
5.2.5 Keyboard and Mouse Shortcuts
There are several keyboard shortcuts for working with entities in scenarios.
•
•
•
•
•
[Ctrl + S]: Save model to disk
[Ctrl + E]: Entity instance…
[Enter]: Edit the properties of the selected entity
[Delete]: Delete the selected entity
[Backspace]: Delete the selected entity
In addition, there is a shortcut in the interface to open the entity definitions editor directly from
within the window ‘Add a new entity – Build’:
•
Press the button ‘Open entity definitions editor’.
44
/ 107
Project No. 004074
NATURNET-REDIME
D.4.2.1
5.3 Attributes in Scenarios
Attributes are features of entities (or agents) that in principle do not change. To incorporate an
attribute in a scenario, an attribute definition is required.
5.3.1 Adding an Attribute to an Entity Instance
•
•
•
•
•
•
Select the entity instance to which you want to attach an attribute.
Press the button ‘Add attribute'.
A window will appear, entitled ‘Add a new attribute’ (see Figure 22).
Select the attribute definition you want to add to the entity instance.
Select the value associated with the attribute in the scenario.
Add remarks if desired.
Press the button 'Apply changes'.
Figure 22. Adding an attribute to the scenario.
45
/ 107
Project No. 004074
NATURNET-REDIME
D.4.2.1
5.3.2 Deleting an Attribute from an Entity Instance
•
•
Select the attribute you want to delete.
Open the ‘Edit’ menu and select the 'Delete' option.
5.3.3 Modifying an Attribute
•
•
•
Select the attribute you want to modify.
Open the ‘Edit’ menu and select the 'Properties' option.
Now you can change the properties of the attribute as described in section 5.3.1.
Press the button 'Apply changes'.
5.3.4 Keyboard and Mouse Shortcuts
There is a shortcut in the interface to open the attribute definitions editor directly from within the
window ‘Add a new attribute – Build’:
•
Press the button ‘Open attribute definitions editor’.
5.4 Configurations in Scenarios
Configurations are used to specify (structural) relationships between entities (and/or agents).
To incorporate a configuration in a scenario, a configuration definition is required.
5.4.1 Adding a Configuration between two Entity Instances
•
•
•
•
•
•
Select two entity instances while holding down the Shift-key.
Press the button 'Add configuration'.
A window will appear, entitled ‘Add a new configuration- Build’ (see Figure 23).
Select the configuration definition you want to add in between the two entity instances.
If necessary, press the button ‘Switch arguments’ to reverse the order of the two entity
instances.
Add remarks if desired.
Press the button 'Apply changes'.
46
/ 107
Project No. 004074
NATURNET-REDIME
D.4.2.1
Figure 23. Adding a configuration to the scenario.
5.4.2 Deleting a Configuration
•
•
Select the Configuration you want to delete.
Select the 'Delete' option in the 'Edit' menu.
5.4.3 Modifying a Configuration
•
•
•
•
Select the Configuration you want to modify.
Select the 'Properties' option in the 'Edit' menu.
Now you can change the properties of the Configuration as described in section 5.4.1.
Press the button 'Apply changes'.
5.4.4 Keyboard and Mouse Shortcuts
There is a shortcut in the interface to open the configuration definitions editor directly from
within the window ‘Add a new configuration – Build’:
•
Press the button ‘Open configuration definitions editor’.
5.5 Quantities and Quantity Spaces in Scenarios
Quantities and quantity spaces are used to represent the behaviour of the system.
5.5.1 Adding a Quantity with Quantity space to an Entity Instance
In order to add a quantity, you need to have at least one entity instance in your scenario.
47
/ 107
Project No. 004074
•
•
•
•
•
•
NATURNET-REDIME
Select the entity instance to which you want to attach a quantity.
Press the button 'Add quantity'.
A window will appear, entitled ‘Add new quantity – Build’ (see Figure 24).
Select the quantity definition you want to add to the entity instance
Select the quantity space to be associated with the quantity.
Add remarks if desired.
Press 'Apply changes'.
Figure 24. Adding a new quantity to the scenario.
5.5.2 Deleting a Quantity from an Entity Instance
•
•
Select the Quantity that you want to delete
Select the 'Delete' option in the 'Edit' menu.
48
/ 107
D.4.2.1
Project No. 004074
NATURNET-REDIME
D.4.2.1
5.5.3 Modifying a Quantity connected to an Entity Instance
•
•
•
•
Select the Quantity that you want to modify.
Select the 'Properties' option in the 'Edit' menu.
Now you can change the properties of the Quantity as described in section 5.5.1.
Press the button 'Apply changes'.
5.5.4 Keyboard and Mouse Shortcuts
There are several keyboard shortcuts for working with quantities in scenarios.
•
•
•
•
•
[Ctrl + Q]: Add quantity
[Ctrl + S]: Save model to disk
[Delete]: Delete the selected quantity
[Backspace]: Delete the selected quantity
[Enter]: Edit the properties of the selected quantity
In addition, there is a shortcut in the interface to open the quantity definitions editor directly from
within the window ‘Add a new quantity – Build’:
•
Press the button ‘Open quantity definitions editor’.
5.6 Values in Scenarios
It is possible to set a value on a quantity magnitude, or on a derivative.
5.6.1 Set a Value on a Quantity Magnitude
In order to set a value on a quantity magnitude, you already need to have a quantity with a
connected quantity space.
• Select the value in the quantity space that you want the quantity to have.
• Press the button ‘Add value’.
A blue arrow will be added pointing to the selected value (see Figure 25).
49
/ 107
Project No. 004074
NATURNET-REDIME
D.4.2.1
Figure 25. Setting a value on a quantity in the scenario.
5.6.2 Set a Value on a Quantity Derivative
In order to set a value on a quantity derivative, you already need to have a quantity with a
connected quantity space and a derivative.
• Select the value in the derivative's quantity space that you want the derivative to have.
• Press the button ‘Add value’.
A blue arrow will be added pointing to the selected derivative value.
5.6.3 Delete a Value
•
•
Select the Value (a blue arrow) that must be deleted.
Press the delete button on the keyboard (or select ‘Delete’ from the Edit menu).
5.6.4 Modify a Value
•
•
Select the value in the derivative's quantity space that you want the derivative to have
instead of the current value.
Press the button ‘Add value’.
The new Value will replace the previous one.
5.7 Dependencies in scenarios
Dependencies describe relations between behavioural features, i.e., quantities and/or their
(derivative) values. There are many kinds of dependencies, but in scenarios, only inequality
dependencies are relevant.
5.7.1 Inequalities
50
/ 107
Project No. 004074
NATURNET-REDIME
D.4.2.1
Inequalities are dependencies which specify ordinal relations between two items.
5.7.1.1
Add (In)equality between Quantities
In order to add an (in)equality between quantities, your scenario should contain at least two
quantities.
•
•
•
•
•
•
Select the two quantities between which the (in)equality must hold (use the Shift button to
make multiple selections).
Press the button ‘Add inequality’.
A window will appear, with the title ‘Add a new inequality – Build’ (see Figure 26).
Choose the kind of ordinal relation you wish by pressing the appropriate radio button.
If necessary, press the button ‘Switch arguments’.
Add remarks if desired.
Press the button ‘Apply changes'.
Figure 26. Adding an (in)equality to the scenario.
5.7.1.2 Add (In)equality between Quantity Values
In order to add an (in)equality between quantity values, your scenario should contain at least
two quantities with quantity spaces.
51
/ 107
Project No. 004074
•
•
•
•
•
•
NATURNET-REDIME
D.4.2.1
Select the two quantity point values (from different quantity spaces) between which the
(in)equality must hold, while holding down the Shift-key.
Note that you can only select point values, not intervals.
Press the button ‘Add inequality’.
A window will appear, with the title ‘Add a new inequality – Build’ (similar to Figure 26).
Choose the kind of ordinal relation you wish by pressing the appropriate radio button.
If necessary, press the button ‘Switch arguments’.
Add remarks if desired.
Press the button ‘Apply changes'.
5.7.1.3 Add (In)equality between a Quantity and a Point Value
In order to add this type of inequality, your scenario should contain a quantity with at least one
point value in its quantity space. It is not possible to create an inequality from a quantity to an
interval.
•
•
•
•
•
Select the quantity and a point value from its quantity space for which the (in)equality must
hold, while holding down the Shift-key.
Press the button ‘Add inequality’.
A window will appear, with the title ‘Add a new inequality – Build’ (similar to Figure 26).
Choose the kind of ordinal relation you wish by pressing the appropriate radio button.
Add remarks if desired.
Press the button ‘Apply changes'.
5.7.1.4 Add (In)equality between a Derivative and a Point Value
In order to add this type of inequality, your scenario should contain a quantity. This can only be
used to specify that a derivative is greater than, equal to, or smaller than zero, as this is the only
point value in the derivative quantity space.
•
•
•
•
•
Select a quantity derivative and the zero from its derivative quantity space, while holding
down the Shift-key.
Press the button ‘Add inequality’.
A window will appear, with the title ‘Add a new inequality – Build’ (similar to Figure 26).
Choose the kind of ordinal relation you wish by pressing the appropriate radio button.
Add remarks if desired.
Press the button ‘Apply changes'.
5.7.1.5 Add (In)equality between Derivatives of two Quantities
In order to add this type of inequality, your scenario should contain at least two quantities.
•
•
•
•
•
•
Select the two quantity derivatives for which the (in)equality must hold, while holding down
the Shift-key.
Press the button ‘Add inequality’.
A window will appear, with the title ‘Add a new inequality – Build’ (similar to Figure 26).
Choose the kind of ordinal relation you wish by pressing the appropriate radio button.
If necessary, press the button ‘Switch arguments’.
Add remarks if desired.
Press the button ‘Apply changes'.
52
/ 107
Project No. 004074
5.7.1.6
•
•
D.4.2.1
Delete an (In)equality in a Scenario
Select the (in)equality that must be deleted by clicking on the representation on the screen.
Select ‘Delete’ from the 'Edit' menu.
5.7.1.7
•
•
•
•
•
NATURNET-REDIME
Modify an (In)equality in a Scenario
Select the (in)equality that must be modified by clicking on the representation on the screen.
Open the 'Edit' menu and select 'Properties' (or simply double-click on the inequality).
Change the type of ordinal relation (greater than, etc.), if desired.
Press the button ‘Switch arguments’, if desired.
Press the button ‘Apply changes'.
5.7.1.8 Add Calculation (Plus/Min)
Calculations allow you to express more complicated equations as (in)equalities, such as ‘Inflow
= Born + Immigrated’. In this equality, ‘Born + Immigrated’ constitutes a (plus) calculation.
Besides summation (plus), it is also possible to use difference (min) calculations. In most types
of (in)equalities that occur in the preceding part of section 5.7.1, you can replace one or both of
the arguments by a calculation. It is recommended however, to use calculations only on the
right hand side of an (in)equality, to improve clarity.
• Select two quantities between which you want to add a calculation.
• Press the button ‘Add plus’ to add a summation between the two selected quantities. OR
Press the button ‘Add min’ to add a subtraction between the two selected quantities.
A window will appear, entitled ‘Add a new calculus - Build’ (see Figure 27).
• Press the button ‘Switch arguments’ to switch the order of the arguments, if desired (this
only applies to min-calculations).
• Add remarks if desired.
• Press the button ‘Apply changes'.
Figure 27. Adding a calculation to a scenario.
5.7.1.9
•
•
Delete Calculation (Plus/Min)
Select the calculation to be deleted.
Select the option 'Delete' from the 'Edit' menu.
5.7.1.10 Modify Calculation (Plus/Min)
•
Select the calculation to be modified.
53
/ 107
Project No. 004074
•
NATURNET-REDIME
D.4.2.1
Select the option ‘Properties’ from the ‘Edit’ menu.
A window will appear, entitled ‘Calculus properties’.
Here you can edit the arguments and the mathematical operator, switch the arguments if
necessary, and add or change remarks, as described in section 5.7.1.8.
5.8 Agents in Scenarios
If you want to model an agent that applies to the initial situation, you should include an agent
instance into your scenario.
5.8.1 Adding a Agent Instance
•
•
•
•
•
Press the button ‘Add agent’.
A window will appear, with the title ‘Add a new agent – Build’ (see Figure 28).
Select the Agent that you want to instantiate.
Type a name for the agent instance in the Name field.
Add remarks in the Remarks field, if desired.
Press 'Apply changes'.
Figure 28. Adding an agent to the scenario.
5.8.2 Deleting a Agent Instance
•
•
•
•
Select the Agent Instance you want to delete.
Select 'Delete' in the 'Edit' menu.
If the Agent Instance has any other elements attached to it a warning will be given.
In the case of a warning, press the button 'Apply changes' to confirm the deletion.
5.8.3 Modifying a Agent Instance
•
•
•
•
Select the Agent Instance you want to modify.
Select 'Properties' in the 'Edit' menu.
Here you can change the parent, name and the comments of the Agent Instance.
Press the button 'Apply changes'.
54
/ 107
Project No. 004074
NATURNET-REDIME
D.4.2.1
5.8.4 Keyboard and Mouse Shortcuts
There is a shortcut in the interface to open the agent definitions editor directly from within the
window ‘Add a new agent – Build’:
•
Press the button ‘Open agent definitions editor’.
5.9 Assumptions in Scenarios
Assumptions are used in scenarios to model conditions which trigger specific model fragments,
thereby constraining the behaviour of the system in some way. There are general assumptions
and assumptions about entities.
5.9.1 Adding an Assumption to an Entity
•
•
•
•
•
Select the Entity instance.
Press the button 'Add assumption'.
A window will appear, with the title ‘Add a new assumption – Build’ (see Figure 29).
Select the Assumption that you want to add.
Add remarks in the Remarks field, if desired.
Press the button 'Apply changes'.
Figure 29. Adding an assumption to an entity in the scenario.
5.9.2 Adding a general Assumption
•
•
•
•
Press the button 'Add assumption'.
A window will appear, with the title ‘Add a new assumption – Build’ (similar to Figure 29).
Select the Assumption that you want to add.
Add remarks in the Remarks field, if desired.
Press the button 'Apply changes'.
5.9.3 Deleting a Assumption
•
•
Click on the Assumption you want to delete.
Select the option 'Delete' from the 'Edit' menu.
55
/ 107
Project No. 004074
NATURNET-REDIME
5.9.4 Modifying a Assumption
•
•
•
Click on the Assumption you want to modify.
Select the option 'Properties' from the 'Edit' menu.
Now you can change the parent, name and the comments of the assumption.
56
/ 107
D.4.2.1
Project No. 004074
NATURNET-REDIME
D.4.2.1
6 Model Fragments
Garp3 allows you to create model fragments as generic, reusable parts of your model. They
contain knowledge about specific processes, agents, or static aspects related to the system of
interest. Model fragments consist of two parts: conditions and consequences. The conditions
specify what must be present in a state for the model fragment to apply. The consequences
specify what information will be added to a state when the model fragment applies (unless it
was already present). The use of ingredients in model fragments differs from their use in
scenarios, as in scenarios ingredients are incorporated as facts instead of as conditions or
consequences.
6.1 Working with Model Fragments
To work with model fragments, you will need to open the Model Fragments Editor, and carry out
one of the tasks described below.
6.1.1 Open Model Fragments Editor
The model fragments editor allows creating and editing of model fragments.
•
Press the button 'Open Model Fragments Editor' in the Garp3 main screen.
A window will appear, entitled ‘Build – Model fragments’, displaying the hierarchy of model
fragments (see Figure 30) 1.
Figure 30. The list of model fragments.
6.1.2 Create a new Model Fragment
You create a new model fragment as a child of another model fragment, or as a member of one
of the general categories Static, Process, or Agent.
•
1
Select the parent (supertype) of the model fragment.
This can be either one of Static, Process, Agent, or an existing model fragment.
This screen is expected to change in future versions of Garp3.
57
/ 107
Project No. 004074
•
•
•
•
NATURNET-REDIME
D.4.2.1
Press the button 'Add model fragment' in the dialogue window.
A window will appear entitled ‘Add a new Model Fragment – Build’ (see Figure 31).
Provide a unique name for the new model fragment in the Name field.
Add remarks if desired.
Press the button ‘Apply changes’ in the dialogue window.
The new model fragment is added to the hierarchy.
Figure 31. Adding a new model fragment.
6.1.3 Create a Child of a Model Fragment
Creating a child (subtype) of a model fragment is done by creating a new model fragment, after
selecting the desired parent (supertype) of the model fragment (see Section 6.1.2).
6.1.4 Delete a Model Fragment
Of course, you can delete a model fragment as well.
•
•
Select the model fragment you want to delete.
Press the button 'Delete selected model fragment' in the dialogue window.
58
/ 107
Project No. 004074
NATURNET-REDIME
D.4.2.1
6.1.5 Modify the Parent of a Model Fragment
You can modify the parent (supertype) of a model fragment, if you are dissatisfied with its
placement in the hierarchy.
•
•
•
•
•
•
•
Select the model fragment you want to modify.
Press the 'Properties' button.
In the listbox 'All Model Fragments', select the new parent.
Press the button 'Add the selected model fragment to the list of parents'.
Select the original parent in the Parents field.
Press the button Delete the selected model fragment from the list of parents '.
Press the button ‘Apply changes’.
Note that additions made to the model fragment may be lost when modifying the parent.
6.1.6 Copy a Model Fragment
To save time when you want to create a model fragment which has a lot in common with an
existing model fragment, you can create a copy of the model fragment and modify the copy.
•
•
•
•
Select the model fragment you want to copy.
Press the button 'Copy the selected model fragment' in the dialogue window.
A dialogue window appears, asking how to deal with children of the model fragment to be
copied: Do not copy any child objects, or Copy the whole tree of children.
Select the option you prefer.
Press the button ‘Start the copy action’ in the dialogue window.
A copy of the model fragment(s) is added to the hierarchy. It has the same name as the
original model fragment, followed by an indication that it is the nth copy. You can change the
name to make it more insightful by editing the model fragment properties.
6.1.7 Editing Model Fragments
You can edit the contents of a model fragment to adapt it to your needs.
•
•
•
•
Select the model fragment you want to Edit.
Press the button 'Edit selected model fragment'.
Now, the Model Fragment Editor will appear, as shown in Figure 32. Here, you can edit the
contents of the model fragment, including Entity Instances (see section 6.3), Attributes
(section 6.4), Configurations (section 6.5), Quantities & Quantity Spaces (section 6.6),
Values (section 6.7), Dependencies (section 6.8), Agents (section 6.9), Assumptions
(section 6.10), Imported MFs (section 6.11), Identity links (section 6.12) and Refinements
(section 6.13). Help on each of these topics can be found in the remainder of this chapter.
The use of colours is explained in section 3.5.
Select the option ‘Save model to disk’ from the ‘Edit’ menu to save the model.
Close the window (in the top right corner) when you have finished editing the model
fragment. The model fragment will automatically be saved.
59
/ 107
Project No. 004074
NATURNET-REDIME
D.4.2.1
Figure 32. The model fragment editor.
6.1.8 Editing the last changed Model Fragment
You can open the model fragment editor for the last changed model fragment directly from the
main screen.
• Press the button 'Edit model fragment: <ModelFragmentName>' in the Garp3 main screen.
6.1.9 View: Change the View of the Model Fragment Editor
You can change the view of the model fragment editor to hide or show parts of the display.
•
•
Open the 'View' menu.
Select one of the following options to hide a part of the display:
o Collapse: hide all information attached below the selected model ingredient
o Collapse Relations: hide relations attached to the selected model ingredient
o Show Relevant: show only information that is used in the current model fragment
o Hide subfragments: hide imported model fragments
o Hide: hide the selected model ingredient and its associated relations
•
Select one of the following options to show a (hidden) part of the display:
o Show subfragments: show imported model fragments
o Expand: show all information attached below the selected model ingredient
o Expand Relations: show relations attached to the selected model ingredient
o Expand All/Tree: show all information (from the selected tree) that was hidden
60
/ 107
Project No. 004074
NATURNET-REDIME
D.4.2.1
The visualization will be adapted accordingly. Icons with a yellow fill denote that relevant
information is hidden from view; icons with a grey fill denote that only irrelevant information
is hidden. When relations are hidden, a small icon is displayed near the items involved.
6.1.10
Error and Warning Messages
The error and warning messages which you may encounter during working with model
fragments are listed below, with an explanation of why they occur and how to remedy the
problem.
•
Please confirm change
Before confirm the following feedback:
Warning! You are about to delete the model fragment“…”, which already has content.
You have chosen to delete a model fragment that has already some content defined in it.
Deleting the model fragment would imply that its contents are also deleted.
o Press ’Apply’ if you want to continue.
o Press ‘Cancel’ if you want to abort the delete operation.
6.1.11
Keyboard and Mouse Shortcuts
To speed up your work, it may be worth learning some of the keyboard and mouse shortcuts for
operations which often reoccur when working with model fragments.
•
•
•
•
•
•
•
•
•
[Del]: Delete
[Enter] or Double-click on an icon: Properties
[M]: Add a Model Fragment as a condition
[Space]: Collapse
[Ctrl + Space]: Collapse
[Ctrl + S]: Save model to disk
[Ctrl + R]: Show Relevant
[*]: Expand Tree
[H]: Hide
6.2 Conditions and Consequences
When you add a piece of knowledge to your model fragment, you will first need to determine
whether it concerns a condition or a consequence. Conditions specify what must be present or
hold in order for the model fragment to apply. Consequences specify the knowledge that should
be introduced when the model fragment applies. Conditions are displayed in red, while
consequences are displayed in blue.
To add a condition or consequence to a model fragment, do the following:
•
Choose a button from the 'Conditions' or 'Consequences' toolbar, depending on which you
want to edit.
Not all types of model ingredients are admitted in all cases, as shown in Table 4. Some types
are forbidden as conditions, some are forbidden as consequences in (certain types of) model
fragments.
61
/ 107
Project No. 004074
NATURNET-REDIME
D.4.2.1
Table 4: Possible conditions and consequences in model fragments.
Possible conditions
Possible consequences
Entities
Entities (except in static MF)
Configurations
Configurations (except in static MF)
Agents (only in agent MF)
Attributes
Attributes
Quantities
Quantities
Inequalities
Inequalities
Calculations (Min/Plus)
Calculations (Min/Plus)
Correspondences
Assumptions
Proportionalities
Model Fragments
Influences (only in process and agent MF)
6.3 Entity Instances in Model Fragments
Entity instances are the parts of the system that play a role in the model fragment you are
working on.
6.3.1 Adding an Entity Instance
You can add an entity instance to either the conditions or the consequences of a model
fragment. If an entity instance is specified in the conditions, it must be present in a state for the
model fragment to hold. If an entity instance is specified in the consequences, it will be added to
a state when the model fragment holds (if it was not present already).
•
•
•
•
•
Press the button 'Add Entity Instance' in the 'Conditions' or 'Consequences' column of the
button bar.
A window will appear, entitled ‘Add a new entity – Build’ (see Figure 33).
Select the Entity that you want to instantiate.
Type a name for the Entity Instance.
Add remarks, if desired.
Press the button ‘Apply changes'.
62
/ 107
Project No. 004074
NATURNET-REDIME
D.4.2.1
Figure 33. Adding an entity to a model fragment.
6.3.2 Deleting an Entity Instance
You can delete unwanted entity instances from a model fragment.
•
•
•
Select the Entity Instance you want to delete.
Open the ‘Edit’ menu and select the option 'Delete'.
If the instance has any other attached elements a warning will be given.
If a warning is presented, press the 'Apply' button to confirm the deletion.
6.3.3 Modifying an Entity Instance
You can modify an entity instance by changing its name or remarks.
•
•
Select the Entity Instance you want to modify.
Open the ‘Edit’ menu and select the option 'Properties'.
Now you can change the parent, name and the remarks of the instance.
6.3.4 Error and Warning Messages
The error and warning messages which you may encounter during the operations related to
entity instances in a model fragment are listed below, with an explanation of why they occur and
how to remedy the problem.
•
•
Please confirm change
Before confirm the following feedback:
The/a … will be deleted because … is no longer part of the model fragment.
You have chosen to delete something which has other items in the model fragment
associated to it. Deleting it would imply that (some of) these connected items are also
deleted.
o Press the button ’Apply changes’ if you want to continue.
o Press the button ‘Cancel changes’ if you want to abort the delete operation.
63
/ 107
Project No. 004074
NATURNET-REDIME
D.4.2.1
6.3.5 Keyboard and Mouse Shortcuts
There are several keyboard shortcuts for working with model fragments.
•
•
•
•
•
•
•
•
[E]: Add entity as condition
[Q]: Add quantity as condition (when an entity instance is selected)
[Ctrl + E]: Add entity as consequence
[Ctrl + Q]: Add quantity as consequence (when an entity instance is selected)
[?]: Add assumption as condition
[Ctrl + S]: Save model to disk
[Ctrl + A]: Add agent instance
[Ctrl + R]: Show Relevant
In addition, there is a shortcut in the interface to open the entity definitions editor directly from
within the window ‘Add a new entity – Build’:
•
Press the button ‘Open entity definitions editor’.
6.4 Attributes in Model Fragments
Attributes are features of entities (or agents) that in principle do not change. To incorporate an
attribute in a model fragment, an attribute definition is required.
6.4.1 Adding an Attribute to an Entity Instance
•
•
•
•
•
Select the Entity Instance to which you want to attach an Attribute.
Press the button ‘Add attribute’ in the 'Consequence' or 'Condition' column of the button
bar.
A window will appear, entitled ‘Add a new Attribute – Build’ (see Figure 34).
Select the Attribute definition you want to add to the Entity Instance.
Select the Value associated with the Attribute in the Model Fragment.
Press the button ‘Apply changes'.
64
/ 107
Project No. 004074
NATURNET-REDIME
D.4.2.1
Figure 34. Adding an attribute to a model fragment.
6.4.2 Deleting an Attribute from an Entity Instance
•
•
Select the Attribute you want to delete.
Select the 'Delete' option in the 'Edit' menu.
6.4.3 Modifying an Attribute connected to an Entity Instance
•
•
•
•
Select the Attribute you want to modify.
Select the 'Properties' option in the 'Edit' menu.
Now you can change the properties of the Attribute as described in section 4.2.7
Press the button 'Apply changes'.
6.4.4 Keyboard and Mouse Shortcuts
There is a shortcut in the interface to open the attribute definitions editor directly from within the
window ‘Add a new attribute – Build’:
•
Press the button ‘Open attribute definitions editor’.
The attribute definitions editor will appear (see Section 4.2).
65
/ 107
Project No. 004074
NATURNET-REDIME
D.4.2.1
6.5 Configurations in Model Fragments
Configurations are used to specify (structural) relationships between entities (and/or agents).
To incorporate a configuration in a model fragment, a configuration definition is required.
6.5.1 Add a Configuration between Entities
•
•
•
•
•
•
•
Note: you already need to have two entities in the Model Fragment.
Select the two entities between which the configuration must be assigned (use the Shift
button to make multiple selections).
Press the button ‘Add configuration' in the 'Condition' or 'Consequence' column of the
button bar.
A window will appear, called ‘Add a new configuration – Build’, with a list of defined
configurations (see Figure 35).
Select a configuration.
If necessary, press the button ‘Switch arguments’.
Add remarks, if desired.
Press the button 'Apply changes'.
Figure 35. Adding a configuration to a model fragment.
6.5.2 Delete a Configuration
•
•
Select the configuration that must be deleted.
Press the delete button on the keyboard (or delete via 'Edit' menu).
6.5.3 Modify a Configuration
•
Select the configuration that must be modified.
66
/ 107
Project No. 004074
•
•
•
NATURNET-REDIME
D.4.2.1
Open the 'Edit' menu and select 'Properties'.
In this Dialogue you can do the following:
o Change between condition or consequence.
o Change the configuration.
o Change the direction of the configuration.
o Change the remarks.
Press the button ‘Apply changes'.
6.5.4 Keyboard and Mouse Shortcuts
There is a shortcut in the interface to open the configuration definitions editor directly from
within the window ‘Add a new configuration – Build’:
• Press the button ‘Open configuration definitions editor’.
The configuration definitions editor will appear (see Section 4.3).
6.6 Quantities and Quantity Spaces in Model Fragments
Quantities and quantity spaces are used to represent the behaviour of the system.
6.6.1
Adding a Quantity with Quantity space to an Entity Instance
In order to add a quantity, your model fragment should contain at least one Entity Instance.
•
•
•
•
•
•
Select the Entity Instance to which you want to attach a Quantity.
Press the button 'Add quantity' in the 'Consequence' or 'Condition' column of the button
bar.
A window will appear, entitled ‘Add a new quantity – Build’ (see Figure 36).
Select the Quantity definition you want to add to the Entity Instance
Select the Quantity Space associated with the Quantity in the dialogue.
Add remarks if desired.
Press the button 'Apply changes'.
67
/ 107
Project No. 004074
NATURNET-REDIME
D.4.2.1
Figure 36. Adding a quantity to a model fragment.
6.6.2
•
•
6.6.3
•
•
•
•
Deleting a Quantity with Quantity space from an Entity Instance
Select the Quantity with Quantity space you want to delete
Select the 'Delete' option in the 'Edit' menu.
Modifying a Quantity with Quantity space connected to an Entity
Instance
Select the Quantity with Quantity space you want to modify.
Select the 'Properties' option in the 'Edit' menu.
Now you can change the properties of the Quantity as described in section 6.6.1.
Press the button 'Apply changes'.
6.6.4 Keyboard and Mouse Shortcuts
There is a shortcut in the interface to open the quantity definitions editor directly from within the
window ‘Add a new quantity – Build’:
68
/ 107
Project No. 004074
NATURNET-REDIME
D.4.2.1
• Press the button ‘Open quantity definitions editor’.
The quantity definitions editor will appear (see Section 4.4).
6.7 Values in Model Fragments
It is possible to set a value on a quantity magnitude, or on a derivative.
6.7.1 Set a Value on a Quantity Magnitude
In order to set a value on the magnitude of a quantity, your model fragment must contain a
quantity.
•
•
Select the value in the quantity space that you want the quantity to have.
Press the button ‘Add value’ in the 'Consequence' or 'Condition' column of the button
bar.
A red (condition) or blue (consequence) arrow flag will appear next to the selected value.
6.7.2 Set a Value on a Derivative
In order to set a value on the derivative of a quantity, your model fragment must contain a
quantity.
• Select the value in the derivative's quantity space that you want the derivative to have.
• Press the button ‘Add value’ in the 'Consequence' or 'Condition' column of the button
bar.
A red (condition) or blue (consequence) arrow flag will appear next to the selected value.
6.7.3 Delete a Value
•
•
Select the Value (a blue or red arrow) that must be deleted.
Press the delete button on the keyboard (or delete via Edit menu).
6.7.4 Modify a Value
•
•
Select the value in the derivative's quantity space that you want the derivative to have
instead of the current value.
Press the button ‘Add value’ in the 'Consequence' or 'Condition' column of the button
bar.
Setting the new value will delete the previous one.
6.8 Dependencies in Model Fragments
Behavioural dependencies describe relations between behavioural features. There are three
kinds of dependencies: causal dependencies, inequalities and correspondences.
6.8.1 Causal Dependencies
Causal dependencies are used to model how processes affect the system. Direct effects are
modelled as influences, indirect effects are modelled as proportionalities. Both can be either
positive or negative.
6.8.1.1 Add Influence
An influence is a causal dependency that models a direct effect (from value to derivative). For
example, in the case of a positive influence (I+), when a liquid flow has the value plus, the
amount of liquid at the destination will increase.
In order to add an influence, your model fragment must contain two quantities.
Note: influences cannot be added in a Static Model Fragment.
69
/ 107
Project No. 004074
•
•
•
•
•
•
NATURNET-REDIME
D.4.2.1
Select the two quantities between which the influence must hold (use the Shift button to
make multiple selections).
Press the button 'Add influence as consequence'.
A window will appear, entitled ‘Add a new influence – Build’ (see Figure 37).
If necessary, press the button ‘Switch arguments’, to reverse the direction of the influence.
Select the sign of the Influence (I+ or I-).
Add a remark if desired.
Press the button ‘Apply changes'.
Figure 37. Adding an influence to a model fragment.
6.8.1.2
•
•
Select the influence that must be deleted by clicking on the representation on the screen.
Open the 'Edit' menu and select the option ‘Delete'.
6.8.1.3
•
•
•
•
Delete Influence
Modify Influence
Select the influence that must be modified.
Open the 'Edit' menu and select 'Properties'.
In this Dialogue you can do the following:
• Change the sign of the influence
• Switch arguments of the influence, thus the direction of the influence, by using the
switch arguments button.
• Change remarks
Press the button 'Apply changes'.
6.8.1.4 Add Proportionality
A proportionality is a causal dependency that models an indirect effect (from derivative to
derivative). For example, in the case of a positive proportionality (P+), when the level of a liquid
in a container increases, the pressure of the liquid on the bottom of the container will also
increase.
In order to add a proportionality, you already need to have defined two quantities in the Model
Fragment.
• Select the two quantities between which the proportionality must hold, while holding down
the Shift-key.
• Press the button 'Add proportionality as a consequence'.
A window will appear, entitled ‘Add a new proportionality – Build’ (similar to Figure 38).
70
/ 107
Project No. 004074
•
•
•
•
•
•
Delete Proportionality
Select the proportionality that must be deleted by clicking on the representation on the
screen.
Open the 'Edit' menu and select the option ‘Delete'.
6.8.1.6
•
•
•
D.4.2.1
If necessary, press the button ‘Switch arguments’, to reverse the direction of the
proportionality.
Select the sign of the Proportionality (P+ or P-).
Add a remark if desired.
Press the button ‘Apply changes'.
6.8.1.5
•
NATURNET-REDIME
Modify Proportionality
Select the proportionality that must be modified.
Open the 'Edit' menu and select the option 'Properties'.
In this Dialogue you can do the following:
• Change the sign of the proportionality
• Switch arguments of the proportionality, thus the direction of the proportionality, by
using the switch arguments button.
Press the button 'Apply changes'.
6.8.2 Inequalities
Inequalities are dependencies which specify ordinal relations between two items. When used as
conditions, the inequalities must hold for the model fragment to be applicable. When used as
consequences, they set constraints on possible behaviour.
6.8.2.1 Add (In)equality between Quantities
In order to add an (in)equality between quantities, you must already have two quantities in the
model fragment.
• Select the two quantities between which the (in)equality must hold, while holding down the
Shift-key.
• Press the button ‘Add inequality’ in the 'Condition' or 'Consequence' column of the button
bar. A window will appear, entitled ‘Add a new inequality – Build’, similar to Figure 38.
• Choose the type of ordinal relation by pressing the appropriate radio button.
• Press the button ‘Apply changes'.
6.8.2.2 Add (In)equality between a Quantity and one of its Point Values
In order to add an (in)equality between a quantity magnitude and one of its point values, you
already need to have a quantity in the Model Fragment.
• Select the quantity and a point value from its quantity space for which the (in)equality must
hold, while holding down the Shift-key.
Note that you can only select point values, not intervals.
• Press the button ‘Add inequality’ in the 'Condition' or 'Consequence' column of the button
bar. A window will appear, entitled ‘Add a new inequality – Build’, as shown in Figure 38.
• Choose the kind of ordinal relation by pressing the appropriate radio button.
• Press the button ‘Apply changes'.
71
/ 107
Project No. 004074
NATURNET-REDIME
D.4.2.1
Figure 38. Adding an inequality to a model fragment.
6.8.2.3 Add (In)equality between Values of different Quantities
In order to add an (in)equality between values of different quantities, you already need to have
two quantities in the Model Fragment.
• Select the two quantity point values (from different quantities) between which the (in)equality
must hold, while holding down the Shift-key.
Note that you can only select point values, not intervals.
• Press the button ‘Add inequality’ in the 'Condition' or 'Consequence' column of the button
bar. A window will appear, entitled ‘Add a new inequality – Build’, similar to Figure 38.
• Choose the kind of ordinal relation by pressing the appropriate radio button.
• Press the button ‘Apply changes'.
Note that this type of inequality does not constrain the actual values of the quantities; it only
specifies knowledge which allows a comparison between specific values of the different
quantities.
6.8.2.4 Add (In)equality between a Quantity Derivative and its Value
In order to add an (in)equality between a quantity derivative and its value, you already need to
have a quantity in the Model Fragment.
• Select a quantity derivative, and a point value from its derivative quantity space for which
the (in)equality must hold (note that this can only be zero), while holding down the Shift-key.
• Press the button ‘Add inequality’ in the 'Condition' or 'Consequence' column of the button
bar. A window will appear, entitled ‘Add a new inequality – Build’, similar to Figure 38.
• Choose the kind of ordinal relation by pressing the appropriate radio button.
• Press the button ‘Apply changes'.
6.8.2.5 Add (In)equality between Derivatives of two Quantities
In order to add an (in)equality between two quantity derivatives, you already need to have two
quantities in the Model Fragment.
• Select the two quantity derivatives between which the (in)equality must hold, while holding
down the Shift-key.
72
/ 107
Project No. 004074
•
•
•
•
Delete a Inequality or Equality in a Model Fragment
Select the (in)equality that must be deleted by clicking on the representation on the screen.
Open the 'Edit' menu and select the option ‘Delete'.
It's also possible to right click the representation and select delete in the menu that appears.
6.8.2.7
•
•
D.4.2.1
Press the button ‘Add inequality’ in the 'Condition' or 'Consequence' column of the button
bar. A window will appear, entitled ‘Add a new inequality – Build’, similar to Figure 38.
Choose the kind of ordinal relation by pressing the appropriate radio button.
Press the button ‘Apply changes'.
6.8.2.6
•
•
•
NATURNET-REDIME
Modify a Inequality or Equality in a Model Fragment
Select the (in)equality that must be modified by clicking on the representation on the screen.
Open the 'Edit' menu and select 'Properties'.
In the dialogue window that appears, you can do the following:
o Switch between Consequence and Condition.
o Change the type of ordinal relation (greater than, etc.).
o Press the button ‘switch arguments’
Press the button ‘Apply changes'.
6.8.2.8 Add Calculation (Plus/Min)
Adding a calculation allows you to express more complicated equations as (in)equalities, such
as ‘MigrationSurplus = Immigration - Emigration’. In this equality, ‘Immigration - Emigration’
constitutes a (min) calculation. Besides subtraction (min), it is also possible to use summation
(plus) calculations. In most types of (in)equalities that occur in the preceding part of section
6.8.2, you can replace one or both of the arguments by a calculation. It is recommended
however, to use calculations only on the right hand side of an (in)equality, to improve clarity.
• Select two quantities between which you want to add a calculation.
• Press the button ‘Add plus’ to add a summation between the two selected quantities OR
Press the button ‘Add min’ to add a subtraction between the two selected quantities.
A window will appear, entitled ‘Add a new calculus - Build’ (see Figure 39).
• Press the button ‘Switch arguments’ to switch the order of the arguments, if desired (this
only applies to min-calculations).
• Add remarks if desired.
• Press the button ‘Apply changes'.
Figure 39. Adding a calculation to a model fragment.
73
/ 107
Project No. 004074
6.8.2.9
•
•
NATURNET-REDIME
D.4.2.1
Delete Calculation (Plus/Min)
Select the calculation to be deleted.
Select the option 'Delete' from the 'Edit' menu.
6.8.2.10 Modify Calculation (Plus/Min)
•
•
Select the calculation to be modified.
Select the option ‘Properties’ from the ‘Edit’ menu.
A window will appear, entitled ‘Calculus properties’.
Here you can edit the arguments and the mathematical operator, switch the arguments if
necessary, and add or change remarks, as described in section 6.8.2.8.
6.8.3 Correspondences
Correspondences are used to indicate that qualitative values of different quantity spaces occur
at the same time. A correspondence may hold between two single values or between two
complete quantity spaces. A correspondence may be directed or undirected, and in the case of
a quantity space correspondence, it may be inverse or not.
A directed correspondence means that given the value of quantity Q1, the value of Q2 can be
determined, but not vice versa. An undirected correspondence means that given the value of
quantity Q1, the value of Q2 can be determined, and vice versa. A normal quantity space
correspondence indicates that the lowest value of Q1 corresponds to the lowest value of Q2,
and the highest value of Q1 to the highest value of Q2, and similarly for all values in between.
An inverse quantity space correspondence indicates that the highest value of Q1 corresponds
to the lowest value of Q2, and the lowest value of Q1 to the highest value of Q2, etc.
6.8.3.1 Adding a Correspondence between Quantity spaces
In order to add a correspondence between quantity spaces, you must have at least two
quantities in your Model Fragment.
•
•
•
•
•
Select both quantity spaces by clicking on their names, while holding down the Shift-key.
Press the button 'Add correspondence as a consequence' in the 'Consequences' column of
the button bar.
A window will appear, labelled ‘Add a new correspondence – Build’, as shown in Figure 40.
Tick the top checkbox ‘Select directed correspondence’ if the correspondence should be
directed. If it is directed, you can switch the order of arguments if desired by pressing the
button ‘Switch arguments’.
Tick the bottom checkbox ‘Select inverse correspondence’ if the correspondence should be
an inverse correspondence. In this case, the top value of quantity Q1 corresponds to the
bottom value of quantity Q2 instead of its top value.
Press the button ‘Apply changes'.
74
/ 107
Project No. 004074
NATURNET-REDIME
D.4.2.1
Figure 40. Adding a correspondence between two quantity spaces.
6.8.3.2 Adding a Correspondence between Quantity values
In order to add a correspondence between quantity values, you must have at least two
quantities in your Model Fragment.
• Select two quantity values (from different quantity spaces) while holding down the Shift-key.
• Press the button 'Add correspondence as a consequence' in the 'Consequences' column of
the button bar.
A window will appear, labelled ‘Add a new correspondence – Build’ (similar to Figure 40).
• Tick the checkbox ‘Select directed correspondence’, if desired.
If so, you can switch the order of arguments if desired by pressing the button ‘Switch
arguments’.
• Press the button ‘Apply changes'.
6.8.3.3
•
•
Select the correspondence to be deleted.
Open the 'Edit' menu and select the option ‘Delete'.
6.8.3.4
•
•
•
•
Deleting a Correspondence
Modify Correspondence
Select the correspondence to be modified.
Open the 'Edit' menu and select the option 'Properties'.
In this Dialogue you can do the following:
• Change between directed or undirected correspondence.
• Specify that the quantity space correspondence should be inverse or not.
• Switch the order of arguments in a directed correspondence.
• Add or change remarks
Press the button ‘Apply changes'.
75
/ 107
Project No. 004074
NATURNET-REDIME
D.4.2.1
6.9 Agents in Model Fragments
6.9.1 Adding an Agent Instance
•
Press the button ‘Add agent as condition’ in the button bar.
A window will appear, entitled ‘Add a new agent - Build’.
• Select the Agent that you want to instantiate.
• Press the button ‘Apply changes'.
Note: agent instances can only be added in an Agent Model Fragment.
6.9.2 Deleting an Agent Instance
•
•
•
•
Select the Agent Instance you want to delete.
Open the 'Edit' menu and select the option ‘Delete'.
If the instance has any other attached elements a warning will be given.
If a warning is presented, press the button ‘Apply changes' if you want to confirm the
deletion.
6.9.3 Modifying an Agent Instance
•
•
•
•
Select the Agent Instance you want to modify.
Open the 'Edit' menu and select the option ‘Properties'.
A window will appear, entitled ‘Agent Instance properties – Build’, as shown in Figure 41.
Here you can change the parent, name and the remarks of the instance.
Press ‘Apply changes’.
Figure 41. Editing agent instance properties in a model fragment.
6.9.4 Keyboard and Mouse Shortcuts
There is a shortcut in the interface to open the agent definitions editor directly from within the
window ‘Add a new agent – Build’:
• Press the button ‘Open agent definitions editor’.
The agent definitions editor will appear (see Section 4.6).
76
/ 107
Project No. 004074
NATURNET-REDIME
D.4.2.1
6.10 Assumptions in Model Fragments
It is possible to add an assumption to an entity, or to add a general assumption.
6.10.1
•
•
•
•
Adding an Assumption
Press the button 'Add assumption as condition' in the condition column of the button bar.
A window will appear, entitled ‘Add a new assumption – Build’, as shown in Figure 42.
Select the Assumption that you want to add.
Add remarks if desired.
Press the button ‘Apply changes'.
Figure 42. Adding an assumption to a model fragment.
6.10.2
•
•
Select the Assumption you want to delete.
Open the 'Edit' menu and select the option ‘Delete’.
6.10.3
•
•
•
Deleting an Assumption
Modifying an Assumption
Select the Assumption you want to modify.
Open the 'Edit' menu and select the option ‘Properties'.
Now you can change the parent, name and the comments of the assumption.
Press the button ‘Apply changes’.
6.10.4
Keyboard and Mouse Shortcuts
There is a shortcut in the interface to open the assumption definitions editor directly from within
the window ‘Add a new assumption – Build’:
• Press the button ‘Open assumption definitions editor’.
The assumption definitions editor will appear (see Section 4.7).
6.11 Importing other Model Fragments
It is possible to import other model fragments as conditions to reuse information specified
earlier.
77
/ 107
Project No. 004074
6.11.1
•
•
•
NATURNET-REDIME
D.4.2.1
Add a Model Fragment as a condition
Press the button ‘Add model fragment as condition’ in the button bar.
A window will appear, entitled ‘Add a new conditional model fragment – Build’, as shown
in Figure 43.
Select the Model Fragment you want to add.
Press the button 'Apply changes'.
The selected model fragment will appear as a red icon.
Figure 43. Adding another model fragment as a condition.
6.11.2
•
•
Select the Model Fragment you want to delete.
Select the 'Delete' option in the 'Edit' menu.
A warning message may be generated if this action will cause other changes.
If a warning message is presented, press the button ‘Apply changes’ if you want to
confirm the deletion.
6.11.3
•
•
•
•
Deleting a conditional Model Fragment
Editing a conditional Model Fragment
Select the Model Fragment you want to modify.
Select the 'Properties' option in the 'Edit' menu.
Press the 'Edit' button.
A window will appear, entitled ‘Edit conditional model fragment – Build’, with the model
fragment already selected.
Press the button ‘Open model fragment editor’.
The model fragment editor will appear, showing the contents of the selected model
fragment. Here, you can edit the contents of the conditional Model Fragment.
78
/ 107
Project No. 004074
NATURNET-REDIME
D.4.2.1
6.12 Identity Links
Identity links are a way to specify that two entity instances (or two agent instances) refer to the
same object. This can be used, for example, when combining multiple model fragments in
another one. At least one of the items must originate from a model fragment imported as a
condition. Identity links are advanced modelling concepts and should be used with care.
6.12.1
•
•
•
Add Identity
Select an entity (or an agent).
Select another entity (or agent) that you consider identical to the first, while holding down
the shift-button.
Press the button ‘Add identity' on the bottom left of the button bar.
A warning message appears (See Figure 44). If you are certain, press ‘Apply changes’.
Figure 44. Adding an identity relation between two items in a model fragment.
6.13 Refining a Conditional Model Fragment
When reusing a model fragment which has another model fragment as a condition, sometimes
the need may occur to refine that conditional model fragment (another example of advanced
modelling concepts). This is typically done in the following situation: there are four model
fragments A, B, C and D, where A is the parent of B, C is the parent of D, and C is a condition in
A. Now you can specify that in model fragment B, the conditional model fragment C should be
refined to D, (or any other child of C). This is done as follows.
• In the editor for model fragment B, select model fragment A.
• Select the option ‘Show subfragments’ from the ‘View’ menu.
Now, the subfragments of A will appear, e.g., model fragment C.
• Select the imported model fragment C to be refined.
• Select the option ‘Refine’ from the View menu.
A window will appear, entitled ‘Add a new model fragment refinement – Build’, with a list
of possible refinements (children of C).
• Select one of the possible refinements, e.g., D.
• Press the button ‘Apply changes’.
A warning message will appear. If you are certain, press the button ‘Apply changes’.
The refinement will be displayed as in Figure 45.
79
/ 107
Project No. 004074
NATURNET-REDIME
D.4.2.1
Figure 45. Refining a conditional model fragment.
This also works when model fragment B is not a child of A, but imports A as a condition.
6.14 Keyboard and Mouse Shortcuts
There is a shortcut in the interface to open the model fragment editor directly from within the
window ‘Add a new conditional model fragment – Build’:
•
Press the button ‘Open model fragment editor’.
The model fragment editor will appear (see Section 6.1.7).
6.15 Error and Warning Messages
The error and warning messages which you may encounter during the operations related to
identity links are listed below, with an explanation of why they occur and how to remedy the
problem.
•
Please confirm change
Before confirm the following feedback:
Warning: By using an identity relation it is possible to create contradictions in the
subelements of both instances.
o Make sure that the entities can be regarded as identical, i.e., that they are of the
same type, and do not have quantities with different values.
•
Please confirm change
Before confirm the following feedback:
Warning: The/a … in model fragment … will be deleted because … is no longer part of the
model fragment.
This warning occurs when something is deleted that is connected to other items in the
model fragment.
•
Conflict
This action is impossible. Please check the following feedback:
There is already an identity between these instances.
80
/ 107
Project No. 004074
NATURNET-REDIME
D.4.2.1
Part III. Running and inspecting simulations
In this part, you will learn about the Simulate environment of Garp3. Here, you can run and
inspect simulations based on the qualitative models made in the Build environment, as
described in part II. Part III consists of four chapters:
•
•
•
•
Chapter 7 describes how to run simulations.
Chapter 8 explains how to select states and paths.
Chapter 9 discusses inspecting simulations.
Chapter 10 describes additional menu options.
81
/ 107
Project No. 004074
NATURNET-REDIME
D.4.2.1
7 Running Simulations
The main screen of the simulation environment appears (see Figure 46) when one of the
simulate tasks (Simulate scenario, Full simulation, or Open the simulator to its current state or a
saved simulation, see section 2.4.1) is activated from the Garp3 main screen. The operations
dealing with running simulations can be performed using the buttons below the ‘Run’ header.
First, you select a scenario to simulate, if you haven’t done so already. Then, you can run the
simulation engine step by step by performing operations on selected states, or do a full
simulation. This results in a state-transition graph which is displayed in the main simulate
screen. In the state-transition graph, states are depicted as numbered circles, and transitions as
arrows between states.
Figure 46. The Simulate main screen, with the options for running simulations.
7.1.1 Select a scenario to simulate
•
•
•
Press the button ‘Select a scenario to simulate’.
A list of available scenarios will appear.
Select one of the scenarios in the list.
Press the 'Simulate selected scenario' button.
Garp3 will display the scenario and its possible interpretations in the state-transition graph. The
possible interpretations are considered start states. They are coloured yellow to indicate their
status as interpreted. In Figure 46, there is only one start state, 1, which is quite common. If
there is no start state, it was not possible to generate a valid interpretation of the scenario. In
that case, you will need to edit your model.
If only one scenario is defined, the 'Select a scenario to simulate' button will change into a
'Simulate scenario: <scenario name>' button. In this case, simulating this scenario only requires
one step:
•
Press the button ‘Simulate scenario: <scenario name>’.
7.1.2 Terminate selected states
States can be terminated to see whether there are any changes in quantity values which may
lead to state transitions.
82
/ 107
Project No. 004074
•
NATURNET-REDIME
D.4.2.1
Press the button ‘Terminate selected states’.
Garp3 will determine which termination rules apply to the selected states, and change their
status to terminated. This is visible in the state-transition graph by a change in the states’ colour
to orange.
7.1.3 Order selected states
Next, states can be ordered to investigate which termination rules can be combined, and to
determine which have priority.
•
Press the button ‘Order selected states’.
Garp3 will prune the termination rules based on priority rules, and merge terminations that occur
simultaneously. The status of the states is changed to ordered. This is visible in the statetransition graph by a change in the states’ colour to brown.
7.1.4 Find successors for selected states
Finally, you can ask Garp3 to find successors for selected states, by determining the effects of
the applicable termination rules.
•
Press the button ‘Find successors for selected states’.
Garp3 will determine whether the remaining terminations result in transitions to new (or already
existing) states. In that case, transitions (and possibly states) will be added to the statetransition graph. In any case, the status of the state is changed to closed. This is visible in the
state-transition graph by a change in the states’ colour to black.
7.1.5 Full simulation
Instead of running the simulation step-by-step for selected states, it is also possible to run a full
simulation.
•
Press the button ‘Full simulation: <ScenarioName>’.
Garp3 will determine all possible terminations and find all possible successors, and repeat this
until no more terminations can be found. The complete state-transition graph will be displayed
(see Figure 47).
83
/ 107
Project No. 004074
NATURNET-REDIME
Figure 47. The state-transition graph after running a full simulation.
7.1.6 Inspect the simulation trace
•
Press the button ‘Open trace window’.
The trace window appears, as shown in Figure 48.
Figure 48. The simulation trace window with all options turned on.
84
/ 107
D.4.2.1
Project No. 004074
NATURNET-REDIME
D.4.2.1
The trace window shows a trace of the reasoning performed by the simulation engine while
running a simulation. This information can be useful for modellers, especially when debugging a
model. In the trace window, different colours are used to distinguish between different types of
information. On the bottom of the trace window (see Figure 48), there is a set of buttons, which
can be used to show or hide particular types of information in the trace. The function of these
buttons is listed below:
•
Show/hide general reasoning status information
By using this option the engine generates short remarks about the reasoning steps that are
being performed. Particularly when running a big simulation this option is handy, because
instead of waiting for X minutes in silence, you get continuously informed about what the
engine is doing.
•
Show/hide search for applicable model fragments
This option shows the model fragments that are being applied to a scenario and whether
that succeeds or fails. Note that in the engine and the trace, model fragments are called
system structures.
•
Show/hide search for assumable model fragments (engine default inequality reasoning)
When searching for applicable model fragments, often inequalities have to be checked for
their consistency with the state that is being developed. For each inequality (and value
statement) the engine may encounter one of the three possibilities: derivable from what is
known (allow addition of model fragment), inconsistent with what is known (do not add
model fragment), consistent but not derivable (allow model fragment to be added for the
time being). In the case of the latter, later derived facts may turn out to be inconsistent with
the 'assumed model fragment'. If this happens the state becomes inconsistent and is
removed. If no conflicting facts are found, the 'assumed model fragment' stays part of the
state. Finally, competing assumptions (that is: neither can be derived, but together they are
inconsistent) become separate states. The reasoning on assuming model fragments can be
followed by using this trace option. It is shown in the trace under ‘Assuming system
structures’.
•
Show/hide search for model fragments still applicable after transition
When searching for model fragments applicable in a new state following a transition, the
engine first evaluates the applicability of the model fragments already active in the old state.
This option shows the results of this reasoning step. In the trace, this information is listed
under ‘Searching for system structures still applicable after transition’.
•
Show/hide added dependencies and check on conditional inequalities
When applying model fragments, (in)equalities are being added (and checked) with regard
to the state that is being generated. This option allows you to get a global view of what
happens concerning these dependencies. In the trace, this information is listed under
‘Adding/checking relations’.
•
Show/hide inequality reasoning details
This option causes more details to be shown concerning the inequality reasoning, namely
why 'given' (in-)equality constraints are consistent or inconsistent. In the trace, this
information is listed under ‘Inequality reasoning’.
•
Show/hide inequality reasoning details: derivable relations
This option allows you to get a closer look at the inequality reasoning. It shows the inequality
relations that can be 'derived' on the basis of the 'given' inequality relations. Notice, that
from a technical point of view this is a rather complex process, because the number of
relations that can be derived can easily become very large. The engine implements some
smart heuristics to effectively perform this reasoning, that is to find inconsistencies within
reasonable time, without doing exhaustive search. In the trace, this information is listed
under ‘Show derivable relations’.
85
/ 107
Project No. 004074
NATURNET-REDIME
D.4.2.1
•
Show/hide influence resolution (using influences and proportionalities)
This option shows the results of 'influence resolution', that is calculating the impact that
influencing quantities (both influences (I) and proportionalities (P)) have on influenced
quantities. In the trace, this information is listed under ‘Resolving influences and proportional
relations’.
•
Show/hide search for possible terminations
This option shows the search for possible terminations (transitions) from the current state. In
the trace, this information is listed under ‘Searching for terminations’.
•
Show/hide ordering and removal of possible terminations
This option shows how the possible terminations (transitions) found may be ordered and/or
merged. In the trace, this information is listed under ‘Ordering of terminations’.
•
Show/hide search for successor states (using ordered terminations)
This option shows the results of the main reasoning steps when searching for successor
states following ordered terminations (transitions). In the trace, this information is listed
under ‘Application of transitions’.
Besides the buttons for individual trace options, there are three buttons which can be used to
modify the selection:
•
Select all trace options
Selects all available trace options
•
Deselect all trace options
Deselects all available trace options
•
Reverse the selection of trace options
Selects all trace options which were previously deselected, and deselects all trace options
which were previously selected.
Furthermore, there are three buttons which can be used to manage (the text in) the trace
window:
•
Save trace to file
Saves the text from the trace window to a text file
•
Clear all contents
Clears the contents displayed in the trace window
•
Close this window
Closes the trace window
7.1.7 Simulation preferences
•
Press the button ‘Simulation preferences’.
The simulation preferences window will appear, as shown in Figure 49.
86
/ 107
Project No. 004074
NATURNET-REDIME
D.4.2.1
Figure 49. The simulation preferences window.
The simulation preferences specify certain aspects of the reasoning performed by the
simulation engine. Changing these preferences may affect the outcome of the simulation. These
preferences are included because they may be useful in certain situations for advanced
modellers, but they should be used with care.
The following preferences can be turned on or off:
•
Apply closed world assumption in influence resolution (default: off)
Activating this preference implies that influenced quantities (by means of P's or I's) for which
the impact of the influencing quantity can not be determined are assumed to be steady (as if
the influencing quantity had no influence). This should not be confused with quantities that
are not influenced at all; they remain unaffected by this assumption.
•
Apply epsilon ordering (default: on)
The epsilon order rule (De Kleer, 1984) states that changes from a point value (and changes
from equality) happen instantly and therefore precede changes that take at least some small
amount of time, such as changes to a point or equality. When this preference is turned off,
all terminations are treated as being similar from this perspective.
•
Apply quantity space constraints on extreme values (default: off)
This preference determines whether or not the derivative of a quantity is allowed to keep
increasing (or decreasing) in the highest (or lowest) point of the quantity space. When
running a simulation the question is whether a quantity may increase while being in its
highest point. There is no single answer to this issue, because it depends on what the
modeller wanted to represent with the upper limit in the quantity space. Is it a real limit
beyond which the quantity magnitude cannot go? Or is it a virtual limit: the magnitude of the
quantity may become higher beyond this landmark but the values above the landmark are
not of interest? By using this preference the modeller can decide upon a perspective as
appropriate for the model created. When the quantity spaces include real limits, this
preference can be turned on to apply the quantity space constraints on the derivative of
quantities with extreme values.
•
Apply correspondences in ordering (default: on)
Correspondences are crucial for merging possible terminations. Often when quantities (or
specific values) correspond, it means that both quantities will need to change value at the
same time. On very rare occasions a modeller may not want this approach and view all
terminations as independent. This can be realised by turning off this preference. Be aware
however that not using correspondences in ordering easily results in an explosion of
possible transitions. You are therefore advised not to switch this preference off.
87
/ 107
Project No. 004074
NATURNET-REDIME
D.4.2.1
When you change any preference settings, you can either save the changes to the model, or
close the editor without saving the changes, by pressing one of the two buttons at the bottom of
the screen:
•
Save changes to model
•
Close this editor
In addition to the four preferences mentioned above, there are a number of advanced
preferences which are not to be used in normal situations. To see them, press the button
‘Advanced >>’. Now the following advanced preferences will be displayed:
•
•
•
•
•
•
•
•
Derive landmark relations (default: off)
Assume inequality terminations (default: off)
Assume value terminations (default: off)
Generate terminations for >= & =< (default: off)
Remove terminations to unequal for full corresponding quantities (default: off)
Use constants in ordering (default: on)
Apply quantity space constraints on zero as extreme value (default: on)
Remove inactive quantities (default: off)
•
•
•
•
•
•
•
Apply continuity on derivative inequalities (default: on)
Allow assumptions on derivatives in reclassifying MFs (default: off)
Apply epsilon merging of immediate terminations (default: on)
Application of analyse zero equality technique (default: on)
Use extra termination rules (default: off)
Specify and Match instead of Subsumption (default: on)
Use complete rule based transition procedure (default: off)
88
/ 107
Project No. 004074
NATURNET-REDIME
D.4.2.1
8 Selecting States or Paths
In the main screen of the Simulate environment, you can set the selection mode to select
individual states or paths (see Figure 50). By default, the state selection mode is set to ‘Select
individual states’. The selection can be manipulated in several ways using the mouse and the
buttons located under the Select header, as described in the following subsections.
Figure 50. Selecting a path in the state-transition graph.
8.1.1 Select individual states
•
Press the button ‘Select individual states’.
Since this is the default mode, it will not be necessary to press this button unless you have
changed the state selection mode to ‘Select a path’ earlier.
Garp3 displays the current selection in the ‘Selected states’ text field below the state-transition
graph, on the left. This text field can also be used directly to enter states to be selected.
8.1.2 Select a path
•
Press the button ‘Select a path’.
When this button is pressed, Garp3 will search for the shortest path from, to, or through
selected states, depending on the type of states you select. This is done according to the
following rules:
•
•
•
If an end state is selected, Garp3 will return the shortest path to that end state.
If a state is selected which is not an end state, Garp3 will return the shortest path from that
state to an end state.
If multiple states are selected, Garp3 will return the shortest path between those states.
When no path can be found according to these rules, Garp3 will issue a warning message.
89
/ 107
Project No. 004074
NATURNET-REDIME
D.4.2.1
Garp3 displays the current selection of states and the currently selected path in the ‘Selected
states’ and ‘Selected path’ text field, respectively (see Figure 50). Both text fields are located
below the state-transition graph.
8.1.3 Select a state
•
Move the mouse above the desired state in the graph and press the left mouse button once.
A red glow will appear around the state to indicate that it is selected.
8.1.4 Select an additional state
•
Select an additional state with the mouse while holding down the shift-key on the keyboard.
8.1.5 Select all states
•
Press the button ‘Select all states’.
8.1.6 Deselect a state
•
Select an already selected state with the mouse while holding down the shift-key on the
keyboard.
8.1.7 Deselect all states
•
Press the button ‘Deselect all states’.
90
/ 107
Project No. 004074
NATURNET-REDIME
D.4.2.1
9 Inspecting Simulations
Garp3 offers, besides the state-transition graph, several views for inspecting different aspects of
a simulation. They are listed in Table 5, together with their button icons and a reference to the
section in which they are described. All these views can all be accessed directly from the
simulation main screen (e.g., see Figure 51).
Table 5. The different views for inspecting the simulation.
The Quantity values view
See section 9.1
The Value History view
See section 9.2
The Equation History view
See section 9.3
The Transition History view
See section 9.4
The Entity-Relations view
See section 9.5
The Dependencies view
See section 9.6
The Model Fragments view
See section 9.7
9.1 The Quantity Values View
The quantity values view shows all quantity values and derivatives within a particular state.
9.1.1 Show quantity values
• Select the state(s) of interest
• Press the button ‘Show quantity values’ in the main Simulate screen.
For each selected state N, a separate window will appear, called ‘Quantity values in state N –
Simulate’. In this window, the visualisation is as follows (see Figure 51):
QuantityName(EntityInstanceName): Value, Derivative
Figure 51. The quantity values view.
91
/ 107
Project No. 004074
NATURNET-REDIME
D.4.2.1
9.1.2 Edit quantity
In the quantity values view, the button on the right is a shortcut to the Build environment, to edit
the quantity definition for the selected quantity.
•
•
Select the quantity to be edited.
Press the button ‘Edit selected quantity’.
9.2 The Value History View
The value history view shows a graphical overview of quantity values (magnitude and
derivative) for multiple states.
9.2.1 Open the Value History View for selected States
•
•
Select the states or path of interest.
Press the button ‘Value history’.
Garp3 will display a window called ‘Quantity value history view’ (see Figure 52).
On the top left side of this window, a list of quantities is shown.
Figure 52. The value history view.
92
/ 107
Project No. 004074
NATURNET-REDIME
D.4.2.1
9.2.2 Select Quantities
•
•
•
Select a quantity with the mouse.
Select additional quantities while holding down the Ctrl-key, if desired.
Press the button ‘Select all’ to select all quantities.
9.2.3 Deselect Quantities
•
•
Deselect individual quantities with the mouse while holding down the Ctrl-key.
Press the button ‘Select none’ to deselect all quantities at once.
9.2.4 Draw a Value History for selected Quantities
• Select the quantities of interest.
• Press the button ‘Draw value history’.
Now, Garp3 will display a value history for each of the selected quantities, with the name of
the quantity on top. In the value history, the following visualisation is used:
• The selected states are shown on the bottom, along the X-axis.
• The possible values in the quantity space are shown on the right, along the Y-axis.
• The value in a particular state is shown as a circle on a grey background.
• The derivative of the quantity in a particular state is shown as a symbol:
o Min (decreasing): a small triangle pointing downwards
o Zero (steady): a small black circle
o Plus (increasing): a small triangle pointing upwards
o Unknown: an empty circle
9.2.5 Clear the Screen
•
Press the button ‘Clear screen’.
9.2.6 Sort the List of Quantities
The list of quantities can be sorted alphabetically by quantity name (the default) or by entity
name to allow easy selection of quantities with similar names, or quantities of the same entity,
respectively.
•
Press the button ‘Sort by Quantity’ or ‘Sort by Entity’.
The format of the quantity name will be changed accordingly,
QuantityName(EntityName), or EntityName:QuantityName, respectively.
9.2.7 Print Value History to File
•
•
•
•
Press the button ‘Print value history to file (postscript)’.
A Save file browser will appear.
Select the directory in which the postscript file should be saved.
Select or type a file name for the postscript file.
Press the button ‘Save’.
9.2.8 Close the Value History View
•
Press the button ‘Close this window’.
9.2.9 Keyboard and Mouse Shortcuts
There is a mouse shortcut in the Value history view:
•
Double mouse-click on a quantity: Draw value history for that quantity.
9.3 The Equation History View
The equation history view shows an overview of selected (in)equalities for multiple states.
93
/ 107
to
Project No. 004074
NATURNET-REDIME
D.4.2.1
9.3.1 Open the Equation History View for selected States or Path
•
•
Select the states or path of interest.
Press the button ‘Equation history’.
Garp3 will display a window called ‘Equation history view’ (see Figure 53).
On the top left side of this window, a list of generic equations between quantities is shown,
where the (in)equality sign is replaced by a ‘?’. This list indicates that information is available
about the ordinal relationships between the quantities involved.
Figure 53. The equation history view.
9.3.2 Select Equations
•
•
•
Select an equation with the mouse.
Select additional equations while holding down the Ctrl-key, if desired.
Press the button ‘Select all’ to select all generic equations.
9.3.3 Deselect Equations
•
•
Deselect individual equations with the mouse while holding down the Ctrl-key.
Press the button ‘Select none’ to deselect all equations at once.
9.3.4 Draw an Equation History for selected Equations
• Select the equations of interest.
• Press the button ‘Draw equation history’ on the bottom left.
Garp3 will display an equation history for each of the selected equations, with the generic
equation on top. In the equation history, the following visualisation is used (see the right
hand side of Figure 53):
• The selected states are shown on the bottom, along the X-axis.
94
/ 107
Project No. 004074
•
NATURNET-REDIME
D.4.2.1
The type of (in)equality is shown above the state number.
It is shown as a symbol which should be inserted in the place of the ‘?’.
9.3.5 Clear the Screen
•
Press the button ‘Clear screen’.
9.3.6 Changing the Display Format of Equations
The list of equations can be formatted in several ways:
• Press the button ‘Show long names’.
Quantities are displayed in the format QuantityName(EntityName).
This is the default option.
• Press the button ‘Show short names’.
Quantity names are displayed without the entity names.
• Press the button ‘Show names in legacy mode’.
Quantity names are displayed in legacy mode, i.e., the way they were shown in previous
versions of Garp.
9.3.7 Include/Exclude Derivative Equations
•
•
Press the button ‘Include Derivative Equations’.
The equations between derivatives will be included in the list as well.
Press the button ‘Exclude Derivative Equations’.
The equations between derivatives will be excluded from the list.
9.3.8 Print Equation History to File
•
•
•
•
Press the button ‘Print equation history to file (postscript)’.
A Save file browser will appear.
Select the directory in which the postscript file should be saved.
Select or type a file name for the postscript file.
Press the button ‘Save’.
9.3.9 Close the Equation History View
•
Press the button ‘Close this window’.
9.3.10
Keyboard and Mouse Shortcuts
There is a mouse shortcut in the Equation history view:
• Double mouse-click on a generic equation: Draw equation history for that generic equation.
9.4 The Transition History View
The transitions history view provides an overview of transitions for (or between) selected states.
9.4.1 Open the Transition History View for Selected States
•
•
Select the states of interest.
Press the button ‘Transition history’.
Garp3 will display a window called ‘Transitions for selected states:[StateList] - Simulate’, as
shown in Figure 54. In this window, the transition names are shown on the left, in the format
MtN, e.g., 1t1. The first number indicates the state of origin for that transition, and the
second number indicates that it is the Nth transition for that state.
9.4.2 Open the Transition History View for a Selected Path
•
Select the path of interest.
95
/ 107
Project No. 004074
•
NATURNET-REDIME
D.4.2.1
Press the button ‘Transition history’.
Garp3 will display a window called ‘Transitions for path:[Path] - Simulate’. On the left side of
this window, the transition names are shown, in the format M->N, e.g., 1->2. The first
number indicates the state of origin for that transition, and the second number indicates its
successor state.
On the right side of each transition name, the cause(s) for the transition is/are shown.
Figure 54. The transition history view.
9.4.3 Inspect the Details of a Selected Transition
•
•
Select the transition of interest.
Press the button ‘Zoom in on details’.
Garp3 will display a window called ‘Details about transition <T> - Simulate’, as shown in
Figure 55. In this window, the Garp details of that transition are shown, including the internal
naming (shown in grey), the cause, the conditions, the results (consequences), the status of
the transition, and the successor states (to_states) for the transition.
Figure 55. The transition details view.
96
/ 107
Project No. 004074
NATURNET-REDIME
D.4.2.1
9.4.4 Close the Transition History View
•
Press the button ‘Close this window’.
9.5 The Entity-Relations View
The entity-relations view is used to show entities, configurations and attributes for selected
states.
9.5.1 Show entities, configurations and attributes
•
Press the button ‘Show entities, configurations and attributes’ in the main Simulate screen.
For each selected state N, a separate window is opened, called ‘Entities and relations in state N
- Simulate’, as shown in Figure 56. The visualisation is as follows:
•
•
•
Entities are shown as labelled rectangles.
Configurations are shown as labelled connections, directed towards a black dot.
Attribute-value pairs are shown as ‘AttributeLabel: ValueLabel’ within the entity or agent that
they belong to.
Figure 56. The entities and relations view.
9.5.2 Change layout entities
•
•
•
Press the button ‘Change layout entities’.
Repeat the above operation, if desired.
Adjust the layout by hand by dragging entities with the mouse, if desired.
The layout algorithm will be called to return a layout of the entities. Since the layout algorithm is
non-deterministic in nature, there is no guarantee that the resulting layout will be different, or
better than it was. This operation can be done repeatedly to try out a few different layouts, but
the layout can also be adjusted by hand.
97
/ 107
Project No. 004074
NATURNET-REDIME
D.4.2.1
9.5.3 Zoom in
•
Press the button ‘Zoom in’.
This will not cause the font size to be increased, only the size of the entity nodes and the
connections.
Special feature: When a particular entity is selected (no visible feedback is given for this),
zooming in will result in a view centered around the selected entity.
9.5.4 Zoom out
•
Press the button ‘Zoom out’.
This will not cause the font size to be decreased, only the size of the entity nodes and the
connections (up to a certain minimum).
Special feature: When a particular entity is selected (no visible feedback is given for this),
zooming out will result in a view centered around the selected entity.
9.5.5 Print diagram to file (Postscript)
•
•
•
•
Press the button ‘Print diagram to file (Postscript)’.
A Save file browser will appear.
Select the directory in which the postscript file should be saved.
Select or type a file name for the postscript file.
Press the button ‘Save’.
9.5.6 Close the Entity-Relations view
•
Press the button ‘Close this window’.
9.6 The Dependencies View
The dependencies view shows the quantities and the dependencies between them (see Figure
57). By default, each quantity is displayed inside the entity it belongs to. There are various
options available to manipulate the dependencies view to show more or less types of
information.
9.6.1 Opening the Dependencies View
You can open the dependencies view for a particular state, or multiple states. In the latter case,
a separate screen will appear for each state.
•
•
In the Simulate main screen, select the desired state(s).
Press the button ‘Show dependencies’ button in the Simulate main screen.
98
/ 107
Project No. 004074
NATURNET-REDIME
D.4.2.1
Figure 57. The dependencies view.
The dependency view window provides scroll bars when part of the figure is hidden from view.
They can be used to move the figure as a whole, horizontally or vertically.
9.6.2 Showing or Hiding Structure and Quantities
The top group of radio buttons toggle the display (on or off) of the Garp3 primitives related to
structure and quantities:
•
•
•
•
•
•
•
•
Entities. Entities are displayed in the Dependencies view as labelled rectangles. To save
space, only entities with quantities are displayed in the Dependencies view. A complete
overview of all entities is presented in the Entity-Relations view (see Section 9.5).
Relations and Attributes
o A relation is displayed as a line directed towards a black dot, with a text label
displayed in the middle (not shown)
o An attribute is displayed as ‘<AttributeName>: <ValueName>’, just below the entity
name.
Quantities are displayed as labelled ovals
Quantity Spaces are displayed within the quantity to which they belong
Values are displayed within the quantity space, highlighted in red
Derivatives are displayed as:
o Black triangle pointing downwards (decreasing)
o Black circle (steady)
o Black triangle pointing upwards (increasing)
Select all context: Display all of the above
Deselect all context: Display none of the above
99
/ 107
Project No. 004074
NATURNET-REDIME
Figure 58 shows the dependencies view with all display options turned on.
Figure 58. The dependencies view with all display options turned on.
9.6.3 Showing or Hiding Causal Dependencies
The second group of radio buttons toggle the display of the causal dependencies:
•
•
•
•
•
•
I+: Positive Influence
I-: Negative Influence
P+: Positive Proportionality
P-: Negative Proportionality
Select all causal
Deselect all causal
9.6.4 Showing or Hiding (In)equalities
The third group of radio buttons toggle the display of the (in)equalities:
•
•
•
•
>: Greater than
>=: Greater or equal than
<: Smaller than
=: Equal
100
/ 107
D.4.2.1
Project No. 004074
•
•
•
•
•
•
•
NATURNET-REDIME
D.4.2.1
d =: Equal derivative
d <: Smaller derivative
d >: Greater derivative
d <=: Smaller or equal derivative
d >=: Greater or equal derivative
Select all inequalities
Deselect all inequalities
9.6.5 Showing or Hiding Correspondences
The bottom group of radio buttons toggle the display of the correspondences:
•
•
•
•
•
•
•
•
•
FQ: Full quantity correspondence 1
dQ: Derivative Quantity correspondence
Q: Quantity correspondence
dV : Derivative Value correspondence
V : Value correspondence
dQ∩: Inverse Derivative Quantity correspondence
Q∩: Inverse Quantity correspondence
Select all correspondences
Deselect all correspondences
9.6.6 View properties of quantities and entities
•
•
Place the mouse on a quantity or an entity and keep it stationary for a while.
A tooltip with specific information about that quantity or an entity will appear. The tooltip will
disappear as soon as the mouse is moved again.
Double-click with the mouse on a quantity to see even more information about that quantity.
This will be displayed in a popup window.
9.6.7 Change layout entities
•
•
•
Press the button ‘Change layout entities’.
The quantities inside entities remain organized as they are within their entity.
Repeat the above operation, if desired.
Adjust the layout by hand by dragging entities with the mouse, if desired.
When an entity is moved, all quantities inside it move with it.
The layout mechanism used is a spring based mechanism which tries to keep tightly connected
entities close together. However, the mechanism is non-deterministic in nature, so each run
may give another result, and it is not guaranteed to improve the layout in all cases.
9.6.8 Change layout quantities
•
•
•
Press the button ‘Change layout quantities’.
Repeat the above operation, if desired.
Adjust the layout by hand by dragging entities and/or quantities with the mouse, if desired.
When an entity is moved, all quantities inside it move with it.
The layout mechanism used is a spring based mechanism which tries to keep tightly connected
quantities close together. However, the mechanism is non-deterministic in nature, so each run
may give another result, and it is not guaranteed to improve the layout in all cases.
1
Currently, this button is not functional. It is not yet possible to create full quantity correspondences
directly in the Build environment; instead, a combination of a quantity correspondence and a derivative
quantity correspondence can be used.
101
/ 107
Project No. 004074
NATURNET-REDIME
D.4.2.1
9.6.9 Change layout dependencies
Dependencies are drawn by default as straight lines with a circular dependency label in the
middle. When there are many dependencies to display, the labels may partly overlap. When this
happens, it may be useful to change the layout of some dependencies.
•
Adjust the layout by hand by dragging the circular dependency label with the mouse, if
desired. The lines and arrows attached will move accordingly.
9.6.10
•
Zoom in
Press the button ‘Zoom in’.
This will enlarge the view by increasing the distance between quantities. The window size and
font size remain constant. Activating this button one or multiple times should reduce the amount
of overlapping items in the display.
Special feature: When a particular entity is selected (no visible feedback is given for this),
zooming in will result in a view centered around the selected entity.
9.6.11
•
Zoom out
Press the button ‘Zoom out’.
This will reduce the view by decreasing the distance between quantities (up to a certain
minimum). The window size and font size remain constant. Activating this button one or multiple
times will move items closer together, at the expense of more overlapping items in the display.
Special feature: When a particular entity is selected (no visible feedback is given for this),
zooming out will result in a view centered around the selected entity.
9.6.12
•
•
•
•
Press the button ‘Print diagram to file (Postscript)’.
A Save file browser will appear.
Select the directory in which the postscript file should be saved.
By default, Garp3’s working directory is proposed.
Select or type a file name for the postscript file.
Press the button ‘Save’.
9.6.13
•
Print diagram to file (Postscript)
Close the dependencies view
Press the button ‘Close’.
9.6.14
Error and Warning Messages
The error and warning messages which you may encounter during the file operations are listed
below, with an explanation of why they occur and how to remedy the problem.
•
Overwrite <Filename>.eps?
This message will appear when you attempt to save your postscript file with a file name of
an already existing file.
You can choose ‘Ok’, or ‘Cancel’.
o ‘Ok’ will save overwrite the existing file with the file you are saving.
102
/ 107
Project No. 004074
o
9.6.15
NATURNET-REDIME
D.4.2.1
‘Cancel’ will abort the save operation.
Keyboard and Mouse Shortcuts
There are currently no shortcuts for the dependencies view.
9.7 The Model Fragments Views
The model fragments views show the contents of particular model fragments in various ways.
9.7.1 Opening the Model Fragments Views
You can open the model fragments views for a particular state, or multiple states.
•
•
In the Simulate main screen, select the desired state(s).
Press the button ‘List Model Fragments’ in the Simulate main screen.
A separate screen with a list of applicable model fragments will appear for each selected state
(see Figure 59).
Figure 59. The model fragment list for a particular state.
9.7.2 Show Model Fragment in Legacy Mode
•
•
Select the model fragment of interest.
Press the button ‘Show model fragment in legacy mode’.
A window will appear (see Figure 60) which shows the details of that model fragment in legacy
mode, including the conditions (shown in red) and results (= consequences, shown in blue). On
the top side of the window, the name of the model fragment is shown, followed by the names of
the entities involved. Below the name, the parent (supertype) of the model fragment is shown,
following ‘Is a’.
103
/ 107
Project No. 004074
NATURNET-REDIME
D.4.2.1
Figure 60. The model fragment Birth shown in legacy mode.
9.7.3 Show Model Fragment in Context
•
•
Select the model fragment of interest.
Press the button ‘Show model fragment in context’.
A window will appear which shows the model fragment in a graphical context using the
visualisation of the dependency view (see Figure 61). In this window, the conditions of the
model fragment are shown in red, and the consequences in blue.
It is possible to manipulate the layout and zoom factor of this view, analogous to the way this
works for the dependencies view (described in section 9.6).
104
/ 107
Project No. 004074
NATURNET-REDIME
D.4.2.1
Figure 61. The model fragment Birth shown in context.
9.7.4 Edit Selected Model Fragment
•
•
Select the model fragment of interest.
Press the button ‘Edit selected model fragment’.
This is a shortcut to the Build environment, which allows you to edit the selected model
fragment (see Chapter 6).
10 Additional Menu Options
The main screen of the Simulate environment also includes menus with additional operations:
the File menu, the View menu, and the Display menu.
10.1 The File Menu
The file menu allows three operations to be executed: ‘Select a scenario’ (already described in
section 7.1.1), ‘Save simulation in model’, and ‘Print state-transition graph to file’.
10.1.1
Save simulation in model
You can save the current state of the simulation into the model for future reference.
•
•
Choose the option ‘Save simulation in model’ from the ‘File’ menu.
A dialog window will appear with a list of simulations saved before.
Select a saved simulation to overwrite or type a new name.
105
/ 107
Project No. 004074
•
NATURNET-REDIME
D.4.2.1
Press the ‘Save’ button.
The currently active simulation will be saved in its current state.
Note that this operation does not save information to disk. You will have to save the model to
disk to do this.
10.1.2
Print state-transition graph to file
You can save a copy of the figure in the screen into a postscript file.
•
•
•
Choose the option ‘Print state-transition graph to file’ from the ‘File’ menu.
A dialog window will appear with a file browser.
Select the appropriate directory using the file browser.
By default, Garp3’s working directory is proposed.
Type a unique file name.
Press the button 'Save'.
A new postscript file will be created that contains the state-transition graph of the current
simulation.
Note: To view postscript files, a postscript viewer or editing program that can handle postscript
is required.
10.1.3
Error and Warning Messages
The error and warning messages which you may encounter during the file operations are listed
below, with an explanation of why they occur and how to remedy the problem.
•
Overwrite <Filename>.eps?
This message will appear when you attempt to save your postscript file with a file name of
an already existing file.
You can choose ‘Ok’, or ‘Cancel’.
o ‘Ok’ will save overwrite the existing file with the file you are saving.
o ‘Cancel’ will abort the save operation.
10.2 The View Menu
The View menu offers an alternative way to open several views. It is possible to choose one of
the following views from this menu:
•
•
•
•
•
•
•
Quantity values (see section 9.1)
Value history (see section 9.2)
Equation history (see section 9.3)
Transition history (see section 9.4)
E-R Structure (see section 9.5)
Dependencies (see section 9.6)
Model fragments (see section 9.7)
•
•
Current scenario (see section 5.1.7)
Scenarios (see section 5.1.1)
The first seven views listed above refer to Simulate views described in previous sections of this
Chapter. The last two views are shortcuts to the Build environment (see Part II of this
document), where you can edit the current scenario, or choose between scenarios to edit or
simulate.
106
/ 107
Project No. 004074
NATURNET-REDIME
D.4.2.1
10.3 The Display Menu
The display menu offers several additional options to change the view in the state-transition
graph and the dependencies view. Section 10.3.1-10.3.5 describe options for The statetransition graph; section 10.3.6 describes options for the dependencies view.
10.3.1
Layout
• Choose the option ‘Layout’ from the Display menu.
Garp3 will try to optimize the layout for the states and terminations.
Note that the termination nodes are only visible when this is set in the preference settings.
10.3.2
Layout States
• Choose the option ‘Layout states’ from the Display menu.
Garp3 will try to optimize the layout for the states.
10.3.3
Layout Terminations
• Choose the option ‘Layout states’ from the Display menu.
Garp3 will try to optimize the layout for the terminations.
Note that the termination nodes are only visible when this is set in the preference settings.
10.3.4
•
•
•
Hide/Show Input State
Choose the option ‘Settings’ from the Display menu.
A window will appear, called ‘Preference settings’.
The button ‘Input State’ under the header ‘Show in state-transition graph’ is pressed by
default to indicate that it should be shown.
Depress the button ‘Input State’.
The ‘input state’ representing the scenario will be hidden from view.
Press the button ‘Input State’ again to show the ‘input state’.
10.3.5
Show/Hide Termination Nodes
By default, the state-transition graph only displays the closed transitions, i.e., the termination
rules which have successfully led to a transition to another state. It is possible, however, to
show all terminations, regardless of their status.
• Choose the option ‘Settings’ from the Display menu.
A window will appear, called ‘Preference settings’.
The button ‘Termination Nodes’ under the header ‘Show in state-transition graph’ is
depressed by default to indicate that they should be hidden from view.
• Press the button ‘Termination Nodes’.
The termination nodes will be shown in the graph as small nodes, attached to the state they
originate from.
• Depress the button ‘Termination Nodes’.
The termination nodes will be hidden from view.
10.3.6
Show/Hide Internal Quantity Names
Garp3 internally uses slightly different names for the quantities during the reasoning process
than the ones shown in the interface. The simulation engine needs to add numbers to the
names of quantities to make them unique. It is possible to show the internal names in the
dependency view, as in legacy mode.
• Choose the option ‘Settings’ from the Display menu.
A window will appear, called ‘Preference settings’.
• Press the button ‘Show Internal Quantity Names in Dependency View’.
The internal quantity names will be shown in the dependency view, as in legacy mode.
• Depress the button ‘Show Internal Quantity Names in Dependency View’ to hide the internal
quantity names from view (this is the default setting).
107
/ 107