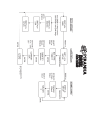
1
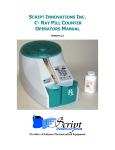
™
Congratulations on your purchase of the Piranha Digital Peak Charger by DuraTrax! Designed for peak detection charging of nickel-cadmium (NiCd) and nickelmetal hydride (NiMH) rechargeable batteries, the Piranha Digital Peak Charger offers programming flexibility normally found in expensive, upper-end
computerized chargers - at an amazingly affordable price! It’s great for batteries containing from 1 to 8 cells, with fully adjustable fast charge current, peak
detection sensitivity and trickle charge rates, and the addition of a custom 2-line LCD for displaying a wide variety of battery and charge data. The Piranha
Digital Peak Charger is an unbeatable value in today’s market, and another great choice from DuraTrax, The Leader in Awesome R/C!
Included with this instruction manual is a quick reference menu
flowchart which shows how the entire program structure for the
Piranha Digital Peak Charger is designed. Retain this flowchart
for reference when reading this manual and for future use.
SPECIAL FEATURES
• AC/DC convenience is great for use at home or at the track!
• Peak charges 1–8-cell NiCd or NiMH packs.
• Peak charge current adjustable from 0.1 to 5.0 amps (3.0A
maximum with AC input).
• Automatic charge mode feature automatically charges
batteries if specific charge settings are not pre-set.
• Adjustable peak detection sensitivity or “threshold” from 3mV –
20mV, to custom match the charger to specific batteries.
• Adjustable trickle charge rates 0, 100mA, 200mA.
• Two-line, 8 character LCD for easy programming and data
display.
• Displays battery voltage, peak detection mV, charge time,
current, and capacity.
• Displays errors for improper input voltage, poor battery
connections, and reverse polarity on the output.
• Store pre-set charge parameters in memory for multiple
batteries.
• Multiple sound cues and melodies.
• Microprocessor controlled intelligence and reliability.
• Solid-state reverse polarity and short circuit protection on input
and output.
SPECIFICATIONS
Input Voltage:
Compatible Cell Types:
110V AC 60Hz, 11-15V DC
nickel-cadmium (NiCd),
nickel-metal hydride (NiMH)
Cell Counts:
1-8 cells
Peak Charge Rate:
0.1-5.0A, 3.0A maximum w/AC input
Charge Rate Increments: 0.1A (100mA)
Fast Charge Termination: zero delta peak
Trickle Charge Rate:
0, 100mA, 200mA selectable
Display Type:
2-line, 8 character LCD
Sound Cues:
individual tones and pre-set melodies
Memory Pre-sets:
store parameters for 10 battery packs
Output Connectors:
spring loaded terminals
Case Size:
5 x 3.4 x 5.5" (127 x 86 x 140mm)
Weight:
2.94 lb (1335g)
IMPORTANT PRECAUTIONS
• Do not charge battery types other than nickel-cadmium (NiCd)
or nickel-metal hydride (NiMH) rechargeable batteries.
Damage may occur from other types of batteries.
• Do not connect AC and DC power sources to the charger
simultaneously.
• Do not attempt to charge batteries at excessive fast charge
currents.
• Do not use automotive type battery chargers to power the
charger.
• Do not leave the charger unattended while charging.
Disconnect the battery and remove input power from
charger immediately if the charger becomes hot. Allow the
charger or battery to cool down before reconnecting.
• Do not allow water, moisture or foreign objects into the
charger.
• Do not place the battery or charger on or near a flammable
object while in use. Keep away from carpets, cluttered
workbenches, etc.
• Do not cover the air intake holes on the charger as this could
cause the charger to overheat.
• Always disconnect charger from power source when not
in use.
• Adult supervision required when used by a child.
• Do not attempt to charge A, AA, AAA or smaller batteries
above 1A rate.
• Do not connect the battery to the supplied connector until it
has been “locked’ into the charger.
The Piranha Digital Peak Charger is capable of
charging both nickel-cadmium (NiCd) and nickelmetal hydride (NiMH) battery chemistries, as
identified by this symbol. Look exclusively for
battery chargers with this symbol to handle both
NiCd and NiMH charging needs.
IMPORTANT CARE & HANDLING INSTRUCTIONS
FOR NIMH BATTERIES
While similar in appearance to sub-C NiCd batteries and having
the same 1.2V rating per cell, NiMH cells contain a different
chemical makeup which requires different care and handling.
• Do not to allow NiMH batteries to overheat at any time.
Heat can adversely affect the performance of NiMH batteries.
If overheating is observed, disconnect the battery from the
charger immediately and allow to cool!
• Do not deep cycle NiMH batteries as permanent damage
could result.
• NiMH cells do not exhibit the “memory effect” like NiCd cells,
so little cycling is needed.
• Store NiMH packs with some voltage remaining on the cells.
• Use a NiMH battery pack no more than three cycles per day,
with a two to three hour break in-between for cooling. More
frequent use is likely to overheat the pack.
• NiMH cells have a self-discharge rate of approximately 2025% (compared to 15% for NiCd batteries). Thus, if NiMH
batteries have been inactive for more than a few days it is
important to recharge them immediately prior to use.
CONFIGURING EACH MEMORY SETTING
Follow these steps to configure a memory setting:
1. While the charger shows the default display, press the (+)
button to access the “BATT SETUP” menu.
2. Briefly press ENTER. The “BAT. TYPE” setting will be displayed.
Press the (+) or (-) buttons to set either “NiCd” or “NiMH” to match
the exact chemistry of the battery to be charged. This tells the
charger exactly how to identify peak charge for the battery to be
charged. Press ENTER to confirm the setting.
INPUT POWER
3. For “CAPACITY,” press (+) or (-) to set the charge input capacity
to the desired mAh (milli-amp hour) level. This selection ranges
from 50mA to 5000mA, in increments of 50mA. Press ENTER to
confirm the chosen setting. The uses for this feature are as
follows:
To use a 12V DC battery or power supply for input power, attach
the charger’s red alligator clip to the positive (+) terminal on the
battery or power supply, and the black alligator clip to the negative
(-) terminal. It’s best to use a “clean” DC power source whose
output is filtered to remove unwanted electrical noise. To achieve
the maximum potential with this charger, the source battery must
be capable of delivering at least 6 amps of current while
maintaining 12V DC.
a. This can be used as a safety feature. If, for some reason,
a battery never reaches peak, this feature tells the charger
to terminate fast charge after this pre-set level of input
capacity has been delivered to the battery.
b. Many NiMH cell manufacturers recommend to leave a
partial charge on a battery before putting it in storage for
an indefinite period of time. Adjusting this capacity level
setting before charging to a pre-determined percentage of
the battery’s maximum rated capacity, will automatically
supply partial charge to the battery.
c. If this capacity setting is too low, the battery will not likely
receive full charge. Conversely, if capacity setting is too
high, it may not provide ample overcharge protection if
the charger fails to recognize peak charge on the
battery.
d. To bypass the capacity feature, set the capacity level to
maximum, or 5000mAh. Caution must be used in doing
so as the charger must not be left unattended.
e. If the battery’s rated capacity is not known or listed, consult
your supplier to get the exact specifications for the battery.
To use 110V AC for input power, connect the black AC plug to a
regular 110V wall outlet.
When input power is applied, the charger will automatically detect
the input voltage level to determine if it is adequate for operation.
The error message “Input V Error” will be displayed if the AC or
DC input voltage is too high or too low. Double-check the power
source at this time to determine what problem might exist.
WARNING! Never connect the DC input leads to any power
source simultaneously with AC input, as permanent damage
to your charger may result!
SELECTING A MEMORY SETTING
The Piranha Digital Peak Charger contains 10 memory selections
(numbered from 0 to 9), whereby different charge configurations
for 10 different types of batteries can be stored. Once
configurations are set into memory, this convenient feature makes
it extremely easy to switch from charging one battery type to
another without having to re-configure the charger each time.
4. The “CURRENT” setting determines how much current is to be
delivered to the battery during peak charge. Press (+) or (-) to
choose the desired charge current in amps. This selection ranges
from 0.1 amp (100mA) to 5.0amps, in increments of 0.1A. Once
the desired charge current is selected, press ENTER to confirm
the setting.
When power is applied to the charger, the LCD will show the
LAST memory setting used. This will be referred to as the “default
display.” The memory number will show between the arrows on
the top line of the display, such as < 1 >. To help identify the
proper memory selection all charge configurations will
automatically scroll on the bottom line of the LCD while sorting
through each memory selection. If the default memory selection
is NOT appropriate for the next battery to be charged, select the
appropriate memory to match the battery, as follows:
If the 5.0A selection is exceeded, the display will advance to the
“Auto” setting. Here, the charger will detect the internal resistance
of the battery being charged every 1 minute and automatically
adjust the charge current to properly match the battery. In
addition, while in the “Auto” setting, if the battery type (selected
earlier in the instructions) was set as “NiCd” the charger will
automatically set the peak detection sensitivity level (see below)
to 3mV. If the load battery selection is “NiMH,” the charger will
automatically set the peak sensitivity level to 5mV.
1. Briefly push the middle ENTER button marked as “E”. The
memory number on the top line of the LCD will begin to flash. Do
not hold the enter button. This will cause the charger to begin
charging.
Note: When 110V AC input power is used, the maximum charge
current will be approximately 3.0A even if the display setting for
charge current is set above 3.0A. Full charge current can be
delivered with proper DC input power.
WARNING! Do not set the charge current too high for the
battery to be charged! This could result in overheating of the
battery, and lead to bodily harm or permanent damage to the
battery and/or the charger.
2. Scroll up or down through the memory selections 0 - 9 by pressing
(+) or (-).
3. Press ENTER once the proper memory selection has been
located, which will be confirmed as the memory number will stop
flashing.
5. The “∆ PEAK” or “delta peak” setting determines the charger’s
sensitivity level for detecting peak charge of a battery. This is
2
do so could result in permanent damage to your battery and
the charger. Match the positive battery lead to the charger’s
red (+) terminal, and the negative (-) battery lead to the
charger’s black terminal. Do not allow the charger’s positive
(+) and negative (-) output terminals to be shorted while a
battery is connected, as permanent damage to the battery
will result. Make sure no stray strands of wire accidentally
make contact with both the positive and negative terminals
or battery connections. Make sure that the spring terminals
have a “positive” lock by gently pulling on the connector. If
the wires easily pull out of the spring connector, reinsert the
wire. “Positive” lock is essential for accurate charging, thus
helping to eliminate false peaks.
sometimes referred to as a “threshold” setting. Press (+) or (-) to
select the desired peak detection sensitivity. This selection ranges
from a high sensitivity setting of 3mV/C (milli-volts per cell in the
pack) to a low sensitivity setting of 20mV/C.
A higher sensitivity setting (lower numerical value) instructs the
charger to be more precise when detecting peak. This is often
most accurate when charge current is set at a low rate. If charge
current is set at a high rate, the charger could possibly terminate
fast charge too soon as voltage fluctuations on the battery and
power source are more dramatic at high charge rates.
A low sensitivity setting (higher numerical value) instructs the
charger to be less precise when detecting peak. This means the
battery will likely be less full when fast charge is terminated, but
the charger is less likely to prematurely terminate fast charge as
a result of possible voltage fluctuations. A low sensitivity setting is
usually unnecessary when a low charge current is selected, but
could be more beneficial when a high charge current is selected.
The connector should be hooked up to the charger before
connecting the battery to the charger.
PEAK CHARGING
Once the desired peak sensitivity selected, press ENTER to
confirm the setting. The display will return to the default display at
this time.
Choose the proper memory selection to match the battery to be
charged. Review all charge parameters for the memory selection
before proceeding (will scroll on the bottom line of the display).
Re-select the proper memory selection if necessary.
We recommend using a setting at 6mv/c for NiCd and 8mv/c
for NiMH.
1. When the LCD shows the default display, press and hold
ENTER for approximately 3 seconds to begin peak charge, which
will be accompanied by an audible melody and the “Charge
Start….” message on the display.
TRICKLE CHARGE & AUDIBLE TONES
The Piranha Digital Peak Charger includes the option to choose
from three different trickle charge rates, and five different audible
melody selections which will sound at various times during the
operation of the charger.
2. Several conditions might exist which could prevent the charger
from starting or completing the peak charge sequence. The LCD
might display any one of the error messages shown below. After
making the necessary error correction, return to step 1 in this
section to re-start the peak charge process.
1. While the charger shows the default display, press the righthand (+) button twice to access the “USER SETUP” menu.
a. “No Battery” will be displayed if the charger does not detect
a battery connected to the outputs. Re-check for solid
connections for each the black and red connection.
b. “Wrong Polarity” will be displayed if the battery is
connected backwards to the charger. Make sure the
battery’s positive lead is connected to the red, positive (+)
terminal on the charger, and the negative lead is
connected to the black, negative (-) terminal on the
charger.
c. “Open Circuit” will be displayed anytime the battery
becomes disconnected from the charger during peak
charge mode. Re-check for solid connections for each of
the black and red connections.
2. Press ENTER. The “TRICKLE” setting establishes the exact
trickle charge current (in milli-amps) which will automatically be
delivered to the battery immediately after peak charge has been
terminated. Press (+) or (-) to select from 0mA, 100mA, or
200mA. Press ENTER to confirm the trickle charge rate selection.
Selecting 0mA will deactivate the “trickle” charge mode.
3. The “MELODY” setting determines which melody will be played
at various points during operation of the charger. On initial set-up,
Melody1 will automatically play. At any time while Melody1 plays,
press the (+) or (-) buttons to hear any of the other four pre-set
melodies which will play automatically. The melody option can be
disabled by selecting Melody Off. Press ENTER to confirm the
melody selection and return to the USER SETUP menu.
4. Press the left-hand (-) button twice to return to the default
display and begin the charge process.
ACTIVE CHARGE DATA
BATTERY CONNECTION
Once peak charge has begun, the charger will automatically
begin displaying data regarding the charge process on TWO
different LCD screens. Press (+) or (-) anytime to alternate
between the two screens, as follows:
The output connections for this charger consist of two springloaded terminals. These terminals offer the optimum in
convenience for using any charge connector of your choice. A
pre-assembled standard battery connector is included with this
charger. Securely connect the battery to be charged to the
terminals with the positive (+) battery lead connected to the red,
positive (+) terminal, and the negative (-) battery lead to the
charger’s black, negative (-) terminal.
SCREEN ONE:
Fast charge amps
3.0 2300
12.000 V
Charge input capacity in mAh
Output voltage
SCREEN TWO:
Fast charge minutes
(count up)
WARNING! Always make sure to follow proper polarities
when connecting the charge leads to the charger! Failure to
3
T 000:00
12.00 Vi
Input voltage to charger
FINAL CHARGE DATA
After peak detection has been achieved the display will flash
“Charge Complete” for 10 seconds accompanied by an audible
melody, and the charger will automatically switch to trickle
charge. The display will automatically change to show final charge
data on two different screens, which will automatically alternate.
Data will maintain on the display until another command is
manually given to the charger. Data displayed will be as follows:
SCREEN ONE:
Fast charge
amp setting
3.0 2300
12.000 V
Final charge capacity to battery
in mAh
Output voltage
1. Final charge capacity: Compare this number to the maximum
rated capacity of the battery being charged. The displayed data
can be used to determine how well the battery accepted charge.
If this value is considerably lower than the rated capacity of the
battery, it could be an indication of one of the following conditions:
a. Poor battery condition. Battery replacement may be
necessary.
b. The charger’s peak detection sensitivity could require
adjustment. Re-setting the peak sensitivity setting to
another value could improve results.
c. The charger’s peak charge current setting may be too high
or too low. Re-setting the peak charge current to another
value could improve results.
d. Poor connection between battery and charger. Make sure
all connectors are free of dirt and debris.
2. Output voltage: this is voltage measured on the output of the
charger. If the displayed voltage is lower than the rated voltage of
the battery, it could be an indication of one of the problems
listed above.
SCREEN TWO:
Total minutes
for fast charge
T 000:00
12.00 Vi
Input voltage to the charger
Total minutes for fast charge: this is the total number of minutes
which were required to complete peak charge of the battery.
2) Check input connections for proper contact.
3) Internal problem. Contact Hobby Services for details.
PROBLEM: Charger doesn’t recognize battery.
CAUSE AND CURE:
1) Battery may be connected backwards. Connect battery leads
properly.
2) Faulty connection or wiring. Correct or replace charge lead.
3) Defective cell in the pack. Replace battery pack or cell.
PROBLEM: Does not automatically terminate peak charge
properly.
CAUSE AND CURE:
1) Check all connections for proper contacts.
2) Bad battery pack. Replace battery.
3) Internal problem with charger. Disconnect battery immediately
and contact Hobby Services for further details.
PROBLEM: Battery voltage low after peak charge (below 1.2V
per cell).
CAUSE AND CURE:
1) Charge rate setting too low. See “Configuring Each Memory
Setting” to reset charge current.
2) Battery connected in reverse. Connect battery leads properly.
3) Defective battery, needs to be replaced.
WARRANTY
DuraTrax warrants this product to be free from defects in materials
and workmanship for a period of 1 year from the date of purchase.
During that period, we will repair or replace, at our option, any
product that does not meet these standards. You will be required to
provide proof or purchase date (receipt or invoice). If during the
1 year period, your DuraTrax product shows defects caused by
abuse, misuse, or accident, it will be repaired or replaced at our
option, at a service charge not greater than 50% of the current retail
price. Be sure to include your daytime telephone number in case we
need to contact you about your repair. This warranty does not cover
components worn by use, application of reverse voltage, cross
connections, poor installation, subjection of components to foreign
materials, any alterations to wires, or tampering. In no case shall our
liability exceed the original cost of the product.
Your warranty is voided if...
SCREEN THREE:
At any time after peak charge has ended, pressing the (+) and (-)
buttons simultaneously will temporarily show the final measured
peak voltage and charge input capacity delivered to the battery.
After 3 seconds, the charger will revert back to the default display.
Peak voltage
8.780Vp
1580 mAh
Final charge input capacity
Peak voltage data can help determine the overall condition of the
battery which was charged. This is NOT necessarily the final
measured voltage of the battery, but its HIGHEST measured
voltage as it was being charged. Typically, a battery in good
condition will exhibit a higher peak voltage than a battery of
poorer condition, and can often result in the battery being able to
deliver more output power. It is normal for the peak voltage value
of a battery to gradually decrease over the useful lifetime of the
battery.
TROUBLESHOOTING GUIDE
PROBLEM: Display does not work when unit is connected.
CAUSE AND CURE:
1) Check power supply for improper power.
Entire Contents Copyright © 2002
A. You allow any wires to become frayed which could cause a short
B. You tamper with any of the electronic components.
C. You exceed minimum or maximum cell specifications for the
battery pack.
D. You allow water, moisture, or any foreign material to enter the
charger case.
E. You apply reverse voltage by connecting the battery pack
backwards.
Under no circumstances will the purchaser be entitled to
consequential or incidental damages. This warranty gives you
specific legal rights, and you may also have other rights which vary
from state to state. If you attempt to disassemble or repair this unit
yourself it may void the warranty.
For service to your DuraTrax product, either in or out of warranty,
send it post paid and insured to:
Hobby Services
1610 Interstate Drive
Champaign, IL 61822
(217) 398-0007
e-mail: [email protected]
Internet Address: www.duratrax.com
DTXZ4099 for DTXP4005 V1.0
™