1
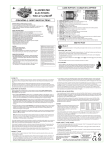
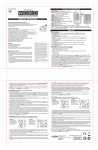
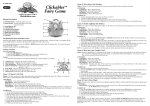
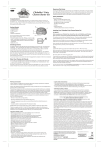
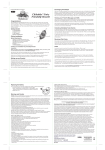
No.10435
5+
15
Video Game System
Manual
TM
Thank you for purchasing the Intellivision X2
15 Video Game System, complete with 15
classic Intellivision sport and arcade games
built-in to one easy to use handheld controller.
This unit includes controller with built-in
software and A/V cable.
Please read the setup instructions and
precautions / warnings before attempting
to connect the Intellivision X2 15 Video
Game System to your TV.
The TV must have Audio/Video Input (AV) Jacks to
be able to play the Intellivision X2 15 Video Game
System - if the TV does not have the Input Jacks
you may purchase a RF/Scart Adapter that has AV
inputs built in.
If you chose to connect the unit through your VCR
you may need to select the LINE OUT button on the
TV/VCR to display the initial menu screen.
You may need to consult the instruction guide to
the TV or VCR for more information about your
specific equipment.
Installing the Batteries
Have an adult install 4 "AAA" batteries
(not included). Caution: When installing the
batteries make sure that the positive (+) and
negative (-) ends are facing in the correct
position . Follow the diagram in the battery
compartment. Note: when the batteries begin
to lose their charge, the power indicator LED
will begin to dim. and the Intellivision TV
Play Power Controller will turn itself off.
Remember to take out batteries when the
Intellivision TV Play Power Controller is not
being used for a long time.
Intellivision X2 15 Video Game Operations
1. Make sure the power switch on the unit is
in the off position.
2. Turn your TV on and turn to the channel
that accepts the input line.
3. Place the power switch on Controller to
the on position the indicator light should
be lit (If not, check the batteries).
4. The TV screen will display the opening
screen shot for approximately 10 seconds.
The next screen will display the Game List.
5. Select a game by scrolling left or right with
8 Way Direct Pad and pressing the “A”
button to commence play.
How to turn off the Intellivision X2 15 Video
Game System
1. Place power switch in the off position.
2. Turn your TV to the desired channel to
view regular TV programs (When using
A/V jacks you will need to set the TV/Video
switch back to the TV position).
Trouble Shooting
1. No picture to the screen
* Is the Intellivision X2 15 Video Game
System turned on?
* Is the TV turned on?
* Is the AV output connected properly?
* Is the battery capacity too low?
* Are the batteries installed properly?
2. Screen Flickers or no color
* Are the TV’s color controls set correctly?
3. No game Sound
* Is the TV volume set too low or in the off
position?
* Has the Audio cable come loose or
become disconnected?
4. Picture on TV screen is unsteady
* Adjust the vertical and horizontal
controls until corrected.
5. Picture is blinking or distorted
* Press the reset button. If there is no
improvement power off the unit and
try again.
6. No Power
* Check whether the batteries were installed
properly.
Hardware Precautions/Maintenance
1. Do not disassemble or try to repair the
Intellivision X2 15 Video Game System
unit or its components.
2. Always place the power switch in the off
position before connecting the unit to
the TV.
3. Do not store the unit in a humid place or
where it could collect dust, lint or other
debris.
4. Do not drop, hit or otherwise abuse the
unit or its components
5. Make sure that all connections to the unit
are correct (refer to Back View Diagram)
and that the plugs are inserted straight
into the proper sockets.
6. Make sure the unit is in the off position
before disconnecting any plugs. Carefully
remove the cables from the plug itself, and
not by pulling on the cable.
7. Do not expose the unit to high heat or
direct sunlight for extended periods of
time. This will cause the unit not to work.
8. Do not spill any liquids on the unit or its
components. If cleaning the unit, use a
soft damp cloth and let it dry completely
before attempting use.
9. Do not rapidly turn the power switch
on/off. This may shorten the life of the
batteries.
Warnings & Precautions
A very small portion of the population have
a condition which may cause them to
experience epileptic seizures or have
momentary loss of consciousness when
viewing certain kinds of flashing lights or
patterns that are commonly present in our
daily environment. These persons may
experience seizures while watching some
kinds of television pictures or playing
certain video games. Players who have not
had any previous seizures may nonetheless
have an undetected epileptic condition.
If you or anyone in your family has
experienced symptoms linked to an epiletic
condition (e.g. a seizure or loss of
awareness) immediately consult your
physician before using any video games.
We recommend that parents observe their
children while they play the games. If you or
your child experience any of the following
symptoms: dizziness, altered vision, eye or
muscle twitching, involuntary movements,
loss of awareness, disorientation, or
convulsions, DISCONTINUE USE
IMMEDIATELY and consult your physician.
FOLLOW THE PRECAUTIONS WHENEVER
USING the Intellivision X2 15 Video Game
System :
• When using your controller do not sit or
stand too close to the television.
• Do not play if you are tired or need sleep.
• Always play in a well lit room.
• Be sure to take a 10 or 15 minute break
every hour while playing.
Repetitive Strain Warning
Warning! Not Suitable for children under
36 months in case of unforeseen use in
particular of small parts and long cords,
giving rise to harm.
Some people may experience fatigue or
discomfort after playing for long periods of
time. If your hands or arms become tired or
uncomfortable while playing, stop and rest.
Front View of Controller
CABLE TO TV
PLUG TO 2nd
PLAYER
CONTROLLER
HOME
LED
DIRECTION
JOY STICK
X
Y
DIRECTION
DISC
WARNING TO OWNERS OF PROJECTION
TELEVISIONS and PLASMA FLAT SCREEN
TELEVISIONS
Do not connect your Intellivision X2™ 15 Video
Game System to a projection OR plasma TV
without first consulting the user manual for your
projection OR plasma TV. Otherwise, it may
permanently damage your TV screen.
B
A
ON/OFF
SELECT
START
1
Insert the NEW AAA batteries in the battery
compartment of your TV Play System. To do
this, you will have to unscrew the
compartment lid (located on the bottom of
the unit) with a small screwdriver. Insert
NEW AAA batteries, and then replace the lid
to the compartment. Finally, you will need
to screw in the screw.
Battery Installation
Use ONLY NEW AAA batteries in this
product. Never mix brands of batteries.
Never mix alkaline, standard (Carbon-zinc)
and rechargeable (nickel-cadmium) batteries
or this product will not work properly. It is
not recommended that rechargeable
batteries be used with this product.
BATTERY CAUTIONS:
•
•
•
•
•
2
Requires 4 x AAA (LR03, 1.5V) Batteries.
(Not Included)
•
•
•
•
•
Batteries should only be replaced by an adult.
Non-rechargeable batteries are not to be recharged.
Do not use rechargeable batteries.
Different types of batteries or new and used batteries
are not to be mixed.
Only batteries of the same or equivalent type as
recommended are to be used.
Batteries are to be inserted with the correct polarity .
Exhausted batteries are to be removed from the toy .
The supply terminals are not to be short-circuited.
Do not dispose of batteries in fire.
Batteries are to be removed from the product when
not in use.
Audio / Video Input
(US & Japan)
TV
The A/V jacks can be found in the front,
back, or both of the TV set, depending
on the TV set.
TV
eo
Vid
io
Audio
Aud
Video
(White)
IN
(Yellow)
AV CABLE
PLAYER 2
PLAYER 1
AV CABLE
1. Plug the TV Play System into the TV or VCR.
The Audio video cable that is attached to the TV Games Unit has a yellow input
and a white input. This cable needs to be plugged into either your TV or VCR.
The Yellow plug should be inserted into the "Video In", which is a yellow
outlined hole on your TV or VCR. The White plug should be inserted into the
"Audio In" which is a white outlined hole on your TV or VCR.
2. Find the correct source/channel on your TV or VCR
to see the game on your screen
You may need to select the appropriate "Line-in source". To do
this, you will need to first turn on the TV Play System. You can
be sure that it is on if the red LED lights up on the unit.
3
Audio / Video Input
(Europe)
TV
RGB
PLUG
RGB ADAPTER /
SCART ADAPTER
Audio
(White)
EUROPEAN
TV
AV
CABLE
IN
Video
(Yellow)
IN
Insert corresponding color pin plugs into pin sockets
4
AV CABLE
PLAYER 1
PLAYER 2
Intellivision X2™
15
Video Game
INSTRUCTION MANUAL
When you turn ON your console, The TV screen will display the
Opening Screen Shot (image above left) for approximately 10
seconds. The next display will be the Game List (image above right).
By pressing the Directional Disc to the left or right you will scroll
through and display the screen shot for each of the games. When you
have decided on which game you want to play press the “A” Button
and then follow the enclosed individual game instructions.
5
1. On the opening game screen, use the Select button to choose a 1 or 2-player game. Press the Start button to begin
the game. The Start button can be pushed at any time during game play to pause a current game.
2. When the game begins your laser gun will appear at the bottom of the screen. If you chose a 2-player game, two
laser guns will appear (player 1 is white and player 2 is green). Use the disc to move the laser guns left and right
across the bottom of the screen.
3. The B button is used to activate the Hyperspeed feature. If you push the B button, your laser gun will appear
randomly in another position at the bottom of the screen.
4. Push the A button to fire your laser gun at the falling meteors and white spinning bombs. If a spinner hits the
ground, you will lose a gun. Hit as many rocks as you can, as every rock that lands reduces your score.
5. Pulsating guided missiles will appear as the game gets harder. They will seek out and destroy your laser gun on
impact. Get underneath it and shoot it out of the sky before this happens. If a missile gets to ground level, it may
attack you horizontally. If this happens, use the Hyperspace feature to avoid it.
6. Your score, level and lives are displayed at the bottom of the screen. You begin the game with 4 guns. Every 1,000
points the you will receive another gun. The screen background will change at 1,000, 5,000 and 10,000.
6
7. Earning Points (shoot objects out of sky):
Big Rock = 10
Small Rock = 20
Big Spinner = 40
Small Spinner = 80
Guided Missile - 100
Losing Points (objects hit ground):
Big Rock = -5
Small rock = -10
Big Spinner = 1 gun
Small Spinner = 1 gun
Guided Missile = -20
Baseball
1. On the opening game screen, use the Select button to choose a 1-player or 2-player game, then press the Start
button. If you are playing a 1-player game, you can now choose between skill levels Pro and All Star (The All Star
level is more difficult than Pro). Press the Start button to begin the game.
2. When the game begins, player 1 (the orange team) is in the field and player 2 (the blue team) is up at bat.
3. The object of the game is to score the most runs in 9 innings. Each time a player crosses home plate successfully
that team is awarded 1 run.
4. How to Play Offense: When you are on offense, hit the ball as far as possible and time your swing just right to make
sure that the base runners have enough time to reach the next base. Once you hit the ball, check the scoreboard.
The scoreboard will display your score potential, whether it is single, double, triple or Home Run. Then press the B
button to run as quickly as possible to get to the base shown on the scoreboard before being thrown out. You can
only go as many bases as you are awarded by the computer (as seen on the scoreboard). Each player that is on
base can only advance by one base at a time and will always remain once base ahead of the player who made the
hit. You may also advance your players by stealing bases.
5. How to Hit: As a hitter you cannot hit curve balls, only fast balls. So you must wait for a fast ball and then time your
swing so that you hit the ball when it is in the strike zone. Push the A button to swing/hit the ball. The better your
timing, the better the hit! Curve balls will always result in a "strike" if you swing, but will always result in a "ball" if
you don't. You can tell the difference between a curve ball and a fast ball, because a fast ball will follow a straight
line path from the pitcher to home plate; curve balls veer off as they approach the hitter. After 3 "strikes" you are out.
Four "balls" will get you a free trip to 1st base.
7
6. How to Steal: Within 2 seconds after the words READY appear on the screen, you can press the Y (Steal) button to
attempt a steal. Press the B (Run) button rapidly to steal a base. You will automatically be charged a strike.
Remember, however, that a "suicide squeeze", or stealing home, will always result in an out in this game.
7. How to Bunt: Within 2 seconds after the words READY appear on the screen, press the X (Bunt) button to attempt
a bunt. You will automatically make contact with the ball, but the computer will determine if you are safe or out.
Then press the B (Run) button as quickly as possible to run to 1st base after the bunt.
8. How to Play Defense: When you on defense, you are only responsible for pitching. Press different areas of the
directional button to to pitch the ball 3 different ways.
Press Down to pitch a Straight Ball
Press Left to pitch a Left Curve Ball
Press Right to pitch a Right Curve Ball
The speed at which the pitch is sent to the hitter is dependent upon the number of times you press the selected
pitch button. Press the pitch button as fast as you can and blow pitches by your opponent. Vary the speed to keep
your opponent off balance.
NOTE: Although it appears as if the 1st, 2nd and 3rd baseman are not touching the bases, if they have the ball, your
player will be called out if he makes a play for their base.
8
Beach Volleyball
1. On the opening game screen, use the Select button to choose a 1 or 2-player game, then press Start. Next, use
the Select button to choose a skill level, 1-6, and then press Start. If you are playing a 2-player game, you cannot
choose a skill level.
2. When the game begins, you are the red team. If you choose a 2-player game, player 1 is the red team and player 2
is the blue team.
3. Press the A button to serve and hit the ball.
4. Press the B button to block and spike the ball.
5. Press the disc to move your player around the court.
6. When the ball is hit to your side of the net, pass (hit) the ball to your teammate. You may only pass the ball twice
before hitting it back over the net. The computer will automatically switch the controlled player when you pass the
ball. The controlled player is the dark red player and the light blue player. When the ball is coming down after
being hit, move the controlled player under the ball to hit it. There is a circle marking on the ground, the player must
stand on the circle to hit the ball. There are 2 different colors to represent different action. Red is for spike and blue
is for normal hit.
7. Your primary defense move is the block and can be used against your opponent's spike. Position yourself next to
the net and in front of the spiker. Press the B button to jump. If you time it correctly, you will block the ball and send
it right back over the net.
8. The teams scores appear in the upper left and right hand corners of the screen in the teams colors. The points
scored in the current game appear over the number of games won in the match. Each game is set for 15 points
and it is a "Best of 5" match.
9
Buzz Bombers
1. On the opening game screen, use the Select button to choose a 1 or 2-player game. Press the Start button to
begin the game. The Start button can be pushed at any time during game play to pause a current game.
2. When the game begins, bees will fly down from the top of the screen. Spray the bees with your Spray Can
before they can reach the ground. When a bee reaches the ground, a flower will appear in that spot. As more
flowers are planted, you will have less room to move the spray can across the screen, and thus you will not be
able to spray as many bees. When there is no longer any space for you to move, you will lose a spray can and
restart the current level again. If you don't have a reserved spray can, then the game is over.
3. On the first level 10 bees will fly down the screen. With each new level, another 10 bees will be added to the
game, thus increasing the level of difficulty.
4. Each spray can has enough fluid for 42 sprays. As you spray the bees, notice the level of fluid in the spray can
decreases. Your spray can is refilled at the start of a new level. You will receive an additional spray can at
20,000, 40,000, 80,000 points and every 80,000 points thereafter.
5. When you spray a Bee it will turn into Honeycomb. The Bees appear in two colors: yellow, and white. When you
spray a Yellow Bee the Honeycomb will appear Yellow, and when a White Bee is sprayed the Honeycomb will
appear in Red.
10
6. In addition to the Spray Can you will have help from a Hummingbird. The Hummingbird will eat the
Honeycombs. You will receive additional points for the Honeycombs that are eaten. If you shoot a Hummingbird
by mistake, he will turn green and fly away. The amount of points you receive is based on the level and location
of the Honeycomb.
7. Point Values:
Yellow Bees -
100 points
White Bees -
1,000 points
Yellow Honeycombs on the Bottom of screen - 600 points
Yellow Honeycombs in the Middle of screen - 800 points
RED Honeycombs on the Bottom of screen - 1600 points
RED Honeycombs in the Middle of screen - 1800 points
Yellow Honeycombs on the Top of screen -
RED Honeycombs on the Top of screen - 2000 points
1000 points
11
Football
1. On the opening game screen, use the Select button to choose a 1-player or 2-player game. If you choose to
play a 1-player game, you can now choose between skill levels Pro and All Star. Play with 6 defensive players
in the Pro level or 7 defensive players in the All Star level. The All Star level is more difficult than Pro. Press the
Start button to begin the game.
2. Player 1 controls the Home Team and player 2 controls the Visiting Team.
3. The game starts at the 20 yard line. There are four simulated 15-minute quarters (each quarter is equal to 2.5
real minutes).
4. Before each play, a Play Selector Manual appears on the screen. There are a total of 4 different plays (Run,
Pass, Field Goal and Punt) to choose from depending on the game situation. Push the A button to choose your
plays. You can choose to run or pass at anytime during the game. Field Goal can be selected at anytime during
the game, except during the first play following the start of the game and after halftime. Punt can only be
selected on the 4th down.
5. The offensive team has 4 Downs, or chances, to move the ball 10 yards, at which time he is awarded a 1st
Down and begins the sequence of 4 attempts to move the ball another 10 yards. If the offense fails to advance
10 yards within 4 Downs, the ball is turned over to the other team.
6. Run Play: When you are on offense, you control the Ball Carrier and the other player controls the defensive
players. The Ball Carrier and two Blockers always move in formation. Use the directional disc to move the Ball
Carrier and the defensive players.
12
7.Pass Play: The directional disc controls the Receiver on a pass play. Maneuver your Receiver down field and into
horizontal alignment with the QB. When you are ready to pass, press the A button. Once the Receiver catches
the ball, you can control the Receiver just like in a Run play. The QB and Blockers will disappear once the pass is
thrown. An incomplete pass results in a loss of down for the offense. There will be no change in field position. If
you are on defense during a pass play, you can move toward the QB and try for a sack, or cover the Receiver to
try and intercept the pass. Interceptions cannot be returned for yardage gains, they simply result in a turnover at
the spot of interception.
8. Punt: You can only attempt a punt on the 4th Down, by selecting PUNT in the Play Selector Manual. Once you are
in punt formation, press the A button to snap and punt the ball. Then a turnover occurs.
9. Field Goal: Upon selecting Field Goal, a field goal will automatically be attempted. The closer your team is to the
opponent's goal line, the better your chance of scoring a field goal. Earn 3 points for successful field goals, or the
ball will be turned over to the opponent.
10. Score:
a) Touchdown: Earn 7 points for scoring a touchdown by running or passing the football past the opponent's goal
line (0 yard line) and into the end zone.
b) Field Goal: Earn 3 points for a field goal by kicking the football past the opponent's goal line and into the end
zone.
c) Safety: Earn 2 points for a Safety when the opposing team loses yardage in their own end zone.
NOTE: If the line of scrimmage is within 5 yards of the opposing player's end zone, his Pass option will be disabled
and you will be forced to either run the ball in for a touchdown or kick a field goal.
13
Frog Bog
1. On the opening game screen, use the Select button to choose a 1-player or 2-player game. Press Start to select. Then
use the Select button to choose a skill level - Easy, Harder or Hardest. Press the Start button to select and begin playing.
2. Player 1 is the purple frog and player 2, or the computer in a 1-player game, is the white frog. Player 1's score is in the
upper left-hand corner of the screen and player 2's score is in the right-hand corner.
3. Catch as many insects as you can by leaping from lily pad to lily pad. The amount of skill that is required in order to
catch insects is dependent upon the game level you chose to play.
Easy Level: Jump and catch as many insects as you can. Use the directional pad to make your frog
leap left and right from one lily pad to the other.
Harder Level: Jump higher and further to catch as many bugs as you can. Use the directional disc and A button
to make your frog leap, but notice that the longer you hold the A button, the further and higher
your frog with jump.
Hardest Level: Jump higher and further, and flick the frog's tongue to catch as many insects as you can.
Control how far and how high you jump with the directional disc and A button, and press the B
button to flick the tongue. Timing is very important on this level.
4. The insects you eat are worth different amounts of points (see chart to the right).
5. If your frog falls in the water you will have to wait for it to swim back to the lily pad,
while the other player will continue to catch bugs.
6. During the game the sky will change from light to dark as morning turns into night.
When the sky turns black and the stars come out, your frog will go to sleep and the
game is over. The player with the most points wins.
14
Hockey
1. On the opening game screen, use the Select button to choose a 1-player or 2-player game. Press the Start
button to make your choice. Then use the Select button to choose a skill level, Pro or All Star (All Star is more
difficult). If you choose Pro, you will have 18 real seconds to score; if you choose All Star, you will have 12 real
seconds to score. Press the Start button to begin the game.
2. The players skate onto the ice. Player 1 controls the red Home Team and they are on offense. Player 2 controls
the blue Visiting Team and they are on defense. Notice that the player that has possession of the puck and the
player blocking the puck holder are a darker shade of red and blue. As the puck is passed to different
teammates, the color of the players changes, with the darker shades indicating who is in control of the puck.
3. How to Play Offense: One defensive player and a goalie are always trying to block your offense. Pass the puck
quickly between your 5 offensive players and try to create scoring opportunities. Press the A or B button to pass
or shoot the puck.
4. How to Play Defense: Use the left and right sides of the directional disc to move your defensive player to 1 of 7
possible positions. Push the A or B buttons to move the goalie left and right.
5. There are 3 simulated 20 minute periods. Each team is awarded 1 point for every goal scored. The team with the
most points at the end of the 3rd period wins.
15
Long Drive Golf
1. On the opening game screen, use the Select button to choose a 1-player or 2-player game. Press Start to begin
the game.
2. Player 1 controls the red golfer on the left side of the screen. Player 2 controls the blue golfer on the right side of
the screen.
3. In order to hit the golf ball well, the player must hit it powerfully and precisely. The computer will count down from
3 and then the dial on the circular gauge at the center of the screen will begin to move clockwise. This represents
your back swing. The further back you allow the dial to travel, the more powerful your swing will be. Press the A
button to stop this dial and set your back swing. A mark will appear on the gauge. Now the dial will begin traveling
forward. You now must control your aim. Press the A button when the dial travels over the white line. When you
press the A button a mark will appear on the gauge. The closer your mark is to the white line, the straighter your
swing will be. If your mark falls to the left side of the white line, the golf ball will veer towards the right. If your
mark falls to the right side of the white line, the golf ball will veer towards the left.
4. After you have pushed the A button for the second time, you will see how you did. The screen will show a driving
range and you will see your ball travel down the field. The computer will tell you how far you hit the ball and you
will find out who won.
5. The computer keeps track of each players score on a separate scoreboard screen. Following each round, the
player that hit the ball the furthest will be awarded 1 point. Each player gets to hit 11 balls. At the end of 11
rounds, the player with the highest score wins.
16
Maze Shoot
1. On the opening game screen, use the Select button to choose a 1-player or 2-player game. Press the Start button
to make your choice.
2. Press the directional disc or A or B button to start the clock and begin playing. The clock is at the top center of the
screen and counts down from 75. The player's scores are also at the top of the screen.
3. When monsters appear, press the A button to shoot an arrow. Notice that only one arrow can be shot at a time,
and another arrow cannot be shot until the first one has hit it's target or left the screen.
4. Shoot as many monsters as you can before time runs out. You will earn one point for each monster that you hit.
5. Two black treasure chests are on either side of the screen. If a monster reaches your treasure chest, it turns black
and heads for the Pyramid at the top center of the screen. If you let him get away with your treasure, you will lose
a point.
6. Play with a friend in 2-player mode, or play alone. See how many points you can earn before the clock hits 0.
17
Night Stalker
1. On the opening game screen, use the Select button to choose a 1-player game or 2-player game. Press the Start
button to begin.
2. The game begins with your man, or both men if you are playing in 2-player mode, in the center bunker. Loaded
weapons are in the maze somewhere, and they are flashing so you can easily find them. Each man's weapon
matches that man's color. Run over the weapons to pick them up. Each gun has 6 bullets.
3. There are two safe places to hide; inside the bunker, where you started the game, or in the spider's web (the web
is semi-protected). Note, you cannot shoot while you are in the web.
4. Each player has 5 men. If you lose a man, a new one will appear in the center bunker.
5. There are 3 types of enemies int his game: spiders, robots and bats.
Spiders: A single menacing spider creeps through the maze, ready to bite a man if he gets too close. Once the
man is bitten, he falls down paralyzed for a few seconds. When he is down, he cannot fire his weapon or
run, and he is vulnerable to a robot attack. If you kill a spider you will receive 100 points.
Bats: Two bats fly through the maze and will bite a man if he gets too close. A bite from a bat will also paralyze
your man and leave him vulnerable to an attack by a robot. If you kill a bat you will receive 300 points.
Robots: The robot is your man's most persistent and deadliest enemy. The robots will shoot at your man and they
have unlimited amunition. If you shoot a robot, it will explode, but another robot will quickly replace it.
Robots always enter the maze from the bottom left-hand corner.
18
There are 6 different types of robots that appear based on how many points you have earned during the game.
Grey Robot appears if you have earned up to 5,000 points. Receive 300 points for destroying it.
Blue Robot appears if you have earned between 5,000 and 15,000 points. Earn 500 points for destroying it.
White Robot appears if you have earned more than 15,000 points. It takes 3 bullets to penetrate his shield.
Earn 1,000 points for destroying it.
Black Robot appears if you have earned up to 30,000 points. This robot is capable of firing white energy bolts
that absorb bullets. Receive 2,000 points for destroying it.
After 50,000 points the Black Robot will shoot yellow energy bolts and can destroy the bunker.
Invisible Robot appears if you have earned at least 80,000 points. Look for his visible bullets to figure out where
he is. Earn 4,000 points for destroying it.
6. The game ends when all of your men have been killed.
19
Pinball
1. On the opening game screen, use the Select button to choose a 1-player or 2-player game. Press Start to select.
If you choose a 2-player game, you can now use the Select button to choose to play as a team or individually.
Press the Start button to Start the game
2. Controls:
Down Position on Disc: Press lower part of the directional disc to pull the plunger back. Release the disc to shoot
the ball into play. The longer you hold disc down, the faster the ball will go.
A Button: Left Flippers.
B Button: Right Flippers.
3. If you are playing in Team mode, player 1 controls the launching of the ball and the upper flippers and player 2
controls the bottom flippers.
4. There are three different layouts. Each has its own unique bumper and point scoring system.
5. The Second and the Third Screen does not have the ball launching option.
6. Cartoon animals (Mice & Panda) at the bottom of the screen tell you who is up. When the left animal blinks, it's
the 1st player's turn. When the right animal blinks then it is the 2nd player's turn.
7. The bottom left hand portion of the screen will display the 1st player's score and on the bottom right will display
the 2nd player's score.
8. The upper portion of the screen will display the number of the balls you have remaining.
20
9. When the number of the balls remaining reaches 0 then the game is over.
Soccer
1. On the opening game screen, use the Select button to choose a 1-player or 2-player game. Press the Start
button to start the game.
2. When the game begins the players will be assembled at the top of the screen. Player 1 controls the Yellow
Team and player 2, or the computer if playing a 1-player game, controls the Blue Team. Press the Start
button and the 6 players will take the field.
3. There are two simulated 45-minute halves. The clock and score boards are at the top of the screen. If
necessary, there is also a simulated 7-1/2 minute overtime period.
4. Use the directional disc to control the movement of your players. Press the directional disc and the A button
to pass or shoot the ball. Press B Button to swap player closest to the ball to catch the ball. Note, some of
your players are controlled by the computer and will automatically pass or catch the ball.
5. Earn 1 point for each goal scored. At the end of the second period, the team with the most points wins. If the
game goes into overtime, the first team to score will win the game. If neither team scores during overtime,
the game will end in a tie.
21
Space Armada
1. On the opening game screen, use the Select button to choose a 1-player or 2-player game. Press the Start
button to begin the game.
2. When the game begins, there will be 32 moving targets arranged in 4 rows. You have 6 laser guns, one visible
at the center of the screen and 5 more in reserve, and 3 protective bunkers. The targets move left and right
and the entire Armada descends every time a target reaches either side of the screen.
3. To hit a target, use the directional disc to move your laser left or right. When you are clear of the bunkers, fire
your laser by pressing the A button. You have unlimited ammunition, but you can only shoot fast enough to
allow one laser round on the screen at a time. If you clear all 32 targets, you will have to battle another
Armada.
4. Every time a bomb hits one of your bunkers, it chips a piece away.
5. The first Armada attack consists of white bombs that move slow enough to get out of the way. By the fourth
battle, you will have to destroy red bombs that explode on impact with the ground.
6. Hit the red flying saucers to rebuild your bunkers.
7. If the targets reach the ground or you run out of laser guns the game is over.
22
Space Gunner
1. On the opening game screen, use the Select button to choose a 1-player or 2-player game. Press the Start
button to begin the game.
2. Press the directional disc or A or B button to start the clock and begin playing. The clock is at the bottom
center of the screen and counts down from 75. The players scores are at the top of the screen.
3. Player 1's gunsight is yellow and player 2's gunsight is purple. Use the directional disc to move your
gunsight around the screen. When a target flies in your gunsight, press the A button to fire.
4. Shoot as many targets as possible before time runs out. Look out for bunches of targets; it's possible to get
6 at once!
23
Tennis
24
1. On the opening game screen, use the Select button to choose a 1-player or 2-player game. Press the Start button
to begin the game.
2. Player 1 controls the red player on the left side of the screen and player 2 controls the blue player on the right side
of the screen.
3. Use the B button to serve the ball. Press the B button once to toss the ball into the air, press the B button a
second time to swing at the ball and serve.
4. Use the directional disc to move your player across the court.
5. Press the A button to hit the ball to the other side of the court.
6. If a serve is good, the opponent hits the ball back across the net and the play continues until one player misses the
ball or hits it out of bounds. The other player will win the point.
7. A Fault is when a server misses the ball or the serve lands outside the opponents court. Two Faults will result in a
point for the other player.
8. A Let occurs when the ball is served and it touches the net before landing in the opponent's court. The player must
serve the ball again. There is no limit to the number of Lets that can occur.
9. A return is not good if the player allows the ball to bounce more than once on his court, if the player misses the
ball, or if the player hits the ball out of bounds.
10. Following a serve, the player must let the ball bounce once in his court before hitting it. If the player hits the ball
before it bounces, he will lose a point.
11. To win the Match, the player must win 3 out of 5 Sets. Each Set consists of 6 games.
12. In a Game, your first point is displayed as 15, your second point as 30, your third point as 40. A tie at 40 or over
is a Deuce. One point following a Deuce is an Ad. Two points following a Deuce is Game.
This device complies with the part 15 of the FCC rules. Operation is subject to the following two conditions: (1) This device may not cause
harmful interference, and (2) this device must accept any interference received, including interference that may cause undesired operation.
Warning: Changes or modifications to this unit not expressly approved by the party responsible for compliance could void the user’s
authority to operate the equipment.
Note: This equipment has been tested and found to comply with the limits for a Class B digital device, pursuant to Part 15 of the FCC Rules.
These limits are designed to provide reasonable protection against harmful interference in a residential installation. This equipment
generates, uses, and can radiate radio frequency energy and, if not installed and used in accordance with the instructions, there is no
guarantee that interference will not occur in a particular installation. If this equipment does cause harmful interference to radio or television
reception, which can be determined by turning the equipment off and on, the user is encouraged to try to correct the interference by one or
more of the following measures:
• Reorient or relocate the receiving antenna.
• Increase the separation between the equipment and receiver.
• Connect the equipment into an outlet on a circuit different from that to which the receiver is connected.
• Consult the dealer or an experienced radio TV technician for help.
Shielded cables must be used with this unit to ensure compliance with the class B FCC limits.
25
Questions? Comments?
Visit our website at:
www.technosourceusa.com
Product specifications and colors may vary.
TM
www.technosourceusa.com
© 2005 Techno Source
All Rights Reserved
30 Canton Road
Kowloon, Hong Kong
Made in China
© 2005 Intellivision Productions, Inc.
All Rights Reserved
Intellivision is a trademark of Intellivision Productions, Inc.
Original games have been modified for optimal play on this device
Visit us at our website : www.intellivisionlives.com
IM-10435