1
Instruction Manual
King
Flash E-TTL Trigger
For Canon
Overview
Thank you for purchasing PIXEL product
Thank you for purchasing the Pixel product --- King. King achieves high-sync flash
shooting with Canon cameras and other creative lighting function including E-TTL II,
E-TTL, FP… etc. King supports shutter speeds up to 1/8000 s. King has 3 different
groups; each group can use multiple units and set each as individual power settings.
When using the EOS EXII series flash, you can set the flash power in the camera
menu, directly.
Please read this instruction manual completely and ensure proper operations with
your flashgun before using this product.
Cautions
1.
Make sure the camera and flash are powered off before installing the King.
2. As an electronic accessory this may be affected by rare environmental causes.
Normal working operations should not be affected by this.
1
3. Drops or shocks will lead to product failure.
4. When not in use for long durations, please turned off the transmitter and the
receiver's power and remove the battery.
5. The batteries should be installed correctly. Reverse polarity may cause
batteries to leak corrosive liquids, heat or explosion.
6. When connecting the cable with the device, do not pull directly on the wires.
7. Do not store in a high temperature, such as an enclosed car under direct
sunlight, the dashboard and other high-temperature areas.
8. Keep dry, do not contact wet hands with the product. Do not immerse in water
or exposed to rain as this may lead to failure of the device.
9. Do not use near flammable gases. Failure to follow this warning may cause
explosion or fire.
10. This product includes batteries; please strictly follow the instruction for proper
operation. Failure to follow this may cause explosions, fire or personal injury.
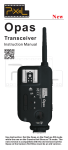
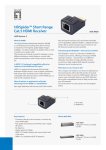
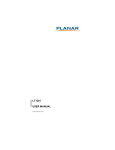
Included items
Please check the listed items below in the package, please contact your dealer if
there are missing items.
King Transmitter
1pc
King Receiver
1pc
PC-1/4 Connecting Cable (6.35mm)
1pc
PC-3.5 Connecting Cable
1pc
USB 2.0 Cable
1pc
Hot Shoe Protector
2pc s
Receiver Holder
1pc
Universal Flash Holder SF-18
1pc
Instruction Manual
1pc
Hot Sho e Pr ot ec tor
Receiver Holder
PC-3.5 Connecting Cable
PC-1/4 Connecting Cable (6.35mm)
Universal Flash
Holder SF-18
2
King Basic
Wireless System
System Mode
Digital FSK 2.4GHz
Distance Range
Up to 100M
Wireless Channel
7
Performance
Flash Mode
E-TTL、TTL、M
Sync Mode
1st Curtain, 2nd Curtain, High Speed Sync
Group Control
3 different groups (7 different combinations)
Function
King supports flash zooming, focal length, ISO,
shutter speed, FV lock and FP
Sync Speed
1/8000S
Compatible Flash
Flashgun, Studio light and outdoor light
Focusing light
Transmitter support with focusing light
Trigger Mode
Transmitter
Input support PC and Hot shoe.
Receiver
Output support TTL, Hot shoe and connecting cable socket.
Socket
Transmitter
USB, PC, Cable input socket, Hot shoe input
Receiver
USB, PC, Cable output socket, Hot shoe output
Power
Suitable Battery
TransmitterAA x 2pcs(support 1.2V rechargeable battery)
or DC 5V power
ReceiverAA x 2pcs(support 1.2V rechargeable battery)or
DC 5V power
Transmi tter 300Hr s ( AA 1.2V 2400mAH rechargeable battery )
Standby
Receiver 200Hrs(AA 1.2V 2400mAH rechargeable battery)
3
Function
Support flash power in camera menu
Support EV
Support FE lock
Support camera group setting
Support 3 flashes output as different power
Support flash group setting on transmitter
Support 1st Curtain, 2nd Curtain and High speed sync
Support High speed sync for studio and outdoor light
Support well known brand flashes for High speed sync and TTL. (Metz, Sigma, Sunpak, Nissin)
Support well known brand flashes for trigger. (Does not support high speed sync and TTL flash)
Support firmware upgrade
Support multi receiver control
Support flash focusing light
When King is used with EOS EXII flash, flash power can be adjusted in camera menu.
Follow camera instructions for above usage.
Device does not support:
Do not support flashes using mixed modes, such as E-TTL and M together
No support for strobe mode
No support for Canon wireless flash system
No support for bracket exposure
No support for directly controlling flash mode and power for EX series flash as camera menu
Receiver does not support camera shutter and flash trigger at the same time.
Transmitter's hot shoe is NOT used for flashgun
4
Compatible Device
King transmitter compatible with
For the camera co m patible list, please kindly to visit our website
http://www. pixelhk.com
King receiver compatible with
Canon EOS flash
Canon EOS 580EXII、580EX、430EXII、430EX、320EX、270EXII、220EX Flash
Aftermarket flash
Metz, Sigma, Sunpak, Nissin
Studio and outdoor flash
Support external flash control in camera menu
450D、500D、550D、600D、40D、50D、60D、7D、
5D Mark II、1D Mark III、1D Mark IV、1Ds Mark III
This function can be controlled the flash directly from camera menu.
Support camera external flash control flashgun
Canon 580EX、580EX II、430EX、430EX II
Metz AF-48、AF-50、AF-58
* All brand name ( s ), logo ( s ) are trademarks of third party company registered worldwide
and were subject ( s ) as provided for information purposes only .
Using non compatible with menu setting camera model as below:
1、Canon 10D、20D、30D、5D、300D、350D、1D、1D Mark II.
2、Above camera model do not have external flash function setting in camera menu;
you can only set the channel and group on transmitter.
5
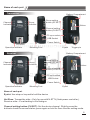
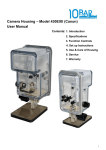
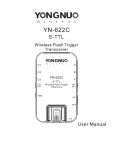
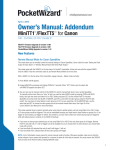
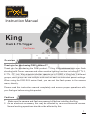
Name of each part
Transmitter
{
Channel
Indicator
Battery Compartment
Gr oup
{Indicator
Group setting
button (GP SET)
Sticker
Channel setting
button (CH SET)
PC sync socket
USB Socket
Power Switch
Hot Shoe
Operation Indicator
Eyelet
Mounting Foot
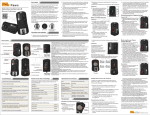
Receiver
{
Channel
Indicator
Trigger pin
Battery Compartment
Gr oup
{Indicator
Group setting
button (GP SET)
Sticker
Channel setting
button (CH SET)
PC sync socket
USB Socket
Power Switch
Hot Shoe
Operation Indicator
Mounting Foot
Eyelet
Name of each part
Eyelet: Use strap or lanyard to hold the device
Hot Shoe: Transmitter side---Only for use with N-ETTL (flash power controller).
Receiver side---For attaching to the flashgun.
Channel setting button (CH SET): Set the device channel. Slightly press the
buttonto check the current status; press again or hold for 2sec to enter setting mode.
6
Group setting button (GP SET): Set the device group. Slightly press the button
to check the current status; press again or hold for 2sec to enter setting mode.
Channel Indicator/Group Indicator: These indicator lights show the group or
channel working status.
Operation Indicator: Power, wireless communication or command indicator.
Indicator displays as red when turning on the device; indicator displays as blue
when the device communicate with camera.
Battery Compartment: Compartment for 2pcs AA battery, 1.2V to 1.6V
Receiver Lock Ring: Suitable to attach on tripod or screw nut.
PC Socket: PC output socket
Power Switch: Switch to OFF to turn off the device; switch to ON to turn on the
device.
Transmitter Mounting Foot: Input interface connection with camera hot shoe.
UBS Socket: Used for firmware upgrade, DC 5V power supply, shutter rem
Sticker: Showing product S/N number, battery type on the sticker.
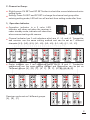
1、Power
Transmitter and receiver are
using 2pcs AA battery which are
compatible with 1.2V battery;
also supports 5V DC power
supplied through USB socket.
King is using 2-steps power
switch; switch to OFF to turn off
and switch to ON to turn on.
The setting will be saved after the power is off, even the different setting on
each channel.
7
2. Channel or Group:
Slightly press CH SET and GP SET button to check the current status and enter
setting mode.
Setting: Press CH SET and GP SET to change the channel and group after
entering setting mode; LED will turn off and exit from setting mode after 3sec.
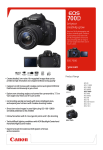
3、Operation Indicator
Operation indicator is a 2 color LED.
Indicator will show red when the receiver is
under standby mode; indicator will show blue
when communicating with camera.
Standby
Communicating
Channel indicator has 3 red indicators which are L1, L2, and L3. Transmitter
and receiver use the same setting method and can be set as 7 different
channels. [L1]、[L2]、[L3]、[L1、L3]、[L2、L3]、[L1、L2]、[L1、L2、L3].
CH
SET
CH
SET
CH
SET
CH
SET
CH
SET
CH
SET
CH
SET
Group indicator are 3 red indicators which are A, B and C. Transmitter
andreceiver use the same setting method and transmitter can be set as
7different groups. [A]、[B]、[C]、[A、C]、[B、C]、[A、B]、[A、B、C].
GP
SET
GP
SET
GP
SET
GP
SET
GP
SET
GP
SET
GP
SET
GP
SET
GP
SET
GP
SET
Receiver can be set as 3 different groups.
[A]、[B]、[C].
8
4、Socket
PC Sync Socket:
PC sync socket on receiver is for connecting with studio or outdoor light. Some
flashes can work with high speed sync (we will indicate the compatible flashes on
our website).PC sync socket on transmitter is not functioning at this moment; we
will update the information on the website http://www.pixelhk.com
USB Socket
A. Upgrade the firmware through this socket
B. 5V DC power supply through this socket
C. The socket on receiver also works with shutter control, compatible cables are
shown on http://www.pixelhk.com
5、Hot Shoe
Hot Shoe:
Transmitter hot shoe is not support for flashgun. This is for PIXEL product NETTL accessory which can be controlled flash power for each group. Please
kindly to ready this accessory instruction for more information.
Attach the flash on receiver hot shoe which can be adjusted flash output through
the hot shoe pins.
Flashgun attached on receiver hot shoe. When using non compatible flash, this is
only manual trigger and shutter speed up to 1/250S.
Hot Shoe Foot
Attach transmitter hot shoe foot on camera. When using with Canon EOS camera
which can be controlled the flash by E-TTL or manually to adjust the flash power.
When not using Canon EOS camera which cannot be controlled the flash by ETTL; only manually trigger and the shutter speed up to 1/250S.
9
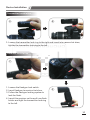
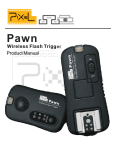
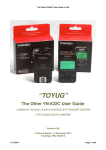
Device Installation
Transmitter Installation
A
B
1. Loosen the transmitter lock ring to the right and insert into camera hot shoe;
tighten the transmitter lock ring to the left.
Receiver Installation
C
1. Loosen the flashgun lock switch.
2. Insert flashgun to receiver hot shoe.
3. Follow the flashgun locking system to
lock the flash.
4. Insert this receiver on the multi use flash
holder and tight the transmitter lock ring
to the left.
D
E
10
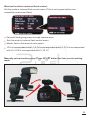
Device Operation Mode
A. Transmitter side: Channel as L1, Group as ALL; Receiver side:
Channel as L1, Group as A
B. Transmitter Operation Mode:
1. ransmitter and camera set as E-TTL
2. Turn on transmitter and the status as below:
1.E-TTL II Flash Mode: E-TTL II
2.Shutter sync.: Hi-speed
3.Exp. Comp.: 0
3. Separate to purchase N-ETTL and use on transmitter hot shoe.
4. Set the channel and group through CH SET and GP SET button.
5. The setting will be saved after the power is off, even the different setting on each
channel.
C. Receiver Side Operation Mode:
1. Receiver will follow the transmitter data to set the flash mode, output, sync speed,
EV, zoom…etc.
2. The indicator flashes as blue when working normal.
3. Receiver default setting from factory.
1.E-TTL II Flash Mode: E-TTL II
2.Shutter sync.: Hi-speed
3.Exp. Comp.: 0
D. This product cannot support Canon external flash wireless function.
E. This device supports to set the flash output through camera.
(This is only compatible with the camera and flash which is supported this mode)
11
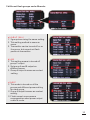
The instruction as below is only for the compatible flash and camera.
External flash function setting in camera menu:
E-TTL II mode:
A
After the installation, press MENU
button and enter to External flash
function setting.
C
Exposure compensation setting can
be set as short-cut menu or camera
button. (Depend on the camera model)
B
Switch flash mode to manual flash
or E-TTL II
D
Zoom setting: Auto or Manual
E
Shutter sync setting: 1st curtain, 2nd curtain, hi-speed. (Default as hi-speed)
12
Manual Mode:
When using with studio light, the flash mode in camera manual must be set as TTL mode
Switch flash mode to manual flash or E-TTL II
Flash power setting(430EX II flash mini output as 1/64.)
Shutter sync setting: 1st curtain, 2nd curtain, hi-speed. (Default as hi-speed)
Zoom setting: Auto or Manual
13
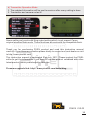
Wireless function in external flash control:
Set this mode in external flash control menu.(This is only support with some
compatible camera and flash)
Set each flash group power through camera menu.
Set this mode in external flash control menu.
Master flash in this menu is not support.
1CH is corresponded with L1; 2 CH is corresponded with L2; 3 CH is corresponded
with L3; 4 CH is corresponded with L1,L2,L3.
Manually set transmitter group. Press GP SET button for 2sec to enter setting
mode.
14
3 different flash groups under M mode:
a) A+B+C(ALL)
1. 3 groups are using the same setting.
2. This setting method is same as
menu.
3. Transmitter can be turned off or on
the group, but cannot set flash
power on transmitter.
b) A:B
1. This setting means is turned off
group C output.
2. Set group A and B output as
different power.
3. Group A output is same as content
setting.
c) A:B C
1. This mode is turned on all the
groups and different power setting
for each group.
2. Group A output is same as content
setting.
3. Flash cannot use exposure
compensation when power output
under M mode.
15
d) Transmitter Operation Mode
1. The updated information will be sent to receiver after every setting is done.
2. Transmitter and camera set as M
Above setting only work with King output setting which is not support Canon
original wireless flash mode. Those functions are work with the compatible flash.
Thank you for purchasing PIXEL product and read this instruction manual
carefully. If you have any question please kindly to contact our local dealer or visit
to http://www.pixelhk.com
This instruction manual is updated at 01st July, 2011. Please contact the PIXEL
seller to get the information if you want to use this product combined with other
latest product, which published after this date.
Firmware upgrade link: http//: www.pixelhk.com/down/king
PSM15 V10.02
16