1
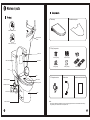
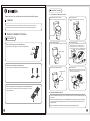
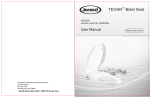
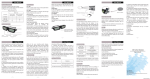
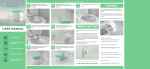
FB104/FB105/FB106
FB107/FB108/FB109
FB104
FB105
1
FB106
2
FB107
3
FB108
4
5
6
FB109
Product Maintenance
9
9
9
1.Main body
2.Installation template
Water inlet on the left
Dismantlement
button
Water inlet on the right
3.Fixing Components
Seat cover
Connecting bolts(2)
Water tanks
Expansive nuts(2)
Alert sticker
Nut(2)
or
Sliding plates(2)
Rubber gasket(2)
Adaptable panel
Lever
Seat
Water supply hose
5.T-shaped connector
6.Water hose
7.Installation and User Manual
Bidet nozzle
Cleaning nozzle
Installation and User Manual
T-shaped connector
Shutoff valve
Bowl
Filter
Water inlet hose
Note:
There are two methods for installation. The way of employing expansive nuts is recommended. Another way is
using butterfly nuts. Please choose one for specific case.
Installation Procedure
First installation method (recommended):
Please make sure you read the instructions carefully and install it properly.
Cautions
1.Dismantle the old seat and seat lid.
Loose the hinge and remove the old seat and seat lid.
2.Install expansive nuts
As figure, insert expansive nuts in the holes of the
ceramic.
1. The water pressure limit is from 0.07 to 0.8 MPa (10 to116 PSI ). Please use as instructed.
2.The water shutoff valve should be near where the product can be installed and dismantled.
Product Installation Procedure
Seat and seat lid
Pre-installation
1.Stick the rubber gaskets on the adaptable panel.
3.Install installation template
As figure, install the installation template on the ceramic.
As figure,stick the rubber gaskets on the slots in the adaptable panel.
Installation template
4.Fix the adaptable panel
As figure, take the adaptable panel to the holes of the
ceramic.Adjust position for connecting bolts and
adjusting pieces, make the connecting bolts aim at
according expansive nuts. Then fix the adaptable panel.
Keep the side with FRONT up
Installation
template
*Nut is supposed to be used for
the second method.
2.Insert the connecting bolts in adjusting pieces.
As figure,insert the connecting bolts in the boles of adjusting pieces.
5.Take away the installation template
Installation template
6.Install the product
Keep the fix slots under the product aim at slots on the
adaptable panel. Push the product to the end as figure
below.Then completes installation.
The fix slots under
the product
3.Insert connecting bolts with adjusting pieces in the adaptable panel.
As figure,insert the connecting bolts in the boles of adjusting pieces in the holes
of the adaptable panel.
Second installation method
1. Refer to first installation method step 1 and 3. Dismantle the old seat and lid. Put the installation template on
the ceramic.
2. Refer to fist installation method step 4. Take the adaptable panel to the holes of the ceramic. Adjust position
of the connecting bolts with adjusting pieces. Screw in the nuts form underside of the ceramic.Then fix the
adaptable panel.
3. Refer to first installation method step 5 and 6. Complete following installation procedure.
Connecting water hose
1. Close the water valve and detach water pipe from
the water tank. Connect the t-shaped connector to
the water tank. Make sure that rubber packing is
inserted in between.
WASH
Turn the lever clockwise from the horizontal position.
Nozzle for WASH moves forward and start the function.
2.Connect the water pipe to the t-shaped connector.
Note: Please remove the regulator cover and regulate o-ring under the following conditions:
a.When the water dynamic pressure is lower than 0.05MPa, especially using
the family tank.
b.When the nozzle cannot work normally and water is low.
1、Take out the regulator with pliers and other tools.
2、Remove the regulator cover and regulate o-ring except the sealing o-ring.
3、Insert the regulator component into the inlet pipe.
Caution: Must use the regulator cover and regulate o-ring when the water pressure
is bigger than 0.1MPa.
Regulator
1
Sealing
Regulate o-ring
o-ring
Regulator
cover
The water volume changes with the turning of lever.
BIDET
3
Turn the lever anticlockwise from the horizontal position.
2
Nozzle for BIDET moves forward and start the function.
3. Press the filter and washer at the two ends of
water hose into the screw tube, then connect the
main body and T-shaped connector with water hose.
4. Open the water valve to check if there is any
leakage.
The water volume changes with the turning of lever.
Washer
STOP
Filter
During wash or bidet status, rotate the knob to horizontal
and stop douche.
Nozzle moves back to original position.
1.Do not lift the product with the seat cover and seat open.
This may cause a mechanical trouble.
Prohibition
2.Cannot use with the hot water which temperature is higher
than 40 ° C .
The water volume changes with the turning of lever until
totally shut off.
5 Product maintenance
1.Clean the outside parts of the product.
2.Clean the nozzle
1. Lever replacement
2.Nozzle replacement
Use a smooth sponge/cloth with diluted kitchen
detergent to clean the product.Do not use the
following types: hydrogen chloride detergemt,
paining thinner, benzene, abrasive paper, polishing
agent, fragrance and insecticide, etc.
Pull out the nozzle softly and use smooth
cloth/sponge or toothbrush with kitchen
detergent to clean the nozzle.
As per figure A,Remove the old lever along the
axis direction.
As per figure B, insert the new lever rib into the
corresponding control valve slot. The installation
is completed with a “click” sound.
As per figure A, Pull out the tube and do not release
then remove the old nozzle along the axis direction.
As per figure B, insert the new nozzle into the tube
along the corresponding slot. The nozzle
replacement is completed.
Paining thinner
Insecticide
A
A
B
B
Abrasive paper
nozzle
3.Clean the filter and regulator
4. Remove the main body.
3. Regulator replacement
4. Water hose leaking solution
(If the water flow is smaller than usual)
1、Clean the filter for both sides. Make sure to
disconnect the water supply hose during cleaning.
2、Clean the regulator o-ring (See the step 2 on the
page 5 to find how to remove and install the
regulator o-ring).
Close the lid. Push the dismantlement button and
pull out the product as the arrow the figure. Then
the product will be dismantled.
Rotate the lever in the working position, clip out the
regulator from the inlet tube by pliers.
Press the new regulator into the bottom of the inlet
tube. The regulator replacement is completed.
Then rotate the lever back to non-working position.
If water leaks from the two ends of water hose,
re-tighten the nuts to avoid water leaking.
Braided hoses
Dismantlement button
Filter
Regulator
Regulator
6
Self Diagnosis and Trouble shooting
Status
Cause
Water is too low during
WASH/BIDET
No water comes out
during WASH/BIDET
Solution
1. Low water pressure of the unit
During WASH/BIDET, turn the lever fast to biggest volume
2. Low water pressure of water supply
When water supply pressure is lower than 0.7kgf/cm , contact
local department for water pressure question
1. Water shut-off valve is turned off
Turn on the water shut-off valve
2. Filter net of T-shaped connector is stuck
Clean the filter net of T-shaped connector
3.Filter net of water inlet hose is stuck
Clean the filter net of water inlet hose
4. Nozzle head is stuck
Take off and clean the nozzle head.
5. External water pressure is low
Increase external water pressure.
Water dropping from bowl
External water pressure is too big
when using the unit
The maximum water pressure of the unit is 0.8MPa . If water supply
pressure is higher than that, please contact local department for water
pressure question.
If any failure still occurs after above trouble-shooting, please contact local service.
Caution
Do not disassemble, repair or remodel the unit.
Specifications
Classification
Model No.
FB104、FB105、FB106、FB107、FB108、FB109
WASH water flow
0.35 - 1.8 L/min
BIDET water flow
0.35 - 1.8 L/min
Backflow Prevention
Check valve, vacuum breaker
Water Supply
Direct from water pipes
Water Pressure Range
Static pressure:0.07- 0.8 MPa,Dynamic pressure:above 0.03MPa
Dimensions
Weight
9
Description
FB104、FB105、FB109
370X500X60mm
FB106、FB107
370X500X62mm
FB108
370X480X62mm
FB104: 2.23
KG
FB107: 2.08
KG
FB105: 2.22
KG
FB108: 2.00
KG
FB106: 2.09
KG
FB109: 2.16
KG
Thank you for choosing the product! If failure or damage occurs, please
check the product based on the trouble shooting guide in this manual first.
If the failure/damage could not be fixed, please contact the retailer or local
service center with proof of purchase.