1
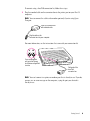
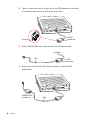
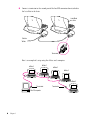
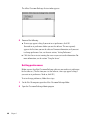
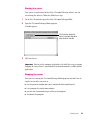
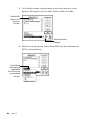
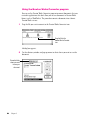
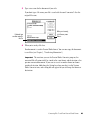
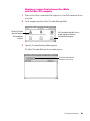
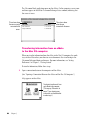
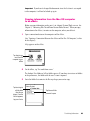
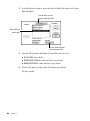
1 Getting Started The eMate Classroom Exchange software allows you to connect one or several eMates to a Mac OS computer and transfer information between the eMate devices and the computer simultaneously. Using the eMate Classroom Exchange software, you can m copy or move information from an eMate to the Mac OS computer m copy information from the computer to an eMate m convert documents to or from Newton Works format on the computer You can convert documents created in word processing and drawing applications that support and have Claris XTND translators, such as the ClarisWorks, MacWrite II, and MacPaint applications. You can also transfer any RTF (rich text format) document. m install packages, such as applications and system updates, from the computer to the eMate How does the software work? The Mac OS computer running the eMate Classroom Exchange software is a “server” to which you connect one or several eMates. A server is a computer on a network that provides a service to others on the network. In this case, the server allows users to transfer documents and install packages. 1 To set up the network, you’ll first need to install the eMate Classroom Exchange software on a Mac OS computer. You can then physically connect the eMates to the computer using cables and start the eMate Classroom Exchange software. You’ll also need to set preferences for the software. These steps are described in the sections that follow. Requirements You’ll need the following hardware and software in order to use the eMate Classroom Exchange software: m The eMate Connectivity CD, where the eMate Classroom Exchange software is stored m A Mac OS computer with the following: m a 68020 processor or better, or a PowerPC™ processor m system software version 7.1 or later m 500K RAM available (750K is needed for PowerPC computers that have virtual memory turned off ) The amount of memory you need depends on the number of eMates you have connected and the amount of information that you’re transferring. m If you’re using an AppleTalk network, you’ll need one LocalTalk connection kit for each eMate you are connecting to the computer and one kit for the computer itself. m If you’re using a serial connection to connect one eMate to the computer, you’ll need a serial cable with a DIN-8 connector on each end. m One or more eMates (The number of eMates you can connect and the rate of information transfer depends upon the type of computer you are using. The software can support up to 16 simultaneous connections.) 2 Chapter 1 Optional m ClarisWorks m At Ease 3.0 or later (earlier versions of At Ease are not supported) Before you use the eMate Classroom Exchange software, please read the ReadMe file that’s included with the software to find out important, late-breaking information. Important Installing the eMate Classroom Exchange software onto a Mac OS computer The eMate Classroom Exchange software is on the eMate Connectivity CD that came with your eMate. For instructions on how to install the software onto a Mac OS computer, see the booklet that came with the CD. Components of the eMate Classroom Exchange software The following files are installed in the eMate Classroom Exchange folder, unless otherwise specified: m ReadMe—This document provides the latest information about the eMate Classroom Exchange software. m Classroom Exchange Admin—This program allows the teacher or administrator to set preferences, view the eMate users connected to the computer, and start or stop the server. m Newton Works Converter—This application converts documents created in applications that don’t support saving into Newton Works format in the Claris XTND system. m Classroom Exchange Server—This program allows the Mac OS computer to be used as a server. The software is installed in the Extensions folder within the System Folder. m Newton Works—This Claris XTND filter allows you to convert Newton Works word processing or drawing documents to and from formats that can be used by software programs on the Mac OS computer. It’s installed in the Claris Translators folder in the Claris folder, within the System Folder. Getting Started 3 Once you’ve installed the software onto the computer, see the next section, “Connecting eMates to a Mac OS computer.” Connecting eMates to a Mac OS computer You can connect the eMates to a Mac OS computer in the following ways: m via an AppleTalk network, you can connect one or several eMates m via a serial cable, you can connect a single eMate Connecting over an AppleTalk network If you have an AppleTalk network, you can connect the eMates in a “chain” to a Mac OS computer using any type of LocalTalk connection kit. See an authorized Apple service provider to purchase kits. Note: You’ll need one LocalTalk connection kit for each eMate you are connecting to the computer and one kit for the computer itself. In certain configurations, where an AppleTalk network is connected directly to an EtherTalk network, a LocalTalk connection kit for the desktop computer may not be necessary. Cable LocalTalk connector box with attached cable 4 Chapter 1 To connect using a LocalTalk connection kit, follow these steps: 1 Plug the rounded cable on the connector box to the printer port on your Mac OS computer. Note: You can connect the cable to the modem port only if you’re using Open Transport. LocalTalk connector box with attached cable Plug the cable on the connector box into your computer. For more information, see the instructions that came with your connection kit. W [ If you use the printer port, go to the Chooser and make sure AppleTalk is active. Cable end of the LocalTalk connector box Note: You can’t connect to a printer or modem port that is already in use. If you do, you may see an error message on the computer, saying the port you selected is already in use. Getting Started 5 2 Connect a terminator to one of the ports on the LocalTalk connector box. You need to attach terminators to the first and last boxes in the chain. LocalTalk connector box Terminator 3 Attach a LocalTalk cable to the other port on the LocalTalk connector box. To computer Cable 4 Plug the other end of the LocalTalk cable into a port on a second LocalTalk connector box. Second LocalTalk connector box 6 Chapter 1 LocalTalk connector box Cable 5 Plug the rounded cable on the LocalTalk connector box into the serial port on the first eMate. Serial port ¯ Cable of the LocalTalk connector box 6 To connect another eMate, attach a LocalTalk cable from the second port on the LocalTalk connector box to a port on another LocalTalk connector box. ¯ To desktop computer 7 ¯ Cable to next eMate Continue attaching cables to LocalTalk connector boxes and connecting the cables on the boxes to the serial ports of the eMates until you’ve connected the last eMate. Getting Started 7 8 Connect a terminator to the second port of the LocalTalk connector box attached to the last eMate in the chain. Last eMate in chain ¯ ¯ Cable to eMate Terminator Here’s an example of a setup using five eMates and a computer. eMate 2 eMate 1 eMate 3 eMate 4 eMate 5 Terminator Mac OS computer 8 Chapter 1 Terminator 9 10 Select the Chooser from the Apple () menu. If AppleTalk is not active, click the AppleTalk Active button. If instructions appear on screen, follow them. Make sure AppleTalk is active. Connecting a single eMate using a serial cable You can connect a single eMate to the printer or modem port on the back of the Mac OS computer using a serial cable with mini-DIN-8 connectors on both ends (available from an Apple-authorized service provider). Standard serial cable Getting Started 9 1 Plug one end of the serial cable into the printer port ([), modem port (W), or printer/modem port (´) on your Mac OS computer. W [ [W Serial cable Note: You can’t connect to a printer or modem port that is already in use. If you connect your eMate to a Performa that has an internal modem, make sure the modem is set to Normal in the Performa Setup control panel. 2 Plug the other end of the serial cable into the serial port on the eMate. Serial port ¯ Serial cable 10 Chapter 1 Disconnecting eMates You can disconnect an eMate from the Mac OS computer or AppleTalk network at any time. Note: Do not disconnect an eMate while information is being transferred. m If the eMate is on an AppleTalk network, unplug the cable of the LocalTalk connector box from the serial port of the eMate. m If the eMate is connected to the computer using a serial cable, unplug the serial cable from the serial port on the eMate. Starting the Classroom Exchange Admin program 1 On the Mac OS computer, open Classroom Exchange Admin. Double-click this icon to start the Classroom Exchange Admin program. Note: Several folders are automatically created the first time you start the Classroom Exchange Admin program. The Student Data folder stores user data and the Shared folder stores documents that can be accessed by all users. Another folder, Plug-ins, stores information on Newton Works stationery developed by third-parties. For more information about using these folders, see Chapter 3, “Transferring Information.” Getting Started 11 The eMate Classroom Exchange Status window appears. 2 Do one of the following: m If a message appears asking if you want to set preferences, click OK. You need to set preferences before you use the software. This message only appears the first time you run the software. For more information, or if you want to change preferences later, see the next section, “Setting Preferences.” m Click Start Server to start running the server so you can transfer information. For more information, see the section “Using the Server.” Setting preferences Before you use the eMate Classroom Exchange software, you need to set preferences for the software. (The first time you start the software, a message appears asking if you want to set preferences. To do so, click OK.) To set or change preferences, follow these steps: 12 Chapter 1 1 On the Mac OS computer, open the eMate Classroom Exchange folder. 2 Open the Classroom Exchange Admin program. 3 Open the Edit menu and choose Preferences. The Preferences dialog box appears. 4 Choose your preferences. Review the following information to find out your options. Getting Started 13 Listen for connections on This option specifies how the eMates are connected to the Mac OS computer. m If you’re connecting using LocalTalk kits, make sure the “AppleTalk network” box is selected. m If you’re connecting one eMate using a serial cable, click the box for the port you are connected to (printer or modem). You can only use this option if the port you specified is not being used by AppleTalk or another application. Backup This lets you choose the type of eMate information you want to back up to the computer. m Click “Newton Works only” to back up only Newton Works items. For example, if Notes is available to users in the Extras Drawer on the eMate (in Classroom Mode) and a user creates a report outline in Notes, the information would not be transferred to the computer, since it’s not a Newton Works item. m Click “Newton Works and selected applications” to back up all Newton Works documents and data from all applications in the Classroom Extras Drawer on the eMate. Note: eMate Classroom Exchange backs up only applications available in the Extras Drawer in Classroom Mode, even if you are using the eMate in Full Newton System mode. If an application doesn’t appear, however, in the Edit Extras slip of the Classroom Dock application, you won’t be able to back it up using eMate Classroom Exchange. You can use other connection software, such as the Newton Connection Utilities, to back up these applications. For more information about controlling which applications are available to users, see Chapter 1 in the eMate 300 Teacher’s Guide or Chapter 1 in the eMate 300 User’s Manual. 14 Chapter 1 Store student documents in You use this option to specify the folder on the Mac OS computer that stores user documents within the Student Data folder. Users can access other users’ folders and data if they know the user’s login name or pre-created folder name. The only way to secure data is to use At Ease on the desktop and have users transfer their information to their At Ease folders. If you want to prevent plagiarism or users modifying other users’ files and information, you’ll want to use the At Ease option. Important Named folders, created as needed—This places a user’s documents into a folder on the computer that has the name he or she uses to connect to the computer. If no folder with that name exists, one is created. With this option, users must enter the same name each time they connect to the computer. Named folders, created in advance—This places a user’s documents into a precreated folder on the computer. You can use this option to make sure users connect using a specific name. You can also create group folders. At Ease documents folder—Stores documents in users’ At Ease folders on the computer. At Ease must be installed on the same computer as the eMate Classroom Exchange software in order to use this option. Users need to enter their At Ease folder name and password. This option prevents users from accessing others’ folders. For more information about At Ease, see the documentation that came with the At Ease software. One folder named “Student Data”—This places all user documents in one folder on the computer. If you choose this option, a user can access other people’s information. Getting Started 15 Advanced m Click the checkbox labeled “Erase data from eMate after backup” if you want to delete information from the eMates after users transfer their files. This frees up internal memory on the eMate and allows new users to start work on a “blank slate.” This is useful in situations where the eMates are shared or where users may be using different eMates from day to day. m Click the checkbox labeled “Allow navigation outside student folder” if you want to let users access other folders on the Mac OS computer. This is useful if users work on group projects and need to access folders other than their own. However, users then have access to all other folders on the computer, so don’t choose this option if you’re concerned about security or plagiarism. If you want all users to have access to specific documents or software, you can place them in the Shared folder. 5 When you’re finished setting preferences, click Save or press Return. Using the server In order to transfer information, you need to start the eMate Classroom Exchange software and start the server on the Mac OS computer. You’ll want to stop the server if you aren’t using it or if you want to change preferences. If you are using the printer port with eMate Classroom Exchange and want to print a document in another application, you’ll need to stop the server, disconnect the cable to the printer port, and attach the printer cable to the printer port. You can use the computer for other activities while the server is running. Stopping the server when it’s not needed will make more memory available to other applications. Important 16 Chapter 1 Starting the server Once you’ve set preferences for the eMate Classroom Exchange software, you can start running the software. To do this, follow these steps: 1 On the Mac OS computer, open the eMate Classroom Exchange folder. 2 Open the Classroom Exchange Admin program. A window appears. Click this button to start the server. It changes to Stop Server when the server is started. 3 Click Start Server. You can use the computer to do other tasks while the server is running. Stopping the server when it’s not needed will make more memory available to other applications. Important Stopping the server Once you start running the Classroom Exchange Admin program, you don’t have to stop the server unless you want to m use the printer or modem port you’re connected to for something else m run a program that needs more memory m prevent users from connecting an eMate to the computer m shut down the computer Getting Started 17 1 On the computer, open the eMate Classroom Exchange folder. 2 Open the Classroom Exchange Admin program. 3 Click Stop Server. Click this button to stop the server. It changes to Start Server when the server is stopped. Quitting the Classroom Exchange Admin program If you want to shut down the computer, you can quit the Classroom Exchange Admin program. To quit, choose Quit from the File menu, or press x-Q. The server is automatically stopped when you shut down the computer. Important The server will continue to run even if you quit the Classroom Exchange Admin program, until you stop the server or shut down the computer. For more information, see “Stopping the Server,” earlier in this chapter. What’s next? Now that you’ve set up the Classroom Exchange Admin program, connected the eMates to the computer, and started the server, you’re ready to move on. 18 Chapter 1 Did you select “Named folders, created in advance” in Preferences? If you chose “Named folders, created in advance,” you’ll need to create user folders on the computer before users can transfer information. You can create new folders with the New Folder command in the File menu. (This command is available while you are in the Finder.) To do this, open the File menu and choose New Folder. A new folder appears in the active window. (If no window is active, the folder appears on the Desktop.) The folder has “untitled folder” in its name, and the name is selected. Type a user’s name for the new folder. ( You may need to click the name of the folder icon to select it first. A box appears around the name when it’s selected.) Continue to create and name user folders. When you’re done, drag the folder icons to the Student Data folder. Make sure you tell users the names of their folders. Do you want all users to have access to specific documents or software? If you want users to have access to specific documents or software, place them in the Shared folder. Do you need to convert documents? If you want to copy word processing or drawing documents from the Mac OS computer to an eMate, you’ll need to save or convert them to Newton Works format. For more information, see Chapter 2, “Converting Files To and From Newton Works Format.” Do you want to transfer documents? If you want to copy documents from the computer to an eMate and they’re already in Newton Works format, or if you want to copy or move documents from an eMate to the computer, see Chapter 3, “Transferring Information.” Getting Started 19 2 Converting Files To and From Newton Works Format Before you transfer documents from the Mac OS computer to an eMate, you’ll need to convert the document to Newton Works format. Do one of the following: m To convert documents that work with the Claris XTND translators, such as ClarisWorks, MacWrite II or MacPaint documents, see the section “Saving Documents in Newton Works Format.” m To convert documents created in applications that don’t allow you to save documents in Newton Works format, such as WordPerfect, you’ll need to use the Newton Works Converter program. For more information, see the section “Using the Newton Works Converter Program.” While most documents can be converted, some formatting information (for example, headers, footers, and footnotes) is not converted. If you need to use advanced formatting, you may want to create a document on the eMate and copy or move it to the computer to finish working on it in another software application. Important 20 Chapter 2 Saving documents in Newton Works format If you are working on a document created in an application that works with the Claris XTND translators, such as ClarisWorks, MacWrite II or MacPaint, you’ll need to save the document in Newton Works format to work with it in Newton Works on the eMate. To save documents in Newton Works format, follow these steps: 1 On the computer, open the document you want to copy to the eMate. 2 Choose Save As from the File menu. Choose Save As to save the document in Newton Works format. Converting Files To and From Newton Works Format 21 3 Use the directory window and pop-up menu to select where you want to save the document. (For example, in the user’s folder within the Student Data folder.) Choose the folder where you want to save your document. Make sure Document is selected. 4 Open the Save As pop-up menu and choose Newton Works Paper to save a word processing document. 22 Chapter 2 From the Save As pop-up menu, choose Newton Works Paper for text documents or PICT for a drawing document. Open the Save As pop-up menu and choose PICT to save a drawing document. Note: The items in the Save As pop-up menu may be different, depending on the translators that are installed on your desktop computer. 5 Type a new name for the document if you wish, then click Save or press Return. If you don’t type a file name, your file is saved with the word “Converted” after the original file name. If desired, type another name for the file. When you’re ready, click Save or press Return. Your document is saved in Newton Works format. You can now copy this document to an eMate (see Chapter 3, “Transferring Information”). Converting Files To and From Newton Works Format 23 Using the Newton Works Converter program You can use the Newton Works Converter program to convert documents that you created in applications that don’t allow you to save documents in Newton Works format, such as WordPerfect. The procedure converts documents into a format Newton Works can use. 1 Drag the file you want to convert to the Newton Works Converter icon. Drag the file to the Newton Works Converter icon. A dialog box appears. 2 Choose the folder where you want to save your document. 24 Chapter 2 Use the directory window and pop-up menu to select where you want to save the document. 3 Type a new name for the document if you wish. If you don’t type a file name, your file is saved with the word “converted” after the original file name. When you’re ready, click Save or press Return. If desired, type another name for the file. 4 When you’re ready, click Save. Your document is saved in Newton Works format. You can now copy this document to an eMate (see Chapter 3, “Transferring Information”). The next time you use the Newton Works Converter program, the converted file will automatically be stored in the same format and destination as the previous converted document. If you want to save it in another format or choose another destination, hold down the Option key when you drag it to the Newton Works Converter icon, and a dialog box will appear for you to change the format or destination. Important Converting Files To and From Newton Works Format 25 3 Transferring Information Transferring information between an eMate and a desktop computer is easy. Once the eMate is connected (see “Connecting eMates to a Mac OS Computer” in Chapter 1, “Getting Started”) you can start the server and transfer the information. Do you need to convert your documents? If you’re copying documents from the Mac OS computer to an eMate, you need to make sure they’re in the Newton Works format. If they’re not, you won’t be able to copy them to the eMate. For more information, see Chapter 2, “Converting Files To and From Newton Works Format.” 26 Opening a connection between the eMate and the Mac OS computer 1 Make sure the eMate is connected to the computer via a LocalTalk connection kit or a serial cable. 2 On the computer, open the eMate Classroom Exchange folder. Double click here to open the Classroom Exchange Admin program. 3 You’ll see these three folders if you’ve already opened the Classroom Exchange Admin program. Open the Classroom Exchange Admin program. The eMate Classroom Exchange Status window appears. This button indicates that the server isn’t running. Transferring Information 27 4 If you see a button labeled Start Server, click it. (If the button is labeled Stop Server, the server is already running and you don’t need to do anything.) The server starts up and the button name changes to Stop Server. 5 Press the Dock k key on the top row of the eMate keyboard. Press Dock to open a connection between the eMate and the computer. I Note: If you changed the eMate’s default connection application to Dock, you’ll need to press the Extras ´ key on the top row of the eMate keyboard, then tap Classroom Dock œ. The connection slip opens. 6 If the connection type in the slip is not correct, tap “u Connect via” and in the list that appears, tap your choice. Tap the type of connection you’re using. If you’re connecting to a computer via an AppleTalk network, tap AppleTalk. If you’re connecting to a computer using a serial cable, make sure Serial is selected. 28 Chapter 3 7 If you’re using an AppleTalk network, you’ll need to select the location of the computer you want to connect to and select the computer. Tap the location of the computer you’re connecting to. In the slip that appears, select the computer. 8 Tap Connect or press Return. Tap Connect or press Return to establish a connection. 9 If a slip appears asking for a name or password, do one of the following. (The procedure for connecting depends on the Preferences settings. See “Setting Preferences” in Chapter 1, “Getting Started.”) m If no names are listed, type your name. Then press Return or tap X. m Tap Name and in the list that appears, tap the name that the Classroom Exchange administrator assigned you. Then press Return or tap X. If the slip asks for a password, type it. m Type your At Ease name and password, then press Return or tap X. Enter your name. Tap here or press Return when you’re finished. Transferring Information 29 The Classroom Dock application opens on the eMate. On the computer, a user name and time appears in the eMate Classroom Exchange Status window, indicating that the server is in use. This column shows when the user connected to the server. This column shows the users currently connected to the server. Transferring information from an eMate to the Mac OS computer When you transfer information from the eMate to the Mac OS computer, the work stays on the eMate unless you chose to erase documents after transferring in the Classroom Exchange Admin preferences. For more information, see “Setting Preferences” in Chapter 1, “Getting Started.” To transfer information, follow these steps: 1 Open a connection between the computer and the eMate. (See “Opening a Connection Between the eMate and the Mac OS Computer.”) A slip appears on the eMate. Tap here to transfer work from your eMate to the computer. (This may say “Move work to server” if you chose to erase information on the eMate after transferring it.) 30 Chapter 3 Note: If you chose the preference to erase information from the eMate after transferring it, you’ll see “Move work to server” instead of “Copy work to server.” 2 On the eMate, tap “Copy work to server” or “Move work to server.” A status slip appears showing you the progress of the transfer. Once the information is copied or moved, the status slip disappears and the Classroom Dock application automatically closes. Finding your information on the computer The information transferred from the eMate is saved on the computer, in a folder based on the preferences you set. If you selected m Named folders, created as needed—documents are placed in a folder that has the name the user entered to connect. The folder is within the Student Data folder. m Named folders, created in advance—documents are placed in a folder that the teacher or administrator set up. The folder is within the Student Data folder. m At Ease documents folder—documents are placed in the user’s folder in At Ease. m One folder named “Student Data”—documents for all users are placed directly in the Student Data folder. If you want to open and work on the documents in ClarisWorks, see the section “Opening Newton Works Documents in ClarisWorks,” later in this chapter. For more information on setting preferences for storing documents, see “Setting Preferences” in Chapter 1, “Getting Started.” Transferring Information 31 Storing multiple copies or different versions of a document on the Mac OS computer When you transfer documents from the eMate to the Mac OS computer, the documents are stored on the computer using the title you entered on the eMate. If you make changes to a document and transfer it, earlier versions of the document are stored in a folder called Archives within the user’s folder. Up to five copies of the same document can be stored in the Archives folder. Note: The document that is not in the Archives folder is the most currently transferred document. These represent earlier archived versions of a document. This is the most recently transferred document. Up to five copies of the same document can be stored in the Archives folder. When you trasnfer the document to the computer a sixth time, the earliest document (for example, Math Problems inside the Archives folder) is replaced with the most recent document outside the Archives folder. The numbers at the end of the filename in the Archives folder are not representative of how recent the document is. To see which document in the Archives folder is the most recent, you need to choose to view the files by date. To do this, go to the Finder and open the Archives folder. From the View menu, select “by Date.” The most recent file will be at the top of the list. If you want to keep more than five copies of a document, move the older copies out of the Archives folder and rename them before you trasnfer the document from the eMate again. This archiving feature helps prevent inadvertent data loss. You may also use this feature to archive various versions of a document or make sure you have extra backup copies of a document. 32 Chapter 3 If you haven’t changed the document since the last time it was copied to the computer, it will not be backed up again. Important Copying information from the Mac OS computer to an eMate Before you copy information, make sure it’s in a format Newton Works can use. See Chapter 2, “Converting Files To and From Newton Works Format.” When you copy information to the eMate, it remains on the computer, unless you delete it. 1 Open a connection between the computer and the eMate. (See “Opening a Connection Between the eMate and the Mac OS Computer,” earlier in this chapter.) A slip appears on the eMate. Tap here to copy work from the computer to your eMate. 2 On the eMate, tap “Get work from server.” The Student Data folder or At Ease folder appears. If you chose to create user folders in the preferences, the folder with the user’s name is opened. 3 Tap here to go to a folder other than the one shown. From the list that appears, tap your choice. Go to the folder that contains the file or package you want to copy. Tap the user folder you want to open. Transferring Information 33 Note: You’ll only be able to navigate outside your user folder, the Student Data folder, or the Shared folder if you chose to allow navigation outside the user folder in the preferences. For more information about preferences, see “Setting Preferences” in Chapter 1, “Getting Started.” A slip appears showing you a list of files or software packages you can copy. 4 Tap the file or package you want to copy. Tap the file you want to get from the computer. Tap Get to transfer the file to your eMate. If you don’t see the file or package you want m The document may not be in Newton Works format. m The file may not be in your user folder or in the Shared folder. You’ll need to go to the computer and place the file in the appropriate folder. 5 Tap Get. A status slip appears showing you the progress of the transfer. 6 To copy another file or package from the computer to an eMate, repeat steps 2–5. 7 When you’re finished, tap X or press the Close key on the eMate keyboard to close the Classroom Dock application. Documents are stored on the eMate as items within Newton Works. Packages are stored in the Extras Drawer. 34 Chapter 3 8 Do one of the following: m To see the documents on the eMate, go to Newton Works. Press the Overview key Ω on the eMate keyboard. If necessary, tap the scroll arrows ≈ on the right side of the screen to move up and down in the list. To open a document, tap it. m To open a package, press Extras, then tap the package’s icon. Disconnecting eMates You can disconnect an eMate from the Mac OS computer or AppleTalk network at any time. Note: Do not disconnect an eMate while information is being transferred. m If the eMate is on an AppleTalk network, unplug the cable of the LocalTalk connector box from the serial port of the eMate. m If the eMate is connected to the computer using a serial cable, unplug the serial cable from the serial port on the eMate. Opening Newton Works documents in ClarisWorks If you copy or move Newton Works documents to the Mac OS computer, you can open them in ClarisWorks. To do this, follow these steps: 1 Start the ClarisWorks application. 2 Choose Open from the File menu. Transferring Information 35 3 In the dialog box that appears, locate and select the folder that contains the Newton Works document. From this menu, you can choose a higher-level folder. Select the file you want to open. You can choose a file type from this pop-up menu. 4 Open the File Type menu and choose the type of files you want to see. m All available—shows all files m Newton Works Drawing—shows only these types of items m Newton Works Paper—shows only these types of items 5 Select the file you want to open, then click Open or press Return. The file is opened. 36 Chapter 3 4 Solutions to Common Problems This chapter describes problems you might experience using the eMate Classroom Exchange software. For important, late-breaking information, please see the Read Me file for the eMate Classroom Exchange software. Your eMate came with a booklet that describes the service and support options available from Apple. It contains phone numbers you can call if you have trouble with the eMate and describes ways of obtaining support information from online services, the Internet, and automated fax services. Before you contact Apple for help, take a few minutes to read the information in this chapter. I can’t get the Classroom Exchange Admin software working on the computer. m Make sure you selected the correct connection option in the Preferences dialog box. m If you’re connected via a network, make sure AppleTalk is active in the Chooser. m You may have inadvertently deleted some of the files necessary to run the software. Try reinstalling eMate Classroom Exchange software. Solutions to Common Problems 37 When I press Dock the eMate doesn’t connect to the computer. m Make sure all pop-up lists on the eMate are closed. Tap anywhere outside a list to close it. m Check that the eMate is properly connected to the computer and that the computer is on. m Make sure the server is running. m Make sure you’ve chosen the correct connection type and the correct Mac OS computer you’re using in the eMate Classroom Exchange Preferences and in the Classroom Dock application. m The Classroom Dock application may not be set as the default connection application. Press Extras ´ and then tap Classroom Dock œ. See Chapter 1 in the eMate 300 Teacher’s Guide or Chapter 1 in the eMate 300 User’s Manual. I can’t convert my document into Newton Works format using the Newton Works Converter. m Try saving the file using the RTF file type. Then drag the file icon onto the Newton Works Converter icon in the eMate Classroom Exchange folder. m The XTND Translator List on the computer may be damaged. You’ll need to delete it and create a replacement XTND Translator List. To delete this file, drag the current XTND Translator List to the Trash. The XTND Translator List is in the Preferences folder, inside the System Folder. To create a new XTND Translator List, open ClarisWorks and the file is created automatically. When I try to convert a document to Newton Works Drawing format, a message says that the drawing is too complex. m If your drawing contains several fill patterns or complex bit-mapped images (from a program such as KidPix), you may not be able to convert it to Newton Works Drawing format. I can’t find the documents I transferred from the computer to my eMate. m Go to Newton Works and press the Overview key Ω. A list of your documents appears. You may need to tap the scroll arrows ≈ to move up and down in the list. m Documents not in the proper format are not transferred. Text-based documents should be saved in Newton Works Paper format; drawings should be saved in PICT format. For more information, see “Saving Documents in Newton Works Format” in Chapter 2, “Converting Files To and From Newton Works Format.” 38 Chapter 4 I can’t find the documents I transferred from my eMate to the computer. m On the computer, look for a folder with the same name you used to connect to the computer, or the Student Data folder, depending on the storage option you selected in Preferences. m Make sure you give your Newton Works documents unique names so you can find them easily. For more information, see Chapter 2 of the eMate 300 Teacher’s Guide. m Make sure you connect to the eMate using the same name each time or else multiple folders may be created for your documents. If you use the “Named folders, created in advance” option in Preferences, each user will always have access to the same folder. My document doesn’t look the same on the eMate as it does on the computer. m Not all formatting attributes are translated when you convert documents into Newton Works format. I saved a document in Newton Works format and typed in a file name, but when I transferred it to the eMate, it was called “untitled.” m Files saved in PICT format don’t show the file name until you open them in Newton Works on the eMate. I transferred a drawing that has a text box with multiple lines of text from the eMate to the computer and then opened the drawing in ClarisWorks. Now, each line of the text is a separate item when I ungroup. m To keep the picture as you drew it, it’s best to not ungroup the items. I pasted a QuickChart into a Newton Works paper and the title and labels disappeared when I transferred the paper to the computer. m Export the QuickFigure charts to Microsoft Excel 5.0 using the QuickFigure Exchange program. Then paste the charts into a word processing document on the computer. m Print your document from the eMate. Solutions to Common Problems 39 When I try to connect to the computer using the Newton Connection Utilities (NCU), I get an error message saying a port is not available. m When you run eMate Classroom Exchange (you click the Start Server button), the program will run and the server will use the port you selected in the preferences until you click the Stop Server button. If you open NCU and use the same port that eMate Classroom Exchange uses, you’ll see the error message. You need to stop the server by opening the eMate Classroom Admin application and clicking the Stop Server button. You can also change the eMate Classroom Exchange preferences, so that it uses a different port than the one you are using with NCU. Classroom Exchange is not visible in the Extensions Manager, so I can’t turn it off and the eMate Classroom Exchange software loads each time the computer is turned on. m While Classroom Exchange Server is not a true extension, it is located in the Extensions folder within the System Folder so that it is always running. If desired, you can move this extension outside the Extensions folder, to another folder, such as the eMate Classroom Exchange folder. I can’t make a backup of some applications that are installed on my eMate. m If an application is not listed in the Edit Extras slip of the Teacher Setup application, then you won’t be able to back it up using eMate Classroom Exchange. You can use another connection application to make a backup, such as the Newton Connection Utilities. 40 Chapter 4 Appendix: Quick Reference This appendix provides brief information on the steps necessary to transfer Newton Works documents and other eMate information from the eMate to a Mac OS computer and vice versa. It also describes the steps necessary to convert documents into Newton Works format. You may want to print these pages and post them near the area where users connect their eMates to the computer, to help remind them of the various processes. m To convert documents to and from Newton Works format, see “Converting Files To and From Newton Works Format.” m To open a connection between the eMate and the computer, see “Opening a Connection Between the eMate and the Mac OS Computer.” m To transfer documents from the eMate to the computer, see “Transferring Information From an eMate to the Mac OS Computer.” m To copy documents from the computer to an eMate, see “Copying Information From the Mac OS Computer to an eMate.” 41 Converting files to and from Newton Works format Saving documents in Newton Works format 1 On the computer, open the document you want to copy to the eMate. 2 Choose Save As from the File menu. 3 Select a location for the document. 4 Open the Save As pop-up menu and choose Newton Works Paper for a text document or PICT for a drawing document. 5 Type a new name for the document, then click Save or press Return. Using the Newton Works Converter program 1 Drag the file you want to convert to the Newton Works Converter icon. 2 Select a location for the document. 3 Choose a file type for the output file, if necessary. 4 Type a new name for the document, then click Save or press Return. Opening a connection between the eMate and the Mac OS computer 42 Appendix 1 Make sure the eMate is connected to the computer via a LocalTalk connection kit or a serial cable. 2 On the computer, open the eMate Classroom Exchange folder. 3 Open the Classroom Exchange Admin program. 4 If you see a button labeled Start Server, click it. 5 Press the Dock k key on the top row of the eMate keyboard, or press Extras and then tap Classroom Dock. 6 If you need to change the connection type, tap “u Connect via” and in the list that appears, tap your choice. 7 If you’re using an AppleTalk network, tap the location of the computer you want to connect to, and in the slip that appears, tap the computer. 8 Tap Connect or press Return. 9 If a slip appears asking for a name or password, do one of the following: m If no names are listed, type your name. Then press Return or tap X. m Tap Name and in the list that appears, tap your name. Then press Return or tap X. If the slip asks for a password, type it. m Type your At Ease name and password, then press Return or tap X. Transferring information from an eMate to the Mac OS computer 1 Open a connection between the computer and the eMate. 2 On the eMate, tap “Copy work to server” or “Move work to server.” 3 Open ClarisWorks on the computer. 4 Choose Open from the File menu. 5 Locate the folder where the document is located. 6 Select the file you want to open, then click Open or press Return. Quick Reference 43 Copying information from the Mac OS computer to an eMate 44 Appendix 1 Open a connection between the computer and the eMate. 2 On the eMate, tap “Get work from server.” 3 Locate the folder that contains the file or package you want to copy. 4 Tap the file or package you want to copy. 5 Tap Get. 6 To copy another file or package from the computer to an eMate, repeat steps 2–5. 7 When you’re finished, tap X or press the Close key on the eMate keyboard to close the Classroom Dock application. 8 Do one of the following: m To see the documents on the eMate, go to Newton Works. Press the Overview key Ω on the eMate keyboard. If necessary, tap the scroll arrows ≈ on the right side of the screen to move up and down in the list. To open a document, tap it. m To open a package, press Extras, then tap the package’s icon. eMate Classroom Exchange User’s Manual K Apple Computer, Inc. © 1997 Apple Computer, Inc. All rights reserved. 1 Infinite Loop Cupertino, CA 95014-2084 408-996-1010 http://www.apple.com Every effort has been made to ensure that the information in this manual is accurate. Apple is not responsible for printing or clerical errors. Apple, the Apple logo, AppleShare, AppleTalk, LaserWriter, LocalTalk, the Light bulb logo, Mac, Macintosh, Newton, and Performa are trademarks of Apple Computer, Inc., registered in the U.S. and other countries. At Ease and eMate are trademarks of Apple Computer, Inc. Acrobat, Adobe, Adobe Illustrator, Adobe Photoshop, and PostScript are trademarks of Adobe Systems Incorporated, which may be registered in certain jurisdictions. Claris, ClarisWorks, MacPaint, and MacWrite are registered trademarks of Claris Corporation. Helvetica is a registered trademark of Linotype-Hell AG and/or its subsidiaries. PowerPC is a trademark of International Business Machines Corporation, used under license therefrom. Simultaneously published in the United States and Canada. Mention of third-party products is for informational purposes only and constitutes neither an endorsement nor a recommendation. Apple assumes no responsibility with regard to the performance or use of these products. Contents 1 Getting Started 1 How does the software work? 1 Requirements 2 Installing the eMate Classroom Exchange software onto a Mac OS computer 3 Connecting eMates to a Mac OS computer 4 Disconnecting eMates 11 Starting the Classroom Exchange Admin program 11 Setting preferences 12 Using the server 16 Quitting the Classroom Exchange Admin program 18 What’s next? 18 2 Converting Files To and From Newton Works Format 20 Saving documents in Newton Works format 21 Using the Newton Works Converter program 24 3 Transferring Information 26 Do you need to convert your documents? 26 Opening a connection between the eMate and the Mac OS computer 27 Transferring information from an eMate to the Mac OS computer 30 Copying information from the Mac OS computer to an eMate 33 Disconnecting eMates 35 Opening Newton Works documents in ClarisWorks 35 4 Appendix Solutions to Common Problems Quick Reference 37 41 iii


![VTW Software Operation manual[PDF:17.4MB] - FOR](http://vs1.manualzilla.com/store/data/005725901_1-df2c6d7f9199f46fcf33ffa12e63545b-150x150.png)