1
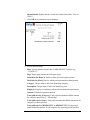
TRIPLE E TECHNOLOGIES
DataManager Version 3.613
DataManager
User’sManual
Triple E Technologies, LLC
P.O. Box 2677 Post Falls, ID 83877
Phone 208.777.9300 • Fax 208.777.9304
©2013 Triple E Technologies LLC. All rights reserved. Triple E Technologies LLC, the Triple E Technologies LLC logo
and the Triple E Technologies LLC product and service names mentioned herein are registered trademarks or trademarks
of Triple E Technologies LLC. All other trademarks are the property of their respective owners.
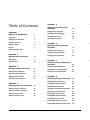
Table of Contents
CHAPTER 5
CHAPTER 1
61
Adding Pricing Categories
61
Updating Pricing Categories
1
Adding Pricing Levels
63
Updating Pricing Levels
69
\
Welcome to DataManager
1
Logging On
1
Changing Your Password
2
Business Functions
4
Database Tables
5
Reports
6
Displaying Screen Data
7
Managing Inventory Receipt
Information
73
Adding Inventory Receipts
73
Updating Inventory Receipts
91
\
Managing Site Information
9
Adding Sites
9
66
CHAPTER 6
CHAPTER 2
Updating Sites
Managing Inventory Pricing
Information
Printing Inventory Receipts
110
CHAPTER 7
13
Managing Inventory Adjustment
Information
113
CHAPTER 3
Adding\ Inventory Adjustments
113
Managing Vendor Information
18
Updating Inventory Adjustments
118
Adding Vendor Categories
18
Printing Inventory Adjustments
123
Updating Vendor Categories
21
Adding Vendor Accounts
23
CHAPTER 8
Updating Vendor Accounts
27
Managing Customer Information 127
CHAPTER 4
Adding Customer Categories
127
\ Customer Categories
Updating
130
Managing Inventory Information
33
Adding Customer Accounts
134
Adding Inventory Categories
33
Inputting Account Beginning Balance
144
Updating Inventory Categories
38
Updating Customer Accounts
151
Adding Inventory Items
41
Managing Customer Pricing
162
Updating Inventory Items
50
Working With Customer Notes
166
Sorting Customer Accounts
169
Working With Customer Invoices
172
Working With Customer Private Cards
175
i
Table of Contents
(Con’t…)
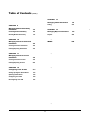
CHAPTER 13
CHAPTER 9
Managing Table Information
235
Tables
235
\
Managing Manual Sales Entry
Information
179
CHAPTER 14
Performing Manual Sales Entry
179
Managing Report Information
288
Deleting Manual Sales Entry
181
Reports
288
CHAPTER 10
\
Managing Customer Statement
Information
184
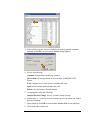
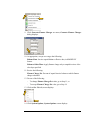
Creating Customer Statements
184
Printing/Exporting Statements
192
INDEX
CHAPTER 11
\
Managing Customer Invoice
Information
196
Creating Customer Invoices
196
Printing/Exporting Invoices
205
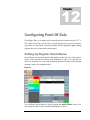
CHAPTER 12
\
Configuring Point Of Sale
212
Setting Up Register Quick Menus
212
Updating Quick Menus
218
Configuring Your POS
224
Reconfiguring Your POS
227
\
ii
406
I P L E
E
T E C H N O L O G I E S
1
Chapter
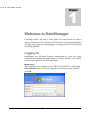
Welcome to DataManager
DataManager provides a wide variety of business functions and a simple, consistent user interface to
manage, monitor and report ESite Controller and CP720 transaction activity and payment information.
This chapter describes getting started, including logging on and changing your password, and exploring the
DataManager application.
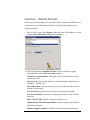
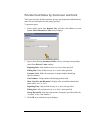
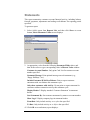
Logging On
DataManager uses Microsoft Windows authentication to verify user logon
credentials; presentation and authorization of a unique Windows User ID and
password are required to access the application.
Windows Log On
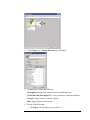
After t turning on your computer, press CTRL+ALT+DELETE to display Log
On to Windows screen. Type your assigned User ID and password, and then
click OK.
1
Getting started…as
1.
2.
3.
easy as 1-2-3!
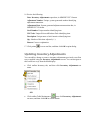
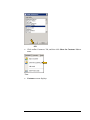
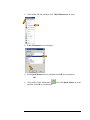
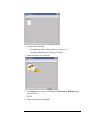
From Desktop, click Start.
Click Programs.
Click OneTouch, and then click OneTouch DataManager.
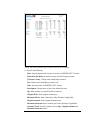
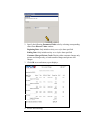
Changing Your Password
To protect your user account and keep the DataManager application as secure
as possible, you should change your password at least every 90 days. When
changing your password, you should adhere to the following complexity
standard:
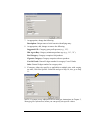
At least seven characters.
No user name, real name or company name.
No complete dictionary word.
Characters from each of the following four groups:
Group
Examples
Uppercase letters
A, B, C …
Lowercase letters
a, b, c …
Numerals
0, 1,2, 3, 4, 5, 6, 7, 8, 9
Symbols
`~!@#$%^&*()_+-={}|[]\:";'<>?,./
EXAMPLE: 4&q6md13?J
2
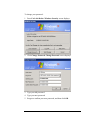
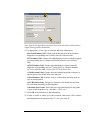
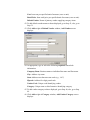
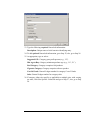
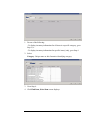
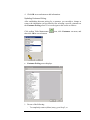
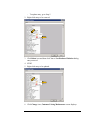
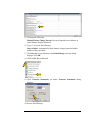
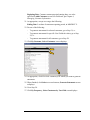
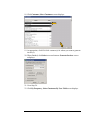
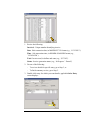
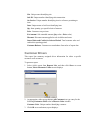
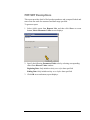
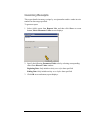
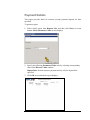
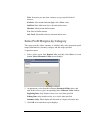
To change your password:
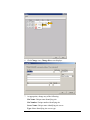
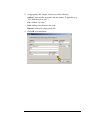
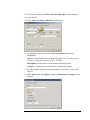
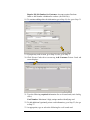
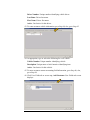
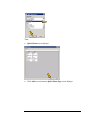
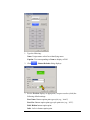
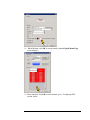
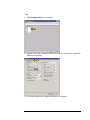
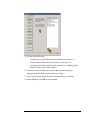
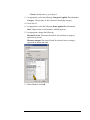
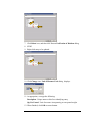
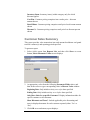
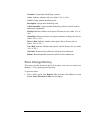
1. Press Ctrl+Alt+Delete. Windows Security screen displays:
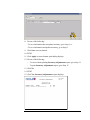
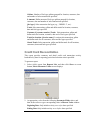
2. Click Change Password. Change Password screen displays:
3. Type your old password.
4. Type your new password
5. Retype to confirm your new password, and then click OK.
3
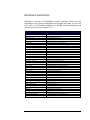
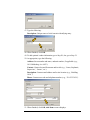
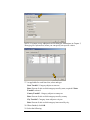
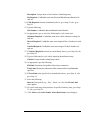
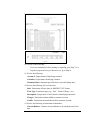
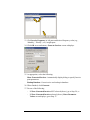
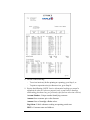
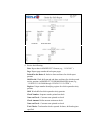
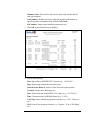
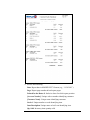
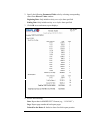
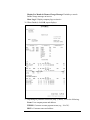
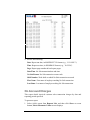
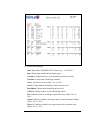
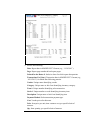
Business Functions
Following is summary of DataManager business functions. Please note that
depending on your product configuration and assigned user rights, you may not
have access to all functions identified. For detailed function descriptions and
procedures, please refer to Chapters 2 – 13.
FUNCTION
AR Report Create
Clear Limits
Credit Card History Purge
Customer Add
Customer List Create
Encryption Key Maintenance
Export Data
Finance Charge Create
Import Data
Inventory Add
Inventory Adjustment
Inventory Barcode Create
Inventory Item Balance Rebuild
Inventory Item List Create
Inventory Receipt Create
Inventory Report Create
Invoice Create
Invoice List Create
Payment Adjustment
Pin Number Create
Price Change
Priced Transaction Create
Print Adjustment
Print Receipt
Private Card Edit
Purchase Order Add
Purchase Order Maintenance
Purge Credit Card Data
Reports List
Sales Entry
Sales List
Sales Report Create
Sales Summary Rebuild
Site Configuration
Site List
Site Synchronization
Statement Create
System Option Change
Table Maintenance
PURPOSE
Generate financial reports
Remove customer cardholder usage restrictions
Remove customer account activity information
Set up customer account
Review list of active customers
Remove and recreate card data Encryption Key
Export customer account information
Generate customer finance charges
Import customer receipt information
Set up inventory item
Update inventory quantities
Generate inventory item barcode label
Refresh inventory item balances
Generate list of current inventory items
Generate inventory item receipt
Generate inventory reports
Generate customer invoice
Generate list of customer invoices
Update customer payment information
Generate proprietary card PINs
Generate inventory item pricing update
Generate priced transaction
Generate hardcopy price adjustment
Generate hardcopy receipt
Update customer proprietary card information
Set up customer Purchase Order
Update customer Purchase Order information
Remove payment card data for PCI compliance
Generate list of available reports
Manually enter customer sale information
Generate list of customer sales activity
Generate sales reports
Refresh sales summary report information
Manage home office and site connection configuration
Generate list of site locations
Synchronize site dialup connections
Generate billing statement
Update system preferences and defaults
Create and update database table information
4
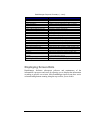
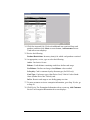
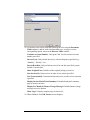
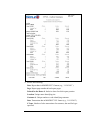
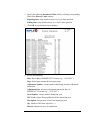
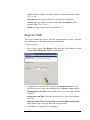
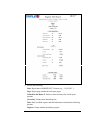
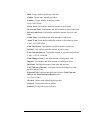
Database Tables
DataManager table maintenance allows you to customize application
functionality to suit your specific business needs. For example, you can build a
table containing only those pricing categories you want the system to use when
setting up a customer account.
Listed below are the various DataManager database tables, along with their
associated contents. Again, depending on your product configuration and
assigned user rights, you may not have access to all tables listed. For detailed
table maintenance information and procedures, please refer to Chapter 13.
TABLE
Adjustment Reasons
Bad Check Names
Card Types
Customer Categories
Customer Pricing
Customers
Discount Codes
Employees
Export Definitions
Gift Cards
Import Definition
Inventory Adjustments
Inventory Categories
Inventory Items
Inventory Receipts
Invoice List
No Sale Reasons
Other Payment Types
Paid-out Reasons
POS Configuration
Pricing Categories
Pricing Levels
Quick Menus
Sales List
Sites
Terms Codes
Units of Measure
Vendor Categories
Vendors
CONTAINS
Codes indicating customer payment adjustment types
Bad check customer names and related banking information
Types of accepted payment cards
Types of customer proprietary card or credit accounts
Types of customer account pricing levels
General and detailed customer account information
Codes indicating inventory item pricing discount types
Employee names and Social Security information
Data export types and descriptions
Types of value + balance style gift cards
List of import definitions currently in use
Codes indicating reasons for inventory adjustments
Codes indicating grouping of related inventory items
Inventory item descriptions and general information
Inventory receipt information by vendor and item category
Customer invoice payment status information
Codes indicating reasons for non-sale transactions
Codes indicating other transaction payment types
Codes indicating reasons for paid-out transactions
POS/register description and configuration information
Codes indicating types of related inventory items
Codes indicating pricing levels for inventory item categories
Menu picture, caption and button layout information
Sales entry and payment information by site location
Site configuration description and related information
Codes indicating customer payment terms
Inventory item units of measures
Codes indicating grouping of related vendor types
General and detailed vendor account information
.
5
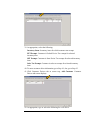
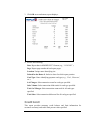
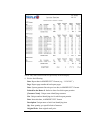
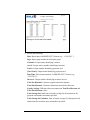
Reports
DataManager allows you to create, view and print a full range of back office
reports. Because access to these reports is governed by your specific product
configuration and assigned user rights, you may not be able to generate all of
the reports listed below. For detailed report information and procedures, please
refer to Chapter 14.
REPORT
DESCRIPTION
Aged Trial Balance
Checks By Shift
CP720 – Gallon Summary
Credit Card Reconciliation
Credit Card Volume & Charges
Credit Limit
Customer Activity
Customer Drivers List
Customer Fuel History Summary
Customer Pricing & Discounts
Customer Sales Summary
Daily Card Sales
Daily Journal
Daily Shift
Discounted Sales
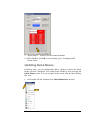
Dispensed Volume by Dispenser & Prod
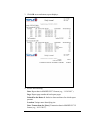
Cha Charts- Fuel Sales
Dispenser Totals by Product & Dispenser
Dyed Diesel Sales by Customer
Employee Charges
FET/SET Exemptions
Finance Charges
Fuel Sales By Date And Point Of Sale
Fuel Sales By Dispenser And Product
Fuel Sales Volume by Dispenser Chart
Gallon Summary with Discounts
Hourly Sales
Inventory Adjustments
Inventory Receipts
Inventory Snapshot
Inventory Stock On Hand
Invoice Preview
Invoices
Invoices – Vehicle Format
Loyalty Card Savings
Monthly Sales Volume by Chart
NO Sale Reasons
On Account Charges
Other Payment Details
Debits and credits by customer and date range
Details/totals of check payments by shift
Gallon totals for fuel at CP720 sites
Transaction settlements by date or customer
Transaction activity by date, customer and/or sales
Credit balance as percent of limit by customer & date
Sales activity by customer and date
Active and inactive drivers by customer and date
Summary fuel product totals by customers
Special pricing and discounts listing by customer
Summary of sales by customer
Total daily sales by card number and date (detail)
Total daily sales by card number and date (summary)
Total daily sales detail by work shift
Discount totals by inventory category and date range
Chart depicting dispensed fuel sales volume by product/
dispenser
Total fuel gallons by dispenser and date
Dyed diesel product sales volume by customer
Total employee charges by account and date range
Federal and State Excise Tax exemptions
Finance charges by customer and date range
Total fuel sales by POS and date
Total fuel sales by dispenser & product for date range
Chart depicting sales volume by dispenser by date range
Total discounted fuel gallons by product type and date
Hourly sales totals by date
Inventory adjustments by stock number and date
Inventory stock receipt by receipt number and date
On-hand inventory by date
Inventory stock on hand by date
Preview customer billing detail
Customer billing summary by date range
Customer billing detail by vehicle ID and date range
Loyalty card savings by customer and date range
Chart depicting total sales volume per month
Register open without sale explanations
Payments received by customer and date range
Other payments received by location and date range
6
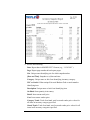
DataManager Reports Summary (…cont).
REPORT
DESCRIPTION
Paid-Outs By Date And Category
Payment Details
Payment History
Pending Settlements
Prepaid Card Status
Price Change History
Private Card Fuel Sales by Dispenser
Private Card Sales by Customer and Card
Private Card Sales Summary Report
Private Cards List
Register Shift
Re-Order Limits
Sales by Payment Method
Sales by Shift and Category
Sales Detail by Date and Category
Sales History with Signatures
Sales Profit Margins by Category
Sales Volume by Hour Chart
Sales Volume Summary by Site
Sales With Overridden Prices
Statements
Statements (Customer Name/Address
Lowered)
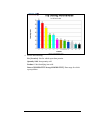
Top Sellers by Category
Top Selling Merchandise Chart
Paid-out activity summary by category and date range
Payment transaction detail by deposit date
Payments and adjustments by customer and date
Pending transaction settlements by date or customer
Active and inactive prepaid cards by date & customer
Item price change history by month
Proprietary card sales by dispenser
Proprietary card sales detail by customer and card
Proprietary card sales summary
Issued proprietary card numbers by customer
Daily shift activity by register
Mobile Inventory Manager reordering limits
Sales activity by category and payment method
Summary of items sold by category by shift
Sales activity by date range and item category
Sales transactions with captured signatures
Sales transaction profit margins by item category
Chart depicting sales transaction volume by hour by day
Gross/net sales volume per site per date range
Overridden price sales by location and date range
Sales activity summary by customer and date range
Customer statements with different locations for
envelope addressing purposes
High sales volume items by category
Chart depicting high volume item quantity by category
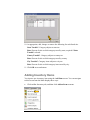
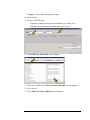
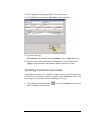
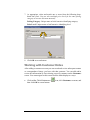
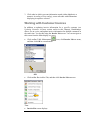
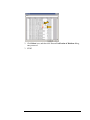
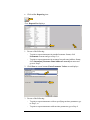
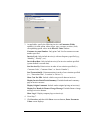
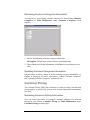
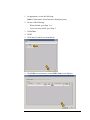
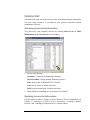
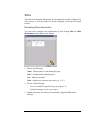
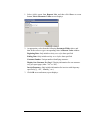
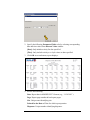
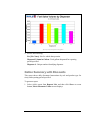
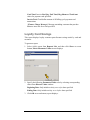
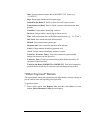
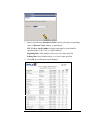
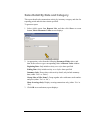
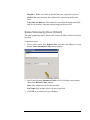
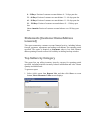
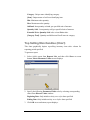
Displaying Screen Data
DataManager facilitates subsequent reference and maintenance of the
information it processes and stores by allowing you to display that information
according to specific sort criteria. Most DataManager input screens have active
column heading buttons running along the top to allow you to do this:
7
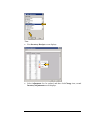
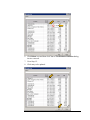
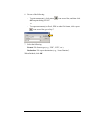
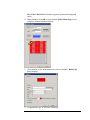
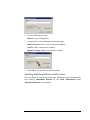
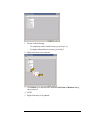
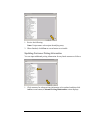
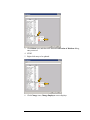
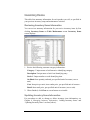
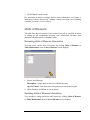
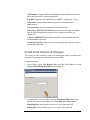
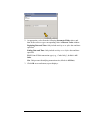
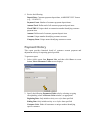
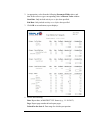
To display screen data in order desired, simply right-click the column heading
by which you want screen information sorted, and then click order in which
you want sorted information sequenced (either alphabetic or numeric Ascending
or Descending). Screen will refresh with information displayed in order and
sequence selected.
8
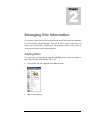
2
Chapter
Managing Site Information
If your business operates from more than one physical location you will need to input certain information
for each location before using DataManager. Each such site must be assigned a unique name and
number, and be associated with a particular server. This information will then be used to monitor site
activity and provide data for export and reporting purposes.
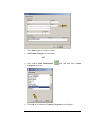
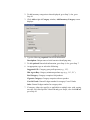
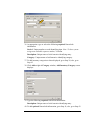
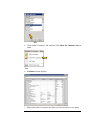
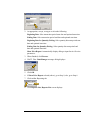
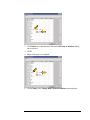
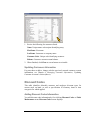
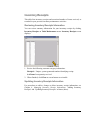
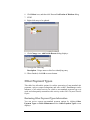
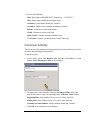
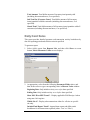
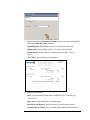
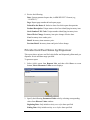
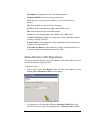
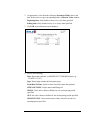
Adding Sites
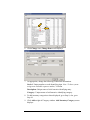
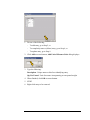
You input new site information using the Add Site screen. You can navigate to
this screen from the Main display three ways:
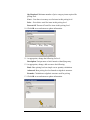
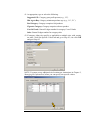
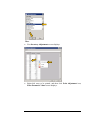
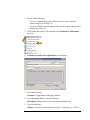
Click toolbar File tab, and then click Sites on menu.
Sites screen displays.
9
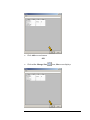
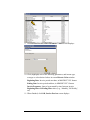
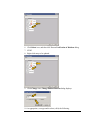
Click Add at screen bottom.
OR
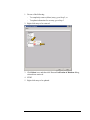
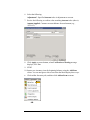
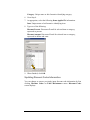
Click toolbar Table Maintenance
Click OK at screen bottom; Sites screen displays.
icon, and then click Sites on menu.
10
Click Add at screen bottom.
OR
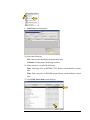
Click toolbar Manage Sites
icon; Sites screen displays.
11
Click Add at screen bottom.
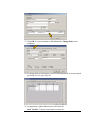
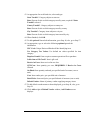
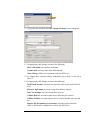
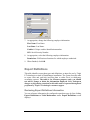
Then:
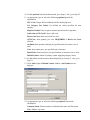
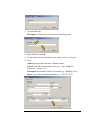
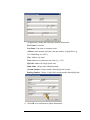
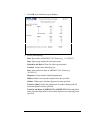
Add Site screen displays:
1. As appropriate, type or select the following required information:
Site Name: Unique name identifying site.
Site Number: Unique number identifying site.
Server Name: Unique name identifying site server.
Type: Site server type.
2. To add optional site information, go to Step 3; else, go to Step 4.
3. Type the following:
Address: Street number and name, and unit number, if applicable (e.g.,
1011 Helderberg Ave #103’).
City: Address city name.
State: Address two character state code (e.g., ‘CA’).
Zipcode: Address five-digit postal code.
4. Click OK at screen bottom.
12
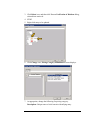
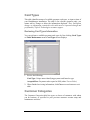
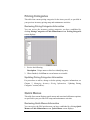
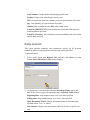
Updating Sites
After setting up a site you can add to, change or remove site information by
first selecting a specific site on the Sites screen. You can navigate to this screen
from the Main display three ways:
Click toolbar File tab, and then click Sites on menu.
OR
Click toolbar Table Maintenance
icon, and then click Sites on menu.
13
Click OK at screen bottom
OR
Click toolbar Manage Sites
icon.
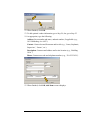
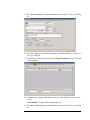
Then:
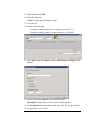
Sites screen displays:
14
1. Do one of the following:
-
To completely remove (delete) entry, go to Step 2; or
-
To add, change or remove specific site information, go to Step 5.
2. Right-click entry to be removed.
3. Click Delete icon, and then click Yes on Verification of Deletion dialog;
selected entry removed.
4. STOP!
5. Right-click entry to be updated.
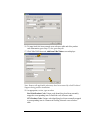
15
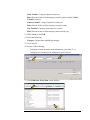
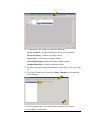
6. Click Change icon; Change Site screen displays:
7. As appropriate, change any of the following:
Site Name: Unique name identifying site.
Site Number: Unique number identifying site.
Server Name: Unique name identifying site server.
Type: Name identifying site server type.
16
8. As appropriate, add, change or delete any of the following
Address: Street number and name, and unit number, if applicable (e.g.,
‘1011 Helderberg Ave #103’).
City: Address city name.
State: Address two-character state code.
Zipcode: Address five-digit postal code.
9. Click OK at screen bottom.
17
3
Chapter
Managing Vendor Information
Before you can begin using DataManager, you must set up a discrete account for each vendor with whom
you do business. You can subsequently add to, change and delete the information you provide. You must
assign each vendor a unique identification code and product category, and record associated address and
contact information. This information will then be used to monitor and control vendor activity and account
balances, and provide data for export and reporting purposes.
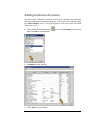
Adding Vendor Categories
A vendor category identifies the type or class of inventory items each of your
vendors provides. You must create vendor categories before adding vendors to
the system.
You input new vendor categories using the Add Vendor Category screen. You
can navigate to this screen from the Main display two ways:
Click toolbar Purchasing tab, and then click Add a Vendor on menu; Add
Vendor screen displays.
18
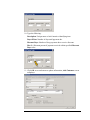
Click Add at right of Category window.
Add Vendor Category screen displays.
OR
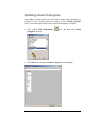
Click toolbar Table Maintenance
Categories on menu.
Click OK at screen bottom; Vendor Categories screen displays.
icon, and then click Vendor
19
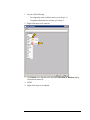
Click Add at screen bottom.
Then:
Add Vendor Category screen displays.
1. Type the following:
Description: Unique name or brief narrative identifying entry.
2. Click OK at screen bottom.
20
Updating Vendor Categories
After adding a vendor category you can change or remove the information you
provided by first selecting a specific category on the Vendor Categories
screen. You can navigate to this screen from the Main display as follows:
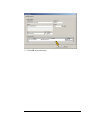
Click toolbar Table Maintenance
Categories on menu.
Click OK at screen bottom; Vendor Categories screen displays.
icon, and then click Vendor
21
1. Do one of the following:
-
To completely remove (delete) entry, go to Step 2; or
-
To update information for an entry, go to Step 5.
2. Right-click entry to be removed.
3. Click Delete icon, and then click Yes on Verification of Deletion dialog;
selected item removed.
4. STOP!
5. Right-click entry to be updated.
22
6. Click Change icon; Edit Vendor Category screen displays:
7. Change the following:
Description: Unique name or brief narrative identifying entry.
8. Click OK at screen bottom.
Adding Vendor Accounts
You must create an account for each of your vendors for activity management
and reporting purposes. You set up a new vendor using the Add Vendor
screen. You can navigate to this screen from the Main display two ways:
23
Click toolbar Table Maintenance
then click OK at screen bottom.
Vendors screen displays.
Click Add at screen bottom.
icon; click Vendors on menu, and
OR
24
Click toolbar Purchasing Tab, and then click Add a Vendor on menu.
Then:
Add Vendor screen displays.
1. As appropriate, type or select the following required General tab
information:
Company Name: Business name or individual last name and first name.
City: Address city name.
State: Address two character state code (e.g., ‘AZ’).
Zipcode: Address five-digit postal code.
Vendor Code: Unique code identifying vendor.
Category: Unique name or brief narrative identifying category.
2. To add vendor category to those displayed, go to Step 3; else, go to Step 6.
3. Click Add at right of Category window; Add Vendor Category screen
displays:
25
4. Type the following:
Description: Unique name or brief narrative identifying entry.
5. Click OK at screen bottom.
6. To add additional information, go to Step 7; else, go to Step 8.
7. As appropriate, type the following:
Address: Street number and name, and unit number, if applicable (e.g.,
1011 Helderberg Ave #103’).
Contact: Contact last and first name and/or title (e.g., “Jones, Stephanie,
Supervisor’, ‘Owner’, etc.).
Description: Contact email address and/or site location (e.g., ‘Building
101A’).
Phone: Contact area code and telephone number (e.g., ‘310-555-3434’).
26
8. Click OK at screen bottom.
Updating Vendor Accounts
After adding a vendor you can add to, change or remove the information you
provided by first selecting a specific vendor on the Vendors screen. You can
navigate to this screen from the Main display two ways:
Click toolbar Table Maintenance
then click OK at screen bottom.
icon; click Vendors on menu, and
OR
27
Click toolbar Purchasing tab, then click Show the Vendor List on menu.
Then:
Vendors screen displays:
1. Do one of the following:
-
To completely remove (delete) entry, go to Step 2; or
-
To change information for a vendor, go to Step 5.
2. Right-click entry to be removed.
28
3. Click Delete icon, and then click Yes on Verification of Deletion dialog;
selected item removed.
4. STOP!
5. Right-click entry to be updated.
29
6. Click Change icon; Change Vendor screen displays:
7. As appropriate, change any of the following:
Company Name: Business name or individual last name and first name.
City: Address city name.
State: Address two character state code (e.g., ‘AZ’).
30
Zipcode: Address five-digit postal code.
Vendor Code: Unique code identifying vendor.
Category: Unique name or brief narrative identifying category.
8. To add vendor category to those displayed, go to Step 9; else, go to Step 12.
9. Click Add at right of Category window; Add Vendor Category screen
displays:
10. Type the following:
Description: Unique name or brief narrative identifying entry.
11. Click OK at screen bottom to update information.
12. As appropriate, add, change or delete any of the following:
Address: Street number and name, and unit number, if applicable (e.g.,
1011 Helderberg Ave #103’).
Contact: Contact last and first name and/or title (e.g., “Jones, Stephanie,
Supervisor’, ‘Owner’, etc.).
Description: Contact email address and/or site location (e.g., ‘Building
101A’).
Phone: Contact area code and telephone number (e.g., ‘310-555-3434’).
31
13. Click OK at screen bottom.
32
4
Chapter
Managing Inventory Information
DataManager allows you to setup a discrete record for each item or product you sell, and to subsequently
add to, change and delete the information you provide. Each inventory item will be assigned a unique stock
number, description and product category, along with associated tax and discount information. This
information will then be used to monitor and control inventory activity and balances, and provide data for
export and reporting purposes.
Adding Inventory Categories
Inventory categories are synonymous with inventory departments and identify
the types or classes of items you sell. You must create item categories before
adding inventory items to the system.
You input new inventory categories using the Add Inventory Category screen.
You can navigate to this screen from the Main display three ways:
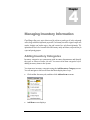
Click toolbar Inventory tab, and then click Add an Item on menu.
Add Item screen displays:
33
Click Add at right of Category window.
OR
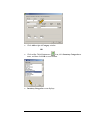
Click toolbar Table Maintenance
icon; click Inventory Categories on
menu, and then click OK at screen bottom.
Inventory Categories screen displays:
34
Click Add at screen bottom.
OR
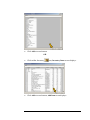
Click toolbar Inventory
Click Add at screen bottom; Add Item screen displays:
icon; Inventory Items screen displays:
35
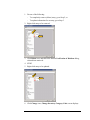
Click Add at right of Category window.
Then:
Add Inventory Category screen displays.
1. Type the following required General tab information:
Description: Unique name or brief narrative identifying entry.
2. To add optional General tab information, go to Step 3; else, go to Step 4.
3. As appropriate, type or select the following:
Suggested G.P.: Category gross profit percent (e.g., ‘15’).
Min Age to Buy: Category minimum purchase age (e.g., ‘18’, ‘21’).
36
Fuel Category: Category comprises fuel products.
Cigarette Category: Category comprises tobacco product.
Cost Of Goods: General Ledger number for category Cost of Goods.
Sales: General Ledger number for category sales.
4. If category either site specific or applicable to multiple sites with varying
tax rates, click Site Specific Values tab and go to Step 5; else go to Step 6.
NOTE: You must set up additional site locations per instructions in Chapter 2,
Managing Site Information, before you can specify site-specific values.
5. As appropriate, select and type the following for each listed site:
State Taxable?: Category subject to state tax.
Rate: Percent of sale at which category taxed by state; required if State
Taxable? selected.
37
County Taxable?: Category subject to county tax.
Rate: Percent of sale at which category taxed by county.
City Taxable?: Category items subject to city tax.
Rate: Percent of sale at which category items taxed by city.
6. Click OK at screen bottom.
Updating Inventory Categories
After adding an inventory category you can change or remove the information
you provided by first selecting a specific category on the Inventory Categories
screen. You can navigate to this screen from the Main display as follows:
Click toolbar Table Maintenance
icon; click Inventory Categories on
menu, and then click OK at screen bottom.
Inventory Categories screen displays:
38
1. Do one of the following:
-
To completely remove (delete) entry, go to Step 2; or
-
To update information for an entry, go to Step 5.
2. Right-click entry to be removed.
3. Click Delete icon, and then click Yes on Verification of Deletion dialog;
selected item removed.
4. STOP!
5. Right-click entry to be updated.
6. Click Change icon; Change Inventory Category Code screen displays.
39
7. As appropriate, change the following:
Description: Unique name or brief narrative identifying entry.
8. As appropriate, add, change or remove the following:
Suggested G.P.: Category gross profit percent (e.g., ‘15’).
Min Age to Buy: Category minimum purchase age (e.g., ‘18’, ‘21’).
Fuel Category: Category comprises fuel products.
Cigarette Category: Category comprises tobacco products.
Cost Of Goods: General Ledger number for category Cost of Goods.
Sales: General Ledger number for category sales.
9. If category either site specific or applicable to multiple sites with varying
tax rates, click Site Specific Values tab and go to Step 10; else, go to Step
11.
NOTE: You must set up additional site locations per instructions in Chapter 2,
Managing Site Information, before you can specify site-specific values.
40
10. As appropriate, add, change or remove the following for each listed site:
State Taxable?: Category subject to state tax.
Rate: Percent of sale at which category taxed by state; required if State
Taxable? selected.
County Taxable?: Category subject to county tax.
Rate: Percent of sale at which category taxed by county.
City Taxable?: Category items subject to city tax.
Rate: Percent of sale at which category items taxed by city.
11. Click OK at screen bottom.
Adding Inventory Items
You input a new inventory item using the Add Item screen. You can navigate
to this screen from the Main display three ways:
Click toolbar Inventory tab, and then click Add an Item on menu.
41
OR
Click toolbar Table Maintenance
icon; click Inventory Items on
menu, and then click OK at screen bottom.
Inventory Items screen displays:
.
Click Add at screen bottom.
OR
Click toolbar Inventory
icon; Inventory Items screen displays:
42
Click Add at screen bottom.
Then:
Add Item screen displays:
1. As appropriate, type or select the following required General tab
information:
Stock #: Unique number or code identifying item. Note: To have system
assign next available sequence number, click Get.
Description: Unique name or brief narrative identifying entry.
Category: Unique name or brief narrative identifying category.
43
2. To add inventory categories to those displayed, go to Step 3; else, go to
Step 10.
3. Click Add at right of Category window; Add Inventory Category screen
displays:
4. Type the following required General tab information:
Description: Unique name or brief narrative identifying entry.
5. To add optional General tab information, go to Step 6; else, go to Step 7.
6. As appropriate, type or select the following:
Suggested G.P.: Category gross profit percent (e.g., ‘15’).
Min Age to Buy: Category minimum purchase age (e.g., ‘18’, ‘21’).
Fuel Category: Category comprises fuel products.
Cigarette Category: Category comprises tobacco product.
Cost Of Goods: General Ledger number for category Cost of Goods.
Sales: General Ledger number for category sales.
7. If category either site specific or applicable to multiple sites with varying
tax rates, click Site Specific Values tab and go to Step 8; else click OK and
go to Step 10.
44
NOTE: You must set up additional site locations per instructions in Chapter 2,
Managing Site Information, before you can specify site-specific values.
8. As appropriate, select and type the following for each listed site:
State Taxable?: Category subject to state tax.
Rate: Percent of sale at which category taxed by state; required if State
Taxable? selected.
County Taxable?: Category subject to county tax.
Rate: Percent of sale at which category taxed by county.
City Taxable?: Category items subject to city tax.
Rate: Percent of sale at which category items taxed by city.
9. Click OK at screen bottom.
45
10. To add optional General tab information, go to Step11; else, go to Step 22.
11. As appropriate, type or select the following optional general tab
information:
UPC Code: Unique Universal Product Code identifying item.
Use Category Tax Values: Use default tax values specified for item
category.
Requires Permit?: Item requires customer permit on file to purchase.
Is this item a Gift Card?: Item is gift card.
Receive in Cases: Item received in case lots.
QTY/Case: Item quantity per case; REQUIRED if Receive in Cases
selected.
On Hand: Item quantity on hand, per specified unit of measure (case or
unit).
Cost: Item vendor price, per specified unit of measure.
Retail Price: Item retail price per specified unit of measure (case or unit).
Default Vendor: Name of primary vendor supplying category items.
12. To add default vendor names to those displayed, go to Step 13; else, go to
Step 21.
13. Click Add at right of Default Vendor window; Add Vendor screen
displays:
14. As appropriate, type or select the following required General tab
information:
Company Name: Business name or individual last name and first name.
City: Address city name.
46
State: Address two character state code (e.g., ‘AZ’).
Zipcode: Address five-digit postal code.
Vendor Code: Unique code identifying vendor.
Category: Unique name or brief narrative identifying category.
15. To add vendor category to those displayed, go to Step 16; else, go to Step
19.
16. Click Add at right of Category window; Add Vendor Category screen
displays:
17. Type the following:
Description: Unique name or brief narrative identifying entry.
18. Click OK at screen bottom to add information.
19. To add optional vendor information, go to Step 20; else, go to Step 21.
20. As appropriate, type the following:
Address: Street number and name, and unit number, if applicable (e.g.,
1011 Helderberg Ave #103’).
Contact: Contact last and first name and/or title (e.g., “Jones, Stephanie,
Supervisor’, ‘Owner’, etc.).
Description: Contact email address and/or site location (e.g., ‘Building
101A’).
Phone: Contact area code and telephone number (e.g., ‘310-555-3434’).
47
21. Click OK at screen bottom to add information; Add Item screen redisplays.
22. To input local fuel item external cross-reference table and eSite product
code information, go to Step 23; else, go to Step 26.
23. Click XRef UNValues tab; Add Item XRef Values screen displays:
48
Note: Some or all applicable values may have been entered by e3tek Technical
Support during product installation.
24. As appropriate, review, type or select the following information:
Fuel Link Product Code: Unique code identifying local item externally
mapped to corresponding item in Fuel Link cross reference table.
CFN Product Code: Unique code identifying local item externally mapped
to corresponding item in Commercial Fueling Network cross-reference
table.
cp POS Product Code: Unique code identifying local item externally
mapped to corresponding item in 3rd-party POS (e.g., Passport, Radiant,
etc.) cross-reference table; required for CP720 locations only.
ccToolkit enum Value: Unique descriptor identifying product category or
specific processor to which item sales restricted.
es Fuel Product Code: Numeric code (1-9) identifying fuel item grade or
type at eSite dispenser.
es CCH Product Code: Unique five-character code identifying fuel item
for credit host processing at eSite dispenser.
es Product Short Name: Three-character code identifying fuel item grade
or type at eSite dispenser (e.g., unleaded = ‘UNL’, etc.).
25. Click OK at screen bottom to add information.
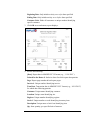
26. If item is combo to which you want to include other items, click Combos
and Dependencies tab and go to Step 27; else, go to Step 28.
49
27. Click item(s) you want to add to combo, then click OK at screen bottom;
Add Item screen redisplays.
28. Click OK at screen bottom.
Updating Inventory Items
After adding an inventory item you can add to, change or remove the
information you have provided by first selecting a specific item on the
Inventory Items screen. You can navigate to this screen from the Main display
two ways:
Click toolbar Inventory tab, and then click Show the Items List on menu.
50
OR
Click toolbar Table Maintenance
icon; click Inventory Items on
menu, and then click OK at screen bottom.
Then:
Inventory Items screen displays:
51
1. Do one of the following:
-
To completely remove (delete) entry, go to Step 2; or
-
To update information for an entry, go to Step 5.
2. Right-click entry to be removed.
3. Click Delete icon, and then click Yes on Verification of Deletion dialog;
selected item removed.
4. STOP!
5. Right-click entry to be updated.
52
6. Click Change icon; Change Item screen displays:
7. As appropriate, change the following General tab information:
Stock #: Unique number or code identifying item. Note: To have system
assign next available sequence number, click Get.
Description: Unique name or brief narrative identifying entry.
Category: Unique name or brief narrative identifying category.
8. To add inventory categories to those displayed, go to Step 9; else, go to
Step 16.
9. Click Add at right of Category window. Add Inventory Category screen
displays:
53
10. Type the following required General tab information:
Description: Unique name or brief narrative identifying entry.
11. To add optional General tab information, go to Step 12; else, go to Step 13.
12. As appropriate, type or select the following:
Suggested G.P.: Category gross profit percent (e.g., ‘15’).
Min Age to Buy: Category minimum purchase age (e.g., ‘18’, ‘21’).
Fuel Category: Category comprises fuel products.
Cigarette Category: Category comprises tobacco product.
Cost Of Goods: General Ledger number for category Cost of Goods.
Sales: General Ledger number for category sales.
13. If category either site specific or applicable to multiple sites with varying
tax rates, click Site Specific Values tab and go to Step 14; else go to Step
16.
NOTE: You must set up additional site locations per instructions in Chapter 2,
Managing Site Information, before you can specify site-specific values.
54
14. As appropriate, select and/or type the following for each listed site:
State Taxable?: Category subject to state tax.
Rate: Percent of sale at which category taxed by state; required if State
Taxable? selected.
County Taxable?: Category subject to county tax.
Rate: Percent of sale at which category taxed by county.
City Taxable?: Category items subject to city tax.
Rate: Percent of sale at which category items taxed by city.
15. Click OK at screen bottom to add information.
16. To update optional General tab information, go to Step17; else, go to Step
27.
17. As appropriate, change the following:
UPC Code: Unique Universal Product Code identifying item.
Use Category Tax Values: Use default tax values specified for item
category.
Requires Permit?: Item requires customer permit on file to purchase.
Is this item a Gift Card?: Item is gift card.
Receive in Cases: Item received in case lots.
QTY/Case: Item quantity per case; REQUIRED if Receive in Cases
selected.
On Hand: Item quantity on hand, per specified unit of measure (case or
unit).
Cost: Item vendor price, per specified unit of measure.
55
Retail Price: Item retail price per specified unit of measure (case or unit).
Default Vendor: Name of primary vendor supplying category items.
18. To add vendor names to those displayed, go to Step 19; else, go to Step 27.
19. Click Add at right of Default Vendor window; Add Vendor screen
displays:
20. As appropriate, type or select the following required General tab
information:
Company Name: Business name or individual last name and first name.
City: Address city name.
State: Address two character state code (e.g., ‘AZ’).
Zipcode: Address five-digit postal code.
Vendor Code: Unique code identifying vendor.
Category: Unique name or brief narrative identifying category.
56
21. To add vendor category to those displayed, go to Step 22; else, go to Step
25.
22. Click Add at right of Category window; Add Vendor Category screen
displays:
23. Type the following:
Description: Unique name or brief narrative identifying entry.
24. Click OK at screen bottom.
25. To add optional vendor information, go to Step 26; else, go to Step 27.
26. As appropriate, type the following:
Address: Street number and name, and unit number, if applicable (e.g.,
1011 Helderberg Ave #103’).
Contact: Contact last and first name and/or title (e.g., “Jones, Stephanie,
Supervisor’, ‘Owner’, etc.).
Description: Contact email address and/or site location (e.g., ‘Building
101A’).
Phone: Contact area code and telephone number (e.g., ‘310-555-3434’).
57
27. Click OK to at screen bottom to add information; Change Item screen
redisplays.
28. To change item tax information, click Tax Information tab at screen top and
go to Step 29; else, go to Step 30.
29. As appropriate, update following for each listed site:
State Taxable?: Category items subject to state tax.
58
Rate: Percent of sale at which category items taxed by state; required if
State Taxable? selected.
County Taxable?: Category items subject to county tax.
Rate: Percent of sale at which category items taxed by county.
City Taxable?: Category items subject to city tax.
Rate: Percent of sale at which category items taxed by city.
30. To change item cross reference information, click XRef Values tab at
screen top and go to Step 31; else, go to Step 32.
31. As appropriate, update the following information:
Fuel Link Product Code: Unique code identifying local item externally
mapped to corresponding item in Fuel Link cross reference table.
CFN Product Code: Unique code identifying local item externally mapped
to corresponding item in Commercial Fueling Network cross-reference
table.
cp POS Product Code: Unique code identifying local item externally
mapped to corresponding item in 3rd-party POS (e.g., Passport, Radiant,
etc.) cross-reference table; required for CP720 locations only.
ccToolkit enum Value: Unique descriptor identifying product category or
specific processor to which item sales restricted.
es Fuel Product Code: Numeric code (1-9) identifying fuel item grade or
type at eSite dispenser.
es CCH Product Code: Unique five-character code identifying fuel item
for credit host processing at eSite dispenser.
es Product Short Name: Three-character code identifying fuel item grade
or type at eSite dispenser (e.g., unleaded = ‘UNL’, etc.)
59
32. To update item combination and dependency information, click Combos
and Dependencies tab at screen top and go to Step 33; else, go to Step 34.
33. As appropriate, click item(s) to update combo information.
34. To change item UPC information, click Item UPC tab and go to Step 35;
else, go to Step 36.
35. As appropriate, add, change or delete item UPC code(s), as follows:
To add, type new code at topmost line in window;
To change, overtype existing code with new code;
To delete, backspace code until line blank.
36. Click OK at screen bottom.
60
5
Chapter
Managing Inventory Pricing
Information
DataManager requires that you establish and maintain pricing structures for the items and item categories
you sell. You can subsequently add to, change and delete the information you provide. This information is
used to determine customer billing and inventory accounting methods, and provide data for export and
reporting purposes.
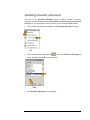
Adding Pricing Categories
Pricing categories are special groupings of inventory items that are given a
single price level for customer billing purposes. You create a pricing category
by selecting from among inventory categories and items you have previously
entered (see Chapter 4, Managing Inventory Information, above).
You input new pricing categories using the Pricing Category Maintenance
screen. You can navigate to this screen from the Main display as follows:
Click toolbar Table Maintenance
icon; click Pricing Categories on
menu, and then click OK at screen bottom.
61
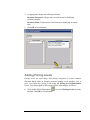
Pricing Categories screen displays:
Click Add at screen bottom; Pricing Category Maintenance screen
displays:
1. Type the following for category:
Description: Unique name or brief narrative identifying entry.
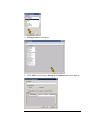
2. Select one of the following from either drop-down list:
Inventory Categories: Unique name or brief narrative identifying
inventory category.
62
Inventory Items: Unique name or brief narrative identifying inventory
item.
3. Click OK at screen bottom.
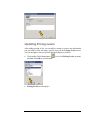
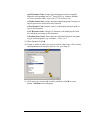
Updating Pricing Categories
After adding pricing categories, you can add to, change or remove the
information you provided by first selecting a specific entry on the Pricing
Categories screen. You can navigate to this screen from the Main display as
follows:
Click toolbar Table Maintenance
icon; click Pricing Categories on
menu, and then click OK at screen bottom.
63
Pricing Categories screen displays:
1. Do one of the following:
-
To completely remove (delete) entry, go to Step 2; or
-
To update information for an entry, go to Step 5.
2. Right-click entry to be removed.
64
3. Click Delete icon, and then click Yes on Verification of Deletion dialog;
selected item removed.
4. STOP!
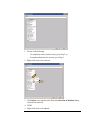
5. Right-click entry to be updated.
6. Click Change icon; Pricing Category Maintenance screen displays.
7. As appropriate, change the following for pricing category:
Description: Unique name or brief narrative identifying entry.
65
8. As appropriate, change the following selection:
Inventory Categories: Unique name or brief narrative identifying
inventory category.
Inventory Items: Unique name or brief narrative identifying inventory
item.
9. Click OK at screen bottom.
Adding Pricing Levels
Pricing levels are used along with pricing categories to create customer
discounts based either on formula, purchase quantity or set purchase cost or
price. You input new pricing levels using the Pricing Level Maintenance
screen. You can navigate to this screen from the Main display as follows:
Click toolbar Table Maintenance
and then click OK at screen bottom.
icon; click Pricing Levels on menu,
66
Pricing Levels screen displays:
Click Add at screen bottom; Pricing Level Maintenance screen displays:
67
1. Type the following required information for level
Description: Unique name or brief narrative identifying entry.
2. As appropriate, select the following required information (Basic
recommended):
Basic: Base pricing level on simple cost or quantity calculation.
Advanced: Base pricing level on formula or algebraic structure.
3. Do one of the following:
-
If Basic pricing method selected (above), go to Step 4; or
-
If Advanced pricing method selected (above), go to Step 6.
4. As appropriate, type or select the following:
Include all items in Price Category for Quantity Pricing?: Apply pricing
level to any item in price category.
Qty Required: Minimum number of price category items required for
pricing level.
Cost +: Cost above inventory cost for items in this pricing level.
Price -: Price below retail for items in this pricing level.
Percent Off: Percent off retail for items in this pricing level.
5. Click OK at screen bottom.
6. Type the following:
Formula: Calculation or algebraic structure used for pricing level.
7. Click OK at screen bottom.
68
Updating Pricing Levels
After adding pricing levels, you can add to, change or remove the information
you provided by first selecting a specific entry on the Pricing Levels screen.
You can navigate to this screen from the Main display as follows:
Click toolbar Table Maintenance
and then click OK at screen bottom.
Pricing Levels screen displays:
icon; click Pricing Levels on menu,
69
1. Do one of the following:
-
To completely remove (delete) entry, go to Step 2; or
-
To update information for an entry, go to Step 5.
2. Right-click entry to be removed.
3. Click Delete icon, and then click Yes on Verification of Deletion dialog;
selected item removed.
4. STOP!
5. Right-click entry to be updated.
70
6. Click Change icon; Price Level Maintenance screen displays
7. Do one of the following:
-
If Basic pricing method selected, go to Step 8; or
-
If Advanced pricing method selected, go to Step 11.
8. As appropriate, change the following for level:
Description: Unique name or brief narrative identifying entry.
9. As appropriate, change, add or remove the following:
Basic: Base pricing level on simple cost or quantity calculation.
Advanced: Base pricing level on formula or algebraic structure.
Include all items in Price Category for Quantity Pricing?: Apply pricing
level to any item in price category.
71
Qty Required: Minimum number of price category items required for
pricing level.
Cost +: Cost above inventory cost for items in this pricing level.
Price -: Price below retail for items in this pricing level.
Percent Off: Percent off retail for items in this pricing level.
10. Click OK at screen bottom to update information.
11. As appropriate, change the following for level:
Description: Unique name or brief narrative identifying entry.
12. As appropriate, change, add or remove the following:
Basic: Base pricing level on simple cost or quantity calculation.
Advanced: Base pricing level on formula or algebraic structure.
Formula: Calculation or algebraic structure used for pricing.
13. Click OK at screen bottom to update information.
72
6
Chapter
Managing Inventory Receipt
Information
DataManager allows you to perform a variety of inventory receipt functions, including receiving floor stock
into inventory, generating and printing receipts, determining inventory reorder limits and identifying topselling items. You can subsequently add to, change and delete the information you provide. This
information is used to determine vendor payments and inventory reordering methods, and provide data for
export and reporting purposes.
Adding Inventory Receipts
You input new inventory receipts using the Inventory Receipts screen. You
can navigate to this screen from the Main display two ways:
Click toolbar Inventory tab, and then click Inventory Receipts on menu.
First Inventory Receipts screen displays:
73
Click Add at screen bottom.
OR
Click toolbar Table Maintenance
icon; click Inventory Receipts on
menu, and then click OK at screen bottom.
First Inventory Receipts screen displays:
74
Click Add at screen bottom.
Then:
Second Inventory Receipts screen displays:
1. As appropriate, review or overtype:
Date: Receipt date, in MM/DD/YYYY format.
2. Type:
Invoice #: Unique number identifying invoice.
3. Do one of the following:
-
To record inventory receipt for specific vendor, go to Step 4; or
-
To record inventory receipt for specific inventory category, go to Step
16; or
-
To record inventory receipt for specific item, go to Step 26.
75
4. Do one of the following:
-
To display inventory items for new vendor, go to Step 5; or
-
To display inventory items for existing vendor, go to Step 14.
5. Click Add at right of Vendor window; Add Vendor screen displays:
6. As appropriate, type or select:
Company Name: Business name or individual last name and first name.
City: Address city name.
State: Address two character state code (e.g., ‘AZ’).
Zipcode: Address five-digit postal code.
Vendor Code: Unique code identifying vendor.
Category: Unique name or brief narrative identifying category.
7. To add vendor category to those displayed, go to Step 8; else, go to Step 13.
8. Click Add at right of Category window; Add Vendor Category screen
displays:
76
9. Type the following:
Description: Unique name or brief narrative identifying entry.
10. When finished, click OK.
11. To add vendor contact information, go to Step 12; else, go to Step 14.
12. Type:
Address: Street number and name, and unit number,
Contact: Last and first name and/or title (e.g., “Jones, Stephanie,
Supervisor’, ‘Owner’, etc.).
Description: Email address and/or site location (e.g., ‘Building 101A’).
Phone: Area code and telephone number (e.g., ‘310-555-3434’).
77
13. When finished, click OK.
14. Select the following:
Vendor: Unique name identifying vendor.
15. Go to Step 58.
16. Do one of the following:
-
To display inventory items for new category, go to Step 17; or
-
To display inventory items for existing category, go to Step 24.
17. Click Add at right of Category window; Add Inventory Category screen
displays:
18. Type the following required General tab information:
Description: Unique name or brief narrative identifying entry.
19. To add optional General tab information, go to Step 20; else, go to Step 21.
20. As appropriate, type or select:
78
Suggested G.P.: Category gross profit percent (e.g., ‘15’).
Min Age to Buy: Category minimum purchase age (e.g., ‘18’, ‘21’).
Fuel Category: Category comprises fuel products.
Cigarette Category: Category comprises tobacco product.
Cost Of Goods: General Ledger number for category Cost of Goods.
Sales: General Ledger number for category sales.
21. If category either site specific or applicable to multiple sites with varying
tax rates, click Site Specific Values tab and go to Step 22; else, go to Step
23.
NOTE: You must set up additional site locations per instructions in Chapter 2,
Managing Site Information, before you can specify site-specific values.
22. As applicable for each listed site, select and type:
79
State Taxable?: Category subject to state tax.
Rate: Percent of sale at which category taxed by state; required if State
Taxable? selected.
County Taxable?: Category subject to county tax.
Rate: Percent of sale at which category taxed by county.
City Taxable?: Category items subject to city tax.
Rate: Percent of sale at which category items taxed by city.
23. When finished, click OK.
24. Select the following:
Category: Unique name identifying category.
25. Go to Step 58.
26. Do one of the following:
-
To display existing inventory item information, go to Step 27; or
-
To display new inventory item information, go to Step 30.
27. Click Find Item; Select Item screen displays:
80
28. Click item, and then click Select; Inventory Receipts screen redisplays.
29. Go to Step 58.
30. Click Add a New Item; Add Item screen displays:
31. As appropriate, type or select the following required General tab
information:
Stock #: Unique number or code identifying item. Note: To have system
assign next available sequence number, click Get.
Description: Unique name or brief narrative identifying entry.
Category: Unique name or brief narrative identifying category.
32. To add inventory categories to those displayed, go to Step 33; else, go to
Step 40.
33. Click Add at right of Category window; Add Inventory Category screen
displays:
81
34. Type the following required General tab information:
Description: Unique name or brief narrative identifying entry.
35. To add optional General tab information, go to Step 36; else, go to Step 37.
36. As appropriate, type or select the following:
Suggested G.P.: Category gross profit percent (e.g., ‘15’).
Min Age to Buy: Category minimum purchase age (e.g., ‘18’, ‘21’).
Fuel Category: Category comprises fuel products.
Cigarette Category: Category comprises tobacco product.
Cost Of Goods: General Ledger number for category Cost of Goods.
Sales: General Ledger number for category sales.
37. If category either site specific or applicable to multiple sites with varying
tax rates, click Site Specific Values tab and go to Step 38; else click OK
and go to Step 40.
NOTE: You must set up additional site locations per instructions in Chapter 2,
Managing Site Information, before you can specify site-specific values.
82
38. As appropriate for each listed site, select and type:
State Taxable?: Category subject to state tax.
Rate: Percent of sale at which category taxed by state; required if State
Taxable? selected.
County Taxable?: Category subject to county tax.
Rate: Percent of sale at which category taxed by county.
City Taxable?: Category items subject to city tax.
Rate: Percent of sale at which category items taxed by city.
39. When finished, click OK.
40. To add optional General tab information, go to Step 41; else, go to Step 52.
41. As appropriate, type or select the following optional general tab
information:
UPC Code: Unique Universal Product Code identifying item.
Use Category Tax Values: Use default tax values specified for item
category.
Requires Permit?: Item requires customer permit on file to purchase.
Is this item a Gift Card?: Item is gift card.
Receive in Cases: Item received in case lots.
QTY/Case: Item quantity per case; REQUIRED if Receive in Cases
selected.
On Hand: Item quantity on hand, per specified unit of measure (case or
unit).
83
Cost: Item cost per specified unit of measure (case or unit).
Retail Price: Item retail price per specified unit of measure (case or unit).
Default Vendor: Name of primary vendor supplying category items.
42. To add default vendor names to those displayed, go to Step 43; else, go to
Step 51.
43. Click Add at right of Default Vendor window; Add Vendor screen
displays:
44. As appropriate, type or select the following required General tab
information:
Company Name: Business name or individual last name and first name.
City: Address city name.
State: Address two character state code (e.g., ‘AZ’).
Zipcode: Address five-digit postal code.
Vendor Code: Unique code identifying vendor.
Category: Unique name or brief narrative identifying category.
45. To add vendor category to those displayed, go to Step 46; else, go to Step
49.
46. Click Add at right of Category window; Add Vendor Category screen
displays:
84
47. Type the following:
Description: Unique name or brief narrative identifying entry.
48. When finished, click OK.
49. To add optional vendor information, go to Step 50; else, go to Step 51.
50. As appropriate, type the following:
Address: Street number and name, and unit number, if applicable (e.g.,
1011 Helderberg Ave #103’).
Contact: Contact last and first name and/or title (e.g., “Jones, Stephanie,
Supervisor’, ‘Owner’, etc.).
Description: Contact email address and/or site location (e.g., ‘Building
101A’).
Phone: Contact area code and telephone number (e.g., ‘310-555-3434’).
51. When finished, click OK; Add Item screen redisplays.
85
52. To input local fuel item external cross-reference table and eSite product
code information, go to Step 53; else, go to Step 56.
53. Click XRef UNValues tab; Add Item XRef Values screen displays:
Note: Some or all applicable values may have been entered by e3tek Technical
Support during product installation.
54. As appropriate, review, type or select:
Fuel Link Product Code: Unique code identifying local item externally
mapped to corresponding item in Fuel Link cross reference table.
CFN Product Code: Unique code identifying local item externally mapped
to corresponding item in Commercial Fueling Network cross-reference
table.
86
cp POS Product Code: Unique code identifying local item externally
mapped to corresponding item in 3rd-party POS (e.g., Passport, Radiant,
etc.) cross-reference table; required for CP720 locations only.
ccToolkit enum Value: Unique descriptor identifying product category or
specific processor to which item sales restricted.
es Fuel Product Code: Numeric code (1-9) identifying fuel item grade or
type at eSite dispenser.
es CCH Product Code: Unique five-character code identifying fuel item
for credit host processing at eSite dispenser.
es Product Short Name: Three-character code identifying fuel item grade
or type at eSite dispenser (e.g., unleaded = ‘UNL’, etc.).
55. When finished, click OK.
56. If item is combo to which you want to include other items, click Combos
and Dependencies tab and go to Step 57; else, go to Step 58.
57. Click item(s) you want to add to combo, then click OK at screen bottom;
Add Item screen redisplays.
87
58. When finished, click OK; Inventory Receipts screen redisplays.
59. As applicable, review, type and/or select:
Items: Item line number.
Category: Unique name identifying category.
Item: Unique name identifying item.
Stock #: Unique number or code identifying item.
UPC Code: Unique Universal Product Code identifying item.
Qty Received: Item quantity received, per specified unit of measure.
Cases: Item quantity received in cases.
Qty/Case: Item quantity per case (required if Cases selected).
Current Cost: Item current cost.
Vendor Price: Item current vendor price.
Disc: Item discount amount, expressed in dollars and cents.
Current Retail: Item current retail price.
88
New Retail: Item new retail price.
Minimum G.P. %: Item minimum gross profit, expressed as percent.
Calculated G.P. %: System-calculated gross profit, expressed as percent.
Ext Amount: Line item extended amount; Qty Received x either Current
Cost or Vendor Price.
Sub Total: Sum of Ext Amount values for all line items.
Discount Total: Sum of Disc. values for all line items.
Discount %: Discount Total value expressed as percent.
Misc Charges: Vendor miscellaneous charge description(s) and total dollar
amount.
Receipt Total: Sum of Sub Total value + Misc Charges value, - Discount
Total value.
60. Do one of the following:
-
To save inventory receipt information for later completion and/or
printing, go to Step 61; or
-
To receive item(s) into inventory and create receipt, go to Step 62.
61. Click Save; STOP!
62. Click Receive; DataManager print request screen displays.
63. Do one of the following:
-
To not print receipt, click No to exit; or
-
To review and/or print receipt, click Yes; go to Step 64.
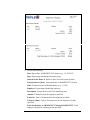
64. Inventory Receipts screen displays; do one of the following:
-
To review receipt before printing, go to Step 65; or
-
To print receipt without review, go to Step 67.
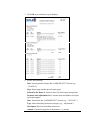
89
65. Review the following:
Receipt Number: Unique number identifying receipt.
Receipt Date: Date receipt created, in MM/DD/YYYY format.
Vendor Invoice #: Unique number identifying invoice.
Stock #: Unique number or code identifying item.
Description: Unique name or brief narrative identifying entry.
Qty: Item quantity ordered, per specified unit of measure.
Vendor Price: Item current vendor price.
By Case?: Item quantity received in cases.
Per Case: Item quantity per case.
# Rcvd: Item quantity received.
Ext Amount: Vendor Price x # Rcvd.
Receipt Total: Receipt total dollar amount.
66. Do one of the following:
-
To close receipt without printing, go to Step 67; or
-
To print receipt, go to Step 68.
67. Click close
68. Click printer
on Inventory Receipts screen banner; STOP!
icon on tool bar, and then click OK on print dialog.
90
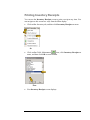
Updating Inventory Receipts
You can use the Inventory Receipts screen to add to, change or remove
inventory receipt information for invoiced items you have not yet received into
inventory. You can navigate to this screen two ways from the Main display:
Click toolbar Inventory tab, and then click Inventory Receipts on menu.
Or
Click toolbar Table Maintenance
icon; click Inventory Receipts on
menu, and then click OK at screen bottom.
Then:
First Inventory Receipts screen displays:
91
1. Do one of the following:
-
To completely remove (delete) entry, go to Step 2; or
-
To update information for entry, go to Step 5.
2. Right-click entry to be removed.
3. Click Delete icon, and then click Yes on Verification of Deletion dialog;
entry removed.
4. STOP!
92
5. Right-click entry to be updated.
6. Click Change icon; second Inventory Receipts screen displays:
7. As appropriate, review and/or type:
Date: Receipt date, in MM/DD/YYYY format.
Invoice #: Unique number identifying invoice.
8. Do one of the following:
-
To record inventory receipt for specific vendor, go to Step 9; or
-
To record inventory receipt for specific inventory category, go to Step
21; or
-
To record inventory receipt for specific item, go to Step 32.
93
9. Do one of the following:
-
To display inventory items for new vendor, go to Step 10; or
-
To display inventory items for existing vendor, go to Step 19.
10. Click Add at right of Vendor window; Add Vendor screen displays:
11. As appropriate, type or select:
Company Name: Business name or individual last name and first name.
City: Address city name.
State: Address two character state code (e.g., ‘AZ’).
Zipcode: Address five-digit postal code.
Vendor Code: Unique code identifying vendor.
Category: Unique name or brief narrative identifying category.
12. To add vendor category to those displayed, go to Step 13; else, go to Step
18.
94
13. Click Add at right of Category window; Add Vendor Category screen
displays:
14. Type the following:
Description: Unique name or brief narrative identifying entry.
15. When finished, click OK.
16. To add vendor contact information, go to Step 17; else, go to Step 19.
17. Type:
Address: Street number and name, and unit number,
Contact: Last and first name and/or title (e.g., “Jones, Stephanie,
Supervisor’, ‘Owner’, etc.).
Description: Email address and/or site location (e.g., ‘Building 101A’).
Phone: Area code and telephone number (e.g., ‘310-555-3434’).
95
18. When finished, click OK.
19. Select the following:
Vendor: Unique name identifying vendor.
20. Go to Step 63.
21. Do one of the following:
-
To display inventory items for new category, go to Step 22; or
-
To display inventory items for existing category, go to Step 29.
22. Click Add at right of Category window; Add Inventory Category screen
displays:
96
23. Type the following required General tab information:
Description: Unique name or brief narrative identifying entry.
24. To add optional General tab information, go to Step 25; else, go to Step 26.
25. As appropriate, type or select:
Suggested G.P.: Category gross profit percent (e.g., ‘15’).
Min Age to Buy: Category minimum purchase age (e.g., ‘18’, ‘21’).
Fuel Category: Category comprises fuel products.
Cigarette Category: Category comprises tobacco product.
Cost Of Goods: General Ledger number for category Cost of Goods.
Sales: General Ledger number for category sales.
26. If category either site specific or applicable to multiple sites with varying
tax rates, click Site Specific Values tab and go to Step 27; else, go to Step
28.
97
NOTE: You must set up additional site locations per instructions in Chapter 2,
Managing Site Information, before you can specify site-specific values.
27. As applicable for each listed site, select and type:
State Taxable?: Category subject to state tax.
Rate: Percent of sale at which category taxed by state; required if State
Taxable? selected.
County Taxable?: Category subject to county tax.
Rate: Percent of sale at which category taxed by county.
City Taxable?: Category items subject to city tax.
Rate: Percent of sale at which category items taxed by city.
28. When finished, click OK.
29. Select the following:
98
Category: Unique name identifying category.
30. Go to Step 63
31. Do one of the following:
-
To display existing inventory item information, go to Step 32; or
-
To display new inventory item information, go to Step 35.
32. Click Find Item; Select Item screen displays:
33. Click item, and then click Select; Inventory Receipts screen redisplays.
34. Go to Step 63.
35. Click Add a New Item; Add Item screen displays:
99
36. As appropriate, type or select the following required General tab
information:
Stock #: Unique number or code identifying item. Note: To have system
assign next available sequence number, click Get.
Description: Unique name or brief narrative identifying entry.
Category: Unique name or brief narrative identifying category.
37. To add inventory categories to those displayed, go to Step 38; else, go to
Step 45.
38. Click Add at right of Category window; Add Inventory Category screen
displays:
39. Type the following required General tab information:
Description: Unique name or brief narrative identifying entry.
40. To add optional General tab information, go to Step 41; else, go to Step 42.
100
41. As appropriate, type or select the following:
Suggested G.P.: Category gross profit percent (e.g., ‘15’).
Min Age to Buy: Category minimum purchase age (e.g., ‘18’, ‘21’).
Fuel Category: Category comprises fuel products.
Cigarette Category: Category comprises tobacco product.
Cost Of Goods: General Ledger number for category Cost of Goods.
Sales: General Ledger number for category sales.
42. If category either site specific or applicable to multiple sites with varying
tax rates, click Site Specific Values tab and go to Step 43; else click OK
and go to Step 45.
NOTE: You must set up additional site locations per instructions in Chapter 2,
Managing Site Information, before you can specify site-specific values.
101
43. As appropriate for each listed site, select and type:
State Taxable?: Category subject to state tax.
Rate: Percent of sale at which category taxed by state; required if State
Taxable? selected.
County Taxable?: Category subject to county tax.
Rate: Percent of sale at which category taxed by county.
City Taxable?: Category items subject to city tax.
Rate: Percent of sale at which category items taxed by city.
44. When finished, click OK.
45. To add optional General tab information, go to Step 46; else, go to Step 57.
46. As appropriate, type or select the following optional general tab
information:
UPC Code: Unique Universal Product Code identifying item.
Use Category Tax Values: Use default tax values specified for item
category.
Requires Permit?: Item requires customer permit on file to purchase.
Is this item a Gift Card?: Item is gift card.
Receive in Cases: Item received in case lots.
QTY/Case: Item quantity per case; REQUIRED if Receive in Cases
selected.
On Hand: Item quantity on hand, per specified unit of measure (case or
unit).
Cost: Item vendor price, per specified unit of measure.
Retail Price: Item retail price per specified unit of measure (case or unit).
Default Vendor: Name of primary vendor supplying category items.
47. To add default vendor names to those displayed, go to Step 48; else, go to
Step 56.
48. Click Add at right of Default Vendor window; Add Vendor screen
displays:
102
48. As appropriate, type or select the following required General tab
information:
Company Name: Business name or individual last name and first name.
City: Address city name.
State: Address two character state code (e.g., ‘AZ’).
Zipcode: Address five-digit postal code.
Vendor Code: Unique code identifying vendor.
Category: Unique name or brief narrative identifying category.
49. To add vendor category to those displayed, go to Step 50; else, go to Step
53.
50. Click Add at right of Category window; Add Vendor Category screen
displays:
51. Type the following:
Description: Unique name or brief narrative identifying entry.
103
52. When finished, click OK.
53. To add optional vendor information, go to Step 54; else, go to Step 55.
54. As appropriate, type the following:
Address: Street number and name, and unit number, if applicable (e.g.,
1011 Helderberg Ave #103’).
Contact: Contact last and first name and/or title (e.g., “Jones, Stephanie,
Supervisor’, ‘Owner’, etc.).
Description: Contact email address and/or site location (e.g., ‘Building
101A’).
Phone: Contact area code and telephone number (e.g., ‘310-555-3434’).
55. When finished, click OK; Add Item screen redisplays.
104
56. To input local fuel item external cross-reference table and eSite product
code information, go to Step 57; else, go to Step 60.
57. Click XRef UNValues tab; Add Item XRef Values screen displays:
Note: Some or all applicable values may have been entered by e3tek Technical
Support during product installation.
58. As appropriate, review, type or select:
Fuel Link Product Code: Unique code identifying local item externally
mapped to corresponding item in FuelLink cross reference table.
CFN Product Code: Unique code identifying local item externally mapped
to corresponding item in Commercial Fueling Network cross-reference
table.
105
cp POS Product Code: Unique code identifying local item externally
mapped to corresponding item in 3rd-party POS (e.g., Passport, Radiant,
etc.) cross-reference table; required for CP720 locations only.
ccToolkit enum Value: Unique descriptor identifying product category or
specific processor to which item sales restricted.
es Fuel Product Code: Numeric code (1-9) identifying fuel item grade or
type at eSite dispenser.
es CCH Product Code: Unique five-character code identifying fuel item
for credit host processing at eSite dispenser.
es Product Short Name: Three-character code identifying fuel item grade
or type at eSite dispenser (e.g., unleaded = ‘UNL’, etc.).
59. When finished, click OK.
60. If item is combo to which you want to include other items, click Combos
and Dependencies tab and go to Step 61; else, go to Step 62.
61. Click item(s) you want to add to combo, and then click OK at screen
bottom; Add Item screen redisplays:
106
62. When finished, click OK; Inventory Receipts screen redisplays.
63. As applicable, review, type and/or select:
Items: Item line number.
Category: Unique name identifying category.
Item: Unique name identifying item.
Stock #: Unique number or code identifying item.
UPC Code: Unique Universal Product Code identifying item.
Qty Received: Item quantity received, per specified unit of measure.
Cases: Item quantity received in cases.
Qty/Case: Item quantity per case (required if Cases selected).
Current Cost: Item current cost.
Vendor Price: Item current vendor price.
Disc: Item discount amount, expressed in dollars and cents.
Current Retail: Item current retail price.
107
New Retail: Item new retail price.
Minimum G.P. %: Item minimum gross profit, expressed as percent.
Calculated G.P. %: System-calculated gross profit, expressed as percent.
Ext Amount: Line item extended amount; Qty Received x either Current
Cost or Vendor Price.
Sub Total: Sum of Ext Amount values for all line items.
Discount Total: Sum of Disc. values for all line items.
Discount %: Discount Total value expressed as percent.
Misc Charges: Vendor miscellaneous charge description(s) and total dollar
amount.
Receipt Total: Sum of Sub Total value + Misc Charges value, - Discount
Total value.
64. Do one of the following:
-
To save inventory receipt information for later completion and/or
printing, go to Step 65; or
-
To receive item(s) into inventory and create receipt, go to Step 66.
65. Click Save; STOP!
66. Click Receive; DataManager print request screen displays.
67. Do one of the following:
-
To not print receipt, click No to exit; or
-
To review and/or print receipt, click Yes; go to Step 68.
68. Inventory Receipts screen displays; do one of the following:
-
To review receipt before printing, go to Step 69; or
-
To print receipt without review, go to Step 71.
108
69. Review the following:
Receipt Number: Unique number identifying receipt.
Receipt Date: Date receipt created, in MM/DD/YYYY format.
Vendor Invoice #: Unique number identifying invoice.
Stock #: Unique number or code identifying item.
Description: Unique name or brief narrative identifying entry.
Qty: Item quantity ordered, per specified unit of measure.
Vendor Price: Item current vendor price.
By Case?: Item quantity received in cases.
Per Case: Item quantity per case.
# Rcvd: Item quantity received.
Ext Amount: Vendor Price x # Rcvd.
Receipt Total: Receipt total dollar amount.
70. Do one of the following:
-
To close receipt without printing, go to Step 71; or
-
To print receipt, go to Step 72.
71. Click close
72. Click printer
on Inventory Receipts screen banner; STOP!
icon on tool bar, and then click OK on print dialog.
109
Printing Inventory Receipts
You can use the Inventory Receipts screen to print a receipt at any time. You
can navigate to this screen two ways from the Main display:
Click toolbar Inventory tab, and then click Inventory Receipts on menu.
Or
Click toolbar Table Maintenance
icon; click Inventory Receipts on
menu, and then click OK at screen bottom.
Then:
First Inventory Receipts screen displays:
110
1. Right-click entry to be printed.
2. Click Print Receipt icon; selected receipt displays:
111
18. Click printer
icon on tool bar, and then click OK on print dialog.
112
7
Chapter
Managing Inventory
Adjustment Information
DataManager allows you to perform a variety of inventory update functions, including adjusting on hand
item quantities, determining inventory reorder limits and generating and printing reports. You can
subsequently add to, change and delete the information you provide. This information is used to monitor
and control inventory activity and help determine floor stock trends.
Adding Inventory Adjustments
You input new inventory adjustments using the Inventory Adjustments
screen. You can navigate to this screen two ways from the Main display:
Click toolbar Inventory tab, and then click Inventory Adjustments on
menu.
OR
Click toolbar Table Maintenance
icon; click Inventory Adjustments
on menu, and then click OK at screen bottom.
113
Then:
First Inventory Receipts screen displays:
Click Add at screen bottom; second Inventory Adjustments screen
displays:
114
1. Do one of the following:
- To display inventory information for all items in a specific category, go to
Step 2; or
- To display inventory information for specific item(s) only, go to Step 4.
2. Select:
Category: Unique name or brief narrative identifying category.
3. Go to Step 6.
4. Click Find Item; Select Item screen displays:
115
5. Click/Ctrl-click item(s) whose quantity you want to adjust, and then click
Select at screen bottom.
6. Review the following:
Stock #: Unique number or code identifying item.
UPC Code: Unique Universal Product Code identifying item.
Description: Unique name or brief narrative identifying item.
On Hand: Item quantity currently in inventory.
7. As appropriate, type and select:
Adjustment Quantity: Number of this item to be adjusted (+/-).
Reason: Cause or explanation.
116
8. Do one of the following:
- To save information but not update inventory, go to Step 9; or
- To save information and update inventory, go to Step 11.
9. Click Save at screen bottom.
10. STOP!
11. Click Apply at screen bottom; print dialog displays.
12. Do one of the following:
-
To close without printing Inventory Adjustments report, go to Step 13.
-
To print Inventory Adjustments report, go to Step 15
13. Click No.
14. STOP!
15. Click Yes; Inventory Adjustments report displays:
117
16. Review the following:
Date: Inventory Adjustments report date, in MM/DD/YYYY format.
Adjustment Number: Unique, system-generated number identifying
adjustment transaction.
Adjustment Date: System-generated adjustment transaction date, in
MM/DD/YYYY format.
StockNumber: Unique number identifying item.
UPCCode: Unique Universal Product Code identifying item.
Description: Unique name or brief narrative identifying item.
Qty: Number of this item adjusted (+/-).
Reason: Cause or explanation.
17. Click printer
icon on tool bar, and then click OK on print dialog.
Updating Inventory Adjustments
You can add to, change or remove inventory adjustments previously saved but
not yet applied using the Inventory Adjustments screen. You can navigate to
this screen two ways from the Main display:
Click toolbar Inventory tab, and then click Inventory Adjustments on
menu.
OR
Click toolbar Table Maintenance
icon; click Inventory Adjustments
on menu, and then click OK at screen bottom.
118
Then:
First Inventory Receipts screen displays:
Select Adjustment # to be updated, and then click Change icon; second
Inventory Adjustments screen displays:
119
1. Do one of the following:
- To display inventory information for all items in a specific category, go to
Step 2; or
- To display inventory information for specific item(s) only, go to Step 4.
2. Select:
Category: Unique name or brief narrative identifying category.
3. Go to Step 6.
4. Click Find Item; Select Item screen displays:
120
5. Click/Ctrl-click item(s) whose quantity you want to adjust, and then click
Select at screen bottom.
6. Review the following:
Stock #: Unique number or code identifying item.
UPC Code: Unique Universal Product Code identifying item.
Description: Unique name or brief narrative identifying item.
On Hand: Item quantity currently in inventory.
7. As appropriate, type and select:
Adjustment Quantity: Number of this item to be adjusted (+/-).
Reason: Cause or explanation.
121
8. Do one of the following:
- To save information but not update inventory, go to Step 9; or
- To save information and update inventory, go to Step 11.
9. Click Save at screen bottom.
10. STOP!
11. Click Apply at screen bottom; print dialog displays.
12. Do one of the following:
-
To close without printing Inventory Adjustments report, go to Step 13.
-
To print Inventory Adjustments report, go to Step 15
13. Click No.
14. STOP!
15. Click Yes; Inventory Adjustments report displays:
122
16. Review the following:
Date: Inventory Adjustments report date, in MM/DD/YYYY format.
Adjustment Number: Unique, system-generated number identifying
adjustment transaction.
Adjustment Date: System-generated adjustment transaction date, in
MM/DD/YYYY format.
StockNumber: Unique number identifying item.
UPCCode: Unique Universal Product Code identifying item.
Description: Unique name or brief narrative identifying item.
Qty: Number of this item adjusted (+/-).
Reason: Cause or explanation.
18. Click printer
icon on tool bar, and then click OK on print dialog.
Printing Inventory Adjustments
You can use the Inventory Adjustments screen to print applied inventory
adjustments at any time. You can navigate to this screen two ways from the
Main display:
Click toolbar Inventory tab, and then click Inventory Adjustments on
menu.
Or
Click toolbar Table Maintenance
icon; click Inventory Adjustments
on menu, and then click OK at screen bottom.
123
Then:
First Inventory Adjustments screen displays:
Right-click entry to be printed, and then click Print Adjustment icon;
Enter Parameter Values screen displays:
124
1. Select the following:
Discrete Value: Adjustment Receipt transaction date.
2. Click OK at screen bottom; selected report displays:
3. Review the following:
Date: Inventory Adjustments report date, in MM/DD/YYYY format.
Adjustment Number: Unique, system-generated number identifying
adjustment transaction.
Adjustment Date: System-generated adjustment transaction date, in
MM/DD/YYYY format.
StockNumber: Unique number identifying item.
125
UPCCode: Unique Universal Product Code identifying item.
Description: Unique name or brief narrative identifying item.
Qty: Number of this item adjusted (+/-).
Reason: Cause or explanation.
4. Click printer
icon on tool bar, and then click OK on print dialog.
126
8
Chapter
Managing Customer Information
DataManager requires that you to set up a discrete account for each proprietary card and credit customer.
The information you provide will be used to determine card usage and credit limits, establish payment
terms, set up accounts receivable and provide bases for activity billing and reporting.
Adding Customer Categories
Customer categories identify types or classes of customers with whom you do
business. You must create customer categories before adding customers to the
system.
You input new customer categories using the Add Customer Category screen.
You can navigate to this screen from the Main display three ways:
Click toolbar Customers tab, and then click Add a Customer on menu.
Add Customer screen displays:
127
Click Add at right of Category window.
OR
Click toolbar Table Maintenance
icon; click Customer Categories on
menu, and then click OK at screen bottom.
Customer Categories screen displays.
128
Click Add at screen bottom.
OR
Click toolbar Customers
icon; Customers screen displays.
129
Click Add at screen bottom; Add Customer screen displays.
Click Add at right of Category window.
Then:
Add Customer Category screen displays.
1. Type the following for category:
Description: Unique name or brief narrative identifying entry.
2. Click OK at screen bottom.
Updating Customer Categories
After adding customer categories you can change or remove the information
you provided by first selecting a specific category on the Customer Categories
screen. You can navigate to this screen from the Main display as follows:
130
Click toolbar Table Maintenance
icon; click Customer Categories on
menu, and then click OK at screen bottom.
Customer Categories screen displays.
131
1. Do one of the following:
-
To completely remove (delete) entry, go to Step 2; or
-
To update information for an entry, go to Step 5.
2. Right-click entry to be removed.
3. Click Delete icon, and then click Yes on Verification of Deletion dialog;
selected item removed.
4. STOP!
5. Right-click entry to be updated.
132
6. Click Change icon; Edit Customer Category screen displays:
7. Change the following for category:
Description: Unique name or brief narrative identifying entry.
8. Click OK at screen bottom.
133
Adding Customer Accounts
You must create a discrete account for each of your customers for transaction
activity management and reporting purposes. You set up a new customer using
the Add Customer screen. You can navigate to this screen from the Main
display two ways:
Click toolbar Table Maintenance
then click OK at screen bottom.
Customers screen displays:
Click Add at screen bottom.
icon; click Customers on menu, and
134
OR
Click toolbar Customers Tab, and then click Add a Customer on menu.
Then:
Add Customer screen displays:
1. As appropriate, type or select the following required Primary Information
tab customer information:
Name: Business name or individual last and first names.
Customer Code: Unique code identifying customer.
Category: Unique name or brief narrative identifying category.
2. To add category to those listed, go to Step 3; else, go to Step 6.
3. Click Add at right of Category window; Add Customer Category screen
displays:
135
4. Type the following:
Description: Unique name or brief narrative identifying entry.
5. Click OK at screen bottom update information.
6. To add additional (optional) Primary Information tab information, go to
Step 7; else, go to Step 20.
7. As appropriate, type or select the following customer information:
Address: Street number and name, and unit number, if applicable (e.g.,
1011 Helderberg Ave #103’).
City: Address city name.
State: Address two character state code (e.g., ‘AZ’).
Zipcode: Address five-digit postal code.
Contact: Contact last and first names and/or title (e.g., “Jones, Stephanie,
Supervisor’, ‘Owner’, etc.).
Description: Contact email address and/or site location (e.g., ‘Building
101A’).
Phone: Area code and telephone number (e.g., ‘310-555-3434’).
Default Terms: Code indicating customer invoice payment terms (e.g.,
‘Net 30’).
8. To add default terms to those displayed, go to Step 9; else, go to Step 12.
9. Click Add at right of Default Terms window; Add Terms Code screen
displays:
136
10. Type the following:
Description: Unique name or brief narrative identifying item.
Days til Due: Number of days until payment due.
Discount Days: Number of days payment due to receive discount.
Disc %: Discount percent if payment received within specified Discount
Days value.
11. Click OK at screen bottom to update information; Add Customer screen
redisplays:
137
12. To add customer credit information, go to Step 13 (requires special logon
and password); else, go to Step 17.
13. Click Manage Credit; Manage Credit Login screen displays:
14. Type password, and then click OK; Add Customer screen redisplays:
15. As appropriate, type or select the following:
Has Credit Limit: Account has credit limit.
Credit Limit: Account credit limit dollar amount.
Allow Charge: Allow use of payment cards (for POS only).
16. To input additional information, go to Step 17; else, go to Step 18.
17. As appropriate, select the following:
IsGiftCardCustomer: Account uses payment cards as gift cards (for POS
only).
Finance Chg Exempt: Account exempt from finance charges.
Sales Tax Exempt: Account exempt from sales tax.
Validate Drivers: Account requires driver PIN entry for card use.
Validate Vehicles: Account requires driver Vehicle Number entry for card
use.
138
Require PO/Job Number for Customer: Account requires Purchase
Order or Job Number validation for card use (for POS only).
18. To continue adding other tab information, go to Step 19; else, go to Step 51.
19. If proprietary card account, go to Step 20; else, go to Step 37.
20. Click Private Cards tab at screen top; Add Customer Private Cards tab
screen displays:
21. Type the following required information for each issued card (omit leading
zeros):
Card Number: Maximum 9-digit, unique number identifying card.
22. To add additional (optional) private card information, go to Step 23; else go
to Step 37.
23. As appropriate, type or select the following for each issued card:
139
Description: Unique name or brief narrative identifying entry.
Pin Required: Cardholder must enter Personal Identification Number for
card use.
24. If Pin Required selected (immediately above), go to Step 25; else, go to
Step 26.
25. Type the following:
Pin Number: Cardholder Personal Identification Number.
26. As appropriate, type or select the following for each issued card:
Odometer Required: Cardholder must enter vehicle odometer reading for
card use.
Driver# Required: Cardholder must enter assigned Driver Number for card
use.
Vehicle# Required: Cardholder must enter assigned Vehicle Number for
card use.
27. If Vehicle# Required selected (see immediately above), go to Step 28; else,
go to Step 29.
28. Type the following for each vehicle requiring identification entry:
Vehicle#: Unique number identifying vehicle.
29. As appropriate, type the following:
Fill Limit: Maximum fuel gallons allowed per transaction.
Tran Limit: Maximum transaction dollar amount allowed per Interval
specified.
30. If Tran Limit value specified (see immediately above), go to Step 31; else
go to Step 32.
31. Select the following:
Interval: Time period (e.g., ‘Day’, ‘Week’, etc.) for which Tran Limit
value applies.
32. To restrict card usage from purchase of specific inventory items, go to Step
33; else, go to Step 36.
33. Click Select under Select Limits; Select Restrictions screen displays:
140
34. Click first item and Ctrl+Click each additional item restricted from card
purchase, and then click Select at screen bottom; Add customer Private
Cards tab screen redisplays.
35. Review the following:
Product Restrictions: Inventory item(s) for which card purchase restricted.
36. As appropriate, review, type or select the following:
Active: Card active for use.
Balance: Credit balance remaining at which to decline card usage.
Use Balance: Decline card usage when Balance value reached.
Is Loyalty: Card is customer loyalty discount type (for POS only).
Card Type: Card usage type; either Driver Card, Vehicle Card or StandAlone (neither Driver nor Vehicle) card.
In Use: Restrict card usage to one fueling pump at a time.
37. To enter customer excise tax exemption information, go to Step 38; else, go
to Step 40.
38. Click Excise Tax Exemption Information tab at screen top; Add Customer
Excise Tax Exemption Information tab screen displays:
141
39. As appropriate, select the following:
Inventory Items: Inventory items for which customer tax exempt.
FET Exempt: Customer is Federal Excise Tax exempt for selected
inventory item.
SET Exempt: Customer is State Excise Tax exempt for selected inventory
item.
Sales Tax Exempt: Customer is sales tax exempt for selected inventory
item.
40. To enter customer driver information, go to Step 41; else, go to Step 43.
41. Click Customer Drivers tab at screen top; Add Customer Customer
Drivers tab screen displays:
42. As appropriate, type or select the following for each driver:
142
Driver Number: Unique number identifying vehicle driver.
Last Name: Driver last name.
First Name: Driver first name.
Active: Card active for this driver.
43. To enter customer vehicle information, go to Step 44; else, go to Step 45.
44. As appropriate, type or select the following for each vehicle:
Vehicle Number: Unique number identifying vehicle.
Description: Unique name or brief narrative identifying item.
Active: Card active for this vehicle.
45. To enter customer custom accounting field information, go to Step 46; else,
go to Step 48.
46. Click User Fields tab at screen top; Add Customer User Fields tab screen
displays:
143
47. As appropriate, type, select or review the following:
Factor Account #: Customer third-party software account number.
Invoice Frequency: Customer invoicing interval.
Invoice Sort: Customer invoice sorting method.
POSCashierPrompt: Default POS display cashier message.
Statement Run Date: Customer statement run date.
48. To enter customer item permit information, go to Step 49; else, go to Step
51.
49. Click Item Permits tab at screen top; Add Customer Item Permits tab
screen displays:
50. Click item(s) for which customer has permit to purchase.
51. Click OK at screen bottom.
Adding Customer Account Beginning
Balance
You can use DataManager’s automated A/R functionality to produce card-lock
and charging customer invoices and billing statements; however, new customer
receivables information must first be input to ensure an accurate beginning state
of accounts before using the functions DataManager provides.
144
1. Do one of the following:
-
To set up a balance forward for which you do not want to include
finance charges, go to Step 2; or
-
To set up a balance forward against which you do want to apply finance
charges, go to Step 10.
2. Click toolbar Receivables Tab, and then click Payments & Adjustments
on menu.
Customer Payments and Adjustments screen displays:
3. Select the following:
Customer: Unique name identifying customer.
4. Type ‘Beginning Balance’ for the following:
Description: Unique name or brief narrative identifying item.
5. Type the following:
Amount: Customer account balance forward (+/-) amount (e.g., ‘976.81’).
145
6. Select the following:
Adjustment?: Specified Amount value is adjustment to account.
7. Review the following to confirm value matching Amount value (above):
Amount Applied: Customer account balance forward amount (e.g.,
‘$976.81’).
8. Click Apply at screen bottom; when Verification of Posting message
displays, click Yes.
9. STOP!
10. Input a new inventory item for beginning balance using the Add Item
screen. You can navigate to this screen from the Main display three ways:
Click toolbar Inventory tab, and then click Add an Item on menu.
OR
146
Click toolbar Table Maintenance
icon; click Inventory Items on
menu, and then click OK at screen bottom.
Inventory Items screen displays.
.
Click Add at screen bottom.
OR
Click toolbar Inventory
icon; Inventory Items screen displays:
147
Click Add at screen bottom.
Then:
Add Item screen displays:
11. As appropriate, type or select the following:
Stock #: Unique number or code identifying item. Note: To have system
assign next available sequence number, click Get.
12. Type ‘Beginning Balance’ for the following:
Description: Unique name or brief narrative identifying entry.
13. Select the following:
148
Category: Unique name or brief narrative identifying category.
14. To add appropriate inventory category to those displayed, go to Step 15;
else, go to Step 20.
15. Click Add at right of Category window; Add Inventory Category screen
displays:
16. Type ‘Beginning Balance’ for the following:
Description: Unique name or brief narrative identifying entry.
17. Click OK at screen bottom; Add Item screen redisplays:
18. Click OK at screen bottom.
19. Click toolbar Sales tab, and then click Sales Entry on menu.
149
Sales Entry screen displays:
20. Select the following:
Site: Unique name identifying transaction location.
Customer: Unique name identifying customer.
21. Either accept or overtype the following:
Date: Sales entry date, in MM/DD/YYYY format; system default is current
date.
Time: Sales entry time, in HH:MM am/pm format; system default is current
time.
22. Click Find; Select Item screen displays:
150
23. Click appropriate ‘Beginning Balance’ from listed items.
24. Click Select at screen bottom; Sales Entry screen redisplays:
25. Type the following:
Ext Amount: Sale extended amount (Quantity value x Unit Price value).
26. Ensure accuracy and completeness of information; when finished, click
Apply at screen bottom to add customer balance forward to system.
Updating Customer Accounts
After adding a customer you can add to, change or remove the information you
provided by first selecting a specific customer on the Customers screen. You
can navigate to this screen from the Main display two ways:
Click toolbar Table Maintenance
then click OK at screen bottom.
icon; click Customers on menu, and
151
OR
Click toolbar Customers Tab, and then click Show the Customer List on
menu.
Then:
Customers screen displays:
152
1. Do one of the following:
-
To completely remove (delete) entry, go to Step 2; or
-
To update entry, go to Step 5.
2. Right-click entry to be removed.
3. Click Delete icon, and then click Yes on Verification of Deletion dialog;
selected item removed.
4. STOP!
5. Right-click entry to be updated.
153
6. Click Change icon; Change Customer screen displays:
7. As appropriate, change the following customer primary information:
Name: Business name or individual last name and first names.
Customer Code: Unique code identifying customer.
Category: Unique name or brief narrative identifying category.
8. As appropriate, add, change or remove the following customer primary
information:
Address: Street number and name, and unit number, if applicable (e.g.,
1011 Helderberg Ave #103’).
City: Address city name.
State: Address two character state code (e.g., ‘AZ’).
Zipcode: Address five-digit postal code.
Contact: Contact last and first name and/or title (e.g., “Jones, Stephanie,
Supervisor’, ‘Owner’, etc.).
Description: Contact email address and/or site location (e.g., ‘Building
101A’).
Phone: Area code and telephone number (e.g., ‘310-555-3434’).
Default Terms: Code indicating customer invoice payment terms (e.g.,
‘Net 30’).
9. To change customer credit information, go to Step 10 (requires special
logon and password); else, go to Step 13.
10. Click Manage Credit; Manage Credit Login screen displays:
154
11. Type password, and then click OK; Change Customer screen redisplays:
12. As appropriate, add, change or remove the following:
Has Credit Limit: Account has credit limit.
Credit Limit: Account credit limit dollar amount.
Allow Charge: Allow use of payment cards (for POS only).
13. To change more customer primary information, go to Step 14; else, go to
Step 15.
14. As appropriate, add, change or remove the following:
IsGiftCardCustomer: Account uses payment cards as gift cards (for POS
only).
Finance Chg Exempt: Account exempt from finance charges.
Sales Tax Exempt: Account exempt from sales tax.
Validate Drivers: Account requires driver PIN entry for card use.
Validate Vehicles: Account requires driver Vehicle Number entry for card
use.
Require PO/Job Number for Customer: Account requires Purchase
Order or Job Number validation for card use (for POS only).
155
15. To continue updating customer information, go to Step 16; else, go to Step
49.
16. To make changes to customer proprietary card information, go to Step 17;
else, go to Step 34.
17. Click Private Cards tab at screen top; Change Customer Private Cards tab
screen displays:
18. As appropriate, change the following for each card displayed (omit leading
zeros):
Card Number: Unique number identifying card.
19. To update additional private card information, go to Step 20; else go to Step
34.
156
20. As appropriate, add, change or remove the following:
Description: Unique name or brief description identifying card.
Pin Required: Cardholder must enter Personal Identification Number for
card use.
21. If Pin Required selected (immediately above), go to Step 22; else, go to
Step 23.
22. Type the following:
Pin Number: Cardholder Personal Identification Number.
23. As appropriate, add, change or remove the following:
Odometer Required: Cardholder must enter vehicle odometer reading for
card use.
Driver# Required: Cardholder must enter assigned Driver Number for card
use.
Vehicle# Required: Cardholder must enter assigned Vehicle Number for
card use.
24. If Vehicle# Required selected (see immediately above), go to Step 25; else,
go to Step 26.
25. Type the following:
Vehicle#: Unique number identifying vehicle.
26. As appropriate, add, change or remove the following:
Fill Limit: Maximum fuel gallons allowed per transaction.
Tran Limit: Maximum transaction dollar amount allowed per Interval
specified.
27. If Tran Limit value specified (see immediately above), go to Step 28; else
go to Step 29.
28. Select the following:
Interval: Time period (e.g., ‘Day’, ‘Week’, etc.) for which Tran Limit
value applies.
29. To update restricted card usage information, go to Step 30; else, go to Step
33.
30. Click Select under Select Limits; Select Restrictions screen displays:
157
31. Click and Ctrl+Click items restricted from card purchase, and then click
Select at screen bottom; Change Customer Private Cards tab screen
redisplays.
32. Review the following:
Product Restrictions: Inventory item(s) for which card purchase restricted.
33. As appropriate, add, change or remove the following:
Active: Card active for use.
Balance: Credit balance remaining at which to decline card usage.
Use Balance: Decline card usage when Balance value reached.
Is Loyalty: Card is customer loyalty discount type (for POS only).
Card Type: Card usage type; either Driver Card, Vehicle Card or StandAlone (neither Driver nor Vehicle) card.
In Use: Restrict card usage to one fueling pump at a time.
34. To change customer tax information, go to Step 35; else, go to Step 37.
35. Click Tax Information tab at screen top; Change Customer Tax
Information tab screen displays:
158
36. As appropriate, add, change or remove the following:
Inventory Items: Inventory items for which customer tax exempt.
FET Exempt: Customer is Federal Excise Tax exempt for selected
inventory item.
SET Exempt: Customer is State Excise Tax exempt for selected inventory
item.
Sales Tax Exempt: Customer is sales tax exempt for selected inventory
item.
37. To update customer driver information, go to Step 38; else, go to Step 40.
38. Click Customer Drivers tab at screen top; Change Customer Customer
Drivers tab screen displays:
159
39. As appropriate, add, change or remove the following:
Driver Number: Unique number identifying driver.
Last Name: Driver last name.
First Name: Driver first name.
Active: Card active for this driver.
40. To update customer vehicle information, go to Step 41; else, go to Step 43.
41. Click Customer Vehicles tab at screen top; Change Customer Customer
Vehicles tab screen displays:
42. As appropriate, add, change or remove the following:
Vehicle Number: Unique number identifying vehicle.
Description: Unique name or brief narrative identifying item.
Active: Card active for use.
43. To update customer custom accounting field information, go to Step 44;
else, go to Step 46.
44. Click User Fields tab at screen top; Change Customer User Fields tab
screen displays:
160
45. As appropriate, add, change or remove the following:
Factor Account #: Customer third-party software account number.
Invoice Frequency: Customer invoicing interval.
Invoice Sort: Customer invoice sorting method.
POSCashierPrompt: Default POS display cashier message.
Statement Run Date: Customer statement run date.
46. To update customer item permit information, go to Step 47; else, go to Step
49.
47. Click Item Permits tab at screen top; Change Customer Item Permits tab
screen displays:
48. Click to update item(s) for which customer has permit to purchase.
49. Click OK at screen bottom.
161
Managing Customer Pricing
Customer pricing combines previously established inventory item pricing
categories and levels (see Chapter 5, Managing Inventory Pricing Information,
above) to specify discounting for selected inventory items and item groupings.
Note: You cannot specify customer pricing if you have not yet entered inventory
pricing categories and price levels.
Adding Customer Pricing
You can optionally specify discount pricing for selected customers using the
Customer Pricing Maintenance screen. You can navigate to this screen from
the Main display as follows:
Click toolbar Table Maintenance
icon; click Customer Pricing on
menu, and then click OK at screen bottom.
Customer Pricing screen displays:
162
Click Add at screen bottom; Customer Pricing Maintenance screen
displays:
1. Select the following from drop-down list:
2. Customer: Unique name identifying customer.
3. As appropriate, select and match one or more from the following dropdown lists (Note: You can select multiple price levels for the same pricing
category to increase discount amounts):
Pricing Category: Unique name or brief narrative identifying category.
Price Level: Unique name or brief narrative identifying level.
163
4. Click OK at screen bottom to add information.
Updating Customer Pricing
After establishing discount pricing for a customer, you can add to, change or
remove the information you provided by first selecting a specific customer on
the Customer Pricing screen. You can navigate to this screen as follows:
Click toolbar Table Maintenance
then click OK at screen bottom.
icon; click Customers on menu, and
Customer Pricing screen displays:
1. Do one of the following:
-
To completely remove (delete) entry, go to Step 2; or
164
-
To update entry, go to Step 5.
2. Right-click entry to be removed.
3. Click Delete icon and then click Yes on Verification of Deletion dialog;
entry removed.
4. STOP!
5. Right-click entry to be updated.
6. Click Change icon; Customer Pricing Maintenance screen displays.
165
7. As appropriate, select and match one or more from the following dropdown lists (Note: You can select multiple price levels for the same pricing
category to increase discount amounts):
Pricing Category: Unique name or brief narrative identifying category.
Price Level: Unique name or brief narrative identifying level.
8. Click OK at screen bottom.
Working with Customer Notes
After adding a customer account you can record and review subsequent contact
or correspondence history you have with that customer. You can add and/or
review this information by first selecting a specific customer on the Customers
screen. You can navigate to this screen from the Main display two ways:
Click toolbar Table Maintenance
then click OK at screen bottom.
icon; click Customers on menu, and
166
OR
Click toolbar Customers Tab, and then click Show the Customer List on
menu.
Then:
Customers screen displays:
1. Right-click name of customer for whom you want to add or review notes.
167
2. Click Change icon; Change Customer screen displays:
3. Click Notes tab at screen top; Change Customer Notes tab screen displays:
168
4. As appropriate:
-
Review customer notes; and/or
-
Type correspondence summary or other relevant customer contact
information in large window; click ADD at right of window to add
information to system and display in note history.
5. Click OK at screen bottom to update information.
Sorting Customer Accounts
After adding customer accounts you can facilitate subsequent reference and
maintenance activities by sequencing displayed Customer List information
according to specified criteria. You specify information sort sequence by first
accessing the Customers screen. You can navigate to this screen from the Main
display two ways:
Click toolbar Table Maintenance
then click OK at screen bottom.
icon; click Customers on menu, and
169
OR
Click toolbar Customers Tab, and then click Show the Customer List on
menu.
Then:
Customers screen displays:
170
1. Right-click column heading by which you want information sorted. Either:
Name: Unique name or brief description identifying entry; or
FirstName: Customer first name; or
LastName: Customer last name or company name; or
Customer Code: Unique code identifying customer; or
Balance: Customer current account balance.
171
3. Click order in which you want information sorted (either alphabetic or
numeric Ascending or Descending); screen refreshes with information
displaying in sequence selected.
Working with Customer Invoices
In addition to updating invoice information for a specific customer (see
Updating Customer Accounts section earlier in this Chapter), DataManager
allows you to review and update invoice information for multiple customers at
the same time. You do this using the Invoice List screen. You can navigate to
this screen from the Main display two ways:
Click toolbar Table Maintenance
and then click OK at screen bottom.
icon; click Invoice List on menu,
OR
Click toolbar Receivables Tab, and then click Invoice List on menu.
Then:
Invoice List screen displays:
172
1. As desired, search or scroll through list to find customer(s) for whom you
want invoice information.
2. Review the following:
Customer: Unique name identifying customer.
Invoice Number: Unique number identifying invoice.
Date: Invoice date in MM/DD/YYYY format.
Total: Total invoice amount in dollars and cents.
Paid: Invoice amount paid in dollars and cents.
3. To finish customer invoice information review, go to Step 12; else, go to
Step 4.
4. Do one of the following:
-
To completely remove (delete) entry, go to Step 5; or
-
To update entry, go to Step 8.
5. Right-click entry to be removed.
173
6. Click Delete icon and then click Yes on Verification of Deletion dialog;
invoice removed.
7. Go to Step 12.
8. Click entry to be updated.
174
9. Click Edit at screen bottom; Invoice screen displays:
10. As appropriate, select or deselect the following:
Suspend Finance Charge: Invoice is finance charge exempt.
11. Click OK at screen bottom; Invoice List screen redisplays.
12. Click Close at screen bottom.
Working with Customer Private Cards
In addition to updating private card information for a specific customer (see
Updating Customer Accounts section earlier in this Chapter), DataManager
allows you to review and update private card information for multiple
customers at the same time. You can do this using the Edit Private Cards
screen. You navigate to this screen from the Main display as follows:
175
Click toolbar Customers Tab, and then click Edit Private Cards on menu.
Edit Private Cards screen displays:
1. Do one of the following:
-
To completely remove (delete) entry, go to Step 2: or
-
To update entry, go to Step 5.
2. Click the following:
Card Number: Maximum 9-digit, unique number identifying card.
3. Click Delete on keyboard; entry removed.
4. STOP!
5. As appropriate, type or select the following for each card you want to
update:
Description: Unique name or brief narrative identifying card.
Pin Required: Card user must enter Personal Identification Number for
card use.
6. If Pin Required selected (immediately above), go to Step 7; else, go to
Step 8.
7. Type the following:
Pin Number: Cardholder Personal Identification Number.
176
8. As appropriate, add, change or remove the following:
Odometer Required: Cardholder must enter vehicle odometer reading for
card use.
Driver# Required: Cardholder must enter assigned Driver Number for card
use.
Vehicle# Required: Cardholder must enter assigned Vehicle Number for
card use.
9. If Vehicle# Required selected (see immediately above), go to Step 10; else,
go to Step 11.
10. Type the following:
Vehicle#: Unique number identifying vehicle.
11. As appropriate, add, change or delete the following:
Fill Limit: Maximum fuel gallons allowed per transaction.
Tran Limit: Maximum transaction dollar amount allowed per Interval
specified.
12. If Tran Limit value specified (see immediately above), go to Step 13; else
go to Step 14.
13. Select the following:
Interval: Time period (e.g., ‘Day’, ‘Week’, etc.) for which Tran Limit
value applies.
14. To restrict card usage from purchase of specific inventory items, go to Step
15; else, go to Step 18.
15. Click Select under Select Limits; Select Restrictions screen displays:
177
16. Click first item and Ctrl+Click each additional item restricted from card
purchase, and then click Select at screen bottom; Add Edit Private Cards
screen redisplays.
17. Review the following:
Product Restrictions: Inventory item(s) for which card purchase restricted.
18. As appropriate, add, change or remove the following:
Active: Card active for use.
Balance: Credit balance remaining at which to decline card usage.
Use Balance: Decline card usage when Balance value reached.
Is Loyalty: Card is customer loyalty discount type (for POS only).
Card Type: Card usage type; either Driver Card, Vehicle Card or StandAlone (neither Driver nor Vehicle) card.
In Use: Restrict card usage to one fueling pump at a time.
19. Click OK at screen bottom.
178
9
Chapter
Managing Manual Sales Entry
Information
You can manually enter a customer sales transaction into DataManager using either a Point Of Sale
ticket or fuel transaction ticket. As with automated sales processing, manual ticket information is used to
input and update inventory and customer invoicing and billing data.
Performing Manual Sales Entry
You create a manual sales entry by accessing the Sales Entry screen. You can
navigate to this screen from the Main display as follows:
Click toolbar Sales tab, and then click Sales Entry on menu.
Sales Entry screen displays:
179
1. Using information on ticket, either accept, type, overtype or select the
following, as appropriate:
Site: Unique name identifying transaction location.
Customer: Unique name identifying customer.
Date: Sales entry date, in MM/DD/YYYY format; system default is current
date.
Time: Sales entry time, in HH:MM am/pm format; system default is current
time.
Discount: Discount type applied to sale, (e.g., ‘5% Senior’).
Card Number: Unique number identifying payment card.
Odometer: Vehicle odometer reading in whole miles.
Driver Identifier: Unique number and/or name identifying vehicle driver.
Vehicle Identifier: Unique number and/or name identifying driver vehicle.
2. Click Find; Select Item screen displays:
3. Click/Ctrl-click item(s) listed on ticket.
4. When finished, click Select at screen bottom; Sales Entry screen
redisplays:
180
5. Review the following item details to ensure entry accuracy and
completeness:
Stock #: Unique number or code identifying item.
Description: Unique name or brief narrative identifying item.
Quantity: Number of this item purchased, per specified unit of measure.
Unit Price: Item price per unit; item customer cost, per specified unit of
measure.
Ext Amount: Sale extended amount (Quantity value x Unit Price value).
Tx: Tax(es) applied to sale.
Dsc: Discount applied to sale.
Sub Total: Sale total, less applied tax(es) and discount.
Tax: Tax amount applied to sale.
Discount: Discount amount applied to sale.
[nnnn.nn]: Total sale amount.
6. When finished, click Apply at screen bottom.
7. When empty Sales Entry screen redisplays; do one of the following:
-
To perform addition manual sales entry, repeat Steps 1 – 6 (above); or
-
Click Close at screen bottom to end manual sales entry.
Deleting Manual Sales Entry
Once input, you can delete (but not change) a manual sales entry. You delete a
manual sales entry by first accessing the Sales List screen. You can navigate to
this screen two ways from the Main display:
181
Click toolbar Sales tab, and then click Sales List on menu.
OR
Click toolbar Table Maintenance
displays:
Click Sales List on menu, and then click OK at screen bottom.
icon; Table Maintenance screen
Then: Sales List screen displays:
1. Right-click entry to be removed.
182
2. Click Delete icon, and then click Yes on Verification of Deletion dialog;
entry removed.
3. STOP!
183
10
Chapter
Managing Customer
Statement Information
DataManager allows you to process, print and export customer billing statements with selectable reporting
cycles and specific start and end dates. This information is used to track customer sales activity and
payment history, and apply applicable invoice financing charges if and when desired. You can subsequently
add to, change or delete the information you provide for each statement run.
Creating Customer Statements
You create a customer statement by first accessing the Invoice List screen. You
can navigate to this screen from the Main display as follows:
Click toolbar Receivables tab, and then click Invoice List on menu.
Invoice List screen displays:
184
3. Select (click) customer invoice for which you want to generate statement,
and then click Edit at screen bottom; Invoice dialog displays:
4. Review the following:
Customer: Unique name identifying customer.
Invoice Date: System-generated invoice run date, in MM/DD/YYYY
format.
Total: Original invoice total amount in dollars and cents.
Paid: Invoice amount paid in dollars and cents.
Balance: Invoice balance forward amount.
5. As appropriate, select the following:
Suspend Finance Charge: Invoice is finance charge exempt.
6. Repeat Steps 1 – 3 (above) for each customer invoice for which you want to
generate statement.
7. When finished, click OK at screen bottom; Invoice List screen redisplays.
8. Click toolbar Receivables tab.
185
9. Click Generate Finance Charges on menu; Generate Finance Charges
dialog displays:
10. As appropriate, accept or overtype the following:
Balance Date: Invoice unpaid balance effective date, in MM/DD/YY
format.
Balances Older Than: Apply finance charge only to unpaid invoices older
than days specified.
11. Review the following:
Finance Charge Pct: Percent of unpaid invoice balance at which finance
charge calculated.
12. Do one of the following:
-
To change Finance Charge Pct value, go to Step 11; or
-
To accept Finance Charge Pct value, go to Step 14.
13. Click toolbar Edit tab; menu displays.
14. Click System Options; System Options screen displays:
186
15. Overtype the following:
Default Finance Charge Percent: Percent of unpaid invoice balance at
which finance charges calculated.
16. Type ‘0’ (zero) for the following:
Days to Delete: Automatically delete finance charges generated within
number of days specified.
17. Click Process at screen bottom; when DataManager message dialog
displays, click OK.
18. Click toolbar Receivables tab.
19. Click Generate Statements on menu; Generate Statements dialog
displays:
20. Review the following:
187
Beginning Date: Customer statement period starting date; see value
specified in Add Customer screen User Fields tab, per Chapter 6,
Managing Customer Information.
21. As appropriate, accept or overtype the following:
Ending Date: Last date of statement reporting period, in MM/DD/YY.
22. Do one of the following:
-
To generate statements for selected customers, go to Step 21; or
-
To generate statements for specific User Fields tab values, go to Step
25; or
-
To generate statements for all customers, go to Step 28.
23. Click By Customer; Select Customers screen displays:
24. As appropriate, click/Ctrl-click customer(s) for whom you want to generate
statements.
25. When finished, click Select at screen bottom; Generate Statements screen
redisplays.
26. Go to Step 28.
27. Click By Frequency; Select Customers by User field screen displays:
188
28. As appropriate, click parameter in left pane for which you want to generate
statements, and then click corresponding value in right pane.
29. When finished, click OK at screen bottom; Generate Statements screen
redisplays.
30. Review the following:
Customers Selected: Number of customers for whom statements to be
generated.
31. As appropriate, select the following:
Show Generated Statements: Display generated statements prior to
printing or export.
32. Do one of the following:
-
If Show Generated Statements (immediately above) not selected, go
to Step 31; or
-
If Show Generated Statements (immediately above) selected, go to
Step 33.
33. Click Generate at screen bottom.
34. WAIT. Then: DataManager message dialog displays; click OK.
35. Go to Step 37.
189
36. Click Generate at screen bottom; Enter Parameter Values screen
displays:
37. Do one of the following:
-
To select statement run time parameters, go to Step 36; or
-
To not select statement run time parameters, go to Step 37.
38. As applicable, specify the following Parameter Fields option(s); for each
option selected, either accept, type, overtype or select (click) corresponding
value in Discrete Value window:
Customer Account Number: Only print Card List for customer account
number specified.
Statement Message: Print optional message on each statement (e.g.,
‘Happy Holidays’, etc.).
Include Customers With Zero Balance: Print or export customer
statements with zero balance this statement cycle.
Only show customers with Activity: Do not print or export statement for
customers with no transaction activity this statement cycle.
Display Header?: Display standard ‘Customer Statement’ in statement
header.
Sort Statements By: Sort customer statements by name or account number.
Show Logo?: Display company logo in statement header.
39. Click OK at screen bottom; Customer statement(s) display:
190
40. Do one of the following:
-
To review statement(s) before printing or exporting, go to Step 33; or
-
To print or export invoice(s) without review, go to Step 36.
41. Review the following:
Account #: Unique number identifying customer.
Customer: Unique name identifying customer.
Statement Dates: Statement period inclusive start and ending dates.
42. Review the following for each line item:
Date: Transaction effective date, in MM/DD/YYYY format.
Tran Type: Transaction type (e.g., ‘Sale’, ‘Finance Charge’, etc.).
Description: Unique name or brief narrative identifying transaction.
Charges: Transaction amount added to customer account.
Credits: Transaction amount deducted from customer account.
43. Review the following account status information:
Current Balance: Customer account balance as of statement period end
date.
191
Last Pmt Date: Date last customer account payment recorded.
0 – 30 Days: Portion of customer account balance 0 – 30 days past due.
31 – 60 Days: Portion of customer account balance 31 – 60 days past due.
61 – 90 Days: Portion of customer account balance 61 – 90 days past due.
91 – 120 Days: Portion of customer account balance 91 – 120 days past
due.
Over 4 months: Portion of customer account balance over 120 days past
due.
44. Do one of the following:
-
To print statement(s), click printer
OK on Print dialog; STOP!
icon on tool bar, and then click
or
-
To export statement(s) to Excel, PDF or other file format, click export
icon on tool bar; go to Step 37.
37. Select the following:
Format: File format type (e.g., ‘PDF’, ‘RTF’, etc.).
Destination: File export destination (e.g., ‘Lotus Domino’).
38. When finished, click OK.
Printing and Exporting Customer
Statements
You can select from and print or export customer statements you have
previously generated but not yet output by first accessing the Reports List
screen. You can navigate to this screen two ways from the Main display:
Click task bar Reporting tab, and then click Reports List on menu.
OR
192
Click toolbar Reporting icon:
Then: Reports List displays:
1. Do one of the following:
-
To print or export statements in standard customer format, click
Statements on menu and go to Step 2; or
-
To print or export statements in customer lowered name/address format,
click Statements [Customer Name/Address Lowered] on menu and
go to to Step 2.
2. Click Show at screen bottom; Enter Parameter Values screen displays:
3. Do one of the following:
-
To print or export statements without specifying run time parameters, go
to Step 5; or
-
To print or export statements with run time parameters, go to Step 4.
193
4. As applicable, specify the following Parameter Fields option(s); for each
option selected, either accept, type, overtype or select (click) corresponding
value in Discrete Value window:
Customer Account Number: Only print Card List for customer account
number specified.
Statement Message: Print optional message on each statement (e.g.,
‘Happy Holidays’, etc.).
Include Customers With Zero Balance: Print or export customer
statements with zero balance this statement cycle.
Only show customers with Activity: Do not print or export statement for
customers with no transaction activity this statement cycle.
Display Header?: Display standard ‘Customer Statement’ in statement
header.
Sort Statements By: Sort customer statements by name or account number.
Show Logo?: Display company logo in statement header.
5. Click OK at screen bottom; Customer statement(s) display:
194
6. Do one of the following:
-
To print statement(s), click printer
OK on print dialog; STOP!
icon on tool bar, and then click
or
-
To export statement(s) to Excel, PDF or other file format, click export
icon on tool bar; go to Step 7.
7. Select the following:
Format: File format type (e.g., ‘PDF’, ‘RTF’, etc.).
Destination: File export destination (e.g., ‘Lotus Domino’).
When finished, click OK
195
11
Chapter
Managing Customer Invoice
Information
DataManager allows you to process and store sales transaction information with which to determine
customer receivables. This information is used to create customer invoices, apply applicable finance charges,
track payments and provide data for accounting statement and reporting purposes. You can subsequently
add to, change and delete the information you provide.
Creating Customer Invoices
You create a customer invoice by first accessing the Generate Priced
Transactions screen. You can navigate to this screen from the Main display as
follows:
Click toolbar Receivables tab, and then click Generate Priced
Transactions on menu.
Generate Priced Transactions screen displays:
196
2. As appropriate, accept, overtype or select the following:
Beginning Date: Sales transaction period start date and optional start time.
Ending Date: Sales transaction period end date and optional start time.
Beginning Date for Quantity Pricing: Sales quantity discount period start
date and optional start time.
Ending Date for Quantity Pricing: Sales quantity discount period end
date and optional start time.
Show Price Report: Automatically display dialog to input Invoice Preview
parameters.
3. When finished, click Process.
4. WAIT. Then: DataManager message dialog displays:
5. Click OK.
6. If Show Price Report selected (above), go to Step 9; else, go to Step 6.
7. Click toolbar Reporting tab.
8. Click Reports List; Reports List screen displays:
197
9. Click Invoice Preview; Enter Parameter Values screen displays:
10. Click (highlight) each of the following parameters, and in turn type,
overtype or select desired values in screen Discrete Value window:
Beginning Date: Invoice period start date, in MM/DD/YYYY format.
Ending Date: Invoice period end date, in MM/DD/YYYY format.
Invoice Frequency: Interval represented by time between invoice
Beginning Date and Ending Date values (e.g., ‘Monthly’, Bi-Weekly’,
etc).
11. When finished, click OK; Invoice Preview screen displays:
198
NOTE: Only those transactions not previously invoiced display.
12. Review the following:
Date: System-generated invoice preview date, in MM/DD/YYYY format.
Printed for the Dates of: Inclusive dates for which report pertains.
[Customer Name]: Unique name identifying customer.
Site: Unique name identifying customer site.
Date: Item sales date, in MM/DD/YYYY format.
Description: Unique name or brief text identifying item.
Qty: Item quantity, per specified unit of measure.
Original Price: Item original vendor price.
Discounted Price: Item vendor price after discount, if applicable.
Original Amount: Item original customer price.
Discounted Amount: Item customer price after discount, if applicable.
Customer Total: Sum of customer invoice Qty, Original Amount and
Discounted Amount values.
199
Frequency Total: Sum of Qty, Original Amount and Discounted
Amount values for all customer invoices for specified Printed for the
Dates of: values (above).
13. Verify accuracy and completeness of customer pricing and all invoice
details.
Correct errors following procedures in this Guide for vendor
and customer pricing; repeat Steps 1-12 (above) as necessary
to ensure invoice data accuracy and completeness before
proceeding.
14. Click toolbar Receivables tab.
15. Click Generate Invoices on menu; Generate Invoices screen displays:
16. As appropriate, accept or overtype the following:
Through Date/Time: Invoice period end date and time, in MM/DD/YYYY
HH:MM:SS AM/PM format.
Invoice Run Date: Invoice generation date, in MM/DD/YYYY format;
default is system-generated current date.
17. Do one of the following:
-
To generate invoices for selected customer(s) only, go to Step 17; or
-
To generate all invoices for a specific frequency value, go to Step 21.
200
18. Click Customer; Select Customers screen displays:
19. As appropriate, click/Ctrl-click customer(s) for whom you want to generate
invoice(s).
20. When finished, click Select at screen bottom: Generate Invoices screen
redisplays:
21. Go to Step 24.
22. Click By Frequency; Select Customers By User Field screen displays:
201
23. Click Invoice Frequency in left pane and desired frequency value (e.g.,
‘Monthly’, ‘Weekly’, etc.) in right pane.
24. Click OK at screen bottom; Generate Invoices screen redisplays:
25. As appropriate, select the following:
Show Generated Invoices: Automatically display dialog to specify Invoice
print parameters.
Backup Database: Create invoice run backup in database.
26. When finished, click Generate.
27. Do one of the following:
-
If Show Generated Invoices NOT selected (above), go to Step 29; or
-
If Show Generated Invoices selected (above), Enter Parameter
Values screen displays; go to Step 27.
202
28. As desired, select (click) from the following invoice run print Parameter
Fields option(s), and for each selection either type, overtype or select
corresponding option values in the Discrete Value window:
Customer Account Number: Only print Card List for customer account
number specified.
Invoice Cycle: Only include invoice(s) with run frequency specified (e.g.,
‘Monthly’, ‘Weekly’, etc.).
Invoice Run Date: Only include invoice(s) for run date specified (system
default is current date).
Show Original Price: Include vendor original pricing on invoices.
Sort Invoices By: Print invoices in order of sort criteria specified.
Sort Transaction By: Print transactions on invoice in order of sort criterion
specified.
Display Invoice Batch Totals Summary?: Include batch totals summary
page at invoice run start.
Display Per Month in Finance Charge Message?: Include finance charge
message at invoice bottom.
Show Logo?: Display company logo on invoice(s).
29. When finished, click OK; Invoice screen displays:
203
30. To 0(s), click printer
dialog.
icon on tool bar, and then click OK on print
31. STOP!
32. WAIT! Then: Following message displays.
204
33. Click OK.
34. Go to next section, “Printing and Exporting Customer Invoices”.
Printing and Exporting Customer Invoices
You can select from and print or export the customer invoices you have
generated by first accessing the Reports List screen. You can navigate to this
screen two ways from the Main display:
Click task bar Reporting tab, and then click Reports List on menu.
OR
Click toolbar Reporting icon:
Then: Reports List displays:
1. Do one of the following:
-
To print or export invoice contents in customer vehicle-related format,
go to Step 2; or
-
To print or export invoice contents in standard customer format, go to
Step 5.
2. Click Invoices – Vehicle Format, and then click Show at screen bottom;
Enter Parameter Values screen displays:
205
3. As applicable, specify the following invoice run Parameter Fields
option(s); for each option, either accept, type, overtype or select (click)
corresponding option values in the Discrete Value window:
Customer Account Number: Only print Card List for customer account
number specified.
Invoice Cycle: Only include invoice(s) with run frequency specified (e.g.,
‘Monthly’, ‘Weekly’, etc.).
Invoice Run Date: Only include invoice(s) for invoice run date specified
(system default is current date).
Sort Invoices By: Print invoices in order of sort criterion specified (i.e.,
‘Customer Code’, ‘Customer Name’ or ‘Invoice Number’).
Sort Transaction By: Print transactions in order of sort criterion specified
(i.e., ‘Transaction Date’, ‘Location’ or ‘Driver #’).
Show Cost Per Mile: Include vehicle cost per mile data on invoices.
Display Invoice Batch Totals Summary?: Include batch totals summary
page at invoice run start.
Display Original Amounts: Include vendor original pricing on invoice(s).
Display Per Month in Finance Charge Message?: Include finance charge
message at invoice bottom.
Show Logo?: Display company logo on invoice(s).
4. Go to Step 7.
5. Click Invoices, and then click Show at screen bottom; Enter Parameter
Values screen displays:
206
6. As applicable, specify the following invoice run Parameter Fields
option(s); for each option, either accept, type, overtype or select (click)
corresponding option values in the Discrete Value window:
Customer Account Number: Only print Card List for customer account
number specified.
Invoice Cycle: Only include invoice(s) with run frequency specified (e.g.,
‘Monthly’, ‘Weekly’, etc.).
Invoice Run Date: Only include invoice(s) for invoice run date specified
(system default is current date).
Show Original Price: Include vendor original pricing on invoices.
Sort Invoices By: Print invoices in order of sort criterion specified (i.e.,
‘Customer Code’, ‘Customer Name’ or ‘Invoice Number’).
Sort Transaction By: Print transactions in order of sort criterion specified
(i.e., ‘Transaction Date’, ‘Location’ or ‘Driver #’).
Display Invoice Batch Totals Summary?: Include batch totals summary
page at invoice run start.
Display Per Month in Finance Charge Message?: Include finance charge
message at invoice bottom.
Show Logo?: Display company logo on invoice(s).
7. Click OK at screen bottom; Invoices display:
207
8. Do one of the following:
-
To review invoice(s) before printing or exporting, go to Step 9; or
-
To print or export invoice(s) without review, go to Step 10.
9. Review the following (NOTE: Invoice information headings presented in
alphabetical order for reference purposes only; actual invoice headings
and heading placement vary per previously specified run selection criteria):
Account Number: Unique number identifying customer.
Amount: Item customer price after discount.
Amount: Sum of item Qty x Price values.
Beg Odom: Vehicle odometer reading at reporting period start.
Bill To: Customer name and Address.
208
Card #: Unique number and name identifying payment/gift card.
Card Total: Reporting period fuel quantity and dollar amount totals for
payment/gift card specified.
Cost/Mile: Vehicle fuel cost per mile; Fuel Amt value divided by Miles
value.
Customer Account #: Unique number identifying customer.
Date: POS transaction date, in MM/DD/YYYY format.
Desc: Unique name or brief narrative identifying item.
Description: Unique name or brief narrative identifying item.
Discounted Amount: Item customer price after discount.
Discounted Price: Item vendor price after discount.
Driver: Unique name or number identifying vehicle driver.
Driver Total: Reporting period fuel quantity and dollar amount totals for
driver specified.
Drv #: Unique number identifying transaction driver of record.
End Odom: Vehicle odometer reading at reporting period end.
Exemption Summary: Tax exemption totals by product summary.
For Card #: Unique number and name identifying payment/gift card.
For Driver #: Unique number and/or name identifying transaction driver of
record.
For Vehicle #: Unique number and/or name identifying transaction vehicle
of record.
From: Your Company name and address.
Fuel Amt: Total dollar amount for fuel gallons purchased, per selected sort
criteria (e.g., Vehicle #, Driver #, etc.)
Fuel Qty: Total fuel gallons purchased, per selected sort criteria (e.g.,
Vehicle #, Driver #, etc.)
Fuel Total: Total dollar amount for fuel gallons purchased, per selected
sort criteria (e.g., Vehicle #, Driver #, etc.)
Invoice #: Unique number identifying invoice.
Invoice Amount: Sum of invoice Total Amt values.
Invoice Date: System-generated invoice run date, in MM/DD/YYYY
format.
Invoice Total: Sum of invoice Total Amt values.
Item: Unique name or brief narrative identifying item.
209
Location: Unique name identifying customer site.
Miles: Difference between Beg Odom and End Odom values.
Miles/Gal: Vehicle miles per fuel gallon; Miles value divided by Fuel Qty.
MPG: Vehicle miles per fuel gallon; Miles value divided by Fuel Qty.
Odometer: Vehicle odometer reading at reporting period end.
Orig Amount: Item original customer price.
Orig Price: Item original vendor price.
Qty: Item quantity, per specified unit of measure.
Quantity: Item quantity, per specified unit of measure.
POS Receipt: Unique number identifying POS transaction receipt.
Price: Item vendor price after discount.
Product: Unique name or brief narrative identifying item.
Sales Summary: Sales and quantity totals by product summary.
Site: Unique name identifying customer site.
TaxAmt: Product tax total paid.
Tax Summary: Tax totals by product summary.
Terms: Customer account payment terms.
Time: POS transaction time, in HH:MM format.
Tkt Ref.: Ticket Reference; unique number identifying POS transaction
receipt.
Transaction Detail: Sales transaction detail, per selected sort criteria (e.g.,
Vehicle #, Driver #, etc.).
Trans Date: POS transaction date, in MM/DD/YYYY format.
Veh #: Unique number identifying transaction vehicle of record.
10. Do one of the following:
-
To print invoice(s), click printer
OK on print dialog; STOP!
icon on tool bar, and then click
or
-
To export invoice(s) to Excel, PDF or other file format, click export
icon on tool bar; go to Step 11.
210
11. Select the following:
Format: File format type (e.g., ‘PDF’, ‘RTF’, etc.).
Destination: File export destination (e.g., ‘Lotus Domino’).
12. When finished, click OK.
211
12
Chapter
Configuring Point Of Sale
DataManager allows you to integrate various customer-facing business operations with your FCT or
POS register. However, before you can do this you must first specify the way you want your terminal or
register menus and menu buttons to function and display, and then appropriately configure attending
peripheral devices such as scanners, printers and card swipers.
Setting Up Register Quick Menus
Quick Menus are the tab functions that display on the left side of the register
screen, with associated inventory items displayed at right. You typically set
menu tab functions for your most frequently purchased and/or non-barcoded
inventory items. See examples below:
Register:
You configure Quick Menus by first accessing the Quick Menus screen. You
can navigate to this screen from the Main display two ways:
212
Click toolbar File tab, and then click Table Maintenance on menu.
Table Maintenance screen displays:
Click Quick Menus on menu, and then click OK at screen bottom.
OR
Click toolbar Table Maintenance
and then click OK at screen bottom.
icon; click Quick Menus on menu,
213
Then:
Quick Menus screen displays:
Click Add at screen bottom; Quick Menu Page screen displays:
214
1. Type the following:
Name: Unique name or brief text identifying menu.
Caption: Text corresponding to Name to display at POS.
2. Click
; Button Defaults dialog displays:
3. Review Preview display; as appropriate, accept or reselect (click) the
following default settings:
Font Name: Button caption print type style (e.g., ‘Arial’).
Font Size: Button caption print type style point size (e.g., ‘8.25’).
Bold: Bolden button caption print.
Italic: Italicize button caption print.
215
Fore Color / Back Color: Button foreground (print) and background
colors.
4. When finished, click OK at screen bottom; Quick Menu Page screen
redisplays with saved button defaults:
5. Click position of first menu button you want to configure; Button [n]
dialog displays:
6. As appropriate, type or select the following:
216
Caption: Text corresponding to Item to display on button.
Item: Unique name or brief description identifying inventory item.
Font Name: Button caption print type style (e.g., ‘Arial’).
Font Size: Button caption print type style point size (e.g., ‘8.25’).
Bold: Bolden button caption print.
Italic: Italicize button caption print.
Fore Color / Back Color: Button foreground (print) and background
colors.
Is a Return: Automatically display selected item as return/over-ring.
Qty Prompt: Automatically display selected item multiple quantity prompt
for cashier.
7. Review button preview and confirm associated information:
8.
When finished, click OK at screen bottom; updated Quick Menu Page
screen displays:
217
9.
Repeat Steps 1 – 8 (above) for each menu tab/button.
10. When finished, click OK at screen bottom; go to ‘Configuring POS’
section, below.
Updating Quick Menus
Following setup, you can subsequently add to, change or delete the Quick
Menus you have configured. You update Quick Menus by first accessing the
Quick Menus screen. You can navigate to this screen from the Main display
two ways:
Click toolbar File tab, and then click Table Maintenance on menu.
218
Table Maintenance screen displays:
Click Quick Menus on menu, and then click OK at screen bottom.
OR
Click toolbar Table Maintenance
and then click OK at screen bottom.
icon; click Quick Menus on menu,
Then:
Quick Menus screen displays:
219
1. Do one of the following:
-
To completely remove (delete) entry, go to Step 2; or
-
To update information for an entry, go to Step 5.
2. Right-click entry to be removed.
3. Click Delete icon, and then click Yes on Verification of Deletion dialog;
entry removed.
4. STOP!
5. Right-click entry to be updated.
220
6. Click Change icon; applicable Quick Menu Page screen displays:
7. As appropriate, change (overtype) the following:
Name: Unique name or brief text identifying menu.
Caption: Text corresponding to Name to display at POS.
8. Click position of first menu button you want to update; Button [n] dialog
displays:
221
9. As appropriate, overtype or reselect the following:
Caption: Text corresponding to Item to display on button.
Item: Unique name or brief description identifying inventory item.
Font Name: Button caption print type style (e.g., ‘Arial’).
Font Size: Button caption print type style point size (e.g., ‘8.25’).
Bold: Bolden button caption print.
Italic: Italicize button caption print.
Fore Color / Back Color: Button foreground (print) and background
colors.
Is a Return: Automatically display selected item as return/over-ring.
Qty Prompt: Automatically display selected item multiple quantity prompt
for cashier.
10. Review button preview and confirm associated information:
222
11. When finished, click OK at screen bottom; updated Quick Menu Page
screen displays:
12. When finished, click OK at screen bottom; go to ‘Configuring POS’
section, below.
223
Configuring Your POS
Following menu setup, you must next configure each FCT or POS Register and
their attending peripherals such as printers and scanners. You do this by first
accessing the POS Configuration screen. You can navigate to this screen from
the Main display two ways:
Click toolbar File tab, and then click Table Maintenance on menu.
Table Maintenance screen displays:
Click POS Configuration on menu, and then click OK at screen bottom.
OR
Click toolbar Table Maintenance
icon; click POS Configuration on
menu, and then click OK at screen bottom.
224
Then:
POS Configuration screen displays:
1. Do one of the following:
-
If POS Configuration screen blank or to add entries, go to Step 2; or
-
To delete or update information for an entry, go to Step 5.
2. Click Add at screen bottom; New POS screen displays:
225
3. As appropriate, type or select (click) the following:
POS Identification: Unique number or code identifying entry.
Description: Unique name or brief narrative identifying entry.
Final Delay: Time (in seconds) from sale completion until cash drawer
open.
Scroll the More Menus: Open advanced menu options to scroll slowly
rather than immediately.
Fore Color / Back Color: Button foreground (print) and background
colors.
Printer Port: Unique number identifying printer port assignment.
Default Receipt: Printer default receipt type; either ‘None’, ‘Retail’ or
‘Commercial’.
Receipt Printer Cuts Paper: Enable printer to cut receipt paper.
Paper Cut String: Printer command for receipt paper cut; input or changed
by e3tek technician only.
Allow Commercial Receipt: Print customer receipt in commercial format.
Scanner Port: Unique number identifying scanner port assignment.
Credit Card Swiper Port: Unique number identifying card swiper port
assignment.
226
Port: Unique number identifying cash drawer port assignment.
Open For On Account Payments: Automatically open cash drawer for
account payments.
Open For Check Payments: Automatically open cash drawer for card
payments..
Open For Credit Card Payments: Automatically open cash drawer for
credit card payments.
Open For Other Payments: Automatically open cash drawer for other
payments.
Pole Display Port: Unique number identifying pole display port
assignment.
4. When finished, click OK at screen bottom.
5. Repeat Steps 2 – 4 for each POS Register or FCT to be configured.
Reconfiguring Your POS
Following configuration, you can subsequently update (change or delete) the
information you have specified. You do this by first accessing the POS
Configuration screen. You can navigate to this screen from the Main display
two ways:
Click toolbar File tab, and then click Table Maintenance on menu.
Table Maintenance screen displays:
227
Click POS Configuration on menu, and then click OK at screen bottom.
OR
Click toolbar Table Maintenance
icon; click POS Configuration on
menu, and then click OK at screen bottom.
Then:
POS Configuration screen displays:
228
4. Do one of the following:
-
To completely remove (delete) entry, go to Step 5; or
-
To update information for an entry, go to Step 7.
5. Right-click entry to be removed.
6. Click Delete icon, and then click Yes on Verification of Deletion dialog;
entry removed.
7. STOP!
8. Right-click entry to be updated.
229
9. Click Change icon; applicable POS screen displays:
7. As appropriate, type, overtype or select (click) the following:
POS Identification: Unique name or code identifying entry.
Description: Unique name or brief narrative identifying entry.
Final Delay: Time (in seconds) from sale completion until cash drawer
open.
Scroll the More Menus: Open advanced menu options to scroll slowly
rather than immediately.
Fore Color / Back Color: Button foreground (print) and background
colors.
230
Printer Port: Unique number identifying printer port assignment.
Default Receipt: Printer default receipt type; either ‘None’, ‘Retail’ or
‘Commercial’.
Receipt Printer Cuts Paper: Enable printer to cut receipt paper.
Paper Cut String: Printer command for receipt paper cut; input or changed
by e3tek technician only.
Allow Commercial Receipt: Print customer receipt in commercial format.
Scanner Port: Unique number identifying scanner port assignment.
Credit Card Swiper Port: Unique number identifying card swiper port
assignment.
Port: Unique number identifying cash drawer port assignment.
Open For On Account Payments: Automatically open cash drawer for
account payments.
Open For Check Payments: Automatically open cash drawer for card
payments..
Open For Credit Card Payments: Automatically open cash drawer for
credit card payments.
Open For Other Payments: Automatically open cash drawer for other
payments.
Pole Display Port: Unique number identifying pole display port
assignment.
8. When finished, click OK at screen bottom.
Assigning Quick Menus to POS Terminals
After creating Quick Menus and configuring your POS, you must next assign
the menus you created to the devices you configured. You assign Quick Menus
to a Register or FCT by first accessing the POS Configuration screen. You
can navigate to this screen from the Main display two ways:
Click toolbar File tab, and then click Table Maintenance on menu.
231
Table Maintenance screen displays:
Click Quick Menus on menu, and then click OK at screen bottom.
OR
Click toolbar Table Maintenance
icon; click POS Configuration on
menu, and then click OK at screen bottom.
232
Then:
POS Configuration screen displays:
19. Double-click POS terminal for which you want to assign menus; applicable
POS screen displays:
20. Click Quick Menus tab; applicable POS screen displays:
233
21. Do one of the following:
-
To add items to Quick Menus for this terminal, go to Step 4; or
-
To delete Quick Menus from this terminal, go to Step 5; or
-
To change Quick Menu items for this terminal, see ‘Updating Quick
Menus’ section, earlier in this chapter.
22. Select (click) Quick Menu tabs(s) from right column and drag to
appropriate Quick Menu in left column; go to Step 6.
23. Select (click) Quick Menus from left column and drag to trashcan.
24. When finished, click OK at screen bottom.
234
13
Chapter
Managing Table Information
In addition to providing for alternative navigation to many of the major business functions described in this
manual, DataManager database tables serve as central repository for the various names, codes, definitions
and message displays used to support those business functions. Note that input and maintenance of table
content is typically performed as part of regular business function transactions; thus, this chapter addresses
table maintenance activities in detail only when not covered in other chapters.
You input and maintain table information by first making selection on the Table
Maintenance screen. You can navigate to this screen from the Main display two ways:
Click toolbar Table Maintenance
icon;
OR
Click toolbar File tab, and then click Table Maintenance on menu.
Then:
Table Maintenance screen displays:
235
Click desired table on menu, and then reference appropriate procedure
below.
Tables
Adjustment Reasons
This table identifies allowable adjustment reasons to current stock on hand, as
well as specification of adjustment effect to inventory (+/0/-) when applied.
Adding Adjustment Reasons Information
You can add inventory adjustment reason information by first clicking
Adjustment Reasons on Table Maintenance menu. Adjustment Reasons
screen displays:
1. Click Add at screen bottom; Add Adjustment Reason screen displays:
236
2. Type the following for entry:
Reason: Cause or explanation.
3. As appropriate, select adjustment reason action type:
Subtract From: Remove from current stock on hand.
Add To: Add to current stock on hand.
Replace Existing: Replace current stock on hand.
4. Click OK at screen bottom to add information.
Updating Adjustment Reasons Information
You can change or remove previously input adjustment reason information by
first clicking Adjustment Reasons on the Table Maintenance menu.
Adjustment Reasons screen displays:
237
1. Do one of the following:
-
To completely remove (delete) entry, go to Step 2; or
-
To change information for an entry, go to Step 5.
2. Right-click entry to be removed.
3. Click Delete icon, and then click Yes on Verification of Deletion dialog;
entry removed.
4. STOP!
5. Right-click entry to be updated.
238
6. Click Change icon; Edit Adjustment Reason screen displays:
7. As appropriate, change the following for entry:
Reason: Cause or explanation.
8. As appropriate, select adjustment reason action type:
Subtract From: Remove from current stock on hand.
Add To: Add to current stock on hand.
Replace Existing: Replace current stock on hand.
9. Click OK at screen bottom to update information.
Bad Check Names
This table identifies names and summary address information of customers for
whom checks have been returned for insufficient funds or other reasons. Note:
Cashier at POS will be alerted if name of customer presenting check appears in
table.
239
Adding Bad Check Names Information
You can add bad check names by first clicking Bad Check Names on Table
Maintenance menu. Bad Check Names screen displays:
1. Click Add at screen bottom; Add Bad Check Information screen displays:
2. Type the following customer information:
First Name: First name.
Last Name: Last name or company name.
Address: Street number and name, and unit number, if applicable (e.g.,
1011 Helderberg Ave #103’).
City: Address city name.
State: Address two character state code (e.g., ‘AZ’).
ZipCode: Address five-digit postal code.
Bank Name: Unique name identifying bank.
Account Number: Unique number identifying bank account.
240
Routing Number: Unique, 9-digit ABA routing number identifying bank.
3. Click OK at screen bottom to add information.
Updating Bad Check Names Information
You can add to, change or remove bad check name information by first clicking
Bad Check Names on Table Maintenance menu. Adjustment Reasons
screen displays:
1. Do one of the following:
-
To completely remove (delete) entry, go to Step 2; or
-
To update information for an entry, go to Step 5.
2. Right-click entry to be removed.
241
3. Click Delete icon, and then click Yes on Verification of Deletion dialog;
entry removed.
4. STOP!
5. Right-click entry to be updated.
6. Click Change icon; Change Bad Check Information screen displays:
242
7. As appropriate, change the following customer information:
First Name: First name.
Last Name: Last name or company name.
Address: Street number and name, and unit number, if applicable (e.g.,
1011 Helderberg Ave #103’).
City: Address city name.
State: Address two character state code (e.g., ‘AZ’).
ZipCode: Address five-digit postal code.
Bank Name: Unique name identifying bank.
Account Number: Unique number identifying bank account.
Routing Number: Unique, 9-digit ABA routing number identifying bank.
8. Click OK at screen bottom to update information.
243
Card Types
This table identifies names of available payment card types, as input at time of
your DataManager installation. The table is for reference purposes only; you
cannot add to, change or delete the information displayed. Note: Subsequent
changes to information contained in this table must be requested through and
performed by Triple E Technologies customer support.
Reviewing Card Types Information
You can reference available payment card types by first clicking Card Types
on Table Maintenance menu. Card Types screen displays:
1. Review the following:
Card Type: Unique name identifying payment card brand or type.
Accepted Here: Payment card accepted at POS (either True or False).
2. When finished reviewing information, click Close at screen bottom to exit
table.
Customer Categories
The Customer Categories table lists types or classes of customers with whom
you do business, as specified in your previous customer account setup and
maintenance activities.
244
Reviewing Customer Categories Information
You can review your existing customer categories by first clicking Customer
Categories on Table Maintenance menu. Customer Categories screen
displays:
1. Review the following customer category information:
Description: Unique name or brief narrative identifying entry.
2. When finished reviewing information, click Close at screen bottom to exit
table.
Updating Customer Categories Information
For procedures to add to, change or delete customer category information, see
Chapter 8, Managing Customer Information, ‘Adding Customer Categories’
and ‘Updating Customer Categories’ sections (above).
Customer Pricing
The Customer Pricing Table lists customers for whom inventory item discount
pricing applies, as specified in your previous account setup and/or maintenance
activities.
Reviewing Customer Pricing Information
You can review the names of customers currently configured for discount
pricing by first clicking Customer Pricing on Table Maintenance menu.
Customer Pricing screen displays:
245
1. Review the following:
Name: Unique name or descriptor identifying entry.
2. When finished, click Close at screen bottom to exit table.
Updating Customer Pricing Information
You can input additional pricing information for any listed customer as follows:
1. Click customer for whom pricing information to be updated, and then click
Add at screen bottom; Customer Pricing Maintenance screen displays:
246
2. As appropriate, select and match one or more from the following dropdown lists (Note: You can select multiple price levels for the same pricing
category to increase discount amounts):
Pricing Category: Unique name or brief narrative identifying category.
Price Level: Unique name or brief narrative identifying level.
3. When finished, click OK.
For further procedures to add to, change or delete previously entered customer
pricing information, see Chapter 8, Managing Customer Information, ‘Adding
Customer Pricing’ and ‘Updating Customer Pricing’ subsections (above).
Customers
The Customers Table lists names and associated summary information for
individuals and companies for whom you have set up a DataManager account.
Reviewing Customers Information
You can review customer identification and account balance information by
first clicking Customers on Table Maintenance menu. Customer Pricing
screen displays:
247
1. Review the following for customers listed:
Name: Unique name or descriptor identifying entry.
FirstName: First name.
LastName: Last name or company name.
Customer Code: Unique code identifying customer.
Balance: Customer current account balance.
2. When finished, click Close at screen bottom to exit table.
Updating Customers Information
For procedures to add to, change or delete previously entered customer account
information, see Chapter 8, Managing Customer Information, ‘Updating
Customer Accounts’ section (above).
Discount Codes
This table identifies allowable customer and employee discount types for
current stock on hand, as well as specification of inventory items or item
categories for which applied.
Adding Discount Codes Information
You add discount code information by first clicking Discount Codes on Table
Maintenance menu. Discount Codes screen displays:
248
1. Click Add at screen bottom; Add Discount screen displays:
2. Type the following:
Description: Unique name or brief narrative identifying entry.
3. As appropriate, select the following:
Is This Discount for Employees?: Apply discount to employee purchases.
Category: Apply action to selected category.
Item: Apply action to selected item.
4. Do one of the following:
-
If Category selected (above), go to Step 5; or
-
If Item selected (above), go to Step 7.
5. As appropriate, select the following Categories Applied To information:
249
Category: Unique name or brief narrative identifying category.
6. Go to Step 8.
7. As appropriate, select the following Items Applied To information:
Item: Unique name or brief narrative identifying item.
8. Type one of the following:
Discount Percent: Discount off retail for selected item or category,
expressed as percent.
Discount Amount: Discount off retail for selected item or category,
expressed in dollars and cents.
9. When finished, click OK.
Updating Discount Codes Information
You can change or remove previously input discount code information by first
clicking Discount Codes on Table Maintenance menu. Discount Codes
screen displays:
250
1. Do one of the following:
-
To completely remove (delete) entry, go to Step 2; or
-
To update information for an entry, go to Step 5.
2. Right-click entry to be removed.
3. Click Delete icon, and then click Yes on Verification of Deletion dialog;
entry removed.
4. STOP!
5. Right-click entry to be updated.
251
6. Click Change icon; Change Discount screen displays:
7. As appropriate, change the following:
Description: Unique name or brief narrative identifying entry.
Is This Discount for Employees?: Apply discount to employee purchases.
Category: Apply action to selected category.
Item: Apply action to selected item.
8. Do one of the following:
-
If Category selected (above), go to Step 9; or
252
-
If Item selected (above), go to Step 11.
9. As appropriate, select the following Categories Applied To information:
Category: Unique name or brief narrative identifying category.
10. Go to Step 12.
11. As appropriate, select the following Items Applied To information:
Item: Unique name or brief narrative identifying item.
12. As appropriate, change the following:
Discount Percent: Discount off retail for selected item or category,
expressed as percent.
Discount Amount: Discount off retail for selected item or category,
expressed in dollars and cents
13. When finished, click OK.
253
Employees
This table identifies each manager, supervisor or cashier employee by Social
Security Number and unique cashier number, and specifies those POS functions
for which employee is authorized without higher approval.
Adding Employees Information
You can add employee information by first clicking Employees on the Table
Maintenance menu. Employees screen displays:
1. Click Add at screen bottom; Add Employee screen displays:
2. Type the following employee information:
First Name: First Name.
Last Name: Last Name.
Cashier #: Unique cashier identification number.
254
SSN: Social Security Number.
3. As appropriate, select the following employee information:
Permissions: POS business functions for which employee authorized.
4. When finished, click OK.
Updating Employees Information
You can change or remove previously input employee information by first
clicking Employees on Table Maintenance menu. Employees screen displays:
1. Do one of the following:
-
To completely remove (delete) entry, go to Step 2; or
-
To update information for an entry, go to Step 5.
2. Right-click entry to be removed.
255
3. Click Delete icon, and then click Yes on Verification of Deletion dialog;
entry removed.
4. STOP!
5. Right-click entry to be updated.
6. Click Change icon; Change Employee screen displays:
256
7. As appropriate, change the following employee information:
First Name: First Name.
Last Name: Last Name.
Cashier #: Unique cashier identification number.
SSN: Social Security Number.
8. As appropriate, select the following employee information:
Permissions: POS business functions for which employee authorized.
9. When finished, click OK.
Export Definitions
This table identifies export data types and definitions, as input for you by Triple
E Technologies at time of DataManager installation. The system uses this table
to export sales and card-lock invoicing data to either Excel or third-party
accounting systems. The table is for reference purposes only; you should
not add to, change or delete the information displayed. Note: Subsequent
changes to information contained in this table must be requested through and
performed by Triple E Technologies customer support.
Reviewing Export Definitions Information
You can reference information for configured export data types by first clicking
Export Definitions on Table Maintenance menu. Export Definitions screen
displays:
257
1. Review the following export data layout information:
Category: Unique name or brief text identifying category.
Description: Unique name or brief text identifying entry.
2. When finished, click Close.
Gift Cards
This table lists names of gift cards associated with customer accounts that use
payment cards as gift cards (for POS only). Note: Cashier at POS will be
alerted if name on payment card appears in table.
Reviewing Gift Cards Information
You can review customer gift card information by clicking Gift Cards on
Table Maintenance menu. First Gift Cards screen displays:
258
1. As appropriate, review the following:
Name: Unique name or brief narrative identifying entry.
2. Do one of the following:
-
When finished, go to Step 3; or
-
To review entry details, go to Step 5.
3. Click Close.
4. STOP!
5. Click entry for which you want details.
6. Click Edit at screen bottom; second Gift Cards screen displays:
259
7. Review the following:
Card Number: Unique card number identifying entry.
Description: Unique name or brief text identifying card.
Pin Required: Cardholder must enter Personal Identification Number for
card use.
Pin Number: Cardholder Personal Identification Number.
Set Limits: Display product restriction selections.
Product Restrictions: Inventory item(s) for which card purchase restricted.
Active: Card active for use.
Available Balance: Credit balance remaining.
In Use: Restrict card usage to one fueling pump at a time.
8. When finished, click OK.
Updating Gift Cards Information
For procedures to add to, change or delete previously entered customer gift card
information, see Chapter 8, Managing Customer Information, ‘Updating
Customer Accounts’ section (above).
Import Definition
This table identifies import data types and definitions, as input for you by
Triple E Technologies at time of DataManager installation. The system uses
this table to import sales and card-lock invoicing data from either Excel or
third-party accounting systems. The table is for reference purposes only; you
should not add to, change or delete the information displayed. Note:
Subsequent changes to information contained in this table must be requested
through and performed by Triple E Technologies customer support.
Reviewing Import Definition Information
You can reference information for configured import data types by first
clicking Import Definitions on the Table Maintenance menu. Import
Definition screen displays:
260
1. Review the following import data layout information:
Description: Unique name or brief text identifying entry.
2. When finished, click Close.
Inventory Adjustments
This table lists both posted (applied) and pending adjustments to inventory and
number of items adjusted (+/-) in each case, as specified in previous inventory
adjustment activities.
Reviewing Inventory Adjustments Information
You can review summary information for each posted and pending inventory
adjustment by first clicking Inventory Adjustments on Table Maintenance
menu. Inventory Adjustments screen displays:
261
1. Review the following:
Adjustment #: Unique, system-generated number identifying inventory
adjustment transaction.
# of Items: Number of items adjusted (+/0) for specified transaction.
Is Posted: Adjustment has been applied to inventory; either ‘Yes’
(adjustment applied) or ‘No’ (adjustment still pending).
2. When finished, click Close.
Inventory Categories
This table lists the types or classes of products you sell, as specified in your
previous inventory setup and maintenance activities.
Reviewing Inventory Categories Information
You can review your existing inventory categories by first clicking Inventory
Categories on Table Maintenance menu. Inventory Categories screen
displays:
1. Review the following customer category information:
Description: Unique name or brief text identifying entry.
2. When finished, click Close at screen bottom to exit table.
Updating Inventory Categories Information
For procedures to add to, change or delete customer category information, see
Chapter 4, Managing Inventory Information, ‘Adding Inventory Categories’
and ‘Updating Inventory Categories’ sections (above).
262
Inventory Items
This table lists summary information for each product you sell, as specified in
your previous inventory setup and maintenance activities.
Reviewing Inventory Items Information
You can review summary information for your active inventory items by first
clicking Inventory Items on Table Maintenance menu. Inventory Items
screen displays:
1. Review the following customer category information:
Category: Unique name or brief narrative identifying category.
Description: Unique name or brief text identifying entry.
Stock #: Unique number or code identifying item.
On Hand: Item quantity on hand, per specified unit of measure (case or
unit).
Cost: Item price per unit; item vendor price, per specified unit of measure..
Retail: Item retail price, per specified unit of measure (case or unit).
2. When finished, click Close at screen bottom to exit table.
Updating Inventory Items Information
For procedures to add to, change or delete inventory item information, see
Chapter 4, Managing Inventory Information, ‘Adding Inventory Items’ and
‘Updating Inventory Items’ sections (above).
263
Inventory Receipts
This table lists inventory receipts and associated number of items received, as
recorded in your previous inventory maintenance activities.
Reviewing Inventory Receipts Information
You can review summary information for your inventory receipts by clicking
Inventory Receipts on Table Maintenance menu. Inventory Receipts screen
displays:
1. Review the following customer category information:
Receipt #: Unique, system-generated number identifying receipt.
# of Items: Item quantity received.
2. When finished, click Close at screen bottom to exit table.
Updating Inventory Receipts Information
For procedures to add to, change or delete inventory receipt information, see
Chapter 6, Managing Inventory Receipt Information, ‘Adding Inventory
Receipts’ and ‘Updating Inventory Receipts’ sections (above).
264
Invoice List
This table lists open and closed invoices and associated summary information
for each owing customer, as recorded in your previous customer account
maintenance activities.
Reviewing Invoice List Information
You can review your customer invoices by clicking Invoice List on Table
Maintenance menu. Invoice List screen displays:
1. Review the following:
Customer: Unique name identifying customer.
Invoice Number: Unique number identifying invoice.
Date: Invoice date, in MM/DD/YYYY format.
Total: Invoice total, in dollars and cents.
Paid: Invoice amount paid, in dollars and cents.
2. When finished, click Close at screen bottom to exit table.
Updating Invoice List Information
For procedures to add to, change or delete customer invoice information, see
Chapter 11, Managing Customer Invoice Information, ‘Creating Customer
Invoices’ and ‘Updating Customer Invoices’ sections (above).
265
No Sale Reasons
This table lists allowable reasons for cash drawer opening other than for normal
sales processing. DataManager tracks instances of all cashier activity for which
a defined no sale reason applies, and subsequently summarizes this activity in
the No Sale Reasons Report.
Reviewing No Sale Reasons Information
You can review current no sale reasons by clicking No Sale reasons on Table
Maintenance menu. No sale reasons screen displays:
1. Review the following:
Description: Unique name or brief text identifying entry
2. When finished, click Close at screen bottom to exit table.
Updating No Sale Reasons Information
You can add to, change or delete table entries by clicking No Sale Reasons on
Table Maintenance menu. No Sale Reasons screen displays:
266
1. Do one of the following:
-
To add entry, go to Step 2; or
-
To completely remove (delete) entry, go to Step 5; or
-
To update entry, go to Step 8.
2. Click Add at screen bottom: Add NoSale Reason dialog displays:
3. Type the following.
Description: Unique name or brief text identifying entry
4. When finished, click OK at screen bottom; STOP!
5. Right-click entry to be removed.
267
6. Click Delete icon, and then click Yes on Verification of Deletion dialog.
7. STOP!
8. Right-click entry to be updated.
9. Click Change icon; Add NoSale Reason dialog displays:
10. Overtype the following.
Description: Unique name or brief text identifying entry
11. When finished, click OK at screen bottom.
Other Payment Types
This table lists allowable options for cashier processing of non-standard sale
payments, such as coupon redemptions and store credits. DataManager tracks
instances of all cashier activity for which a non-standard payment type was
used, and subsequently summarizes this activity on the Other Payment Details
Report.
Reviewing Other Payment Types Information
You can review current non-standard payment options by clicking Other
Payment Types on Table Maintenance menu. Other Payment Types screen
displays:
268
1. Review the following:
Description: Unique name or brief text identifying entry
2. When finished, click Close at screen bottom to exit table.
Updating Other Payment Types Information
You can add to, change or delete table entries by clicking Other Payment
Types on Table Maintenance menu. Other Payment Types screen displays:
1. Do one of the following:
-
To add entry, go to Step 2; or
-
To completely remove (delete) entry, go to Step 3; or
-
To update entry, go to Step 8.
2. Click Add at screen bottom: Add NoSale Reason dialog displays:
269
3. Type the following.
Description: Unique name or brief text identifying entry
4. When finished, click OK at screen bottom; STOP!
5. Right-click entry to be removed.
6. Click Delete icon, and then click Yes on Verification of Deletion dialog.
7. STOP!
8. Right-click entry to be updated.
9. Click Change icon; Change Other Payment Types dialog displays:
270
10. Overtype the following.
Description: Unique name or brief text identifying entry
11. When finished, click OK at screen bottom.
Paidout Reasons
This table lists allowable, non-sales related cash in and cash out payment
options for items such as deliveries, donations and end of shift drawer count.
DataManager tracks instances of all cashier activity for which a paidout reason
was used, and subsequently summarizes this activity on the Paid Outs by Date
and Category Report.
Reviewing Paidout Reasons Information
You can review current paidout reason options by clicking Paidout Reasons on
Table Maintenance menu. Paidout Reasons screen displays:
1. Review the following:
Description: Unique name or brief text identifying entry
2. When finished, click Close at screen bottom to exit table.
Updating Paidout Reasons Information
You can add to, change or delete table entries by clicking Paidout Reasons on
Table Maintenance menu. Paidout Reasons screen displays:
271
1. Do one of the following:
-
To add entry, go to Step 2; or
-
To completely remove (delete) entry, go to Step 5; or
-
To update entry, go to Step 8.
2. Click Add at screen bottom: Add Paidout Reason dialog displays:
3. Type the following.
Description: Unique name or brief text identifying entry
4. When finished, click OK at screen bottom; STOP!
5. Right-click entry to be removed.
272
6. Click Delete icon, and then click Yes on Verification of Deletion dialog.
7. STOP!
8. Right-click entry to be updated.
9. Click Change icon; Change Paidout Reasons dialog displays:
10. As appropriate, overtype and/or select (click) the following.
273
Description: Unique name or brief text identifying entry.
Require Description: Cashier must input explanation or further details.
Paid In?: Reason applies to cash pay-in item.
11. When finished, click OK at screen bottom.
POS Configuration
This table identifies each FCT or Register currently configured for your POS.
Reviewing POS Configuration Information
You can review number assignment of each of your active POS stations by
clicking POS Configuration on Table Maintenance menu. POS
Configuration screen displays:
1. Review the following:
POSNumber: Unique number identifying POS station.
2. When finished, click Close at screen bottom to exit table.
Updating POS Configuration Information
For procedures to add to, change or delete POS configuration information, see
Chapter 12, Configuring Point Of Sale, (above).
274
Pricing Categories
This table lists current pricing categories for the items you sell, as specified in
your previous inventory pricing setup and maintenance activities.
Reviewing Pricing Categories Information
You can review the inventory pricing categories you have established by
clicking Pricing Categories on Table Maintenance menu. Pricing Categories
screen displays:
1. Review the following:
Description: Unique name or brief text identifying entry.
2. When finished, click Close at screen bottom to exit table.
Updating Pricing Categories Information
For procedures to add to, change or delete pricing categories information, see
Chapter 5, Managing Inventory Pricing Information, ‘Updating Pricing
Categories’ section (above).
Quick Menus
This table lists current Register quick menus and associated tab/button captions,
as specified in your previous POS setup and maintenance activities.
Reviewing Quick Menus Information
You can review the POS quick menus you have established by clicking Quick
Menus on Table Maintenance menu. Quick Menus screen displays:
275
1. Review the following:
Name: Unique name or brief text identifying entry.
Caption: Text corresponding to Name to display at POS.
2. When finished, click Close at screen bottom to exit table.
Updating Quick Menus Information
For procedures to add to, change or delete quick menus information, see
Chapter 12, Configuring Point Of Sale, ‘Updating Quick Menus’ section
(above).
Sales List
This table summarizes customer sales activity and attending invoice status
information, as well as provides for quick navigation to relevant sales entry
detail screens.
Reviewing Sales List Information
You can review summary customer sales entry and invoice status information
by clicking Sales List on Table Maintenance menu. Sales List screen
displays:
276
1. Review the following:
Invoice #: Unique number identifying invoice.
Date: Sale transaction date, in MM/DD/YYYY format (e.g., ‘11/25/2012’).
Time: Sale transaction time, in HH:MM:SS AM/PM format (e.g.,
’12:56:26 PM’).
Total: Invoice total, in dollars and cents (e.g., ‘$175.82’).
Status: Invoice generation status (e.g., ‘In Progress’. ‘Posted’).
2. Do one of the following:
-
To review details for specific entry, go to Step 3; or
-
To finish summary review, go to Step 5.
3. Double-click entry for which you want details; applicable Sales Entry
screen displays:
277
4. Review the following
Site: Unique name identifying transaction location.
Customer: Unique name identifying customer.
Date: Sale transaction date, in MM/DD/YYYY format (e.g., ‘11/25/2012’).
Time: Sale transaction time, in HH:MM:SS AM/PM format (e.g.,
’12:56:26 PM’).
Date: Sales entry date, in MM/DD/YYYY format; system default is current
date.
Time: Sales entry time, in HH:MM am/pm format; system default is current
time.
Discount: Discount type applied to sale, (e.g., ‘5% Senior’).
Card Number: Unique number identifying payment card.
Odometer: Vehicle odometer reading in whole miles.
Driver Identifier: Unique name or number identifying vehicle driver.
Vehicle Identifier: Unique number and/or name identifying driver vehicle.
Stock #: Unique number or code identifying item.
Description: Unique name or brief text identifying entry.
Quantity: Number of this item purchased, per specified unit of measure.
Unit Price: Item price per unit; item customer cost, per specified unit of
measure.
Ext Amount: Sale extended amount (Quantity value x Unit Price value).
Tx: Tax(es) applied to sale.
Dsc: Discount applied to sale.
Sub Total: Sale total, less applied tax(es) and discount.
Tax: Tax amount applied to sale.
Discount: Discount amount applied to sale.
[nnnn.nn]: Total sale amount.
5. Click Close at screen bottom.
Updating Sales List Information
For procedures to add to or delete sales list information, see Chapter 9,
Managing Manual Sales Entry Information (above).
278
Sites
This table lists summary information for each physical location configured for
your system, as well as provides for quick navigation to relevant sites detail
screens.
Reviewing Sites Information
You can review summary sites information by first clicking Sites on Table
Maintenance menu. Sites screen displays:
1. Review the following:
Name: Unique name or code identifying entry.
Site #: Unique number identifying site.
City: Address city name.
State: Address two-character state code (e.g., ‘CA’).
2. Do one of the following:
-
To review details for specific entry, go to Step 3; or
-
To finish summary review, go to Step 5.
3. Double-click entry for which you want details; applicable Site screen
displays:
279
4. Review the following
Site Name: Unique name or code identifying entry.
Site Number: Unique number identifying site.
Address: Street number and name, and unit number, if applicable (e.g.,
‘1011 Helderberg Ave #103’).
City: Address city name.
State: Address two-character state code (e.g., ‘CA’).
Zipcode: Address five-digit postal code.
Server Name: Unique name identifying site server.
Type: Site server type.
5. When finished, click Close at screen bottom.
Updating Sites Information
For procedures to add to, change or delete sites table information, see Chapter
2, Managing Site Information, ‘Updating Site Information’ section (above).
Terms Codes
This table lists invoice payment terms options, as specified in course of setting
up and maintaining customer account information. Displayed values provide
basis for calculation and adjustment of invoice totals.
Reviewing Terms Codes Information
You can review current net payment terms codes by clicking Terms Codes on
Table Maintenance menu. Terms Codes screen displays:
280
1. Review the following:
Description: Unique name or brief text identifying entry.
Discount %: Discount Total value expressed as percent.
# Of Days Discount Applies: Number of days until discount expires (e.g.,
‘10’)
# Of Days Until Due: Number of days until payment due (e.g., ‘60’).
2. When finished, click Close at screen bottom.
Updating Terms Codes Information
You can delete table entries as follows:
1. Right-click entry to be removed.
2. Click Delete icon, and then click Yes on Verification of Deletion dialog;
entry removed.
281
3. Click Close at screen bottom
For procedures to add to or change invoice terms information, see Chapter 8,
Managing Customer Information, ‘Adding Customer Accounts’ and ‘Updating
Customer Accounts’ sections (above).
Units of Measure
This table lists units of measure for the products you sell, as specified in course
of setting up and maintaining inventory item information. Measure units
determine calculation basis of quantity values.
Reviewing Units of Measure Information
You can review current units of measure by clicking Units of Measure on
Table Maintenance menu. Units of Measure screen displays:
1. Review the following:
Description: Unique name or brief text identifying entry.
Qty Per Pound: Unit of measure item quantity per one pound weight.
2. When finished, click Close at screen bottom.
Updating Units of Measure Information
You can add to, change and delete table entries by clicking Units of Measure
on Table Maintenance menu. Units of Measure screen displays:
282
1. Do one of the following:
-
To add entry, go to Step 2; or
-
To completely remove (delete) entry, go to Step 6; or
-
To update entry, go to Step 9.
2. Click Add at screen bottom; Add Unit of Measure Code dialog displays:
3. Type the following:
Description: Unique name or brief text identifying entry.
Qty Per Pound: Unit of measure item quantity per one pound weight.
4. When finished, click OK at screen bottom.
5. STOP!
6. Right-click entry to be removed.
283
7. Click Delete icon, and then click Yes on Verification of Deletion dialog.
8. STOP!
9. Right-click entry to be updated.
10. Click Change icon; Unit of Measure Code dialog displays:
11. As appropriate, overtype the following:
Description: Unique name or brief text identifying entry.
Qty Per Pound: Unit of measure item quantity per one pound weight.
12. When finished, click OK at screen bottom.
284
Vendor Categories
This table lists current categories for the types or groupings of items you
purchase from vendors, as specified in your previous vendor setup and
maintenance activities.
Reviewing Vendor Categories Information
You can review the vendor categories you have established by clicking Vendor
Categories on Table Maintenance menu. Vendor Categories screen displays:
1. Review the following:
Description: Unique name or brief text identifying entry.
2. When finished, click Close at screen bottom.
Updating Vendor Categories Information
For procedures to add to or change vendor categories information, see Chapter
3, Managing Vendor Information, ‘Adding Vendor Categories’ and ‘Updating
Vendor Categories’ sections (above).
Vendors
This table lists current vendors from whom you purchase inventory items, as
specified in your previous vendor setup and maintenance activities.
Reviewing Vendors Information
You can review summary information about the vendors you have established
by clicking Vendors on Table Maintenance menu. Vendors screen displays:
285
1. Review the following:
Code: Unique code identifying vendor.
Description: Unique name or brief text identifying entry.
2. When finished, click Close at screen bottom.
Updating Vendors Information
For procedures to add to or change vendor information, see Chapter 3,
Managing Vendor Information (above).
286
14
Chapter
Managing Report Information
DataManager provides a wide variety of periodic and special reports detailing daily business activities
across multiple functional lines. You have the option of either accepting standard report presentation or
specifying parameters as serves a specific one-time or ongoing business need. Please note that depending on
DataManager functionality purchased and sort criteria specified, you may not have access to all reports or
report information described.
You access DataManager report information by first making selection from the
Reports List screen. You can navigate to this screen from the Main display two ways:
Click task bar Reporting tab, and then click Reports List
OR
Click toolbar Reports List
icon.
Then:
Reports List screen displays:
Reference selected report below.
287
on menu;
Reports
A/R Trial Balance
This report provides detail and summary 0 – 121+ day customer Accounts
Receivable balance information for reporting period and selection criteria
specified.
To generate report:
1. Select (click) report from Reports List, and then click Show at screen
bottom; Enter Parameter Values screen displays.
2. As appropriate, select from the following Parameter Fields values, and
then in turn select or type corresponding value in Discrete Value window:
Customer Category: Only include customers within category specified.
Terms: Only include customers with payment terms specified.
Cutoff Date: Only include activity up to date and time specified.
3. Do one of the following:
-
To accept or change report cutoff date, go to Step 4; or
-
To not specify report cutoff date, click Set to NULL value; go to Step
5.
4. As appropriate, accept or change the following:
Cutoff Date: Only include activity on or before date and time specified.
5. Click OK at screen bottom; report displays:
288
6. Review the following:
Date: Report date in MM/DD/YYYY format (e.g., ‘11/10/2013’).
Page: Report page number of total report pages.
Customer Name: Unique name identifying customer.
Account Number: Unique number identifying customer account.
Current Balance: Customer account balance as of statement period end
date.
Uninvoiced Trans: Dollar amount of account transactions not yet invoiced.
Unapplied Pmt/Adjust: Dollar amount of account payments and
adjustments not yet applied,
Balance (0 – 121+): Outstanding account balance for day range specified.
Account Totals: Accounts receivable balance totals for customers and field
headings reported.
289
Checks By Shift
This report provides detail and total customer check receipt information for
reporting period and selection criteria specified.
To generate report:
1. Select (click) report from Reports List, and then click Show at screen
bottom; Enter Parameter Values screen displays.
2. As appropriate, select from the following Parameter Fields values, and
then in turn select corresponding value from Discrete Value window:
Beginning Date and Time: Only include activity on or after date and time
specified.
Ending Date and Time: Only include activity on or before date and time
specified.
3. Click OK at screen bottom; report displays:
290
4. Review the following:
Date: Report date in MM/DD/YYYY format (e.g., ‘11/10/2013’).
Page: Report page number of total report pages.
Printed for the Dates of: Inclusive dates and times for which report
pertains.
Shift Period: Work shift start and end dates and times for which reported
activity pertains, in MM/DD/YYYY HH:MM:SSAM/PM format (e.g.,
‘11/10/2012 11:48:28AM through 12/24/2013 11:50:17PM’).
Register: Unique number identifying register for which reported activity
pertains.
Shift: Work shift for which reported activity pertains.
Check Number: Sequence number printed on check.
Name on Check: Customer name printed on check.
Check Amount: Dollar amounts written on check.
Name on Check: Customer name printed on check.
Total Checks: Total number checks reported for dates, shift and register
specified.
291
Sum Of Checks: Total dollar amount of checks reported for dates, shift and
register specified.
CP720 Gallon Summary
This report provides CP720 gallon and dollar amount sales totals by fuel
product type for reporting period and selection criteria specified.
To generate report:
1. Select (click) report from Reports List, and then click Show at screen
bottom; Enter Parameter Values screen displays.
2. As appropriate, select from the following Parameter Fields values, and
then in turn select or type corresponding value in Discrete Value window:
Beginning Date: Only include activity on or after date specified.
Ending Date: Only include activity on or before date specified.
Customer #: Include activity for either all customer numbers or specific
customer number only; default is All Customers.
3. Click OK at screen bottom; report displays:
292
4. Review the following:
Date: Report date in MM/DD/YYYY format (e.g., ‘11/10/2013’).
Page: Report page number of total report pages.
Printed for the Dates of: Inclusive dates for which report pertains.
Location: Unique name identifying site.
Customer #: Unique number or code identifying customer.
Date: Transaction date in MM/DD/YYYY format (e.g., ‘10/11/2013’).
# Trans: Number of sales transactions for customer, date and fuel type
specified.
293
Gallons: Number of fuel type gallons pumped for location, customer, date
and number of sales transactions specified.
$ Amount: Dollar amount of fuel type gallons pumped for location,
customer, date and number of sales transactions specified.
[fuel type]: Sales transaction fuel type (e.g., ‘DIESEL 2’, etc.).
Totals: Sales transaction, gallon and dollar totals for location, customer,
date and fuel type specified.
Customer # [customer number] Totals: Sales transaction, gallon and
dollar totals for location, customer, date and all fuel types specified.
Totals for location: [location name]: Location sales transaction, gallon
and dollar totals for all customers, dates and fuel types specified.
Grand Totals: Sales transaction, gallon and dollar totals for all locations,
customers, dates and fuel types specified.
Credit Card Reconciliation
This report provides summary and detail credit card transaction activity
breakdown by date for reporting period and selection criteria specified.
To generate report:
1. Select (click) report from Reports List, and then click Show at screen
bottom; Enter Parameter Values screen displays.
2. As appropriate, select from the following Parameter Fields values, and
then in turn select or type corresponding value in Discrete Value window:
Beginning Date: Only include activity on or after date specified.
Ending Date: Only include activity on or before date specified.
294
Summary Only: Do not show card activity detail; only include data for
card type summary.
Card Number: Include activity for either all payment card numbers or
specific payment card number only; default is All Cards.
Site Number: Unique name identifying transaction site.
3. Click OK at screen bottom; report displays:
4. Review the following:
Date: Report date in MM/DD/YYYY format (e.g., ‘11/10/2013’).
Page: Report page number of total report pages.
Printed for the Dates of: Inclusive dates for which report pertains.
Location: Unique name identifying site.
Date: Transaction date in MM/DD/YYYY format (e.g., ‘10/11/2013’).
Time: Transaction time in HH.MM format (e.g., ’14:26’).
Card Type: Name identifying payment card type (e.g., ‘Visa’, ‘Discover’,
etc.)..
POS: Point Of sale payment location (e.g., ‘Register’, ‘Pay At The Pump’,
etc.).
295
Card Number: Unique number identifying payment cardholder; last four
digits only (masked for reporting purposes).
Exp Date: Payment card expiration date in MMYY format (e.g., ‘0817’).
Auth Num: Unique number identifying payment card transaction
authorization.
$ Sale Amount: Payment card transaction dollar amount.
[Card Type] Total for [POS location]: Sales transaction count and dollar
total for specified payment card type at POS location specified (e.g.,
‘Register 1’).
Totals for [MM/DD/YYYY]: Sales transaction count and dollar totals for
location and date specified.
Totals for [Location]: Sales transaction count and dollar totals for location
and all dates specified.
Credit Card Volume & Charges
This report provides summary credit card transaction activity breakdown by
card type for reporting period and location(s) specified.
To generate report:
1. Select (click) report from Reports List, and then click Show at screen
bottom; Enter Parameter Values screen displays.
2. As appropriate, select from the following Parameter Fields values, and
then in turn select corresponding value from Discrete Value window:
Beginning Date: Only include activity on or after date specified.
Ending Date: Only include activity on or before date specified.
296
3. Click OK at screen bottom; report displays:
4. Review the following:
Date: Report date in MM/DD/YYYY format (e.g., ‘11/10/2013’).
Page: Report page number of total report pages.
Location: Unique name identifying site.
Printed for the Dates of: Inclusive dates for which report pertains.
Card Type: Name identifying payment card type (e.g., ‘Visa’, ‘Discover’,
etc.).
# of Charges: Sales transaction count for card type specified.
Sales Volume: Sales transaction dollar totals for card type specified.
Total # of Charges: Sales transaction count total for all card types
specified.
Total Sales: Sales transaction dollar total for all card types specified.
Credit Limit
This report provides summary credit balance and limit information for
customer account(s) and credit limit percent value specified.
297
To generate report:
1. Select (click) report from Reports List, and then click Show at screen
bottom; Enter Parameter Values screen displays:
2. As appropriate, select from or type the following Parameter Fields values,
and then in turn select or type corresponding value in Discrete Value
window:
CustomerCode: Either All Customers or specific customer account
number.
Percentage of Credit Limit: Only include customers exceeding specified
percent of credit limit used (e.g., ‘0.05%’).
3. Click OK at screen bottom; report displays:
298
4. Review the following:
Date: Report date in MM/DD/YYYY format (e.g., ‘11/10/2013’).
Page: Report page number of total report pages.
Customer: Unique name identifying customer.
Account #: Unique code or number identifying customer.
Balance: Customer account credit balance.
Credit: Customer account credit limit.
Open Credit: Customer account available credit.
% of Limit: Customer account percent of credit limit used.
Customer Activity
This report provides summary sales transaction and account balance activity for
customer and reporting period specified.
To generate report:
1. Select (click) report from Reports List, and then click Show at screen
bottom; Enter Parameter Values screen displays:
2. As appropriate, select from the following Parameter Fields values, and
then in turn select or type corresponding value in Discrete Value window:
Beginning Date: Only include activity on or after date specified.
Ending Date: Only include activity on or before date specified.
Customer Account Number: Unique number identifying customer.
3. Click OK at screen bottom; report displays:
299
4. Review the following:
Date: Report date in MM/DD/YYYY format (e.g., ‘11/10/2013’).
Page: Report page number of total report pages.
Printed for the Dates of: Inclusive dates for which report pertains.
[Customer Name]: Unique name identifying customer.
Account: Unique code or number identifying customer.
Date: Sales transaction date in MM/DD/YYYY format (e.g., ‘10/11/2013’).
300
Site: Unique name identifying site.
Sale ID: Unique number identifying sales transaction.
On Invoice: Unique number identifying invoice reference pertaining to
item.
Item: Unique name or brief text identifying item.
Qty: Item quantity, per specified unit of measure.
Price: Customer cost per item.
Ext Amount: Sale extended amount (Qty value x Price value).
Discount: Discount amount applied to sale in dollars and cents.
Sum of Sales and Credits for Selected Period: Total customer sales and
credits this reporting period.
Customer Balance: Customer account balance forward as of report date.
Customer Drivers
This report lists summary assigned driver information for either a specific
customer or all customers.
To generate report:
1. Select (click) report from Reports List, and then click Show at screen
bottom; Enter Parameter Values screen displays:
2. As appropriate, either accept default (All Customers) or type entry for the
following Parameter Field value in Discrete Value window:
Customer Code: Unique number identifying customer.
3. Click OK at screen bottom; report displays:
301
4. Review the following:
Date: Report date in MM/DD/YYYY format (e.g., ‘11/10/2013’).
Page: Report page number of total report pages.
[Customer Name]: Unique name identifying customer.
Account #: Unique code or number identifying customer.
Driver ID: Unique number identifying driver.
First Name: Driver first name.
Last Name: Unique number identifying sales transaction.
Active?: Driver card usage activated for this customer account (either ‘Yes’
or ‘No’).
Customer Fuel History Summary
This report provides monthly summary of fuel purchase gallons and dollar
amounts for customer and reporting period specified.
To generate report:
302
1. Select (click) report from Reports List, and then click Show at screen
bottom; Enter Parameter Values screen displays:
2. As appropriate, select from the following Parameter Fields values, and
then in turn select or type corresponding value in Discrete Value window:
Beginning Date: Only include activity on or after date specified.
Ending Date: Only include activity on or before date specified.
CustomerNumber: Unique number identifying customer.
Display One Customer Per Page?: Display information for one customer
only per report page (either ‘Yes’ or ‘No’).
InvoiceFrequency: Only include information for invoices with frequency
specified (e.g., ‘All’, ‘Monthly’, etc.).
3. Click OK at screen bottom; report displays:
303
4. Review the following:
Date: Report date in MM/DD/YYYY format (e.g., ‘11/10/2013’).
Page: Report page number of total report pages.
Printed for the Dates of: Inclusive dates for which report pertains.
[Customer Name]: Unique name identifying customer.
[Account Number]: Unique number identifying customer.
[Month]: Abbreviated calendar month for which report data pertains (e.g.,
November = ‘Nov’).
[Stock #]: Unique number or code identifying item.
Total: Total monthly gallon and dollar amount for all fuel types listed.
Total: Total gallon and dollar amount for all months and fuel types listed.
Customer Pricing and Discounts
This report lists discount(s) and pricing basis on which discount amount or
percent applied for each customer reported.
304
To generate report:
1. Select (click) report from Reports List, and then click Show at screen
bottom; report displays:
2. Review the following:
Date: Report date in MM/DD/YYYY format (e.g., ‘11/10/2013’).
Page: Report page number of total report pages.
[Account Number]: Unique code or number identifying customer.
[Customer Name]: Unique name identifying customer.
Description: Unique name or brief text identifying discount.
Category: Item category for which discount applies.
305
Inventory Items: Inventory item(s) within category only for which
discount applies.
Cost Plus: Customer pricing comprises item vendor price + discount
amount shown.
Retail Minus: Customer pricing comprises retail price less discount amount
shown.
Discount %: Customer pricing comprises retail price less discount percent
shown.
Customer Sales Summary
This report provides sales transaction item and amount breakdown and grand
total for customer(s) and reporting period specified.
To generate report:
1. Select (click) report from Reports List, and then click Show at screen
bottom; Enter Parameter Values screen displays:
2. As appropriate, select from the following Parameter Fields values, and
then in turn select or type corresponding value in Discrete Value window:
Beginning Date: Only include activity on or after date specified.
Ending Date: Only include activity on or before date specified.
Only Show Sales for a specific Customer?: Display information either for
specific customer or all customers.
Show Discounts and Taxes?: Include applicable price discounting and
taxes in displayed amounts for each customer reported (either ‘Yes’ or
‘No’).
3. Click OK at screen bottom; report displays:
306
4. Review the following:
Date: Report date in MM/DD/YYYY format (e.g., ‘11/10/2013’).
Page: Report page number of total report pages.
Printed for the Dates of: Inclusive dates for which report pertains.
[Account Number]: Unique code or number identifying customer.
[Customer Name]: Unique name identifying customer.
Stock #: Unique number or code identifying item.
Item Description: Unique name or brief text identifying item.
Qty Sold: Inventory item quantity sold.
307
Total Amount: Total dollar amount of inventory item/quantity sold
(including discount and taxes, if so specified).
Sub Total for [Customer Name]: Total dollar amount of all inventory
items/quantities sold this customer (including discount and taxes, if so
specified).
Grand Total: Total dollar amount of all inventory items/quantities sold all
customers (including discount and taxes, if so specified).
Daily Card Sales
This report provides detailed payment card transaction activity breakdown by
date for reporting period and selection criteria specified.
To generate report:
1. Select (click) report from Reports List, and then click Show at screen
bottom; Enter Parameter Values screen displays.
2. As appropriate, select from the following Parameter Fields values, and
then in turn select or type corresponding value in Discrete Value window:
Beginning Date: Only include activity on or after date specified.
Ending Date: Only include activity on or before date specified.
Show POS ID or EEE Tran #? : Display applicable POS Receipt # when
using non-e3tek register.
Which Site # ?: Display sales transactions either for all sites or specific
site only.
Include Final Report Totals?: Append item counts and dollar totals
breakdown for all transactions reported (either ‘True’ or ‘False’).
308
Show Discount?: Display discounted totals for all transactions reported
(either ‘True’ or ‘False’).
3. Click OK at screen bottom; report displays:
4. Review the following:
Date: Report date in MM/DD/YYYY format (e.g., ‘11/10/2013’).
Page: Report page number of total report pages.
Printed for the Dates of: Inclusive dates and times for which report
pertains.
Location: Unique name identifying site.
Date: Transaction date in MM/DD/YYYY format (e.g., ‘10/11/2013’).
Time: Transaction time in HH.MM format (e.g., ’14:26’).
Tran #: Unique number identifying sales transaction.
Acct #: Unique number identifying customer account.
309
Card Number: Unique number identifying payment card.
Product: Unique name identifying inventory item.
PPU: Item price per unit; item customer cost, per specified unit of measure.
Qty: Item quantity, per specified unit of measure.
Amount: Sale extended amount (PPU value x Qty value).
Totals for [MM/DD/YYYY]: Sales transaction counts and dollar totals for
location and date specified.
Totals for [Location]: Sales transaction counts and dollar totals for location
and all dates specified.
Daily Journal
This report provides summary sales transaction activity for all payment
methods by date for reporting period and selection criteria specified.
To generate report:
1. Select (click) report from Reports List, and then click Show at screen
bottom; Enter Parameter Values screen displays.
2. As appropriate, select from the following Parameter Fields values, and
then in turn select or type corresponding value in Discrete Value window:
Beginning Date: Only include activity on or after date specified.
Ending Date: Only include activity on or before date specified.
Show Discounted Totals?: Display discounted totals for all transactions
reported (either ‘True’ or ‘False’).
Site Selection: Display sales transactions either for all sites or specific site
only.
310
3. Click OK at screen bottom; report displays:
4. Review the following:
Date: Report date in MM/DD/YYYY format (e.g., ‘11/10/2013’).
Page: Report page number of total report pages.
Printed for the Dates of: Inclusive dates and times for which report
pertains.
Location: Unique name identifying site.
Date: Transactions for [Date]: Transaction date in MM/DD/YYYY
format (e.g., ‘10/11/2013’).
311
Transaction #: Unique number identifying sales transaction.
Time: Transaction time in HH.MM format (e.g., ’14:26’).
Payment Location: Location at site that processed transactions (e.g.,
‘Register 1’).
Site Name: Unique name identifying site.
Payment Method: Sales transaction payment type.
Sale Total/Discounted Sale Total: Sales transaction extended payment
amount (price per unit value x quantity value/ price per unit value x
quantity value - discount).
Total Transactions: Total sales transaction count for location and date
specified.
Total for [MM/DD/YYYY]: Sales transaction dollar totals for location and
date specified.
Totals for [Location]: Sales transaction dollar total for location and all
dates specified.
Total Sales for Dates of: [MM/DD/YYYY to MM/DD/YYYY]: Sales
transaction dollar totals for all locations and inclusive dates specified.
312
Daily Shift
This report summarizes daily sales transaction activity for reported work shifts
and reporting period specified.
To generate report:
1. Select (click) report from Reports List, and then click Show at screen
bottom; Enter Parameter Values screen displays.
2. As appropriate, select from the following Parameter Fields values, and
then in turn select corresponding value from Discrete Value window:
Beginning Date and Time: Only include activity on or after date and time
specified.
Ending Date and Time: Only include activity on or before date and time
specified.
3. Click OK at screen bottom; report displays:
313
4. Review the following:
Date: Report date in MM/DD/YYYY format (e.g., ‘11/10/2013’).
Page: Report page number of total report pages.
Printed for the Dates of: Inclusive dates for which report pertains.
Shift Number nn: Unique number identifying work shift.
Opened: Work shift start date and time, in MM/DD/YYYY HH:MM:SS
AM/PM format (e.g., ‘11/10/2012 11:48:28AM’).
Closed: Work shift end date and time, in MM/DD/YYYY HH:MM:SS
AM/PM format (e.g., ‘12/24/2013 11:50:17PM’).
[Transaction Location]: Location at site that processed transactions (e.g.,
‘Register 1’).
Cash: Cash payment dollar total for shift and reporting period specified.
314
Check: Check payment dollar total for shift and reporting period specified.
Credit: Credit payment dollar total for shift and reporting period specified.
On Account: On account payment dollar total for shift and reporting period
specified.
Private: Private card payment dollar total for shift and reporting period
specified.
Other: Total miscellaneous payment dollar total for shift and reporting
period specified.
Paid Ins: Paid-in transaction dollar total for shift and reporting period
specified.
Paid Outs: Paid-out transaction dollar total for shift and reporting period
specified.
Change Given: “Make change” transaction dollar total for shift and
reporting period specified.
SalesTotal: Sales transaction dollar total less Change Given value for shift
and reporting period specified.
Discounted Sales
This report shows daily discounted sales transactions for customers and
reporting period specified. You have option of selecting either a summary or
detail report version (detail version used here for explanation purposes).
To generate report:
1. Select (click) report from Reports List, and then click Show at screen
bottom; Enter Parameter Values screen displays.
315
2. As appropriate, select from the following Parameter Fields values, and
then in turn select corresponding value from Discrete Value window:
Beginning Date and Time: Only include activity on or after date and time
specified.
Ending Date and Time: Only include activity on or before date and time
specified.
Include Detail: Display detail report version (either ‘True’ or ‘False’).
3. Click OK at screen bottom; report displays:
4. Review the following:
Date: Report date in MM/DD/YYYY format (e.g., ‘11/10/2013’).
Page: Report page number of total report pages.
Printed for the Dates of: Inclusive dates for which report pertains.
Discounts for [Date]: Discounted sales date, in MM/DD/YYYY format.
Invoice #: Unique number identifying invoice.
Customer: Unique name identifying customer.
Pre-Discount Total: Sales transaction dollar amount before discount.
Discount: Sales transaction discount dollar amount.
Post-Discount Total: Sales transaction dollar amount after discount.
316
Total Discounts for [Date]: Discount dollar total and Post-Discount dollar
total for all customers on date specified.
Dispensed Volume by Dispenser and
Product
This chart graphically depicts fuel sales in gallons by dispenser and product
type for site and reporting period specified.
To generate report:
1. Select (click) report from Reports List, and then click Show at screen
bottom; Enter Parameter Values screen displays.
2. As appropriate, select from the following Parameter Fields values, and
then in turn select or type corresponding value in Discrete Value window:
Beginning Date: Only include activity on or after date specified.
Ending Date: Only include activity on or before date specified.
3. Click OK at screen bottom; report displays:
317
4. Review the following:
For [Site Name]: Site for which chart pertains.
Dispensed Volume in Gallons: Total gallons dispensed for reporting
period specified.
Dispenser & Product: Gallons dispensed for reporting period by Dispenser
ID and product.
[Color Legend]: Color scheme for charted products.
Data displayed for the Dates of: Inclusive dates for which report pertains.
Dispenser Totals
This report shows total gallons dispensed per dispenser and product for date
and site specified.
To generate report:
1. Select (click) report from Reports List, and then click Show at screen
bottom; Enter Parameter Values screen displays:
318
2. Specify the following Parameter Fields value by selecting corresponding
date and time values from Discrete Value window:
[Date]: Only include activity for date specified.
[Time]: Only include activity at or before time on date specified.
3. Click OK at screen bottom; report displays:
4. Review the following:
Date: Report date in MM/DD/YYYY format (e.g., ‘11/10/2013’).
Page: Report page number of total report pages.
Site: Unique name identifying site.
Printed for the Date of: Date for which report pertains.
Dispenser: Unique number identifying dispenser.
319
Stock #: Unique number or code identifying item.
Description: Unique name or brief text identifying item.
Daily Qty: Product quantity dispensed in gallons on report date, as of time
specified.
DailyAmt: Product dollar total sales on report date, as of time specified.
MTD Qty: Month-to-date product quantity dispensed in gallons, as of
report date and time.
MTDAmt: Month-to-date product dollar total sales, as of report date and
time.
YTD Qty: Year-to-date product quantity dispensed in gallons, as of report
date and time.
YTDAmt: Year-to-date product dollar total sales, as of report date and
time.
Total Qty: Year-to-date product quantity dispensed in gallons, as of report
date and time.
Total Amt: Year-to-date product dollar total sales, as of report date and
time.
[Product Name] Totals: Product quantity and dollar sales totals for all site
dispensers and displayed reporting categories, as of report date and time.
Dyed Diesel Sales by Customer
This report details daily dyed diesel sales activity per customer for site and date
range specified.
To generate report:
1. Select (click) report from Reports List, and then click Show at screen
bottom; Enter Parameter Values screen displays:
320
2. Specify the following Parameter Fields value by selecting corresponding
date and time values from Discrete Value window:
Beginning Date: Only include activity on or after date specified.
Ending Date: Only include activity on or before date specified.
Pick from defaults: In lieu of selection, accept default for Beginning Time
and/or Ending Time values.
Beginning Time: Only include activity on or after time specified.
Ending Time: Only include activity on or before time specified.
3. Click OK at screen bottom; report displays:
4. Review the following:
321
Date: Report date, in MM/DD/YYYY format (e.g., ‘11/10/2013’).
Page: Report page number of total report pages.
Printed for the Dates of: Inclusive dates and times for which report
pertains.
Location: Unique name identifying site.
Date: Sales transaction date, in MM/DD/YYYY format.
Customer: - : Unique name identifying customer.
Time: Transaction time in HH.MM format (e.g., ’14:26’).
Card #: Unique number identifying customer.
Invoice: Unique number identifying invoice on which transaction billed.
Card Veh. #: Unique number identifying driver vehicle.
Card Description: Name identifying payment card type (e.g., ‘Visa’,
‘Discover’, etc.).
Driver #: Unique name or number identifying vehicle driver.
Vehicle #: Vehicle identification number (VIN).
Odometer: Vehicle odometer reading in whole miles.
Stock #: Unique number or code identifying item.
Item Description: Unique name or brief text identifying item.
Pump: Unique number identifying fuel dispensing station.
Hose: Unique number identifying fuel dispensing station hose.
Qty: Item quantity, per specified unit of measure.
Unit Price: Item price per unit; item customer cost, per specified unit of
measure.
Ext Amt: Sale extended amount (Qty value x Unit Price value).
Totals for [Customer]: Transaction totals for customer specified.
Totals for [Date]: Transaction totals for date specified.
Totals for [Site]: Transaction totals for site specified.
Total for the dates of: [MM/DD/YYYY – MM/DD/YYYY: Transaction
totals for reporting period specified.
322
Employee Charges
At your option, this report provides either summary or detail daily charge
activity for employees and date range specified.
To generate report:
1. Select (click) report from Reports List, and then click Show at screen
bottom; Enter Parameter Values screen displays:
2. Specify the following Parameter Fields value by selecting corresponding
date and time values from Discrete Value window:
Beginning Date: Only include activity on or after date specified.
Ending Date: Only include activity on or before date specified.
Include Detail: Display transaction details for each employee; either ‘True’
or ‘false’).
3. Click OK at screen bottom; report displays:
323
4. Review the following:
Date: Report date, in MM/DD/YYYY format (e.g., ‘11/10/2013’).
Page: Report page number of total report pages.
Printed for the Dates of: Inclusive dates for which report pertains.
Transactions for [Date]: Transaction date, in MM/DD/YYYY format.
Time: Transaction time in HH.MM format (e.g., ’14:26’).
Employee: Unique name identifying employee.
Description: Unique name or brief text identifying item.
Amount: Transaction total for employee specified.
Totals for: Total of all transactions for employee specified.
Totals for [Date]: Total of all transactions for all employees for date
specified.
Total for the dates of: [MM/DD/YYYY through MM/DD/YYYY: Total
employee charges for reporting period specified.
324
FET/SET Exemptions
This report provides detail of fuel product purchases and exempted federal and
state excise tax totals for customers and date range specified.
To generate report:
1. Select (click) report from Reports List, and then click Show at screen
bottom; Enter Parameter Values screen displays:
2. Specify the following Parameter Fields value by selecting corresponding
values from Discrete Value window:
Beginning Date: Only include activity on or after date specified.
Ending Date: Only include activity on or before date specified.
3. Click OK at screen bottom; report displays:
325
4. Review the following:
Date: Report date, in MM/DD/YYYY format (e.g., ‘11/10/2013’).
Page: Report page number of total report pages.
Printed for the Dates of: Inclusive dates for which report pertains.
Customer: Unique name identifying customer.
Product: Unique name or brief text identifying item.
Quantity: Exempted product gallon amount purchased by customer
reported.
FET Total: Total product Federal Excise Tax for which reported customer
exempted.
SET Total: Total product State Excise Tax for which reported customer
exempted.
Summary
Product: Unique name or brief text identifying item.
Quantity: Total exempted product gallon amount purchased by all
customers reported.
FET Total: Total product Federal Excise Tax for which all reported
customers exempted.
326
SET Total: Total product State Excise Tax for which all reported
customers exempted.
Grand Total:
Quantity: Total exempted gallon amount purchased of all products by all
customers reported.
FET Total: Total Federal Excise Tax exempted for all products by all
customers reported.
SET Total: Total product State Excise Tax exempted for all products by all
customers reported.
Finance Charges
This report provides summary of finance charge information for customer(s)
and date range specified.
To generate report:
1. Select (click) report from Reports List, and then click Show at screen
bottom; Enter Parameter Values screen displays:
2. Specify the following Parameter Fields value by selecting corresponding
values from Discrete Value window:
Beginning Date: Only include activity on or after date specified.
Ending Date: Only include activity on or before date specified.
Customer Number: Include activity for either all customers or specific
customer number specified; default is All Customers.
327
3. Click OK at screen bottom; report displays:
4. Review the following:
Number of Finance Charges: Number of times finance charges applied to
customer account(s) for date range specified..
Finance Charges Total: Total finance charges applied to customer
account(s) for date range specified.
Fuel Sales by Date and POS
This report provides detailed, daily fuel sales history for site(s) and reporting
period specified.
To generate report:
1. Select (click) report from Reports List, and then click Show at screen
bottom; Enter Parameter Values screen displays:
328
2. As appropriate, select from the following Parameter Fields values, and
then in turn select or type corresponding value in Discrete Value window:
Beginning Date: Only include activity on or after date specified.
Ending Date: Only include activity on or before date specified.
Site Selection: Display sales transactions for either all sites or specific site
only; default is All Sites.
3. Click OK at screen bottom; report displays:
329
5. Review the following:
Date: Report date in MM/DD/YYYY format (e.g., ‘11/10/2013’).
Page: Report page number of total report pages.
Printed for the Dates of: Inclusive dates for which report pertains.
[Site]: Unique name identifying site.
330
Transactions for [Date]: Transaction date in MM/DD/YYYY format (e.g.,
‘10/11/2013’).
Sales For [POS Location at Site]: Location within site where transactions
processed (e.g., ‘Register 1’, ‘Pay at the Pump’, etc.).
Time: Transaction time in HH.MM am/pm format (e.g., ’11:26 am’).
Trans #: Unique number identifying transaction.
Description: Unique name or brief narrative identifying item.
PPU: Price Per Unit; Item cost, per specified unit of measure.
Qty: Item quantity, per specified unit of measure.
Amount: Sale extended amount (PPU value x Qty value).
Totals for [POS Location at Site]: Transactions, Qty and Amount totals
for named POS location within site for transaction date specified.
Totals for [Date]: Transactions, Qty and Amount totals for all POS
locations within site for transaction date specified.
Totals for Dates [MM/DD/YYYY to MM/DD/YYYY]: Transactions, Qty
and Amount totals for all POS locations within site for date range
specified.
Total Sales for Dates of: [MM/DD/YYYY to MM/DD/YYYY]: Sales
transaction dollar totals for all locations and inclusive dates specified.
Fuel Sales by Dispenser & Product
This report shows total fuel sales per dispenser and product for date and site
specified.
To generate report:
1. Select (click) report from Reports List, and then click Show at screen
bottom; Enter Parameter Values screen displays:
331
2. Specify the following Parameter Fields value by selecting corresponding
date and time values from Discrete Value window:
[Date]: Only include activity for date specified.
[Time]: Only include activity at or before time on date specified.
Show Discounts?: Display discounted sales totals (either ‘Yes’ or ‘No’).
3. Click OK at screen bottom; report displays:
4. Review the following:
Date: Report date in MM/DD/YYYY format (e.g., ‘11/10/2013’).
Page: Report page number of total report pages.
Printed for the Dates of: Date range for which report pertains.
332
Dispenser [nn]: Unique number identifying dispenser.
[Product Name]: Unique name identifying item dispensed (e.g., ‘DL2’).
[Dispensed Volume]: Total quantity in gallons (e.g., ‘1,945.384’) of item
dispensed.
[Sales Volume]: Total dollar sales of item dispensed (e.g., ‘$7,526.70’).
Total for Dispenser: Dispenser total gallons and dollar sales of all items
dispensed.
Total Fuel for Date(s) selected: Total gallons and dollar sales of all items
dispensed from each site dispenser, and total gallons and dollar sales of all
items dispensed from all site dispensers.
Fuel Sales Volume by Dispenser
This chart graphically depicts fuel sales in gallons by dispenser for all product
types for site and reporting period specified.
To generate report:
1. Select (click) report from Reports List, and then click Show at screen
bottom; Enter Parameter Values screen displays:
2. Specify the following Parameter Fields value by selecting corresponding
values from Discrete Value window:
Beginning Date: Only include activity on or after date specified.
Ending Date: Only include activity on or before date specified.
3. Click OK at screen bottom; report displays:
333
4. Review the following:
For [Site Name]: Site for which chart pertains.
Dispensed Volume in Gallons: Total gallons dispensed for reporting
period specified.
Dispenser #: Unique number identifying dispenser.
Gallon Summary with Discounts
This report shows daily discounted transactions by sale and product type for
site(s) and reporting period specified.
To generate report:
1. Select (click) report from Reports List, and then click Show at screen
bottom; Enter Parameter Values screen displays.
334
2. As appropriate, select from the following Parameter Fields values, and
then in turn select or type corresponding value in Discrete Value window:
Beginning Date and Time: Only include activity on or after date and time
specified.
Ending Date and Time: Only include activity on or before date and time
specified.
POS: Point Of Sale transaction type (e.g., ‘Cards Only’); default is All
Sales.
Site: Unique name identifying transaction site; default is All Sites).
3. Click OK at screen bottom; report displays:
335
4. Review the following:
Date: Report date in MM/DD/YYYY format (e.g., ‘11/10/2013’).
Page: Report page number of total report pages.
Printed for the Dates of: Inclusive dates for which report pertains.
336
Location: Unique name identifying site.
Date: Sales transaction date, in MM/DD/YYYY format (e.g., ‘12/21/2013’
[Product Type]: Unique name identifying dispensed item (e.g., ‘Diesel 2’)
# Trans: Number of product sales transactions by transaction type (e.g.,
‘Private Cards’).
Gallons: Number of product gallons dispensed by transaction type (e.g.,
‘Credit Cards’).
$ Amount: Dollar total of product gallons dispensed by transaction type
(e.g., ‘Console’).
Discounted Amount: Dollar total of discounted sales transactions by
product and transaction type.
Totals for location: Reporting period totals for sales transactions, gallons
dispensed, sales dollar amounts and discounted sales dollar amounts for site
and transaction types specified.
Grand Totals: Reporting period total for sales transactions, gallons
dispensed, sales dollar amounts and discounted sales dollar amounts for all
sites and transaction types specified.
Hourly Sales
This report summarizes hourly sales transaction volume and dollar totals by site
and POS location within site for reporting period specified.
To generate report:
1. Select (click) report from Reports List, and then click Show at screen
bottom; Enter Parameter Values screen displays:
337
2. Specify the following Parameter Fields value by selecting corresponding
values from Discrete Value window:
Beginning Date: Only include activity on or after date specified.
Ending Date: Only include activity on or before date specified.
3. Click OK at screen bottom; report displays:
4. Review the following:
Date: Report date in MM/DD/YYYY format (e.g., ‘11/10/2013’).
Page: Report page number of total report pages.
Printed for the Dates of: Inclusive dates for which report pertains.
338
Location: Unique name identifying site.
Date: Sales transaction date, in MM/DD/YYYY format (e.g., ‘12/21/2013’
[POS Location at Site]: Location within site where transactions processed
(e.g., ‘Register 1’, ‘Pay at the Pump’, etc.).
Hour of the Day: Work hour end for which sales dollar and transaction
totals reported.
Sales: Hourly sales dollar total.
Count: Hourly sales transaction total.
Total for [POS Location at Site]: Total sales dollar amount and transaction
count for date and location within site specified.
Total for [Date]: Total sales dollar amount and transaction count for date
and location within site specified.
Total for [Site]: Total sales dollar amount and transaction count for date
and all locations within site specified.
Total Sales for Dates of: Total sales dollar amount and transaction count
for all sites for reporting period specified.
Inventory Adjustments
This report details adjustments made to inventory by adjustment number and
date.
To generate report:
1. Select (click) report from Reports List, and then click Show at screen
bottom; Enter Parameter Values screen displays:
339
2. Specify the following Parameter Fields value by selecting corresponding
values from Discrete Value window:
Beginning Date: Only include activity on or after date specified.
Ending Date: Only include activity on or before date specified.
3. Click OK at screen bottom; report displays:
4. Review the following:
Date: Report date in MM/DD/YYYY format (e.g., ‘11/10/2013’).
Page: Report page number of total report pages.
Adjustment Number: Unique number identifying inventory adjustment
transaction.
Adjustment Date: Inventory adjustment transaction date, in
MM/DD/YYYY format (e.g., ‘11/25/2013’).
Stock Number: Unique number identifying item.
UPC Code: Unique Universal Product Code identifying item.
Description: Unique name or brief text identifying item.
Qty: Number of this item adjusted (+/-).
Reason: Adjustment cause or explanation.
340
Inventory Receipts
This report details inventory receipts by receipt number and/or vendor invoice
number for date range specified.
To generate report:
1. Select (click) report from Reports List, and then click Show at screen
bottom; Enter Parameter Values screen displays:
2. Specify the following Parameter Fields value by selecting corresponding
values from Discrete Value window:
Beginning Date: Only include activity on or after date specified.
Ending Date: Only include activity on or before date specified.
3. Click OK at screen bottom; report displays:
341
4. Review the following:
Date: Report date in MM/DD/YYYY format (e.g., ‘11/10/2013’).
Page: Report page number of total report pages.
Receipt Number: Unique number identifying inventory receipt transaction.
Receipt Date: Inventory receipt transaction date, in MM/DD/YYYY format
(e.g., ‘11/25/2013’).
Vendor Invoice #: Unique number identifying vendor invoice.
Stock Number: Unique number identifying item.
Description: Unique name or brief text identifying item.
Qty: Number of this item ordered.
Vendor Price: Item current vendor price.
By Case?: Item received in case lots (either ‘Yes’ or ‘No’).
Per Case: If applicable, number of items in each case.
# Rcvd: Number of items received, per specified unit of measure.
Ext Amount: Receipt extended amount (Qty value x Vendor Price value).
Receipt Total: Total dollar amount of items received.
342
Inventory Snapshot
This report presents summary of on-hand inventory by item category at each
site for date and time specified.
To generate report:
1. Select (click) report from Reports List, and then click Show at screen
bottom; Enter Parameter Values screen displays:
2. Specify the following Parameter Fields value by selecting corresponding
values from Discrete Value window:
SnapShotDateTime: Date and time for which snapshot requested.
3. Click OK at screen bottom; report displays:
343
4. Review the following:
Date: Report date in MM/DD/YYYY format (e.g., ‘11/10/2013’).
Page: Report page number of total report pages.
Site: Unique name identifying site for which snapshot taken.
[Date and Time]: Snapshot as of date and time.
Category: Unique name or brief text identifying inventory category.
UPC or Stock#: Either unique Universal Product Code or stock number
identifying item.
Description: Unique name or brief text identifying item.
On Hand: Item quantity in inventory.
Retail: Item current retail price.
Cost: Item current vendor price.
Category Totals: Total of on-hand, retail cost and vendor price values for
all items in inventory category specified.
Grand Totals: Total of on-hand, retail cost and vendor price values for all
items in all inventory categories specified.
344
Inventory Stock On Hand
This report presents summary of current item count and retail value by site for
inventory categories specified.
To generate report:
1. Select (click) report from Reports List, and then click Show at screen
bottom; Enter Parameter Values screen displays:
2. Specify the following Parameter Fields value by selecting or typing
corresponding values in Discrete Value window:
Display UPC Codes or Stock Numbers?: Display unique Universal
Product Code or stock number for inventory items?; default is UPC Codes.
Include Only Quantity Greater Than Zero?: Display only category items
with +1 or more quantities (either ‘Yes’ or ‘No’)?; default is No.
Show Summary: Display only summary stock on hand data (either ‘Yes’
or ‘No’)?; default is No.
Category: Display stock on hand data for all sites or specified site only;
default is All.
3. Click OK at screen bottom; report displays:
345
4. Review the following:
Date: Report date in MM/DD/YYYY format (e.g., ‘11/10/2013’).
Page: Report page number of total report pages.
Site: Unique number identifying site for which report pertains.
Category: Unique name or brief text identifying inventory category.
UPC or Stock#: Either unique Universal Product Code or stock number
identifying item.
Description: Unique name or brief text identifying item.
On Hand: Item quantity in inventory.
Cost: Item current vendor price.
Avg Cost: Item average vendor price.
Retail: Item current retail price.
Avg Retail: Item average retail price.
Cur Value: Item current inventory value; On Hand value x Cost value.
GPM: Gross Profit Margin; Retail value mark up above cost, expressed as
percent.
Total On Hand: Total item quantity in inventory category.
346
Total Curent Value: Total value of inventory category items; Total On
Hand value x Cost value.
Grand Total On Hand: Total item quantity in inventory for all categories.
Grand Total Cur. Value: Total value of all inventory category items;
Grand Total On Hand value x Cost value.
Invoice Preview
Following priced transactions run, this report allows review of customer
invoice information to ensure accuracy and completeness prior to printing.
To generate report:
1. Select (click) report from Reports List, and then click Show at screen
bottom; Enter Parameter Values screen displays:
2. Specify the following Parameter Fields value by selecting or typing
corresponding values in Discrete Value window:
Beginning Date: Only include activity on or after date specified.
Ending Date: Only include activity on or before date specified.
Invoice Frequency: Only include activity for customers with invoicing
cycle specified (e.g., ‘Monthly’, Bi-Weekly’, etc.).
3. Click OK at screen bottom; report displays:
347
NOTE: Only those transactions not previously invoiced display.
4. Review the following:
Date: Report date in MM/DD/YYYY format (e.g., ‘11/10/2013’).
Page: Report page number of total report pages.
Date: System-generated invoice preview date, in MM/DD/YYYY format.
Printed for the Dates of: Inclusive dates for which report pertains.
[Customer Name]: Unique name identifying customer.
Site: Unique number identifying site for which report pertains.
Date: Item sales date, in MM/DD/YYYY format.
Description: Unique name or brief text identifying item.
Qty: Item quantity, per specified unit of measure.
Original Price: Item original retail price.
348
Discounted Price: Item retail price after discount, if applicable.
Original Amount: Item original customer price.
Discounted Amount: Item customer price after discount, if applicable.
Customer Total: Qty, Original Amount and Discounted Amount value
totals for customer specified.
Frequency Total: Qty, Original Amount and Discounted Amount value
totals for all customers with invoice frequency specified.
Grand Total: Qty, Original Amount and Discounted Amount value
totals for all customers for all invoice frequencies.
Invoices
Following priced transactions run, this report allows review of customer
invoice information to ensure accuracy and completeness prior to printing.
To generate report:
1. Select (click) report from Reports List, and then click Show at screen
bottom; Enter Parameter Values screen displays:
2. Specify the following Parameter Fields value by selecting or typing
corresponding values in Discrete Value window:
Customer Account Number: Only print Card List for customer account
number specified.
Invoice Cycle: Only include invoice(s) with run frequency specified (e.g.,
‘Monthly’, ‘Weekly’, etc.).
349
Invoice Run Date: Only include invoice(s) for run date specified (system
default is current date).
Show Original Price: Include vendor original pricing on invoices.
Sort Invoices By: Print invoices in order of sort criterion specified.
Sort Transaction By: Print invoice transactions in order of sort criterion
specified.
Display Invoice Batch Totals Summary?: Include grand total values for
all invoices in batch.
Display Per Month in Finance Charge Message?: Include per month
finance charge message on invoice.
Show Logo?: Display company logo on invoice.
3. When finished, click OK; report displays:
4. Depending on parameter selections (Step 2, above), review the following:
From: Your company name and address.
Bill To: Customer name and address.
350
Customer Account Number: Unique number identifying customer
account.
Invoice #: Unique number identifying customer invoice.
Invoice Date: Invoice run date, in MM/DD/YYYY format (e.g.,
11/25/2013’).
Terms: Customer account payment terms (e.g., ‘Net 30’).
Page: Report page number of total report pages.
For Card #: Unique number identifying payment card for which billing
provided.
[Driver Name]: Unique name or number identifying vehicle driver.
Terms: Customer account payment terms (e.g., ‘Net 30’).
Page: Report page number of total report pages.
For Card #: Unique number identifying payment card for which billing
provided.
[Cardholder Name]: Unique name identifying cardholder.
POS Receipt: Unique number identifying POS transaction receipt.
Location: Unique name identifying site.
Date: Sales transaction date, in MM/DD/YYYY format (e.g.,
‘12/21/2013’).
Time: Sales transaction time, in HH:MM format (e.g., ’07:18’).
Veh #: Unique number identifying vehicle.
Drv #: Unique name or number identifying vehicle driver.
Description: Name or brief text identifying item.
Qty: Item quantity, per specified unit of measure.
Price: Customer cost per unit.
Amount: Transaction extended amount (Qty value x Price value).
Card Total for Card #: Invoice Fuel Qty, Fuel Total and Total Amt
values for payment card specified.
Fuel Product Usage: Invoice fuel Quantity and Amount totals by product
and all products for all payment card numbers specified.
Invoice Total: Total dollar amount of all billing cycle payment card
transactions.
[Finance Charge Message]: Message reminding customer that past due
balances incur late fee at rate specified.
351
Invoices – Vehicle Format
Following priced transactions run, this report allows summary and detail review
of customer invoice information with focus on vehicle fuel usage and cost.
To generate report:
1. Select (click) report from Reports List, and then click Show at screen
bottom; Enter Parameter Values screen displays:
35. Specify the following Parameter Fields value by selecting or typing
corresponding values in Discrete Value window:
Customer Account Number: Only print Card List for customer account
number specified.
Invoice Cycle: Only include invoice(s) with run frequency specified (e.g.,
‘Monthly’, ‘Weekly’, etc.).
Invoice Run Date: Only include invoice(s) for run date specified (system
default is current date).
Sort Invoices By: Print invoices in order of sort criterion specified.
Sort Transaction By: Print invoice transactions in order of sort criterion
specified.
Show Cost Per Mile: Include vehicle per mile fuel cost.
Display Invoice Batch Totals Summary?: Include grand total values for
all invoices in batch.
Display Original Amounts?: Include customer before discount pricing.
352
Display Per Month in Finance Charge Message?: Include per month
finance charge message on invoice.
Show Logo?: Display company logo on invoice.
36. When finished, click OK; report displays:
37. Depending on parameter selections (Step 2, above), review the following:
From: Your company name and address.
TERMS: Customer account payment terms (e.g., ‘Net 30’).
Bill To: Customer name and address.
353
Account Number: Unique number identifying customer account.
Invoice Date: Invoice run date, in MM/DD/YYYY format (e.g.,
11/25/2013’).
Invoice #: Unique number identifying customer invoice.
Invoice Amount: Sum of current cycle and past due invoice dollar totals.
Sales Summary
Product: Unique name identifying item.
Quantity: Product quantity, per specified unit of measure.
Amount: Item dollar total for Quantity value specified.
Totals: Sum of Quantity and Amount values for all products specified.
Tax Summary
Description: Unique name or brief text identifying item.
TaxAmt: Total State and Federal tax for specified item.
Exemptions Summary
Description: Unique name or brief text identifying item.
Amount: Total State and Federal tax exempted for specified item.
Transaction Detail
For Card #: Unique number identifying payment card for which billing
provided.
Trans Date: Sales transaction date, in MM/DD/YYYY format (e.g.,
‘12/21/2013’).
Desc: Description; unique name or brief text identifying item.
Tkt Ref.: Unique number identifying POS transaction receipt.
Qty: Item quantity, per specified unit of measure.
Price: Customer cost per unit.
Amount: Transaction extended amount (Qty value x Price value).
Orig Price: Customer cost per unit before applied discount, if any.
Orig Amount: Transaction extended amount (Qty value x Price value)
before applied discount, if any.
Site: Unique name identifying site.
Driver: Unique name or number identifying vehicle driver.
MPG: Miles per gallon; End Odom (Ending Odometer reading) value less
Beg Odom (Beginning Odometer reading) value, divided by Qty value.
354
Card Total: Invoice Fuel Qty, Fuel Total, Beg Odom and Total Amt
values for payment card specified.
Invoice Total: Total dollar amount of all billing cycle payment card
transactions.
[Finance Charge Message]: Message reminding customer that past due
balances incur late fee at rate specified.
Loyalty Card Savings
This report displays loyalty customer post-discount savings totals by card and
customer.
To generate report:
1. Select (click) report from Reports List, and then click Show at screen
bottom; Enter Parameter Values screen displays:
2. Specify the following Parameter Fields value by selecting corresponding
values from Discrete Value window:
Beginning Date: Only include activity on or after date specified.
Ending Date: Only include activity on or before date specified.
3. Click OK at screen bottom; report displays:
355
4. Review the following:
Date: Report date in MM/DD/YYYY format (e.g., ‘11/10/2013’).
Page: Report page number of total report pages.
Customer: Unique name identifying customer.
Acct #: Unique code or number identifying customer.
Card #: Unique number identifying payment card.
[Card Name]: Unique name identifying payment card.
Date Time: Sales transaction date, in MM/DD/YYYY format (e.g.,
‘12/21/2013’).
Invoice #: Unique number identifying customer invoice.
Total Pre-Discount: Customer original transaction amount.
Total Post-Discount: Customer transaction amount after discount.
Loyalty Savings: Difference between transaction Total Pre-Discount and
Total Post-Discount values.
Total Savings for Card: Sum of loyalty savings for all transactions for
payment card number and name specified.
Total Savings for Customer: Sum of loyalty savings for all payment card
transactions for customer name and number specified.
356
Monthly Sales Volume (Chart)
This report displays monthly total sales volume in dollars for location and date
range specified.
To generate report:
1. Select (click) report from Reports List, and then click Show at screen
bottom; Enter Parameter Values screen displays:
2. Specify the following Parameter Fields value by selecting corresponding
values from Discrete Value window:
Beginning Date: Only include activity on or after date specified.
Ending Date: Only include activity on or before date specified.
3. Click OK at screen bottom; report displays:
357
4. Review the following:
For [Site Name]: Company location for which report data pertains.
Sales Volume in Dollars: Total sales in dollars for location and calendar
month(s) specified.
Month Of Year: Calendar month for which report data pertains.
No Sale Reasons
This report details daily no sale transactions for location and date range
specified.
To generate report:
1. Select (click) report from Reports List, and then click Show at screen
bottom; Enter Parameter Values screen displays:
2. Specify the following Parameter Fields value by selecting corresponding
values from Discrete Value window:
Beginning Date: Only include activity on or after date specified.
Ending Date: Only include activity on or before date specified.
3. Click OK at screen bottom; report displays:
358
4. Review the following:
Date: Report run date, in MM/DD/YYYY format (e.g., ‘11/10/2013’).
Time: Report run time, in HH:MM:SS format (e.g., ’10:25:24’).
Page: Report page number of total report pages.
Date/Time: No Sale transaction date and time.
No Sale Reason: No Sale transaction reason code.
Shift Number: Work shift on which No Sale transaction occurred.
First Name: First name of employee making No Sale transaction.
Last Name: Last name of employee making No Sale transaction.
On Account Charges
This report details invoiced customer sales transaction charges by date and
reporting period specified.
To generate report:
1. Select (click) report from Reports List, and then click Show at screen
bottom; Enter Parameter Values screen displays:
359
2. Specify the following Parameter Fields value by selecting corresponding
values from Discrete Value window:
Beginning Date: Only include activity on or after date specified.
Ending Date: Only include activity on or before date specified.
Customer Charges/Private Cards: Display either customer charges only,
private card charges only, or both customer charges and private card
charges.
3. Click OK at screen bottom; report displays:
4. Review the following:
360
Date: System-generated report date in MM/DD/YYYY format (e.g.,
‘11/10/2013’).
Page: Report page number of total report pages.
Printed for the Dates of: Inclusive dates for which report pertains.
Transactions for [Date]: Date for which customer sales transaction data
pertains.
Customer: Unique name identifying customer.
Invoice #: Unique number identifying customer invoice.
Time: Sales transaction time, in HH:MM am/pm format (e.g., ’12: 23 pm’).
Sale Total: Sales transaction total dollar amount.
Method: Sales transaction payment type.
Payment Amt: Sales transaction payment dollar amount.
Card #: Unique number identifying payment card.
Acct #: Unique number identifying customer account.
Totals for: [Customer Name]: Total sales transaction payment dollar
amount for customer on date specified.
Totals for: [Date]: Total sales transaction payment dollar amount for all
customers on date specified.
Totals for the Dates [MM/DD/YY to MM/DD/YY]: Total sales transaction
payment dollar amount for all customers and reporting period specified.
“Other Payment” Details
This report details transaction payments made other than by customer charge or
private card for dates and reporting period specified.
To generate report:
1. Select (click) report from Reports List, and then click Show at screen
bottom; Enter Parameter Values screen displays:
361
2. Specify the following Parameter Fields value by selecting corresponding
values from Discrete Value window:
Beginning Date: Only include activity on or after date specified.
Ending Date: Only include activity on or before date specified.
Include Detail: Display details of each transaction (either ‘True’ or
‘False’).
3. Click OK at screen bottom; report displays:
4. Review the following:
Date: System-generated report date, in MM/DD/YYYY format (e.g.,
‘11/10/2013’).
Page: Report page number of total report pages.
Printed for the Dates of: Inclusive dates for which report pertains.
Transactions for [Date]: Date for which sales transaction data pertains.
362
Time: Sales transaction time, in HH:MM format (e.g., ’10:23’).
Employee: Employee first and last name (if applicable).
Invoice #: Unique number identifying invoice.
Payment Description: Sales transaction payment type (e.g.,
‘Miscellaneous’).
Amount: Sales transaction total payment amount.
Totals for [Payment Description]: Total sales transaction payments of type
specified (e.g., ‘Miscellaneous’).
Totals for [Date]: Total sales transaction payments by all types on date
specified.
Total for the Dates [MM/DD/YY to MM/DD/YY]: Total sales transaction
payment dollar amount for all customers and reporting period specified.
Paid Outs by Date and Category
This report provides both summary and detailed history of paidouts by date and
category for non-sales related cash out options such as deliveries and donations.
To generate report:
1. Select (click) report from Reports List, and then click Show at screen
bottom; Enter Parameter Values screen displays:
2. Specify the following Parameter Fields value by selecting corresponding
values from Discrete Value window:
Beginning Date: Only include activity on or after date specified.
Ending Date: Only include activity on or before date specified.
363
Include Detail: Display details of each sales transaction (either ‘True’ or
‘False’).
3. Click OK at screen bottom; report displays:
4. Review the following:
Date: System-generated report date, in MM/DD/YYYY format (e.g.,
‘11/10/2013’).
Page: Report page number of total report pages.
Printed for the Dates of: Inclusive dates for which report pertains.
Paid-Outs for [Date]: Date for which paid-out transaction data pertains.
Category: Unique name or brief text identifying category.
Description: Unique name or brief text identifying item.
Employee: Employee workstation where paid-out transaction performed
Amount: Transaction payment amount.
Total paid outs for [Category]: Total paid-out transaction dollar amount
for category specified (e.g., ‘Advertising’).
Total paid-outs for [Date]: Total paid-out transaction dollar amount for all
categories on date specified.
Total paid-outs for [MM/DD/YYYY to MM/DD/YYYY]: Total paid out
transaction dollar amount for all categories for reporting period specified.
364
Payment Details
This report provides detail of customer account payment deposits for date
specified.
To generate report:
1. Select (click) report from Reports List, and then click Show at screen
bottom; Enter Parameter Values screen displays:
2. Specify the following Parameter Fields value by selecting corresponding
values from Discrete Value window:
Deposit Date: Include customer payment activity only for deposit date
specified.
3. Click OK at screen bottom; report displays:
365
4. Review the following:
Deposit Date: Customer payment deposit date, in MM/DD/YYYY format
(e.g., ‘11/10/2013’).
Payment Count: Number of customer payment deposit items.
Amount Total: Dollar total of all customer payment deposit items.
Check/TRN #: Unique check or transaction number identifying customer
payment item.
Amount: Dollar total of customer payment deposit item.
Account: Unique number identifying customer account.
Company Name: Unique name identifying customer account.
Payment History
This report provides historical detail of customer account payment and
adjustment activity for reporting period specified.
To generate report:
1. Select (click) report from Reports List, and then click Show at screen
bottom; Enter Parameter Values screen displays:
2. Specify the following Parameter Fields value by selecting or typing
corresponding values in Discrete Value window, as appropriate:
Beginning Date: Only include activity on or after date specified.
Ending Date: Only include activity on or before date specified.
Customer Code: Either all customers or unique number identifying
specific customer.
366
3. Click OK at screen bottom; report displays:
4. Review the following:
Date: System-generated report date, in MM/DD/YYYY format (e.g.,
‘11/10/2013’).
Page: Report page number of total report pages.
Printed for the Dates of: Inclusive dates for which report data pertains.
Payments and Adjustments for: Customer name and address for which
report data applies.
Date: Transaction date, in MM/DD/YYYY format (e.g., ‘10/19/2013’).
Type: Name identifying transaction category (e.g., ‘Adjustment’).
Description: Brief text describing transaction.
Amount: Transaction payment or adjustment (+/-) amount.
367
Reference #: Invoice number for which transaction applies.
Total: Net sum (+/-) of all payments and adjustments for customer
specified.
Grand Total: Net sum (+/-) of all payments and adjustments for all
customers specified.
Pending Settlements
This report lists customer credit card transactions that did not batch out with
payment processor or otherwise awaiting transmission for processing and
settlement.
To generate report:
1. Select (click) report from Reports List, and then click Show at screen
bottom; report displays:
2. Review the following:
Date: System-generated report date, in MM/DD/YYYY format (e.g.,
‘11/10/2013’).
Page: Report page number of total report pages.
Printed for the Dates of: Inclusive dates for which report data pertains.
Date: Transaction date, in MM/DD/YYYY format (e.g., ‘10/19/2013’).
Type: Name identifying transaction category (e.g., ‘Adjustment’).
Description: Brief text describing transaction.
368
Amount: Transaction payment or adjustment (+/-) amount.
Reference #: Invoice number for which transaction applies.
Total: Net sum (+/-) of all payments and adjustments for customer
specified.
Grand Total: Net sum (+/-) of all payments and adjustments for all
customers specified.
Prepaid Card Status
This report displays prepaid card setup and balance information by customer
for report date specified.
To generate report:
1. Select (click) report from Reports List, and then click Show at screen
bottom; report displays:
2. Review the following:
Date: System-generated report date, in MM/DD/YYYY format (e.g.,
‘11/10/2013’).
Page: Report page number of total report pages.
Account #: Unique number or code identifying customer account.
369
Customer: Unique name identifying customer.
Active: Indicates whether card in use (either ‘Yes’ or ‘No’).
Card #: Unique number identifying card.
Description: Unique name identifying card.
Vehicle Identifier: Unique number identifying vehicle for which card use
authorized, if applicable.
Pin Rqd: Indicates whether card requires PIN entry for use (either ‘Yes’ or
‘No’).
Odom Rqd: Indicates whether card requires odometer reading entry for use
(either ‘Yes’ or ‘No’).
Driver # Rqd: Indicates whether card requires Driver ID entry for use
(either ‘Yes’ or ‘No’).
Veh # Rqd: Indicates whether card requires Vehicle ID entry for use (either
‘Yes’ or ‘No’).
Gal Limit: Maximum fuel gallons for which card use authorized.
Balance: Remaining dollar amount for which card use authorized.
Price Change History
This report provides historical detail of inventory item cost and retail price
changes (+/-) for reporting period specified.
To generate report:
1. Select (click) report from Reports List, and then click Show at screen
bottom; Enter Parameter Values screen displays:
370
2. Specify the following Parameter Fields value by selecting corresponding
values in Discrete Value window, as appropriate:
UPC Code or Stock Number: Display report data by item identifier
specified (either ‘UPC Code’ or ‘Stock Number’).
Beginning Date: Only include activity on or after date specified.
Ending Date: Only include activity on or before date specified.
3. Click OK at screen bottom; report displays:
371
4. Review the following:
Date: System-generated report date, in MM/DD/YYYY format (e.g.,
‘11/10/2013’).
Page: Report page number of total report pages.
Printed for the Dates of: Inclusive dates for which report data pertains.
Product Description: Unique name or brief text identifying inventory item.
Stock Number/UPC Code: Unique number identifying inventory item.
Date of Price Change: Inventory item price change effective date.
Cost: Inventory item vendor price.
Retail: Inventory item customer price.
Previous Retail: Inventory item retail price before change.
Private Card Fuel Sales by Dispenser
This report shows private card fuel sales dollar and dispensed gallon totals per
dispenser for site and date range specified.
To generate report:
1. Select (click) report from Reports List, and then click Show at screen
bottom; Enter Parameter Values screen displays:
2. Specify the following Parameter Fields value by selecting corresponding
values from Discrete Value window:
Beginning Date: Only include activity on or after date specified.
Ending Date: Only include activity on or before date specified.
372
3. Click OK at screen bottom; report displays:
4. Review the following:
Date: Report date, in MM/DD/YYYY format (e.g., ‘11/10/2013’).
Page: Report page number of total report pages.
Printed for the Date of: Date for which report pertains.
Location: Unique name identifying site.
Date: Sales transaction date, in MM/DD/YYYY format (e.g.,
‘10/19/2013’).
Dispenser: Unique number identifying dispenser.
Dollars: Dollar total of product dispensed on date specified.
Gallons: Gallon total of product dispensed on date specified.
Totals for [Date]: Dollar and gallon totals of product dispensed for all
location dispensers on date specified.
Totals for the Dates of [MM/DD/YY to MM/DD/YY]: Dollar and gallon
totals of product dispensed for all location dispensers for reporting period
specified.
373
Private Card Sales by Customer and Card
This report provides detailed customer private card transaction information by
either site or card number for date range specified.
To generate report:
1. Select (click) report from Reports List, and then click Show at screen
bottom; Enter Parameter Values screen displays:
2. Specify the following Parameter Fields value by selecting corresponding
values from Discrete Value window:
Beginning Date: Only include activity on or after date specified.
Ending Date: Only include activity on or before date specified.
Customer Code: Either all customers or unique number identifying
specific customer.
Card Number: Unique number identifying payment card.
Show Sales Tax and Discounts?: Display sales tax and discounted sales
totals (either ‘Yes’ or ‘No’).
Beginning Time: Only include activity on or after time specified.
Ending time: Only include activity on or before time specified.
Group Records By: Sort sales transactions in sequence specified (either by
‘Location’ or by ‘Card Number’).
3. Click OK at screen bottom; report displays:
374
4. Review the following:
Date: Report date in MM/DD/YYYY format (e.g., ‘11/10/2013’).
Page: Report page number of total report pages.
Printed for the Dates of: Inclusive dates for which report pertains.
Location: Unique name identifying customer site.
Customer: [Customer name and Account Number]: Unique name and
code or number identifying customer.
Date & Time: Sales transaction date and time.
Card #: Unique number identifying payment card.
Invoice #: Unique number identifying invoice on which sale billed.
Card Desc: Unique name or brief text identifying payment card.
375
Stock #: Unique number or code identifying item.
Item Description: Unique name or brief text identifying item.
Odometer: Vehicle odometer reading at sales transaction date and time.
Qty: Item quantity, per specified unit of measure.
Unit Price: Item price per unit; item customer cost, per specified unit of
measure.
Ext Amount: Sale extended amount (Quantity value x Unit Price value).
Total for [Date]: Customer total sales dollar amount and transaction count
for date and location within site specified.
Total for [Customer Name and Account Number]: Customer total sales
dollar amount and transaction count for date range specified.
Total for [Location]: Site total sales dollar amount and transaction count
for all customers for reporting period specified.
Total for the Dates of [MM/DD/YYYY - MM/DD/YYYY]: Total sales
dollar amount and transaction count for all sites for reporting period
specified.
Private Card Sales Summary
This report summarizes private card sales transaction information by site for
date range specified.
To generate report:
1. Select (click) report from Reports List, and then click Show at screen
bottom; Enter Parameter Values screen displays:
2. Specify the following Parameter Fields value by selecting corresponding
values from Discrete Value window:
376
Beginning Date: Only include activity on or after date specified.
Ending Date: Only include activity on or before date specified.
Beginning Time: Only include activity on or after time specified.
Ending time: Only include activity on or before time specified.
Show Sales Tax and Discounts?: Display sales tax and discounted sales
totals (either ‘Yes’ or ‘No’).
3. Click OK at screen bottom; report displays:
4. Review the following:
Date: Report date in MM/DD/YYYY format (e.g., ‘11/10/2013’).
Page: Report page number of total report pages.
Printed for the Dates of: Inclusive dates for which report pertains.
Location: Unique name identifying customer site.
Stock #: Unique number or code identifying item.
Item Description: Unique name or brief text identifying item.
# of Transactions: Number of sales transactions for specified item.
Qty: Item quantity, per specified unit of measure.
Avg Price: Item average retail price.
Ext Amount: Sale extended amount (Quantity value x Unit Price value).
377
Total for the Dates of [MM/DD/YYYY through MM/DD/YYYY]: Total
site transaction count and sales dollar amount for reporting period specified.
Private Card List
This report summarizes current customer setup up information for active and/or
inactive private card accounts.
To generate report:
1. Select (click) report from Reports List, and then click Show at screen
bottom; Enter Parameter Values screen displays:
2. Specify the following Parameter Fields value by selecting corresponding
values from Discrete Value window:
Customer Account #: Display information for either ‘All Customers’ or
specified customer only.
Display Inactive Cards?: Include inactive card information in report
(either ‘Yes’ or ‘No’).
Show Inactive Cards Only?: Include only inactive card information in
report (either ‘Yes’ or ‘No’).
Show Pin Number?: Include customer PIN information in report (either
‘Yes’ or ‘No’)
3. Click OK at screen bottom; report displays:
378
4. Review the following:
Date: Report date in MM/DD/YYYY format (e.g., ‘11/10/2013’).
Page: Report page number of total report pages.
Account #: Unique number or code identifying customer account.
Customer: Unique name identifying customer.
Active: Card active for use (either ‘Yes’ or ‘No’).
Card #: Unique number identifying customer private card.
Description: Unique name identifying private card.
Vehicle #: Unique number or code identifying vehicle.
Pin?: Indicates whether card usage requires PIN entry (either ‘Yes’ or
‘No’).
Odom?: Indicates whether card usage requires vehicle odometer reading
(either ‘Yes’ or ‘No’).
Driver #?: Indicates whether card usage requires driver number entry
(either ‘Yes’ or ‘No’).
379
Veh #: Indicates whether card usage requires vehicle number entry (either
‘Yes’ or ‘No’).
Gal Limit: Maximum fuel gallons for which card use authorized.
Use Bal: Indicates whether to decline card usage when Balance value
reached (either ‘Yes’ or ‘No’).
Balance: Private card current account balance (+/-).
Register Shift
This report summarizes register cash and non-cash drawer activity and fuel
sales information by shift for reporting period specified.
To generate report:
1. Select (click) report from Reports List, and then click Show at screen
bottom; Enter Parameter Values screen displays.
2. As appropriate, select from the following Parameter Fields values, and
then in turn select or type corresponding value in Discrete Value window:
Beginning Date and Time: Only include activity on or after date and time
specified.
Ending Date and Time: Only include activity on or before date and time
specified.
Only Show Sales That Occurred Between Specified Date-Time Range:
Only include sales activity for date-time range specified.
3. Click OK at screen bottom; report displays:
380
5. Review the following:
Date: Report date in MM/DD/YYYY format (e.g., ‘11/10/2013’).
Page: Report page number of total report pages.
Printed for the Dates of: Inclusive dates and times for which report
pertains.
[Location]: Unique name identifying site.
Date: Date for which register and shift information immediately following
pertains.
Register: Unique number identifying register.
381
Shift: Unique number identifying work shift.
Cashier: Unique name identifying cashier.
Cashier #: Unique number identifying cashier.
NON-CASH ITEMS
Check Total: Total number and dollar amount of check items.
On Account Total: Total number and dollar amount of on-account items.
Private Cards Total: Total number and dollar amount of private card
items.
Credit Total: Total number and dollar amount of credit items.
‘Other’ Total: Total number and dollar amount of miscellaneous items.
CASH – INTO DRAWER
Cash Total (Sales): Total number and dollar amount of cash sales.
Paid Ins: Total number and dollar amount of paid-in items.
Total Cash into Drawer: Total dollar amount of cash sales and paid-ins.
CASH – OUT OF DRAWER
Cash (Change Given): Total dollar amount of change back cash.
Deposits: Total number and dollar amount of cash deposit items.
Paid Outs: Total dollar amount of cash sales and paid-outs.
Total Cash out of Drawer: Total dollar amount of change back cash,
deposits and paid-outs.
Expected Cash: Dollar amount difference between Total Cash into
Drawer and Total Cash out of Drawer values.
Fuel Sales Volume
[Product]: Unique name identifying fuel product.
[Volume]: Total product sales in gallons.
[Amount]: Total product sales in dollars.
382
Re-Order Limits
Depending on inventory management software utilized, this report either
provides snapshot of current inventory item status (+/-) or identifies inventory
items input via MIM (Mobile Inventory Manager) which have reached their
reorder points.
To generate report:
1. Select (click) report from Reports List, and then click Show at screen
bottom; Enter Parameter Values screen displays.
2. As appropriate, select from the following Parameter Fields values, and
then in turn select or type corresponding value in Discrete Value window:
Vendor Name?: Display report data either for all vendors or only vendor
specified.
Only Show Items that Need to be Ordered?: Display report data only for
items which have reached their reorder points (either ‘True’ or ‘False’).
3. Click OK at screen bottom; report displays:
383
4. Review the following:
Date: Report date in MM/DD/YYYY format (e.g., ‘11/10/2013’).
Page: Report page number of total report pages.
[Location]: Unique name and number identifying site.
[Company Name] Date: Company and date for which report data pertains.
Vendor: Unique name identifying vendor.
Category: Unique name identifying inventory category.
Description: Unique name or brief text identifying inventory item.
UPCCode: Unique Universal Product Code identifying item.
OnHand: Item quantity on hand, per specified unit of measure.
MinQty: Minimum order quantity.
MaxQty: Maximum order quantity.
Order # Cases: Item case order quantity.
Order # Singles: Single item order quantity.
Qty/Case: Number of items per case.
Inv Me: Inventory Me; note to generate vendor order.
384
Sales by Payment Method
This report summarizes daily sales totals by payment type, for location(s) and
date range specified.
To generate report:
1. Select (click) report from Reports List, and then click Show at screen
bottom; Enter Parameter Values screen displays.
2. As appropriate, select from the following Parameter Fields values, and
then in turn select or type corresponding value in Discrete Value window:
Beginning Date: Only include activity on or after date specified.
Ending Date: Only include activity on or before date specified.
3. Click OK at screen bottom; report displays:
385
4. Review the following:
Date: Report date, in MM/DD/YYYY format (e.g., ‘11/10/2013’).
Page: Report page number of total report pages.
Location: Unique name identifying site.
Printed for the Dates of: Inclusive dates for which report data pertains.
Sales for [Date]: Sales transactions by type for date specified.
Totals for [Date]: Sales dollar totals by transaction type and all types for
date specified.
All Methods: Sales transaction dollar total for all payments types for date
specified.
Cash: Dollar total of all cash sales transactions for date specified.
Check: Dollar total of all check sales transactions for date specified.
Card: Dollar total of all payment card sales transactions for date specified.
On Acct: Dollar total of all on account sales transactions for date specified.
Emp Chg: Dollar total of all employee charge sales transactions for date
specified.
Other Amount: Dollar total of all miscellaneous sales transactions for date
specified.
Paid Outs: Dollar total of all register paid out transactions for date
specified.
Tax: Dollar total of all sales and excise taxes collected for date specified.
386
Sales by Shift and Category
This report summarizes sales item quantity and dollar totals by inventory
category or department, for site, work shift and date range specified.
To generate report:
1. Select (click) report from Reports List, and then click Show at screen
bottom; Enter Parameter Values screen displays.
2. As appropriate, select from the following Parameter Fields values, and
then in turn select or type corresponding value in Discrete Value window:
Beginning Date: Only include activity on or after date specified.
Ending Date: Only include activity on or before date specified.
3. Click OK at screen bottom; report displays:
387
4. Review the following:
Date: Report date and time, in MM/DD/YYYY/HH:MM format (e.g.,
‘11/10/2013 13:08’).
Page: Report page number of total report pages.
Location: Unique name identifying site.
Printed for the Dates of: Inclusive dates for which report data pertains.
Sales for Shift #: Work shift for which report data pertains.
Opened [Date and Time]: Work shift start date and time.
Closed [Date and Time]: Work shift end date and time.
Category/Dept: Unique name identifying inventory item category or
department.
Quantities: Number of category items sold.
Sales Amount: Dollar total of category items sold.
Shift Total: Total dollar amount and item quantity for all inventory items
reported.
388
Sales Detail By Date and Category
This report details sales transaction activity by inventory category and date for
reporting period and selection criteria specified.
To generate report:
1. Select (click) report from Reports List, and then click Show at screen
bottom; Enter Parameter Values screen displays.
2. As appropriate, select from the following Parameter Fields values, and
then in turn select or type corresponding value in Discrete Value window:
Beginning Date: Only include activity on or after date specified.
Ending Date: Only include activity on or before date specified.
Summary Only: Do not show sales activity detail; only include summary
data (either ‘True’ or ‘False’).
Group Sales of Like Items?: Group together sales with same stock number
and price (either ‘Yes’ or ‘No’).
Show Overrings Only: Display overring transactions only (either ‘Yes’ or
‘No’).
3. Click OK at screen bottom; report displays:
389
4. Review the following:
Date: Report date in MM/DD/YYYY format (e.g., ‘11/10/2013’).
Page: Report page number of total report pages.
Printed for the Dates of: Inclusive dates for which report data pertains.
Location: Unique name identifying site.
Transactions For [Date]: Transaction date in MM/DD/YYYY format (e.g.,
‘10/11/2013’) for which data following pertains.
Category: Unique name or brief text identifying inventory category or
department.
Tran #: Unique number identifying sales transaction.
Stock #: Unique number or code identifying inventory item.
390
Description: Unique name or brief text identifying item.
Payment Method: Sales transaction payment type.
Price: Item price per unit; item customer cost, per specified unit of
measure.
Qty: Item quantity, per specified unit of measure.
Ext Price: Sale extended amount (Qty value x Price value).
Disc: Sales transaction discount dollar amount.
Net Ext: Net sale amount (Qty value x Price value - Disc value).
Totals For [Category]: Daily sales transaction volume and dollar total for
inventory category specified.
Totals for date: Sales transaction volume and dollar total for all inventory
categories and date specified.
Total Sales for Dates of: Sales transaction volume and dollar total for all
inventory categories and reporting period specified.
Sales History with Signatures
This report provides summary electronic signature sales transaction activity for
customer(s) and date range specified.
To generate report:
1. Select (click) report from Reports List, and then click Show at screen
bottom; Enter Parameter Values screen displays.
3. As appropriate, select from the following Parameter Fields values, and
then in turn select or type corresponding value in Discrete Value window:
391
Beginning Date: Only include activity on or after date specified.
Ending Date: Only include activity on or before date specified.
Customer Code: Either all customers or unique number identifying
specific customer.
3. Click OK at screen bottom; report displays:
4. Review the following:
[Date]: Report date in MM/DD/YYYY format (e.g., ‘11/10/2013’).
Printed for the Dates of: Inclusive dates for which report data pertains.
Page: Report page number of total report pages.
Invoice #: Unique number identifying invoice.
Tran Date: Transaction date in MM/DD/YYYY format (e.g., ‘10/11/2013’)
for which data following pertains.
Customer: Unique name identifying customer.
Location: Unique same identifying site.
Register: Unique number identifying register.
Stock #: Unique number or code identifying inventory item.
Description: Unique name or brief text identifying item.
Qty: Item quantity, per specified unit of measure.
392
Price: Item price per unit; item customer cost, per specified unit of
measure.
ExtPrice: Sale extended amount (Qty value x Price value).
SubTotal: Sale dollar total before discount and/or taxes.
Discount: Sale discount dollar amount.
Tax: Sale tax dollar amount.
Sale Total: Sale dollar total after discount and/or taxes.
Sales Profit Margins by Category
This report provides either summary or detailed daily sales transaction profit
margin information by inventory category and date range specified.
To generate report:
1. Select (click) report from Reports List, and then click Show at screen
bottom; Enter Parameter Values screen displays.
2. As appropriate, select from the following Parameter Fields values, and
then in turn select or type corresponding value in Discrete Value window:
Beginning Date: Only include activity on or after date specified.
Ending Date: Only include activity on or before date specified.
Summary Only: Either display all sales total or category sub-totals only.
3. Click OK at screen bottom; report displays:
393
4. Review the following:
Date: Report date in MM/DD/YYYY format (e.g., ‘11/10/2013’).
Page: Report page number of total report pages.
Printed for the Dates of: Inclusive dates for which report data pertains.
Transactions For [Date]: Transaction date in MM/DD/YYYY format (e.g.,
‘10/11/2013’) for which data following pertains.
Vendor: Unique name identifying vendor.
Category: Unique name or brief text identifying inventory category.
Tran #: Unique number identifying sales transaction.
Stock #: Unique number or code identifying inventory item.
Description: Unique name or brief text identifying item.
Payment Method: Sales transaction payment type.
Cost: Vendor price after discount.
Price: Item price per unit; item customer cost, per specified unit of
measure.
Qty: Item quantity, per specified unit of measure.
394
Margin %; Price value mark up above Cost value, expressed as percent.
Profit: Price value mark up above Cost value, expressed in dollars and
cents.
Total Sales for Dates of: Sales transaction overall profit margin and dollar
total for all inventory categories and reporting period specified.
Sales Volume by Hour (Chart)
This chart graphically depicts hourly sales volume in dollars for date and site(s)
specified.
To generate report:
1. Select (click) report from Reports List, and then click Show at screen
bottom; Enter Parameter Values screen displays:
2. Specify the following Parameter Fields value by selecting corresponding
values from Discrete Value window:
Date: Only include activity for date specified.
Site Name: Only include activity for site(s) specified.
3. Click OK at screen bottom; report displays:
395
5. Review the following:
For [Site Name]: Site for which chart pertains.
Sales Volume in Dollars: Sales volume in dollars for hour range specified.
Hour of Day: Unique number identifying dispenser.
Sales Volume Summary by Site
This report summarizes gross and net sales volume in dollars for site and date
range specified.
To generate report:
1. Select (click) report from Reports List, and then click Show at screen
bottom; Enter Parameter Values screen displays.
396
2. As appropriate, select from the following Parameter Fields values, and
then in turn select or type corresponding value in Discrete Value window:
Beginning Date: Only include activity on or after date specified.
Ending Date: Only include activity on or before date specified.
3. Click OK at screen bottom; report displays:
4. Review the following:
Date: Report date and time, in MM/DD/YYYY/HH:MM format (e.g.,
‘11/10/2013 13:08’).
Page: Report page number of total report pages.
From Date/To Date: Inclusive dates for which report data pertains.
SITE/LOCATION: Unique name identifying site.
GROSS: Gross sales volume in dollars for site and reporting period
specified.
NET: Net sales volume in dollars for site and reporting period specified.
GRAND TOTAL: Gross and net sales volume totals for all sites for
reporting period specified.
397
Sales with Overridden Prices
This report summarizes daily sales transactions with overridden prices for
site(s) and date range specified.
To generate report:
1. Select (click) report from Reports List, and then click Show at screen
bottom; Enter Parameter Values screen displays.
2. As appropriate, select from the following Parameter Fields values, and
then in turn select or type corresponding value in Discrete Value window:
From Date: Only include activity on or after date specified.
To Date: Only include activity on or before date specified.
3. Click OK at screen bottom; report displays:
398
5. Review the following:
Date: Report date, in MM/DD/YYYY format (e.g., ‘11/10/2013’).
Page: Report page number of total report pages.
Sales for [Date]: Date for which page data pertains.
LOCATION: Unique name identifying site.
Date/Time: Sales transaction date and time, in MM/DD/YYYY HH:MM
format (e.g., ‘11/23/2013 12:46’).
Invoice #: Unique number identifying invoice.
UPC Code: Unique Universal Product Code identifying item.
Stock #: Unique number or code identifying item.
Description: Unique name or brief text identifying item.
Qty: Item quantity, per specified unit of measure.
Orig Price: Item customer cost before override.
New Price: Item customer cost after override.
ExtPrice: Qty value x New Price value.
399
Statements
This report summarizes customer account financial activity, including balance
forward, payments, adjustments and ending credit balance for reporting period
specified.
To generate report:
1. Select (click) report from Reports List, and then click Show at screen
bottom; Enter Parameter Values screen displays:
2. As appropriate, select from the following Parameter Fields values, and
then in turn select or type corresponding value in Discrete Value window:
Customer Account Number: Only print Card List for customer account
number specified.
Statement Message: Print optional message on each statement (e.g.,
‘Happy Holidays’, etc.).
Include Customers With Zero Balance: Print or export customer
statements with zero balance this statement cycle.
Only show customers with Activity: Do not print or export statement for
customers with no transaction activity this statement cycle.
Display Header?: Display standard ‘Customer Statement’ in statement
header.
Sort Statements By: Sort customer statements by name or account number.
Show Logo?: Display company logo in statement header.
From Date: Only include activity on or after date specified.
To Date: Only include activity on or before date specified.
45. Click OK at screen bottom; report displays:
400
46. Review the following:
Account #: Unique number identifying customer.
Customer: Unique name identifying customer.
Statement Dates: Statement period inclusive start and ending dates.
Date: Transaction effective date, in MM/DD/YYYY format.
Tran Type: Transaction type (e.g., ‘Sale’, ‘Finance Charge’, etc.).
Description: Unique name or brief text identifying item.
Charges: Transaction amount added to customer account.
Credits: Transaction amount deducted from customer account.
Credit Balance: Customer account credit balance as of statement period
end date.
Last Pmt Date: Date last customer account payment recorded.
401
0 – 30 Days: Portion of customer account balance 0 – 30 days past due.
31 – 60 Days: Portion of customer account balance 31 – 60 days past due.
61 – 90 Days: Portion of customer account balance 61 – 90 days past due.
91 – 120 Days: Portion of customer account balance 91 – 120 days past
due.
Over 4 months: Portion of customer account balance over 120 days past
due.
Statements [Customer Name/Address
Lowered]
This report summarizes customer account financial activity, including balance
forward, payments, adjustments and ending credit balance for reporting period
specified. The report is identical to Statements (above), but with customer
address printing lowered to allow fold visibility in mailing envelope window.
Top Sellers by Category
This report lists top selling inventory items by category for reporting period
specified, including min/max inventory balance information and sales volume
quantity and dollar totals.
To generate report:
1. Select (click) report from Reports List, and then click Show at screen
bottom; Enter Parameter Values screen displays.
402
2. As appropriate, select from the following Parameter Fields values, and
then in turn select or type corresponding value in Discrete Value window:
Start Date: Only include activity on or after date specified.
End Date: Only include activity on or before date specified.
3. Click OK at screen bottom; report displays:
6. Review the following:
Date: Report date, in MM/DD/YYYY format (e.g., ‘11/10/2013’).
Page: Report page number of total report pages.
Printed for the date of: Date range for which report pertains.
403
Category: Unique name identifying category.
[Item]: Unique name or brief text identifying item.
Min: Minimum order quantity.
Max: Maximum order quantity.
OnHand: Item quantity on hand, per specified unit of measure.
Quantity Sold: : Item quantity sold, per specified unit of measure.
Extended Price: Quantity Sold value x item Price value.
[Category Total]: Quantity and dollar total for all items in category.
Top Selling Merchandise (Chart)
This chart graphically depicts top-selling inventory item sales volume for
reporting period specified.
To generate report:
1. Select (click) report from Reports List, and then click Show at screen
bottom; Enter Parameter Values screen displays:
2. Specify the following Parameter Fields value by selecting corresponding
values from Discrete Value window:
Beginning Date: Only include activity on or after date specified.
Ending Date: Only include activity on or before date specified.
3. Click OK at screen bottom; report displays:
404
4. Review the following:
For [Location]: Site for which report data pertains.
Quantity Sold: Item quantity sold.
Product: Code identifying item sold.
Dates of [MM/DD/YYYY through MM/DD/YYYY]: Date range for which
report pertains.
405
Index
A/R Trial Balance Report, 288
Adding Adjustment Reasons
Information, 236
Adding Bad Check Names
Information, 240
Adding Customer Accounts, 134
Adding Customer Account
Beginning Balance, 144
Adding Customer Categories, 127
Adding Customer Pricing, 162
Adding Discount Codes Table
Information, 248
Adding Employees Table
Information, 254
Adding Inventory Adjustments, 113
Adding Inventory Categories, 33
Adding Inventory Items, 41
Adding Inventory Receipts, 73
Adding Pricing Categories, 61
Adding Pricing Levels, 66
Adding Sites, 9
Adding Vendor Accounts, 23
Adding Vendor Categories, 18
Adjustment Reasons Table, 236
Assigning Quick Menus to POS
Terminals, 231
Bad Check Names Table, 239
Business Functions, 4
Card Types Table, 244
Changing Your Password, 2
Checks By Shift Report, 290
Configuring Your POS, 224
CP720 Gallon Summary Report,
292
Creating Customer Invoices, 196
Creating Customer Statements, 184
Credit Card Reconciliation Report,
294
Credit Card Volume & Charges
Report, 296
Credit Limit Report, 297
Customer Activity Report, 299
Customer Categories Table, 244
Customer Drivers Report, 301
Customer Fuel History Summary
Report, 302
Customer Invoices, 196
Customer Notes, 166
Customer Pricing, 162
Customer Pricing and Discounts
Report, 305
Customer Pricing Table, 245
Customer Sales Summary Report,
306
Customers Table, 247
Daily Card Sales Report, 308
Daily Journal Report, 310
Daily Shift Report, 313
Database Tables, 5, 235
Deleting Manual Sales Entry, 181
Discount Codes Table, 248
Discounted Sales Report, 315
Dispensed Volume by Dispenser
and Product Report, 317
Dispenser Totals Report, 318
Displaying Screen Data, 7
Dyed Diesel Sales by Customer
Report, 320
Employee Charges Report, 323
Employees Table, 254
Export Definitions Table, 257
FET/SET Exemptions Report, 325
Finance Charges Report, 327
Fuel Sales by Date and POS
Report, 328
Fuel Sales by Dispenser & Product
Report, 331
Fuel Sales Volume by Dispenser
Report, 333
Gallon Summary with Discounts
Report, 334
Gift Cards Table, 258
406
Hourly Sales Report, 337
Import Definition Table, 260
Inventory Adjustments Report, 339
Inventory Adjustments Table, 261
Inventory Categories Table, 262
Inventory Items Table, 263
Inventory Receipts Report, 341
Inventory Receipts Table, 264
Inventory Snapshot Report, 355
Inventory Stock On Hand Report,
345
Invoice List Table, 265
Invoice Preview Report, 347
Invoices – Vehicle Format Report,
351
Invoices Report, 349
Logging On, 1
Loyalty Card Savings Report, 355
Manual Sales Entry, 179
Monthly Sales Volume Report
(Chart), 357
No Sale Reasons Report, 358
No Sale Reasons Table, 266
On Account Charges Report, 359
“Other Payment” Details Report,
361
Other Payment Types Table, 268
Paid Outs by Date and Category
Report, 363
Paidout Reasons Table, 271
Payment Details Report, 365
Payment History Report, 366
Pending Settlements Report, 368
Performing Manual Sales Entry,
179
Point Of Sale, 212
POS Configuration Table, 274
Prepaid Card Status Report, 369
Price Change History Report, 370
Pricing Categories Table, 275
Printing and Exporting Customer
Invoices, 205
Printing and Exporting Customer
Statements, 192
Printing Inventory Adjustments,
123
Printing Inventory Receipts, 110
Private Card Fuel Sales by
Dispenser Report, 372
Private Card List Report, 378
Private Card Sales by Customer and
Card Report, 374
Private Card Sales Summary
Report, 376
Private Cards, 175
Quick Menus Table, 275
Reconfiguring Your POS, 227
Register Shift Report, 380
Re-Order Limits Report, 388
Reports, 6, 287
Reviewing Card Types Table
Information, 244
Reviewing Customer Categories
Table Information, 245
Reviewing Customer Pricing Table
Information, 245
Reviewing Customers Table
Information, 247
Reviewing Export Definitions
Table Information, 257
Reviewing Gift Cards Table
Information, 258
Reviewing Import Definition Table
Information, 260
Reviewing Inventory Adjustments
Table Information, 261
Reviewing Inventory Categories
Table Information, 262
Reviewing Inventory Items Table
Information, 263
Reviewing Inventory Receipts
Table Information, 264
Reviewing Invoice List Table
Information, 265
Reviewing No Sale Reasons Table
Information, 266
Reviewing Other Payment Types
Table Information, 268
Reviewing POS Configuration
Table Information, 274
Reviewing Pricing Categories
Table Information, 275
407
Reviewing Quick Menus Table
Information, 275
Reviewing Sales List Table
Information, 276
Reviewing Sites Table Information,
279
Reviewing Terms Codes Table
Information, 280
Reviewing Units of Measure Table
Information, 282
Reviewing Vendor Categories
Table Information, 285
Reviewing Vendors Table
Information, 285
Sales by Payment Method Report,
385
Sales by Shift and Category Report,
387
Sales Detail By Date and Category
Report, 389
Sales History with Signatures
Report, 391
Sales List Table, 276
Sales Profit Margins by Category
Report, 393
Sales Volume by Hour Report
(Chart), 395
Sales Volume Summary by Site
Report, 396
Sales with Overriden Prices Report,
398
Setting Up Register Quick Menus,
212
Sites, 9
Sites Table, 279
Sorting Customer Accounts, 169
Statements [Customer
Name/Address Lowered] Report,
402
Statements Report, 400
Tables, 235
Terms Codes Table, 280
Top Sellers by Category Report,
402
Top Selling Merchandise Report
(Chart), 404
Units of Measure Table, 282
Updating Adjustment Reasons
Information, 237
Updating Bad Check Names
Information, 241
Updating Customer Accounts, 151
Updating Customer Categories, 130
Updating Customer Categories
Table Information, 245
Updating Customer Pricing, 164
Updating Customer Pricing Table
Information, 245
Updating Customers Table
Information, 248
Updating Discount Codes Table
Information, 250
Updating Employees Table
Information, 255
Updating Gift Cards Table
Information, 260
Updating Inventory Adjustments,
118
Updating Inventory Categories, 38
Updating Inventory Categories
Table Information, 262
Updating Inventory Items, 50
Updating Inventory Items Table
Information, 263
Updating Inventory Receipts, 91
Updating Inventory Receipts Table
Information, 264
Updating Invoice List Table
Information, 265
Updating No Sale Reasons Table
Information, 266
Updating Other Payment Types
Table Information, 269
Updating Paidout Reasons Table
Information, 271
Updating POS Configuration Table
Information, 274
Updating Pricing Categories, 63
Updating Pricing Categories Table
Information, 275
Updating Pricing Levels, 69
Updating Quick Menus, 218
408
Updating Quick Menus Table
Information, 276
Updating Sales List Table
Information, 278
Updating Sites, 13
Updating Sites Table Information,
280
Updating Terms Codes Table
Information, 281
Updating Units of Measure Table
Information, 282
Updating Vendor Accounts, 27
Updating Vendor Categories, 21
Updating Vendor Categories Table
Information, 285
Updating Vendors Table
Information, 283
Vendor Categories Table, 294
Vendors Table, 285
409