1
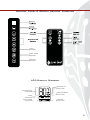
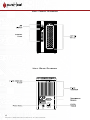
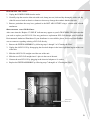
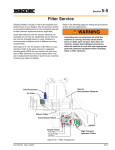
Owner’s
Manual
Introduction
Features / Benefits
Records
Specifications
Warnings
Controls / Diagrams
Setting Up the Unit
Operating the Unit
Maintaining the Unit
Safety & Warnings
Consumer Information
Warranty Information
www.GreenTechEnv.com
3
3
3
4
4
5
7
7
8
10
11
11
Introduction
Welcome to a more comfortable, efficient way of heating your living spaces during cold weather!
pureHeat is the most complete and advanced space heating system on the market. It heats using a cuttingedge PTC (Positive Thermal Coefficient) element that heats the air efficiently without drying it out. It purifies
your air with PCO technology that features a high power germicidal UVC bulb. This bulb creates a purifying
plasma that reduces mold, bacteria, and viruses (even on surfaces) so the months spent with doors and windows
closed no longer means months spent in a stuffy indoor environment.
pureHeat is designed to provide years of trouble-free service when used and maintained according to this
Owner’s Manual. The pages of this manual will guide you through proper operation, cleaning the filter, and
replacing the PCO Cell as necessary.
Thank you for purchasing pureHeat by GreenTech Environmental.
Features
PTC Infrared Heating Element
PCO Air Purification Technology
LCD Display
Unit Control Panel
Simple Remote
Benefits
Clean, Economical, and Safe Heating
Even Distribution of Heat from Floor to Ceiling
Does not Burn or Dry Out Air
Low Operating & Maintenance Cost
Efficient PCO Purification for Pure, Clean, Heated Air
Quiet Mode
Overheat Safety Shut Off
Tip-Over Safety Shut Off
Records
Purchase Date:___________________________________________________________________________
Model Number:___________________________________________________________________________
Serial Number:___________________________________________________________________________
Distributor Name:_________________________________________________________________________
Distributor Phone:_________________________________________________________________________
3
Specifications
Voltage: . . . . . . . . . . . . . . . . . . . . . . . . . . . . . . . . . . . . . . . . . . . . . . . . . . . . . . . . . . . . . . . . . . . . . 120V ~60Hz
Power: . . . . . . . . . . . . . . . . . . . . . . . . . . . . . . . . . . . . . . . . . . . . . . . . . . . . . . . . . . . . . . . . . . . up to 1500 watts
Heat Output: . . . . . . . . . . . . . . . . . . . . . . . . . . . . . . . . . . . . . . . . . . . . . . . . . . . . . . . . . . . . . . . . . . . . . 5000BTU
Remote Battery: . . . . . . . . . . . . . . . . . . . . . . . . . . . . . . . . . . . . . . . . . . . . . . . . . . . . . . . . . . . . . . . . . . . CR2025
Temperature Control Range: . . . . . . . . . . . . . . . . . . . . . . . . . . . . . . . . . . . . . . . . . . 60 - 90 Degrees Fahrenheit
Heating Element: . . . . . . . . . . . . . . . . . . . . . . . . . . . . . . Infrared Positive Thermal Coefficient (PTC) Element
Air Filter: . . . . . . . . . . . . . . . . . . . . . . . . . . . . . . . . . . . . . . . . . . . . . . . . . . . . . . . . . . . . . . . Lifetime Washable
Air Purifier: . . . . . . . . . . . . . . . . . . . . . . . . . . . . . . . . . . . . . . . . . . . . . . Photo Catalytic Oxidation (PCO) Cell
Display: . . . . . . . . . . . . . . . . . . . . . . . . . . . . . . . . . . . . . . . . . . . . . . . . . . . . . . . . . . . . . . . . . . . . . . . . . . . . LCD
Coverage: . . . . . . . . . . . . . . . . . . . . . . . . . . . . . . . . . . . . . . . . . . . . . . . . . . . . . . . . . . . . . . . . . . . Up to 1000 ft
2
Dimensions: . . . . . . . . . . . . . . . . . . . . . . . . . . . . . . . . . . . . . . . . . . . . . . . . . . . . . . . 11.5”x7.5”x13” (HxWxD)
Weight: . . . . . . . . . . . . . . . . . . . . . . . . . . . . . . . . . . . . . . . . . . . . . . . . . . . . . . . . . . . . . . . . . . . . . . . . . . . . 14 lbs
Certifications: . . . . . . . . . . . . . . . . . . . . . . . . . . . . . . . . . . . . . . . . . . . . . . . . . . ETL Canada & US by Intertek
Warranty: . . . . . . . . . . . . . . . . . . . . . . . . . . . . . . . . . . . . . . . . . . . . . . . . . . . . . . . . . . . . 3 Year Factory Limited
Warnings
WARNING: Do not cover the Hot Air Outlet
WARNING: Keep the unit away from fabric or
other flammable material. Give the unit 3 ft
of space to the front and at least 1 ft of
space to the sides and rear.
CAUTION: Attempting to service the unit
beyond cleaning the filter or changing the
PCO Cell creates danger of electric shock.
CAUTION: Disconnect the power cord before
cleaning the filter or changing the PCO Cell.
4
Copyright © 2010 GreenTech Environmental; All Rights Reserved
Control Panel & Remote Control Diagrams
POWER
HEATER
WARMER
COOLER
timer
Control
TIMER
Quiet Mode
Control
QUIET
Purifier
Control
PURIFIER
LCD Display Diagram
Temperature
Indicator
Timer
Indicator
Quiet Mode
Indicator
Heating Up
Indicator
Cooling Down
Indicator
Purifier
Indicator
5
Unit Front Diagram
POWER
HEATER
WARMER
COOLER
TIMER
QUIET
PURIFIER
Unit Rear Diagram
6
Copyright © 2010 GreenTech Environmental; All Rights Reserved
Setting Up the Unit
1. Unpack the unit by cutting open taped areas. Fold back box flaps and gently turn entire box upside down.
Lift box off of styrofoam packed contents. Remove styrofoam, turn upright. We recommend keeping
packing materials for future transport or storage of unit.
2. Find a level and unobstructed location to place heater away from cold walls (outside walls).
3. Plug the POWER CORD into a grounded outlet (120V, 15A or higher).
4. Activate the REMOTE by removing the plastic shipping guard from the battery compartment.
Operating The Unit
Turning the Unit On/Off
• Turn the unit on by pressing the “I” on the POWER TOGGLE (Unit Rear).
• Turn the unit off by pressing the “O” on the POWER TOGGLE (Unit Rear).
• Always unplug the unit when not in use.
Heater Mode
• Press the HEATER CONTROL button to activate the Heater Mode. (This will also automatically activate
Purifier Mode. To toggle Purifier Mode on or off, press the PURIFIER CONTROL button.) Set the
desired temperature using the TEMPERATURE CONTROL buttons. You may select a temperature from
60 to 90 degrees Fahrenheit.
Purifier Mode
• Toggle the Purifier Mode on or off at any time that the unit is turned on by pressing the PURIFIER
CONTROL button.
Timer Function
• Set the TIMER FUNCTION by pressing the TIMER CONTROL button to activate it.
• Press the TIMER CONTROL button once for each additional hour desired (1 - 12 hours).
• If you press the TIMER CONTROL button again once the TIMER INDICATOR on the LCD DISPLAY
reads “12h” the TIMER FUNCTION will be deactivated.
• If the Heater & Purifier Modes are active and you set the timer, it will turn both modes off after the
designated time has elapsed.
• If either the Heater or Purifier Modes are independently active and you set the timer, it will turn the active
mode off after the designated time has elapsed.
• If neither the Heater or Purifier Modes are active (nothing is active) and you set the timer, it will turn ON
both the Heater and Purifier Modes after the designated time has elapsed.
7
Quiet Function
• If you feel the unit is too loud for your environment, such as when you are sleeping, press the QUIET
MODE CONTROL button. The unit continues to heat and purify according to active modes, but the fan
runs on the most silent speed.
Standby Mode
• When the room exceeds set temperature by 2 Degrees F the heater goes into “STANDBY MODE”,
essentially turning off except the temperature sensor. After that, when the room drops 2 Degrees F below
the set temperature, the heater comes back to normal operation. This is because the heater radiates a
small amount of heat even when the fan is on the lowest setting, which would cause the heater to continue
raising the temperature of a small room indefinitely were it not for the “STANDBY MODE” feature.
Audible Notifications
• When the heater reaches the set temperature it will produce an audible tone to let the customer know.
It will produce the same tone when it goes into “STANDBY MODE”.
Maintaining The Unit
Cleaning the Filter
The filter should be cleaned every 30 days or more often if you find that the filter is collecting visible particulate.
1. Unplug the POWER CORD from the outlet.
2. Remove the FILTER ASSEMBLY SCREW using a screwdriver. Place the screw aside where you will not
misplace it.
3. Allow the FILTER ASSEMBLY to lean away from the rear of the unit until it is free to be removed.
4. Remove the FILTER from the FILTER ASSEMBLY by using a flat blade screwdriver to release the four
tabs of the FILTER COVER and then carefully lifting the FILTER from the FILTER ASSEMBLY.
5. Use a vacuum cleaner to remove built up particulate from the FILTER. Optionally, you can also clean
the FILTER using warm soapy water. If you opt to using water, ensure that the FILTER dries completely
before continuing.
6. Carefully replace the FILTER in the FILTER ASSEMBLY. Replace the FILTER COVER onto FILTER
ASSEMBLY and ensure all 4 tabs are in place.
7. Set the tabs of the FILTER ASSEMBLY in their place on the rear of the unit and pivot upwards until it is
properly seated.
8. Replace the FILTER ASSEMBLY SCREW using a screwdriver. Tighten until snug.
9. Plug the POWER CORD back into the outlet..
8
Copyright © 2010 GreenTech Environmental; All Rights Reserved
Cleaning the Unit
1. Unplug the POWER CORD from the outlet.
2. Carefully wipe the exterior of the unit with a soft, damp (not wet) cloth and dry thoroughly with a soft, dry
cloth. Do not use harsh or abrasive cleaners as these may damage the aesthetic finish of the unit.
3. Remove particulate that may have gathered in the HOT AIR OUTLET using a vacuum with a brush
attachment.
Replacing the PCO Cell
After some time the “Replace UV BULB” indicator may appear on your LCD SCREEN. This indicates that
you need to replace your PCO Cell. You may purchase a replacement PCO Cell through your GreenTech
Environmental Authorized Distributor. If your distributor is not available, please visit www.GreenTechEnv.
com to contact us regarding ordering a PCO Cell directly.
1. Remove the FILTER ASSEMBLY by following steps 1 through 3 of “Cleaning the Filter”.
2. Unplug the old PCO Cell by disengaging the electrical adapter in the lower right hand region of the rear
of the unit.
3. Slide the old PCO Cell straight out of the rear of the unit.
4. Slide the new PCO Cell straight into it’s place in the rear of the unit.
5. Connect the new PCO Cell by plugging in the electrical adapter to it’s socket.
6. Replace the FILTER ASSEMBLY by following steps 7 through 9 of “Cleaning the Filter”.
PCO
Cell
Electrical
Adapter
9
Safety Info & Warnings
1. Do not operate the heater if any cord or part of the machine is damaged or has malfunctioned.
Return heater for examination and repair if damage has occured.
2. Do not plug heater into anything other than a 3-prong 110v 15amp or higher grounded circuit receptacle.
3. Do not use an extension cord to power this heater.
4. Do not block the front grill or rear filter of the heater. Be sure that there is adequate space around the
heater for air flow.
5. Keep heater away from areas which may have standing water. The heater is not made for use in bathrooms,
laundry areas or areas with similar attributes.
6. Do not insert any foreign objects into the vent as this may cause an electric shock, fire or damage the
heater itself.
7. Do not change the heater’s wiring or design as it will void the warranty and possibly cause injury.
8. Always unplug heater when not in use.
9. Turn heater off before removing plug from outlet.
10.Do not place cord under any kind of covering such as carpet, rugs or similar covers. Place cord away from
high traffic areas as best as possible to keep from injuring a person or causing damage to the cord or heater.
11.Heater is intended for indoor use only, do not use outdoors.
12.The filter must be cleaned regularly to avoid clogging and possible malfunction of the heater. If the heater
is used in a dirtier or dustier area than normal the filter must be cleaned more often.
13.Air dry the filter, do not use any other method to quicken the process as it could damage the filter.
10
Copyright © 2010 GreenTech Environmental; All Rights Reserved
Consumer Information
GreenTech Environmental declines responsibility for all damages arising from improper use of the unit or in case of
tampering with the unit.
Warranty Information
LIMITED WARRANTY INFORMATION
Your pureHeat (Product) is warranted to be free from all defects in material and workmanship in normal household use for a period of (3) Years from date of
purchase. The warranty is granted only to the original purchaser. The warranty is subject to the following provisions:
Any damages or malfunctions caused by negligence, abuse, or use not in accordance with the Product Owner’s Manual are not covered by this warranty. Likewise,
any defects or damages caused by unauthorized service or the use of other than Genuine GreenTech Environmental Parts are not covered.
GreenTech Environmental, LLC will, at its option, repair or replace a defective Product or part(s) for the Product that is/are covered by this warranty. As a matter
of warranty policy, GreenTech Environmental, LLC will not refund the customer’s purchase price.
LIMITED LIFETIME WARRANTY ON TRIPLE HEATING ELEMENT
The heating element in the Product is warranted for the lifetime of the original purchaser. If the heating element fails after the standard warranty terms have expired,
the purchaser should return the unit to a GreenTech Environmental Service Center for repair or replacement.
OBTAINING WARRANTY SERVICE
To obtain warranty service you must return the defective product along with proof of purchase to the GreenTech Environmental Authorized Service Center. All
shipping costs submitted under this Warranty shall be borne by purchaser. Unless this Warranty is expressly renewed or extended by GreenTech Environmental, LLC,
any repaired or replaced part of unit shall be warranted to the original purchaser only for the length of the unexpired portion of the original warranty. For the location
of the nearest GreenTech Environmental Authorized Service Center or for other service information, please visit us online at: www.GreenTechEnv.com/service
Before any product is sent for service, the customer should contact the GreenTech Environmental Service Center to obtain a Return Merchandise Authorization
(RMA) Number. This RMA Number should be clearly written on the box before shipping. All components/parts including the remote (if applicable), manuals, and
original packaging should be included in the return if available.
FURTHER LIMITATIONS AND EXCLUSIONS ARE AS FOLLOWS
Any warranty that may be implied in connection with your purchase or use of the Product, including any warranty of merchantability or any warranty for Fitness For
A Particular Purpose is limited to the duration of this warranty. Some states do not allow limitations on how long an implied warranty lasts, so the above limitations
may not apply to you.
Your relief for the breach of this warranty is limited to the relief expressly provided above. In no event shall GreenTech Environmental, LLC be liable for any
consequential or incidental damages you may incur in connection with your purchase or use of the Product. Some states do not allow the exclusion or limitation of
incidental or consequential damages, so the above limitation or exclusion may not apply to you.
This Warranty gives you specific legal rights, and you may also have other rights which vary from state to state.
REGISTRATION
Please register your Product within 10 days of purchase by visiting www.GreenTechEnv.com/warranty or fill out and return the enclosed warranty registration card.
Registering your new GreenTech product entitles you to the most up-to-date GreenTech warranty and promotion information.
11
www.GreenTechEnv.com
Version: 1