1
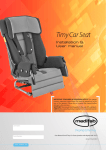
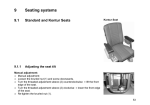
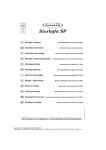
Starlight Car Seat Installation & User manual IMPORTANT CONSUMER INFORMATION NOTICE: This manual contains important instructions that must be passed on to the user of this product. Please do not remove this manual before delivery to the end user. SUPPLIER: This manual must be given to the user of this product. USER: Before using this product, read entire manual and save for future reference. User Name: Serial Number: Medifab Ltd [email protected] New Zealand: Call 0800 543 343 7-9 Allens Road, Ashburton 7700 Australia: Call 1300 543 343 26 Pardoe Street, Devonport, TAS 7310 www.medifab.com User Manual for all Starlight Car Seats (product code begins with “4140”) Manual: Starlight20140613 Page 1 Fitting and Using your Special Needs Seat STARLIGHT-Reha – Special Needs Child Car Seat Thank you for purchasing your STARLIGHT-Reha special needs child seat, for maximum satisfaction please read and follow the enclosed instructions carefully. Should you have a question, require any advice or help please contact our offices at: Installation and Operating Instructions: Before installation and use in a vehicle please read and adhere to the following instructions carefully. User Guide Recaro / Storchenmuehle manufacturer’s instructions Please also make sure that the instructions remain with the product. We reserve the right to make technical changes. Yours Hernik GmbH. Page 2 General information: The STARLIGHT-Reha rehab special needs child car seat consists of two modules 1. A commercial IPAI - car seat made by Recaro / Storchenmuehle (please refer to the manufacturer's instructions ) . 2. Adaptation module with accessories to enable this seat be used for special needs purposes suiting the individual needs of the child. (please ensure you follow these instructions from Hernik). 3. The STARLIGHT-Reha special needs seat is supplied assembled as a complete seat unit with adaptor base attached. Options such as Iso-Fix and footrests are supplied separately, and it is the dealers responsibility to ensure that components such as these and other options are fitted and adjusted properly. 4. It is necessary for the dealer to adjust and install your STARLIGHT-Reha to suit the individual needs of the child, achieving the optimal seating position for comfort and support. 5. Do not modify or change this equipment in any way or change the use of any components or optional equipment, do not add any non-approved accessories, without first having specific written permission from the manufacturers. 6. Important: The STARLIGHT-Reha special needs child car seat is designed for use in the rear seat, with the vehicles lap and diagonal seatbelt positioned on the front of the child. The 5-point harness fitted is a posture support and must not be used in isolation, the vehicles seatbelt must be used at all times on the front of the child for safety. Page 3 1. Fitting the STARLIGHT-Reha: Your STARLIGHT-Reha seat will be fitted with one of the following options: A. Iso-Fix stability bracket (fig. i). B. Tubular stability bracket option (fig. ii) (fig.i) (fig. ii) 1 2 4 3 Position the chosen stability bracket into the 2 square receiving tubes provided in the base plate. Adjust the bracket back or forward to suit the position of the seat within the vehicle (ref. 1) Tighten grub screws, 2 each side (ref. 2) on the receiving tubes. When the seat is fitted there should be no gap between the top of the Play backrest and the vehicle seat backrest, if a gap exists this will lead to instability, rocking and possible damage to the seat mechanism. Where the tubular stability bracket has been supplied, the outer part of the bracket (ref. 3) is positioned in the gap between the cushion and backrest of the vehicles seat. The Iso-Fix bracket locates onto the vehicle Iso-Fix (latch) system, standard on all cars from 2006. After latching and to prevent inadvertent opening of the Iso-Fix latches, simply tighten the thumb screws clockwise each side (ref. 4) For removal, undo the thumb screws anti-clockwise and pull the thumb screws forward away from the vehicle backrest to un-latch. Also see instructions for use from Recaro / Storchenmuehle. 2. Fitting and Adjusting the Optional Footrest: Position the footrest mount bars into the square receiving tubes provided at the front of the seat base plate (fig. iii). Adjust back or forward to suit the position of the seat in the vehicle. Tighten grub screws provided (1 each side) on the receiving tubes. Page 4 5 6 (fig. iii) Use the quick clamps to adjust the angle of the footrest (ref. 5) Position the footrest to the correct height by loosening both grub screws as shown (ref. 6), slide footrest plate up or down, re-tighten grub screws when the desired position is achieved. 3. Fitting and adjusting the optional Crotch Pommel: (fig. iv) 7 Fit the Crotch Pommel mount bracket to the upper base plate, with the screws provided (ref. 7) The depth of the Crotch Pommel can be adjusted using the appropriate bracket mounting holes. Fit the Crotch Pommel into the bracket tube, adjust to the required height, secure by tightening the quick clamp (ref. 8) 8 Page 5 4. Added recline option: This option allows for increased tilt, by making adjustments each side of the base plate as shown below (fig vi): Remove fixing screw and nut each side (ref. 11) Chose tilt position Refit and tighten fixing screw (fig. vi) 11 Page 6 5. Adjusting the 5-point Harness: It is important to make correct adjustments to the child harness fitted to the STARLIGHT-Reha child seat (fig. viii). Adjustments are necessary for Comfort, Support and Safety. The harness will need routine adjustment to suit the size of the child and allow for growth over time together with changing seasons, where additional clothing is worn etc. Adjust the height of the harness to suit the child’s shoulder height, the ideal harness height is 1 or 2 finger widths above the child’s shoulder height. Position the harness on the child and adjust so that there is no slack in any of the harness straps. Ensure that there are no twists in the harness straps, and that the straps sit flat against the child’s body. The centre buckle (ref. 16) should be adjusted to a low position on the lap, thus keeping the lap strap correctly positioned. Before positioning ensure the abdominal pad is placed correctly. Adjustments to the height of the centre buckle is possible by accessing the webbing inside the abdominal pad. Important: the STARLIGHT-Reha child seat is designed to use the vehicles seatbelt on the front of the child, the harness as fitted to the Play seat is a posture support only, always use the vehicle seatbelt ensuring correct positioning (please refer to manufacturesr instructions as provided by Recaro / Storchenmuehle) Page 7 7. Using the Swivel Base: STARLIGHT-Reha is available with a Swivel Base option, which allows easy access for positioning the child. This option is available for passenger or driver side. (fig. ix) 18 (fig. x) 19 Page 8 To use the swivel function, lift the plunger located on the inboard side of the STARLIGHT-Reha base plate, and swivel the seat outward. To return, simply rotate the seat inward until locked. Newest versions of STARLIGHT-Reha have a Red or Black plunger (fig. x), simply lift the plunger to unlock (ref. 19). Both plunger types should lock easily when the seat is rotated back to forward facing. Care and Maintenance: 1. At 8 weekly intervals check the overall condition of the STARLIGHT-Reha seat. Check all screw and bolt connections for tightness and tighten as required, or seek advice / attention from your supplying dealer. 2. Regularly wipe the seat trim with a clean dry cloth to remove general dirt, for heavier stains you may clean the covers in situ with a mild detergent or fabric cleaner / shampoo. 3. The seat covers are removable, and for washing instructions please refer to the manufacturers guide from Recaro / Storchenmuehle Safety: Before use, ensure the components of the seat are in good working order and condition. Please read and understand the fitting and operating instructions provided here, and by Recaro / Storchenmuehle. The operating instructions must always be kept on the child car seat. Your child is only safe when the seat is correctly installed and the child is correctly positioned within the seat. The harness belts must be tight without slack and without twists in the webbing. If the seat is fitted with a swivel mechanism, ensure it is in the locked position. The vehicles three - point seat belt must always be used in the correct fashion and be positioned in the appropriate belt guides. Please check: A) That the safety belt is securely located in the belt guides B) That the seat belt buckles are properly engaged C) That there are no twists Ensure that no solid objects such as pins, belt buckles, etc. are caught between the child and seat belts that could lead to injuries in an accident. Explain to your child how important it is to be well secured and that the belts must not be interfered with or opened. Page 9 This seat is for use in the rear seat of the vehicle and must not be positioned in the front seat at any time, otherwise you jeopardize the safety of your child. Ensure the car seat is not in contact, or damaged by moving parts in the vehicle. Never leave your child unattended in the car seat . In the event of an accident the whole child car seat should be replaced. Disposal: 1. All delivery packaging can be recycled. 2. The metal parts are used for scrap metal recycling. 3. All other parts, foams, covers , plastics should be recycled or disposed of according to appropriate local authority conditions . Disposal should be in accordance with the respective applicable national regulations. Check with your local authority for disposal options. Warranty: Hernik – seats are designed and manufactured in accordance with strict quality standards. If , in exceptional circumstances, you have cause for complaint , Hernik GmbH guarantee in accordance with the terms and conditions of delivery: 24 months warranty on all solid parts, from date of installation. 12 months warranty on all moving parts, from date of installation. For parts that were not manufactured by Hernik GMBH , please refer to the warranty policy of the respective manufacturer. Claims under this guarantee are subject to the device being properly installed and used in accordance with instructions provided. Warranty is void where modifications or improper repairs , without prior consultation with the manufacturers are carried out. Warranty is void where a device is improperly fitted. Further claims, for whatever legal reason, in particular claims for direct or indirect damages are excluded. Page 10 Dear Customer: Thank you for purchasing a STARLIGHT-Reha special needs seat, which will give your child support and growth for their transport needs. Please ensure that your supplying dealer / fitter gives you instruction in the use of the seat and all of its component parts. Perform all functions including the following: Adjustment of the harness support Adjustment of the head support and how to adjust the harness height. Adjustment of the foot rest Adjustment of the recline mechanism How to fit the seat to and remove the seat from your vehicle How to use the swivel access base Important: How to fit and use the vehicles seatbelt for the safety of the child. Instructions for use: ISOFIX – Mounting Bracket Our seats are available with an Iso-fix Adapter Bracket option, in place of the regular clamp style Stability Bracket. The Iso-fix Adapter Bracket allows the seat to locate to existing Iso-fix attachment points in all cars after 2006. As it is a mechanical connection the Iso-fix Adapter Bracket offers more support and greater stability for the child seat in the car. Caution: Our Iso-fix Adapter Bracket is for location and stability purposes only, the vehicles 3point seat belt must always be used to secure the passenger. Please read carefully and understand the User Instructions provided with your car seat. Installation: 1. 2. 3. 4. 5. 6. 7. Position the Iso-fix Adapter Bracket into the rectangular tubes provided to the rear of the base plate on the seat. Turn both Allen screws (1) each side but do not tighten. Extend (slide) the iso-fix bracket out from the seat and pinch tighten the Allen screws (1) Line up the Iso-fix latches with the car’s Iso-fix brackets Then push the car seat back on both sides until a clearly audible click is heard from both Iso-fix latches. Set the required angle of the car seat backrest (see User Instructions). Now loosen both Allen screws (1) both sides, slide the car seat against the backrest of the vehicle seat, ensuring there is contact. Tighten both Allen screws on both sides to lock the Iso-fix Adapter Bracket in place. Secure the Iso-fix latches from inadvertant opening by tightening the thumbsrews (2) provided both left and right side. Check to verify that the Iso-fix latches are securely locked in place. 1 2 Removal : 1. 2. 3. Loosen both thumbscrews (2), left and right. Pull both thumbscrews simultaneously,forward toward the child seat to unlock the Iso-fix latches. You may now remove the car seat. 1 2