1
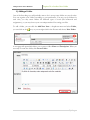
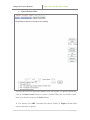
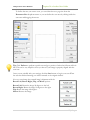
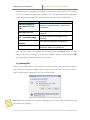
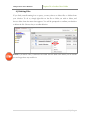
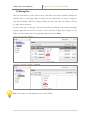
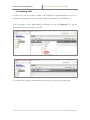
User Guide
Chapter 24
eLocker User Guide
SharpSchool User Manual
Chapter 24: eLocker User Guide
Table of Contents
About eLockers .................................................................................................................................... 3
About this Guide.................................................................................................................................. 3
Who Should Use this Guide ............................................................................................................... 3
Accessing your Website....................................................................................................................... 3
I.
Accessing your eLocker ............................................................................................................. 4
II.
Browsing your eLocker .............................................................................................................. 4
1)
Adding a Folder ....................................................................................................................... 5
2)
Adding Files.............................................................................................................................. 6
a.
Upload File ........................................................................................................................... 7
b. Upload Multiple Files .......................................................................................................... 8
c.
Upload Scanned Files........................................................................................................ 10
3)
Opening files .......................................................................................................................... 13
4)
Deleting Files.......................................................................................................................... 14
5)
Moving Files ........................................................................................................................... 15
6)
Renaming a file....................................................................................................................... 16
7)
Mark as Featured ................................................................................................................... 17
2|Page
SharpSchool User Manual
Chapter 24: eLocker User Guide
About eLockers
S
harpSchool’s eLockers provide users with the ability to manage and
store files and folders online. Since the files and folders are
available online, these can be easily transferred from home to
school and vice versa. SharpSchool’s eLocker solution works with all major
browsers, making it easy for anyone to access their eLocker from any
computer with an internet connection.
About this Guide
This user guide offers teachers, students, and other users an introduction into the operation
of SharpSchool’s eLocker system.
Who Should Use this Guide
The contents of this guide are written to be readable by users of all technical backgrounds.
Primarily, this guide will be used by teachers, students, and other users who may have an
eLocker on their website.
If you have been given a training site, it is a good idea to practice the steps covered in this
guide before working on your real site. This eliminates the risk of accidentally deleting
important content or ruining anything on your real site.
Accessing your Website
In order to use an eLocker, you must first log into your website. The login page to your
school or district site will contain fields for the username and password. The location of the
login button will vary according to your website’s design; however, login buttons are typically
available on the upper right corner of your website.
3|Page
SharpSchool User Manual
I.
Chapter 24: eLocker User Guide
Accessing your eLocker
The exact method used to get to your eLocker will vary from school to school and district to
district. Generally you will find a link along the top or bottom of your page (wherever you
find the published links) and will contain “Locker,” “eLocker,” or “Personal Workspace.”
For example, some schools use “My eLocker.”
Note: You may need to log in to your site before the link becomes visible.
Pitfall: If you receive a prompt to log in after clicking the eLocker link, either you are not
already logged in or your site administrator has not yet set up a rule governing the creation
of your eLocker.
II.
Browsing your eLocker
Once you have loaded your eLocker, you will see a file browser interface displaying your
empty eLocker.
4|Page
SharpSchool User Manual
Chapter 24: eLocker User Guide
1) Adding a Folder
One of the first things you will probably want to do is set up some folders on your eLocker.
You can organize your folders according to your preferences. You may set up folders for
each class, you may create folders for different types of work (like homework and
assignments), or you may choose your own unique method for sorting your files.
To add a folder, you can click the Add New Item… dropdown menu and select Folder,
you can click on the
icon, or you can right-click in the file area and choose New Folder.
A new page will open which allows you to enter a folder Name and Description. When you
are ready to create the folder, click Create Folder.
5|Page
SharpSchool User Manual
Chapter 24: eLocker User Guide
2) Adding Files
Once you have folder set up in your eLocker, you may then want to upload files. To do so,
first double-click on a folder to open it. Then click on the Add New Item… dropdown and
choose File, click the
icon, or right-click in the file area and choose New File.
If you are using Internet Explorer, there will be three file upload methods available: Upload
File, Upload Multiple Files, and Upload Scanned Files. The latter two options require
the use of Microsoft Internet Explorer; when using an alternative browser such as Mozilla
Firefox, Safari, or Google Chrome, you will only be able to choose Upload File.
6|Page
SharpSchool User Manual
Chapter 24: eLocker User Guide
a. Upload File
To upload a file, click on Browse and choose the file you wish to upload. The File
Name will be populated automatically with the original file name. If you wish to change
the file name for the uploaded version of the file, you are free to do so.
When you are ready to upload your file, click Add File to upload the file.
7|Page
SharpSchool User Manual
Chapter 24: eLocker User Guide
b. Upload Multiple Files
To upload specific files, click on Select File and chose the file or files you wish to
upload.
If you want to upload an entire folder, click on Select Folder and choose the
appropriate folder from the Browse for Folder window. At the bottom of the window
you also have the option to Include Sub-folders which you can check if you wish to
upload them as well. To confirm your selection, click on Scan.
8|Page
SharpSchool User Manual
Chapter 24: eLocker User Guide
If you want all your files to retain the directory structure they had on your computer,
choose Maintain directory structure. If you would like all the files to be uploaded to
the same directory, choose Upload all these files into the same folder. When you
have made your selection, click Upload to begin uploading the files.
Note: If one of the files you choose exceeds the upload limit for a single file, the upload
will not be complete successfully. The actual file size limit will be dependent on the rules
set by your site administrator. In the example locker, the limit is 20.0 MB, as highlighted
on the previous page.
9|Page
SharpSchool User Manual
Chapter 24: eLocker User Guide
c. Upload Scanned Files
You may also choose to upload files directly from your scanner. To upload scanned files,
click on the Select Source button to choose a scanner. When the new window opens,
make your selection and press the Select button.
If your scanner uses ADF (Automatic Document Feeder) or Duplex (double-sided
scanner) check those options.
10 | P a g e
SharpSchool User Manual
Chapter 24: eLocker User Guide
To bring up the scan interface, click Acquire.
From this interface you can make decisions as to the quality of your scanned image, the
color used, and the size of the scanned area.
Scan allows you to choose what the image is and what it will be used for. Each choice
has its own default resolution and scan type which
will greatly impact the size of the scanned image. The
three default choices are Photo (for images, figures,
etc, that you plan to print), Web (for images, figures,
etc that will be viewed online), Text (for text-only
scans). You can also choose to manually configure
the Resolution and Scan Type via the dropdown
menu.
11 | P a g e
SharpSchool User Manual
Chapter 24: eLocker User Guide
To define the area you want to scan, you can either choose a page size from the
Document Size dropdown menu or you can define the scan area by clicking inside the
scan area and dragging the mouse.
Tip: Click PreScan to perform a quick scan and get a preview of what the full scan will look
like. This can be very helpful as it lets you know if your image is properly aligned with the
scan area.
Once you are satisfied with your settings, click the Start button to begin your scan. When
the scan has finished running you will be returned to the original window.
Now you can change the scanned image’s alignment with the
Rotate Left, Rotate Right, Flip, and Mirror options.
Rotate Left: Rotate the image 90 degrees to the left.
Rotate Right: Rotate the image 90 degrees to the right.
Flip: Rotate the image 180 degrees.
Mirror: Reverse the image.
12 | P a g e
SharpSchool User Manual
Chapter 24: eLocker User Guide
And finally, before uploading your images, you must choose what kind of file you want
to create. A number of options are available to you. The best choice will be dependent
on the images being scanned, the desired file size, and other such considerations.
File Type
Individual Image(s) of
type: BMP, JPEG, TIFF,
PNG
Multi-Page TIFF File
PDF – Searchable Image
What it Produces
Produces a standard image – ideal for use
on websites.
Saves multi-page documents to a single
image file.
PDF with hidden text allowing it to be
searched.
PDF – Formatted Text and
PDF with formatted text and graphics.
Graphics
Microsoft Word Document Converts the scanned image into a Word
document. Ideal for scanned text.
Once you have made your selection for the image, press the Upload button. A small
window will come up asking you to enter the filename. Input a name and press OK.
Your image will now be uploaded in to the eLocker.
3) Opening files
Once you have added files to your eLocker, you can then access them from any computer
with an internet connection. Simply log in to your eLocker and click on a file you wish to
open. Your browser will prompt you to save or open the file.
Note: The exact prompts you see will vary depending on the type of file you clicked on and
the browser you are using.
13 | P a g e
SharpSchool User Manual
Chapter 24: eLocker User Guide
4) Deleting Files
If you find yourself running low on space, you may choose to delete files or folders from
your eLocker. To do so, simply right-click on the file or folder you wish to delete, and
choose delete from the menu that appears. You will be prompted to confirm your decision
to delete the file. Choose okay to confirm deletion.
Pitfall: If you delete a file, it cannot be recovered. Do not delete a file unless you are certain
you no longer have any need for it.
14 | P a g e
SharpSchool User Manual
Chapter 24: eLocker User Guide
5) Moving Files
There are cases where you may wish to move a file from one folder to another. Perhaps you
uploaded a file to the wrong folder, or maybe you just decided that you want to reorganize
your files and folders. With the eLocker interface, moving a file from one folder to another
is a quick and easy process.
To move a file, use cut and paste. This works just like cut and paste in most major operating
systems; right-click on the file you wish to move and choose Cut. Then navigate to the
folder you wish to place the file in, right-click again and choose Paste.
Tip: You can also use this method to move entire folders.
15 | P a g e
SharpSchool User Manual
Chapter 24: eLocker User Guide
6) Renaming a file
In some cases you may want to rename a file. Perhaps the original filename was not very
descriptive, or perhaps you want to include additional information in the filename.
You can rename a file by right-clicking the filename and choosing Rename. You will be
prompted to enter a new name for the file.
To complete the rename, click somewhere in the browser, outside of the name field.
16 | P a g e
SharpSchool User Manual
Chapter 24: eLocker User Guide
7) Mark as Featured
If you have certain files that you access a lot, you can feature these files. This provides you
with quick and easy access to your most frequently needed files.
To set a file or folder as featured, right-click on the folder or file you wish to feature and
choose Mark as Featured. The folder or file will now appear in a special Featured Items
bar at the top of the eLocker.
Tip: To stop featuring the file, right-click on the file within the Featured Items area and
choose Mark as Normal.
17 | P a g e