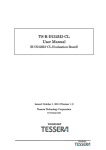
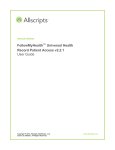
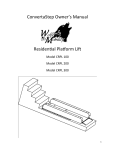
1
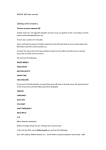
Telserve Professional User Manual A telemedicine accessory to blood glucose monitoring systems Telcare, Inc. Bethesda, MD 20814 USA Phone: (888) 666-‐4530 Hours: Monday -‐ Friday, 9AM -‐ 5PM EST E-‐mail: [email protected] Website -‐ www.mytelcare.com This manual will be readily available on the Internet. You may request a hard copy of this manual by calling Telcare at (888) 666-‐4530 This manual is available via MyTelcare.com or you may request a hard copy by contac8ng: Telcare, Inc., [email protected], (888) 666-‐4530 Contents Page 2 Page 3 Page 4 Page 10 Page 12 Intended Use and General Precau8ons Telserve Healthcare Professional (HCP) Portal Using the HCP Portal Administra8on Page Support P/N: MA0003 Rev: 08/11 1 Intended Use RX -‐ ONLY INTENDED USE Telserve Data Management System – Professional Use The Telserve Data Management System – Professional Use (Telserve – Pro) is an accessory to blood glucose monitoring systems for the review and evalua8on of blood glucose test results to aid in diabetes management. Telserve collects data from blood glucose meters such as the Telcare BGM GENERAL PRECAUTIONS - Glucose results from alterna8ve site tes8ng sites should not be used for insulin dosing. -‐ The Telcare Blood Glucose Meter (BGM) and the Telserve Data Management System (Telserve) do not provide automated treatment decisions. They are not subs8tutes for professional clinical judgment. All pa8ent diagnoses and treatment are to be performed under the supervision of a healthcare professional. • This system is not intended for emergency calls or for transmiTng 8me-‐cri8cal data or alarms. Clinical judgment and experience are required to check and interpret the measurements transmiWed. • Blood glucose (BG) data may not immediately be transferred to Telserve. BG readings on your blood glucose meter (and not the Telserve website) should determine your normal treatment for your diabetes. • The Telserve system is intended for use by pa8ents with diabetes who use the Telcare BGM. 2 Using the Healthcare Professional Portal The Telserve Healthcare Professional (HCP) portal is designed to work with internet browsers that implements the hWps:// secure protocol. The tested browsers include MicrosoY Internet Explorer 8.0.7600 and 7.0.5730; Mozilla Firefox 3.6.15 and 3.5.17; Apple Safari 5.0.4 and 5.0.5; Apple iOS 4.2.1; and Google Android 2.2.1. Login Instructions 1 Obtain login creden8als by calling Telcare at (888) 666-‐4530. 2 Start your internet browser. 3 Go to hWps://MyTelcare.com 4 Log in using the Username and Password provided to you. 5 AYer you login, you will be directed to the HCP Portal. Enter Login Username and Password Recover Password To acquire canisters of Caltech DISPATCH wipes please contact: Medex Supply 1-‐888-‐433-‐2300 Sears 1-‐800-‐349-‐4358 Berktree 1-‐866-‐505-‐5333 Op8cs Planet 1-‐800-‐504-‐5897 Amazon.com 3 Using the Healthcare Professional Portal 1 1 2 Home Page The toolbar at the top of the home page allows you to navigate anywhere in the site. Graphs To view Blood Glucose (BG) and demographic informa8on graphs select “Dashboard Graph” in the toolbar. To view a specific graph, hover over the Dashboard and Alert List icons un8l the pull down menu appears. 4 Using the Healthcare Professional Portal 1 Patient List To view textual rendi8ons of data, scroll down to “Pa8ent List” within the Dashboard. 2 Click a header to sort the data. 3 Use the Search Func8on to search. 4 Click the Pa8ent’s name to access their personal portal. All BG data is in their portal. 5 Click Export to download all data. Patient Name Export Headers Search Function 5 Using the Healthcare Professional Portal * Pages 6-‐8 provide an overview of the Pa8ent Portal. For more detailed instruc8ons on the Pa8ent Portal, refer to the Pa8ent User Manual located at mytelcare.com/support/new Text 1 The top por8on of the Pa8ent screen shows glucose data and test strip usage data. 2 The far right of the screen shows the last five readings (including BGL, date, 8me and tag). 3 To view addi8onal readings click “Get more…” 4 To view all of the pa8ent’s readings and sort them by Time Tag and Range, click Readings on the top right of the page (see page 8). 5 Select different 8melines by clicking the buWons below your name. 6 To download all of the pa8ent’s data in .CSV format to your computer, click “Export Data.” 7 To manage the messages for a par8cular pa8ent click Messaging (see page 9). 8 To set a pa8ent’s BG target zones, click Clinical Profile (see page 8). 6 Using the Healthcare Professional Portal Graph 1 2 3 The middle sec8on of the Pa8ent screen presents glucose data in graphical format. The graph on the leY presents the average BG sorted by Reading Tags. The graph on the right presents BG averages by date. Reading Tag Graph 7 ay Day Tagged Averages 7 D Tagged Averages 1 Trend Graph 7 Day Overall Average (hover over dots for details) Latest Messages At the boWom of the page are the latest messages sent to the pa8ent’s Glucose Meter. 7 Using the Healthcare Professional Portal Clinical Profile Prescribed Readings Adjustable Limits Update Patient Readings Refer a Patient Filters Click the icon on the Navigation Bar. 8 Using the Healthcare Professional Portal 1 Messaging (Patient Specific) Under “Messaging Op8ons,” select the basic messages to be sent to your pa8ent’s Telserve account. This text can also be viewed on the glucose meter. 2 For each message type, you are able to either enable, disable, or follow System Default. Create System Default rules within Administra8on (page 10). 3 Triggered Messages: it is possible to write messages that are sent to the meter under certain condi8ons. These are customizable. To Save: Check “Enable This Message.” Then press Save. 4 Message to be sent a_er next BG reading: The message will be sent to the meter aYer the next reading is taken. Default Messages Enable Add New Triggered Message Save Triggered Message 9 Administration Page Personal and Professional Details Change Password Professional Details 10 Administration Page 1 Messaging (System-Wide) To view and edit clinical message rules select “Administra8on” from the toolbar. 2 “Messaging Op8ons,” Basic automated messages sent to your pa8ents’ meters. 3 Triggered Messages: Messages that are only sent under certain condi8ons. You define these condi8ons. To Save: Check “Enable This Message.” Then press Save. Options Enable Add New Triggered Message Save Triggered Message 11 Support Contact Telcare, Inc. Bethesda, MD 20814 USA Phone: (888) 666-‐4530 Hours: Monday -‐ Friday, 9AM -‐ 5PM EST E-‐mail: [email protected] Website -‐ www.mytelcare.com Rev. 7/2011 12