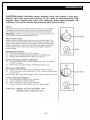
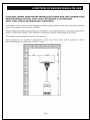
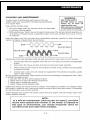
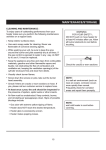
1
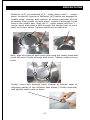
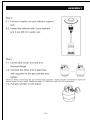
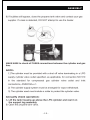
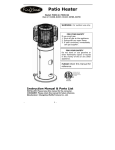
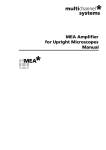
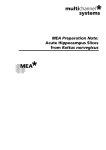
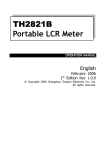
Patio Heater
Model: PH01-S PH01-SS
Item number 60763
WARNING: For outdoor use only.
FOR YOUR SAFETY
If you smell gas:
1. Shut off gas to the appliance
2. Extinguish any open flame
3. If odor continues, immediately
call gas supplier.
FOR YOUR SAFETY
Do not store or use gasoline or
other flammable vapors or liquids
in the vicinity of this or any other
appliance.
PLEASE retain this manual for
future reference.
CERTIFICATE TO
ANSI 83.26a-2008
CONFORM TO CSA
2.37a-2008
Intertek
Instruction Manual & Parts List
INSTALLER: Please leave this manual to the consumer.
CONSUMER: Please retain with this manual for future reference.
Manufacturer: Changzhou Wellife Furnace Co., Ltd.
-1-
Tools and parts needed for assembly
DANGER
CARBON MONOXIDE HAZARD
This appliance can produce
monoxide which has no odor.
carbon
Using it in an enclosed space can kill you.
Never use this appliance in an enclosed
space such as a camper, tent, car or
home.
WARNING:
Improper installation,
adjustment, alteration, service or
maintenance can cause injury or
property
damage.
Read
the
and
installation,
operating
maintenance instructions thoroughly
before installing or servicing this
equipment.
Tools needed:
● Open end wrench (10
& 13mm (included)
NOT included:
● Adjustable opening
wrench 8’’ loang
● Slip joint 9’’ long
WARNING :
● Philips screwdriver
LPG cylinders to be used must be constructed and with medium blade
marked in according with US DOT specifications.
Spray bottle of soap
Storage of the heater indoors is permissible only ●
solution for leak
if the LPG cylinder is turned off and removed.
testing
NOTE:
Use only 20lb LPG tank with size of 18.1in/46cm
Height x 12.5in/32cm Width.
Do not use if the environment temperature is
below 40 degrees F / 4.4 degrees C.
For Outdoor Use Only
-2-
PRECAUTIONS
NOTE: PLEASE READ THE FOLLOWING SAFETY RULES
WARNING:
This heater must only be used outdoors. Using this product in an enclosed
area may cause injury, death or property damage.
Only use in a well-ventilated space. Do not use in a building, garage, or
any other enclosed area.
Read the instructions before use. This heater must be installed in accordance
with local codes or, in the absence of local codes, with the National Fuel
Code, ANSI Z223.1. If applicable, the heater, when installed, must be
electrically grounded in accordance with local codes or, in the absence
of local codes, with The National Electrical Code, ANSI/NFPA70.
Do not use the heater in an explosive atmosphere. Keep the heater away
from areas where gasoline or other flammable liquids or vapors are stored.
Prior to use, check for damaged parts such as hoses, regulators, pilot or burner.
Turn off and disconnect the LPG cylinder before moving the heater.
Do not attempt to alter this heater in any manner. EXAMPLE: Using the
heater without the top canopy reflector or radiant screen.
Do not shorten the burner post assembly.
Do not use the heater in basements or below ground level. It must always
be placed on a solid and level surface.
Always ensure there is ample fresh air ventilation. This heater is for outdoor
use ONLY.
Never replace or substitute the regulator with any regulator other than
the factory suggested replacement.
Do not clean the heater with cleaners that are combustible or corrosive.
Do not paint radiant screen, control panel or top canopy reflector.
All leak tests should be done with a soapy solution. NEVER USE AN OPEN
FLAME TO CHECK FOR LEAKS.
The LPG cylinder should be turned off when the heater is not in use.
At least once a year, the unit should be inspected for the presence of
spiders, spider webs or other insects.
-3-
PRECAUTIONS
CHECK THE HEATER IMMEDIATELY IF ANY OF THE FOLLOWING EXIST:
1. The smell of gas in conjunction with extreme yellow colored tips of the
burner flames.
2. The heater does not reach temperature.
3. The burner makes a popping noise during use (a slight popping noise is
normal when the burner is extinguished after using).
Children and adults should be aware of the hazards of high surface
temperature and should stay away to avoid burns or clothing ignition.
Young children should be carefully supervised when they are in the area
of the heater.
Clothing or other flammable material should not be hung from the
heater or placed on or near the heater.
Any guard or other protective device removed for servicing the
heater must be replaced prior to operating the heater.
Installation and repair should be done by a qualified service person.
The heater should be inspected before use and cleaning may be
required at least once a year, or as necessary. It is imperative that
the control compartment, burner, and circulating passageways of the
heater are kept clean.
Keep the heater area clear of combustible materials such as gasoline and
other flammable vapors and liquids.
Do not obstruct the flow of combustion and ventilation air.
Keep the ventilation opening of the LPG cylinder enclosure free and clear
of debris.
Storage of the heater indoors is permissible only if the LPG cylinder is turned
off, disconnected, and removed from the heater.
Cylinders must be stored outdoors in a well-ventilated area out of the
reach of children. Disconnected cylinders must have threaded valve
plugs tightly installed, and must not be stored in a building, garage, or any
other enclosed area.
-4-
ASSEMBLY
-5-
PRECAUTIONS
ATTACHING WHEEL ASSEMBLY
Step 1
1-1. Locate Wheel Assembly (17) and 2 nuts/bolts contained in plastic bag
with Wheel Assembly (Fig. 1).
Fig. 1
Step 2
2-1. Turn Base (15) so that holes for attachment of Wheel Assembly
are facing you (Fig. 2).
Fig. 2
2-2. Align holes in Wheel Assembly (17) with holes on Base (15) (Fig. 3).
Insert bolts through both sets of holes and secure nuts on end of bolt
(Fig. 4).
Fig. 3
Fig. 4
Step 3
3-1. Wheel Assembly (17) should now be attached to Base (15) as shown
(Fig. 5).
Fig. 5
-6-
ASSEMBLY
-7-
ASSEMBLY
-8-
PRECAUTIONS
Reflector (#2) is comprised of 3 – outer pieces and 1 – center
piece. Locate all 4 pieces of Reflector (#2) which are wrapped in
bubble wrap. Unwrap and remove all pieces and peel off the
protective blue plastic on each piece. Locate 9 bolts and 9 cap
nuts in the plastic bag. Align the 3 – outer pieces with the 1 –
center piece and place a bolt through the center hole on each
piece as shown below. Tighten castle nut on each bolt.
Next, align the sides of each outer piece and the center piece and
insert the next 3 bolts through both holes. Tighten castle nuts on
bolts.
Finally, insert bolt through holes located at outside edge of
adjoining panels of the reflector side pieces (3 bolts required)
and tighten castle nuts on bolts.
-9-
ASSEMBLY
- 10 -
ASSEMBLY
- 11 -
ASSEMBLY
- 12 -
ASSEMBLY
OPERATION
- 13 -
OPERATION
- 14 -
OPERATION
- 15 -
LOCATION OF HEATER WHILE IN USE
- 16 -
MAINTENANCE
- 17 -
TROUBLESHOOTING
- 18 -