1
n
n
n
n n
H
GEOFILE"
DATA FILING SYSTEM FOR USE WITH GEOS™
n
n
n
n
n
n
n
n
n
n
n
n
n
n
n
FOR THE COMMODORE 64, 64C, AND 128 COMPUTERS
n
n
n
n
B
E
R
E
Y
Softlferks
Update Policy
To participate in Berkeley Softworks' update service, fill out and return the
geoFile Registration card enclosed in this package. Registered users will be
—.
sent notices outlining the procedure for obtaining updates and revisions.
License
LJ
/
\
This manual and software are copyrighted by Berkeley Softworks and are
LJ
LJ
intended for use on a single machine. You may not copy this manual or
software whole or in part, except in the normal use of the software or to
make a backup copy. You may not make copies to lend, rent or lease to
others. You may transfer this program and license it to another if (1) all of
the materials purchased (including backup copies) are sold, given or loaned to
another person and (2) the transferee agrees to be bound by all the terms and
conditions of this agreement.
The software program(s) and manual in this package are provided "as is"
LJ
without warranty of any kind, either express or implied, including, but not
limited to the implied warranties of merchantability or fitness for a particular
[I
purpose.
Warranty
'—'
Berkeley Softworks warrants that this product is free from defects in materials
and workmanship under normal use for a period of ninety (90) days from the
date of purchase. If a defect occurs during this period, you may return your
IJ
*—I
___.
LJ
disk to Berkeley Softworks or its authorized dealer, along with a dated proof
of purchase, where it will be replaced free of charge.
jj
There are no other warranties, express or implied regarding the disk and
j
j
related materials, their fitness for any purpose, their quality or
merchantability. Berkeley Softworks shall not be liable for any incidental,
—
consequential, or direct damage resulting from the breach of any express or
LJ
implied warranty, including damage to property.
_
LJ
deskTop, Font Pack, geoCalc, geoChart, geoFile, geoMerge, geoMouse,
geoPaint, geoPrint Cable, GEOS, geoWrite, Graphics Grabber, Writer's
{_J
Workshop are © Copyright Berkeley Softworks, 2150 Shattuck Ave.,
Berkeley, CA., 94704; 1985, 1986, 1987.
rj
Commodore 64® is a registered trademark of Commodore Electronics Ltd.
Commodore 128
TM
1
is a trademark of Commodore Electronics Ltd.
Manual by: John Miller
<—J
>w/
LJ
GEOFILE design by: John Wedgwood
Printed 4/87
u
u
n
GEOFILE
USER'S MANUAL
n
2150 Shattuck Avenue
Berkeley, California 94704
u
D
Q
u
□
U
□
□
D
U
U
□
U
U
U
□
D
D
U
U
□
Qu
u
a
u
TABLE OF CONTENTS
CHAPTER 1
H^
INTRODUCTION TO GEOFILE
n
1-1
1-1
R
WHAT IS GEOFILE?
USE GEOFILE WITH OTHER
GEOS BASED PROGRAMS
j—|
H
1-2
HOW TO USE THIS MANUAL
14
HOW TO GET HELP
CHAPTER 2
BEFORE YOU BEGIN
;—i
2-1
n
2-2
1
P-i
I
'
II f-s.
m '
)
i
OVERVIEW
2-2
WHAT YOU NEED TO RUN GEOFILE
2-3
INSTALL GEOFILE
24
_
INTRODUCTION
2-5
2-5
2-6
MAKE A SECOND COPY OF
YOUR GEOFILE DISKETTE
GEOFILE WORK DISKS
MAKING A GEOFILE WORK DISK
ANSWERS TO CHAPTER 2 "WHAT IF...?"
n
_
CHAPTER 3
n
BOOT GEOS AND OPEN GEOFILE
PI
3-1
3-2
H
3-3
INTRODUCTION
OVERVIEW
BOOT GEOS AND OPEN
YOUR GEOFILE DISKETTE
H
34
H
34
OPEN AN EXISTING GEOFILE DOCUMENT
3-5
RETURN TO THE DESKTOP
P!
3-5
-.
H ■
n
n
n
OPEN GEOFILE FROM THE DESKTOP:
OPEN A NEW DOCUMENT
OPEN AN EXISTING GEOFILE DOCUMENT
FROM THE DESKTOP
■
3-5
3-6
ANSWERS TO CHAPTER 3 "WHAT IF...?"
PRACTICE FOR CHAPTER 3
□
D
U
U
□
D
U
U
□
U
...
u
□
u
u
Q
O
□
U
Qu
u
u
u
CHAPTER 4
HOW TO DESIGN GEOFILE FORMS
4-1
4-3
4-4
4-10
4-10
INTRODUCTION
GEOFILE FORM PAGE
OVERVIEW
CREATE A MASTER FORM
CREATE A FIELD
4-10
TYPE IN A FIELD NAME
4-11
MOVE A FIELD
4-11
4-12
COPY A FIELD
CHANGE THE SIZE OF A FIELD
4-12
4-12
4-13
REMOVE A FIELD
CHOOSE A SORT FIELD
SAVE A MASTER FORM
r—i
4-13
USING SUB LAYOUTS
_-,
4-14
OPEN AN EXISTING SUB LAYOUT
,_,
4-15
1
'
1 '
1
!
M
H
H
PI
PI
n
n
n
n
n
H
4-13
4-14
CREATE A SUB LAYOUT
CHANGE THE SCREEN APPEARANCE
AUTOMATIC FIELD ALIGNMENT
4-15
MOVE AROUND YOUR FORM
4-18
PRACTICE FOR CHAPTER 4
4-17
ANSWERS TO CHAPTER 4 "WHAT IF...?"
CHAPTER 5
DATA ENTRY AND MANAGING YOUR
GEOFILE FORMS
5-1
5-1
5-3
INTRODUCTION
OVERVIEW
ENTER THE DATA ENTRY MODE
5-3
SELECT A FIELD
54
TYPE INFORMATION INTO A FIELD
54
MOVE A FIELD WITH THE CRSR KEYS
54
54
5-5
5-5
LOOK THROUGH YOUR FORMS
ANSWERS TO CHAPTER 5 "WHAT IF...?"
ADD MORE FORMS TO YOUR DATA-BASE
PRACTICE FOR CHAPTER 5
u
u
u
LJ
U
U
D
U
a
u
u
u
u
u
u
u
a
a
Gu
□
u
u
CHAPTER 6
RECALLING INFORMATION
6-1
6-1
INTRODUCTION
OVERVIEW
6-6
ENTER SEARCH MODE AND CREATE A SEARCH
6-6
FORM
HOW TO USE A SEARCH FORM TO PERFORM
6-6
6-12
6-14
SEARCHES AND RECALL FORMS
CONDITIONAL SEARCHES
USE "WILD CARD" CHARACTERS, *, ?,!
ANSWERS TO CHAPTER 6 "WHAT IF...?"
6-14
PRACTICE FOR CHAPTER 6
CHAPTER 7
CHANGING INFORMATION
/0^
,_ '
)
i
H
rn
7-1
INTRODUCTION
7-2
74
7-4
7-5
OVERVIEW
ENTER DATA ENTRY MODE
MANUALLY UPDATE INFORMATION
AUTOMATICALLY UPDATE INFORMATION
7-6
7-6
REPLACEMENT OPTIONS
ANSWERS TO CHAPTER 7 "WHAT IF...?"
7-7
PRACTICE FOR CHAPTER 7
CHAPTER 8
PRINTING GEOFILE FORMS
8-1
INTRODUCTION
H
8-6
8-6
8-6
8-7
8-7
8-8
ENTER THE PRINT MODE
PREVIEW YOUR FORM LAYOUT
PRINT FIELD OUTLINES
PRINT FIELD NAMES
PRINT A BLANK FORM
PRINT MORE THAN ONE FORM PER PAGE
r-i
8-8
8-9
PRINT ALL, SOME, OR ONE OF YOUR FORMS
PRINT TO LABELS, INDEX CARDS, OR
|—l ^
8-9
PRINT COLUMN HEADERS
8-11
PRACTICE FOR CHAPTER 8
H
n
D
' '
pi
8-2
8-10
8-11
OVERVIEW
COMPUTER PAPER
PRINT YOUR FORM
ANSWERS TO CHAPTER 8 "WHAT IF...?"
u
u
a
u
a
u
u
□
u
a
u
D
U
U
U
□
U
G
UU
u
u
u
CHAPTER 9
GEOFILE REFERENCE
9-1
9-3
OVERVIEW
APPENDIX A:
9-7
9-17
APPENDIX B:
APPENDDCC:
GEOFILE DICTIONARY OF TERMS
GEOFILE MENU ITEMS
USE GEOFILE WITH OTHER
GEOS APPLICATIONS
CHAPTER 10
GEOMERGE
10-1
10-1
10-2
INTRODUCTION
INSTALL GEOMERGE
GEOMERGE TUTORIAL
10-6
10-11
10-13
MERGE FORM DOCUMENTS
MERGE DATA FILES
USING A MERGE DATA FILE
WITH A MERGE FORM DOCUMENT
INDEX
u
u
u
u
■
U.
u
u
u
u
u
_ u
u
u
u
u
D
D
u
Qa
u
u
u
H
CHAPTER 1
n
INTRODUCTION TO GEOFILE?
n
WHAT IS GEOFILE?
p-,
1 f*)
_
1 '
M
!"""!
geoFile is the GEOS (Graphic Environment Operating System), based
filing and data-base program. A data-base is a way to organize large, or
small amounts of information in such a manner that retrieving and sorting
the information you want is easy, efficient, fast, and reliable.
With geoFile you can store, recall, and analyse all kinds of information,
from client records and invoices, to inventory lists and investments. You
can even keep track of your recipes, or a stamp collection making geoFile
perfect for your information handling needs, either at home, or in your
business. And because geoFile is GEOS compatible, you will be using the
same easy to learn and use graphic environment that you are already familiar
H
with.
PI
geoFile is very flexible. The program stores and organizes information in
n
Once you design your form, simply fill in the blanks. One "Master" form
H
"forms" that you design anyway you want right on the display screen.
contains all of the information that you want to store in your data-base.
You can also create up to 15 "sub layouts" that can contain selected
portions of your "Master" form, that you can then easily view or print out.
No matter how you design these sub layouts, or how many of them you
have, you will not affect your original form design, or how geoFile stores
and handles the information in your data-base.
Finally, updating, or changing information stored in geoFile is fast and
easy. After learning a few simple commands you will be able to use
geoFile to sort through, retrieve and change, if you wish, any or all of the
pieces of information you have stored in your geoFile forms.
USE GEOFILE WITH OTHER
GEOS BASED PROGRAMS
Since geoFile is GEOS compatible, you can use it with other GEOS based
programs.
geoWrite
Create a Text Scrap from the data in your geoFile data-base, and paste it
into a geoWrite document.
geoPaint
Paste a graphic that you created with geoPaint into a field in your geoFile
data-base.
1-1
Introduction
geoMerge
You can create form letters using the data contained in your geoFile forms.
geoFile can create a geoWrite document using the data in your data-base.
You can then use this document as your Merge Data File. Chapter 10 of
this manual tells you how to use Merge Data Files with the geoMerge
program to create forms letters and other programed text documents.
geoCalc
To carry out complex calculations and analysis on the data in your geoFile
forms, you can copy that data into the geoCalc application program. You
can create a Text Scrap from the data in your geoFile forms that you can
paste into a geoCalc spreadsheet
NOTE: See Appendix C for more information on how to use geoFile with
other GEOS based applications
Combining geoFile with these other GEOS based applications can greatly
increase the utility and versatility of geoFile. This manual includes
examples on how to use geoFile. But the geoFile program is flexible and
powerful enough that you will soon be finding your own ways to use
geoFile to make your GEOS world more productive and enjoyable.
HOW TO USE THIS MANUAL
To make learning and using geoFile as simple as possible, it is best to see
this manual as consisting of four main parts.
Chapters 1 and 2 contain important information and procedures that you
must read and follow before you can begin to work with geoFile. Chapter
1 gives you a general overview of the geoFile program and manual.
Chapter 2 contains information on the equipment that you need to run the
program, and the installation procedures that you must follow in order to
start working with geoFile.
Chapters 3 through 8 make up the learning part of the geoFile manual.
The major functions and commands of the program are examined in
overview, and then in step-by-step instructions.
If you are proficient with GEOS, and feel comfortable with how the
environment works, you may be able to read just the chapter overviews and
get right to work. The step-by-step instructions will help you with the
more complex operations in the program and serve you later as a reference.
LJ
t
\
i
j ;
•
u
Introduction
1-2
U
u
Each of the chapters 2 through 8 consists of:
1) An introduction containing the objectives of the chapter (what you will
learn), and its key terms. Some questions under the heading "WHAT
IF...?" are also included to help focus your learning of geoFile.
2) An overview of the chapter which discusses the program functions and
commands in a general way.
3) Step-by-step instructions for each of the functions and commands of
geoFile.
4) A practice example applying what you have learned in the chapter.
5) Answers to the "WHAT IF...?" questions in the chapter introduction.
Chapter 9 contains three appendixes. Appendix A is a dictionary of the key
terms in geoFile. The menu items in geoFile are listed and explained in
Appendix B. In addition, Appendix C documents the procedures that you
use to transport data from your geoFile data-bases to other GEOS based
applications.
n
_
Chapter 10 contains information and instructions on how to use geoMerge,
a mail merge type GEOS application that is included on your geoFile
diskette.
'I
n
!"H
Finally, this manual contains a comprehensive Index to help you locate the
information you need quickly.
We hope that this manual is useful both to your learning and use of
geoFile. If you have any comments or suggestions about the manual,
please send them to:
f|
Berkeley Softworks
Attn. Documentation
|—]
H ^
2150 Shattuck Avenue.
Berkeley, CA. 94704
We will enjoy hearing from you.
n
n
_
n
1-3
Introduction
u
HOW TO GET HELP
u
We hope that you will find geoFile an easy to learn and use program, and
that this manual (along with your GEOS User's Manual), provides you
LJ
with most of the answers to the questions you may have about the
operation of geoFile. However, if you do run across a problem that is not
answered by the manual, there are three ways to obtain additional help.
"
K^J
|
)
LJ
The first, fastest, and recommended way to obtain information about and
help with GEOS and its follow-on applications, like geoFile, is through
the QuantumLink telecommunications network. QuantumLink, or Q-Link,
is an online service network designed for Commodore users.
^j
i
i
Berkeley Softworks provides Customer Service message boards, along with
a Programming and Technical Information message board and other useful
services, in the Commodore Information Network section of Q-Link.
\
i
,
,
receive the most timely help and information. In addition you will have
,
,
through Q-Link, many of them free of charge.
.
,
Through these message boards, GEOS and geoFile users can generally
^
access to programs and products from Berkeley Softworks that are offered
Berkeley Softworks provides customer service by telephone, but as the lines
are often busy, we also recommend that users write in to us detailing their
problems. All correspondence is answered promptly. The Berkeley
Softworks customer service address and telephone number appears on the
back cover of this manual.
—'
,
^J
'—'
t-J
u
u
u
u
u
u
u
u
Introduction
1-4
LJ
u
CHAPTER 2
BEFORE YOU BEGIN
INTRODUCTION
Before you can begin to use geoFile you must read and follow the
instructions in this chapter.
OBJECTIVES
After completing Chapter 2 you will know:
• What minimum equipment and software you need to run geoFile.
• How to install the geoFile application program so that you can begin to
work with it.
• How to make a second copy of geoFile with the DISK COPY utility
program using one or two disk drives.
• How to make one or more work disks to use with geoFile, and the
importance of making work disks for GEOS applications.
KEY TERMS
GEOS
RAM-expansion unit
deskTop
P^
install
DISK COPY utility program
rn
boot
_
application program
1
work disk
"WHAT IF...?"
1 <
1) Do I need more than one disk drive to run geoFile?
HI
2) Do I need any other software in order to operate geoFile?
n
3) Must I install the geoFile application every time I use it?
PI
4) Should I use the DISK COPY utility program to make a second copy of
nmy geoFile disk?
>
.
H
r—i
n
2-1
Before you Begin
u
OVERVIEW
geoFile is a GEOS based program so that in addition to the geoFile
I
I
package, you will need to have the same basic hardware and software that
you need to run GEOS itself. Additional equipment such as a printer, a
|
|
second disk drive, a RAM-expansion unit (REU), are not required, but will
improve the performance and utility of geoFile.
I J
Before you begin to work with geoFile, you should make a second copy of
|
j
least one additional work disk using DISK COPY for use with geoFile.
I
|
WHAT YOU NEED TO RUN GEOFILE
y
Rather than standing alone, geoFile is a part of GEOS, the official
operating system for the Commodore 64. geoFile was designed to be
k
simple to learn and to use, as well as being a powerful data handler. As a
'—
part of the GEOS world, however, there is a minimum amount of
.
the geoFile disk using the DISK COPY utility. You should also make at
equipment (hardware), and computer programs (software), that you need in
order to run geoFile. In addition to these minimum requirements there are
other optional equipment items that can improve your productivity with
.
,
'—'
,
'—'
geoFile, but are not necessary for its operation.
You must have the following hardware and software in order to run and
work with geoFile:
I—I
• a Commodore computer 64, 64c, or 128 (running in the 64 mode).
I
I
• one Commodore disk drive (1541, or 1571).
I
|
• GEOS (Graphic Environment Operating System) software, version 1.2 or
j
|
later.
• an input device such as a joystick, or mouse.
• the geoFile package, which includes the program diskette and this
manual.
• one blank, formatted, DS/DD (double sided/double-density), diskette.
u
LJ
|
|
|
|
u
KJ LJ
U
Before you Begin
2-2
u
u
The following optional equipment items are recommended so that you
can take fall advantage of the power and versatility of geoFile. This
optional equipment is not, however, necessary to the operation of
geoFile.
• a GEOS supported printer that is properly connected to your
Commodore computer. This will allow you to print out the forms
that you design with geoFile. A list of GEOS supported printers is
included in your GEOS Userfs Manual.
• an interface card or geoPrint Cable if you are planning on using a
non Commodore compatible printer to print out your GEOS
documents. geoPrint Cable is a parallel printing cable that makes
printing your GEOS documents fast and easy.
• a RAM-expansion unit (REU). With an REU the operating speed of
geoFile (and other programs), is greatly increased. Also you will be
able to dedicate all of the disk space on the disk in your disk drive to
your data-base, while the REU itself holds the geoFile application.
• a second disk drive (1541, or 1571). With two disk drives you will
be able to copy files and disks more easily. You will also be able to
dedicate all of the disk space on one disk to a data-base, while the disk
in the other disk drive contains the geoFile application.
-a proportional input device such as geoMouse. A proportional input
device makes getting around in the GEOS world fast and easy.
• several blank, formatted, DS/DD (double sided/double-density),
diskettes for making work disks.
INSTALL GEOFILE
You need to install the geoFile program by following the steps below
before you can begin to create forms and data-bases.
IMPORTANT: Be sure to install geoFile using your own GEOS
boot disk, or the GEOS boot disk that will always be used with this
PI
geoFile disk. Any geoFile work disks that you make from your
n
,
,
original geoFile disk must also be used with this same GEOS boot
disk.
n
n
2-3
Before you Begin
You perform this installation procedure only once, the first time that you
open the geoFile program.
1. Boot GEOS as described in your GEOS User's Manual.
2.
Close your GEOS boot disk.
3. Put the geoFile disk (label side up), into the disk drive and open it
4.
Open the file named geoFile by clicking on the geoFile icon and
selecting the open menu item from the file sub menu. (You can also
double click on the geoFile icon to open it) The geoFile screen will
appear with a dialog box on top of it saying, "geoFile installed".
NOTE: This dialog box will appear only once, the first time that you open
the geoFile application.
5.
Select OK to return to the deskTop. Your geoFile disk is now
installed
MAKE A SECOND COPY OF
YOUR GEOFILE DISKETTE
You should make copies of your geoFile disk in case you should ever run
into problems with the original disk.
If you are using one disk drive:
1:
Open, or double click on the DISK COPY utility program icon (located
on side B of your geoFile diskette), to run the program. The screen will
turn blue to indicate that you are in the BASIC mode.
2: Follow the directions that appear on the screen. The source disk is the
disk that you want to copy. The destination disk is your new copy.
i
i
I
,
.
,
'—'
Ifyou have two disk drives:
'—'
User's Manual.
U
With your geoFile disk in disk drive A, and your destination, or new disk in
I—I
First set up your system to use two disk drives as described in your GEOS
disk drive B:
1: Click on the copy menu item in the disk sub menu. The disk copy
menu item is included with the V1.3 of the deskTop.
Before you Begin
2-4
^KJ LJ
u
u
u
2:
Follow the directions that appear on the screen. The source disk is the
disk that you want to copy. The destination disk is your new copy.
The two methods outlined above are the only safe ways to produce extra
copies of your applications disks, and to make work disks.
IMPORTANT:If you have the BACKUP program supplied on your
GEOS disk, it should not be used to make copies of your applications
disks, or to make work disks. Use the BACKUP program only to make
backup copies of your GEOS boot disk.
GEOFILE WORK DISKS
Besides making a backup copy of the entire geoFile disk, the most
important thing for you to do before you start to work with geoFile is to
make at least one work disk. You can make as many copies of the geoFile
application as you wish. It is these copies that you should use when you
want to work with geoFile. Your original geoFile disk should be stored in
a safe place. Use the original geoFile disk only if something goes wrong
with one of your work disks.
The work disks that you make will contain the information that you want
to store in a data-base. By combining geoFile with other GEOS
applications and desk accessories, you can customize work disks to suit
your exact needs.
MAKING A GEOFILE WORK DISK
There are two ways to make a work disk for use with geoFile (or any other
GEOS application).
•
With the copy of your geoFile disk in the disk drive, format a blank
disk by clicking on the format menu item in the disk sub menu.
Then use the DISK COPY utility program to make an additional copy
of the geoFile disk. (See Make a Second Copy of geoFile.) After you
have made this geoFile work disk you can add files to (or delete files
from), your new disk to suit your particular needs.
•
H
/—\
]
Format a blank disk as described above. Then copy selected files from
the second copy of the geoFile disk that you made in the previous
section onto your new work disk.
n
n
H
2-5
Before you Begin
LJ
U
An example of a work disk containing a selection of GEOS files might
include the following:
geoFile
deskTop 1-3
printer driver
fj
[^J
(the correct one for your printer, copied from side B of
Q
your geoFile disk).
This is a basic work disk configuration for geoFile. Depending on your
needs, you can add additional files from other GEOS products and
,
,
applications, such as:
• additional font files from Font Pack or Writer's Workshop.
LJ
•
'—I
geoPaint or Graphics Grabber (included with Desk Pack 1), so that you
can add your own graphics and pictures to your geoFile forms, or
•
transfer them from popular graphics libraries.
I—I
desk accessories such as the Calculator or Notepad so that you can make
I I
quick calculations, or jot down memos to yourself while you are
working with geoFile.
LJ
By having only the files that you need on your work disks, you allow for
plenty of disk space for your geoFile forms. Make up several customized
work disks, each useful for a particular type of job.
^^ j |
[_j
You are now ready to learn how to use geoFile!
fj
u
ANSWERS TO CHAPTER 2 "WHAT IF..,?"
1) Do I need more than one disk drive to run geoFile?
geoFile'
r ,
No. You only need one disk drive to operate geoFile. However,
I
two
disk drives will make file copying much easier, and allow you to devote
the entire storage space on a disk to your data-base.
'—'
2) Do I need any other software in order to operate geoFile?
'—'
Yes. geoFile is a GEOS based application, so you will need to have
the GEOS package (program disk and manual), and know how GEOS
operates in order to work with geoFile.
—-
~ .
'—'
u
Before you Begin
2-6
u
_
u
3) Must I install the geoFile application every time I use
it?
No. The installation procedure for geoFile (or for any other GEOS
based application), is something that you do only once, the first time
that you open the program.
4) Should I use the DISK COPY utility program to make a
second copy of my geoFile disk?
Yes. Use the DISK COPY utility program whenever you want to copy
a GEOS based application disk, or make work disks. Double click on
the DISK COPY icon, or use the copy menu item in the disk sub
menu that is located in the command menu of your geoFile deskTop.
n
H
n
h
n
H
n
_
2-7
Before you Begin
□
a
□
a
□
u
a
u
D
□
a
lj
a
a
u
□
u
u
a
u a
□
a
.
a
CHAPTER 3
BOOT GEOS AND OPEN GEOFILE
INTRODUCTION
Each of the chapters 3 through 8 cover a major functional area of the
geoFile application program. Read the overviews of each chapter to get
a general explanation of the geoFile operations that are to be covered in
that chapter. A more detailed view of those operations is given in the
step-by-step instructions that follow.
Whether you read only the overviews, or follow the step-by-step
instructions, by the end of chapter 8 you should be familiar with and
have practiced all of the major commands and functions in geoFile.
IMPORTANT: Before you begin to read Chapter 3, be sure that you
have read and have followed the instructions contained in Chapter 2 of
this manual.
Chapter 3 contains the information that you need to boot (run), the
GEOS program, and to start up and begin to work with the geoFile
application program.
OBJECTIVES
After reading this chapter you should know:
' !
•
How to open the geoFile diskette after you have booted GEOS.
I !
•
Two ways to open geoFile from the deskTop.
M
•
How to open a new or existing geoFile document.
r"j
•
How to return to the deskTop.
H
KEY TERMS
Commodore Key
HI
geoFile document
[—"]
File dialog box
Create/Open/Quit dialog box
H
n
P—)
3-1
Open geoFile
"WHAT IF...?"
1) Do I need to boot GEOS before I can begin to work with the geoFile
application program?
2) How many ways are there to open an existing geoFile document from
the deskTop?
3) Can I return to the deskTop from the Create/Open/Quit dialog box?
OVERVIEW
BOOT GEOS AND OPEN
YOUR GEOFILE DISKETTE
As with any other GEOS based application program, you have to first
boot (run), GEOS before you can open and work with geoFile
documents. Once GEOS is running, close your System, or boot disk
_
1 I
(the disk that you run GEOS from), and open your geoFile diskette.
I
CREATE NEW DOCUMENTS
Q
Create new geoFile documents by double clicking on the geoFile icon,
which is located on the first page of the geoFile disk notepad. A
Create/Open/Quit dialog box appears. Select the Create icon to create
a new geoFile document.
OPEN EXISTING DOCUMENTS
i
[_j
,
,
^-^ j|
p
Open existing geoFile documents by clicking on the Open icon in the
Create/Open/Quit dialog box. A File dialog box appears with a list of
the geoFile documents that are on on the disk. Select the filename that
you wish to open.
Existing geoFile documents can also be opened directly from the
deskTop by double clicking on their icons.
RETURN TO THE DESKTOP
Returning to the deskTop after you are finished working with geoFile is
simply a matter of clicking on the Quit icon in the Create/Open/Quit
LS
—
I—r
dialog box.
Ou
LJ
Open geoFile
3-2
—
STEP-BY-STEP INSTRUCTIONS
BOOT GEOS AND OPEN
YOUR GEOFILE DISKETTE
The instructions below are written for a one drive system. If you want
to use two disk drives while you are working with the geoFile
application program, refer to your GEOS User's Manual and set up your
system to use two drives.
To boot GEOS and open your geoFile diskette:
1: Set up and turn on your disk drive, computer and monitor as
described in your Commodore C64 System Guide. (If you have a
128 you will need to be running it in the 64 mode to run GEOS.)
2:
Place your GEOS boot disk in your disk drive (GEOS, or System
Disk label side up), and type the following BASIC command on
your keyboard:
LOAD "GEOS",8,1
When the GEOS program has been loaded correctly, the GEOS deskTop
will appear on the screen.
3:
Close your boot disk by clicking on the Close icon located in the
top right-hand corner of the disk notepad. You can also close your
disk by pressing both the Commodore key £c and[cj at the same
time.
4:
5:
Remove your boot disk from the disk drive.
Place your geoFile diskette (the one that came in your geoFile
package), in the disk drive and open it by clicking on the Disk icon
(this icon is entitled Drive A if you have closed and removed your
boot disk from the disk drive). The Disk icon is located in the
upper right-hand corner of the monitor screen. You can also open
your disk by pressing both the Commodore key ft andYO\ at the
same time.
n
3-3
Open geoFile
OPEN GEOFILE FROM THE DESKTOP:
OPEN A NEW DOCUMENT
To open the geoFile application:
1: Double click on the geoFile icon or...
2:
Click on the geoFile icon once to select it, and then select the open
menu item from the file sub menu. The Create/Open/Quit dialog box
will appear.
To create a new geoFile document:
1: Click on the Create icon in the dialog box. Another dialog box
appears asking you to enter, or type in a filename for your file.
2: After typing in a filename press RETURN. In a few moments the
geoFile grid background will appear on the screen. When you first
begin to work with geoFile, you will be in the form design mode of
the program.
OPEN AN EXISTING GEOFILE DOCUMENT
Once you have created one or more files on your geoFile disk, you will
be able to open existing geoFile documents from the Create/Open/Quit
dialog box.
To open an existing document using the Open icon:
1:
Click on the Open icon in the Create/Open/Quit dialog box after
you have opened geoFile from the deskTop. The File dialog box
appears with a list of the filenames of the geoFile documents that
are on your disk.
2:
Click on the name of the file that you want to open. The name that
you clicked on will appear in reverse video.
3:
Click on the Open icon to open that file. (Clicking on the
Cancel icon returns you to the Create/Open/Quit dialog box.) The
first form that is stored in that file appears on the screen with its
name in the title bar. Your first form will appear as an unbroken
grid, until you have designed a form.
Open geoFile
3-4
,
>
n
_
RETURN TO THE DESKTOP FROM THE
~
CREATE/OPEN/QUTT DIALOG BOX
To return to the geoFile deskTopfrom the CreatelOpenlQuit dialog box:
M
1: Click on the Quit icon in the Create/Open/Quit dialog box. The first
page of the geoFile deskTop will appear on the screen.
OPEN AN EXISTING GEOFILE DOCUMENT
FROM THE DESKTOP
To open an existing document from the deskTop:
1:
Once you have opened the geoFile disk, double click on the geoFile
document icon of the file on which you want to work as it appears
on the geoFile deskTop, or...
2:
Select the document that you want to open by clicking on its icon
once. Then click on the open menu item in the file sub menu.
Either way, the first form that is stored in that file appears on the screen
with its name in the title bar.
ANSWERS TO CHAPTER 3 "WHAT IF...?"
1) Do I need to boot GEOS before I can begin to work
f)
with the geoFile application program?
Yes. geoFile is a GEOS based, application program. You always
need to boot GEOS before running a GEOS application program.
2) How many ways are there to open an existing geoFile
document from the deskTop?
Two. You can qpen a geoFile document by double clicking on its
icon, or by selecting the icon and then clicking on the open menu
item in the file sub menu.
3) Can I return to the deskTop from the Create/Open/Quit
dialog box?
Yes. To return to the deskTop from the Create/Open/Quit dialog
box, click on the Quit icon.
3-5
Open geoFile
u
PRACTICE FOR CHAPTER 3
After you have set up your computer system and booted GEOS as described
in the beginning of this chapter, you should practice opening up geoFile
documents from the deskTop.
First, place your geoFile diskette (label side up), in the disk drive and open
it. You should see the geoFile program icon on the deskTop that appears.
Double click on this icon to open up the geoFile application.
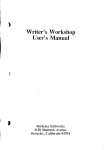
When the Create/Open/Quit dialog box appears, click on the Create icon
to create a new geoFile document.
Create Icon
u
u
u
u
u
[qeos j file | edit ^^^^^^^^M§
♦V^» ♦ ♦
:::rs;
Select Option:
iCreflteLnew document
| Open | existing document
| Quit | to deskTop
u
u
u
u
u
Type in the filename, Practice File when the program asks you to
u
geoFile form design background will appear on the screen. Notice the
filename in the title bar located in the top right-hand corner of the
D
enter a filename. Press the |RETURN| key. In a few moments the
u
screen.
u
a
u
u
Uu
u
a
Open geoFile
3-6
u
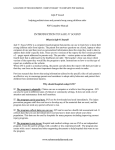
Click on the close menu item in the file sub menu. The
Create/Open/Quit dialog box appears. Click on the Open icon.
Open Icons
Select Option:
♦
new document
) document
4
Quit | to deskTop
The File dialog box appears with a list of the geoFile document files that
you currently have stored on your diskette.
n
Practice File should be one of three files that are currently stored on your
disk. The other two are called disk-labels, and video* The filename of
a selected file appears in reverse video (white letters on a black background).
Click on the Opeu icon to open the Practice File. The geoFile grid
background will appear on the screen. Now click on the close menu item
in the file sub menu. You will again see the Create/Open/Quit dialog box
on the screen.
3-7
Open geoFile
LJ
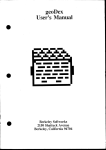
Quit Icon
Select Option:
|Create| new document
| Open I existing document
T Quit^t to deskTop
LJ
D
Li
U
LJ
LJ
Return to the geoFile deskTop now by clicking on the Quit icon.
U
U
U
U
u
G
LJ
LJ
U
U
U
U
U
LJ
Open geoFile
3-8
D
CHAPTER 4
HOW TO DESIGN GEOFILE FORMS
INTRODUCTION
Forms make up the foundation of your geoFile data-bases. The
information and data that you want to store, sort, and recall is contained
on forms that you design yourself on your screen. Chapter 4 contains
the information that you need to design geoFile forms.
OBJECTIVES
After reading Chapter 4 you should know:
(
'
•
The major features of the geoFile form page.
•
How to create Master forms and sub layouts
•
What a field is, and how you create them on your form.
•
How to move fields around, copy them, change their size and shape,
or remove them from your forms.
•
How to name your fields.
•
How to choose a field to be your sort field.
•
How to change the way geoFile looks on the screen.
•
How you can move around your form page to look at, or work on
different parts of your form.
KEY TERMS
form
Master form
sub layout
form page
grid background
position indicator
command menu
tide bar
field
4-1
Design Forms
KEY TERMS cont.
field outline
field name
move tab
re-size tab
sort field
scrolling
sub menu
form design mode
"WHAT IF...?"
1) What are the three steps in designing a geoFile form?
2) What is a field?
3) Can I move fields around on the form page after I have created them?
4) Can I change the size and shape of fields?
5) What is the largest size field that I can have on my form?
6) How long can a field name be?
7) Can any one of the fields on my form page act as the sort field?
8) Can I turn off the geoFile grid background?
9) Can I move to another part of my form page any way other than by
moving the pointer to one of the screen edges?
IMPORTANT: Before going on to either the chapter overview, or the
step-by-step instructions, read the next section about the geoFile form page.
This section contains definitions of many of the terms that are used in
geoFile.
n
u
u
Ou
u
Design Forms
4-2
LJ
__
u
GEOFILE FORM PAGE
When you first create a geoFile document and name it, what you will see
on the screen is the geoFile form page. You should know the basic parts
and features of the form page.
Command-
qeos j me; eon; option; j form; disptoij
■M.H..g..W..yvyU.lw.v..M..w..r^lifiIMI,,.,,..,..>,.||l
5
Practice File
«-Title Bar
Menu
—Form Page
Position-
Indicator
rid
Background
>-**v
)
The form page: The major feature of the screen that you see when you
have opened a geoFile document is the form page. On the surface of the
form page you will design the forms that will contain your data-base
information.
The grid background: The background that you see on the form page
when you have opened a geoFile document is the grid background. Use the
grid background as an aid when you are designing your geoFile forms. You
can change the background pattern that you see when working with your
geoFile forms.
The position indicator: The position indicator appears in the top lefthand corner of the form page. It is made up of three parts. The large
hollow black box represents the full page of your form. The smaller red
box represents that part of the form that you are currently viewing. The
solid black box on the right-hand side of the indicator is a "handle" that can
be used to move the position indicator to a different place on the form page.
The command menu: The command menu lies across the top of the
form page above the position indicator. Each item in the command menu
when it is selected, will cause a sub menu of geoFile commands to appear.
n
H
4-3
Design Forms
The title bar: The title bar lies across the top of the form page to the
right of the command menu. The filename (up to 16 characters) that you
have given your geoFile document appears in the title bar. When you
change the filename of a geoFile document the new name will appear in the
title bar.
OVERVIEW
All of the information that is stored in your data-base is contained in fields
on a geoFile Master form. You design a Master form in three steps. First
I—I
choose the sort field. You can also create up to 15 sub layouts for
I—I
you create fields. Then you give names to the fields, and finally you
specialized purposes. Sub layouts are made up of portions of the fields in
your Master form.
LJ
WHAT ARE FIELDS?
LJ
Fields are rectangular areas or boxes, that you create right on your form
page. Fields contain the information that you want to store in a data-base.
LJ
There are three parts to the fields on your form: the field outline, the field
name, and the data that you want to store under that field name.
LJ
CREATE A MASTER FORM
U
CREATE A FIELD
You create a field by clicking once on the form page, and then "dragging,"
or moving the pointer across the form page until you have created a field
^ LJ
[ j
that is the size and shape that you want. Click again to set the size of the
field.
LJ
You can create up to 64 fields on a geoFile form, if the individual field
[j
sizes are not too large.
NAME A FIELD
U
of its outline. A selected field has a thicker border than other fields. The
field name identifies a field. Field names are the key to how geoFile sorts
and stores your data. After you have named a field, click outside of the field
;
Field names are typed into a selected field (a selected field has a thick black
border), after it has been created. You select a field by clicking once inside
outline to de-select it.
rj
-,
,- -,
'—l
Ou
u
LJ
Design Forms
4-4
G
HOW TO MOVE A FIELD
After you have created a field on your form you may want to move it
around in order to position it correctly, or just to see how it might look in
a different place on your form. A field can be moved around on the form
using the move tab. The move tab appears in a field after it has been
given a field name. Any data that is in a field, and its name will move
along with the field. You can move a field by clicking once on its move
tab. A set of blue brackets appear which you can move with the
mouse/joystick pointer. Move the brackets to the field's new position and
click to set the field down there.
If the field that you want to move is still selected, click once outside of the
field outline to de-select it.
HOW TO COPY A FIELD AND MOVE IT
You may have a particular shape of a field that you want to duplicate many
times on your form, or you may have some particular field name and
outline that you want to duplicate. Besides using the move tab to move a
field, you can also use it to make a copy of a field. This copy can then be
moved around on the form page. To copy a field you double click on the
move tab. You can then move this copy (it appears as a set of blue
brackets), around on the form page by moving your mouse/joystick pointer,
and set it down where you want it by clicking again.
HOW TO CHANGE THE SIZE
AND SHAPE OF A FIELD
After creating a field, you may want to change its size or shape in order to
accommodate additional information, or make it look different on your
form.
r—i
[—i
NOTE: If the field that you want to change the size or shape of is selected
(has a thick black outline), click once outside of the field outline to
de-select it.
pi
You can change the size of a field by using the re-size tab. The re-size tab
_
de-selected. Now click on the re-size tab, and drag the pointer across the
-^ {**}
is stored in a field, and its name is saved even if you change the size of the
]
' ]
''
appears in the lower right-hand corner of a field after it has been created and
form page until the field is the size and shape that you want. Any data that
field. A single field can be up to 8 1/2 by 11 inches in size.
n
H
4-5
Design Forms
u
HOW TO REMOVE A FIELD
^
delete menu item in the field sub menu.
j
>
If the field that you want to remove from your form is not selected, click
once inside of its outline to select it.
.
,
HOW TO CHOOSE THE SORT FIELD NAME
U
mode, you must choose one of the fields in your Master form to be the sort
'—'
while you are working on a form. However, with a large data-base this can
<—I
You may want to remove one or more of the fields that you have created on
your form. Remove a selected field from your form by clicking on the
^j
Before you can go into the data entry mode of geoFile from the form design
field. The field that you choose is used by geoFile as a key when the
program stores and recalls the forms in your data-base. Any field name in
your form can act as a sort field. You can change the sort field at any time
l
'—'
take a relatively long time
The geoFile program sorts text fields alphabetically. If a sort field has
been designated a number field, then your forms will be sorted
I I
numerically.
To choose a field to be the sort field first select a field, and then click on the
set sort field menu item in the field sub menu.
The field that you choose as the sort field appears with a dotted line around
i
j
LJ
^^ LJ
*
j
it to distinguish it from other fields on your form.
SAVE A MASTER FORM
When you exit the design mode of geoFile, either to another mode or
U
j
j
diskette.
i
j
CREATE A SUB LAYOUT
y
Sub layouts are selected parts, or portions of your Master form. The
|
1
Master form contains all of the fields and information that is stored in your
data-base. A sub layout contains only those fields and data that you want to
isolate from the other parts of your data-base.
J
|
completely out of the program, your Master form will be saved onto your
u
Design Forms
4-6
U
LJ
You can use a sub layout to change the arrangement or layout of the fields
in your data-base without affecting the way the fields are laid out, on your
Master form. The field names on your Master form are also left as they are.
You can create a sub layout of your Master form by clicking on the
change layout menu item in the file sub menu. Select one of the
Empty Layout names from the dialog box that appears. Click on the New
icon, and give your new layout a name. When the geoFile grid background
reappears, you will see a form that looks just like your Master form, same
fields in the same arrangement. This sub layout has the new layout name
in the title bar with brackets, <sub layout>, around it.
Now you can delete fields from this sub layout, move them around, change
their size and shape, or their names, until you have just the sub layout
design that suits your purpose. Use a sub layout to view special parts of a
large data-base, or to create a particular layout for printing.
This sub layout (and any others that you may design), will be saved in the
same way that your Master form is saved. (When you enter a different
mode in geoFile, your layout is saved.) You can recall your sub layout by
clicking on the change layout menu item in the file sub menu, select
the correct name from the dialog box that appears, and then clicking on the
Open icon.
p|
CHANGE THE DISPLAY APPEARANCE
p
The display sub menu in the command menu contains several options
that allow you to change the way your geoFile screen appears. An * next
to an option in the sub menu indicates that it is selected.
n
HOW TO TURN THE GEOFILE
n
!
GRID BACKGROUND ON AND OFF
When you first open a geoFile document, the grid background will appear
_,
on the screen.
_
You have the option of changing the way the geoFile screen appears while
' '
you are working on your forms. The geoFile grid background pattern can
be turned on, or off as you wish. You can change the appearance of the
I
I
display in this way at any time while you are working on a form.
i
i
Click on the white, or gray menu items in the display sub menu to
PI
turn off the grid background. To turn the grid background back on, click on
the grid on menu item.
4-7
Design Forms
HOW TO CHANGE THE SCREEN
BACKGROUND COLOR
You also have the option of changing the geoFile screen background color
from gray to white and back again. To change the screen color click on
either the white, or gray menu items in the display sub menu.
NOTE: This option is in addition to the screen colors that you can apply
from the preference manager (see your GEOS User's Manual)
AUTOMATIC FIELD ALIGNMENT
You can have your fields align themselves automatically with the grid
background, or not as you wish. Switch on this feature to position field
outlines on the grid lines, or exactly halfway in-between the grid lines. If
you do not want to uniformly align your fields, switch this feature back off.
NOTE: The geoFile alignment feature will still operate even when the grid
background is not visible (has been switched off).
When you first open a geoFile document, your fields will not align
themselves with the grid background.
Click on the align on menu item in the display sub menu so that your
fields will align themselves with the grid. Any field created, or moved after
you switch on the alignment feature will "snap" to the nearest grid line. If
you want the fields not to align with the grid, click on the align off
menu item.
HOW TO MOVE AROUND
ON THE FORM PAGE
When working with geoFile what you see on your the monitor screen is
only a portion of the entire form page on which you can create your data
base. You can move from one portion of your form to another with the
help of the position indicator, or by using geoFile's scrolling feature.
USING THE POSITION INDICATOR
TO MOVE AROUND YOUR FORM
Use the position indicator, located in the upper left-hand corner of the form
page, to quickly move from one portion of your form to another. The
position indicator is made up of three parts, the indicator outline, the
viewing window, and the moving handle.
Design Forms
4-8
Click once inside the position indicator, and then move the small viewing
window to that portion of your form page that you want to look at, or work
on. Click again, and the new portion of the form page comes into view.
MOVE THE POSITION INDICATOR
The position indicator itself can be moved around on the form page. The
page indicator has no effect on how the fields in geoFile function; they can
be created, moved, and so on right where the position indicator is located.
However, for ease of viewing, or working, you may wish to move the
position indicator to a different place on the form page. Click on the
moving handle located on the right-hand side of the position indicator and
drag the indicator wherever you want to on the screen.
geoFile does not allow you to drag the position indicator completely off of
the form page. When moving the position indicator, the handle always
remains visible on the form page. You can, however, switch the position
indicator off completely, and thereby remove its image from the screen.
HOW TO SCROLL AROUND YOUR SCREEN
You can move around on the form page by using geoFile's scrolling
feature. Scrolling is most effectively used if you do not wish to move a
great distance on your form, or if you wish to look at your form design and
data as you move.
To scroll simply move the pointer to one of the edges of the geoFile
screen. You will scroll in that direction until you come to the end of the
form page, or until you move the pointer back toward the middle of the
screen.
USE PAGE PREVIEW
TO MOVE AROUND YOUR FORM
geoFile has a page preview option that lets you view your entire form, and
the layout of all your fields at one time. You can also use page preview to
move to different parts of your form.
Click on the preview menu item in the file sub menu to display the
preview window with your entire form layout on the screen. To move to a
different part of your form, and display that portion on the screen, position
the pointer over the area, or part of your form to which you want to move.
Now click. The screen behind the preview window will now display this
new portion of your form. Click outside of the window to continue
working.
4-9
Design Forms
u
STEP-BY-STEP INSTRUCTIONS
u
CREATE A MASTER FORM
u
CREATE A FIELD
y
To create afield on the form page:
(^j
1:
Place the pointer where you want one corner of your field to appear.
i
2:
Click once to set the corner.
u
3:
i
Drag the pointer across the form page until you have created a field
the size and shape that you want.
\
4: Click again to set the size of the field. The field that you have
|
(—'
created will now appear with a thick, black field outline. The grid
,
background will not appear within the field outline.
'—'
u
NOTE: geoFile will not allow you to create a field that overlaps
,
another. If you try to do this, the field outline that you are
creating will touch the other field's outline and you will be able
to go no further.
'—'
-
I—I
TYPE IN A FIELD NAME
U
To type in afield name:
1: Select the field that you want to name by clicking once inside that
|
j
field. A selected field will appear with a thicker border.
2:
Type in the field name. The text cursor shows where the field name
will appear in the selected fields.
3:
u
i
i
Click once outside of the field outline to de-select it. The move and
re-size tabs will appear inside of a unselected field's outline.
A field name can be up to 16 characters in length. You can use letters,
numbers, or even characters like % and ? in your field name.
NOTE: If you want to use geoFile data with geoMerge to create form
letters, your field names will have to consist of alphanumeric
(letters and numbers) characters, and no spaces. Use a sub
layout just for use with geoMerge if you need to change some
non-alphanumeric field names to the correct format.
u
I—I
\^J 1 I
u
u
Design Forms
4-10
u
MOVE AFIELD
To move afield on the form page:
1: Click once on the move tab located inside a field that you want to
move. The move tab appears in the upper left-hand corner of a field
after you have given it a name (a field name) and you have clicked
once outside of the field outline. The black outline of the field is
replaced by blue brackets when you click on the move tab. The
pointer becomes attached to these brackets.
2:
Drag the pointer across the form page, and position the field where
you want it to be.
3:
Click once to reset the field in its new position on the form page.
The blue brackets disappear, and the field outline and move tab
reappear.
COPY A FIELD
To copy afield and move it on the form page:
1: Double click on the move tab in the field that you want to copy and
move. Blue brackets with the pointer attached to them appear over
the field outline to indicate that the field is to be copied and moved,
and not just moved.
2:
Drag the pointer across the form page, and position the field where
you want it.
3:
Click once to set the field in its new position on the form page.
The blue brackets disappear and the field outline and move tab
reappear.
NOTE: geoFile will not allow you to overlap fields. If you try to set
one field over even a portion of another field, you will hear a
tone from your monitor telling you to reposition the field that
you are trying to move. If you do not hear a tone when you try
to position a field over another one, turn up the volume on
your monitor.
4-11
Design Forms
u
CHANGE THE SIZE OF A FIELD
y
To change the size and shape of afield:
1:
Click once on the re-size tab. (The re-size tab appears in the lower right-
,
■
and you now see only the field outline with the pointer attached.
.
.
hand corner of an unselected field.) The re-size and move tabs disappear
'—'
2: Drag the pointer across the form page until the field is the size and
^-^
shape that you want.
3: Click once to set the field at its new size and shape. This field is now a
I—I
I I
selected field (it has a thick black outline).
u
NOTE: geoFile does not allow you to re-size a field so that it overlaps
another.
I
REMOVE A FIELD
I
U
To remove a field from a form:
1: Click once inside of the field that you want to remove from your
|
|
form. This will select the field (it appears with a thick, black
outline).
1
|
|
|
2:
Click on the field menu item in the command menu. The field
sub menu appears.
,
,
XJ y
3: Click on the delete menu item in the field sub menu. The
selected field is removed from your form.
i
i
,
,
1: Click inside of a field outline in your form to select it. (A selected
»
,
2: Click on the field menu item in the command menu. A sub
'—'
CHOOSE A SORT FIELD
To choose afield to be the sort field:
field appears with a thicker outline.)
^
menu appears.
3:
Click on the set sort field menu item to choose the selected field
to be the sort field.
LJ
u
u
u
Design Forms
4-12
SAVE A MASTER FORM
To save a Master form:
1: Click on the data entry menu item in the options sub menu, or
close the file by clicking on the close menu item in the file sub
menu. Your Master form will be saved on the diskette.
USING SUB LAYOUTS
CREATE A SUB LAYOUT
To create a sub layoutfrom your Master form:
1:
Click on the file menu item in the command menu. A sub menu
appears.
2:
Click on the change layout menu item in the file sub menu. A
dialog box appears containing the names of your Master form and 15
possible sub layouts. Your Master form is listed at the top of the
list.
3:
Click on one of the Empty Layout items to select it. The layout
name that you select will appear in reverse video (the name appears
white on a black background).
pi
4:
!
5:
Type in a name for the layout. This name should be different from
your Master form name.
6:
Press
l_
n
The geoFile grid reappears containing all of the fields and their
arrangement as they appear on your Master form. Notice, however, that
the title bar now contains the name of your sub layout with brackets
'
PI
<name>, around it.
n
PI
Click on the New icon to view this empty sub layout. The
program asks you to give a name to this sub layout.
You can now delete, move, change the size and shape, or names of the
fields on this sub layout. Use a sub layout to create a specialized
/^N
n ~
arrangement of a portion of your complete data-base for viewing, or for
printing.
n
n
|—I
4-13
Design Forms
OPEN AN EXISTING SUB LAYOUT
To open an existing sub layout:
1:
Click on the file menu item in the command menu. A sub menu
appears.
2:
Click on the change layout menu item in the file sub menu. A
dialog box appears containing the names of your Master form and 15
possible sub layouts. Your Master form is listed at the top of the list.
Any other sub layouts that you may have created are listed after your
Master form.
3:
Click on one of the sub layout names to select it. The layout name
that you select will appear in reverse video.
4:
Click on the Use icon to view this sub layout.
The geoFile grid reappears containing all of the fields and their
arrangement as they appear on your sub layout.
You can now delete, move, change the size and shape, or names of the
fields on this sub layout. Use a sub layout to create a specialized
arrangement of a portion of your complete data-base for viewing, or for
printing.
,
CHANGE THE SCREEN APPEARANCE
^
To switch the geoFile grid background off:
—'
To start with the geoFile grid background will be on.
1:
Click on the display menu item in the command menu. A sub
, ■ .
ii
menu appears.
2:
Click on the white, or gray menu item in the display sub menu.
This will remove the grid pattern, and leave either a white or gray
.
.
background.
To switch the geoFile grid background on:
1:
Click on the display menu item in the command menu. A sub
menu appears.
2: Click on the grid on menu item in the display sub menu.
NOTE: Whatever screen appearance is selected when you save your
geoFile document will be the screen appearance when you later
reopen that document.
I—I
'—'
I—I
k^ LJ
I
I
u
Design Forms
4-14
AUTOMATIC FIELD ALIGNMENT
To start with, fields will not align themselves with the grid background.
To automatically align your fields with the grid background:
1:
Click on the display menu item in the command menu. A sub
menu appears.
2:
Click on the align on menu item in the display sub menu.
To not automatically align your fields with the grid background:
1:
Click on the display menu item in the command menu. A sub
menu appears.
2:
Click on the align off menu item in the display sub menu. Any
fields that you now do something to (create, move, copy), you will
be able to place between the grids.
NOTE: Whatever alignment option is selected when you save your
geoFile document will be in operation when you later reopen
that document.
MOVE AROUND YOUR FORM
To move from one portion of your form to another using the position
^^^
(
)
indicator:
1: Click once inside of the black outline of the position indicator.
This outline represents the full page of your form. The small red
box (viewing window), turns blue, and becomes attached to the
pointer.
2:
Drag the small box, or viewing window, to that portion of the page that
you want to look at, or work on. The viewing window represents that
part of the form that you are currently viewing.
3:
Click again. A new portion of the form page appears on the screen.
To move the position indicator itself:
1:
Click on the solid black box or "handle" located on the right-hand side
of the position indicator outline. The pointer becomes attached to the
handle.
2:
Drag the position indicator to wherever you want it to appear on the
form page.
3:
Click again to drop the position indicator where you want it.
4-15
Design Forms
To switch off the position indicator:
1:
Click on the display menu item in the command menu. A sub
menu appears.
2:
Click on the hide indicator menu item in the display sub menu.
i
i —
The hide indicator menu item becomes the show indicator menu item
*—'
when you switch the position indicator off.
To switch the position indicator on:
1: Click on the display menu item in the command menu. A sub
I I
menu appears.
2:
U
Click on the show indicator menu item in the display sub menu.
u
To use geoFile's scrolling feature to move around your form:
1: Move the pointer to the edge of the screen in the direction that you want
to move: up, down, left, or right. The screen will scroll in that
direction as long as you keep the pointer at the edge of the screen.
j_j
To stop scrolling, simply move the pointer back toward the middle of the
i
j
,
,
j_J
screen.
To use page preview to move to a different part of your form:
1:
Click on the file menu item in the command menu. A sub menu
appears.
2: Click on the preview menu item in the file sub menu. The preview
window appears showing the entire layout of your form.
3:
Click once inside the preview window in the place to which you want
to move. The screen behind the preview window will now display this
new portion of your form.
'—'
'—'
'—'
__
4: Click once outside of the preview window. The window disappears.
5:
Continue working on your form.
LJ
LJ
Design Forms
4-16
U
_
u
ANSWERS TO CHAPTER 4 "WHAT IF...?"
1) What are the three steps in designing a geoFile form?
The three steps in geoFile form design are: creating fields, entering field
names, and selecting a sort field.
2) What is a field?
A field is a rectangular area, or box that you create on the form page of
your geoFile form. Fields contain the information that you want to
store in your data-base.
3)
Can I move fields around on the form page after I have
created them?
Yes. You can move any of your created fields at any time while you are
I
in the form design mode of geoFile.
!
—
4)
' !
_.
while you are in the form design mode of geoFile.
_
5) What is the largest size field that I can have on my form?
' '
!i
Can I change the size and shape of fields?
Yes. You can change the size and shape of your fields at any time
8 1/2 by 11 inches is the largest size field that you can create on your
form. This is also the largest form size.
[j
H
n
n
PI
6) How long can a field name be?
16 characters maximum. You can use any characters that you wish to
in a field name.
7) Can any one of the fields on my form page act as the sort
fieid?
Yes. Any one of the fields on your form can act as the sort field.
8) Can I turn off the geoFile grid background?
Yes. If you do not want to see the geoFile grid background you can
turn it off.
n
fp
9) Can I move to another part of my form page any way
other than by moving the pointer to one of the screen
edges?
pi
n^
Yes. You can use the position indicator to move quickly around your
form page, or you can use the page preview.
n
n
4-17
Design Forms
PRACTICE FOR CHAPTER 4
It will be important for you to practice creating fields, naming them and
moving them around your form page so that you can become familiar
with this aspect of geoFile operation.
Open up the geoFile document called Practice File, that you created
in Chapter 3. Place the pointer under the position indicator.
U
u
u
LJ
Click once to set the corner of the field, and drag the pointer across the
screen until you have created a field that is about 2 by 10 grids in size.
U
D
MMM^J »»*»•• »|* ♦»♦♦»♦♦ ♦♦♦»♦♦!♦ ♦♦••♦♦♦•♦♦♦
•««♦
**'*lfc
**
LJ
U
G
!
I
U
G
LJ
Design Forms
4-18
D
When the field is the size you want, click again to set the corner.
After you have created this field you will need to name it. Make sure
that the field is selected (click inside of its outline if it is not), and then
type in the field name Last Name.
n
qeos j file ■ edit j option? j field j type j
| ;|Lost Namelr*
After you give a name to a field and click outside of the field outline,
the move and re-size tabs appear inside of the field outline.
4-19
Design Forms
u
u
Move Tab
u
Resize Tab
u
LJ
U
U
LJ
Move the pointer over the move tab and click. You should see a pair of
blue brackets in place of the field outline.
LJ
U
U
*********** *K^ ******** OT|» ************
*********** *\*\ * ♦♦♦♦♦♦♦♦ *** >***********<
D
U
G
u
Drag the pointer straight down the form page three grid lines, or so.
u
Click again to set the field down in its new position.
u
LJ
u
Design Forms
4-20
u
Nome
You can also use the move tab to copy a field so that you can move it
around the form page. Double click on the Last Name field move tab to
copy it.
n
Drag this copy down below the Last Name field about three grid lines, and
click to set it down.
4-21
Design Forms
LJ
LJ
U
,u
iBf
u
Name
LJ
U
U
The re-size tab can be used to change the size and shape of the fields that
you have created. Click once on the re-size tab of the lower field. Both the
move and re-size tabs will disappear. The pointer will become attached to
the lower right-hand corner of the field outline. Drag the pointer out to the
right about 6 grid lines, and then down a couple of grid lines.
LJ
G
U
U
u
************ *\ ********** ****************
TTITITTTTTTNii
**************
G
G
G
G
Click to set the size of the field.
G
G
LJ
u
Design Forms
4-22
u
foims
Sist Name
Now you want to try your hand at removing, or deleting a field from your
form. Click once inside of the large Last Name field to select it.
n
Name
Lait Name
4-23
Design Forms
u
Click on the delete menu item in the field sub menu.
LJ
LJ
set style
U
set sort field
***********«s recover field
*********** ♦["*
dear field
CU
C=X
Lost Name
U
U
*********** ♦!
LJ
U
LJ
The field that is selected (in this case the larger of the Last Name fields),
will be deleted from your form.
U
LJ
U
I Name
U
LJ
U
LJ
Practice now creating your own fields, naming them, moving them around,
copying them, changing their size and shape, and removing, or deleting
them from your form. Leave the original Last Name field on the form,
however, for the next section of practice.
G
After you have designed your form the way that you want it, you will need
to select a sort field. Select the Last Name field that you created previously
by clicking inside of its outline. Now click on the set sort field menu
item in the field sub menu.
LJ
U
Design Forms
4-24
LJ
Set Sort Field
The sort field's outline has a cross hatched rather than a solid appearance.
n
FT!
d:
m Slgle
For the purposes of the following examples in this manual, change the
name of your Practice File to Customers. To do this click on the
change layout menu item in the file sub menu. Practice File should
already be selected (the name appears in reverse video).
n
n
4-25
Design Forms
U
U
♦ JsrjTf
Change layout...
'Alll
LJ
U
Empty layout
Empty feyovt
Empty fayo&t
| delete I
U
LJ
r Style
♦ Bitchased
LJ
U
Click on the rename icon in the change layout dialog box. Another dialog
box appears. Type in the new name Customers. This new name will
now appear in both the change layout dialog box, and in the title bar for
your Master form.
U
LJ
LJ
LJ
Change layout...
Empty fyf/ont
Empty fapotrt
Empty fyf/oot
rename |
new
i♦i ^ i
U
LJ
t Style
. pclwsej
LJ
U
Now create a sub layout called Address Labels by clicking on one of the
Empty Layout items in the change layout dialog box.
LJ
G
LJ
U
LJ
Design Forms
4-26
LJ
Change layout...
r Style
Click on the New icon. Type the name Address Labels into the dialog
box that appears.
n
New layout name...
Address labels |
[Cancel]
t Style
H
n
Press | RETURN|. A form like your Master form appears, but with the
name Address Labels (enclosed in brackets), in the title bar.
n
H
n
4-27
Design Forms
t Name
A ♦ ♦ «
r Style
Now click on the change layout menu item in the file sub menu.
Your sub layout now appears in the change layout dialog box along with
your Master form Customers.
put Nome:
♦fcphone
.A *M&sl Name
Change layout...
| Customers
|
! ^ddress '
ffifPfy fyffOUt
1 ttttpty f&ff&ot
i ♦ i ♦'»
! JWMay
use^J
| rename |
^
|
nem |
| delete |
1::::::
I j&if Style
Click on the use icon to continue working with your sub layout Address
Labels. Practice changing the geoFile screen appearance by clicking on
the display menu item in the command menu, and then clicking on the
different menu items in the sub menu that appears.
Design Forms
4-28
n
The page indicator is initially located in the top left-hand corner of the
geoFile screen. The small viewing window inside of the indicator is used
to move quickly around on your form. Try clicking on the window and
moving it to a different portion of your geoFile form. Click once to view
this new portion.
Try creating some fields in this portion of the form. After you are done,
n
click again inside of the position indicator and move the window back to
the upper left-hand corner of your form. When you click again, you should
see that portion of the Address Labels sub layout that contains the Last
Name field.
After this, try moving the position indicator itself by clicking on its
"handle," and dragging it to a different place on your form page. Notice that
wherever you move the indicator on the form page, the handle is always
visible.
You can also remove the position indicator completely by clicking on the
hide indicator menu item in the display sub menu. You can bring the
indicator back by clicking on the show indicator menu item, which
appears in the display sub menu.
4-29
Design Forms
u
u
Another way to move around your form is to use the scrolling feature of
geoFile. Try this feature out by moving the pointer to the edges of the
screen and observing what happens. Stop scrolling by moving the pointer
back toward the middle of the form page.
Finally, click on the preview menu item in the file sub menu to bring
up the viewing window. Notice that you are now looking at your entire
form and not just at the visible portion that you have been working on.
Click once in an empty portion of the viewing window and observe what
happens to the screen behind the window. Click once again where some of
your fields appear in the window and see what happens to the screen.
Click outside of the preview window to continue working.
When you are done practicing with these geoFile operations, click on the
change layout menu item in the file sub menu. The Address Labels
sub layout should already be selected (its name appears in reverse video).
Before continuing on to Chapter 5 click on the delete icon to remove the
Address Labels sub layout from your data-base.
Design Forms
4-30
I—I
' LJ
CHAPTER 5
DATA ENTRY: PUTTING INFORMATION
INTO YOUR FORMS
INTRODUCTION
Storing, sorting, and recalling information is what you want your data
base to do for you. After you have designed a form, you can start to put
information into the fields that you created in Chapter 4. As your data
base grows, you will want to add more forms to your data-base, and be
able to "page" through and look at your forms and the data stored within
them. You may also sometimes want to remove a particular form from
your data-base. Chapter 5 examines these functions of geoFile.
OBJECTIVES
After you have completed Chapter 5 you should know how to:
•
Enter the data entry mode of geoFile and type data into your fields.
•
Add more forms to your data-base
•
Look through your forms
•
Remove a form from your data-base
KEY TERMS
data entry mode
text cursor
"WHAT IF...?"
1) What are the three steps involved in entering information into my
geoFile form?
2) Can I only use the mouse or joystick pointer to move between
fields?
3) How much data can I enter, or type into one field?
OVERVIEW
After you have designed your geoFile form, you will be ready to start
typing information into it There are three steps to entering
information, or data into your forms.
5-1
Data Entry
First enter the data entry mode. Then select one of the fields on your form
into which you want to type information. Finally, using the keyboard,
type in the information that you want to store in that field.
ENTER DATA ENTRY MODE
Entering geoFile's data entry mode allows you to select a field on your form
and then type in the data that you want to store under that particular field's
name. Enter the data entry mode by clicking on the data entry menu
item in the options sub menu. The fields that you see on the geoFile
form page in the data entry mode are the same as those that you have created
in the form design mode. The only difference in the appearance of fields in
the data entry mode, is that the move and re-size tabs do not appear inside
the field outlines as they do in the form design mode.
SELECT A FIELD FOR DATA ENTRY
Once you are in the data entry mode you can select a field and begin to type
information into it Select a field by clicking once inside its outline. A
selected field will have an outline that is thicker than the other field
outlines.
TYPE IN THE DATA
Once you have selected a field by clicking inside of its outline you can
begin to type information into it with the keyboard. The text cursor,
which appears in a field when it is selected, shows where the characters that
you type in will appear in the field. If the cursor disappears while you are
typing characters into a field geoFile is attempting to fit the characters into
a field that is too small. The field will, however, contain all the characters
that you have typed into it even though you may not see all of them on the
screen. You might want to return to the form design mode and make your
field larger. You can type up to 256 characters into a field.
USE THE CURSOR KEYS
TO MOVE BETWEEN FIELDS
By using different combinations of the
\p, | SHIFT], and cursor keys
you can move quickly between the fields on your form without taking your
hands off the keyboard.
and horizontal |CRSR|...
move right one field
and vertical |CRSR|...
move down one field
and horizontal ICRSRJ..
, |SHIFT] and vertical |CRSR|...
Data Entry
5-2
move left one field
move up one field
n
ADDING MORE FORMS TO YOUR DATA-BASE
PI
More forms with the same form design can be added to your data-base
allowing you to store different sets of related information. When you add a
PI
new form to your data-base, the previous form that you were working on is
saved, along with any information that you typed into the fields of that
niuiui. Each form that you create is sorted alphabetically (or numerically for
number fields), in the data-base as soon as it is saved. The sorting of your
pi
forms is depends on the sort field that you designate when you design the
form.
|—I
You add new forms to your data-base by clicking on the new form menu
item in the form sub menu.
_
LOOKING THROUGH YOUR FORMS
_
1
_
You can look through the forms into which you have entered data. You can
either go forward, or backward alphabetically (or numerically), through the
forms that you have saved. Look through the forms that you have saved by
clicking on either the next, or the previous icon located at the top of
II
The next icon is the right pointing arrow at the top of your form page.
HI ^.^^
when you are in the data entry mode.
'I
your form page.
The previous icon is the left pointing arrow. These icons are visible
n
STEP-BY-STEP INSTRUCTIONS
n
ENTER THE DATA ENTRY MODE
|—i
1
To enter the data entry mode.
1:
_
! I
2:
PI
that the move and re-size tabs do not now appear in the outlines of
your fields.
SELECT A FIELD
To select afield into which you will enter information:
nl:
,
,
Click on the data entry menu item in the options sub menu.
You will see a form layout on the screen that is the same as that
which you created in the form design mode. The only difference is
I I
H
Click on the options menu item in the command menu. A sub
menu appears.
Click once inside the outline of the field into which you want enter
data.
n
5-3
Data Entry
TYPE INFORMATION INTO A FIELD
To type information into a selectedfield:
1: Simply type information into a selected field using the keyboard. You
can type up to 256 characters into a single field.
MOVE TO A FIELD WITH THE CRSR KEYS
To move to the next field to the right on yourform using the cursor keys:
1: Press both the two keys, ^f , and the horizontal |CRSR|, at the
same time.
To move to the field to the left usins the cursor keys:
i—i
1: Press the three keys, ^k , [SHIFT | and the horizontal JCRSRJ, at
the same time.
To move down one field using the cursor keys:
1: Press the two keys, ft , and the vertical |CRSR|, at the same time.
To move up one field using the cursor keys:
1: Press the three keys, £m , |SHIFt|, and the vertical JCRSR|, at the
same time.
ADD MORE FORMS TO YOUR DATA-BASE
To add another form to your data-base:
1: Click on the form menu item in the command menu. A sub menu
will appear.
2:
Click on the new form menu item in the form sub menu.
LOOK THROUGH YOUR FORMS
To look forward through your savedforms:
1: Click on the next form icon (the arrow pointing to the right at the top
of your form page). Each time you click on this icon you will advance
one form forward through your data-base.
To look backward through your savedforms:
1:
Click on the previous form icon (the arrow pointing to the left at the
top of your form page). Each time you click on this icon you will go
back one form through your data-base.
Data Entry
5-4
ANSWERS TO CHAPTER 5 "WHAT IF...?"
1) What are the three steps involved in entering information
into my geoFile form?
The three steps involved in entering information into your forms, are:
enter data entry mode, select a field, type in the information.
2) Can I only use the mouse or joystick pointer to move
between fields.
No. You can also use the keyboard |CRSR| keys.
3)
How much data can I enter, or type into one field?
256 characters maximum.
PRACTICE FOR CHAPTER 5
f|
f|
You should already know how to create fields on your data-base forms, give
them names, and move them around from your reading in chapter 4. In
chapter 5 you saw how to enter, or type data into your fields. Now
combine these two aspects of geoFile program operation by creating a
customer data-base that might be used by a car dealer.
n
|—j
j—|
First, open your geoFile document called Customers that you created in
Chapter 4. Make sure that you have these 11 fields on your form page.
Last Name
First Name
n
M
Address
n
1 '
City
State
n1
zip
Telephone
"
_
n
Birthday
Car Style
Purchased
H
n
n
r—;
5-5
Data Entry
One Way to arrange these fields on your form is illustrated below:
♦ pst Rome:
♦ IT. , ,
I Bfthday
; m style
3:v::::;::::::::::::::::
"tn
♦ ♦?♦
♦♦♦♦♦
jk
***********
3::::::::::!:::::::::::::
Sr
^:;;;:::::
JlfMM
j..........
You selected the Last Name field as your sort field in Chapter 4 (its field
outline should appear cross-hatched), so that your forms will be stored in
your data-base alphabetically by last name. You can, of course, choose any
of the fields on your form to be the sort field.
This form is your Master form layout for the Customers data-base.
If you want to examine just a portion of the fields and data in your data
base, you will want to create a sub layout from your Master form.
Data Entry
5-6
n
n
h
n
Suppose that you want to isolate just the name and address information in
you data-base in order to be able to print out address labels. First, click on
the change layout menu item in the file sub menu, select an empty
layout and call it Address Labels just as you did in Chapter 4. Working
with this sub layout, delete the following fields:
H
Telephone
n
Birthday
Car Style
n
n
n
n
n
n
n
Purchased
leaving just the fields:
Last Name
First Name
MI
Address
City
State
Zip
Now you can arrange these remaining fields on your form in an address
label format like the one illustrated below:
n
n
uuigss:
mA t****************** »t ♦ ♦ ♦
IIMHMI *T% ******************* *%* * * *
n
n
n
n
This is a form design that you can use to look at, or print out address labels
that are based on the information contained in your Customers data-base.
n
n
5-7
Data Entry
u
After designing this sub layout, return to your Master form Customers
by clicking on the change layout menu item in the file sub menu, and
then selecting Customers from the dialog box that appears. While you are
in the form design mode of geoFile, select the Birthday field by clicking
once inside of its outline. Define the Birthday field as a number field by
then selecting the number field menu item from the type sub menu.
u
Li
U
This will be important later in the next chapter.
U
Now get into the data entry mode of geoFile by clicking on the data entry
U
menu item in the options sub menu. Select each field in turn and enter
appropriate data into each of them. Use information about yourself, a friend
U
or family member, or just make it up.
IMPORTANT: For this example, be sure to put in a four digit number
in the form MonthDay in the Birthday field (0217 would be February 17;
1105 would be November 5).
After filling up a form with data, create a new, blank form by clicking on
the new form menu item in the form sub menu. Fill up 10 forms in
your data-base in this way.
IMPORTANT: Have two of your forms contain 0217 as the data item
in their Birthday fields. Have one of these forms also have a Last Name of
Smith.
U
LJ
U
U
U
LJ
U
U
U
U
U
U
Now look through the forms in the Customers data-base by clicking on
the left, or right pointing arrows located at the top of the form page.
Notice how your forms are stored in your data-base, namely alphabetically
by last name. They are stored and sorted this way, because you set Last
Name as the sort field.
U
U
LJ
U
Data Entry
5-8
LJ
n
CHAPTER 6
H
RECALLING INFORMATION
INTRODUCTION
Chapter 6 contains the information that you need to search through your
geoFile forms, and recall the data that you want.
OBJECTIVES
After reading this chapter you should know how to:
•
Enter the search mode of geoFile.
•
Create and use a search form
•
Perform a conditional search.
•
Use "wild card" characters in a search operation.
KEY TERMS
search form
conditional search
"wild card" character
"WHAT IF...?"
1) Does a search form look like a form in the form design mode?
2) Can I search for numerical data in a geoFile search operation?
3) Can I use the "wild card" character * as part of a data item in a field
of my data-base?
OVERVIEW
INTRODUCTION
The information and data that is stored in your data-base will be most
useful to you if you can search through your forms and recall those
forms that have the particular information that you want. You can
recall forms that share just one bit of information in common, or
several.
6-1
Recalling Info
You can also recall forms that have numerical data that is:
greater than
less than
greater than or equal to
less than or equal to
not equal to
a particular value that you define (type into a field), in your search form.
You can even use the wild card characters ?, *, and! to match either groups
of, or single characters in fields of your data-base.
ENTER SEARCH MODE AND
CREATE A SEARCH FORM
The search form is the key to data item searches that you want to conduct
through your geoFile data-base. You create a search form by clicking on
the create search form menu item in the form sub menu. The search
form looks much like the geoFile design form, except that the search form
initially does not contain any data in it fields.
HOW TO USE A SEARCH FORM
Once you have created a search form, you can define the data item, or items
that you want to search for in your geoFile forms. In a regular search
operation, the program searches for and recalls those forms that match the
data items that you type into the fields of your search form.
For example, if you type Smith into a field called Last Name in your
search form, geoFile will recall all of those forms in your data-base that
have Smith as the data item in the Last Name field. You can also have the
program match the data in more than one field at a time. You define a
search data item by typing it into a field in your search form.
PERFORM A SEARCH
U
program to search for in your data-base and click on the OK icon. Now
I—I
After you define the data items in your search form that you want the
click on one of the search icons that appear at the top of your search form
page after you have clicked on OK icon. The search icons are located at the
top of your search form. The icons look like a face looking to the left, and
a face looking to the right. By clicking on the left looking face you will
search backward through your data-base. Click on the right looking face to
search forward through your data base.
lJ
^J LJ
LJ
u
Recalling Info
5.2
H
H
When the search operation is complete, the first form that geoFile finds is
f—]
pi ^^^
f)
n
displayed on the screen. You can look through these recalled forms by
clicking on the next form icon (the right pointing arrow), to see the next
form of those that have been recalled. Click on the last form icon (the
left pointing arrow), to look back through your recalled forms.
CONDITIONAL SEARCHES
|—|
A conditional search in geoFile is a search where you define (type into a
_
items in your data-base to match. This means that you can search for data
1
'
1
P"l
field on your search form), a special case or condition that you want the data
items that are not only equal to, but also not equal to, greater than, less
than, greater than or equal to, less than or equal to, or less than and/or
greater than the search data item (or items), that you define in your search
form. Conditional searches of the data in your forms using inequalities
such as these, are used in searches involving numerical data.
The symbols or characters used in conditional searches are:
> data
.. .recalls fields greater than data ("data" can be anything)
< data
<= data
>= data
.. .recalls fields less than data
.. .recalls fields less than or equal to data
.. .recalls fields greater than or equal to data
<> data
.. .recalls fields not equal to data
Use the keys & (meaning and), and % (meaning or), to combine two
of the above conditionals in a search. For example, lets say that you
type the following into a field called Age on your search form:
Age: <30&>=21
Click on the OK icon. When you then click on one of the search
icons, geoFile will search through your data-base and recall all of those
forms whose Age fields have data that is less than 30 and greater than or
equal to 21. In other words, you could recall the records in a personnel
file of those persons you are between 21 and 29 years of age. (Actually
you would recall all records which have an Age field data of between
21.0 and 29.999... .)
n
H
6-3
Recalling Info
u
USING "WILD CARD" CHARACTERS
To increase the ease and flexibility of your searches in geoFile, the program
allows you to use three so called "wild card" characters in your search form,
the ? (question mark), the * (asterisk), and the ! (exclamation point).
geoFile does not interpret, or read a "wild card" character in the same way as
[J
[j
\^J
it interprets a regular character in a search form.
rj
USE THE ?
rj
When the program encounters a ? in a field of the search form, it will
substitute any one character for the ? as it searches for the matching forms
j—,
'—'
--:
in your data-base. For example, if you type the following into a field called
Zip (zip code), in your search form:
9470?
—.
u
Click on the OK icon and then on one of the search icons that appear at
the top of the search form page. geoFile will recall all of those forms in
I—1
94702,.. .94709. (Also any forms that have data in their Zip fields such as
I
your data-base whose Zip fields contain the data 94700,94701,
I
9470A, or 9470x etc., will also be recalled.)
...
USE THE *
When the program encounters an * in a field of your search form, it will
substitute any one, or more characters for the * as it searches through the
forms in your database. For example, if you type the following into a field
called Last Name in your search form:
<j
u
^"^ j |
j_J
Da*
Click on the OK icon and then on one of the search icons that appear at
the top of the search form page. geoFile will recall all of those forms in
your data-base whose Last Name fields contain data which begin with the
letter Da. This might include names such as Dave, Darla, Dan, Danielle,
etc. (Also any form that have data in their Last Name fields such as Da7,
Da+Po, Dan/123 etc., will also be recalled.)
You could also search for any last names that contain an "a" in them by
typing *a* into the Last Name field of a search form.
fj
i—i
.—,
I—'
U
Recalling Info
5.4
u
u
H
^
USE THE !
1
If the ! (exclamation point), is typed in before either a ?, an * (or even
another !), in a search data item, geoFile will interpret the ?, or * literally.
■I
What this means is that you can use (and search for), the characters ?, *,
and ! in data items of your data-base. For example, if you type:
n
H
into a field entitled Valid License, and click on the OK icon. geoFile will
P!
recall all of the forms in your data base that have an * as the data item in
PI
the Valid License field after you click on one of the search icons. If you
left out the ! in the above example, the program would then recall all of the
forms in your data-base, regardless of what was in the Valid License field.
n
H
n
n
n
n
6-5
Recalling Info
LJ
STEP-BY-STEP INSTRUCTIONS
q
ENTER SEARCH MODE AND
,—,
CREATE A SEARCH FORM
To enter the search mode ofgeoFile and create a search form:
1: Click on the form menu item in the command menu. A sub menu
appears.
2:
Click on the create search form menu item in the form sub menu.
The search form that appears on the screen looks much like your design
HOW TO USE A SEARCH FORM TO
PERFORM SEARCHES AND RECALL FORMS
To recall data items in your data-base whose text, or value matches (is the
same), the search data items that you define in your searchform:
2:
i
r -;
y—
.-- -,
mode forms except that a search form has no data in its fields.
1:
^
—
I—I
_
LJ
\
I
(The outline of a selected field will appear thicker than the other field
j
1
outlines.)
_
Select a field in your search form by clicking once inside of its outline.
Type data that you want to match with data that is stored under that
same field name in your data-base into the selected field.
3: Repeat steps 1 and 2 above for each field and conditional that you want
u
[j
^-^ ^j
to define in your search form.
4:
5:
Click on the OK icon after you have defined all of the conditions of
LJ
your search.
i
Click on either of the two search icons (the left and right looking faces
j—j
recall operation. geoFile will recall those forms that meet all of the
,—,
that appear at the top of the search form page), to start the search and
conditions that you define in your search form.
CONDITIONAL SEARCHES
■
^
^
U
To recall forms in your data-base whose text, or value does not match (is
■—
not the same), the text in the search data item:
1: Select a field in your search form by clicking once inside of its outline.
'—'
(The outline of a selected field will appear thicker than the other field
outlines.)
2:
Type the characters <> into the selected field. After these characters
type in the data that you want not to match data in your data-base.
I—I
kj u
LJ
u
Recalling Info
6-6
—
3: Repeat steps 1 and 2 above for each field and conditional that you want
to define in your search form.
NOTE: You can combine different search conditionals as different search
items in different fields on your search form. For example, recall
forms that match one field and do not match another by typing the
data you want to match into one search field, and the data you want
to not match into a different field, preceded by the characters <>.
4: Click on the OK icon after you have defined all of the conditions of
your search.
5:
Click on either of the two search icons (the left and right looking faces
that appear at the top of the search form page), to start the search and
recall operation. geoFile will recall those forms that meet all of the
conditions that you define in your search form.
To recall forms in your data-base that have a data item (or items), whose
value is greater than a value that you define in your search form:
1: Select a field in your search form by clicking once inside of its outline.
(The outline of a selected field will appear thicker than the other field
outlines.)
2: Type the character > into the selected field. After this character, type in
the value that you want geoFile to use in its conditional search through
your data-base.
3: Repeat steps 1 and 2 above for each field and conditional that you want
to define in your search form.
NOTE: Remember that you can combine more than one conditional in a
search operation by typing the conditionals into different fields on
your search form.
4: Click on the OK icon after you have defined all of the conditions of
your search.
5: Click on either of the two search icons (the left and right looking faces
that appear at the top of the search form page), to start the search and
recall operation. geoFile will recall those forms that meet all of the
conditions that you define in your search form.
6'7
Recalling Info
To recallforms in your data-base that have a data item (or items), whose
value is less than a value that you define in your search form:
1: Select a field in your search form by clicking once inside of its outline.
(The outline of a selected field will appear thicker than the other field
outlines.)
2:
Type the character < into the selected field. After this character, type in
the value that you want geoFile to use in its conditional search through
your data-base.
3:
Repeat steps 1 and 2 above for each field and conditional that you want
to define in your search form.
4:
Click on the OK icon after you have defined all of the conditions of
your search.
5:
Click on either of the two search icons (the left and right looking faces
that appear at the top of the search form page), to start the search and
recall operation. geoFile will recall those forms that meet all of the
conditions that you define in your search form.
To recall forms in your data-base that have a data item (or items), whose
value is greater than or equal to a value that you define in your search form:
1: Select a field in your search form by clicking once inside of its outline.
(The outline of a selected field will appear thicker than the other field
outlines.)
2:
Type the characters >= into the selected field. After these characters,
type in the value that you want geoFile to use in its conditional search
through your data-base.
3:
Repeat steps 1 and 2 above for each field and conditional that you want
to define in your search form.
4:
Click on the OK icon after you have defined all of the conditions of
your search.
5:
Click on either of the two search icons (the left and right looking faces
that appear at the top of the search form page), to start the search and
recall operation. geoFile will recall those forms that meet all of the
conditions that you define in your search form.
Recalling Info
6-8
To recall forms in your data-base that have a data item (or items), whose
value is less than or equal to a value that you define in your search form:
1: Select a field in your search form by clicking once inside of its outline.
(The outline of a selected field will appear thicker than the other field
outlines.)
2:
Type the characters <= into the selected field. After these characters,
type in the value that you want geoFile to use in its conditional search
through your data-base.
3: Repeat steps 1 and 2 above for each field and conditional that you want
to define in your search form.
4:
Click on the OK icon after you have defined all of the conditions of
your search.
5:
Click on either of the two search icons (the left and right looking faces
that appear at the top of the search form page), to start the search and
recall operation. geoFile will recall those forms that meet all of the
conditions that you define in your search form.
n
n
n
n
6-9
Recalling Info
u
u
To define two conditionals in the same field on your search form using the
& (and), character:
1: Select a field in your search form by clicking once inside of its outline.
(The outline of a selected field will appear thicker than the other field
LJ
[J
outlines.)
\^J
2a: Type one of the conditionals, <>, <, >, <=, >= into the selected field.
2b: Type in a value that you want to be governed by this condition.
r~>
2c: Type the character &.
2d: Type in another conditional, <>, <, >, <=, >=.
r ,
2e: Type in a value that you want to be governed by this second
'—'
conditional.
.- —j
3: Repeat steps 1 and 2 above for each field and conditional that you want
to define in your search form.
'—'
4: Click on the OK icon after you have defined all of the conditions of
I—I
your search.
5:
u
Click on either of the two search icons (the left and right looking faces
that appear at the top of the search form page), to start the search and
recall operation. geoFile will recall those forms that meet all of the
conditions that you define in your search form.
t
j
LJ
^^^ LJ
LJ
U
U
U
U
U
U
LJ
0
Recalling Info
6-10
- --.
To define two conditionals in the same field on your search form using the
% (or), character:
1:
Select a field in your search fonn by clicking once inside of its
outline. (The outline of a selected field will appear thicker than the
other field outlines.)
2a:
2b:
2c:
2±
2e:
Type one of the conditionals, <>, <, >, <=, >= into the selected
field.
Type in a value that you want to be governed by this condition.
Type the character %.
Type in another conditional, <>, <, >, <=, >=.
Type in a value that you want to be governed by this second
conditional.
3:
Repeat steps 1 and 2 above for each field and conditional that you want
to define in your search form.
4:
Click on the OK icon after you have defined all of the conditions of
your search.
5:
Click on either of the two search icons (the left and right looking
faces that appear at the top of the search form page), to start the search
and recall operation. geoFile will recall those forms that meet all of
the conditions that you define in your search form.
n
6-11
Recalling Info
USE "WILD CARD" CHARACTERS
To match any single character in a search data item:
1: Select a field in your search form by clicking once inside of its outline.
(The outline of a selected field will appear thicker than the other field
outlines.)
i
■
2: Type a ? (question mark), in place of a single character in a search data
'—'
item in your search form. The program will substitute any single
^—
character in a selected field of your data-base in place of the ? character
i—I
that you type into a field in your search form.
I 1
3: Repeat steps 1 and 2 above for each field and conditional that you want
to define in your search form.
U
4: Click on the OK icon after you have defined all of the conditions of
I
your search.
5:
Li
Click on either of the two search icons (the left and right looking faces
that appear at the top of the search form page), to start the search and
[j
recall operation. geoFile will recall those forms that meet all of the
conditions that you define in your search form.
l_j
To match any series (or string), of characters in a search data item:
1:
f
^-^ j i
Select a field in your search form by clicking once inside of its outline.
(The outline of a selected field will appear thicker than the other field
j
j
outlines.)
2: Type an * (asterisk), in place of a series of characters in a search data
'—
item in your search form. The program will substitute any series, or
.- - j
string of characters in a selected field of your data-base in place of the *
'—'
character that you type into a field in your search form.
3: Repeat steps 1 and 2 above for each field and conditional that you want
to define in your search form.
I—I
4: Click on the OK icon after you have defined all of the conditions of
LJ
your search.
5: Click on either of the two search icons (the left and right looking faces
that appear at the top of the search form page), to start the search and
LJ
K^J LJ
recall operation. geoFile will recall those forms that meet all of the
conditions that you define in your search form.
[J
LJ
Recalling Info
6-12
I
)
Tb use and recall data items in your data-base that contain the characters ?,
*, or !:
1: Select a field in your search form by clicking once inside of its outline.
(The outline of a selected field will appear thicker than the other field
outlines.)
2:
Type the character ! into the selected field in front of any character (?,
*,!), of a search data item in your search data form. The ! tells the
program to take literally the character immediately following it, and not
treat that character as a wild card character.
3:
4:
Repeat steps 1 and 2 above for each field and conditional that you want
to define in your search form.
Click on the OK icon after you have defined all of the conditions of
your search.
5:
Click on either of the two search icons (the left and right looking faces
that appear at the top of the search form page), to start the search and
recall operation. geoFile will recall those forms that meet all of the
conditions that you define in your search form.
n
n
n
\
i
n
6-13
Recalling Info
ANSWERS TO CHAPTER 6 "WHAT IF...?"
1) Does a search form look like a form in the form design
mode?
Yes, except that data items do not appear in your fields while you
are in the search mode.
2) Can I search for numerical data in a geoFile search
operation?
Yes. Using conditionals like greater than (>), and less than (<), are
a good way to search for numerical data in your data-base.
3) Can I use the "wild card" character * as part of a data
item in a field of my data-base?
Yes. But if you use a "wild card" character as all, or part of a data
item, you have to place a! before the characters *, ?, or ! if you are
using a search operation. The ! causes the program to recognize the
*, ?, or! as regular and not "wild card" characters.
PRACTICE FOR CHAPTER 6
After reading about search operations in geoFile, you should practice
with the different commands to see how they work. Use the sample data
base for a car dealer that you created in the practice section of Chapter 5.
Open the geoFile document entitled Customers that you created in
chapter 5. Click on the create search form menu item in the form
sub menu. A search form in which you can define search data items
appears on the screen. It looks like your regular form, containing the
same layout, field outlines and field names. The only difference is that
data items do not appear in any of the fields, and an OK icon appears at
the top of the page.
LJ
U
LJ
U
***************w ♦ **********
************* ♦ly**********
JL*************************
LJ
LJ
JET.1
, ICaf Style :
LJ
• JPufctased:
LJ
LJ
LJ
Recalling Info
6-14
As an example of a search operation that you could perform on your
customer list, try to recall all of the forms in your data-base that have a
Birthday on February, 17. To do this, type 0217 into the Birthday field
on your search form:
n
Lost namet;
1: J First Name s
telephone:
f:
Address
1::
:
JJ: fa.
State : 1
i
,
[Purchased:
n
Click on the OK icon, and then click on one of the search icons that
n
n
appear at the top of the search form page. The search icons appear as
faces looking left and right By clicking on one of these icons, you will
recall any forms in your data-base that have February 17 (typed into the
field in the form MonthDay), as the data item in their Birthday fields.
Telephone : 759-5746|
[Address :
I
i
n
n
City
19 Top St
: Westvilte
State : 11
JBirthday
8217
rc«f Style : sedan
L J Purchased : 6/86
n
r—^
I
i
n
n
n
r—i
f
I
If you want now to page through the forms that have been recalled, click
on either the left, or right pointing arrows at the top of the form page.
(If you created two forms only that contain Birthday data items of
0217, as was suggested in the Chapter 5 practice, you will alternate
between these two forms when you click on the arrows.)
6-15
Recalling Info
The above was an example of a regular search for a specific item of data in
your data-base -the birthday February 17.
Now, instead of a specific day, you want to recall the forms in your data
base that satisfy some special condition. Still using the example of a car
dealer, lets say that you want to send a birthday card to each of your
customers whose birthday is in February.
Enter the search mode again and type the following into the Birthday field:
>=0201&<0301
and click on the OK icon. When you now click on one of the search
icons, all of the forms of customers whose birthdays are in February
(Month of 02), will be recalled.
NOTE: Another way to accomplish the same thing would be to type 02*
into the Birthday field.
To practice using wild card characters in searches, type the following into
the Last Name field, after you have entered the search mode:
S*
and click on the OK icon. Now click on one of the search icons. All of
the forms of your customers that have a last name that starts with the letter
S will be recalled.
geosjfile edit j options 1 torn \ display
* (Last Home:: Smith
:l
Fi/Jt Name: E
Telephone: 759-5746 L
[Address : 18 Top * I
TKestville
> :H
: 66698
iBtfth<fo :Mirrn.
r Style : sedan
Recalling Info
4 JPwchosed : 6/86
6-16
If instead of the first example above you had typed the following into the
Birthday field:
021?
all of the forms with birthdays between February 10 and 19 would be
recalled when you click on the OK icon and then on one of the search
icons.
6-17
Recalling Info
u
u
o
LJ
LJ
U
U
U
U
U
u
LJ
u
U
u
u
u
LJ
U
Qu
u
LJ
LJ
CHAPTER 7
UPDATING OR
CHANGING INFORMATION
INTRODUCTION
Chapter 7 provides you with the instructions you need to update, or
change information in your geoFile forms.
OBJECTIVES
After reading this chapter you should know:
•
Hie two methods which you can use to update, or change
information in geoFile.
•
How to create a search form so that you can automatically update
information in your data-base.
•
How to use conditionals and "wild card" characters in search data
items when you want to search for and update information.
•
What the geoFile replacement options are, and how to choose one.
•
How to manually update, or change the information in your data
base.
KEY TERMS
replace with character, @
replacement option
"WHAT IF...?"
1) Does the search form that I use to update information in my geoFile
data-base look different than the search form that I use just to locate
that information?
f""l
f"~|
2) Can I use the same conditionals in a search and replace operation
that I use in a search operation?
3) Can I update information in only one form at a time using a search
nand replace operation?
n
n
n
7-1
Changing Information
u
OVERVIEW
u
Some information that is stored in your data-base, like a birth date, is
permanent and unchanging. Unless you have made a mistake when you
originally typed in information like this, you will not need to change,
or update it. However, you must have the ability to change, or update
the information in your data-base. Most of the information in your data-
bases will be information that can change. (For instance, even a
customer's name could change.) Because of this, you will want to know
how to easily update, or change the information that is stored in your
.
,
,
.
'—'
,
»'—'
^-^
I—»
geoFile forms.
I—I
You type, or enter information into your data-base while you are in the
1 !
data entry mode of geoFile. Information is changed, or updated while
you are in the data entry mode as well.
I
I
Updating the information in a form involves two steps. First you
1
I
I
|
j
|
search for the form that has the information that you want to change or
update. Then you can either manually change the information, or by
typing a special character into the search data items of your search form
you can automatically change, or update information.
MANUALLY UPDATE INFORMATION
You can easily update information in your geoFile forms manually.
First, recall a form either by paging through your forms with the arrow
icons located at the top of the form page surface, or use a search
operation to locate fields that share certain data items (see Chapter 6).
Now you can delete information in a selected field by pressing the
|INST/DEL| key one time for each character that you want to delete.
Once you have deleted the unwanted information, simply type new
information into that field.
You can delete all of the information stored in the currently displayed
form by clicking on the clear all fields menu item in the field sub
menu.
y
w^ i i
I
j
,
.
—'
'—'
LJ
u
u
u
u
u
Changing Information
7.2
n
PI
AUTOMATICALLY UPDATE INFORMATION
I—I
Use a search and replace operation to automatically update or change
information in your data-base. You can change one data item at a time,
1 !
P^
,—|
_
' '
I I
PI
or more than one. You can change the data items in only the form that
{***)
you are currently viewing and working on, or in all of the recalled forms
in your data-base. You can use conditionals, or "wild card" characters in
your search data items for a search and replace operation just as you use
them in a simple search operation. Automatically updating information
in your data-base form can be much faster and more accurate than
updating that same information manually.
The key to automatically updating, or changing the information in your
geoFile forms is the replace with character, or the @ character.
Basically when used in a search data item, the @ character tells the
program to replace the data in the field of a recalled form (recalled on the
basis of what you define in the search form), where an @ character
occurs, with whatever data is typed in after the @ character in your
search form.
For example, if you type the following into a field entitled State on
your search form:
Calif*@CA
geoFile will recall all of the forms in your data-base that have Calif (or
California, Calif1234, etc.), in their State field. The form appearing on
the screen is only the first recalled form with that data item. You now
have the option to either replace Calif with CA in this form only, or in
all of the recalled forms of your data-base. Click on either the In this
form, replace or the In all forms, replace menu items, which are
located in the form sub menu. The program will now make the
replacement in the State field.
7-3
Changing Information
You can, of course, define several search and replace fields on the same
search form. You can also use conditionals and wild card characters in a
search and replace operation just as you use them in a search operation. For
example, if you type the following into a field entitled Price/Earnings
Ratio (pice/earnings ratios are used by stock brokers and analysts to
indicate the relationship between the per share price of a corporation's stock,
and the corporation's yearly earnings):
<=15
and the following into a field entitled Possible Buy?:
@Yes
the program will recall all of the forms in your data-base that have a data
item in the Price/Earnings Ratio field of 15 or less. When you select one of
the replacement options In this form, replace or In all forms,
replace from the form sub menu, the program will replace whatever data
may be stored in the Possible Buy? field of either this current form, or
of all of the recalled forms, with the new data item Yes.
STEP-BY-STEP INSTRUCTIONS
ENTER DATA ENTRY MODE
You will need to be in the data entry mode of geoFile in order to update or
change the information in your data-base. Enter the data entry mode by
clicking on the data entry menu item in the options sub menu (see
Chapter 4 for more information on data entry).
MANUALLY UPDATE INFORMATION
To manually change information stored in your data-base:
1: Click once inside of the field outline to select the field whose
information or data you want to change. A selected field has a thicker
outline than the other fields on your form. The text cursor appears after
the last character of the data item in the selected field.
2: Press the lINST/DELl key once for each character in a data item that
you want to delete.
Changing Information
7.4
3:
Type in the new, or updated information that you now want to store
under that field name. When you move to a new form, or have finished
using the geoFile program and return to the deskTop, the new
information that you typed in will be saved with that form.
AUTOMATICALLY UPDATE INFORMATION
To automatically change information stored in your data-base:
1: While you are in the geoFile data entry mode (see above), click on the
form menu item in the command menu. A sub menu appears.
2:
Click on the create search form menu item in the form sub menu.
3:
Type the item, or data that you want to search for in your data-base,
into a selected field. You can type search data items into more than one
field in your search form. You can use conditionals, and/or "wild card"
characters in these search data items as described in Chapter 6.
4: For each search data item in step 3 above that you want to replace with
some other data or information, type in the replace with character
(@), immediately after the search data item.
5: Type in the replacement data immediately after the @.
6: After you have finished defining search and replace items in your search
form, click on the OK icon.
6: Now click on one of the search icons (the faces looking right and
left), that appear at the top of your form. The program will recall only
those forms in your data-base that meet all of the search conditions that
you have defined in your search form.
The form that is displayed on the screen after the search and recall operation
is complete is the first form that geoFile found in your data-base (searching
either forward or backward), that meets the search conditions.
At this point you are ready to replace, or change information in you data
base.
7-5
Changing Information
u
LJ
REPLACEMENT OPTIONS
To replace data items in the currently displayedform only:
1:
LJ
Click on the form menu item in the command menu. A sub menu
__
appears.
! i
2: Click on the In this form, replace menu item in the form sub
LJ
menu. Any data items that have been typed in after a replace with
character Ǥ>), in one, or more of the fields in your search form will
now appear as the data items in the field, or fields of the displayed form
of your data-base.
LJ
|
|
NOTE: You can not replace data that is stored in the sort field.
|_j
To replace data items in all of the recalledforms:
1: Click on the form menu item in the command menu. A sub menu
Lj
2:
appears.
\~\
Click on the In all forms, replace menu item in the form sub
menu. Any data items that have been typed in after a replace with
character (@), in one, or more fields in your search form will now
r,
appear as the data items in those fields of all of the recalled forms in
your data-base.
,
(
^—'
K^J
,
ANSWERS TO CHAPTER 7 "WHAT IF...?"
1) Does the search form that I use to update information in
I—I
my geoFile data-base look different than the search form
that I use just to locate that information?
LJ
information, or recall and replace.
I—I
No. A search form looks the same whether you want to recall
2) Can I use the same conditionals in a search and replace
I
I
operation that I use in a search operation?
Yes. But greater than, less than etc., only make sense on the search
LJ
side of a search and replace statement.
3)
Can I update information in only one form at a time
using a search and replace operation?
Yes. Just select the In this form, replace menu item in the form
submenu.
LJ
[_j
[^J [j
u
u
Changing Information
7.5
,
,
PRACTICE FOR CHAPTER 7
After reading about search and replace operations in geoFile, you should
practice with the different commands to see how they work. Use the
sample data-base for a car dealer that you created in the practice section of
Chapter 5.
n
Open the geoFile document entitled Customers that you created in
Chapter 5. Click on the create search form menu item in the form
sub menu. A search form appears on the screen. It looks like your regular
form, containing the same layout, field outlines and field names. The only
difference is that data does not appear in any of the fields.
Scorch Form
I Name:
l»» ■ ■
[Telephone:
J::
t ♦♦♦♦♦♦♦♦♦♦♦♦ ♦W ♦ *********
^
♦
%
♦♦ ♦
IStflte :
jBirthdcnj
ICor Style :
JPufchosed:
n
n
n
n
n
n
r~!
i
i
As an example of a search and replace operation that you could perform on
your customer list, try to recall and correct a mistaken entry in your data
base.
Lets say that Mr. Smith calls you up and thanks you for the birthday card
that you sent him. However, he tells you that his birthday is April 17, not
February 17. Also, he has moved since you sold him his car. His new
address and phone are:
5 Top St.
Milltowne, PA. 20516
phone #424-7111
n
n
You could update this information in your data-base by paging through
your forms, backspacing through the incorrect information and then typing
in the new, correct information.
H
n
7-7
Changing Information
Instead, use a search and replace operation to make all of the corrections at
one time. Type the following into the fields indicated on a search form:
When your search form is completed, click on the OK icon.
Now when you click on one of the search icons, the form (or forms), that
have a last name of Smith and a birthday of February 17 (0217), will be
recalled. Click on the In this form, replace menu item in the form
sub menu. Mr. Smith's birthday will be corrected to 0417 (April 17).
Corrections, or replacements will also be made in the Telephone, Address,
City, State, and Zip fields as follows:
t Name : Robert | ♦ ♦ JM1:1
(Last I
: 424-7111 I
: 5 Top SU
:Mi!!lowne
IState : PA
IBifthdaij
JZiP
: 8417
i Style: sedan
Changing Information
: 2851*
* J Purchased: 6/86
7-8
I«
CHAPTER 8
PRINTING GEOFILE FORMS
INTRODUCTION
You will often want to print out all, or part of the information in your data
base. Using geoFile sub layouts you can create up to 15 different formats,
or arrangements of the information in your Master form that can be used for
printing. You learned about Master forms and sub layouts in Chapter 4.
I
There are also some special operations in the geoFile application that apply
only when you want to print a geoFile document. Chapter 8 examines
i
»
these special print operations.
H
OBJECTIVES
After reading chapter 8 you should know how to:
H
H
n
H _
f*}
H
H
^
•
Preview your form layout before printing.
•
Print all, some, or one of the forms in your data-base.
•
Print a geoFile document with, or without the field outlines.
•
Print a geoFile document with, or without the field names.
•
Print a blank form.
•
Print more than one form per page.
•
Print out your forms with headers.
•
Print on computer paper, mailing labels, or index cards.
KEY TERMS
—
page preview
_
column header
' (
pack (a form on a page)
"WHAT IF...?ff
•
f
1) Can I print out a form that includes only some of the field outlines and
f~\
H
field names that I have on my Master form?
2) Can I move fields around the form page while I am in the print mode of
geoFile?
8-1
Printing Forms
3) Can I print more than one form per page?
4) Can I print out my data-base information in special formats like
mailing labels and index cards?
OVERVIEW
Most of the decisions about the design of your form for printing will be
made while you are in the form design mode of geoFile. Using sub layouts
you can position the fields in your Master form in up to 15 different
arrangements for printing.
Sometimes, however, you will want to be able to remove a field outline
from your printout, or be able to print just a few of the field names with
your data. You may want to print information onto mailing labels, or
index cards. You might want to print more than one form on a single sheet
of paper.
These special printing options are accessible while you are in the print
mode of the geoFile program.
ENTER THE PRINT MODE
In order to print out your geoFile document you need to be in the print
mode of the geoFile program. To enter the print mode, click on the print
menu item in the options sub menu.
PREVIEW YOUR FORM LAYOUT
Just as you can preview the overall layout of your form while you are in
the form design mode of geoFile, you can also preview your form for
printing by clicking on the preview menu item in the file sub menu.
PRINT FIELD OUTLINES
Your print out can contain some, all, or none of the field outlines (the
boxes around each field on your form). geoFile will print all of the field
outlines unless you indicate otherwise.
In order not to print one of your fields' outlines, just click inside of the
outline to select it. Then click on the print the box menu item in the
field sub menu. The asterisk that did appear next to the print the box
menu item will no longer be there to indicate that the selected field outline
will not be printed. A field outline that you have selected not to print will
appear on the screen with a thinner outline than a field that will be printed.
Printing Forms
8-2
When you print, the outline of the field (or fields), that you have selected in
this way will not appear on the print out, only the field's name and the data
will appear.
If you want to delete all of the outlines on your form from your print out,
click on the print no boxes menu item in the Held sub menu.
NOTE: You can decide later to print any one, or all of your field outlines.
Click on the appropriate menu item in the field sub menu.
PRINT FIELD NAMES
You can print out the field names on your form, or not, just as you
choose, the procedure for printing out field names, or not, is similar to
the procedure for printing, or not printing field outlines. geoFile will
print all of the field names unless you indicate otherwise.
If you do not want to print a field name, click inside the field outline to
select it Then click on the don't print field name menu item in
the field sub menu. The field name (or names), that you have chosen
not to print, will appear on the screen with strike outs, or dashes
through the characters of the field name.
When you print, the name of the field (or fields), that you have selected
in this way will not appear on the print out, only the field outline and
the data in that field will appear.
If you want to delete all of the field names on your form from your print
out, click on the print no field names menu item in the field sub
menu.
NOTE: You can decide later to print any one, or all of your field
outlines. Click on the appropriate menu item in the field sub
menu.
PRINT A BLANK FORM
You can also print out a blank form which is a form that contains only
the field outlines with the field names and no data. Click on the print
blank form menu item in the print sub menu to print out a blank
form.
8-3
Printing Forms
PRINT MORE THAN ONE FORM PER PAGE
geoFile lets you print out more than one form per page. This is called
"packing" forms. You can manually pack your forms for printing, or by
using geoFile's pack form menu item in the form sub menu, geoFile
will automatically pack as many of your forms as possible onto a single
page.
To pack forms manually, click on the + (plus sign), icon located at the top
of the form page while you are in the print mode of geoFile. A preview
window appears over your form. Click again on the + icon to print two
forms per page. Each time that you click on the + icon, you will be able
to print an additional form per page. A line extending across the preview
rn
,—i
window appears each time you click on the + icon.
'—'
When you print out a form that has been divided in this way, everything on
your form that appears above the line will be printed out If any of your
—
fields are "cut off" by (if they appear below), the line on the preview
'—'
window they will not appear in your print out.
—
LJ
If you want geoFile to automatically print out as many forms as are
—
possible on a single page, click on the pack forms menu item in the
LJ
form sub menu.
__
You can un-pack your form by clicking on the - (minus sign), icon.
I
LJ
j
W U
PRINT ALL, SOME, OR ONE OF YOUR FORMS
U
The print sub menu has menu items in it that let you choose which forms
in your data-base to print
j
If you want to print out all of the forms in your data-base, click on the
[j
|
print all forms menu item.
LJ
To print only the forms that have been recalled in a search operation, click
on the print selected forms menu item.
ri
If you only want to print out the form that is currently displayed, click on
the print current form menu item.
f~j
Once you have clicked on one of these options, the print dialog box appears
asking you if you want to print out your data in columns with the field
names across the top (column headers), or if you want to print to labels,
index cards, or onto computer paper.
Printing Forms
8-4
i
j r -j
^^ '—■'
—,
LJ
u
PRINT A COLUMN HEADER
If you want to print a column header, listing all of your field names at the
top of a columns of data, design a sub layout with your fields lined up
across the top of your form page. Then, when you want a print out of this
type of layout, click on the column header button in the print dialog
box.
PRINT TO LABELS, INDEX CARDS, OR
COMPUTER PAPER
If you want your geoFile data to be printed out as mailing labels, index
cards, or on computer paper, select one of these options in the print dialog
box.
PRINT YOUR FORM
When you have completed making your choices for printing in the print
dialog box, click on the OK icon. Your form, with the layout and options
that you have designed and selected, will print out if:
1) you have set up your GEOS compatible printer correctly.
2) you have the correct printer driver file present on your geoFile work
disk (the disk that you are printing from).
3) you have selected that printer driver.
For more information on how to set up your system to print out GEOS
documents see Chapter 2 of this manual, and the printing section of your
GEOS User's Manual.
n
n
n
H
n
n
H
8-5
Printing Forms
u
STEP-BY-STEP INSTRUCTIONS
Q
ENTER THE PRINT MODE
n
To enter the print mode of geoFile:
1:
Click on the options menu item in the command menu. A sub
menu appears.
^
.
y—'
2: Click on the print menu item in the options sub menu. In print
i—I
PREVIEW YOUR FORM LAYOUT
_
I I
mode, no move or re-size tabs appear in the field outlines.
To look at, or preview yourform before printing it out:
1:
Click on the file menu item in the command menu. A sub menu
appears.
I
2:
Click on the preview menu item in the file sub menu. A preview
window appears showing you the overall layout of your form.
3:
Click once outside of the preview window to continue working.
PRINT FIELD OUTLINES
geoFile will normally print out all of the outlines of the fields on your
form.
To not print out afield outline:
1: Click once inside of the outline of the field to select it. A selected
field's outline appears thicker than the other field outlines on your form.
2: Click on the field menu item in the command menu. A sub menu
appears.
3:
LJ
u
U
Pj
W LJ
,-"-,
'—'
'—'
—
u
Click on the print the box menu item in the field sub menu. The
selected field's outline now appears thinner than the other field outline
to indicate that it will not be printed. An asterisk next to the print
the box menu item in the field sub menu means that the box will be
LJ
LJ
printed.
To delete all of the field outlines from your print out:
1: Click on the field menu item in the command menu. A sub menu
u
[J
appears.
2:
Click on the print no boxes menu item in the field sub menu.
When you print out this form, none of the field outlines will appear.
kj u
Fj
u
Printing Forms
8-6
LJ
n
NOTE: You can reverse either of the above actions and print the boxes
H
after all. The print the box menu item appears in the field sub
menu after you have chosen not to print a field's box, or outline.
n
!""! /■—v
PRINT FIELD NAMES
geoFile will normally print all of the names of the fields on your form.
[—|
1:
'
To not print out afield name:
f—[
|—j
Click once inside of the outline of the field to select it. A selected
field's outline appears thicker than the other outlines of the fields on
your form.
2:
Click on the field menu item in the command menu. A sub menu
appears.
3:
pi
Click on the print field name menu item in the field sub menu.
The field name that you have chosen not to print appears with strike
outs through the characters to indicate that it will not be printed. An
PI
asterisk next to the print field name menu item in the field sub
menu means that the field name will be printed.
1 '
_
To delete all of the field names from your print out:
1: Click on the field menu item in the command menu. A sub menu
M
I
I"™!
f"|
appears.
2:
Click on the print no field names menu item in the field sub
menu. When you print out this form, none of your field names will
appear.
NOTE: You can reverse either of the above actions and print the field
names after all. The print field name menu item appears in the
[""|
H
field sub menu after you have chosen not to print a field's name.
PRINT A BLANK FORM
A blank form contains no data and no field names. It is a print out that just
r—|
contains the field outlines.
|—j
To print a blank form:
1: Click on the print menu item in the command menu. A sub menu
appears.
1
2: Click on the print blank form menu item in the print sub menu.
n
n
P^
8-7
Printing Forms
u
PRINT MORE THAN ONE FORM PER PAGE
You can either manually set how many forms you want to print on one
_
LJ
sheet of paper, or you can let the program automatically put as many forms
on a page as is possible.
LJ
To manually set the number ofprintedforms on a page:
_
1:
|
Click on the + (plus sign), icon located at the top of your form page.
(The + and - icons appear only in the print mode of geoFile.) A
preview window appears containing an overall view of your form.
2:
K^J
|
Click on the + icon for each additional form you want to print on a
single page. (Once again for two forms, twice for three etc.)
NOTE: If a dividing line passes through any of the items, or fields in your
form, nothing below the line will be printed.
To automatically print as manyforms as is possible on a page:
1: Click on the print menu item in the command menu. A sub menu
appears.
2:
Click on the pack forms menu item in the form sub menu. A
preview window appears. The program automatically calculates how
many forms, with the currently displayed layout, can be printed on one
page.
-
LJ
To undivide your form:
1:
Click on the - (minus sign), icon located at the top of the print mode
form page. One dividing line will be removed from the preview
\
I
window each time that you click on the - icon.
LJ
PRINT ALL, SOME, OR ONE OF YOUR FORMS
To print out all of the forms in your data-base:
1:
2:
LJ
Click on the print menu item in the command menu. A sub menu
appears.
[J
Click on the print all forms menu item in the print sub menu.
The print dialog box appears.
[j
j
To print out only those forms that have been recalled in a search operation:
1: Click on the print menu item in the command menu. A sub menu
i
rn
appears.
2: Click on the print selected forms menu item in the print sub
menu. The print dialog box appears.
^~"^
ri
u
Printing Forms
8-8
u
To print out only the currently displayedform:
1: Click on the print menu item in the command menu. A sub menu
appears.
2:
Click on the print current form menu item in the print sub menu.
The print dialog box appears.
PRINT TO LABELS, INDEX CARDS, OR
COMPUTER PAPER
To print out to mailing labels:
1: Click on the labels button in the print dialog box.
2:
Click on the OK icon. The information in your form(s) will print out
to the standard mailing label format (1").
NOTE: Be sure that you have positioned the fields that you want to print
out in label format so that they appear in the upper left-hand corner
of your form page.The Sample Labels file included on your
geofile diskette shows you the format to be used for labels.
To print out to index cards:
1: Click on the index cards button in the print dialog box.
2:
Click on the OK icon. The information in your form(s) will print out
to the standard index card format (3" by 5").
To print out to computer paper:
1: Click on the computer paper button in the print dialog box.
2: Click on the OK icon. The information in your form(s) will print out
on continuous paper.
NOTE: geoFile will print out on computer paper unless you choose a
different option.
PRINT COLUMN HEADERS
To print out a column header of your field names with your geoFile form:
1: Click on the column header button in the print dialog box.
n
r-j
n
8-9
Printing Forms
u
PRINT YOUR FORM
When you have completed making your choices for printing in the print
LJ
dialog box:
To print out yourform:
LJ
1:
•
•
Click on the OK icon. Your form, with the layout and options that
you have designed and selected, will print out if:
you have set up your GEOS compatible printer correctly.
LJ
you have the correct printer driver file present on your geoFile work
LJ
disk (the disk that you are printing from).
•
,U
you have selected that printer driver.
For more information on how to set up your system to print out GEOS
documents see chapter 2 of this manual, and the printing section of your
GEOS User's Manual.
U
U
U
U
LJ
U
U
U
U
U
U
Printing Forms
8-10
ANSWERS TO CHAPTER 8 "WHAT IF.,.?"
1) Can I print out a form that includes only some of the
field outlines and field names that I have on my Master
form?
Yes. You have the choice of printing any of the field names or field
outlines (or boxes), in your form that you wish.
2) Can I move fields around the form page while I am in the
print mode of geoFile?
No. You can only change the layout of your form in the form design
mode of geoFile.
3) Can I print more than one form per page?
Yes. You can manually, or automatically pack your print out to
include more than one form per page.
4) Can I print out my data-base information in special
formats like mailing labels and index cards?
Yes. You have the option to print out the information in your data
base to mailing labels, index cards, or onto computer paper. We have
even included an example file on your geoFile diskette that shows a
layout to use that will print out to standard label format (1 inch).
PRACTICE FOR CHAPTER 8
After reading about printing in geoFile you should practice with the
different commands and options to see how they work. For the examples
below, use the Master Form Customers and the sub layout Address
Labels, that you created in Chapter 5.
First of all, be sure that you have correctly connected a GEOS compatible
printer to your computer. A list of compatible printers is located in your
GEOS User's Manual, along with a list of the printer driver files that must
be used with each of those printers. Any additional printer interface that
you might need is also listed there.
Also, make sure that the correct printer driver file is on your geoFile work
disk, and that you have selected this printer driver. You select the correct
printer driver by clicking on the select printer menu item in the geos
sub menu, and then finding and clicking on that printer driver's filename in
the dialog box that appears. General information about selecting the correct
printer driver for your printer can be found in your GEOS User's Manual.
8-11
Printing Forms
Once you have checked all of this, open your geoFile document
Customers. Click on the change layout menu item in the file sub
menu. Now click on the Address Labels sub layout that you created in
Chapter 4.
Enter the print mode of geoFile by clicking on the print menu item in the
options sub menu. Your Address Labels sub layout now looks
something like this.
t Nome:
•e:
Printing Forms
t Nome:
IIP—g?
8-12
n
n
Click on the print no boxes menu item in the field sub menu.
n
Name:
n
«ifi»t
# ^..¥..¥~¥«¥~¥-v«¥..¥-r.¥~r.
:::::::::::S:::::::::::i
Now click on the print no field names menu item in the field sub
menu.
n
8-13
Printing Forms
Now select the Zip field and click on the print the box menu item in the
field sub menu.
gBgysgfPEfEgiBrc
print field name
!•♦•♦«
print all field names
+ JA4dfG&
print no field names
the box
:JZZ— *print
print all boxes
♦ «$?
TTTTWI 4 4*4
V
print no boxes
Pack as many address labels on your print out as possible by clicking on
the + icon until the top dividing line appears just underneath your lowest
field in the preview window.
t.TJ.wiimiAiH^fHPffntnaBii 111(S fi^imr.r.rgagM
tj i*W*T TTwfTlC?
1 i'ftdd7c*r
t ^ |TTW TT
—i * t!!!
You can automatically pack forms on your print out by clicking on the
pack forms menu item in the form sub menu.
Printing Forms
8-14
Now print out all of the forms in the sub layout Address Labels. Click on
the print all forms menu item in the print sub menu. The print dialog
box will appear.
When the print dialog box appears, click on the computer paper button
(if you have tractor fed paper in your printer), and click on the OK icon to
n
print out your address labels on computer paper.
After printing out your information in this manner, try printing it out
using the labels option.
8-15
Printing Forms
First of all, click on the quit menu item in the file sub menu to return to
the deskTop. On your original geoFile disk there should have been a
sample geoFile document entitled Sample Labels. If this file was not
copied onto your geoFile work disk copy it over now.
When you open this file from the deskTop by clicking on its icon twice,
you will see exactly how much space on your form page you have in which
i
'
to create lables. If you create a sub layout from the fields in your data-base
that conforms to these dimensions (all of the fields fit in the space shown),
then you can use the print to labels printing option.
PRINT TO LABELS
While in the print mode of geoFile (click on the print menu item in the
options sub menu to enter print mode), click on the print all forms
menu item in the print sub menu. Then click on the labels button in
the print dialog box.
Click on the OK icon to start printing your labels. Notice the difference
between these labels and the ones you printed out in the first example
above.
You should try the other geoFile print options to see how they work. For
instance, create a sub layout with your fields all lined up horizontally across
the top of your form page. Then click on the column header menu item
in the print dialog box to print out your data in columns underneath each of
the field names.
SAVING DOCUMENTS AND
KEEPING YOUR SANITY
One final note is in order. When working with geoFile, or any other
software product it is always a good idea to make extra copies of your
documents on separate disks at least daily, or at the end of a work session.
Things like power outages, electrical storms, hardware failures, static
|
|
U
.,
{,
,
i
,
,
,
,
electricity and so forth can play havic on the data that is stored on your
LJ
insure that any data that might be lost through some mishap or other will
'—!
floppy disks. With recently made and updated copies of your disks you will
be relatively easy to replace.
LJ
<J U
u
u
Printing Forms
8-16
n
n
H
CHAPTER 9
GEOFILE REFERENCE
OVERVIEW
Chapter 9 contains three appendices that serve two purposes. Appendix A,
DICTIONARY OF TERMS, and Appendix B, GEOFILE MENUS
together form a quick reference of the terms and operations that are used in
the geoFile application. Appendix C, USE GEOFILE WITH OTHER
GEOS APPLICATIONS, explains how to move, or transport your
geoFile data to other GEOS based applications, so that you can use it with
programs such as Writer's Workshop, geoCalc, and geoMerge.
9-1
geoFile Reference
u
u
u
u
u
u
u
u
u
u
..... u
u
u
LJ
u
u
u
u
uu
u
u
geoFile Reference
9-2
APPENDIX A:
DICTIONARY OF TERMS
A
application program These are programs that are based on GEOS and
that need GEOS to operate. geoFile is an application program, or
application of GEOS.
B
boot Boot is a term that means start, or run the operating system. In
other words, you "boot" GEOS before starting to work with geoFile.
c
column header
A column header is a geoFile print option that allows
you to print out all of the field names in your form at the top of a column
of data items associated with each of those fields.
command menu The command menu lies across the top of your geoFile
form page. Under each name in the command menu are sub menus that
contain the operating commands of the geoFile application.
Commodore key The Commodore key on the keyboard is a special key
which when pressed at same time that you press another key allows you to
use various keyboard controlled commands. These keyboard controlled
fl
commands are the same as some of the commands that you control through
the sub menus. The Commodore key looks like this:
n
and is located in the lower left-hand corner of your keyboard.
conditional search A conditional search is a search through your
r—I
geoFile data-base that you want to meet some condition (greater than, not
equal to etc.), that you indicate, or define in a search form.
'
Create/Open/Quit dialog box This is a dialog box that appears on
|—I
the screen when you open, or run the geoFile application. This dialog box
-_ ^N
I !
an existing document, or return to the deskTop.
'
contains the commands that you can use to create a geoFile document, open
H
n
n
9-3
geoFile Reference
D
data entry mode The data entry mode is the operating mode of the
geoFile application where you enter, or type information into your form.
deskTop The deskTop is the user interface (the way that you work with
the system), for GEOS. The files that you store on your diskettes using
GEOS appear on the deskTop as icons, or pictures. You use the deskTop
to manipulate (move, copy, print, throw away), your files and disks.
DISK COPY utility This is an utility program in GEOS that you can
use to copy your applications programs, or GEOS work disks.
F
field A field is a rectangular area, or box that you create on your form
page. It contains the information that you want to store in your data-base.
field outline This is the box, or line that appears around a field.
file dialog box This is a dialog box that appears on the screen when
you want to open an existing geoFile document (also called a file). The
box lists all of the geoFile documents that are stored on your diskette.
form You design and store your geoFile data-base on forms. You have
complete control over how to design your forms and what information to
store on them.
form design mode The form design mode is the operating mode of the
geoFile application where you design the layout of your form.
u
|
|
form page The form page is the surface of your form. You only see a
portion of your form on the screen at any one time. The form page is
where you design and work on your data-base form.
i
i
i
i
G
U
geoFile document This is a data-base that you create with the geoFile
application. It can be full of information, or data, or it can be empty.
GEOS Graphic Environment Operating System. Geos is the official disk
operating system for the Commodore 64. For example, geoFile operates in
GEOS.
LJ
|_J
^J LJ
u
u
geoFile Reference
9-4
grid background The grid background is the background pattern on the
form page. The grid background helps you design your geoFile forms.
I
install Install is an operation that you must perform on geoFile, or any
GEOS based program, the first time that you use it. When you open, or
start a GEOS based program for the first time, you will install it.
M
Master form A Master form is the form that contains all of the fields
and information that are stored in your data-base.
move tab The move tab is used to move, or copy a field on your form.
The move tab appears in the upper left-hand corner of an un-selected field.
p
pack This is a printing option that lets you automatically fit as many of
your forms on a printed out page as is possible.
page preview Using page preview you can look at your entire geoFile
form layout.
PI
n
n
_
position indicator The position indicator indicates what part of your
form is presently visible on the screen. You can also use the position
indicator to move to a different portion of your form.
R
RAM-expansion unit (REU)
An add-on piece of hardware, available
from Commodore, that allows you to add 256K, or 512K (K=kilobytes), to
your RAM (random access memory), storage.
'
1 i
re-size tab The re-size tab is used to change the size, or shape of a field.
The re-size tab appears in the lower right-hand comer of an un-selected field.
replace with character Using the replace with character (@), in a
search form you can automatically replace one piece of information, or data
in your data-base with another.
replacement options Two options that you can use to replace
information, or data in one, some, or all of your forms.
n
P^
9-5
geoFile Reference
s
search form A special geoFile form where you indicate, or define
information that you want to search for and recall from your data-base.
scrolling Scrolling is the action of moving around your form by moving
the mouse/joystick pointer to the edge of the screen.
sort field The sort field is the key field used by the geoFile program to
store, sort and recall your forms. Any of the fields on your form can act as
the sort field.
sub layout A sub layout contains a portion of the fields and information
that are stored on your Master form. With sub layouts you can make
special layouts, or arrangements of your Master form for viewing, or for
printing.
sub menu Sub menus contain the operating commands of geoFile The
names of the sub menus are contained in the command menu.
T
text cursor This is the vertical line that appears in a field to indicate
where text that you type into a field will appear.
title bar The title bar contains the name of the Master form, or sub
I I
layout on which you are currently working. The title bar is located above
the upper right-hand corner of the form page.
I
w
u
into a search form you can perform non-specific searches through your data-
'—'
"wild card" character By typing a "wild card" character, *, ?, and!,
I
,
base. For example, type D* to recall all data items that start with the letter
D.
U
work disk A work disk is a disk on which you do your work in GEOS
'—I
you "boot", or run the operating system from (such as your GEOS, or
I—I
(such as a work disk for the geoFile application), as opposed to a disk that
System disk).
u
u
geoFile Reference
9-6
,
,
APPENDIX B:
GEOFILE MENUS
'n
Here are brief explanations of the menu items in geoFile. Any keyboard
shortcuts are listed after the menu item in parentheses, ().
FORM DESIGN MODE
FILE SUB MENU
edit; options I form display
C=0
change layout
show count
show pictures C= S
copij layouts
build scrap
C=R
rename
print
C= C
close
n
show pictures ^K [IF] By clicking on this menu item you will display
any graphics, or pictures that you may have pasted into fields on your
geoFile document.
NOTE: A hide pictures menu item appears in the file sub menu when
you have graphics already displayed in your geoFile document. By
hiding pictures until you need to see them you will speed up the
overall operation of the geoFile program.
close
you are wo
®y clicking on this menu item you will close the file that
ng on, and return to the Create/Open/Quit dialog box.
preview fir |o| By clicking on this menu item you will display a
preview window that lets you look at the overall layout of your entire form.
rename \F [r] By clicking on this menu item you can change the
name of your file.
n
n
n
9-7
geoFile Reference
print By clicking on this menu item you will display the print dialog
box. Here you can select the print output options that you want.
copy layouts By clicking on this menu item you will make a copy of
the layouts in your form. These copies will contain no data.
build scrap By clicking on this menu item you will cause the Build
Scrap dialog box to appear. Now you can create a Text Scrap from the
information in your geoFile document that you can; paste into a geoWrite
document, paste into a geoCalc spreadsheet, or you can create a Merge Data
File for use with the geoMerge application..
quit By clicking on this menu item you will dose the file that you are
working on, and return to the deskTop.
show count By clicking on this menu item you can find out how many
forms are presently stored in your data-base.
change layout By clicking on this menu item you can move to a
different sub layout, or create a new one.
EDTC SUB MENU
qeos i file ^^ options j field
[cut
(copy
type
1 display]
paste
paste picture
cut By clicking on this menu item, after having selected a field, you will
cut the field name out of that field. You can then paste that field name into
another field in your form.
copy By clicking on this menu item, after having selected a field, you
will make a copy of the field name. You can then paste that name into
another field in your data-base.
paste By clicking on this menu item, after having selected a field, you
will paste a field name, from either a scrap or an album, into that field.
paste picture By clicking on this menu item, after having selected a
field, you will paste a graphic, from either a scrap or an album, into that
field.
geoFile Reference
9-8
OPTIONS SUB MENU
[qeos j file I edit pgj^ field I type j
I ftform design
form design By clicking on this menu item you will enter the form
design mode of geoFile.
data entry By clicking on this menu item you will enter the data entry
mode of geoFile.
print By clicking on this menu item you will enter the print mode of
geoFile.
NOTE: The mode that you are currently working in appears with a * next
to the name.
FIELD SUB MENU
| qeos | file j edit I options W^ type j display \
n
[set style
set sort
recover field
C=U
clear field
delete
n
n
n
n
n
n n
n
set style By clicking on this menu item, after you have selected a field,
you can set the style for text in that field.
set sort field By clicking on this menu item, after having selected a
field, you will set that field as the sort field for your data-base.
recover field O:[^] By clicking on this menu item, after having
selected a field, you will recover the last saved version of that field.
clear field \r Py By clicking on this menu item, after having selected
a field, you will Mete that field's field name.
delete By clicking on this menu item after having selected a field, you
will delete that entire field from your form.
n
n
9-9
geoFile Reference
TYPE SUB MENU
j file j edit j options j Held
comment field
number fieid
ISTKBf
comment field By clicking on this menu item, after having selected a
field, you will turn that field into a comment field. A comment field is
simply decoration in your form. It has no field name, and you can not enter
data into it You can, however, paste text, or a graphic into a comment
field. This text or graphic will appear in any print out of your form. Some
good ways to use a comment field are as a title for a form, or to place a
logo on a form.
NOTE: When you paste a graphic into a field, the field automatically
becomes a comment field.
number field By clicking on this menu item, after having selected a
field, you will turn that field into a number field. Any field that you
want to store numerical data in, should be designated a number field. A
number field will be stored, sorted, and recalled numerically, rather than
as a text field is recalled, which is alphabetically.
text field By clicking on this menu item, after having selected a field,
you will turn a field into a text field.
NOTE: All fields are text fields until you designate them number, or
comment fields.
DISPLAY SUB MENU
| geos j file j edit j options j field j type j
ftqrid background
gray backgroud
white background
hide indicator
C=L
align on
C=A
grid background By clicking on this menu item you will display
the geoFile grid background.
U
LJ
geoFile Reference
9-10
U
n
n
gray background By clicking on this menu item you will display a
plain gray background on the screen without the grid.
n
white background By clicking on this menu item you will display a
plain, white background on the screen without the grid.
n(
n
indicator off/on By clicking on this menu item you can either
display the page position indicator, or remove it from the screen.
n
i
align on/off By clicking on this menu item you can either align
your fields with the grid background, or not.
i
n
DATA ENTRY MODE
r—;
FILE SUB MENU
(Same as in FORM DESIGN MODE)
f—!
i
I
EDIT SUB MENU
n
n
n
I geos j file
n
n
cut By clicking on this menu item, after having selected a field, you
will cut the data item out of that field. You can then paste that item
n
into another field in your data-base.
n
copy By clicking on this menu item, after having selected a field, you
will copy the data item in that field. You can then paste that item into
another field in your data-base.
H
H
H
paste By clicking on this menu item, after having selected a field, you
will paste a text (only), item into that field. The text item is pasted
from a Text Scrap.
OPTIONS SUB MENU
(Same as in FORM DESIGN MODE)
p
p
p
9-11
geoFile Reference
FORM SUB MENU
neui form
recover form
clecir form
CZ
recover field
clear field
create search form
ignore case
in this form, replace
in all forms, replace
new form ^[NJ By clicking on this menu item you will cause a new
form, with no data in its fields, to appear on the screen. The form that you
were working on will be saved to the disk.
recover form By clicking on this menu item you will recover the last,
saved version of your form.
clear form C^^j By clicking on this menu item you will clear all of
the data items from the form that your are working on currently. Use the
recover form menu item to reverse this action.
recover text By clicking on this menu item, after having selected a field,
you can recover the last, saved version of the data in that field.
clear text By clicking on this menu item, after having selected a field,
you will clear the data from that field. Use the recover field menu item
to reverse this action.
create search form By clicking on this menu item you will create a
search form.
ignore case By clicking on this menu item you will cause the program
to ignore case distinctions (UPPER, or lower case), when you perform a
search in your data-base.
in this form replace By clicking on this menu item when you are
performing a search and replace operation, you will make the replacements)
in the currently displayed form only.
geoFile Reference
9-12
H
n
in all forms replace By clicking on this menu item when you are
performing a search and replace operation, you will make the replacements)
in all of the forms in your data-base.
R
nn
n
DISPLAY SUB MENU
(Same as in FORM DESIGN MODE, no align on/off menu item)
n
PRINT MODE
n
FILE SUB MENU
(Same as in FORM DESIGN MODE)
OPTIONS SUB MENU
n
(Same as in FORM DESIGN MODE)
FIELD SUB MENU
n
| qeos j file j options |jgEl print j display
print all field names
print no field names
print the box
print all boxes
print no boxes
print field name C* \^\ By clicking on this menu item, after having
selected a field, you wiUprint that field's field name.
NOTE: Initially, all field names will be printed.
print aD field names By clicking on this menu item you will print all
of the field names that are on your form.
f)
NOTE: Initially, all field names will be printed.
9-13
geoFile Reference
print no field names By clicking on this menu item you will print
none of the field names that are on your form.
print the box By clicking on this menu item, after having selected a
field, you will print that field's field outline (or box).
NOTE: Initially, all of the field outlines, or boxes are printed.
print all boxes ^r [m| By clicking on this menu item you will
print all of the field outlines, or boxes of the fields in your form.
NOTE: Initially, all of the field outlines, or boxes are printed.
print no boxes By clicking on this menu item you will print none
of the field outlines of the fields in your form.
PRINT SUB MENU
| geos I file j options
w9H9Fm
prim oil forms
print selected form£.
print current form C=.
print blank form
pack forms
C=.
C=V
u
u
print all forms By clicking on this menu item you will print out
all of the forms in your data-base.
print selected form By clicking on this menu item you will print
out only those forms that have been recalled in a search operation.
print current form By clicking on this menu item you will print
out the currently displayed form.
print blank form By clicking on this menu item you will print out
a blank form (a form with no data).
o
LJ
u
u
u
u
u
geoFile Reference
9-14
u
n
(—[
'H
H
pack forms 0* lE] By clicking on *is menu item you will
automatically print out the maximum number of your forms that will
fit on an 8 1/2 by 11 inch sheet of paper.
DISPLAY SUB MENU
(Same as in FORM DESIGN MODE, no align on/off menu item)
9-15
geoFile Reference
u
u
u
u
u
u
□
u
u
u
u
a
u
a
■
LJ
u
geoFile Reference
9-16
APPENDIX C:
USE GEOFILE WITH OTHER
GEOS APPLICATIONS
INTRODUCTION
You can build text scraps, or Merge Data Files from the data in your
geoFile data-base that you can then use in other GEOS applications
programs such as geoWrite, geoCalc, and geoMerge.
Building a text, or Merge Data File from your geoFile data is a five step
process:
IMPORTANT: You must begin this process while you are in the form
design mode of geoFile.
1:
Select each of the fields in your geoFile form, one after the other, by
clicking once inside of the field outlines.
What this will do is to line up each field and its data in columns in the
scrap that you are going to build. The scrap might look something like
this:
Name
Boxes
Returns
Bannon
32
Barnes
Davidson
27
41
Wilson
25
6
3
12
2
Commission
$52.00
$48.00
$58.00
$46.00
NOTE: This is similar to the way your data would look if it was printed
out with a column header.
IMPORTANT:
Be sure to select, one after the other, all of the fields in
your data-base to insure that all of your columns of field names and data
appear in the order that you want them to.
9-17
geoFile Reference
LJ
NOTE: If you want a text scrap to include only a portion of the fields and
their associated data, create a sub layout that contains only the
U
fields that you want.
2:
U
After selecting all of the fields, click on the file menu item in the
command menu.
3:
Click on the birild scrap menu item in the file sub menu. A dialog
u
box appears.
u
Scrap Type
Ulephone
Udress
"Hhich scrap?
u
Nhich form?
All fo'ms
G
f~| Selected forms
I
i Current form
OKl^
LJ
iCanceil
LJ
*»*«»«*«* ♦♦♦♦♦♦♦♦♦♦♦♦♦
U
* ttirchased
..
U
BUILD A TEXT SCRAP (CALC SCRAP)
If you do nothing but click on the OK icon now, a text scrap will be
created that can be used in geoWrite, or in geoCalc. The scrap contains the
fields and data from all of the forms that are presently stored in your data
base. You can also build a scrap from selected forms that were recalled in a
search operation, or you can use just the currently displayed form to build
your scrap. Click on the appropriate button for each of these form options.
LJ
U
LJ
U
Form Options.
U
Selected forms
PI Current form
*
Iciiiceil
LJ
LJ
UU
m Style
geoFile Reference
bchased
9-18
LJ
LJ
LJ
BUILD A MERGE DATA FILE
You can also build a Merge Data File, that is actually a geoWrite
document, from your geoFile data that can be used in the geoMerge
application program. Simply click on the button next to the word Merge
in the dialog box. Your data will be arranged in a geoWrite document in
the format of a Merge Data File as follows (using the data from the
example above):
Name
Boxes
Returns
Commission
(page break inserted here by the program)
Bannon
32
6
$52.00
Barns
27
3
_.
$48.00
f)
*
Davidson
41
12
$58.00
Wilson
25
2
$46.00
The fields will appear in the order that you selected them in step 1 above.
In addition, remember that the field names in a Merge Data File must be
made up of alphanumeric characters (letters and numbers), and can contain
no spaces.
4:
Click on the OK icon. A text scrap, or Merge Data File (really a
geoWrite document), will be created and stored on your disk. (You will
be able to see the text scrap, or geoWrite document icon on your disk's
deskTop.)
9-19
geoFile Reference
5:
If you have created a text scrap, copy it onto a disk containing the
geoWrite, or geoCalc application, and paste it into either a geoWrite
document, or into a geoCalc spreadsheet (You could also copy the
geoWrite, or geoCalc application onto your geoFile work disk if you
have enough disk space). See your GEOS User's Manual, or your
geoCalc manual for more information on how to paste scraps into
documents.
If instead you have created a Merge Data File, you can use this file
immediately with the geoMerge application. Of course you will have
to either have the geoMerge application copied onto your geoFile work
disk, or copy the Merge Data File (actually a geoWrite document), onto
a work disk containing the geoMerge application. See your Writer's
Workshop, or geoDex User's Manual for more information on how to
useMerge Data Files with the geoMerge application.
The procedures in step 5 above assumes that you are working with a
single disk drive computer system. It is much easier to copy files and
use GEOS applications together with each other if you have set up your
computer system to use two disk drives (see your GEOS User's Manual
for information on how to set up your computer system to operate with
two disk drives).
r *
UJ
1—'
u
u
u
u
LJ
LJ
U
geoFile Reference
9-20
H
CHAPTER 10
GEOMERGE
n
INTRODUCTION
fl >-^
'
)
[—]
This chapter describes geoMerge, a GEOS based application that lets you
produce multiple copies of a document, where each document can have
unique names, addresses, or other data, that you define. You can either type
in the data yourself, or bring it in from another GEOS program such as
geoDex, geoFile, or geoWrite.
OBJECTIVES
i—i
1
This chapter contains a tutorial on geoMerge. In addition you will leam
how to:
1
•
Install the geoMerge application.
l_)
•
•
Use «IF...», and «IF...».. ,«ELSE»
•
•
•
statements in your Merge Forms.
Create a Merge Data File with geoWrite.
Use a Merge Data file with a Merge Form Document file.
Print your geoMerge documents.
j—] {
*-n
Create a Merge Form Document.
INSTALL GEOMERGE
Before you can begin to work with the geoMerge application you will have
to install the program in the same way that you installed the geoFile
r-j
application in Chapter 2.
P-j
After you have started, or booted (run the program), GEOS as is described
—
■
_
in the disk drive and open it by clicking on the Disk icon that is located in
the upper right-hand corner of the screen.
_
To install the geoMerge application:
1
in Chapter 3, close your System, or boot diskette and remove it from the
disk drive. Place your geoFile work disk, which you created in Chapter 2,
' l
n
i
.
f—1
1: Double click on the geoMerge icon that appears on the first page of the
deskTop. A dialog box appears saying that geoMerge is now installed.
2:
n
Click on the OK icon.
IMPORTANT: Be sure to install geoMerge only after you have booted,
or run GEOS with your own GEOS System, or boot disk, or with the
GEOS boot disk that will always be used with this geoMerge program.
Any geoMerge work disks that you make containing this particular
geoMerge program must also be used with this same GEOS boot disk.
(—1
_
10-1
GEOMERGE
u
GEOMERGE TUTORIAL
{
geoMerge application program. Later sections in this chapter will explain
,
This tutorial is designed to help you quickly learn the basics of the
and generalize the procedures outlined in the tutorial.
For now, follow the steps in the tutorial exactly; type in all characters as
they appear when directed to do so. Soon you will be creating your own
customized merge forms.
,
^
*—'
i
i
. l-i
w^
'—•
CREATE A MERGE FORM DOCUMENT
LJ
document. To do this:
LJ
To enter and practice with geoMerge, you must first create a merge form
1:
Copy the geoWrite application onto the same disk that contains your
geoMerge application. The geoWrite application is located on the back
LJ
side (the side without the disk label on it), of your geoFile diskette.
2:
Open the geoWrite application from the deskTop by double clicking on
LJ
its icon.
[_J
3:
Create a document called test memo.
|_j
4:
Type the following data into it:
i
«firstName», meet me at 2PM in the stairwell. Mike.
j
\^J f j
(The « » symbols serve to identify firstName as a label in this merge
. -,
form document.)
After typing in the form above, check it for accuracy. Then:
'—'
5: Exit geoWrite by selecting the quit menu item from the file sub
'—'
menu.
SELECT A MERGE FORM DOCUMENT
NOTE: Be sure that your printer is connected to your computer correctly,
and that you have the correct printer driver selected for your
LJ
I
i
system. (See "Choosing a Printer Driver and Printer" section in
Chapter 2, and "Selecting a Printer" in Chapter 3 of your GEOS
LJ
manual).
U
u
GEOMERGE
10-2
LJ
n
H
6:
Open geoMerge from the deskTop by double clicking on its icon. A
dialog box will appear asking you to choose a form document
7:
Click on test memo.
n
H
n
n
n
n
8: Now click on the OPEN icon to select this file as you merge form
document. (Clicking on the Cancel icon returns you to the desktop.)
TYPE IN MERGE DATA MANUALLY
n
Once test memo has been selected, the program will ask you if the merge
data will come from a geoWrite file.
Use qeoWfite file lot merge
information?
10-3
GEOMERGE
9:
Click on the NO icon (you will be entering data manually). Another
dialog box will appear asking you to choose print options:
u
LJ
U
LJ
10: Click on the OK icon. (An explanation of Print Options for use with
geoMerge can be found at the end of this chapter.)
Since you are typing in the merge data manually, the program will now
start asking you to supply data each time it encounters a label in the merge
form document In this example, when geoMerge encounters
«firstName» the following dialog box will appear
U
U
U
LJ
U
Enter data to substitute for
label "fifstName-:
U
U
U
U
U
11: Type in the name that will be substituted for the label «firstName».
You could type in any name. For this example, type in the name
Pauline.
U
U
12: Press [RETURN]
u
GEOMERGE
10-4
u
u
PRINT YOUR DOCUMENT
Once geoMerge has asked for, and you have typed in all of the proper
replacements, your print out will be of the form document test memo
with all of the substitutions made for the labels, provided that:
•
•
your printer is turned on
it is hooked up correctly
•
you have the correct printer driver selected
While geoMerge prints, you will see a Cancel icon on the screen. Click
on this icon if you wish to stop printing for any reason.
If you have gone through all of the above steps correctly your print out
should look something like this:
Pauline,
meet me at 2PM in the
stairwell.
Mike.
DO ANOTHER MERGE
When geoMerge has printed the document (or you have canceled the
printing process), you will be asked if you wish to do another merge.
If you click on the Yes icon, the program will again ask you to supply a
substitution for the label "firstName". You can then type in a different
name and geoMerge will print another document with the new name in
place of the «firstName» label. Try this with the merge form document
that you have created in this tutorial. Type in a different "firstName", press
RETURN and see what is now printed out
When you have made as many stairwell invitations as you wish to make,
go on to the next paragraph.
QUIT
If you click on the NO icon, you will return to the initial file dialog box,
where you can:
•
•
load and print a different merge form, or...
exit the geoMerge program and return to the deskTop.
10-5
GEOMERGE
u
NOTE: If you are using a two disk drive system you may click on the
Drive icon to look at a list of the files that are on the diskette that
I I
diskette than the one that is currently in the other disk drive, click
1
I
|
|
is in the other disk drive. If the file you want is on a different
on the Disk icon. (The Disk icon appears after you have click
on the Drive icon.) Now put the correct diskette into the disk
drive when you are asked to do so by the dialog box that appears.
Remember that the geoMerge program will not allow you to
exchange diskettes in the disk drive that the geoMerge program was
originally started, or run from.
MERGE FORM DOCUMENTS
This section will explain how you can make merge form documents.
LABELS
Any geoWrite document can be used as a merge form document. Wherever
K^J
u
|
|
u
U
u
|
|
|
|
j
|
n-^ j
|
i
i
i
.
,
.
you want a word, or group of words to vary from printing to printing, add a
label with a suitable name. The format for a label is as follows:
«labelName»
The «...» symbols indicate to the program that this is a label, and
"labelName" represents any name that you choose to be the name for that
particular label.
The label name cannot contain more than 20 characters, and there cannot be
any formatting, such as font changes, within the label name itself.
However, you can set the whole label, including the brackets, in boldface
(or any other style), if you wish the data to appear bold.
'—'
In addition, you may not use spaces within a label name. In other words,
'—'
you may not use last name as a label name. Use lastname instead.
Any one label name can be repeated as often as you wish throughout the
merge form document; geoMerge will ask you only once to supply the data
I—I
each time that the label appears in your merge form document.
I
to be substituted for the label in your print out and will then use that data
I
LJ
GEOMERGE
10-6
U
u
«H\..» STATEMENT
In addition to replacing labels with data, you may wish to have words or
groups of words included, or not included depending on some "key text"
contained in a label. For example, if you are writing cover letters to
prospective employers, you may want to include a specific portion of text if
you have previously spoken with them before, and exclude the text if you
have not. This can be done with an «IF...» statement.
The format for an IF statement is as follows:
«IF labelName = "key text"»text«ENDIF»
What this means is, "If the data typed in for labelName is exactly equal to
key text, then leave text in the print out; otherwise leave text out of the
print out.
NOTE: The quote marks ("...") in the example above are a necessary part
of the «IF...» statement. They indicate that what is contained
inside of them is key text.
SPECIAL NOTE
Lets say that you want geoMerge to search for a key text that has quote
marks in it such as:
Dave said, "hello" to me.
PI
PI
H
You will need to type a double set of quote marks both before and after the
text that is inside of the quote marks when you type your «JF...»
statement. In the example above you would type:
«IF greeting="Dave said,""hello"lt to me."»"Hi
Joe!"«ENDIR»
n
H
n
nn
|—I
in order to search for data in the label, greeting, that is equal to:
Dave said, "hello" to me.
and then to print to the statement:
"Hi Joe!"
NOTE: The «ENDIF» label tells the program that this is the end of
this particular «IF...» statement. After an «ENDIR» label
you could start a new «IF...» statement.
n
10-7
GEOMERGE
LJ
EXAMPLE
If you have the following merge form document:
I—'
u
Dear «interviewer»,
«IF talkedAlready ="true"» I enjoyed speaking with
^_J
you on «date». «ENDIE» I look forward to
interviewing with your company in the future.
u
And when asked to supply data, you type in:
|
|_j
for «date»
geoMerge will print the following:
Dear Mr.
I
Tibbs,
look forward to interviewing with
your company in the future.
{^
If you type in true instead offalse when you are asked to supply data for the
label «talkedAlready», your print out will look something like this:
Dear Mr.
Tibbsf
I enjoyed speaking with you on June
I look forward to interviewing with
your company in the
GEOMERGE
future.
10-8
j
u
Mr. Tibbs for «interviewer»
false
for «talkedAlready»
June 9th
LJ
9.
n
«If...».. .«EIse» STATEMENT
'
You may also want to print one portion of text if a label is the same as the
famm
key text, and a different portion if it is not This can be accomplished with
PI ^-v
The «IF...».. .«ELSE» statement has the following format
PI
H
an «IF...».. .«ELSE» statement.
«IF labelName="key text"»textl
«ELSE»text2«ENDIR»
n
P
p|
p|
What this means is, "If the data that you type in for labelName is exactly
the same as the key text, then print the text that immediately follows the
«IF... "key text"» statement If it does not exactly equal the key text,
then print the text that follows the «ELSE» statement
NOTE: Again, the «ENDIF» statement indicates the end of the
«JF...» statement, or in this case the «IF...»«ELSE»
|—I
p
1
' ! ^^
n (1
N
n
H
H
P
PI
statement
EXAMPLE
If your form contains,
Dear «interviewei»,
«IF talkedAlready ="true"» I enjoyed speaking with
you «date». «ELSE» I have heard great things
about the salaries you oflFer.«ENDIR» I look forward
to interviewing with your company in the future.
And when you are asked to supply the data to be used you type in,
Mr. Tibbs
false
June 9th
for «interviewei»
for «talkedAlready»
for «date»
geoMerge will print the following:
Dear Mr.
Tibbs,
I have heard great things about the
salaries you offer. I look forward to
interviewing with your company in the
future.
10-9
GEOMERGE
u
If you type in true instead offalse when you are asked to supply data for the
label «talkedAlready», your print out will look something like this:
I—I
Dear Mr. Tibbs,
LJ
I enjoyed speaking with you on June 9.
I
I
I
I
I look forward to interviewing with
your company in the future.
NOTE: An «IF...», or «EF...».. .«ELSE» statement cannot
start on one page of a geoWrite document and end on a following
page. Also, these statements cannot be "nested;11 that is, an
«IF...», or <<EF...»...«ELSE» statement could not
have appeared in either text 1, or text 2 in the previous examples.
However, a label(s) could appear within text 1, or 2.
\^J
LJ
LJ
[j
u
LJ
U
u
GEOMERGE
10-10
MERGE DATA FILES
Manually typing in the data to be substituted for each label is not the only
way to merge data with a merge form document The data can also come
from a "merge data file."
Merge data files are simply geoWrite documents. These files can be created
with geoWrite, or with other products from Berkeley Softworks, such as
geoDex, geoFlle, or geoCalc.
CREATE A MERGE DATA FILE
WITH GEOWRITE
LABEL RECORD
A merge data file begins with the label record. This is a list of all of the
labels to be "substituted for" in the merge form document Each label must
appear on a line by itself. For example, the label record for a form letter
might be:
firstName
lastName
address
city
state
zip Code
(page break inserted here by the program)
r^
The asterisk at the end of the label list indicates the end of the label record.
The program will also automatically insert a page break after this first
asterisk.
■
IMPORTANTrThere is only one label record in a merge data file, and it
_
must always be the first record.
n
H
10-11
GEOMERGE
DATA RECORD
The next line after the asterisk is the first line of the first data record.
Each data entry in the data record is separated by a|RETURN.]
NOTE: A data entry may be up to 200 characters long, and may include
several lines of text, as long as the|RETURNJkey is not pressed
within the data entry; for long data entries let the word-wrap create
new lines.
IMPORTANT:Each data record must have corresponding data entries, or
blank lines, for every line in the label record. In other words, each record
following the first must have the same number of lines in it as has the first
record.
Whatever characters appear in the first data entry in your data file will be
substituted for the first label in the label record wherever that label appears
in your merge form when you make a print out. The second data entry,
which follows immediately after the first entry in your data file, is
substituted for the second label entry in the label record wherever that label
appears in your merge form, and so on, in a similar fashion for all of the
labels in the label record.
A blank line (a|RETURN[on a line by itself), in the data record tells the
merge program to substitute a blank for the corresponding label in the label
record wherever that label appears in your merge form. In other words, each
data record must have corresponding data entries, or blank lines, for every
line in the label record.
An asterisk on a line by itself indicates the end of the data record. The line
following the asterisk is the first line of the next data record in your data
file.
Your data file may contain as many data records as you like.
IMPORTANT:The last data record in your merge data file must be
followed by an asterisk and aJRETURNlbefore you close and save the merge
data file (a geoWrite document) on your diskette.
Labels in geoMerge may be up to 20 characters in length. Labels can
contain alphanumeric characters only (letters and numbers), and no spaces.
Data entries may be up to 200 characters in length. Data entries may
contain any type of character (alphanumeric and non-alphanumeric), and
may also contain spaces.
GEOMERGE
10-12
USING A MERGE DATA FILE WITH A
MERGE FORM DOCUMENT
The following sample files and the print out examples demonstrate using a
merge data file with a merge form document file.
FORM LETTER FOR USE WITH GEOMERGE
Merge Form Document
«firstName» «lastName»
«address»
«city», «state» «zip Code»
Dear «firstName»,
Thanks for the check.
Merge Data File
firstName
lastName
address
city
state
zip Code
(page break inserted here by the program)
John
Smith
1234 Main Street
Any Town
PA
19152
*
Carl
Greenskeeper
141 Country Club Drive
Chicago
IL
60610
10-13
GEOMERGE
PRINT OUTS
First Document:
John
Smith
1234 Main Street
Any Town,
PA
19152
Dear Johnf
Thanks
for the
check.
Second Document:
Carl
Greenskeeper
141 Country Club Drive
Chicago,
Dear
IL
60610
Carlf
Thanks
for the
check.
GEOMERGE PRINTING OPTIONS
Select either high, draft, or NLQ printing mode depending on the
format that you want to use.
High Quality Mode
Click on the high button to choose the high quality mode.
This is the "default" and recommended mode for geoWrite (geoMerge),
output. The high quality mode produces all of the fonts and styles in the
same format as they appear to you on the screen.
GEOMERGE
10-14
Draft Quality Mode
Click on the Draft button to choose the draft quality mode.
This mode does not produce different fonts and styles and will not produce
the same formatting as that which appears on the screen. The draft quality
will, however, print much faster than the high quality mode. Use this
mode to get quick, rough drafts of your document. Pictures or graphics
cannot be printed in this mode.
NOTE: Draft quality mode does not work with some early versions of the
printer driver files. Be sure to use the version 2.0 printer driver
files supplied on the back side (the side without the disk label), of
your geoFile diskette for draft quality printing. Copy the file that
you need onto the same disk and side that contains your geoMerge
application.
NLQ Mode
Click on the NLQ button to choose the near letter quality mode.
This mode can be used with letter quality printers. This mode does not
produce different fonts and styles but it will produce the same formatting
that appears on the screen. Pictures or graphics cannot be printed in this
mode.
To use this mode, all text must be in the Commodore 10 font. The
Commodore 10 font is supplied on your geoFile diskette.
A few printers have different page lengths for NLQ printing than for high
quality printing. Selecting the NLQ spacing menu item from the page
sub menu causes the NLQ page length to be used. The only time that you
should use NLQ spacing, is when you print in the NLQ mode.
NOTE: NLQ mode does not work with the early versions of the printer
driver files. Be sure to use the version 2.0 printer driver files
supplied on the back side of the geoFile disk for NLQ printing.
The From Page and To Page boxes allow you to print a part of the
file. Normally the entire file is printed. To change the pages that are
printed out, click inside either of the boxes and enter a new value.
The Single Sheet and Tractor Feed buttons allow you to print with
regular continuous printer paper, or with single sheets fed in one at a time.
geoMerge will stop after printing each page if Single Sheet is selected
so that you can insert a new sheet. Click on the OK icon in the dialog box
that appears when you are ready to print the next sheet.
10-15
GEOMERGE
u
D
U
.
.
.
u
u
D
U
uu
u
GEOMERGE
10-16
u
D
INDEX
n
n
n
n
n
A
add forms
align, on/off.
application program
automatic
field alignment
4-8,4-15
B
BACKUP, program
blank form, print
blue brackets
2-5
8-3,8-7
4-5,4-11
i
n
n
5-3,5-4
9-11
9-3
boot
GEOS
9.3
2-4,3-1,
3-2,3-3,
3-5
n
boot disk, GEOS
2-3,2-4,
n
brackets, blue
4-5,4-11
sub layout
build scrap
4-13
9-8
n
3-2,3-3
C
Calculator.
change layout
character, "wild card"
replace with
clear, form
text
2-6
9-8
6-4,6-5,
6-12,6-13,
4-5,4-11
9-8
9-8
4-4,4-10
10-2
6-2,9-12
4-7,4-13
Create/Open/Quit
dialog box
3-2,9-3
cursor keys
customer service
cut, data.
cut, field name
5-2,5-4
1-4
9-11
9-8
D
data, define
10-1
record
data entry
10-11
5-1
mode
deskTop,
9-12
9-3
9-9
computer.
field
field name
layouts
create, field.
form document
search form
sub layout
9-5
9-12
comment field
Information
Network.
key
copy, data
disk
7-3,7-5,
9-9
9-7
9.3
8-5,8-9
2-7,4-3,
C64
6-3,6-6
thru6-ll,
9-3
9-11
2-4,2-7
for updating
delete, field
design form
9-6
field name
close, file
column header.
Print
command menu
Commodore, 128
conditional search
3-3
3.3
return to
desk accessories
Desk Pack 1...
diskette
disk copy utility
disk drive
disk, icon
in geoMerge
display,
1-4
3-3,9-3
change appearance
5-2,5-3,
,
9-4,9-9
7-4
9-9
4-1,4-17,
9-4
2-6,9-4
3-2,3-5
2-6
2-6
2-2
2-2,2-5,
2-6,9-4*
2-2,2-3,
2-6,3-3'
3.3
10-6
4-7,4-14,
4-17
2-2
INDEX
document,
create
3-2,3-4
form page, geoFile
form letter.
4-3,9-4
1-2,10-13
geoFile
icon
open existing
3-2,9-4
format, disk.
2-5
3-5
open new
drive icon, geoMerge
3-2,3-4,
G
3-5
geoCalc
3-4,3-5
geoDex
1-2
10-6
geoFile
l-U-2,
1-2
2-4
E
form page
Empty Layout
enter, data
4-13
5-1,5-4
geoMerge
geoPaint
1-2
2-6
geoPrint Cable
geoWrite
GEOS
2-3
1-1
1-1,2-2,
GEOS Userfs Manual
Graphics Grabber.
grid background
ofi/on
2-6,9^
3-3
2-6
4-3
4-7,4-8,
geoMerge
10-2
merge data
10-4
print mode
search mode
8-2,8-6
6-2,6-6
F
field
4-3
4-4,4-17
copy
4-5,4-11
create
4-4,4-10
move
4-5,4-11,
name
4-17
4-4,4-10
hardware
2-2
names, print.....
outline
4-17
8-3,8-7
4-4,9-4
hide pictures
9-7
outlines, print
overlap
8-2,8-6
4-11,4-12
I
remove
4-6,4-12
quit
3-2
select
re-size
4-4,5-3
4-5,4-12,
create
3-2
open
3-2
File dialog box
Font Pack
form, add
design
look through
print
search
H
LJ
icon
U
IF statement
IF...ELSE statement
ignore case
in this form, replace
in all form, replace
indicator, outline
oftfon
8-4,8-5,
8-7,8-9
6-2,6-6
information, update
input device
7-2
2-2,2-3
install, geoFile
2-3,2-4,
u
2-6,9-5
10-1
u
geoMerge
interface card
10-7
10-9
9-12
9-12
9-13
4-8
9-11
U
4-17
3-2,9-4
2-6
5-3,5-4
4-1,4-17,
9-4
5-3,5-4
thru6-ll
form design, mode....~.... 9-9
INDEX
4-14,9-5,
9-10,9-11
2-3
U
\
I
i
I
u
G
0
u
H
1
labels
load, GEOS
look through forms
i
n
O
L
n
n
10-6
3-3
5-3,5-4
M
Master form
4-4,4-10,
save
4-6,4-13
overview
1-2,3-1
open, geoFile
3-2,3-3
3-4
existing document.... 3-4,3-5
new document
3-4
options, replacement
7-3,7-5,
9-5
n
n
n
n
n
outline, field
9-5
4-4,9-4
overlap fields
4-11,4-12
maximum amount
of data
maximum field size
5-2,5-5
4-5,4-17
P
merge data,
10-4
pack form
1-2,9-19,
10-11
page preview
8-4,8-7,
9-5,9-15
4-9,4-16,
parallel printing cable
paste, data.
field name
picture
perform search
position indicator.
oftfon
preview, file
4-17,9-5
2-3
9-11
9-8
9-8
6-2
4-3
4-16,9-11
9-7
file
merge form
document
file
move, around form
n
10-6
10-13
4-8,4-15,
between fields
4-17
5-2,5-4,
field.
5-5
4-5,4-11,
position indicator.
4-17
4-8,4-9,
tab
4-15,9-5
4-5,4-11,
moving handle
monitor tone
9-5
4-8
4-11
N
name, field.
nested statement
new form
Notepad.
number field.
4-4,4-10,
4-17
10-10
9-12
2-6
9-9
preview form layout
print,
all boxes
all field names
all forms
blank form
column header.
current form
draft quality
field name
file
field outlines
form
from geoMerge
high quality
merge document
8-2,8-6
9-14
9-13
9-14
8-3,8-7,
9-14
8-5,8-9
9-14
10-15
8-3,8-7,
9-13
9-8
8-2,8-6
8-4,8-5,
8-7,8-9
10-14
10-14
10-5
INDEX
LJ
(print, cont1)
mode
NLQ
no boxes
9-9
10-15
9-14
no field names
selected form
9-14
9-14
single sheet
tractor feed
the box
print mode, enter.
10-15
10-15
9-14
8-2,8-6
print on
labels
index cards
computer paper
printer.
printer driver.
8-5,8-9
8-5,8-9
8-5,8-9
2-3
2-6
proportional input
device
Q
2-3
QuantumLink.
1-4
quit, file
9-8
R
Ram-expansion unit
(REU)
record,
data
label
10-12
10-11
replace with character
7-3,7-5,
9-12
4-6,4-12
9-7
9-5
merge
options
10-5
7-3,7-5,
9-5
re-size field
4-5,4-12,
tab
run,GEOS
4-5,9-5
3-2,3-3
INDEX
search, conditional
4-17
LJ
4-6,4-13
4-9,4-16,
LJ
9-6
6-3,6-6
thru6-ll,
9-3
•
u
search form,
6-2,6-6,
u
create
search mode, enter
search, perform
select field
set sort field, name
6-2
6-2,6-6
6-2
4-4,5-3
9-9
9-9
9-8
9-7
u
set style
show count
show pictures
software
sort field,
choose
7-6,9-6
2-2,2-6
9-6
4-6,4-12,
4-17
step-by-step
sub layout,
1-2,3-1
4-6,4-13,
brackets
create
4-13
4-7,4-13
9-5
9-9
9-12
replacement,
scroll
2-2,2-3,
recover, field name
form
text
remove field.
rename, file
S
save, Master form
open existing
sub menu
substitutions, merge
System, disk.
T
text cursor
text field
9-6
4-14
9-6
10-5
3-2,3-3
text scrap
5-2,9-6
9-9
1-1,1-2,
tide bar.
4-3,4-4
U
update information
manually
automatically
9-18
9-6
7-2
7-2,7-4
7-3,7-5
LJ
Li
LJ
U
U
n
H
ri
i
V
viewing window
4-8
w
n
"What if..."
1-3
white background, oflToni. 4-7,4-8,
4-14,9-11
"wild card" character
..6-4,6-5,
6-12,6-13,
9-6
H
workdisk, geoKle
r-i
Writer's Workshop
word-wrap
10-12
2-3,2-5,
9-6
2-6
n
n
n
n
INDEX
FOR CUSTOMER SERVICE CALL:
(415) 644-0890
9AM-5PM
(PACMC STANDARD TIME)
INDEX
BERKELEY SOFTWORKS
Software
2150 SHATTUCK AVE.
Problem Report
BERKELEY, CA 94704
Name_
Street
City
State
Phone
Date
Zip_
Instructions
Use this form to report software bugs, hardware compatibility issues,
documentation enhancements, or other suggested improvements. Mail this
form, or a copy of it to Berkeley Softworks.
Software
Title
Type of Problem
Hardware Compatibility
Software Bug
Documentation Bug
Software Improvement
Other
Hardware Description
C64
C128
Printer
Other.
_
Disk Drive_
Printer Interface (if any)
Peripherals
__
Description of Suggestion, or Problem
Describe your problem, or suggestion.
BERKELEY SOFTWORKS
2150 SHATTUCK AVE.
BERKELEY, CA 94704
Software
Problem Report
Name.
Street.
City
State
Phone
Date
Zip_
Instructions
Use this form to report software bugs, hardware compatibility issues,
documentation enhancements, or other suggested improvements. Mail this
form, or a copy of it to Berkeley Softworks.
Software
Title
Type of Problem
Hardware Compatibility
Software Bug
Documentation Bug
''
Software Improvement
Other
n
Hardware Description
R
C64
pi
rnnier
C128
Printer Interface (if any)
' '
n
n
n
n
Peripherals.
Other.
Disk Drive.
Description of Suggestion, or Problem
Describe your problem, or suggestion.
NOTES
n
n
n
n
n
n
n
n
n
n
n
NOTES
U
u
LJ
U
LJ
U
U
LJ
LJ
U
U
U
U
U
uu
U
U
U
NOTES
n
n
n
n
n
n
n
nO
n
n
H
u
u
LJ
U
U
LJ
U
LJ
U
U
u
u
u
u
u
u
u
•U
Ou
u
u
u
o
n
U
U