1
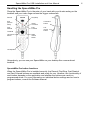
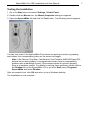
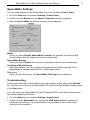
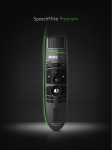
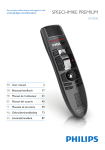
SPEECHMIKETM
PRO
6274
INSTALLATION AND
USER MANUAL
PHI
SpeechMike Pro USB Installation and User Manual
COPYRIGHT
© 1997 – 2002 Philips Speech Processing.
All rights reserved. Reproduction in whole or in part is prohibited without the written
consent of the copyright owner.
Information in this manual is subject to change without notice.
TRADEMARKS
SpeechMike is a trademark of Philips.
DISCLAIMER AND NOTICES
Philips Speech Processing has carried out extensive testing with most popular
configurations. However, since PC add-ons and drivers change very rapidly, we are
unable to guarantee conflict-free operation. Possible solutions for solving such conflicts
can be found in the Readme file.
The CE mark confirms that the machine corresponds to the
relevant guidelines of the European Union.
This manual has been printed on chlorine-free, recycled paper,
in line with the highest standards of environmental friendliness.
The cardboard used for packaging can be recycled. This
electronic facility contains recyclable material.
Technical changes and errors excepted.
2
SpeechMike Pro USB Installation and User Manual
Introduction
Thank you for buying a Philips SpeechMike.
The SpeechMike Pro has been designed to offer optimum user convenience and
greater efficiency for your daily work. This manual covers the installation of the
SpeechMike Pro hardware and software, the handling of the SpeechMike Pro and the
testing of the installation.
SpeechMike Pro USB features
• Professional multimedia input device for single-handed operation.
• LEDs for visual and built-in loudspeaker for acoustic feedback.
• All buttons can be programmed to suit individual user preferences.
Package contents
• Philips SpeechMike Pro LFH 6274 with self-adhesive microphone holder.
• Mouse drivers for Windows 98 SE, Windows ME, Windows 2000 and Windows XP.
• SpeechMike Control Application to customize button settings for the control of
Windows applications such as Microsoft Office and Internet applications.
• SpeechMike sound recorder with enhanced recording and playback features.
• SpeechMike Pro User Manuals.
Support and feedback
For the latest information not contained in the manual, please refer to the Readme file
on the SpeechMike CD or go to the Start menu, Programs, SpeechMike and select
Readme.
For the latest version of the SpeechMike software package, please contact your
software vendor.
For additional information on professional speech processing and speech recognition
solutions from Philips Speech Processing, please visit our web site at:
http://www.speech.philips.com
For further information, please refer to the "World-Wide Service Information" booklet
included with this package.
3
SpeechMike Pro USB Installation and User Manual
4
Installation
System requirements
• IBM-compatible PC
• USB port
• Minimum of 32 MB RAM recommended
• Windows 98 SE, Windows Me, Windows 2000 or Windows XP
Hardware installation
Windows ME, Windows 2000 and Windows XP:
1. Turn on your computer and plug the SpeechMike Pro USB into the USB port.
2. The New Hardware Found message will be displayed shortly on your screen.
Note: If this message does not appear, verify whether the USB port is enabled in the
BIOS of your system. See your hardware documentation for details or contact your
hardware vendor.
3. Installation will proceed automatically.
Windows 98 SE:
Note: The Windows 98 Second Edition CD contains the USB drivers for the microphone
and loudspeaker only. The drivers for the LED display and dictation buttons must be
installed from the SpeechMike CD before connecting the hardware.
1. Turn on your computer and insert the SpeechMike CD without plugging the
SpeechMike Pro USB into the USB port.
2. Autorun.exe will start. If this program is not run when you insert the SpeechMike CD,
start setup manually by doing the following:
• Double-click the My Computer icon on the desktop.
• Double-click the CD-ROM drive icon; you will be shown the contents of the CD.
• Start the program autorun.exe by double-clicking it.
3. Click Install to begin installation. When you are prompted to select the components
you wish to install, select the Control application, the SpeechMike recorder and
the SpeechMike driver. Follow the instructions on the screen to install the software
components.
4. Remove the SpeechMike CD and insert your Windows 98 SE CD.
5. Plug the SpeechMike Pro USB into the USB port. Windows will find a total of three
new devices.
6. When the Add New Hardware Wizard starts, click Next.
7. On the next screen, make sure that Search for the best driver for your device.
(Recommended) is selected. Then click Next.
SpeechMike Pro USB Installation and User Manual
5
8. On the following screen, the only option selected should be Specify a location, and
the path of the Windows\inf subfolder should be displayed in the field. If necessary,
uncheck all other options and click Next.
9. Windows will now start looking for the necessary files; click Next.
Note: The required files from the Windows 98 SE CD can be found in the
Setup/Win98 subdirectory, browse to this directory and click OK.
10. After the first part of the installation has been completed successfully, click Finish.
11. Repeat steps 6–10 until all three SpeechMike Pro USB components are installed
correctly .
SpeechMike Pro
USB plug
Microphone
holder
Software installation
Note: A user must have administrator rights to install the program under Windows 2000
or Windows XP. Contact your system administrator if you need help.
Windows ME, Windows 2000 and Windows XP:
The SpeechMike Pro software is delivered on a CD. When you insert the
SpeechMike CD into your CD-ROM drive, autorun.exe is started. Select Install to begin
the installation. If this program is not run when you insert the SpeechMike CD, start
setup manually by doing the following:
1. Double-click the My Computer icon on the desktop.
2. Double-click the CD-ROM drive icon; you will be shown the contents of the CD.
3. Start the program autorun.exe by double-clicking it and select Install.
Windows 98 SE:
The software has already been installed as part of the hardware installation described
above.
SpeechMike Pro USB Installation and User Manual
Handling the SpeechMike Pro
Place the SpeechMike Pro in the palm of your hand with your thumb resting on the
trackball and your index finger across the trigger underneath.
Record
Play/Stop
EOL
(End-ofletter)
Insert/
Overwrite
Fast
Rewind
Fast
Forward
Trackball
Left mouse
button
Command
button
Left
mouse
button
Right
mouse
button
Loudspeaker
Alternatively, you can use your SpeechMike on your desktop like a conventional
trackball.
SpeechMike Pro button functions
When the SpeechMike Pro is installed correctly, the Record, Play/Stop, Fast Rewind
and Fast Forward buttons are available and ready for use. However, the functionality of
each button depends on the application and whether the buttons are used in a
programmed mode. For more information on individual button settings and on how to
program buttons, consult the Software Manual.
6
SpeechMike Pro USB Installation and User Manual
Testing the Installation
1. Go to the Start menu and select Settings, Control Panel.
2. Double-click the Mouse icon; the Mouse Properties dialog box appears.
3. Open the SpeechMike tab and click the Test button. The following screen appears:
You can now check if the SpeechMike Pro buttons are working correctly by pressing
each button; the corresponding button on the screen will toggle.
Note: If the Record, Play/Stop, Fast Rewind, Fast Forward, INS/OVWR and EOL
buttons do not work properly in a programmed mode, there is a compatibility
problem with an additional mouse; if the mouse buttons do not work properly,
there is a hardware conflict. For details on solving these problems, please refer to
the Readme file on the SpeechMike CD or go to the Start menu, Programs,
SpeechMike and select Readme.
After a successful test, click OK and return to your Windows desktop.
The installation is now complete.
7
SpeechMike Pro USB Installation and User Manual
8
SpeechMike Settings
You can make settings for the SpeechMike Pro in the Windows Control Panel.
1. Go to the Start menu and select Settings, Control Panel.
2. Double-click the Mouse icon; the Mouse Properties dialog box appears.
3. Open the SpeechMike tab and the following screen appears:
Mouse
When you select Disable SpeechMike Trackball, the trackball, the left and right
mouse buttons and the trigger button will be deactivated.
SpeechMike Buttons
When you select Disable, the six freely configurable buttons will be deactivated.
Use Bottom Mike Button as
With this selection, you can configure the trigger button on the underside of the
SpeechMike to emulate either the left or right mouse button.
Test button
When you click this button, the SpeechMike Test Page will be displayed.
Troubleshooting
For the latest information not included in the user manual, please refer to the Readme
file. The file can be found on the SpeechMike CD and in the SpeechMike program group
in the Start menu.
If you are using your SpeechMike Pro with Windows 98 SE, check that all components
are installed properly as follows:
1. Go to the Start menu and select Settings, Control Panel.
2. Double-click the Multimedia icon; ensure that USB audio device is selected for
playback and recording. If the SpeechMike is not available in the Control Panel,
unplug it and reconnect it.
SpeechMike Pro USB Installation and User Manual
9
3. Ensure that the following components are installed in the Device Manager:
Under Human Interface Devices:
• HID compliant consumer control device
• HID human interface device
Under Universal Serial Bus Controllers:
• USB Universal Host Controller
• USB composite device
• USB root hub
Under Sound, video and game controllers:
• USB audio device
• USB audio device
Attention:
Using the SpeechMike Pro USB together with certain USB hubs on certain PCs may
cause the operating system to freeze during booting.
Workaround: Unplug your SpeechMike before booting and reconnect it afterwards.
To solve this problem, we recommend replacing the USB hub or connecting your
SpeechMike Pro USB directly to the USB port of your computer.
Warning
The cable of your SpeechMike can be damaged if it is kinked or if it is pulled or twisted
too much. Please handle the cable carefully to ensure the best possible performance of
your SpeechMike.
If the LEDs and buttons of your SpeechMike Pro USB do not work correctly, refer to the
Readme file.
Cleaning the Trackball
1. Turn the retainer ring counterclockwise to remove the
ball.
2. Wipe the ball with a clean, lint-free cloth.
3. Blow carefully into the ball cage to dislodge dust and
lint.
4. Look for a build-up of dirt on the rubber rollers inside
the ball cage.
5. If dirty, clean the rollers using a cotton swab
moistened slightly with alcohol.
6. Make sure that fluff from the swab is not left on the
rollers.
7. Replace the ball and retainer ring.
© 2002 by Philips Speech Processing
5103 109 9455.1
T
www.speech.philips.com