1
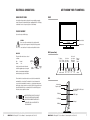
15”/19” HD Ready LCD TV
User Manual
WELCOME
Contents
Thanks for buying this Wharfedale 15” or 19” LCD TV. This guide will help you set
up and begin using your Wharfedale TV.
WELCOME........................................................................................................... 2
First, check the contents of your box with the parts checklist below:
IMPORTANT INFORMATION................................................................................... 4
SAFETY NOTICE................................................................................................... 5
• Wharfedale 15” or 19” LCD TV
ELECTRICAL CONNECTIONS................................................................................. 6
• Remote control
GET TO KNOW YOUR TV CONTROLS..................................................................... 7
• AA battery x2
GET TO KNOW YOUR REMOTE CONTROL.............................................................. 8
• Audio cable
Now you can get started!
CONNECTING YOUR TV......................................................................................... 9
setting up....................................................................................................... 12
Tuning your TV .............................................................................................. 14
Using your TV.................................................................................................. 15
Adjusting your picture and audio settings.............................................. 17
SPECIFICATION.................................................................................................. 20
TROUBLESHOOTING........................................................................................... 21
PRODUCT GUARANTEE....................................................................................... 22
2
WHARFEDALE | HD Ready LCD TV | User Manual | Customer helpline: 0845 604 0105
WHARFEDALE | HD Ready LCD TV | User Manual | Customer helpline: 0845 604 0105
3
IMPORTANT INFORMATION
SAFETY NOTICE
Read all instructions before use and keep for future reference.CAUTION
CAUTION
RISK OF ELECTRIC SHOCK
DO NOT OPEN
CAUTION
RISK OF ELECTRIC SHOCK
DO NOT OPEN
Risk of electric shock, do not open.
Do not attempt to service this product yourself as opening or removing covers
may expose you to dangerous voltage or other hazards. Refer all servicing to
qualified service personnel.
CAUTION
RISK OF ELECTRIC SHOCK
DO NOT OPEN
WARNING
• T o reduce the risk of fire or electric shock, do not expose this product to rain
or moisture. Position where there is no risk of splashing or dripping of liquids.
Do not place vases or any other objects filled with liquids on the unit.
• T o avoid fire, no naked flame source, such as lit candles, should be placed
on or around the unit.
• A t least 10cm of space should be left around the apparatus for
sufficient ventilation.
WARNING
F or your protection, please read these instructions completely and keep this
manual for future reference.
• U
nplug the device from the wall socket when it is not being used for a long
period of time. When there is lightning, unplug the unit from the wall socket
immediately. Never touch the aerial cable during lightning.
• The device is not suitable for children to operate.
• T o prevent damage or electrocution – do not push objects of any kind through
the openings in this device.
• U
nplug the device from the wall socket before cleaning. Do not use liquid
cleaners or aerosol cleaners. Use a damp cloth for cleaning.
• Power supply cords should be routed safely to prevent damage to the cord.
• P lace the TV in such a position that the screen is not exposed to direct sunlight.
It is best to have soft indirect lighting while watching TV. Avoid dark
environments and screen reflection as these may cause eye fatigue.
• The ventilation holes must be kept clear from obstructions.
• W
hen the TV has been moved from a cold place, it will need time for the
moisture from inside to evaporate.
• In case of smoke, or unusual noises or smells coming from the unit, switch it
off, unplug it from the wall socket and contact your dealer or service centre.
• U
se an isolated power transformer during maintenance as the chassis of the
device may be electrified.
• T he mains plug is used for disconnecting the device and to make it
easily accessible.
• Make sure the unit is connected to a mains socket which is earthed.
4
WHARFEDALE | HD Ready LCD TV | User Manual | Customer helpline: 0845 604 0105
WHARFEDALE | HD Ready LCD TV | User Manual | Customer helpline: 0845 604 0105
5
ELECTRICAL CONNECTIONS
GET TO KNOW YOUR TV CONTROLS
Connecting to power
CAUTION
RISK OF ELECTRIC SHOCK
DO NOT OPEN
FRONT
Check that the voltage marked on the product corresponds with your supply
voltage. This product is fitted with a BS plug complying with BS1363. If this plug
is unsuitable or needs to be replaced, please note the following:
Plug Replacement
If you need to replace the fitted plug.
Power indicator
WARNING
Never connect live or neutral wires to the earth terminal of
the plug. Only fit an approved 13 Amp BS1363/A plug and the
correct rated fuse. If in doubt, consult a qualified electrician.
BACK (connections)
IMPORTANT
The wires in this mains lead are coloured
as follows:
Blue
Brown
Remote sensor
Use to turn
To change
the TV Menu the volume
mode Button up or down
FUSE
BLUE
(NEUTRAL)
N
Neutral
Live
As the colours of the wires in the mains
lead of this apparatus may not correspond
with the coloured markings identifying the
terminals in your plug, proceed as follows:
OUTER
SLEEVE
CORD GRIP
SOURCE MENU
VOL-
VOL+
CH-
CH+
POWER
SIDE
Antenna input
Earphone output
VGA/COMPONENT/S-VIDEO audio
input interface
YPbPr input
ASTE ELECTRICAL PRODUCTS SHOULD NOT
W
BE DISPOSED OF WITH HOUSEHOLD WASTE.
PLEASE RECYCLE WHERE FACILITIES EXISTS.
CHECK WITH YOUR LOCAL AUTHORITY FOR
RECYCLING ADVICE.
WHARFEDALE | HD Ready LCD TV | User Manual | Customer helpline: 0845 604 0105
Power or
Standby
Button
BROWN
(LIVE)
L
The wire which is coloured blue must be connected to the terminal, which is
marked with N or coloured blue. The wire which is coloured brown must be
connected to the terminal which is marked L or coloured brown. Always ensure
that the plug cord grip is fastened correctly. If a 13A (BS1363) fused plug is used
it must be fitted with a 3A fuse conforming to BS1362 and be ASTA approved.
If in doubt, contact a qualified electrician.
6
Use to scroll
up or down
through the
TV channels
S-VIDEO input
SCART input
VGA input
HDMI input
WHARFEDALE | HD Ready LCD TV | User Manual | Customer helpline: 0845 604 0105
7
GET TO KNOW YOUR REMOTE CONTROL
Show channel details
Press to switch off the sound
SLEEP
DISPLAY
MUTE
NICAM
PC
AUTO AD
STANDBY
Press to set a sleep timer
SOURCE
Press to switch to PC mode
CONNECTING YOUR TV
ANTENNA CONNECTION
Connect your aerial to the TV as shown in the picture below:
Press to switch off the
picture and sound
Multi-fam ily D we llings /Apartments
(Conne c t to wall a ntenna socket)
Select which source to play/
watch from
Auto adjust in PC mode
wall a ntenna
s ock et
ANT IN
R F c oa xia l wire ( 75 ohm)
Numerical buttons use to select a channel
V HF a ntenna
U HF a ntenna
outdoor
a ntenna
Single -fam ily D we llings / Hous e s
(Conne c t to w all jack for outdoor a ntenna)
S SM
PSM
Select Picture mode
Be c are ful n ot to b e nd the b ronze
wire wh e n connec ting the antenna .
Select Sound mode
OK
Quick view, press to view the
last selected channel
P+
Press to access the
Settings menus
IMPROVE YOUR SIGNAL
Q.VIEW
Exit the menu
V-
MENU
V+
To improve picture quality in a poor signal area, use a signal amplifier
(not supplied).
Use to scroll up or down
through the TV channels or
turn the volume up or down
PTEXT
INDEX
Request teletext index page
Teletext Buttons
SUBCODE MIX
View teletext mixed with a
TV programme
Access subcoded page
TIME
Display the Teletext time
Pause a page on teletext
8
ANT IN
HOLD
SIZE
REVEAL
Teletext fast colour
navigation buttons
Reveal hidden words
in teletext
Change the screen display size
(Teletext mode only)
WHARFEDALE | HD Ready LCD TV | User Manual | Customer helpline: 0845 604 0105
WHARFEDALE | HD Ready LCD TV | User Manual | Customer helpline: 0845 604 0105
9
CONNECT YOUR PC TO THE TV
CONNECT A VCR TO YOUR TV
You can use your TV as a monitor for your personal computer by connecting it
with a VGA cable (not supplied).
There are two ways in which you can connect a VCR to your TV. Make sure that
both the TV and VCR are switched off before you connect them.
1 Read your computer user guide and check it has a VGA connector.
2 Turn the power off on your TV and PC.
Connection Option 1
3 C
onnect a D type 15-pin VGA interface cable to the VGA video interface
connector on the PC. Connect the other end of the cable to the PC interface
connector on the TV. Tighten the screws on the VGA connectors and connect
the audio cable (not supplied) to the audio input socket on the back of the TV.
Connect the aerial cable as connection 1. Refer to the VCR manual for the
settings instructions.
4 Turn on the power of the TV first and then the PC.
Connection Option 2
5Press the SOURCE button on the TV or TV remote control to set the video
input mode to PC.
1Connect the audio and S-VIDEO cables from the VCR output jacks to the TV
input jacks.
6Once the image shows, if there is noise present, change the PC mode to
another resolution, change the refresh rate to another rate or adjust the
brightness and contrast on the menu until the picture is clear.
2 Insert a video tape into the VCR and press PLAY on the VCR.
CONNECT A DVD PLAYER TO YOUR TV
SCART INPUT
Connect the DVD video outputs (Y, PB, PR) to the COMPONENT (Y, Pb, Pr) IN
socket on your TV.
1 C
onnect the scart lead from the extrenal device (DVD player, Set-top box or
games console) to the TV scart socket.
2
1
VCR
3 Turn on the power of the TV first, then the VCR.
4Press the SOURCE button on the TV to set the video input mode to SVIDEO.
2Press the SOURCE button to select scart mode.
1 Turn on the DVD player and insert a DVD.
3Press the play button on the external device.
2Press the SOURCE button to select COMPONENT.
3 Refer to the DVD player user guide for operating instructions.
HDMI INPUT
1 Connect the cable from the HDMI device to the TV HDMI socket.
2Press the SOURCE button to select HDMI mode.
3 Refer to the HDMI device user guide for how to operate.
MOUNT YOUR TV ONTO THE WALL (19” LCD TV only)
You may be able to mount your TV onto the wall using a wall bracket (not
supplied). Use 4 machine screws (M4 x 8mm) to screw the TV onto the bracket
(not supplied). See the wall bracket user guide for instructions.
10
WHARFEDALE | HD Ready LCD TV | User Manual | Customer helpline: 0845 604 0105
WHARFEDALE | HD Ready LCD TV | User Manual | Customer helpline: 0845 604 0105
11
setting up
Location
Switching your TV on
You will need to place your TV near your plug socket (so the power cable can
comfortably reach) and near your aerial lead.
1Press the POWER/STANDBY button on the top of the TV or the STANDBY
button on your remote control.
Connection
2The TV will turn on and the red light in the bottom right corner will turn green.
This may take a few moments.
2Insert the three-pin plug at the end of the power lead into a wall socket.
3The first time you switch on, a box will appear on screen asking if you’d like
to AUTO SEARCH for channels. Press P+/- to select YES or NO, then press
MENU to confirm. (see image 1) See page 14 to learn how to tune later.
3Insert the batteries into the remote. Make sure they are inserted the right way
around, matching the polarity as indicated inside the battery compartment.
4 T he TV will automatically begin to search for channels. A progress bar will
appear on screen and the search will take a few moments.
1 Insert your TV aerial lead into the Antenna input on the right edge of the TV.
BATTERY CAUTION
AUTO SEARCH
1
UNITED KINGDOM
NO
YES
5When the search is complete, AUTO SEARCH will shut and the TV channel
saved to button 1 (this should be BBC1) will be displayed.
• D
o not attempt to recharge, short-circuit, disassemble, heat or throw the
batteries into a fire.
• P lacing batteries with wrong or mixed polarities will result in damage
to the batteries and/or may result in a malfunction of the unit.
• Do not mix old and new batteries.
• Dispose of batteries properly in accordance with local law.
• D
o not mix alkaline, standard (carbon-zinc), or rechargeable (nickelcadmium) batteries.
For details on how to attach other equipment to your TV see GET TO KNOW YOUR
TV CONTROLS on page 7.
12
WHARFEDALE | HD Ready LCD TV | User Manual | Customer helpline: 0845 604 0105
WHARFEDALE | HD Ready LCD TV | User Manual | Customer helpline: 0845 604 0105
13
2
TUNING
TUNING PROGRAM
COUNTRY
AUTO SEARCH
U NITED KINGDOM
Tuning your TV
Using your TV
RETuning your TV at a later date
Changing the channel
1Press MENU, then the V+ button twice until the TUNING menu appears on
screen. (see image 2)
Change the channel by keying in the channel number of the station you want
to watch using the numerical buttons.
2Press the P- button so AUTO search is highlighted. Press the V+ button
to select.
3The TV will automatically search for channels and save each one.
The progress will be displayed on screen. Press V+/- to select YES,
and press MENU to confirm.
4When the search is complete, auto search will shut and the first TV
channel found will be displayed.
Manually searching for a channel
3
1Select the channel number you want to manually tune a channel to.
2Press Menu, then the V+ button twice until the TUNING menu appears
on screen.
3Press the P- button so TUNING PROGRAM is highlighted. Press the V+ button
to select.
4With the P- button, scroll down to MANUAL SEARCH. Press the V+ button
to select.
5Use the V+ and V- button to tune to the channel UP or DOWN. Press MENU to
confirm. (see image 3)
Note: You can fine tune your channels by selecting the FINE TUNE option from
the TUNING menu. Use the V+ and V- buttons in the same way as you do when
manually tuning.
Switching to an external source other than TV
If you have attached a DVD player or similar device to the TV, you’ll need to tell
the TV to display the content from it. Simply press SOURCE repeatedly to cycle
through the options and stop when the required source name is displayed in the
top right corner of the screen.
For details on how to plug in other equipment see GET TO KNOW YOUR TV
CONTROLS on page 8.
14
WHARFEDALE | HD Ready LCD TV | User Manual | Customer helpline: 0845 604 0105
Alternatively, use the P+ and P- buttons to move consecutively through your
channel list.
Adjusting the volume
Use the V+ and V- buttons to turn the volume of your TV up or down.
Press MUTE to remove the sound altogether and simply press it a second time
to switch the sound back on.
Viewing the details of an analogue channel
1Press Menu, then the V+ button twice until the TUNING menu appears
on screen.
2Press the P- button so TUNING PROGRAM is highlighted. Press the V+ button
to select.
3Press the V+ button repeatedly to cycle through the channels.
The programme showing in the background will change as your move
between channel details.
Change the order of your channel list
1Press Menu, then the V+ button twice until the TUNING menu appears
on screen.
2Press the P- button so TUNING PROGRAM is highlighted. Press the V+ button
to select.
3With the P- button scroll down to EXCHANGE. Press the V+ button to select.
4When you have highlighted TO, use the V+ button to move the channel to the
position you want to place the channel. For example, ITV1 may have tuned to
button number four and you may want it to correspond to button number three.
(see image 4)
5When you have highlighted the new required position of the channel, scroll
down with the P- button to EXCHANGE to go back to the previous menu.
4
EXCHANGE
FROM :
4
TO :
3
EXCH A NGE
WHARFEDALE | HD Ready LCD TV | User Manual | Customer helpline: 0845 604 0105
15
Adjusting your picture and
audio settings
Renaming a channel in your channel list
Changing the menu language
1Press Menu, then the V+ button twice until the TUNING menu appears
on screen.
1Press Menu, then the V+ button three times until the FUNCTION menu
appears on screen.
2Press the P- button so TUNING PROGRAM is highlighted. Press the V+ button
to select.
2Press the P- button to highlight Language and then press the V+ and
V- buttons to scroll through the available languages.
3 Using the P- button, scroll down to EDIT NAME. Press the V+ button to select.
3The language of the menu will change as you scroll through. When you get to
your preferred language, press OK to apply and exit the menu.
4Move the cursor through the characters of the existing name using the V+
and V- buttons. Use the P- and P+ buttons to change the letter or number.
5Press MENU to store your changes.
SKIPPing a channel from your channel list
1Press Menu then the V+ button twice until the TUNING menu appears
on screen.
2Press the P- button so TUNING PROGRAM is highlighted. Press the V+ button
to select.
3With the P- button scroll down to SKIP. Press the V+ button to select ON.
4The TV will not stop on this channel anymore. If you want to re-include this
channel, you just have to go back to the SKIP menu when you press the CH+
or CH- button (but you can press the numeric buttons to select the channel)
and select OFF.
Changing the picture settings
1Press MENU to open the main menu, the first page of which is the picture
settings page.
2Use the P- and P+ buttons to scroll through the options. They are:
Brightness, Contrast and Colour - Use the V- and V+ buttons to select
a level between 0 and 100. The picture will adjust as you change the level.
SHARPNESS - Use the V- and V+ buttons to select a level between 0 and 4.
The picture will adjust as you change the level.
noise reduction - Choose one of the preset picture levels from: OFF, LOW,
MID and HIGH.
3Press MENU twice to apply your amended settings and exit the menu.
Changing your audio settings
Accessing and using teletext
Teletext varies depending on what channel you are viewing when you access it.
To access Teletext, press the
button. Use the colour buttons to browse by
section or use the Teletext number buttons to input a three-digit page number
and go directly to it.
Other functions for the teletext mode are as follows:
IX - Press this button to superimpose the teletext screen over the TV
M
picture. Press a second time to return to the normal text mode.
1Press Menu, then the V+ button until the AUDIO menu appears on screen.
2Use the P- and P+ buttons to scroll through the options (see image 5).
They are:
VOLUME, BALANCE, BASS, TREBLE - Use the V- and V+ buttons to select a
level between 0 and 100. The sound will adjust as you change the level.
Audio mode - Choose one of the preset audio modes from: Voice, Music,
Theatre, Personal.
AVL (Auto Volume) - Use the V- and V+ buttons to select On or Off.
5
AUD IO
VOLUME
BALANCE
BASS
TREBLE
AUDIO MODE
AVL
50
50
50
50
VOICE
OFF
3Press MENU twice to apply your amended settings and exit the menu.
INDEX - Press this button to go straight to the index page of teletext.
HOLD - Press this button to pause on the currently displayed page and stop
teletext from automatically updating or scrolling.
SIZE - Press this button repeatedly to cycle through the screen size options
for teletext. Choose from full screen, top half or bottom half.
REVEAL - Press this button to reveal hidden parts of text in Teletext quizzes.
16
WHARFEDALE | HD Ready LCD TV | User Manual | Customer helpline: 0845 604 0105
WHARFEDALE | HD Ready LCD TV | User Manual | Customer helpline: 0845 604 0105
17
Setting a sleep timer
Using the Child Lock function
The Sleep Timer allows you to set your TV to switch off automatically at a
predefined time.
1From the Function menu, choose Child Lock. Enter the four-digit
password which is factory set to 0000.
1Press the SLEEP button repeatedly to cycle through the available times
(the options are 0, 15, 30, 45, 60, 90, 120, 180 and 240).
2 The Child Lock menu will open.
2 A fter you have chosen the sleep timer, wait a few seconds until text
disappears from the screen.
3 When the set time has expired, the TV will automatically turn off.
Adjusting function settings
6
FU NCTIO N
IN PUT SOURC E
TV
LA N GUAGE
ENGLISH
T X T LAN GUAGE
PAN EUROPE AN
T X T EAST/W EST
EAST
BLUE SCREEN
ON
D ISPLAY MODE
4:3
RE SET
CHI LD LOCK
7
C HI LD LOCK
PASSWORD
C HI LD LOCK
7
O FF
3Scroll through the options using the P- and P+ buttons (see image 7).
They are:
PASSWORD - Input your new password. When you have entered the four
digits you will be prompted to enter them again. Your new password will then
automatically be saved.
CHILD LOCK - Use the V- and V+ buttons to select On or Off.
1Press Menu, then the V+ button until the Function menu appears
on screen.
2Scroll through the options using the P- and P+ buttons (see image 6).
They are:
INPUT SCREEN - Choose between TV, PC, S-VIDEO, SCART, COMPONENT
or HDMI.
Language - Change the language used by the menus.
TEXT LANGUAGE- Select between pan european, greek or cyrillic.
TEXT EAST/WEST- Select between east or west.
Blue Screen - Choose either On or Off.
DISPLAY - Choose the size of the screen. Options are full screen, 16:9 or 4:3.
RESET – Press the V+ button to install the original settings back.
CHILD LOCK - Press the V- button to access the Child lock menu.
ADJUSTING MENU OPTIONS
1Press MENU, then the V+ button until the Adjust menu appears on screen.
2Scroll through the options using the P- and P+ buttons. They are:
AUTO SYNC - Adjust the picture location frequency and phase settings.
PHASE - Remove any horizontal distortion and sharpen the display.
CLOCK - Update the clock.
H.POSITION - Adjust the horizontal picture position.
V.POSITION - Adjust the vertical picture position.
18
WHARFEDALE | HD Ready LCD TV | User Manual | Customer helpline: 0845 604 0105
WHARFEDALE | HD Ready LCD TV | User Manual | Customer helpline: 0845 604 0105
19
SPECIFICATION
TROUBLESHOOTING
Specifications of the television that you have just purchased may vary from the
information in this table due to technical innovations.
To assist in locating possible faults, use the help guide below.
Problem
Model
L1511W-A L1911W-A
Picture, sound
system
PAL/SECAM-B/G,D/K,I,L/L’
Audio output
≥1.5W+1.5W
External input
port
COMPONENT input, PC input, S-VIDEO input, Audio input,
Headphone output, SCART, Antenna input, HDMI input
Power
requirements
~150-240V 50/60Hz
Power
consumption
Temperature
Humidity
Accessories
≤50W
No picture,
no sound
Check the television has been properly plugged in.
Check the television has a proper supplied power source.
Check electricity is available.
Blank screen
Check the signal inputs.
Press the SOURCE button to change signal input to
TV input.
Restart the television if power supply is interrupted.
No sound
Press the MUTE button and see if Mute mode is set.
Switch to another channel and see if the same problem
occurs.
Press the VOL+ button to see if the problem can be solved.
Poor sound
Check if the sound system is correct. Refer to the user
guide to adjust.
No picture in
some channels
Check if the correct channel is selected.
Adjust the antenna.
Make adjustments by FINE TUNE and MANUAL SEARCH.
No colour for
some channels
(black & white)
Check if the same problem exists in other channels.
Check out the picture and sound systems.
Refer to the user guide for colour adjustment.
Spots with some
or all pictures
Check if the antenna is correctly connected.
Check if the antenna is in good condition.
Make fine adjustment of channel.
Television out
of control
Disconnect the television from the power supply and
10 seconds later, re-connect the television to the
power supply.
If the problem still exists, contact authorised after-sales
service for technical assistance.
≤60W
Working: 5°C – 35°C
Storage: -15°C – 45°C
Working: 20% – 80%
Storage: 5% – 90%
Remote control
Batteries
Owner’s manual
Audio cable
Note
All specifications are subject to change without notice.
All qualities are approximate values.
How to solve the problem
Note
1If the fault cannot be repaired using the above guide, consult your local
authorised service centre.
2The TV set must only be repaired by a qualified registered service person.
Never attempt to remove the back cover as the TV set has dangerous
voltages inside that may cause a fatality or fire.
20
WHARFEDALE | HD Ready LCD TV | User Manual | Customer helpline: 0845 604 0105
WHARFEDALE | HD Ready LCD TV | User Manual | Customer helpline: 0845 604 0105
21
PRODUCT GUARANTEE
This product is guaranteed against manufacturing defects for a period of
1 Year
This does not cover the product where the fault is due to misuse, abuse, use
in contravention of the instructions, or where the product has been the subject
of unauthorised modifications or alterations, or has been the subject of
commercial use.
In the event of a problem with the product within the guarantee period please
call the customer helpline on 0845 604 0105. If the item is shown to have
had an inherent defect present at the time of sale, Argos will provide you with
a replacement.
Your statutory rights remain unaffected.
Guarantor; Argos Ltd
489 - 499 Avebury Boulevard
Central Milton Keynes
MK9 2NW