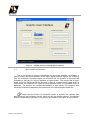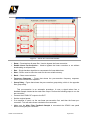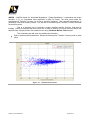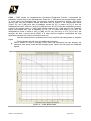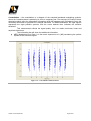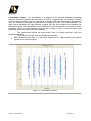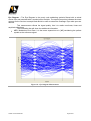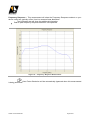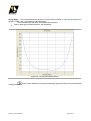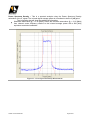
1
Linear Industries, Inc. AT8001 User Manual For the AT8001 Digital Exciter Rev. A – August 2011 Revision History REV A DESCRIPTION Initial Version DATE BY 2011/1/08 Henry Douglas How to Contact Linear LINEAR INDUSTRIES INC. – NORTH AMERICA DIVISION 2531 Technology Drive Suite 310 Elgin, IL 60124 Web site: www.linear-tv.com Phone: (847) 428-5793 Toll Free: (847) 428-5793 Fax: (847) 428-5785 About this document Indicates a hint. Indicates important information. AT8001 Technical Manual August 2011 Table of Contents Section 1: User Notices and Warnings Section 2: General Introduction Section 3: General Operation Section 4: Graphical User Interface (GUI) Operation Section 5: OEM Implementation Recommendations AT8001 Technical Manual August 2011 Linear Industries, Inc. AT8001 User Manual Section 1 User Notices and Warnings AT8001 Technical Manual August 2011 Section 1 – User Notices and WARNINGS USER NOTICES IT IS VERY IMPORTANT TO READ THE FOLLOWING MANUAL SECTIONS PRIOR TO OPERATION OF THIS EXCITER! Notice 1 The exciter AC mains operating voltage setting is marked on the rear panel of the chassis. Notice 2 For adjusting the RF output power setting a qualified technician should always employ the use of an RF Wattmeter and a calibrated dummy load. Notice 3 Should accident or injury occur to the personnel engaged in the installation, operation, or service of the equipment should seek proper medical attention. It is advisable that such personnel have familiarity with first aid practices. Notice 4 To call our technical support center or for other customer service issues at Linear Inc, refer to the following number: 847 428-5793, or e-mail to [email protected]. Notice 5 If you experience some specific difficulty and the technical information available in this manual is not enough to help you, do not hesitate to call LINEAR technical support center. Notice 6 The technical information presented on this manual is sole intellectual propriety of Linear Industries Inc. Reproduction of this document in full or partial is prohibited with out prior written authorization from Linear Industries Inc. This document is legally protected by US copyright laws. WARNING! THE VOLTAGES AND CURRENTS IN THIS EQUIPMENT COULD BE DANGEROUS. PERSONEL MUST, AT ALL TIMES, OBSERVE SAFETY WARNINGS, INSTRUCTIONS, AND ANY REGULATIONS. THIS OPERATION’S MANUAL IS INTENDED AS A GENERAL GUIDE FOR TRAINED AND QUALIFIED PERSONNEL WHO ARE AWARE OF THE DANGERS THAT ARE INHERENT IN THE HANDLING AND OPERATION OF POTENTIALLY HAZARDOUS ELECTRICAL AND ELECTRONIC CIRCUITS. IT AT8001 Technical Manual August 2011 IS NOT THE INTENT OF THIS MANUAL TO PROVIDE A COMPLETE SET OF SAFETY INSTRUCTIONS OR PRECAUTIONS THAT SHOULD ALREADY BE UNDERSTOOD BY TRAINED OR EXPERIENCED PERSONNEL IN USING THIS OR OTHER TYPES OF ELECTRONIC EQUIPMENT. THE INSTALLATION, OPERATION, AND MAINTENANCE OF THIS EQUIPMENT INVOLVE RISKS TO PERSONNEL AND ALSO TO THE EQUIPMENT. LINEAR, INC. SHALL NOT BE RESPONSIBLE FOR INJURY OR DAMAGE THAT IS THE RESULT OF IMPROPER PROCEDURES OR USE BY PERSONS IMPROPERLY TRAINED OR LACKING THE KNOWLEDGE TO PERFORM ASSOCIATED TASKS. ALL LOCAL CODES FOR BUILDING, SAFETY, FIRE, OR RELATED STANDARDS MUST BE OBSERVED. CONSULT LOCAL AUTHORITIES FOR THE STANDARDS FOR THE AREA OR REGION WHERE THE EQUIPMENT WILL BE INSTALLED AND PUT IN USE. WARNING! AT ALL TIMES DISCONNECT AC/MAINS POWER BEFORE OPENING COVERS, DOORS, ENCLOSURES, PANELS, OR PROTECTIVE SHIELDS THAT EXPOSE LIVE CIRCUITS. NEVER PERFORM MAINTENANCE, MAKE ADJUSTMENTS, OR SERVICE THE EQUIPMENT WHEN ALONE OR FATIGUED. WARNING! IF ELECTROLYTIC OR OIL FILLED CAPACITORS ARE UTILIZED IN THE EQUIPMENT AND THE COMPONENT APPEARS LEAKY, OR IS BULGING, OR IF THE CASE OR COVERING OF THE COMPONENT APPEARS DAMAGED OR DISTRESSED ALLOW SUFFICIENT TIME FOR THE UNIT TO COOL OR FULLY DISCHARGE BEFORE SERVICING. SERVICING HOT OR LEAKY CAPACITORS CAN CAUSE A RUPTURE OF THE CASE AND POSSIBLE INJURY. Returns and Exchanges Equipment (Damaged or undamaged) should not be returned unless written approval and a Merchandise Return Authorization (MRA Number) is received from your Linear Sales representative or Linear Customer Service. Special shipping instruction will be provided which will assure proper handling. The circumstances and reasons for the return must be included in the request for return. Equipment that is special or “custom” ordered may be not returnable. In situations where return or exchange is at the request of the customer a restocking fee may be charged. All returns must be sent freight prepaid and properly insured by customer. When communicating with Linear please refer to your Order or Invoice Number. Unpacking Use care when unpacking the equipment. First perform a visual inspection of the AT8001 Technical Manual August 2011 item(s) to determine if any damage occurred during shipment. Be sure to retain all the shipping materials (crates and boxes or cartons) until such time that it has been determined that the received equipment arrived undamaged. Find all PACKING LISTS and keep them to assist in locating and identifying any components or assemblies that may have been removed for shipping and might need to be reinstalled in the equipment. Make sure that all shipping traps, supports and packing materials are completely removed from the equipment prior to initialization and use. AT8001 Technical Manual August 2011 Linear Industries, Inc. AT8001 User Manual Section 2 General Introduction AT8001 Technical Manual August 2011 Section 2 – General Introduction 1. Introduction The objective of this manual is to supply information necessary for the installation and operation of the digital exciter model AT8001 providing a digital UHF signal of 100mW rms. LINEAR INDUSTRIES INCORPORATION recommends that the user carefully reads the sections of this manual before installing or operating this equipment. 1.1 General Description Equipment AT8001 is an exciter/driver providing a digital signal of 100mW rms UHF in the ATSC TV 8-VSB standard. The model AT8001 is developed by LINEAR INDUSTRIES INCORPORATION and provides the most up to date and state of the art technology for transmission of digital TV signals. The Model AT8001 is modular in construction and employs 100% digital technology and automatic nonlinear and linear pre-correction. An optional comprehensive performance and characteristic measurement software system can also be included. The system of intelligent digital control using microprocessors allows the supervision in real time of all the functions of the exciter/driver. Its operation is completed through a keyboard and display, located on the front panel, through which there is access to all the readings, alarms and configurations The software for pre-correction and performance measurement operates within the software of the computer (external computer not provided). 1.2 Principle Characteristics If contained in a LINEAR transmitter it will provide the management all of the functions of that transmitter and each of its amplifiers It contains: 2 line and 40 column digital display Automatic linear and non linear pre-correction PLL synthesized oscillator from a 10 MHz OCXO or by an external 10MHz reference (for example: GPS). Highly linear and efficient and UHF transistorized power amplifier module Automatic Level Control of power (ALC); keeps the system power level constant. Front panel error indication, current and past alarms Low acoustic noise air ventilation system Part of the ADVANCED TV family of transmitters designed with all national and international standards taken into consideration. Conforming to ITU and FCC and all other recognized international standards. Chassis constructed to fit into standard 19” rack mount assemblies External supervision possible via optional Ethernet or Web server Compatible with ASI and SMPTE-310M inputs AT8001 Technical Manual August 2011 1.3 General Functional Description The Digital Exciter / Driver provides +20dBm (100mW) RF signal with level to drive transmitter pre-amplifier system. For the ATSC/8VSB transmission standard the exciter driver must receive a Transport Stream (TS) MPEG-2 of either SMPTE 310M or ASI. The modulator automatically recognizes which of the two standards is being used. The TS input identification is only accomplished via the signal input connector which is a female BNC located on the back panel of chassis. This module generates two IF signals; (I) In-phase (i) and (Q) Quadrature. The central frequency of the modulated carrier is of 18,833916 MHz. All processing is compatible with ATSC A/53E standard. The modulated I and Q IF signal, is passed from the 8VSB modulator to the RF UHF upconverter which up converts the IF signal to the final UHF channel. This up conversion occurs by multiplying the I and Q signal with the local oscillator frequency which is generated by a PLL synthesized oscillator, which in turn is referenced by an internal OCXO (Oven Controlled Crystal Oscillator) or via an external source. The on channel RF UHF signal passes from the Up-converter to a Linear amplifier. The signal then is fed from the linear amplifier to the rear panel allowing it to be connected directly to the pre-amplifier of any UHF TV transmitter. All the management functions and controls of the exciter /driver are accomplished through the through the front panel display and push buttons. The AT8001’s main control unit receives information from all the main transmitter modules; modulator, up-converter, pre-amplifier, final power amplifiers*, reflectometer*, processes the information and allows, through the keyboard, push buttons and the digital display the complete control and operation of the equipment. The control unit can process the information in such a way when installed in a transmitter, that it makes it possible for the user the access readings like forward and reverse power, voltage and current of PSU’s, transistor currents, current and past alarms; and some set-up and configurations, such as adjustment of power and password, etc, although the majority of these configurations are carried fixed in the factory and do not have to be modified by the user. In the case that it is necessity to alter some configuration of the equipment, such as a channel change (in the case of a LINEAR transmitter), the technical department at Linear Industries Inc must be first consulted. The exciter / driver is available with optional software (GUI7001) that will allow automatic daily pre-correction of linear and non-linear distortion, as well as a series of transmitter signal measurements. AC INPUT The AC input module 4573 - used in the AT8001 exciter driver is a full wave bridge rectifier capable of input from 85 to 250VAC and is constructed using fly-back plus buck regulator techniques. The module 4573 is composed of two supplies; CIP8455 (CIM3555) providing +27V and AT8001 Technical Manual August 2011 15V and the second converter buck regulator CIP8390 (CIM3584) with and input of +27V provides outputs of +15V, +8V and +3.3V. The module possesses fast output voltage surge protection and voltage metering information for the software. VENTILATION SYSTEM The cooling of the exciter / driver is provided by ventilated forced air, through a venting system that encourages good interior air circulation. The front and rear covers vents also assist in the cooling of the unit making it possible to direct output warm air directly into environment. 1.5 AT8001 - Module and parts location Rear panel 1.6 AT8001 – 100mW UHF ATSC/8VSB Exciter - Technical Specifications AT8001 Technical Manual August 2011 1.6 AT8001 – 100mW UHF ATSC/8VSB Exciter - Technical Specifications - Continued AT8001 Technical Manual August 2011 1.7 AT8001 Block Diagram: AT8001 Technical Manual August 2011 1.8 Picture 1.9 Identification AT8001 AT8001 AT AT8001 Technical Manual August 2011 Initial inspection It is important to inspect all the packing and verify no visible damage to the equipment immediately upon receipt. If the equipment and or packing has signs of damage, that is suspected to have happened during transport evidence of such must be immediately written down on appropriate documentation provided by the delivery or transportation service and Linear Industries Inc must be notified at the earliest possible time. Failure to do so may possibly void any warranty. The unit has been tested thoroughly in the Linear Industries Inc factory to make sure of no defects and to ensure the unit is functioning according to its intended specification and mode of operation. However, if the equipment when placed into operation does not function and has no evidence of transportation damage the unit must be returned to Linear Industries Inc factory with an explanation of the defect and given attention to the department of technical assistance. Protection against risk of electric shock As with all equipment fed with the electrical current, the risk of electric shock may arise. To prevent electric shock please take the following precautions: Any maintenance on this equipment must only be carried out by a fully technician. In the event that the cover is removed do not touch any area or region near where an AC mains enters the unit. The AC input is located near the ON/OFF switch and transformer etc.). Switch off the main and disconnect the AC cord before changing the AC input mains fuse. Use only the correct fuse, i.e. exactly the same type and value of the fuse removed. Do not immerse the unit in water or operate in areas of very high humidity. Care: Please observe the standard and documented precautions for electrostatic sensitive devices. Electrostatic discharges (ESD) can damage the electronic components. It is strongly recommend working with this unit in a area with protection against electrostatic discharge. For the place and location of the connectors please see internal layout diagram of equipment. Input Mains The input mains voltage of the exciter driver is set at the factory; it is not necessary to alter its configuration. This equipment can be fed with a voltage of 90 - 240 VAC at a mains frequency of 41-63 Hz, without interruption or damage to the equipment. The exciter/driver includes a standard three pin AC input. The central pin is ground and is connected to the chassis of the assembly. An external ground lug is also included for additional grounded (recommended). AT8001 Technical Manual August 2011 Partial view of rear panel, AC switch and mains entrance Handles and Connectors Handles should be installed with care, in order that they do not get bent or twisted during installation. If 7/8” or ½” handles are use, care must be taken not to damage during installation inside the cabinet or final installed location. It is not recommended to try to install into a smaller space than 31.4” or 80cm. No force should be applied to the handles or input and output connectors. The installation of this unit should be done in such away to ensure that if any liquid drains on the unit it immediately drains to the side and does not enter into the unit. Any connectors must be installed and mounted in accordance with the manufacturers specifications. The completed connections inside any cabinet must be isolated with from one another particularly those of containing RF to those not containing RF. All cables used on this unit must be of professional quality. Isolation between cables should not be made with silicone coating as this has been found to dry up rubber coatings of other cables and fittings. Lightning protection of the equipment Grounding should be made through a separate and specific cable and terminated correctly at both ends. The ground is labeled GND on the exciter driver unit. As TV transmitter sites are normally located on higher altitude points such as mountains, hills and tall buildings there is a higher incidence probability of static and electrical discharge from lightning. Lightening discharges typically carry large amounts of electric energy and place enormous risk on the safety of personnel as well as the equipment. Most lightening is conducted through the tower and guy structure of the antenna and the likelihood of damage to the equipment is increased because the tower structure is located nearby the transmitter building. To minimize the effect of the lightning and atmospheric discharges the use of a lightning protection system is strongly recommended. Such lightning system should be in place to ensure the continuity of transmission during a lightning storm. The phenomenon of lightning is basically that the electrical energy is conducted by the electrostatic induction AT8001 Technical Manual August 2011 between the earth and clouds, therefore, the most important part of the protection system should be a good grounding system made up of metal rods (electrodes) or an arrangement of wire mesh, which should allow minimum ground resistance, so that any electrical lightning discharge flows directly to the ground system rather than that of the building and equipment. The key elements necessary for protection of equipment and personnel from lightning are: 1. Use current division to control the dissipation of lightning strike energy on an antenna tower grounding system through multiple paths. 2. Separate the antenna tower from the equipment building by a minimum of 30 feet. 3. Use only a single point grounding system for the equipment building 4. Use a bulkhead panel/waveguide hatch for all coaxial cable entry into the equipment building 5. Coordinate the location of the (1) bulkhead panel bond, (2) power and telecommunications entry bond, (3) bond between antenna & equipment building, at the single point ground connection 6. Isolate all wire-line communication services from remote ground with optical devices or isolation transformers 7. Use AC power surge protection at main power entry and critical secondary panels To accomplish the best grounding, and provide the best protection of the transmission equipment it is important to consider the characteristics of the surrounding land. It is recommended to determine the character of the soil specifically its resistance. The resistance of a grounding system to should not exceed 5 , but the ideal value is obviously as close to zero as possible. In general the best method of grounding can be accomplished with a single steel rod of approximately 2.73 yards or 2.5 meters placed in the ground nearby the transmitter building. There maybe the case where the resistivity of the ground is too high, in which case it is recommended that the complete grounding of the building and grounding system be studied in detail by a professional and authorized electrical grounding organization. It is important to obtain the correct grounding system by using such methods as lightning rods and making sure they are completely isolated from the transmission equipment. An incorrect grounding system may not sufficiently protect the transmission equipment and damage caused by static discharge or lightning will not be covered by the equipment guarantee. Grounding of the electric Installation Lightning can enter the transmitter building via many routes including the transmission line via the antenna and or tower structure. In such a case, the lightning can discharge enormous amounts of destructive electrical energy on the transmitter and it’s peripheral equipment. To protect the input of the equipment for such peak voltages sufficient grounding and isolation should be provided on the input mains and output RF connection. When installing the grounding system the following should be observed: I. Connect all equipment chassis low resistance and appropriately sized ground wire. II. Connect all the wires of the grounding system to one point, and connect to the building ground point and to the outside ground system. III. Connect the incoming mains neutral to the grounding system at the point of the building ground IV. Connect the RF output cable to the main building ground system V. The structure of the tower must also be connected to the external grounding system. AT8001 Technical Manual August 2011 VI. Isolate cables from the lightning rods with porcelain or equivalent high voltage insulators. Mechanical Drawings In this section the mechanical drawings will be presented showing the external structure of the unit. Front Panel On the front display panel is located the display, keyboard and signaling LED’s. Rear Panel The rear panel of the exciter includes the following elements: 310M / ASI OUT – Electric interface DVB-ASI-C Function: Sample of ASI signal Type: Female BNC 10MHz REF OUT Function: 10MHz output reference Type: BNC female 310M / ASI IN –DVB-ASI-electrical interface Function: Transport Stream (TS) Input Type: BNC female Impedance: 75 10MHz REF IN Function: 10MHz input reference Type: BNC female Impedance: 50 RF SAMPLE OUT Function: RF output sample Type: N female Impedance: 50 RF OUT Function: RF output signal Type: N female Impedance: 50 AFTER FILTER SAMPLE Function: RF input sample taken from after output RF mask filter. (Used to make the linear pre-correction) Type: N female AT8001 Technical Manual August 2011 Impedance: 50 Level: -10 ~0dBm BEFORE FILTER SAMPLE Function: RF input sample taken from before output RF mask filter. (Used to make the Non-linear precorrection) Type: N female Impedance: 50 Level: -10 ~0dBm Ventilation Output Input mains disconnect 3 Pin AC mains input Ground lug RF output amplifier heat sink ventilation output USB – USB connection ETHERNET – Ethernet for remote control (optional). CONTROL I/O – Input and output control Installing Exciter / Driver into a transmitter (For more information see OEM implementation recommendation Section) For the installation of the exciter driver into a transmitter the following conditions are necessary: 1- Two samples of feedback (before and after the filter). The amplitude/frequency response should have less than 1dB of ripple within +/- 15MHz of the channel of operation. 2- Impedance of the sample ports must be 50 ohms 3- The RF level of the sample before and after the filter must be between -10dBm and 0dBm (average level). When the exciter / driver RF output is connected correctly to the transmitter pre-amplifier and the correct RF level samples before and after the output RF mask filter are connected to the applicable sample input ports, the operator can then use the GUI7001 software (optional) to make linear and nonlinear pre-corrections and the performance measurements AT8001 Technical Manual August 2011 Possible operations with the exciter / driver Below are the possible operations of the exciter driver available when installed in a transmitter. A- Power adjustment – POWER SETUP ([1100]) Power adjustment of the exciter driver which may* alter the transmitter output power is possible and accessible through the POWER SETUP screen ([1100]) and accessed from the Main Menu for the Menu on the display digital. Instructions are given in the annex (Operational Software). It is important to note that if the power of the transmitter is altered the modulation level and consequently the non-linear distortion will change which will require the pre-correction to be recalculated. This can be done through the SCALE adjustment ([1520]). The recalculation of the correction must be done after all final power level changes. For best results and the software GUI7001 (optional) for performance measurements should be used. * Note that some transmitters may have an ALC around the pre-amplifier or final amplifier or combination thereof, which will disenable any power adjustment from the exciter. B- Pre-correction of transmitter The corrections for linear and non linear distortion will have been tested and temporarily set up in the factory for typical operational characteristics. When installed into a transmitter, if there is significant change in the RF output characteristics of linear and nonlinear distortions, thus affecting its frequency response, group delay and levels of inter-modulation, is suggested to carry through a new process of pre-correction of the transmitter. This process can be made through optional GUI7001 Software (Optional). D- SCALE adjustment This parameter adjusts the amount of non-linear pre-correction being a applied to the signal. The inter-modulation of the signal varies with the power output. This “scale” adjustment can be used to optimize the levels of shoulder without the need to recalculate the pre-correction curves using software GUI7001 (optional). The value of this adjustment must be proportionally reduced when the transmitter output power is reduced. E- Adjustment of the Pilot Level This adjustment allows for the configuration in the level desired ATSC signal pilot carrier level, with the following band of values: -2048 the +511. For more details on this configuration consult annex A (Operational Software) F- Linearization ON and OFF Non-Linear Pre-Correction – It is possible to confirm and to switch off the non-linear precorrection from the front panel. When using the GUI7001 software, it is important to confirm that this parameter is operative in order that the linearization of the transmitter amplifiers can take place. Linear Pre-Correction – It is possible to confirm and to switch off the linear pre-correction AT8001 Technical Manual August 2011 from the front panel. When using the GUI7001 software, it is important to confirm that this parameter is operative in order that the linearization to compensate for the output RF Mask filter can take place. 2.9 Communication A- Via Ethernet The exciter driver includes an Ethernet connection on the rear panel allowing access to its Ethernet Web page. The web page contains all the functionalities of the interface keyboard and display such as SETUP’s, MEASUREMENTS and ALARMS, etc. This interface can be used for remote management. B- Via Exciter Driver USB port Communication to the exciter / driver via the USB port is only possible utilizing the GIU7001 software system. For more details on this configuration consult annex A (Operational Software). 3. Alarms The table below provides the respective steps to be taken when an alarm occurs and how to cancel or normalize any alarms. AT8001 Technical Manual August 2011 Linear Industries, Inc. AT8001 User Manual Section 3 General Operation AT8001 Technical Manual August 2011 Section 3 – General Operation 1. Introduction The DTV Exciter AT8001 provisions: (a) Measurements, (b) Configurations, (c) Alarms, and (d) Remote control via microcontrollers (not applicable in standalone configurations) Below is a detailed description about the operational software (configuration and operation) system installed within the AT8001 exciter. AT8001 Exciter – Front Panel On the front panel of the AT8001 Exciter there is a LCD Display with 2 lines and 40 columns. Also a circular keypad with a set of 4 command keys in (grey), and one centered button, labeled ENTER (black), an escape key, ESC, complete the set of 6 keys that allows an easy operator interaction. The LCD display can be used to check the operational status of many parameters, and make changes on some parameters using the 5 button keypad. AT8001 Technical Manual August 2011 2. Digital Exciter – The Master Control Unit 6 1 5 4 DIGITAL EXCITER 2 3 2.1 Keypad Below the description of each key located on the front panel of the AT8001 Exciter. The manipulation of these keys allows the operation to have access of the status and configuration of the transmitter. (1) Moves the arrow UP to the next function shown on LCD screen (2) Moves the arrow to the next RIGHT position (3) Moves the arrow DOWN to the next function shown on LCD screen (4) Moves the arrow to the next LEFT position (5) ENTER – Confirms the chosen selection (6) ESC – Cancel the selection and return to the previous screen. 2.2 LCD Display To browse over the LCD screen follow the instructions below: Move the arrow up or Down to the item listed by pressing the () or () buttons. Identification Main Menu: -> Setup 1/5 [0000] DIGITAL EXCITER Hit ENTER. Remarks: Please note that all screens are assigned a 4 digit number on the top-right of the LCD screen. These numbers, represents the screen position on the command menu. AT8001 Technical Manual August 2011 2.3 Signaling Besides the LCD screen and the command keypad, the front panel of AT8001 also shows a set of 4 LED’s. These LED’s when ON indicate: POWER ON – External AC line voltage is present. SYNC. LOSS – The INPUT transport stream is not present. CURRENT ALARM – One or more alarm situations are occurring. PAST ALARM – Alarm log screen. 3. Initialization: The first screen that appears when powering ON the transmitter is: Linear Industries Inc. AT73-1K5 – 8VSB ATSC Digital Exciter DIGITAL EXCITER The First Presentation Screen shows the time of the manufactures and the model of the transmitter, and the system it was set for. For the sample screen above: Model: AT73-1K5 System: 8VSB ATSC The Second presentation Screen, as seen below; shows the channel, the current output power, date and time. Channel: 01 Output Power: 02/05/11 14:57:30 0 [W] DIGITAL EXCITER While no other key is pressed, these 2 presentation screens will be succeeding each other on the LCD. After pressing any key on the keypad, the next screen that appears is: Main Menu: -> Setup 1/5 [0000] DIGITAL EXCITER (Note: It is always possible to return to the initial LCD screen by pressing the ESC key) After 5 minutes the initial LCD screen menu is displayed. AT8001 Technical Manual August 2011 5.4 Measurement System Table Measurements Menu Indications Measurements Sub-Set Indications Transport Stream Description Shows the INPUT transport stream protocol, or none. Transport Stream Data Packets Rate Measure the input Data Rate: 0 ~ 19,39 Mbps Null Packets Rate Measure Nulls packages: 0 ~ 19,39 Mbps FIFO Occupation (%) +3.3V Exciter Power Supply Voltage +15V +3.3V voltage power supply measurement +15V voltage power supply measurement +5V +5V voltage power supply measurement +27V +27V voltage power supply measurement +8V +8V voltage power supply measurement Controller Software Version 0 ~ 100% Microcontroller Software Version FPGA FPGA Software Version Drawer Drawer Power Software Version Indicates whenever the incoming transport stream contains the M/H structure with the MHE packets PID equal to the exciter configuration. Shows the total number of Groups, i.e., the number Total Number of Groups of M/H Slots that contains M/H Groups. M/H Slots With M/H Groups One M/H Sub-frame have 16 M/H Slots. This measurement shows the location of each M/H Group within an M/H Sub-frame. '-' => M/H Group NOT present; 'check symbol' => ----------------M/H Group IS present Maximum Delay set by the M/H Mux. Maximum Delay Calculated STL delay based on the GPS 1PPS STL Delay signal. Automatic calculated Delay in order for all Automatic Delay transmitters in the network have the same delay. This field displays NO SIGNAL or UNKOWN Int. GPS SIGNAL in the absence of a proper input signal. When validated, shows the PPS phase and frequency difference between this reference and the current PPS obtained with the internal control system of the OCXO (delivered on PPS output connector). When this input is identified as current reference a message identifies if the OCXO is in the frequency or phase locking process. This field displays NO SIGNAL or UNKOWN Ext PPS SIGNAL in the absence of a proper input signal. When validated, shows the PPS phase and frequency difference between this reference and the current PPS obtained with the internal control system of the OCXO (delivered on PPS output connector). When this input is configured as current reference a message identifies if the OCXO is in the frequency or phase locking process. ATS M/H Service Present ATSC M/H Service SFN over ATSC M/H Clock Measurements AT8001 Technical Manual August 2011 Ext 10M Cur TS Cur Cal Last Cal Time Lock Automatic Level Control ALC Vout Sensor Vin Programmed Power This field displays NO SIGNAL or UNKOWN SIGNAL in the absence of a proper input signal. When validated, shows the frequency difference between a PPS generated with this reference and the current PPS obtained with the internal control system of the OCXO (delivered on PPS output connector). When this input is configured as current reference a message identifies if the OCXO is in the frequency or phase locking process and the phase difference is also available. This field displays NO SIGNAL or UNKOWN SIGNAL in the absence of a proper input signal. When validated, shows the frequency difference between a PPS generated with this reference and the current PPS obtained with the internal control system of the OCXO (delivered on PPS output connector). When this input is configured as current reference a message identifies if the OCXO is in the frequency or phase locking process and the phase difference is also available. Current value of the frequency control of the OCXO, range comprehended between 0 (0%, order of magnitude -1500ppb) and 262143 (100%, order of magnitude +1500ppb) Last calibrated value (zero frequency difference and less then 100ns phase difference) of the frequency control of the OCXO, range comprehended between 0 (0%, order of magnitude -1500ppb) and 262143 (100%, order of magnitude +1500ppb) Time counter since achieved lock The voltage at the variable gain amplifier which controls the output power. The voltage at the average power detector output used to close the Automatic Level Control (ALC) loop. Measure the Programmed Power Forward Measure the Reflected Power Reflected Measure the Direct Power ALC Reference Voltage Measure the ALC control voltage 50V Power Supply: drawer input power supply Drawers Power Supply measurement (+50V) 28V Driver Power Supply: driver input power supply measurement (+28V) Current Measure the electrical current of the drawer modules Temperature Communication Status Drawers Communication Status Temperature measurements of the drawers Indicate the communication status among the RF drawers and the MASTER Control Unit. To access the menu above, see item 4.1 below: AT8001 Technical Manual August 2011 ATTENTION For SFN operation it is mandatory feed the Exciter with an external reference signal locked on a GPS signal. 4.1 Transport Stream related measurements To gather information about the status of the incoming transport stream, follow the instructions below, starting on the main menu screen: Main Menu: -> Measurements 2/5 [0000] DIGITAL EXCITER Access Measurements Measurements: -> Transport Stream 01/10 [2000] DIGITAL EXCITER Select Transport Stream and hit ENTER Transport Stream Meas: 1/4 [2100] -> Transport Stream: Sync. Loss DIGITAL EXCITER Hit key “” to view the other screens that are part of this menu. Transport Stream Meas: 2/4 [2100] -> Data Packets Rate: 0.00 [Mbps] DIGITAL EXCITER Transport Stream Meas: 3/4 [2100] -> Null Packets Rate: 0.00 [Mbps] DIGITAL EXCITER AT8001 Technical Manual August 2011 Transport Stream Meas: 4/4 [2100] -> FIFO Ocupation: 0.00 [%] DIGITAL EXCITER Hit ESC key to return to the Measurements screen. The use of the keys e allows changes on the desired function to be performed. 4.2 Status on the Exciter Power Supplies Out from the Measurements menu; select Exciter Power Supply and hit ENTER. Measurements: -> Exciter Power Supply 02/10 [2000] DIGITAL EXCITER Power Supply Measurements: 1/3 [2200] -> +3.3V : OK +15V : OK DIGITAL EXCITER Use the Up and Down keys, and, to check the voltage status on the DTV exciter. Power Supply Measurements: 2/3 [2200] -> +5V : OK +27V : OK DIGITAL EXCITER Power Supply Measurements: -> +8V : OK 3/3 [2200] DIGITAL EXCITER Hit ESC key to return to the Measurements screen. AT8001 Technical Manual August 2011 4.3 Software Version This screen indicates the time of the software and its version. Three families of software are shown; the FPGA software present on the ATSC modulator, the Micro-controller software on the digital exciter unit, and the micro-controllers unit installed on the RF Power Drawers. All these times and version should be available to be report to the factory when necessary. The sequence below indicates how to access the software version screen: Measurements: -> Software Version 03/10 [2000] DIGITAL EXCITER Select Software Version and hit ENTER Software Version: 1/3 [2300] -> uController: AT1A0002v1.00 DIGITAL EXCITER Hit key “” to view the other screens that are part of this menu. Software Version: -> FPGA : 2/3 [2300] DIGITAL EXCITER Software Version: 3/3 [2300] -> Drawer 01/01: No Answer! DIGITAL EXCITER To return to the Measurements press ESC key. 4.4 ATSC M/H Service Measurements: -> ATSC M/H Service 04/10 [2000] DIGITAL EXCITER Select ATSC M/H Service and hit ENTER. AT8001 Technical Manual August 2011 ATSC M/H Service: 1/4 [2400] -> ATSC M/H Service Present: No DIGITAL EXCITER Hit key “” to view the other screens that are part of this menu. ATSC M/H Service: -> Total Number of Groups 2/4 [2400] : 00 DIGITAL EXCITER ATSC M/H Service: 3/4 [2400] -> M/H Slots With M/H Groups: DIGITAL EXCITER ATSC M/H Service: 4/4 [2400] -> _ _ _ _ _ _ _ _ _ _ _ _ _ _ _ _ DIGITAL EXCITER 4.5. SFN over ATSC M/H Measurements: -> SFN over ATSC M/H 05/10 [2000] DIGITAL EXCITER Select SFN over ATSC M/H and hit ENTER. SFN over ATSC M/H: 1/3 [2500] -> Maximum Delay : 0000.000 [ms] DIGITAL EXCITER Hit key “” to view the other screens that are part of this menu. SFN over ATSC M/H: 2/3 [2500] -> STL Delay : 0000.000 [ms] DIGITAL EXCITER SFN over ATSC M/H: 3/3 [2500] -> Automatic Delay: 0000.000 [ms] DIGITAL EXCITER AT8001 Technical Manual August 2011 4.6 Clock Measurements Measurements: -> Clock Measurements 06/10 [2000] DIGITAL EXCITER Select Clock Measurements and hit ENTER. Clock Measurements: -> Int GPS: No Signal 1/7 [2600] DIGITAL EXCITER Hit key “” to view the other screens that are part of this menu. Clock Measurements: -> Cur TS: No Signal 4/7 [2600] DIGITAL EXCITER Clock Measurements: -> Ext PPS: No Signal 2/7 [2600] DIGITAL EXCITER Clock Measurements: -> Ext 10M: No Signal 3/7 [2600] DIGITAL EXCITER Clock Measurements: -> Cur Cal: 000000 0.0% 5/7 [2600] (Warm Up) DIGITAL EXCITER AT8001 Technical Manual August 2011 Clock Measurements: -> Last Cal: 000000 6/7 [2600] 0.0% DIGITAL EXCITER Clock Measurements: 7/7 [2600] -> Time Lock: ___d __h __m ___s DIGITAL EXCITER 4.7 Automatic Level Control Measurements: 07/10 [2000] -> Automatic Level Control DIGITAL EXCITER Select Automatic Level Control and hit ENTER. Automatic Level Control: 1/1 [2700] ->ALC Vout: 0.00[V] Sensor Vin: 0.00[V] DIGITAL EXCITER 4.8 Power Shows the programmed and direct, reflected power measurements in the equipment output, ALC Reference Voltage. To access the Power screen, the sequence of screens below must be followed, starting from the initial menu: Main Menu: -> Measurements 2/5 [0000] DIGITALMeasurements EXCITER Access Measurements: -> Power 08/10 [2000] DIGITAL EXCITER Access Power and hit ENTER AT8001 Technical Manual August 2011 Transmitter Power Meas.: -> Programmed: 000 [W] 1/3 [2800] DIGITAL EXCITER Hit key “” to view the other screens that are part of this menu. Transmitter Power Meas.: 2/3 [2800] -> Forward: 0 [W] Reflected: 0 [W] DIGITAL EXCITER Transmitter Power Meas.: 3/3 [2800] -> ALC Reference Voltage: 0.00 [V] DIGITAL EXCITER Hit ESC key to return to the prior screen. 4.9 RF Power Drawer Measurements For RF Power Module it is possible to measure: (a) electrical current, (b) RF delivery power, (c) temperature. Hit the ESC key to return to the measurements screen menu, or return to the main menu screen and select measurements. Measurements: -> Drawers 09/10 [2000] DIGITAL EXCITER Select Drawers and presses ENTER. Drawer Measurements: -> Power Supply 1/3 [2900] DIGITAL EXCITER Select Power Supply and presses ENTER. Drawer 01/01 Power: 1/2 [2910] -> 50V Power Supply: 0.0 [V] DIGITAL EXCITER Hit key “” to view the other screen that is part of this menu. Drawer 01/01 Power: 2/2 [2910] -> 28V Driver Power Supply: 0.0 [V] DIGITAL EXCITER AT8001 Technical Manual August 2011 Press ESC to return to the Drawer Measurements screen. Drawer Measurements: -> Current 2/3 [2900] DIGITAL EXCITER Select Current and press ENTER. Drawer 01/01 Current: 1/3 [2920] -> I1 0.00 A I2 0.00 A DIGITAL EXCITER Hit key “” to view the other screens that are part of this menu. Drawer 01/01 Current: 2/3 [2920] -> I3 0.00 A I4 0.00 A DIGITAL EXCITER Drawer 01/01 Current: -> ID 0.00 A 3/3 [2920] DIGITAL EXCITER Press ESC to return to the Drawers Measurements screen. Drawer Measurements: -> Temperature 3/3 [2900] DIGITAL EXCITER Select Temperature and press ENTER. Drawer 01/01 Temperature:1/3 [2930] -> T1: 0.0 ºC T2: 0.0 ºC DIGITAL EXCITER Hit key “” to view the other screens that are part of this menu. Drawer 01/01 Temperature:2/3 [2930] -> T3: 0.0 ºC T4: 0.0 ºC DIGITAL EXCITER AT8001 Technical Manual August 2011 Drawer 01/01 Temperature:3/3 [2930] -> TD: 0.0 ºC DIGITAL EXCITER 4.10 Communication among RF drawers From the LCD screen it is possible to conduct and view a diagnostic check of the communication link between the master control unit and the RF power amplifier drawer. Press ESC, to the Main Menu screen, and then to the screen [2000] is reached, as below: Measurements: -> Communication Status 10/10 [2000] DIGITAL EXCITER Select Communication Status and press ENTER. Drawers Communication Status:1/1 [2A00] -> P01: -P02: -P03: -DIGITAL EXCITER Press the ESC key to return to the Main Menu. 5. The alarm system An alarm is indicated by one of the 3 red LEDs located on the front panel of the digital exciter. The first LED alarm is for transport stream (TS) absence (SYNC. LOSS). The next LED alarm is for a current malfunction present on the equipment, and requires investigation, (see CURRENT ALARM). The third LED indicates a past alarm (see PAST ALARM). This situation that past alarm, is no longer present. On normal operation, just a green LED is ON, which confirms that the AC input power is present. Once a CURRENT ALARM LED is ON, the origin of the alarm should be investigated. From the Main Menu screen, access the System Alarms/Log. Main Menu: -> System Alarms/Log 3/5 [0000] DIGITAL EXCITER Access System Alarms/Log AT8001 Technical Manual August 2011 System Alarms/Log: -> Current Alarms 1/4 [3000] DIGITAL EXCITER Select Current Alarms and press ENTER Current Alarms: -> Sync Loss TS 1 1/5 [3100] DIGITAL EXCITER Hit key “” to view the other current alarms. The “Alarm List Empty!” means the alarm is no longer present. Press ESC to return to the System Alarms/ Log menu System Alarms/Log: -> Alarm Log 2/4 [3000] DIGITAL EXCITER Access the Alarm Log and press ENTER. Hit key “” to view all alarms, current and past alarms. Alarm Log Since 04/26/11 13:34:56[3200] -> ! 04/26/11 13:34:56 Too Few Drawers DIGITAL EXCITER The symbol '!' is an indication that the alarm is current, (LED ON for alarms) with date and time of its occurrence. The symbol '#' is an indication that any alarms are no longer present, (LED ON for past alarm, LED OFF for current alarms), and the date and time mark when it ceased to occur. The alarm log keeps up to 100 registers. The Clear Alarm Log, if selected, erases the alarm log registers and then registers the date and time when the alarms were erased. The ATS tables following will show the possible alarms and the respective steps that are necessary at the moment the alarm occurs and the moment it is normalized. AT8001 Technical Manual August 2011 Exciter alarms The table below shows all possible alarms generated on the Digital Exciter and the associated suggested action to cease its occurrence. ALARM ALARM DESCRIPTION FOLLOWING ACTION MESSAGE Sync Loss TS 1! Lack of sync with the input transport screen. Check for the presence of TS 1 on the rear BNC connector of the Exciter. Further action if necessary check inside the exciter for malfunction. LO Lack of LOCK (UP Lock Converter) Fail! Clock Lock Lack of LOCK (Clock- Fail! modulator) FIFO Overflow FIFO Overflow! (modulator) +15V, +8V, PS failure; +15V, +8V, +3.3V, +27V, +3.3V, 27V or +5V +5V AT8001 Technical Manual Check for mal-function on the UP Converter. Substitute the module Check for eventual cabling bad contact. Full analysis of the circuitry will be necessary. Call Linear Industries Customer Service. Full analysis of the circuitry will be necessary. Call Linear Industries Customer Service. Follow the basic procedure with voltmeter looking for some clear evidence of mal-function. Replace the module if necessary. August 2011 ALARM ALARM DESCRIPTION FOLLOWING ACTION MESSAGE FPGA Comm. Fail! Ext. Ref. Fail! SFN TS Info Error! Fifo Underflow ! Clock / CXO No communication with the FPGA. Full analysis of the circuitry will be necessary. Call Linear Industries Customer Service. Lack of external reference signal. Level or quality Check the associated connections. Call Linear Industries Customer Service. Error on the SFN parameters caused by power reduction on the transmission. Check the BTS input. BTS. Check the 10MHz Reference and 1PPS signal. Check if the max. delay on the network still compatible with the system delay. (PATCH DELAY) and (OFFSET DELAY). Selfexplanatory No local action. Selfexplanatory No local action. The transmitter output power was reduced to 0W via remote action. No local action. Fail! Remote Mute ! AT8001 Technical Manual August 2011 System Alarms: ALARM ALARM DESCRIPTION FOLLOWING ACTION MESSAGE Check the physical connection on the RS485 cabling. These connections are located on the Exciter read panel, green connector. On the other end, at the rear At least one drawer is not Drawer Comm. ! communicating with the Exciter panel of the RF Power Drawers, DB-9 connector. Using the Hyper-Terminal, check the parameters on the RF Power Module. Call Linear Industries Customer Service. Check the presence of 208Vac on each RF Power Drawer. Indication that the transmitter does not have enough RF Too Few Drawers! Power Drawers to operate at Check the IRUSH circuit and/or the interlock. the minimum reduction power Check the physical connection on the level. RS485 connector (DB-9). These connections are located on the RF Power Drawer rear panel. The cables connect the RF Power Drawer to the Exciter. AT8001 Technical Manual August 2011 Call Linear Industries Customer Service. Check the physical connection on the RS485 cabling. These connections are Indication that the transmitter is Reduced Power! not operating at the nominal power. At least one RF Power located on the Exciter read panel, green connector. Call Linear Industries Customer Drawer is not contributing. Service. Check other alarms status that can help for a better diagnostic. Reflected power is present at the Reflected Power! RF output of the transmitter. Check the RF Power passives connections, looking for overheating on potential bad contacts on the transmission line. Call Linear Industries Customer Service. Check the connection on this Module. The correction action involved change of Fan Failure! 4 Fans Module failure. the damage single fan, or change of the entire set. Note: The transmitter could temporarily operate under this condition. This set of AT8001 Technical Manual August 2011 fans produce refrigeration for the reject loads, on the power combiner circuitry, which under normal operation does not need refrigeration. Check the wiring between the battery Low Battery! Battery Failure and the circuitry around. Check if the Battery Charger is working. The POWER ON/OFF switch is set on the OFF position. Green Power Amp. OFF! Switch locates on the bottom part of the front panel of the Check if the Green Switch (POWER ON/OFF Switch) is OFF. Check interlock. Call Linear Industries Customer Service. transmitter cabinet. Phase Loss! Main Breaker is disconnected. Check Main Breaker OFF. Call Linear Industries Customer Service. Indication that the transmitter is programmed, but there is no output power Check the Power Meter and directional coupler Verifiy control voltage at the PC board +15V Eqp. Fail! Failure on the +15V equipment power supply. Check FUSE Check Module 12035. +8V Eqp. Fail ! Failure on the +8V equipment power supply. Check FUSE Check Module 12035. Output Power Zero! Drawers Alarms ! AT8001 Technical Manual Failure on the RF Power Drawer Via LCD check which RF Power Drawer listed is as the failure one. Access: Main Menu - System Alarms/Log – Drawers Alarms. August 2011 5.1 Drawer Alarms While in the System Alarms/Log screen it is possible to check and review all alarms, current and past, on the RF power drawer. From the System Alarms/log, screen [3000]. System Alarms/Log: -> Drawers Alarms 4/4 [3000] DIGITAL EXCITER Select Drawers Alarms and ENTER. Drawers Alarms: -> Current Alarms 1/2 [3400] DIGITAL EXCITER Select Current Alarms and press ENTER to check current alarms. Drawer01/01 Current Alarms:1/1 [3410] Alarm List Empty! DIGITAL EXCITER Use the keys (4) or (2) to select one among many RF power drawers. Press key ESC to return to the previous screen, Drawers Alarms. Drawers Alarms: 2/2 [3400] -> Past Alarms (hold Enter to Clear) DIGITAL EXCITER Select Past Alarms and press ENTER to check past alarms. Drawer01/01 Past Alarms: 1/1 [3420] Alarm List Empty! DIGITAL EXCITER Use the keys (4) or (2) to select one among many RF power drawers. AT8001 Technical Manual August 2011 5.6 Setup The SETUP screens permits for selection and changes on the configuration and operational parameters. The menu below profiles the possible operations under SETUP. Items on the SETUP menu Description Power Setup Program the RF output power level Frequency Setup Program the RF UHF Channel of the transmitter Image Frequency Suppression I and Q unbalance correction in order to reject the image frequency at the mixer output TX Balance, eliminated the image frequencies band LO Leakage Suppression Reduces the LO undesirable spurious Pre-Correction Enable and Disable the pre-correction circuitry Crest Factor Reduction Configure Crest Factor parameters to reduce the Peak to Average Power Ratio in order to improve inter-modulation on PA output at the expense of MER degradation Turn ON and turn OFF the modulation Modulation Settings NASC pilot level configurnaion (Programação do nível da piloto entre -2.048 ~ +511 ) Turn ON and turn OFF the ALC (Automatic Level Control) Transmitter Setup Mute the or not the RF power output on the event of absence of Transport Stream Select local or remote the transmitter output level control. ATSC M/H Setup AT8001 Technical Manual *Enable or disable M/H mode and configure MHE (M/H Encapsulated) packets PID. *This feature is an option. August 2011 SFN over ATSC M/H Password Setup Restore Web Password to Default *Enable or disable SFN over M/H mode and configure static delays. *This feature is an option. Password configuration Reset web page user time and password to default values. User: user Password: linear Time and Date Setup Set time and date Alarms Mask Enable or disable conditions to generate alarms. Selects one of three USB ports available on the 8001: USB Setup - Device Rear / Device Frontal: PC software GUI8001 - Host Frontal: USB flash drive for software upgrade USB Host Access Setup With USB Host Frontal selected use this menu and follow further instructions to make a software upgrade Configure three parameters with respect to the 2 TS inputs: - TS input: Selects with one is preferable Transport Stream Input - Mode: Automatic (automatically switches in the case one fails) / Manual (does not switch even if it fails) - Hold: On (hold the last input even if the preferable input stopped failing) / Off (go back to the preferable input if has stopped failing) Set the priority list for exciter time base reference: - User cal (free running): internal OCXO without a reference (+50ppb) Clock Reference - Internal GPS*: plug the antenna cable at the rear panel - External 10 MHz - External 1PPS - Incoming TS: this mode is useful for M/H since pre-processor and post-processor must be in the same time base. AT8001 Technical Manual August 2011 6.1 Power Setup This section commands the software to set the transmission power of the equipment. Starting from the Main Menu: Main Menu: -> Setup 1/5 [0000] DIGITAL EXCITER Select Setup and press ENTER. Setup: -> Power Setup 01/18 [1000] DIGITAL EXCITER Select Power Setup and press ENTER Power Setup: Program: 000 [W] Output: 1/1 [1100] 0 [W] DIGITAL EXCITER To reach the desirable output power level, press the key (2), to increase the power or (4) to decrease the power. Once the desirable power level is adjusted, press ENTER for software acknowledgement, otherwise the change will not become effective. 6.2 Frequency Setup The channel frequency change is a parameter that cannot be changed by the operator in the field. It is factory adjusted only. Starting at the setup menu screen [1000]: Setup: -> Frequency Setup 02/18 [1000] DIGITAL EXCITER Select Frequency Setup and press ENTER AT8001 Technical Manual August 2011 Setup: 02/18 [1000] Factory Setup Only DIGITAL EXCITER 6.3 Image Frequency Suppression Allows the configuration of numeric values related to the amplitude and phase of the signal for the suppression of the image frequency (superior lateral band). Both amplitude adjustments are set in [dB] and both phase adjustments are set in [degrees]. Setup: 03/18 [1000] -> Image Frequency Suppression DIGITAL EXCITER Starting at the setup menu screen [1000], Select Image Frequency Suppression and press ENTER. The screen below will appear. Warning!! Changing these parameters may damage the equipment. Continue? No DIGITAL EXCITER ATTENTION: When accessing this screen, by selecting option “YES”, the operator will be responsible for the changes done on this parameter, as well as the effects that these changes may cause in the equipment if not using the appropriate instruments and test point. To access the screen Image Frequency Suppression, select YES using the keys ◄ or ►. Image Frequency Suppression: 1/4 [1300] -> I Amplitude: -0.000 [dB] DIGITAL EXCITER To program the values, use keys ◄ and ►. To change between the parameters, AT8001 Technical Manual August 2011 use keys or . Image Frequency Suppression: 2/4 [1300] -> Q Amplitude: -0.000 [dB] DIGITAL EXCITER To program the values, use keys ◄ and ►. Image Frequency Suppression: 3/4 [1300] -> I Phase : + 0.00º DIGITAL EXCITER To program the values, use keys ◄ and ►. Image Frequency Suppression: 4/4 [1300] -> Q Phase : + 0.00º DIGITAL EXCITER To program the values, use keys ◄ and ►. Press ESC to return to the Setup Menu. Setup: -> LO Leakage Suppression 04/18 [1000] DIGITAL EXCITER Select LO Leakage Suppression and press ENTER. The screen below will appear. Warning!! Changing these parameters may damage the equipment. Continue? No DIGITAL EXCITER ATTENTION: When accessing this screen, by selecting option “YES”, the operator will be responsible for the changes done on this parameter, as well as the effects that these changes may cause in the equipment if not using the appropriate instruments and test point. To access the LO Leakage Suppression screen, select “Yes” by using the keys or . AT8001 Technical Manual August 2011 6.4 LO Adjustment (LO Leakage Suppression) Sets the DC voltage configuration of the signal leakage suppression adjustment system for the local oscillator of the Up Converter with the following range of values: -60 [mV] to +60 [mV]. Use the keys or to adjusts the value. LO Leakage Suppression: -> I Offset: + 0.00 [mV] 1/2 [1400] DIGITAL EXCITER Hit key “” to view the next screen. LO Leakage Suppression: -> Q Offset: + 0.00 [mV] 2/2 [1400] 5.6.5 Activate / De-activate Pre-correction DIGITAL EXCITER Through these screens it is possible to activate or de-activate the linear and non-linear precorrection. ON: activate the pre-correction OFF: de-activate pre-correction To access this screen, start at the SETUP MENU screen [1000]. Setup: -> Pre-Correction 05/18 [1000] DIGITAL EXCITER Select Pre-Correction and press ENTER The screen below will appear. Warning!! Changing these parameters may damage the equipment. Continue? No DIGITAL EXCITER AT8001 Technical Manual August 2011 ATTENTION: When accessing this screen, by selecting option “YES”, the operator will be responsible for the changes done on this parameter, as well as the effects that these changes may cause in the equipment if not using the appropriate instruments and test point. To access the Pre-Correction screen, select “Yes” by using the keys or . Pre-Correction Setup: -> Linear 1/2 [1500] DIGITAL EXCITER Select Linear and press ENTER Linear Pre-Correction: 1/1 [1510] -> Linear Pre-Correction: On DIGITAL EXCITER Use the keys ◄ or ► to Enable or disable the Linear precorrection. Press ESC to return to Pre-correction Setup. Pre-Correction Setup: -> Non-Linear 2/2 [1500] DIGITAL EXCITER Select Non-Linear and press ENTER Non-Linear Pre-Correction: 1/2 [1520] -> Non-Linear Pre-Correction: On DIGITAL EXCITER AT8001 Technical Manual August 2011 Use the keys ◄ or ► to Enable or disable the Non-Linear precorrection. Hit key “” to view the next screen. Non-Linear Pre-Correction: -> Scale: +000 2/2 [1520] DIGITAL EXCITER The scale listed on the screen above, is related with how intense the pre-correction will act over the ATSC signal on the modulator. Press key ESC to return to Setup Menu. 6.6 Crest Factor Reduction Setup: -> Crest Factor Reduction 06/18 [1000] DIGITAL EXCITER The screen below will appear. Warning!! Changing these parameters may damage the equipment. Continue? No DIGITAL EXCITER ATTENTION: When accessing this screen, by selecting option “YES”, the operator will be responsible for the changes done on this parameter, as well as the effects that these changes may cause in the equipment if not using the appropriate instruments and test point. To access the Crest Factor Reduction screen, select “Yes” by using the keys ◄ or ►. Crest Factor Reduction: -> CFR status: Bypass 1/3 [1600] DIGITAL EXCITER AT8001 Technical Manual August 2011 Use the keys ◄ or ► to configure the option and hit key “” to view the next screen. Crest Factor Reduction: 2/3 [1600] -> Reduction: 0.00[dB] I Max. MER: DIGITAL EXCITER Use the keys ◄ or ► to adjust the value and hit key “” to view the next screen. Crest Factor Reduction: -> Factor: 100% I 3/3 [1600] 45.9 [dB] DIGITAL EXCITER Use the keys ◄ or ► to adjust the value. Press key ESC to return to Setup Menu. 6.7 Modulation Settings On this screen option it’s possible to turn the modulation process on and off. It is also possible to adjust the pilot level rating from -2048 to +511. Press ESC up to the SETUP MENU screen. Setup: -> Modulation Settings 07/18 [1000] DIGITAL EXCITER Select Modulation Settings and press ENTER. The screen below will appear. Warning!! Changing these parameters may damage the equipment. Continue? No DIGITAL EXCITER AT8001 Technical Manual August 2011 ATTENTION: When accessing this screen, by selecting option “YES”, the operator will be responsible for the changes done on this parameter, as well as the effects that these changes may cause in the equipment if not using the appropriate instruments and test point. To access the Modulation Settings screen, select “Yes” by using the keys ◄ or ►. Modulation Settings: -> Modulation: On 1/2 [1700] DIGITAL EXCITER Use the keys ◄ or ► to Enable or disable the modulation. Hit key “” to view the next screen. Modulation Settings: 2/2 [1700] -> Pilot Level Offset: +0000 DIGITAL EXCITER Use the keys ◄ or ► to adjust the pilot level. Press key ESC to return to Setup Menu. 6.8 Transmitter Setup (not applicable in standalone operation) Under this menu it is possible to turn ON and turn OFF the ALC (Automatic Level Control), mute the or not the RF power output on the event of absence of Transport Stream, and also select being local or remote the transmitter output level control. Setup: -> Transmitter Setup 08/18 [1000] DIGITAL EXCITER Select Transmitter Setup and press ENTER. Transmitter Setup: 1/3 [1800] -> Automatic Level Control: On DIGITAL EXCITER AT8001 Technical Manual August 2011 Use the keys ◄ or ► to Enable or disable the ALC. Hit key “” to view the other screens that are part of this menu. Transmitter Setup: -> Mute on TS Loss: On 2/3 [1800] DIGITAL EXCITER Use the keys ◄ or ► to Enable or disable the Mute. Transmitter Setup: 3/3 [1800] -> Output Level Control: Local DIGITAL EXCITER Use the keys ◄ or ► to select the option. Press key ESC to return to Setup Menu. 6.9 ATSC M/H Setup Setup: -> ATSC M/H Setup 09/18 [1000] DIGITAL EXCITER Select ATSC M/H Setup and press ENTER. ATSC M/H Setup: -> Enable M/H Mode: No 1/2 [1900] DIGITAL EXCITER Use the keys ◄ or ► to enable or disable the Mute. Hit key “” to view the next screen. AT8001 Technical Manual August 2011 ATSC M/H Setup: -> MHE Packet Pid 2/2 [1900] DIGITAL EXCITER Press key ESC to return to Setup Menu. 6.10 SFN over ATSC M/H Setup: -> SFN over ATSC M/H 10/18 [1000] DIGITAL EXCITER Select SFN over ATSC M/H and press ENTER. SFN over ATSC M/H: -> Enable SFN Mode: No 1/3 [1A00] DIGITAL EXCITER Use the keys ◄ or ► to enable or disable SFN Mode. Hit key “” to view the next screen. Use the keys ◄ or ► to select Manual or automatic. Hit key “” to view the last screen of this menu. SFN over ATSC M/H: -> SFN Delay Mode: Manual 2/3 [1A00] DIGITAL EXCITER SFN over ATSC M/H: 3/3 [1A00] -> Local Delay: 000.0000 [ms] DIGITAL EXCITER To program, the operator must use the or keys. To alternate the digits, press the ◄ or ► keys. Press key ESC to return to Setup Menu. AT8001 Technical Manual August 2011 6.11 Password Setup Once a password is composed (by four numbers) it will become the set password for the equipment. Please be certain to capture and store your password in a safe place. To access the password configuration screen, the operator must follow the sequences below, starting from the SETUP MENU. Setup: -> Password Setup 11/18 [1000] DIGITAL EXCITER Access to the Password Setup and press Enter. Password Setup: 1/2 [1B00] -> Enable / Choose new password DIGITAL EXCITER To Enable the password or set a new one, select Enable / Choose new password. New Password: Write new password: 1/1 [1B10] 0 0 0 0 DIGITAL EXCITER To set the password, use the keys ◄ and ► keys to move the arrow head under each one of the 4 password positions. The and keys increase or decrease the numerical value of the each position. Once a password is selected the screen will return to the main menu screen. Press key ESC to return to Password Setup. Hit key “” to view the last screen of this menu. Password Setup: -> Disable password 2/2 [1B00] DIGITAL EXCITER AT8001 Technical Manual August 2011 The option Disable password if selected dispenses the use of password. Press key ESC to return to Setup Menu and hit key “” to view the next screen. 6.12 Restore Web Password to Default Setup: 12/18 [1000] -> Restore Web Password to Default DIGITAL EXCITER Select Restore Web Password to default and press ENTER. The screen below will appear. WARNING! You are about to restore web password default Continue? No DIGITAL EXCITER To access the Restore Web Password to default screen, select “Yes” by using the keys ◄ or ►. Restore Web Password to Default [1C00] Default Web Password Restored DIGITAL EXCITER Press key ESC to return to Setup Menu and hit key “” to view the next screen. 6.13 time and date configuration Setup: -> Time and Date Setup 13/18 [1000] DIGITAL EXCITER Select time and Date Setup and press ENTER. AT8001 Technical Manual August 2011 Time and Date Setup: 1/1 [1D00] Time: 10:45 Date: 26/04/11 MM/DD/YY DIGITAL EXCITER To program the date and time, use the or keys. To change between the parameters, press the ◄ or ► keys. Press key ESC to return to Setup Menu and hit key “” to view the next screen. 6.14 Alarms Mask Setup: -> Alarms Mask 14/18 [1000] DIGITAL EXCITER Select Alarms Mask and press ENTER. Alarms Mask: 1/1 [1E00] -> Activate TS IN: TS 1 / TS2 DIGITAL EXCITER Use the keys ◄ or ► to select TS1, TS2 or TS1 / TS2. Press key ESC to return to Setup Menu and hit key “” to view the next screen. 6.15 USB Setup Setup: -> USB Setup 15/18 [1000] DIGITAL EXCITER Select USB Setup and press ENTER. USB Setup: -> Config USB: Device Rear 1/1 [1F00] DIGITAL EXCITER Use the keys ◄ or ► to configure USB. Press key ESC to return to Setup Menu and hit key AT8001 Technical Manual August 2011 “” to view the next screen. 6.16 USB Host Access Setup Setup: -> USB Host Access Setup 16/18 [1000] DIGITAL EXCITER Select USB Host Access Setup and press ENTER. USB Host Access: 1/1 [1G00] Activate Host Frontal Port at USB Setup DIGITAL EXCITER Press key ESC to return to Setup Menu and hit key “” to view the next screen. 6.17 Transport Stream Input Setup: -> Transport Stream Input 17/18 [1000] DIGITAL EXCITER Select Transport Stream Input and press ENTER. Transport Stream Input Setup:1/3 [1H00] -> TS Switch Mode: Manual DIGITAL EXCITER Use the keys ◄ or ► to configure automatic or manual. Hit key “” to view the next screen. Transport Stream Input Setup:2/3 [1H00] -> TS Switch Hold: Off DIGITAL EXCITER Use the keys ◄ or ► to select On or Off. Hit key “” to view the next screen. Transport Stream Input Setup:3/3 [1H00] -> TS Switch Sel: TS 1 AT8001 Technical Manual DIGITAL EXCITER August 2011 Use the keys ◄ or ► to select TS 1 or TS 2. Press key ESC to return to Setup Menu and hit key “” to view the next screen. 6.18 Clock Reference Setup: -> Clock Reference 18/18 [1000] DIGITAL EXCITER Select Clock Reference and press ENTER. Clock Reference Setup: -> 1st Priority: Current TS 1/8 [1I00] DIGITAL EXCITER Use the keys ◄ or ► to select. Hit key “” to view the next screen. Clock Reference Setup: 2/8 [1I00] -> 2nd Priority: External PPS Hit key “” to view the next screen. DIGITAL EXCITER Use the keys ◄ or ► to select. Hit key “” to view the next screen. Clock Reference Setup: 3/8 [1I00] -> 3rd Priority: External 10M DIGITAL EXCITER Use the keys ◄ or ► to select. Hit key “” to view the next screen. Clock Reference Setup: 4/8 [1I00] -> 4th Priority: Internal GPS DIGITAL EXCITER Use the keys ◄ or ► to select. Hit key “” to view the next screen. AT8001 Technical Manual August 2011 Clock Reference Setup: -> User Cal: 131072 50.0% 5/8 [1I00] +0000 PPB DIGITAL EXCITER Use the keys ◄ or ► to program the values. Hit key “” to view the next screen. Clock Reference Setup: -> PPBmax Cal: +1500 6/8 [1I00] DIGITAL EXCITER Use the keys ◄ or ► to program the value. Hit key “” to view the next screen. Clock Reference Setup: -> PPBmin Cal: -1500 7/8 [1I00] DIGITAL EXCITER Use the keys ◄ or ► to program the value. Hit key “” to view the last screen of this menu. Clock Reference Setup: -> Zero PPB Cal: 131072 8/8 [1I00] DIGITAL EXCITER Use the keys ◄ or ► and or to program the value. Press key ESC to return to Main Menu. 7. Remote Management System (Tele-supervision) All of the equipment parameters such as: transmission power level, power supply measurements, alarm verification and all the possible functional selections may be accessed two different ways. Frontal Panel – Through the frontal panel all of the equipment measurements and configurations may be accessed, as shown in the operation section. Local or remote PC vi It is possible to change and/or monitor all of the parameters and measurements as is done at the frontal panel through the WEB server. AT8001 Technical Manual August 2011 To accomplish this it is necessary to configure the IP / Mask / Gateway. 7.1 IP Configuration Start from the Main Menu Main Menu: -> Remote Access 4/5 [0000] DIGITAL EXCITER Select Remote Access and press ENTER Remote Access: -> IP Address 1/3 [4000] DIGITAL EXCITER Select IP Address and press ENTER. IP Address: 192.168.100.018 1/1 [4100] DIGITAL EXCITER Configure the desired IP by using the keys ◄ or ► and or . Press ESC to the Remote Access screen. Hit key “” to view the next screen. 7.2 Mask Configuration Remote Access: -> Subnetwork Mask 2/3 [4000] DIGITAL EXCITER Select Sub-network Mask and press ENTER. Subnetwork Mask: 255.255.255.000 1/1 [4200] DIGITAL EXCITER AT8001 Technical Manual August 2011 Configure the Mask using the keys ◄ or ► and or . Press ESC to the Remote Access screen. Hit key “” to view the next screen. 7.3 Gateway Configuration Remote Access: -> Gateway 3/3 [4000] DIGITAL EXCITER Access the Gateway and press ENTER. Gateway: 192.168.100.001 1/1 [4300] DIGITAL EXCITER Configure the gateway address using ◄ or ► and or . 8. Options Main Menu: -> Options 5/5 [0000] DIGITAL EXCITER Select Options and press ENTER. Options: -> Serial Number 1/4 [5000] DIGITAL EXCITER Select Serial Number and press ENTER. Options: 1/4 [5000] Serial Number must be configured. DIGITAL EXCITER Hit key “” to view the next screen. AT8001 Technical Manual August 2011 Options: -> Options List 2/4 [5000] DIGITAL EXCITER Select Option List and press ENTER. Options List: ->Linear Pre-Correction 1/9 [5200] DIGITAL EXCITER Hit key “” to view the other screens that are part of this menu. Options List: 2/9 [5200] -> Memoryless Non-Line. Pre-Correction DIGITAL EXCITER Options List: 3/9 [5200] -> Memory Non-Linear Pre-Correction DIGITAL EXCITER Options List: -> Measurement Software 4/9 [5200] DIGITAL EXCITER Options List: -> Crest Factor Reduction 5/9 [5200] DIGITAL EXCITER Options List: -> ATSC M/H 6/9 [5200] DIGITAL EXCITER Options List: -> SFN over ATSC M/H 7/9 [5200] DIGITAL EXCITER Options List: -> Scheduler 8/9 [5200] DIGITAL EXCITER AT8001 Technical Manual August 2011 Options List: -> Internal GPS 9/9 [5200] DIGITAL EXCITER Press ESC to return the Options screen. Hit key “” to view the next screen. Options: -> Enable Option 3/4 [5000] DIGITAL EXCITER Select Enable Option and press ENTER. Options: 3/4 [5000] Serial Number must be configured. DIGITAL EXCITER Hit key “” to view the next screen. Options: -> Time Limited Options 4/4 [5000] DIGITAL EXCITER Select time Limited Options and press ENTER. AT8001 Technical Manual August 2011 Linear Industries, Inc. AT8001 User Manual Section 4 Graphical User Interface (GUI) AT8001 Technical Manual August 2011 Section 3 – Graphical User Interface (GUI) 1 Introduction GUI8001 is the software developed by Linear Industries Inc. and is used to perform non-linear and linear pre-correction and signal measurements with the AT8001 ATSC 8VSB digital exciter. 2 Installation System Requirements for Windows: Table 1 – Minimum System Requirements. Operating Systems Windows XP (Service Pack 2 or 3) Windows Server 2003 (Service Pack 2 or R2) Processors Intel Pentium (Pentium 4 and above) Disk Space 466 MB RAM 1024 MB (2048 MB recommended) Intel Celeron** Intel Xeon Intel Core Windows Vista (Service Pack 1) AMD Athlon 64** Windows Server 2008 AMD Opteron AMD Sempron To install MCR perform the following steps: 1. Install the MATLAB COMPONENT RUNTIME. Execute the MCRInstaller.exe file located in the MATLAB Component Runtime folder. 2. Install the USB Driver. Execute the CDM 2.04.06.exe file located in the USB Driver folder. This is a Virtual COM Port driver Microsoft WHQL certified and compatible with the following operating systems: Windows Server 2008 Windows Server 2008 x64 Windows Vista Windows Vista x64 Windows XP Windows XP x64 Windows 2000 AT8001 Technical Manual August 2011 Windows Server 2003 Windows Server 2003 x64 Figure 1 – MATLAB Component Runtime Installation Window. 3 Operation Before running the software, be certain that the AT8001 is on and USB cable is connected between the exciter and PC. The exciter USB Port is located at the rear panel. Run the executable file GUI8001vXXX.exe located in the GUI8001 folder, where XXX indicates the version. The main screen will appear as follows. AT8001 Technical Manual August 2011 Figure 2 – GUI Software Main Window. Choose the correct Serial Port number and Click on Connect. If the communication is ok, the information bar displays: “Successfully Connected.” and Hardware Version Text Box is updated. The Serial Port number may vary between computers. All features in this software are optional. The prompt screen will show which options are included, which are not. AT8001 Technical Manual August 2011 Figure 3 – Prompt Window. If an option is included, the corresponding button is enabled. AT8001 Technical Manual August 2011 Figure 4 – AT8001 connected with all options enabled. 3.1 Non-Linear Pre-Correction This is the process is used to compensate for the power amplifier non-linearity, in order to reduce the intermodulation at the output signal and thus improve PA efficiency. With the automatic non-linear digital pre-correction the PA linearity is improved and extended so that the PA can be operated at higher power. This means that a lowerpower lower-cost linearized PA can be used in place of a higher-power higher-cost PA. Furthermore, the linearized PA operates more efficiently since it is operated closer to saturation. The benefits are compounded because a lower-power PA operating more efficiently consumes substantially less power than an inefficient higher-power PA. When the Non-Linear Pre-Correction screen is opened, the software read and display the pre-correction curves stored on the non-volatile memory. The Memory Effects Compensation checkbox is not going to be enabled if this option is not included. AT8001 Technical Manual August 2011 Figure 5 shows the non-linear pre-correction main window. 10 8 1 2 3 9 4 5 6 7 Figure 5 – Non-Linear Pre-Correction Window. 1. Reset – Download linear LUTs (Look-Up Tables). Used to bypass the corrections. 2. Enable Non-Linear Pre-Correction – Used to bypass the corrections or not without downloading linear LUTs. 3. Amplitude Trigger – Adjust the amount of peak power used to trigger the signal capture. 4. Run – Single iteration algorithm to compensate for non-linear distortions. 5. Memory Effects Compensation – Check this box to compensate for memory non-linear distortions. Uncheck to compesante for memoryless distortions only. 6. Save – Push this button to save the result on the non-volatile memory. 7. Back – Close current window. 8. AM/AM – Figure that shows the AM/AM behavior for the pre-correction. 9. AM/PM – Figure that shows the AM/PM behavior for the pre-correction. 10. DUT – If the Memory Non-Linear Pre-Correction option is enabled, two PA memory models may be selected: Type A and Type B. try both to compare which one fits better. AT8001 Technical Manual August 2011 Memoryless vs. Memory Pre-Correction – Non-linearity is present when the AM/AM and AM/PM transfer functions are not straight lines, i.e., when the DUT (Device Under Test) has not a constant gain and a constant output phase delay with respect to the input amplitude. When such distortions don't change with time they're called memoryless non-linearity, or static non-linearity. It means the output signal at the present moment depends only on the input signal at the present moment also. However, some amplifiers present a dynamic behavior. Their AM/AM and AM/PM behavior change with time in a short time range (nano / micro seconds). It happens because the output signal at the present moment doesn't depend on the input signal at the present moment only, but also on its previous values. It generates more distortion, and a memoryless pre-corrector is not able to compensate for these memory effects. This pre-correction is an automatic procedure. It uses a signal taken from a feedback sample located between the power amplifier output and the mask filter input. Perform the following steps to run the pre-correction: 1. Connect the AT8001 RF output to the amplifier to be linearized. If an output filter is used, run the algorithm with the filter connected to the amplifier because the reflected signal coming from the filter may change the amplifier behavior. 2. Set the desired power. 3. Take the Before Filter Feedback Sample and make sure is connected the AT8001 rear panel before running the pre-correction. The coupler used for the sample must be directional, with isolation greater than 15 [dB] in order avoid miscalculation created by a reflected signal. The coupling port must have 50 [Ω] impedance in order to avoid a linear distortion in the feedback path. Also the coupling port response must be as flat as 0.3 [dB] in a 30 [MHz] range. The feedback sample level must be between -10 and 0 dBm. You can use the Signal Measurements software to check if the feedback sample is present. 4. Press Reset to bypass the last correction. 5. Check or uncheck the Memory Effects Compensation checkbox. 6. If Memory Effects Compensation is checked, select between Type A or Type B at the DUT menu. This option is not available if the memoryless pre-correction is selected (Memory Effects Compensation unchecked). There differences between IOT and Solid State amplifiers regarding its memory non-linearities. As a rule of thumb Type A achieves better results for IOT amplifiers and Type B for Solid State. 7. Click on Run. The whole process consists of single iteration. After a few seconds the results will be applied automatically. Both algorithms works independently. Crest Factor Reduction will be automatically bypassed when the algorithm is running. AT8001 Technical Manual August 2011 8. Once the correction performed satisfied results, click on Save push-button to save the curves on the non-volatile memory. After running the algorithm, the presence of unbalanced shoulders means that there are memory effects left. 9. If Crest Factor Reduction option is enabled, make it active on AT8001 front panel and set a reduction level. When the amplifier operates above the saturation level, i.e., clipping the signal peaks, the CFR may reduce intermodulation. However, be aware there is a trade-off between intermodulation reduction and MER using CFR. The more the reduction the worst the MER. The next Figure shows typical results using the Memoryless and the Memory PreCorrection. Usually the Memory correction achieves better results than the Mermoryless correction. Figure 6 – Memoryless vs. Memory Comparison. There is no guarantee to achieve better results using the Memory PreCorrection. It depends on the amplifier to be linearized. AT8001 Technical Manual August 2011 Figure 7 presents the corresponding curves used to compensate for the nonlinearities of Figure 6. This curve holds the inverse DUT characteristic, i.e., the necessary characteristic to compensate for the distortion. Figure 7a – Memoryless curves. Figure 7b – Memory curves. The memory curves (Figure 7b) are three dimensional plots, where the color means amplitude (in [dB]) for AM/AM and phase (in [°]) for AM/PM. A distortion is present when horizontal parallel lines present different colors. When Crest Factor Reduction is used, intermodulation may be reduced. However there is a trade-off with three collateral effects: MER reduction Frequency response distortion Image frequency rejection AT8001 Technical Manual August 2011 Figure 8 represents typical results when Crest Factor Reduction is used. Figure 8 – Crest Factor Reduction. 3.2 Linear Pre-Correction This is the process is used to compensate for linear distortions, for example not constant frequency response and group delay inside the channel. A Mask Filter is used at a transmitter output to limit the signal bandwidth and comply with an emission mask. The sharper it is the greater the group delay distortion. A small amount of attenuation is also introduced at channel edges. Linear pre-correction is used to compensate for these effects. When the Linear Pre-Correction screen is opened, the software read and display the pre-correction curves stored on the non-volatile memory. The next figure shows the linear pre-correction main window. AT8001 Technical Manual August 2011 1 2 6 3 4 7 5 Figure 9 – Linear Pre-Correction Window. 1. Reset – Download an all-pass filter. Used to bypass the linear correction. 2. Enable Linear Pre-Correction – Used to bypass the linear correction or not without downloading an all-pass filter. 3. Run – Single iteration algorithm to compensate for linear distortions. 4. Save – Button used to save the result on the non-volatile memory. 5. Back – Close current window. 6. Frequency Response – Figure that shows the pre-correction frequency response, which is the inverse filter response. 7. Group Delay - Figure that shows the pre-correction group delay, which is the opposite filter group delay. This pre-correction is an automatic procedure. It uses a signal taken from a feedback sample located at the mask filter output. Perform the following steps to run the pre-correction: 1. Connect the AT8001 RF output to the DUT. 1. Set the nominal power. 2. If an amplifier is used, run the non-linear pre-correction first, and then the linear precorrection. This will make linear calculation more accurate. 3. Make sure the After Filter Feedback Sample is connected the AT8001 rear panel before running the pre-correction. AT8001 Technical Manual August 2011 The coupler used for the sample must be directional, with an isolation greater than 15 [dB] in order avoid miscalculation created by a reflected signal. The coupling port must have a 50 [Ω] impedance in order to avoid a linear distortion in the feedback path. Also the coupling port response must be as flat as 0.5 [dB] in a 30 [MHz] range. The feedback sample level must be between -10 and 0 dBm. You can use the Signal Measurements software to check if the feedback sample is present. 4. Click on Run. The whole process consists of single iteration. After a few seconds, the results will be applied automatically. Crest Factor Reduction will be automatically bypassed when the algorithm is running. 5. Once the correction achieves satisfying results, click on Save push-button to save the curves on the non-volatile memory. Figure 10 presents the corresponding curves used to compensate a mask filter. Figure 10 – Typical Linear Pre-Correction Curves. AT8001 Technical Manual August 2011 3.3 Signal Measurements This software is used to perform measurements at the signals generated by the AT8001 Digital Exciter. There are fourteen measurements avaiable. 6 5 1 2 3 4 7 Figure 11 – Signal Measurements Window. 1. Signal Selection – Select which signal is going to be measured. “Input” is the signal at the DUT input, or the modulator output. The Input signal is always the reference. Both feedback samples are also available. Some measurements allow just one signal selection. In order to make a comparison, others allow two signals at the same time. 2. Measurements – This pop-up menu shows all fourteen measurements available. For each measurement there is an additional option like Concatenate, Persist, or Average the consecutive measurements. 3. Measure Push-Button – Click once to start measuring. Click again to stop. 4. Back – Close current window. 5. Measurement Window – This Figure shows the last active measurement. 6. File => Export – Use this option to export the measurement to one of the following formats: .emf => Enhanced Metafile. .eps => Encapsulated Postscript. .jpeg => Joint Photographic Experts Group. AT8001 Technical Manual August 2011 .pdf => Portable Document Format. 7. Information Bar – This bar shows additional information regarding the last measurement. AT8001 Technical Manual August 2011 It is useful to evaluate the signal compression caused by the amplifier non-linearity, as it gets close to the saturation region. Perform this measurement using the Feedback Before Filter sample. Figure 12 shows a signal that has been compressed at the saturation level and expanded at the turn-on region, typical in class AB amplifiers. The information bar will show two additional important pieces of information: Error: Shows the Mean Squared Error between the Input and Feedback signals. Peak Compression: shows in [dB] how much the maximum peak found was compressed. Figure 12 – Amplitude Modulus Measurement. AT8001 Technical Manual August 2011 AM/AM – AM/AM stands for Amplitude Modulation / Amplitude Modulation, it represents the normalized output/input amplitude ratio (amplifier gain) in [dB] vs. normalized input amplitude in [dB] Full Scale. The blue points show the Instantaneous Transfer Function, as it has a dynamic behavior. Their spread characteristic is caused by noise and memory effects. The red line is the Memoryless Transfer Function that best fits the blue points. This is a powerful tool to evaluate a power amplifier transfer function, and thus its linearity. Check how spread the blue points are in order to realize how much memory effects the amplifier has. Always perform this measurement using Feedback Before Filter sample. The information bar will show the additional information: Peak to peak amplitude distortion: Shows the Memoryless Transfer Function peak to peak value. Figure 13 – AM/AM Measurement. AT8001 Technical Manual August 2011 AM/PM – AM/PM stands for Amplitude Modulation / Phase Modulation, it represents the phase deviation in [°] vs. normalized input amplitude in [dB] Full Scale. The blue points show the Instantaneous Transfer Function, as it has a dynamic behavior. Their spread characteristic is caused by noise and memory effects. The red line is the Memoryless Transfer Function that best fits the blue points. This is a powerful tool to evaluate a power amplifier transfer function, and thus its linearity. Check how spread the blue points are in order to realize how much memory effects the amplifier has. Always perform this measurement using Feedback Before Filter sample. The information bar will show the additional information: Peak to peak amplitude distortion: Shows the Memoryless Transfer Function peak to peak value. Figure 14 – AM/PM Measurement. AT8001 Technical Manual August 2011 CCDF – CCDF stands for Complementary Cumulative Distribution Function. It represents the probability (vertical axis) of the Instantaneous Power be “x” [dB] above the average power, where “x” is the value in the horizontal axis. For example, suppose an amplifier is driving 1 [kW] into a dummy load, and the Feedback Sample was taken from its output. In the measurement below (Figure 15), the 0 [dB] point has a probability around 40 [%]. It means 40 [%] of time the Instantaneous power is above 1 [kW] (or 0 [dB]) and thus 60 [%] of time the Instantaneous power is below the average power (1 [kW]). Now another example: the 6 [dB] point for the Feedback signal (red dashed line), has a probability of 0.07 [%]. It means that 99.93 [%] of time, the Instantaneous Power is below 4 [kW] (6 [dB]), but for very few time, or 0.07 [%] of time, the amplifier will drive a power above 4[kW]. It is clear that the amplifier compressed the high amplitudes, because the red line is below the blue one. Use this measurement to evaluate how much an amplifier has compressed or clipped a signal. The information bar will show the additional information: PAPR: Stands for Peak to Average Power Ratio and represents the ratio between the maximum peak power found and the average power. Shown for both Input and Feedback signals. Figure 15 – CCDF Measurement. AT8001 Technical Manual August 2011 Constellation – the constellation is a diagram of the sampled baseband modulating symbols, where the Cartesian plane is plotted by its real vs. imaginary part. The real part (In Phase) of those sampled symbols carry the transmitted information while the imaginary part (Quadrature) carry the necessary information to generate the vestigial side band. For 8VSB modulation, the eight regions represents the eight possible symbols, and the seven dashed lines indicates the decision threshold. This measurement reflects the signal quality. Use it to realize non-linear, linear and amplitude distortions. The information bar will show the additional information: MER: Modulation Error Rate. It is the mean squared error in [dB] considering the perfect symbol as the reference signal. Figure 16 – Constellation Measurement. AT8001 Technical Manual August 2011 Constellation Contour – the constellation is a diagram of the sampled baseband modulating symbols, where the Cartesian plan is plotted by its real vs. imaginary part. The real part (In Phase) of those sampled symbols carry the transmitted information while the imaginary part (Quadrature) carry the necessary information to generate the vestigial side band. For 8VSB modulation, the eight regions represents the eight possible symbols, and the seven dashed lines indicates the decision threshold. The Constellation Contour differs from the Constellation in the sense it shows probability regions for a demodulated symbol to fall in coded in colors. A red area means high probability, as the blue area means low probability. This measurement reflects the signal quality. Use it to realize non-linear, linear and amplitude distortions. The information bar will show the additional information: MER: Modulation Error Rate. It is the mean squared error in [dB] considering the perfect symbol as the reference signal. Figure 17 – Constellation Contour. AT8001 Technical Manual August 2011 Eye Diagram – The Eye Diagram is the purely real modulating symbols filtered with a raised cosine filter and persisted with a symbol period multiple. The open eyes points indicates the exact moment for the receiver to sample and decide in order to extract the message. Eyes wide open are desired. This measurement reflects the signal quality. Use it to realize non-linear, linear and amplitude distortions. The information bar will show the additional information: MER: Modulation Error Rate. It is the mean squared error in [dB] considering the perfect symbol as the reference signal. Figure 18 – Eye Diagram Measurement. AT8001 Technical Manual August 2011 Frequency Response – This measurement will show the Frequency Response existent on your device under test, typically a filter. Use it to measure linear distortions. The information bar will show the additional information: Peak to peak frequency response distortion: self explained. Figure 19 – Frequency Response Measurement. Crest Factor Reduction will be automatically bypassed when this measurement is being performed. AT8001 Technical Manual August 2011 Group Delay – This measurement will show the Group Delay existent on your device under test, typically a filter. Use it to measure linear distortions. The information bar will show the additional information: Peak to peak group delay distortion: self explained. Figure 20 – Group Delay Measurement. Crest Factor Reduction will be automatically bypassed when this measurement is being performed. AT8001 Technical Manual August 2011 Power Spectrum Density – This is a spectral analysis using the Power Spectrum Density estimation of the IF signal. The in-band signal average power is normalized to be the 0 [dB] point. The information bar will show the additional information: Shoulders attenuation @ -+ 3.25 [MHz]: shows the shoulder attenuation @ -+ 3.25 [MHz] from channel center frequency relative to the in-band average power with a 500 [kHz] equivalent resolution bandwidth. Figure 21 – Power Spectrum Density Measurement. AT8001 Technical Manual August 2011 Symbols – This measurement represents the purely real demodulated symbols over time. Figure 22 shows the demodulated symbols after a mask filter without linear pre-corrections and then with. Straight indicates a high MER signal. The information bar will show the additional information: MER: Modulation Error Rate. It is the mean squared error in [dB] considering the perfect symbol as the reference signal. Figure 22 – Symbols Measurement. AT8001 Technical Manual August 2011 Spectrogram – This is a three dimensional measurement representing the Power Density (Z axis) vs. Frequency (X axis) vs. Time (Y axis). The viewing angle can be rotate to any position. Figure 23 – Spectrogram Measurement. AT8001 Technical Manual August 2011 Spectrogram Contour – That's the Spectrogram in the X (Frequency) – Y (Time) view, where the color gives the Power Density. Figure 24 – Spectrogram Contour Measurement. AT8001 Technical Manual August 2011 Time Domain – This measurement shows both input and feedback IF signals at the same time in a time domain. The information bar will show two additional pieces of information: Error: Shows the Mean Squared Error between the Input and Feedback signals. Figure 25 – Time Domain Measurement. AT8001 Technical Manual August 2011 3.4 Calibration Every AT8001 unit presents a internal linear distortion on feedback path. This distortion is compensated during linear pre-correction. However is not present at the mask filter. It generates an error that may be avoided using the calibration process. 1. Set the output power do 0 [dBm]. 2. Make an external loop; connect the RFoutput on After Filter Feedback Sample in. 3. Bypass the Non-Linear and Linear Pre-Corrections. 4. Open the Signal Measurements window and Measure Frequency Response between Input and Feedback After Filter. The result is going to be the internal linear distortion to be calibrated. Figure 26 – Internal feedback linear distortion. 5. At the main screen click on Advanced and the on Calibration. The Calibration window will open. 6. Press Run the calculate the distortion. The inverse response will appear compared to the last Frequency Response measurement. Next Figure shows the results. AT8001 Technical Manual August 2011 Figure 27 – Calibration window. 7. Press Save on the Non-Volatile Memory Panel. Close the Calibration window. 8. Back to the measurement window measure the frequency response again. Now with the compensation taking place a flat response will appear. The calibration will take effect on Linear-Precorrection and on measurements like Frequency Response, Group Delay, MER, Constellation, etc. AT8001 Technical Manual August 2011 Linear Industries, Inc. AT8001 User Manual Section 5 OEM Implementation Recommendation AT8001 Technical Manual August 2011 4. OEM Implementation Recommendation Part 1 – Test Bench set up 1. Ensure the correct version of MATLAB is installed. Refer to LINEAR service department for details. 2. Ensure the correct GUI is available on the PC desktop. 3. Connect 50 ohm RF coax cable between Exciter RF output and Sample after filter input. 4. Connect USB cable (provided) between AT8001 and external PC (not provided) 5. Switch on AT8001 and ensure the RF power output is turned to 0dBm. (For navigation procedure see General operation in this manual) 6. Double click AT8001 GUIX.XX software. Establish communication link between PC and AT8001 and confirm by running “signal measurements. This is done by clicking on the “Feedback after filter” check circle, selecting a measurement from the “Measurements” drop down box and clicking on the “Measure” icon in the bottom left corner. Ideally check the “Constellation” or “Eye Diagram” measurements for confirmation of operation. 7. Ensure the calibration procedure is completed correctly as described previous section. 8. Go back to the Graphic User Interface display. 9. Select “Non-Linear Pre- Correction” and select “Reset” and “Save”. Wait 10-15 seconds before attempting to move to the next window. 10. Go back to the Graphic User interface display. 11. Select “Linear Pre-Correction” and select “Reset” and “Save”. Wait 10-15 seconds before attempting to move to the next window. 12. You are now ready to connect the exciter to the transmitter. Part 2 – Transmitter set up 1 Connect a cable between the output of the RF Mask filter and the “After Filter Feedback Sample”. The coupler used for the sample must be directional, with isolation greater than 15 [dB] in order avoid miscalculation created by a reflected signal. The coupling port must have 50 [Ω] impedance in order to avoid a linear distortion in the feedback path. Also the coupling port response must be as flat as 0.5 [dB] in a 30 [MHz] range. The feedback sample level must be between -10 and 0 dBm. AT8001 Technical Manual August 2011 2 Connect a cable between the input of the RF Mask filter and the “Before Filter Feedback Sample”. The coupler used for the sample must be directional, with isolation greater than 15 [dB] in order avoid miscalculation created by a reflected signal. The coupling port must have 50 [Ω] impedance in order to avoid a linear distortion in the feedback path. Also the coupling port response must be as flat as 0.5 [dB] in a 30 [MHz] range. The feedback sample level must be between -10 and 0 dBm. 3 Connect a cable between the output of the 10dB attenuator at the AT8001 RF output and the input to the Transmitter intermediate power amplifier. This should be the same port where the previous analog or digital exciter was connected. If previous analog or digital exciter output was greater than analog 400mW output peak of sync or digital 100mW rms, then an additional RF linear amplifier will be required. This is an optional accessory that can be provided by LINEAR Industries. 4 Ensure the exciter output is turned down to 0dBm (1mW). 5 Confirm that any intermediate drive power level adjustments are in the normal positions. 6 If possible disenable any feed-forward or pre-correction circuits in the intermediate amplifier stages. 7 Switch on the transmitter and check all meter readings are normal without RF being applied. 8 Ensure the RF output power meter is reading lower than 10% of the required digital RF power output. If the transmitter was previously calibrated for analog operation an external power meter (not supplied) that measures average power will be required at the output of the transmitter. If the transmitter is reading above 10% power level, switch off transmitter and exciter and increase the attenuation at the output of the AT8001 to 20dB. 9 Increase RF drive power level using front of AT8001. See technical manual for navigation procedure. Adjust power level to 50% or required output power. If insufficient drive level is available switch off transmitter and exciter and remove 10dB attenuator. Ensure the RF drive power level is at zero and begin procedure again. 10 Measure using the AT8001 measurement software “Feedback before filter” the following performance: I. Eye Diagram – MER should be better than 25dB II. Power spectrum density – Average shoulder power at +/- 3MHz relative to mask should be lower than 45dB. III. CCDF – Difference in PAPR input to feedback should be less than 0.8dB IV. AM/AM – peak to peak amplitude distortion should be less than 1.0dB V. AM/PM – peak to peak phase distortion should be less than 2.0 degrees VI. Constellation – symbol plot should be very narrowly spaced with no curvature or difference in width VII. Group Delay – less than 50nS between +/- 2.5MHz VIII. Frequency Response – less than 1dB between +/- 2.5MHz AT8001 Technical Manual August 2011 11 Select on the Measurements software “Feedback after filter” and measure and select the “Eye Diagram” measurement again and check the MER. MER should be better than 18dB. If any of these measurements are significantly out of specification then it may not be possible to correct the transmitter for a performance that meets or exceeds the FCC recommendations for ATSC transmitter performance as delineated in ATSC document A65/B. I. Go back to the Graphic User Interface display. II. On the AT8001 front panel ensure the “Non-Linear Pre-correction” via the “SetUp” menu is set to “ON”. Refer to AT8001 technical manual for navigation instructions. Click on “Non-Linear Pre-Correction”. Click on “Run” and view the bottom left hand screen to ensure the application is working. Wait up to 15 seconds or until the processing is complete. It is complete when the display of AM/AM and AM/PM curves significantly change shape from the previous straight line. III. Click on “Save” and wait 10-15 seconds until Save is complete. IV. Re-check all the measurements as noted in xxii above. Significant improvements should have been made in all performances “Before Filter Feedback Sample”. V. Go back to the Graphic User Interface display. VI. On the AT8001 front panel ensure the “Linear Pre-correction” via the “Set-Up” menu is set to “ON”. Refer to AT8001 technical manual for navigation instructions. On the GUI software click on “Linear Pre-correction” Click on “Run” and view the bottom left hand screen to ensure the application is working. Wait up to 15 seconds or until the processing is complete. It is complete when the display of Frequency Response and Group Delay curves significantly change shape from the previous straight line. VII. Click on “Save” and wait 10-15 seconds until Save is complete. VIII. Re-check the MER measurement using either the constellation or Eye Diagram and ensuring that the “Feedback After Filter” is selected. Significant improvements should have been made on the SNR. Typical performance should exceed 27dB. IX. Leave for 5-10 minutes to ensure the transmitter is operating safely and shows no signs of instability. Then increase via the AT8001 front panel the RF drive power until the transmitter output power has reach 80% of the required output. X. Repeat xxii through xxxi.Leave for 5-10 minutes to ensure the transmitter is operating safely and shows no signs of instability. Then increase via the AT8001 AT8001 Technical Manual August 2011 front panel the RF drive power until the transmitter output power has reach 100% of the required output. XI. Repeat xxii through xxxi again XII. Certain transmitter RF amplifier devices have an inherent non-linearity that is caused by a “memory” effect i.e. the RF output amplitude is dependent on present and past input amplitude values. This can be typically caused by bias coupling, matching networks, instantaneous variation on junction temperature, and others system component variants. XIII. If the “memory-effect” is significant, it can cause non-linearity that manifests in decreased the MER or increased RF shoulder level. Included in the AT8001 GUI software is memory-effect compensation that in some circumstances may improve the MER by up to 6dB or the shoulder level but by up to 3dB. To implement memory-effect compensation, please follow the instructions below. Memory effect correction procedure 1. After completing the above procedure correctly reduce the transmitter output power via the AT8001 front panel to 80%. 2. In the Linear Correction display, un-check the “Enable Linear Pre-correction box. 3. Re-measure the MER via the Eye-Diagram measurement and the shoulder power levels via the Power Spectrum Density measurement and note the values. 4. On the Non-Linear Correction display check the “Memory enable box” and click “Run”. Wait 10-15 seconds or until the process is complete. The process will be complete when the AM/AM and AM/PM curves disappear and amplitude color bars appear. A distortion is present when the horizontal parallel lines present different colors along the horizontal access. 5. Re-measure the MER and shoulder levels to see if there is any improvement. If there is improvement, then increase the power to 100% power level and re-run all the corrections in the following order. Non-linear memory and linear correction. 6. If there is no improvement in MER or shoulder level, the un-check the enable memory correction and repeat xxiv through xxxv again. 7. The transmitter now should be corrected to obtain maximum performance in terms of a balance between MER and shoulder level. AT8001 Technical Manual August 2011 8. It is a good idea at this time to record all measurements before and after filter sample feedback. This can be done via the “file” function on the measurements page or simply by pressing “Print Screen” on the PC and saving to a third party software; such as PowerPoint®, Excel® or Word®. 9. Ensure the transmitter operates in a stable and safe condition for up to one hour before leaving the exciter system in operation on a permanent basis. AT8001 Technical Manual August 2011 LINEAR Industries Inc. 2531 Technology Dr., Suite 310 Elgin IL 6012, USA SERVICE +1 847 428 5793 +1 847 428 5785 [email protected] SALES 410 750 2165 [email protected] www.linear-tv.com AT8001 Technical Manual August 2011