1
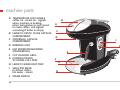
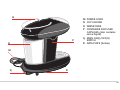
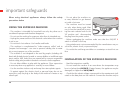
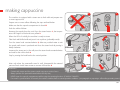
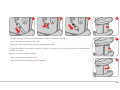
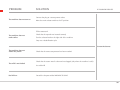
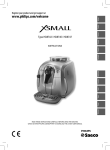
EN
INSTRUCTION MANUAL
GENERAL OPERATING
RULES
Carefully read the instruction manual
and warranty limitations
The machine must be connected to a
grounded power outlet. The machine must
be kept clean by frequently washing the
grid, the driptray, the capsule holder, the
tank, the steam knob, and the air intake
EXTREMELY IMPORTANT: never immerse
the machine in water or put it in the
dishwasher. The water contained in the
tank must be replaced regularly. Do not use
the machine if the tank is empty
After changing the water, check that
the water intake tube is inside the tank.
We recommend descaling at least every
two months using a descaling agent
made especially for espresso machines
according to instructions in the
DECALCIFICATION chapter
The boiler is fitted with a valve that
maintains constant pressure,
for this reason some water may drip from
the capsule holder
EN
table of contents
MACHINE PARTS . . . . . . . . . . . . . . . . . . . . . . . . . . . . . . . . . . . . . . . . . . . . . . . . . . . . . . . . . . . . . . . . . . . . . . . . . . . . . . . 28
IMPORTANT SAFEGUARDS. . . . . . . . . . . . . . . . . . . . . . . . . . . . . . . . . . . . . . . . . . . . . . . . . . . . . . . . . . . . . . . . . . . . . . 30
USING THE ESPRESSO MACHINE. . . . . . . . . . . . . . . . . . . . . . . . . . . . . . . . . . . . . . . . . . . . . . . . . . . . . . . . . . . . . . . . . . . . . . . . . . . 30
INSTALLATION OF THE ESPRESSO MACHINE . . . . . . . . . . . . . . . . . . . . . . . . . . . . . . . . . . . . . . . . . . . . . . . . . . . . . . . . . . . . . . . 30
CLEANING THE ESPRESSO MACHINE. . . . . . . . . . . . . . . . . . . . . . . . . . . . . . . . . . . . . . . . . . . . . . . . . . . . . . . . . . . . . . . . . . . . . . . 31
IN CASE OF MALFUNCTIONING . . . . . . . . . . . . . . . . . . . . . . . . . . . . . . . . . . . . . . . . . . . . . . . . . . . . . . . . . . . . . . . . . . . . . . . . . . . . 31
IMPROPER USE OF THE ESPRESSO MACHINE . . . . . . . . . . . . . . . . . . . . . . . . . . . . . . . . . . . . . . . . . . . . . . . . . . . . . . . 31
MACHINE SIGNALS . . . . . . . . . . . . . . . . . . . . . . . . . . . . . . . . . . . . . . . . . . . . . . . . . . . . . . . . . . . . . . . . . . . . . . . . . . . . . 32
INSTALLATION AND START-UP OF ESPRESSO MACHINE . . . . . . . . . . . . . . . . . . . . . . . . . . . . . . . . . . . . . . . . 33
TURNING ON/OFF . . . . . . . . . . . . . . . . . . . . . . . . . . . . . . . . . . . . . . . . . . . . . . . . . . . . . . . . . . . . . . . . . . . . . . . . . . . . . 34
DRIP TRAY ADJUSTMENT . . . . . . . . . . . . . . . . . . . . . . . . . . . . . . . . . . . . . . . . . . . . . . . . . . . . . . . . . . . . . . . . . . . . . . 35
MAKING COFFEE . . . . . . . . . . . . . . . . . . . . . . . . . . . . . . . . . . . . . . . . . . . . . . . . . . . . . . . . . . . . . . . . . . . . . . . . . . . . . . . 36
MAKING CAPPUCCINO . . . . . . . . . . . . . . . . . . . . . . . . . . . . . . . . . . . . . . . . . . . . . . . . . . . . . . . . . . . . . . . . . . . . . . . . . 37
MAKING HOT WATER . . . . . . . . . . . . . . . . . . . . . . . . . . . . . . . . . . . . . . . . . . . . . . . . . . . . . . . . . . . . . . . . . . . . . . . . . . . 38
PREPARING COFFEE AFTER GENERATING STEAM . . . . . . . . . . . . . . . . . . . . . . . . . . . . . . . . . . . . . . . . . . . . . . . 39
DESCALING . . . . . . . . . . . . . . . . . . . . . . . . . . . . . . . . . . . . . . . . . . . . . . . . . . . . . . . . . . . . . . . . . . . . . . . . . . . . . . . . . . . . 40
CLEANING AND MAINTENANCE . . . . . . . . . . . . . . . . . . . . . . . . . . . . . . . . . . . . . . . . . . . . . . . . . . . . . . . . . . . . . . . . 42
TECHNICAL DATA. . . . . . . . . . . . . . . . . . . . . . . . . . . . . . . . . . . . . . . . . . . . . . . . . . . . . . . . . . . . . . . . . . . . . . . . . . . . . . . 44
RECOMMENDATIONS . . . . . . . . . . . . . . . . . . . . . . . . . . . . . . . . . . . . . . . . . . . . . . . . . . . . . . . . . . . . . . . . . . . . . . . . . . 44
TROUBLESHOOTING . . . . . . . . . . . . . . . . . . . . . . . . . . . . . . . . . . . . . . . . . . . . . . . . . . . . . . . . . . . . . . . . . . . . . . . . . . . 45
WARRANTY LIMITATIONS . . . . . . . . . . . . . . . . . . . . . . . . . . . . . . . . . . . . . . . . . . . . . . . . . . . . . . . . . . . . . . . . . . . . . . 46
machine parts
A TEMPERATURE LED SIGNALS
coffee ok - steam ok - signals
when machine is heating,
when temperature is not correct
to make coffee, and signals
a warning if boiler is empty
B LEVER TO OPEN/ CLOSE CAPSULE
COMPARTMENT
C (INTERNAL) CAPSULE
COMPARTMENT
D BREWING UNIT
E HOT WATER/STEAM WAND
(PANNARELLO)
F CUP HOLDING GRILL
G FLOATING DEVICE
TO SIGNAL FULL TRAY
H LEVER TO RAISE DRIP TRAY
I SELECTOR KNOB
to deliver coffee hot water - steam
L STEAM SWITCH
28
B
A
C
D
I
L
E
F
G
H
EN
N
POWER CORD
CUP HOLDER
WATER TANK
CONTAINER FOR USED
CAPSULES (also contains
some liquid)
Q MAIN ON(I)/OFF(O)
SWITCH
R DATA PLATE (below)
M
N
O
P
P
O
M
Q
R
29
important safeguards
When using electrical appliances always follow the safety
precautions below
- Do not place the machine on,
or near, electrical or gas burners
or inside a hot oven
1
- Do not use the machine for purposes other than its intended use
- The machine must be turned
on only when being used. After
use, it must be turned off by moving the main selector knob to the
"0" position and disconnecting
the plug from the power socket
- Unplug the powercord from the electrical socket when the machine
is not in use
- Before unplugging the machine make sure that the ON/OFF 1
switch is off and is not lit up
- Do not touch hot surfaces. Use handles and knobs
- Using attachments not recommended by the manufacturer may result in fire, electric shock, or personal injury
USING THE ESPRESSO MACHINE
- This machine is intended for household use only. Any other use is
considered improper and therefore dangerous
- This machine is manufactured to "make espresso coffee" and to
"prepare hot beverages": use care to prevent scalding due to water
jets or any improper use of the machine
- The machine is not designed to be used by people (including children) with limited physical, mental or sensory abilities or insufficient experience and/or skills, unless they are supervised by a person responsible
for their safety, who provides instructions on how to use the appliance
- Do not allow children to play with the appliance. Close supervision
is necessary when any appliance is used by or near children
- Use the machine indoors only and away from atmospheric agents
- To protect against fire, electric shock or personal injury do not immerse the cord, the plug or the body of the machine in water or any
other liquid
30
- Do not let the cord hang over tables or countertops or touch hot surface
INSTALLATION OF THE ESPRESSO MACHINE
- Read the instructions carefully
- Do not install the machine in an area where the temperature may
be at or below than 0°C/30°F (if water freezes, the appliance may be
damaged) or higher than 40°C/140°F
- Check that the electric voltage corresponds to the requirements indicated on the data plate on the machine. Connect the machine only to
EN
a grounded power socket with minimum voltage of 6A if power required is 230Vac and 12A if power required is 110Vac
IN CASE OF MALFUNCTIONING
- If the plug and the socket are not compatible, have the plug replaced by qualified personnel
- Do not use the appliance if the cord or plug are damaged or if the
appliance shows signs of malfunctioning or if it has been damaged in
any way. Send the machine to the nearest authorized technical assistance center to be checked or repaired. If the power cord is damaged, it must be replaced by the manufacturer or an authorized technical assistance center
- Place the machine on a countertop away from water taps and sinks
- After removing the packaging, check that the appliance is in perfect
condition before installation
- Do not allow children to play with the packaging materials from the
machine
CLEANING THE ESPRESSO MACHINE
- In case of damage or malfunction, turn off the appliance and do not
tamper with it. For repairs contact a technical assistance center authorized by the manufacturer and request the use of original spare parts
only. Failure to comply with these instructions may compromise safe
operation of the machine and will not be covered by warranty
- Unplug from outlet when not in use and before cleaning. Allow machine to cool before putting on or taking off parts, and before cleaning
the appliance
IMPROPER USE OF THE APPLIANCE
- Before unplugging the machine check that the main selector switch
is in the "0" position
- This appliance is intended for household use only. Any other use is
to be regarded as improper
- Wait until the machine is cool before cleaning
- The manufacturer is not liable for accidents caused by lack of or nonconformity to existing legislation on grounding requirements
- Clean the body and attachments with a wet cloth and then wipe with
a dry cloth. Do not use detergents or abrasive cleaners
- Do not allow the machine to get wet or immerse in water, partially
or fully
- The manufacturer is not liable for possible damage caused by improper, incorrect or unreasonable use
SAVE THESE INSTRUCTIONS
31
machine signals
Thanks to the Multi-purpose LED screen, the machine guides the user for correct operation
BLUE Light solid
The machine is ready to make an espresso, or produce hot water
BLUE Flashing
BLUE
The machine is warming up to make espresso and/or hot water
YELLOW Light solid
The machine is ready to steam
YELLOW Flashing
The machine is warming up to create steam
YELLOW
RED Light solid
Replenish the water system; fill the water tank and dispense hot water
RED Flashing Slowly
Boiler temperature too high to make coffee, circulate water through system by dispensing hot
water until the LED turns blue
RED
32
RED Flashing Quickly
Capsule compartment open during coffee extraction, hot water or steam
CAUTION! SCALDING DANGER!!
EN
installation and start-up of espresso machine
1
2
HO
3
4
2
Before connecting the machine to a power supply, carefully read the safeguards listed in the previous chapter
5
Install the cup stand (included in the package) on the top part of the machine; insert the feet in the holes and
press firmly 1
Remove the water tank by tipping top of tank slightly backwards first 2. Fill the tank with fresh drinking water until
the MAX mark is reached 3. CAUTION: always fill the tank with still fresh drinking water only. Hot water or
other liquids may damage the tank. Do not use the machine without water
Insert the tank placing the back lower edge (curved) in place first and then tipping the tank forward 4
Make sure that the selector knob is in the central position 5
Insert the plug into the power socket. Consult the following chapter to switch on the appliance 6
A
6
N.B. We suggest keeping the original package (at least during the
warranty period) in case the machine needs to be sent to the technical
assistance center for repair
CAUTION: make sure that the capsule compartment is closed before setting the selector knob to steam and/or activating steam or hot water, or extracting coffee. Never open the compartment during the delivery of steam,
hot water or coffee A
33
turning on/off
1
2
Before switching on the machine check the water level in the tank; if
necessary add water as described previously
To switch the appliance on, push the main on/off switch and move it into
the "I" position 1
As the appliance warms up; the temperature LED is blue and flashes 2
BLUE
3
The water in the system must be circulated (only upon start-up or
when the tank is emptied)
4
Do this by placing an empty container under the steam wand 3 and rotating the selector knob counterclockwise 4 until a few ounces of water flow
into the container
When water is flowing regularly, move the selector knob back to the central
position 5
Place the empty container under the coffee group and rotate the selector
knob clockwise 6
After having deliverd approx. 50 cc of water, move the selector knob back
to the central position 5
5
6
Note: if the appliance has not been used for a long period, we suggest
running some water through the coffee group into an empty container
without inserting a capsule
To switch the machine off, push the main selector switch and move it
into the "0" position; never disconnect the plug from the power
socket when the appliance is switched on
34
EN
drip tray adjustment
1
2
3
The X8 appliance is designed to adust to any type of cup you choose
To adjust the drip tray, pull the lever located under the tray 1
When the desired position has been reached, pull the lever:
position recommended for large cups 2
position recommended for small cups 3
Note: the adjustment must be made before starting the delivery of coffee
35
making coffee
1
2
3
The X8 machine is designed to function exclusively with “Metodo Iperespresso” capsules 1
4
5
Make sure that the temperature LED is blue and lit solidly
Place a cup under the coffee group 2. Unlock and lift the opening lever of the capsule compartment until the capsule is ejected and the empty capsule holder falls back to its normal position (if the holder contains a capsule, it
will be expelled and dropped into the used capsule container) 3
Insert the capsule as shown in the picture and make sure that it is inserted correctly 4
Note: the capsule must slide easily into the compartment; if this is not the case, change capsule
Lower the lever completely to close the compartment 5. Rotate the selector knob clockwise; the device completes the pre-infusion and then coffee is delivered 6. When the coffee has reached the desired level, stop the delivery by moving back the selector knob into the central position
Note: the brewing cycle consists of a first phase called "pre-infusion" (short injection of water in the capsule followed by a
pause) lasting about 3 seconds and a second phase for brewing
WARNING:
- Capsules are single-dose and can not be used to make two coffees
- Remember to clean the drip tray and empty the used capsule container
- Remember to replace the water in the water tank frequently
36
6
EN
making cappuccino
A
1
2
3
4
5
The machine is equipped with a steam arm to froth milk and prepare one
or more cappuccinos
Prepare one or more coffees following the steps outlined below
Make sure that the capsule compartment is closed A
Froth the milk as follows:
Remove the capsule from the unit. Press the steam button 1; the temperature LED begins to flash and turns yellow 2
When the LED is lit solidly, the machine is ready to steam
Take fresh well-chilled milk and pour it into a pitcher (preferably metal)
Turn the steam knob counterclockwise 3, allow any residual water to exit
the nozzle until steam is produced and close the steam knob by turning it
briefly clockwise
YELLOW
Immerse the steam arm in the milk, turn the steam knob counterclockwise
and wait for the milk to froth 4
Stop by moving the knob back to the central position
Note: only when the pannarello wand is cold, disassemble the external
part and wash it with warm water to remove milk residue 5
WARNING:
- Contact with steam and the steam nozzle may cause serious burns
- Always position the pannarello wand above the drip tray
- NEVER open the capsule compartment while using the steaming function: SCALDING DANGER
- If no steam is produced after 30 seconds, the machine switches back to normal operation conditions (see paragraph on preparing a coffee after generating steam)
37
making hot water
1
3
2
4
YELLOW
The steam nozzle fitted to the machine can also heat up water
5
Remove the capsule from the unit and any milk residue from the steam nozzle 1
Press the steam button 2; the steam icon on the front display flashes to indicate that the machine is
heating up 3
Wait for the steam switch to light up (machine ready) followed by a short beep
Fill a metal pitcher with the desired quantity of water to be heated
Immerse the steam nozzle 4 in the water and open the steam knob by turning it counterclockwise 5
After reaching the desired temperature, move the knob back to the central position 6
WARNING:
- Contact with steam and the steam nozzle may cause serious burns
- Always position the pannarello wand above the drip tray
- NEVER open the capsule compartment while using the steaming function: SCALDING DANGER
38
6
EN
preparing coffee after generating steam
After generating steam, the appliance cannot produce coffee until the correct
coffee temperature has been reached (the temperature LED turns solid
blue), or the taste of the coffee will be ruined
1
2
Therefore, after steaming, it is important to return to coffee mode by pushing
the steam button 1
During the cooling stage (approx. 15 minutes) the temperature LED turns
red and is flashing 2
RED
To cool down the machine faster (approx. 1 minute) follow these
instructions:
3
4
5
6
Place an empty container under the steam arm 3
Rotate the selector knob counterclockwise 4
Run hot water through the machine until the temperature LED turns blue 5
Move the selector knob back to the central position 6 the machine is ready
to make an espresso
BLUE
39
descaling
1
2
3
The formation of limescale is a natural consequence of using of the machine
4
5
Descaling is necessary every 2-3 months; if the water is very hard, descaling should be done more frequently
Descaling may be done with a non-toxic descaling product for coffee machines available in the market
Note: to descale, remove the pannarello wand from the steam spout: loosen the ring nut without removing it
and disassemble the top part of the pannarello wand from the steam spout 1
Switch the appliance off 2
A
Remove the watertank and empty the residual water
B
Fill the tank with the descaling solution according to the instructions reported on the descaling product
package 3
C
Place an empty continer under the steam spout 4
D
Switch the machine on by moving the main selector switch to the "I" position 5
E
Without waiting for the machine to warm up, start running water through the machine by turning the knob
counterclockwise 6
F
After 30 seconds move the knob back to the central position 7
G
Switch the machine off by moving the main selector switch to the "0" position and empty the container 8
CAUTION: never use vinegar for descaling purposes
40
6
EN
7
8
30
HO
9
10
2
H Leave the descaling solution inside the machine (switched off) for approx. 10-15 minutes
I
Repeat steps (C) to (H) until the descaling solution in the tank is completely used
L
When the descaling solution is finished, remove the water tank, rinse it carefully and fill it again with fresh
drinking water 9
11
M Turn the machine on by moving the main on/off switch to the "I" position 10
N
Without waiting for the machine to warm up, run water through the machine by turning the knob counter
clockwise 11
O When the tank is empty, move the knob back to the central position 12
P
Empty rinsing water from the container
Q Fill the water tank again and repeat the steps described from point (N)
12
After performing a second rinsing cycle, fill the tank again. Now the appliance is ready for use. After descaling has
been completed, replace the pannarello wand on the steam tube
WARNING:
If descaling is not performed as needed, calcium may cause malfunctioning not covered by the warranty
It is advisable to use our descaling agent
Do not use vinegar, lye, salt, formic acid because they may damage the machine
The descaling solution must be totally disposed of according to the specific laws and regulations of your area
41
cleaning and maintenance
1
2
The appliance and its components must be cleaned at least once a week
Keep the water in the tank fresh; wash the tank and fill it daily with fresh drinking water
Do not use ethyl alcohol, solvents, abrasive sponges and/or aggressive chemicals
- Switch the appliance off and disconnect the plug from the power socket 1
- Remove the water tank and wash it 2
- Remove the grill and wash it with warm water 3
- Remove the drip tray and wash it with warm water 4
- Remove the end of the pannarello wand and wash it with warm water 5
- Loosen the ring nut holding the top part of the pannarello wand 6
CAUTION: do not dry the machine and/or its components in a microwave oven and/or traditional oven
42
3
4
EN
5
6
7
- Remove the top part of the pannarello wand and wash it with warm water 7
8
9
- Wash the steam spout with a moist cloth
- Extract the used capsule tray by grasping and pulling firmly 8
- Empty the residue in the capsule container (Caution: used capsules and some liquid from the coffee extraction
will be in the tray)
Insert the capsule container as follows:
- Align the front part in the machine 9
- Insert the back part by pushing it firmly inside 10
10
43
technical data
recommendations
Casing: ABS
To enjoy a high quality espresso, remember to:
Internal boiler: Stainless steel
- Change the water in the tank daily and empty the drip tray at least
once a week
Tank: 1.2 liters
Pump: 15 bar
Used capsule tray capacity: 7 capsules
Steam arm
See plate on the appliance
Cup holder
Electric cord length: 1.5 m
Weight without packaging: 5 Kg
Voltage: 230 V, 50 Hz (EU); 120 V, 60 Hz (USA)
Power: 1050 W (EU); 1100W (USA)
Size: 200 x 340 x 350 mm
The manufacturer reserves the right to make changes
or improvements without notice
44
- Use water with low calcium content to reduce deposits inside the
machine
- Use the cup warmer
EN
PROBLEM
SOLUTION
IF PROBLEM PERSISTS
Connect the plug to a correct power socket
The machine does not turn on
Move the main selector switch to the "I" position
Fill the water tank
The machine does not
make coffee
Check that the capsule was inserted correctly
Turn the selector knob on the right side of the machine
Carry out a decalcification cycle
Contact Assistance
The machine does not
deliver any steam
Check that the correct temperature has been reached
Check that the steam wand is clean and not clogged (only when the machine is cold)
The milk is not frothed
Red LED on
Use cold milk
Consult the chapter entitled MACHINE SIGNALS
45
warranty limitations
The warranty does not cover damage caused by:
- Calcium or by a lack of periodical decalcification
- Operation with a voltage that differs from the one indicated on the plate
- Improper use or use that is not compliant with the instructions
- Internal modifications
Furthermore the warranty does not cover repair costs on machines previously serviced by non-authorized technical assistance centers. The cost of repairs will be the responsibility of the machine owner
Finally:
- Do not place the drip tray in the dishwasher
- Always keep the area under and around the holding tanks dry
Failure to observe these instructions may cause damage to the body of the
machine not covered by the warranty
WARNING:
It is advisable to keep the original packaging (at least for the duration
of the warranty period) to ship the machine to the assistance centers
for repair
Any damage caused by transport without adequate packaging will not be
covered by the warranty
46
In the EU: the WEEE symbol used on this product means that it can not be
disposed of with other domestic waste and must be collected separately.
Consumers now have the opportunity to hand-in their used appliance free
of charge on a 1:1 basis when they purchase a new product. For further
information regarding the used appliance collection points, please contact
the town of residence, the local waste disposal service or nearest retailer.
Consumers are responsible for disposing of used appliances according to
current laws and the non-compliance thereof will attract fines and criminal
sanctions. The correct disposal of these products will contribute to
protecting the environment and natural resources as well as human
health. Disposal of used electric and electronic appliances for private
individuals in the EU. The WEEE symbol used for this product indicates that
it is not to be disposed of with other household waste and should be
disposed of separately. Private consumers have the opportunity to hand in
their used appliance free of charge on a 1:1 basis when they purchase a
new product. For further information regarding the used appliance
collection points, please contact the local authority in your town of
residence, the local waste disposal service or the nearest retailer where
the product was purchased. Consumers are responsible for disposing of
used appliances according to current laws and non-compliance thereof
may be sanctioned. The correct disposal of this product will contribute to
protecting the environment, natural resources and human health.