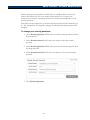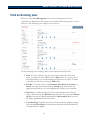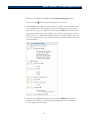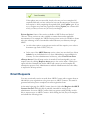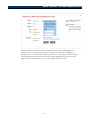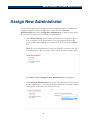
1
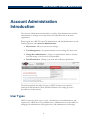
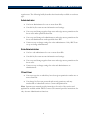
ARUP Connect™ Account Administration Administrator Manual October 2015 ARUP Connect™ Account Administration Table of Contents Account Administration Introduction ............................................................... 3 User Types ............................................................................................................................................... 3 Administrator .................................................................................................................................... 4 Sub-Administrator ............................................................................................................................. 4 Client User ........................................................................................................................................ 4 My Account ......................................................................................................... 5 Administrators and Sub-Administrators ................................................................................................... 5 Profile Information ............................................................................................................................ 5 Permissions ....................................................................................................................................... 6 Change Password .............................................................................................................................. 8 Change Security Questions ............................................................................................................... 9 User Management ............................................................................................. 11 Access User Management ...................................................................................................................... 11 Find an Existing User ............................................................................................................................. 12 Edit a User Account ............................................................................................................................... 13 Lock a User Account .............................................................................................................................. 13 Reset a User Password ........................................................................................................................... 13 Delete a User Account............................................................................................................................ 14 View a User Log .................................................................................................................................... 15 Create a New User Account ................................................................................................................... 15 To set up an account for a new user: ............................................................................................... 16 Email Requests ....................................................................................................................................... 19 Assign New Administrator ............................................................................... 21 Email Preferences ............................................................................................. 24 To receive email notifications: ............................................................................................................... 24 Quick Reference for Administrators ............................................................... 25 ARUP Connect™ - Administrator User’s Manual Copyright 2003 ARUP Laboratories 500 Chipeta Way, Salt Lake City, Utah 84108 October 2015 Ver. 7.5 ALL RIGHTS RESERVED ii ARUP Connect™ Account Administration Account Administration Introduction The Account Administration functionality is used by client administrators and subadministrators to manage access and services for individual users in the client organization. When logged in to ARUP Connect™, administrators and sub-administrators see the following options under Account Administration: • My Account. Edit your own account settings. • User Management. Set up and maintain account settings for other users. • Assign New Administrator. Assign your administrator duties to another user and change your own level of responsibility. • Email Preferences. Manage your email and notification preferences. The following briefly describes the types of ARUP Connect users and their permissions and limitations. More detailed information for setting up users is provided later in this manual. User Types ARUP Connect has three types of users: administrators, sub-administrators, and regular users. ARUP must set up administrators. Administrators are responsible for managing sub-administrators and regular users. Sub-administrators can manage 3 ARUP Connect™ Account Administration regular users. The following briefly describes the functionality available to each user type. Administrator • Can be an administrator for one or more client IDs. • Can edit his/her own account information and settings. • Can set up and change regular client users and assign access permissions for those users under specified client IDs. • Can set up and change sub-administrators and assign access permissions for those sub-administrators under specified client IDs. • Cannot set up or change settings for other administrators. Only ARUP can set up or change administrators. Sub-Administrator • Can be a sub-administrator for one or more client IDs. • Can edit his/her own account information and settings. • Can set up and change regular client users and assign access permissions for those users. • Cannot set up or change settings for other sub-administrators or administrators. Client User • Can access services to which they have been given permission under one or more client IDs. • Can change his/her own password and security questions, and may unsubscribe to subscribed services. Cannot add permissions. Note: Separate user manuals provide instructions for each of the services and applications available within ARUP Connect. This manual provides instructions for only Account Administration functions. 4 ARUP Connect™ Account Administration My Account The My Account page allows the user to edit certain information for their own account. Regular users can edit their passwords and security questions. Administrators and Sub-Administrators can edit their own passwords and security questions, and can also edit their own profile information. To edit your own account, select Account Administration > My Account. When making changes, you do not need to enter data in all sections. You can change information in just one section without affecting the existing information in other sections. Do not be concerned that the fields in the other sections remain blank. Administrators and Sub-Administrators Profile Information Select the Profile tab to view or modify any of your profile information. Remember that fields marked with an asterisk are required and may not be left blank. When you are finished making changes, click Save. 5 ARUP Connect™ Account Administration Permissions Select the Permissions tab to view or modify permissions. Hover over the icon for a brief description of a service. You can edit your permissions for specific services under designated Client IDs. To manage permissions: 1. Click the On or Off radio buttons next to the desired service to add or remove it. Administrators and Sub-Administrators also have to option to click the Unsubscribe from all Services button to unsubscribe from all services, when applicable. 2. When you are finished updating permissions, click Update. A message displays notifying you whether or not the account was updated successfully. If the update failed, check to ensure you have entered information in all required fields and selected at least one document type for services that require it, and then click Update again. 6 ARUP Connect™ Account Administration 7 ARUP Connect™ Account Administration Private Options. Some of the services available to ARUP clients are labeled “Private.” These services are only available to certain clients under applicable circumstances. For example, the ARUP Gateway private service is available to clients who take advantage of this customizable online laboratory test directory through ARUP. If you have been granted access to a private service, it is not automatically selected. You will need to click the check box if you want this service to appear in your Connect menus. • As with other options, some private services will also require you to select a document type such as PDF, XLS, etc. • In the case of the ARUP Gateway service, select just one check box. Select Admin for any individual who is to have administrative responsibilities in Gateway. For non-administrators in Gateway, select View Private Data. Change Password Select the Password and Security Questions tab to change your password. All users can change their own passwords at any time. Passwords are changed in the following events, but may also be changed at any time a user determines it to be necessary. • All new users must log in with a temporary password and then enter and confirm a password of their own choosing. • The system will require you to change your password at least every six months. A few days before a password expires, you will be reminded to change it. If you do not do so, on the day the password expires you will be unable to log in to ARUP Connect until you complete the task of changing your password. • If you forget your password, you can answer your security questions to obtain a temporary one-time password which will allow you to log in and change your password. 8 ARUP Connect™ Account Administration To change your password: 1. In the Current Password field, enter your current password. If you were given a temporary password (for first-time users or forgotten password), enter the temporary password. 2. In the New Password field, enter the new password. Passwords must meet the requirements that display in the Password Requirements area. As you meet the requirements, the updates to . 3. In the Confirm Password field, enter the new password again. You must enter the password exactly the same. 4. Click Update Password. Note: You cannot reuse the same password within eight password changes. If you attempt to do so, the system will prompt you to choose a different password. Change Security Questions Select the Password and Security Questions tab to manage your security questions. All users can change their own passwords at any time. 9 ARUP Connect™ Account Administration Security questions are questions to which only you would be likely to know the answers but will be easy for you to answer when needed. If you forget your password, you can have your password reset by correctly answering both of your security questions. First-time users are required to set up their security questions the first time they log in. It is optional but not required to change security questions when a password is changed. To change your security questions: 1. In the Security Question 1 field, select your first security question from the drop-down list. 2. In the Security Answer 1 field, enter your answer to the first security question. 3. In the Security Question 2 field, select your second security question from the drop-down list. 4. In the Security Answer 2 field, enter your answer to the second security question. 5. Click Update Questions. 10 ARUP Connect™ Account Administration User Management The User Management page is for setting up and maintaining regular users and subadministrators. • Administrators can manage regular users and sub-administrator accounts. • Sub-administrators can manage regular user accounts. • Only ARUP can manage Administrator accounts. If you find some options are not available to you, it means you don't have administrative rights for that particular option. For example, an administrator cannot manage another administrator’s settings. Access User Management To open the User Management page, log on to ARUP Connect and select Account Administration > User Management from the drop-down list to add new users or to edit existing user information. 11 ARUP Connect™ Account Administration Find an Existing User When you select User Management, a User List of existing users for your organization is displayed. At this screen you can find and edit existing users or create new users. The following is an example of the User List. Use the following tools to manage the User List and locate specific users: • Filter. To find a specific user, type any portion of the user’s first or last name, user name, or email address into the Filter field. As you type, the list becomes limited to just records matching the filter text you enter. To return to the full list, clear the text from the Filter field. • Sort By. To sort the User List by Username, First Name, Last Name, or Email, select the desired term from the Sort By drop-down menu. The application will filter the User List alphabetically, based on your selection. • Direction. To update the direction of how items display in the User List, select a direction from the Direction drop-down list. You can select Normal (A-Z) to have the list display alphabetically or Reversed (Z-A) to have the list display alphabetically in reverse order. • Users Per Page. To update the amount of user results that display per page, click the Users Per Page drop-down menu, and select the desired amount of search results to display. 12 ARUP Connect™ Account Administration • Refine By. To refine the User List by specific User Type, User Status, Client Role, or Clients. You can make single or multiple selections. The User List will display only user’s that match your selection(s). When you locate the desired user, you can Edit a User Account, Lock a User Account, Reset a User Password, Delete a User Account, or View a User Log by clicking the applicable icon. If you do not see these icons for a specific user, you cannot edit, lock, delete or view the log for that user as they are at the same permission level as you or higher. The following section explains the icons and their functions. Edit a User Account Click the Edit button to open the Edit Account page for the selected user and edit profile information and/or permissions. Once you are finished, click Save. See Find an Existing User for more information on finding a specific user account to edit. Lock a User Account Click the Lock button to lock the account for the selected user. This option is used to block an existing user’s access to ARUP Connect™ without deleting the user account. Clicking the Lock button blocks the user but retains the history log for that user. After clicking the Lock button, it updates to the Unlock button Unlock button to unlock a user’s account. . Click the Reset a User Password Click the Reset Password button to reset the password for the selected user. A Temporary Password is automatically generated. 13 ARUP Connect™ Account Administration Copy the temporary password and give it to the new user. The user will need this temporary password in order to log on to ARUP Connect. Delete a User Account Click the Delete button to delete the account for the selected user. When a user leaves employment with the client or otherwise no longer requires access to ARUP Connect, the user name should either be deleted or inactivated (locked). Click the Delete button to remove the selected user account and permissions. A confirmation message is displayed asking you to confirm. Click Yes to complete the deletion, or click No, Cancel to cancel the delete action. Deleting a user removes your record of that user’s profile and activity log. If you do not wish to delete the activity log for a user, you have the option of locking the account instead of deleting it to prevent access by that user. 14 ARUP Connect™ Account Administration View a User Log Click the View Log button to open a View Log window displaying up to 100 of the latest user attempts to log on to ARUP Connect over the previous week for the selected user. The log shows the user, date and time of the event, IP address where the attempt originated, and a description of the result (Successful Login, Failed Login). You can also right-click on the screen and select Print to print the selected user log. Note: The IP address may or may not be significant information since a single IP address may be used by the entire organization. Click the Close button to return to the previous screen. The following is an example of a log. Create a New User Account Before setting up a new user, search the User List to ensure they don’t already have an account set up. See Finding an Existing User for more information on searching the User List. 15 ARUP Connect™ Account Administration To set up an account for a new user: 1. From the User Management screen, click the Create New Account button. The New Account screen opens where you will enter the user information. 2. Enter the following information for the new user. Required fields are marked with an asterisk (*) and may not be left blank. Other fields are optional. Username. Enter a user name for use logging on to ARUP Connect (required). You do not enter passwords for users. A temporary password will be automatically generated (one-time use) for you to give to the user. If a user forgets their password, they have the option of resetting their own password by answering their security questions, or you can generate another temporary (one-time use) password for them. See Reset a User Password for more information. First Name. Enter the user's first name (required). Last Name. Enter the user's last name (required). Phone. Enter the user’s work phone number (required). Email. Enter the user’s work email address (required). Supervisor. Enter the name of the user’s supervisor (optional). Facility. Enter the facility where this user works (optional). 16 ARUP Connect™ Account Administration Location Description. Enter a brief description of the user's work location (optional). 3. Click Create User. A Temporary Password is automatically generated. 4. Copy the temporary password and give it to the new user. The user will need both their user name and this temporary password to log on the first time. The user will be required to enter and confirm a password of their own choosing and select two security questions and enter answers for them at the first log on. See My Account for more instructions on entering passwords and security questions. 5. Click Close. The Permissions tab opens. 6. In the Assign to Client ###### as a area, select the type of user desired. A regular User is specified by default. Click Sub-Administrator if you wish to give administrative duties and permissions to this user. A SubAdministrator can set up other users but cannot set up other Administrators or Sub-Administrators. A regular user has limited administrative permissions for their own account only. Click Remove from this Client to remove permissions under this client ID. 17 ARUP Connect™ Account Administration 7. When you are finished, click Save. The Permission Settings display. Hover over the icon for a brief description of a service. 8. Click the On radio button for each service you wish to make available to this user under this client ID. Services you turn on will appear as menu options when the user logs on to ARUP Connect. Click the Off radio button to turn off services. Some services also require you to select a report format (such as PDF, XLS, etc.) or additional settings related to the service. Where these are noted, you must select at least one format before you will be able to save the user information. 9. When you are finished selecting services, click the Update button at the bottom of the window. A message will be displayed to tell you whether or not the update was successful. 18 ARUP Connect™ Account Administration If the update was not successful, check to be sure you have completed all required fields and you have selected at least one document type for services that require it. After completing all required fields, click Update again. If you try to navigate away from the page before clicking Update, the software will notify you that you have not yet saved your changes. Private Options. Some of the services available to ARUP clients are labeled “Private.” These services are only available to certain clients under applicable circumstances. For example, the ARUP Gateway private service is available to clients who take advantage of this customizable online laboratory test directory through ARUP. • As with other options, some private services will also require you to select a document type such as PDF, XLS, etc. • In the case of the ARUP Gateway service, select just one check box. Select Admin for any individual who is to have administrative responsibilities in Gateway. For non-administrators in Gateway, select View Private Data. eExcept Access. If the eExcept service is turned off and unassignable, you can request access by clicking Request Access next to the service name. A dialog box opens with the estimated time before ARUP will contact you and complete the subscription process. Only Administrators and Sub-Administrators have the ability to request the eExcept service. Email Requests You may occasionally receive an email from ARUP Connect with a request from an individual in your organization to be given access to ARUP Connect. This email is generated when the person completes an online registration form. At the main login page for ARUP Connect, there is a link called Register for ARUP Connect Services. While this link is primarily intended for setting up an administrator for a new ARUP Connect client, any person could possibly use this link to request access to ARUP Connect. After clicking the link, they will complete and submit the following form: 19 ARUP Connect™ Account Administration The information from the form is forwarded by email to the administrator for action. You can set up the new user account and/or contact this individual as needed. Click on the link in the email to go directly to user setup in ARUP Connect. The information from the form will already be pre-populated there and you will simply need to complete the setup as you would with any new user. 20 ARUP Connect™ Account Administration Assign New Administrator Use the following process to assign your own administrator duties to another user, assign new rights, or remove all rights for yourself. From the Account Administration menu select Assign New Administrator. A window opens with a list of clients for whom you are currently an administrator. 1. In the Select Client(s) section, select the check box for each client ID you wish to assign to a new administrator. If you are assigning all client IDs listed, click the Select All link. To unselect all check boxes, click the None link. Note: If you are administrator for only one client ID, you will not see step 1 as described above. But your steps 1 and 2 will be the same as steps 2 and 3. The Select User To Assign As New Administrator section appears. 2. From the New Administrator drop-down, select the name of the user to be the new administrator. You can type the first characters of the user’s name to scroll quickly to that name and select it in the list. 21 ARUP Connect™ Account Administration The Select Your New Role section appears. 3. From the Change My Role To drop-down, select your own new authorization level for the selected client ID(s): Sub-Administrator, or User, for the Seleted Client ID(s). 4. Click Sumit Changes. A warning message displays the updates for the selected client ID(s) if you proceed. Click Yes to complete the assignment. Or click No, Cancel if you do not wish to complete the assignment. 22 ARUP Connect™ Account Administration When the new administrator next logs in to ARUP Connect, they will see the following window where they will be required to confirm they accept the assignment as administrator. The new administrator should first click the link to read the ARUP Connect Administrator User Agreement. The user should then click the check box to select it and click the Continue button. After the new administrator clicks Continue, the system will display the main ARUP Connect window including the Administrator menu options. 23 ARUP Connect™ Account Administration Email Preferences Go to Account Administration > Email Preferences to modify your Email notification preferences. • • • • • • • • • Connect Downtimes Hot Lines Product Releases ARUP Announcements Business Reports eExcept eInvoice Order Status and Results Secure File Transfer Email notifications are sent to the Email Address listed under My Account, Profile Information. To receive email notifications: 1. Select the check box next to the desired notification type. 2. Use the drop-down menus to modify the frequency of the notifications. 3. Scroll down to the bottom of the page and lick Save. 24 ARUP Connect™ Account Administration Quick Reference for Administrators QuickRef_Admin.pdf 25