1
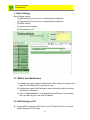
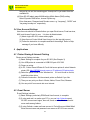
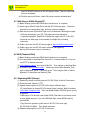
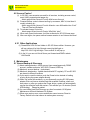
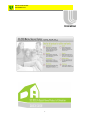
Server Center SC-203 Quick Guide v2.3 1 Server Center SC-203 Quick Guide v2.3 Index 1. FEATURES.................................................................................................................................................... 3 2. START-UP ...................................................................................................................................................... 3 3 4 5 2.1 PRODUCT PACKAGE CONTENT ............................................................................................................... 3 2.2 DEVICE INSTALLATION ........................................................................................................................... 3 2.3 DEVICE SHUT-DOWN .............................................................................................................................. 5 2.4 DEVICE CONFIGURATION WITH “INSTALL WIZARD”.............................................................................. 6 BASIC SETTINGS........................................................................................................................................ 8 3.1 WAN & TIME MODIFICATION ................................................................................................................ 8 3.2 WIFI SETTINGS ON PC............................................................................................................................ 8 3.3 DDNS SETTINGS .................................................................................................................................... 9 3.4 USER ACCOUNT SETTINGS ................................................................................................................... 10 APPLICATIONS ......................................................................................................................................... 10 4.1 PRINTER SHARING & INTERNET PRINTING ........................................................................................... 10 4.2 E-MAIL SERVER .................................................................................................................................... 10 4.3 WEB SERVER & WEB PAGES DIY .........................................................................................................11 4.4 NAS (NETWORK DISK) .........................................................................................................................11 4.5 STREAMING NAS (SERVER) ..................................................................................................................11 4.6 PHOTO ALBUM, VIDEO LIBRARY, MUSIC BOX ..................................................................................... 12 4.7 VOIP ACCESS ....................................................................................................................................... 13 4.8 GUEST ACCESS ..................................................................................................................................... 13 4.9 ACCESS CONTROL ................................................................................................................................ 14 4.10 OTHER APPLICATIONS .......................................................................................................................... 14 MAINTENANCE ........................................................................................................................................ 14 5.1 SERVER BACKUP & RECOVERY ............................................................................................................ 14 5.2 RESET TO DEFAULT............................................................................................................................... 15 5.3 FIRMWARE UPGRADE ........................................................................................................................... 16 2 Server Center SC-203 Quick Guide v2.3 1. Features z z z z z z z z z z z z z z z z z z z Installation Wizard & PC Wizard, help non-experienced users to set-up servers & applications easily WiFi 802.11g AP router platform Support various Internet connections Dynamic DNS, allowing dynamic or private IP assigned to your servers NAT-Firewall engine Surfing-Net Control by user name, MAC id, time budget, and weekly schedule Printer server supports printer sharing over Intranet and Internet E-mail server allows users to send/receive mails with web or Outlook Instant Message Guest accounts are allowed to share & access personal files & messages Web server & Web page DIY, allows users to create & post his web pages easily Personal web pages & Portal pages Network Access Storage (NAS) supporting web & network neighbor access Streaming NAS to serve WS-30X Media Adapters Personal Photo Album with network access & sharing capability Personal Video/Music Library with network access & sharing capability SIP VoIP server allows users to make free long-distant phone calls, no matter where they are. Web-based address book, with import export capability, compatible with PCs Easy system maintenance & trouble-shooting 2. Start-up 2.1 Product Package Content The package should contain the following items: (1) One SC-203 unit (2) One 12VDC Power adapter (3) Two dipole antennas (4) One Quick Guide, such as this one (5) One CD including PC Wizard and User Guide 2.2 Device Installation 1. Screw-in the two antennas onto the SC-203. Place the device in the center of serving area, keep from metal obstacle as possible. 3 Server Center SC-203 Quick Guide v2.3 The antennas stand vertically in general 2. Follow Step 1, 2, 3 shown on labels: (1) insert the +12VDC power adapter, (2) insert WAN cable, (3) finally turn on the Power switch. Don’t plug-in wrong power adapter. DDNS Server dyndns.org Internet 1. Wiring step 1 2 3 2. Device boot-up in 90 sec 1. Wiring step 1 2 3 2. Device boot-up in35 90 sec Printer SC-203 USB LAN ADSL Modem WAN Line LAN 3-in-1 business machine 3. Windows/ IE set LAN 4. http://192.168.5.1 5. Auto-run Install Wizard to set : -ADSL user account, password -System time -DDNS 6. Install WiFi card or built-in WiFi 7. Windows/XP wireless network : set “sc203” on top of Preferred Network list 8. A WiFi icon on the bottom-right corner, indicate SC203 you are connecting to. 9. Do Internet web surf or ping an Internet host Basic Settings 3. After you push the Power button, system starts to boot, the Power LED is blinking before Internet connection is setup successfully. 4. The gateway is ready to use when the LEDs are in the following status: Power: steadily on WAN: on or blinking (if WAN cable plug-in) LAN: on or blinking (if LAN cable plug-in) HDD: on 4 Server Center SC-203 Quick Guide v2.3 5. The default settings of the SC-203 can be found at the bottom of the unit, such as: IP address: 192.168.5.1 MAC id: 00-0A-C7-XX-XX-XX SSID: sc203 6. SC-203 supports Web UI. Have one PC connected to the LAN port of the SC-203 to do configuration. Open the PC browser, type in http://192.168.5.1, and enter to “Install Wizard” (See Section 1.3) 7. For further applications, refer to Chapter 2 of this guide. An update and complete User’s Manual are available on the web-site http://www.uni-wlan.com). 8. If you cannot access Internet via SC-203 or find something wrong, please check Power LED for instant diagnostic Status 1 Power LED status Period (blink-stop-blink) Blink 2 sec, on 3 sec, blink 2 sec, repeat until disk check complete System will scan and detect network status every 30 minutes and will Blink 4 sec, on 3 sec, blink 4 sec System will scan and detect network status every 30 minutes and will Blink 6 sec, on 3 sec, blink 6 sec Blink 8 sec, on 3 sec, blink 8 sec Blink 10 sec, on 3 sec, blink 10 sec Blink 12 sec, on 3 sec, blink 12 sec Blink 14 sec, on 3 sec, blink 14 sec 2 3 4 5 6 7 Description System is doing disk check WAN port NOT connected to Internet Poor performance in WAN connection Run WAN port Power-on-self-test fails Run LAN port Power-on-self-test fails Run WLAN (WiFi) port Power-on-self-test fails Run USB port Power-on-self-test fails 2.3 Device Shut-down To shut-down (turn the power off) or reset the unit, please follow these steps: Press and hold the Power button for 2 seconds, then release Wait for the system to shut-down. It takes about 10 seconds for all LEDs to turn off Then press the power button to restart the system Warning: Always use the Power button on the front panel to turn the system off. It is abnormal to un-plug the DC power directly and it will take more than 10 minutes for system to do disk check when next time you turn-on the device. 5 Server Center SC-203 Quick Guide v2.3 2.4 Device Configuration with “Install Wizard” 1. Open Internet Explorer on your PC and enter http://192.168.5.1. If the device is in “factory default” configuration, the Installation Wizard would auto-run. It will auto detect the network connection methods. Click “Auto Configure” to continue. 2. Please wait a bout 1 minute for Install Wizard to run. It can detect what 3. connection (DHCP, PPPoE, or Fixed IP) the WAN port is fit to. Then follow the instruction to complete the Install Wizard settings. If you have difficulty, refer to on-line Help When you finish above settings, the services status table will appears. It tells you which servers are available to work. Please click on “Save this set” button to the next step. A similar status table can be seen in Admin page. Further settings (e.g. DDNS) in Admin page will make disabled servers activate automatically 6 Server Center SC-203 Quick Guide v2.3 4. Now the SC-203 setup is successful, click on “Configure Complete!!” button to save and activate it. 5. Then you will see the SC-203 user interface, and you can access the Internet instantly. 6. Open your browser and type in the address bar like http://www.yahoo.com to test if you can go to Internet. 7 Server Center SC-203 Quick Guide v2.3 3 Basic Settings Basic Settings include: (1) WAN settings (You have done in Install Wizard) modification, (2) Time settings (You have done in Install Wizard) modification, (3) DDNS settings, (4) member account setting, (5) WiFi settings on PC. 3.1 WAN & Time Modification (1) Administrator loginsÆSystem MaintenanceÆTime setting, run network time again if Install Wizard did not get network time. (2) Administrator loginsÆWAN settingsÆ select connection method, do some modification if necessary. (3) Click on “Save this Set” to do IP address Release/Renew. It is necessary when you did not get or lose WAN IP address. 3.2 WiFi Settings on PC z Windows XP has a built-in WiFi Utility. If your PC has WiFi built-in, use it and enable Windows XP WiFi Utility. 8 Server Center SC-203 Quick Guide v2.3 z z z z If your PC is not WiFi ready, install a WiFi (or called WLAN) card and the vendor provided Utility in your PC. You can use either (1) the Windows Utility or (2) card vendor provided Utility, but never both. If the vendor’s Utility is installed, then Windows Utility has to be disabled by means of un-checking the “Windows Connection”. Run Vendor Utility in PC, set SSID= “sc203” (default), then the WLAN LED should be lit. Enter PC/Windows/Network to set the WLAN card IP address as dynamically assigned. (1) From the Desktop, double-click on My Computer. (2) Double-click on Control Panel. (3) Double-click on Network, then select WLAN and click Properties. (4)Select TCP/IP under the Configuration tab, and then click Properties. (5)Set the IP address to obtain an IP address automatically and DNS configurations to obtain DNS automatically. z With Windows XP Utility, click on the wireless LAN icon on the bottom-right corner of PC screen. If you don’t see the icon, click StartÆSettingÆNetwork Connection. Enable the wireless connection. z In Windows XP Utility, enter SC-203 network name (ssid, default sc203) on the top of Preferred network list. Therefore, your PC will always connects to SC-203 no matter the signal is weaker than other Access Points. To address SC-203, we recommend you to use domain name instead of IP z address, e.g. domain name for network printer, VoIP server, Email box, Web-server, NAS address. Thus your PC, no matter where it is, will be always connected to SC-203 servers 3.3 DDNS Settings DDNS (Dynamic Domain Name Service) is necessary for home servers with dynamic IP address on WAN port. When you see Email server or Printer server disable in the status table of Install Wizard or Admin pages, it implies DDNS has not been set. Suppose there is already internet connection for your SC-203, to set DDNS : (1) Use your PC behind SC-203 to register a free DDNS service in the DNS server, e.g. http://www.dyndns.org. (2) Create an account (e.g. user name=”larrywang”, password=98765), in the DDNS server (3) After you get the confirmation of your account, select and set a DDNS domain name in the server. For instance, “larrywan.homeip.net” where the 9 Server Center SC-203 Quick Guide v2.3 first part is you set, the remaining part “homeip.net” is you select from the available list. (4) Enter SC-203 admin pageÆWAN settingÆWeb Name (DNS) setting Select Dynamic DNS server, choose Dyndns.org Enter Username, Password and Domain name, e.g. “larrywang”, “98765” and “larrywang.homeip.net” respectively 3.4 User Account Settings User Accounts should be created before you open Email server, Portal services, NAS, and Access Control to use. It is done by Administrator: (1) Admin logins SC-203, enters admin pages (2) User Account ControlÆAdd User Account (on the top-right corner) (3) Follow the instruction to complete and Save the settings. Refer to Help message if you have difficulty. 4 Applications 4.1 Printer Sharing & Internet Printing Printer server Settings includes: (1) Basic Settings is complete for your SC-203 (See Chapter 3) (2) Your USB printer is connected to USB1/2/3 port of SC-203 (3) Power-on printer (4) In PC, Control PanelÆPrinter & FaxÆ Add a new printerÆ select Network printer URL http://(SC203 domain-name or IP address):631/printers/usb (5) Select the printer model in the Windows list. If it is not found on the list, install the printer driver. (6) Follow the instruction. Set the network printer as Default if you like. (7) Then you can print your files in Words, Adobe, Power Point, Browser (8) You can print it from remote site over Internet 4.2 E-mail Server E-mail Settings includes: (1) Basic Settings, particularly DDNS and User Account, is complete (2) If using web mail, no matter your PC is, you can http://(domain name) SC-203, user account logins, then edit, send, receive, delete mails and move mails among folders. (3) If using Outlook, create mail user account in ToolsÆAccountÆAddÆMail Enter account name and password user name as SC-203 user account, 10 Server Center SC-203 Quick Guide v2.3 and POP3/SMTP address as SC-203 domain name. Then the new Email account will appear. (4) Click the accountÆServer, check “My server requires authentication” : 4.3 Web Server & Web Pages DIY (1) Basic Settings, particularly DDNS and User Account, is complete (2) Admin loginsÆWeb Portal Edit to edit the SC-203 Home page Follow the instructions to change titles, logo, pictures, system messages (3) Each account user’s Web Site Page can be customized, following the steps : -Edit your web page in your PC. This page cannot be interactive. -Login admin pagesÆ Page EditÆ Upload the pages from PC to SC-203. Note that one Web page could consists of multiple files, including index.html. (4) Public users can visit SC-203 home page by http://(sc203-domain-name) (5) Public users can visit SC-203 user’s personal web pages by http://(sc203-domain-name)/~(username) 4.4 NAS (Network Disk) (1) Basic Settings, particularly DDNS and User Account is complete (2) You can upload or download files from/to PC, no matter where it is. You can use HTTP or Samba to do that (3) http://(domain-name), user loginsÆ My File Then upload or download files (4) In browser, type \\(domain-name) Choose the share folder Network_Disk, type-in Username “guest”, Password “guest”. Then drag the files or folders between PC directories and Network_Disk 4.5 Streaming NAS (Server) (1) Streaming content could be placed in SC-203 Public & User’s Private area (2) Protocols used : Samba, HTTP (3) Upload streaming files to SC-203 Public area in different ways : -PC uses Samba to access SC-203 shared folder (network_disk) in browser \\192.168.5.1\network_disk Then use Media Adapter WS-302 (guest, guest) to stream it -USB copy-in. Put the files under folder DCIM (This folder is commonly found in most digital camera). If you use USB flash disk, create DCIM folder by yourself first. -Copy files from private to public area of SC-203. First user login SC-203ÆMy FileÆEdit Then follow instruction (4) Upload streaming files to SC-203 Private area 11 Server Center SC-203 Quick Guide v2.3 -Use WS-302 to do navigation and play of files in SC-203 private area (Samba) -Use PC browser to do navigation and play of files in SC-203 private area (HTTP) Samba HTTP Server Content SC-203 public area SC-203 public location SC-203 private area SC-203 private Client WS-30X media adapter WS-301, WS-304 Set-top-Box Player PC/Media Player PC/Media player Stream format (depend on player, low bit-rate format MPEG-4, DivX-AVI, WMV9 is preferred) Max data-rate 10M bps (Ethernet) 10M bps (Ethernet) 4M bps (WiFi) 4M bps (WiFi) (5) Stream-able File formats depending on your player support WS-302 supports : DivX-AVI, MP3, WMV9, MPEG4 and MPEG2 , VOB (DVD copy files) (6) It can support 2 streams simultaneously depending on the file bit rate and if there is other background traffic, e.g. big file transfer 5. Content copied from USB into public area 6. Content uploaded in public area 7. Content uploaded in private area SC-203 Camera USB LAN Internet ADSL Modem WAN Line LAN 3-in-1 business machine WS-302 1. 2. 3. 4. Digital Audio/Video files are created (movie in MPEG4, DivX or WMV9) or copied from DVD-ROM or TV capture cards. Put the files under share folder Network_Disk, with username “guest & password “guest” Or upload the files to SC-203 public area with Samba by \\(domain-name) Or upload the files to SC-203 private area with HTTP by http://(domain name) and login user account 8. Use Remote Control to set Network/Video/Audio 9. If Remote device is SC203, all default settings are valid (ssid=sc203, Remote IP =192.168.5.1) 10. Use Remote Control to browse the contents & do trick play (Pause, forward, Backward, OSD Repeat, Time Seek..) Streaming NAS (Server) 4.6 Photo Album, Video Library, Music Box (1) Photo/ Video/ Music files can be imported from USB devices to SC-203 public space by push the “Copy” button. In USB storage, all the files should be 12 Server Center SC-203 Quick Guide v2.3 under DCIM folder (2) Photo/Video/Music files can be HTTP uploaded from PC to SC-203 personal private space by user loginÆ Photo Album (3) Folders can be created and deleted (4) Thumbnail directories : show reduced size photos of the files under a directory (5) Full-size photo on click to display on PC or WS-302 (6) Photo print to the USB printer connected to SC-203 (7) Click on the picture file for down-loading to PC (8) Video / Audio can be streaming played on PC and WS-30X 4.7 VoIP Access (1) SIP server in SC-203 is plug-and-play, nothing to configure (2) Work with Gateway and IP phones, allows users to make free long-distant phone calls, no matter where they are, even behind NAT (with private IP). (3) Support standard SIP devices : Uni-PDA, Uni-Phone, PSTN Gateway, MSN, PC soft phone (4) All IP phones are registered to the SC-203 at regular time by : Set sc203 address to “Registrar” and “Proxy” in IP phone (5) An extension number is set to each IP phone. With these number, they can calls each other. (6) It supports server-to-server inter-domain call service by : (extension)@(sc203-address) or use Address Book, PSTN Wall Phone inlet SC-203 VoIP Server LAN WAN Uni DDNS Server SIP server Internet ADSL Modem Internet or Intranet access Line TEL LAN Plug-in anywhere (hot-spot, office, home) with Internet or Intranet access to SC-203 Home server Uni-PDA 9# WG-205 Gateway 31# TA U-Phone Line TEL LAN PC 32# Life TEL LAN Line (Phone cable) 21# 24# VoIP Phone number (example) 070-xxxxx-yy VoIP prefix Family Server Number Extension Number (20~39), Unication VoIP Total Solution for Home User 4.8 Guest Access (1) Each member creates his own Guest list (2) Guest is allowed to share & access personal files & messages (3) Share files, a folder of files, messages and video streaming within group 13 Server Center SC-203 Quick Guide v2.3 4.9 Access Control (1) In SC-203, user accounts are used for all services, including access control, email, NAS, personal portal pages, by : Admin pageÆUser Account ControlÆAdd a new Account (2) Parental Access controls Internet surfing by username, MAC id, total time & weekly schedule by : Admin pageÆUser Account ControlÆcheck a userÆAllowable time “Limit” Then set Total and Schedule. (3) To activate Access Control by : Admin pageÆUser Account ControlÆSurf-Net “start” (4) When user opens his browser, it will be re-directed to SC-203 Home page. (5) After user logins, he opens another browser session to surf internet as usual. 4.10 Other Applications (1) Firewall and VPN GUI are hidden in SC-203 Home edition. However, you still can retrieve it by http://(domain name)/cgi-bin/login or http://192.168.5.1/cgi-bin/login. Then another UI will pop-up (2) In the UI, you can set Virtual Server port forward and DMZ in admin UIÆFirewall 5 Maintenance 5.1 Server Backup & Recovery (1) Admin settings backup : ADSL account (user name/password), DDNS account, member accounts, WiFi SSID, Channel, WEP key (2) Member’s account backup : (write-down) (3) Member’s data backup : upload download with PC regularly. PC are SC-203 are placed in different locations (4) If you want to reset the device, push the Power button instead of making un-plug & plug the power adapter directly. (5) When city power fails suddenly, or you abnormally un-plug SC-203 power adapter, that could cause internal hard disk crashed. However, when next time power on, after you pushes the Power button, system will automatically recover the defective hard disk sectors. This will take you 10 minutes (Power LED blinking). Please be patient. (6) You can initiate Hard Disk Recovery any time from admin UIÆSystem MaintenanceÆCheck Hardware File System (7) When more serious error occurs and device cannot recover, Reset to Factory Default is the last chance to make system recovery. 14 Server Center SC-203 Quick Guide v2.3 . 5.2 Reset to Default (1) There are two ways to do Reset to Default – (1) one is from admin UI (software reset to default), and (2) the other is push the button inside a small hole on the bottom side of the device. The 2nd way is used when system hangs-up. (4) To press the reset button located in the tiny hole with a sharp object and hold 15 Server Center SC-203 Quick Guide v2.3 it about 3 seconds down till the power LED starts to blink to ensure that it’s been reset. (5) System reboots for about 50 seconds. (6) Open Internet Explorer to enter http://192.168.5.1. The Install Wizard will pop-up again.. 5.3 Firmware Upgrade (1) This is intelligent on-line firmware upgrade mechanism (2) Admin loginsÆ System MaintenanceÆFirmware Upgrade (3) System will check if your SC-203 needs new version upgrade (4) Follow the instruction to do that 16 Server Center SC-203 Quick Guide v2.3 Unication Consumer Web Site On www.uni.com.tw or ww.uni-wlan.com, there is a Support Section where help and tips are only afew clicks away. Here you find the latest software updates, guides to use the products more efficiently. FCC Statement This device complies with Part 15 of the FCC rules. Operation is subject to the following two conditions: (1) This device may not cause harmful interference, and (2) This device must accept any interference received including interference that may cause undesired operation. Guidelines for Safe and Efficient Use Please read this information before using the product. Recommendations • Always treat your product with care and keep it in a clean and dry place. • Do not expose your product to liquid or moisture or humidity. • Do not expose your product to extreme high or low temperatures. • Do not expose your product to open flames or lit tobacco products. • Do not drop, throw or try to bend the product. • Do not attempt to disassemble the product. 17 Server Center SC-203 Quick Guide v2.3 Headquarter: Unication Co., Ltd. Tel.:886-2-22999678 Fax: 886-2-22997998 E-mail:[email protected] Address: 5F., No.6, Wu-Kung 5Rd., Hsinchunag City, Taipei, Taiwan, R.O.C Unication USA: Dallas Branch: Tel.:1-972-424-8908 Fax: 1-214-245-4857 E-mail:[email protected] © 2005 Unication Co., Ltd. All rights reserved. This document is published by Unication Co., Ltd. The information contained in this document is the exclusive property of Unication Co., Ltd. It shall not be disclosed, distributed or reproduced in whole or in part without written permission of Unication Co., LTD. The information in this document may change without notice due to improvements to programs and/or equipment. Such changes will be incorporated into new editions. 18